Modena Vicino Series User manual

User
Manual Book
Built –In Steam Oven
Vicino Series
BT 3435

2
Thank you for your trust in choosing MODENA products for your household needs. With your satisfaction as our
priority, we constantly aim to deliver stylishly designed products equipped with state-of-the-art technology to
assist you in your daily activities.
This is your guidebook containing everything you need to know about our product. Please reach out to us if you
need further assistance or other information via our Customer Care or our official website www.modena.com.

3
CONTENTS PAGE
•
Introduction 2
•
Part 1: Safety Warnings 4
•
Part 2: Name of Parts 5
•
Part 3: Installation 6
•
Part 4: How to Use 8
•
Part 5: Maintenance 10
•
Part 6: Problem & Solution 11
•
Part 7: Precaution action 11
•
Part 8: Specification 12
•
Appendix 1 13

4
1. Please independently use sockets with rated current above 16A. Reliable grounding must be guaranteed. Please do
not use loose or poor contact power sockets, or it easily leads to electric shock, short circuit and fire; if the equipment
share one socket with other electric appliances, fire may be caused for abnormal heating.
2. When unplugging socket, hold the plug end with a hand to pull it out; do not unplug with the hand holding power cord,
otherwise electric shock, short circuit, fire and other dangers will be caused.
3. Only professional repair technicians can disassemble, repair and transform the equipment.
4. If the equipment is idle for a long time, please unplug the power plug or turn off the power supply of the product.
5. During use the appliance becomes hot. Care should be taken to avoid touching heating elements inside the oven.
6. WARNING: Accessible parts may become hot during use. Young children should be kept away.
7. Do not use harsh abrasive cleaners or sharp metal scrapers to clean the oven door glass, since they can scratch the
surface, which may result in shattering of the glass.
8. This appliance is not intended for use by persons (including children) with reduced physical, sensory or mental
capabilities, or lack of experience and knowledge, unless they have been given supervision or instruction concerning
use of the appliance by a person responsible for their safety.Children should be supervised to ensure that they do not
play with the appliance.
9. WARNING: The appliance and its accessible parts become hot during use.Care should be taken to avoid touching
heating elements.Children less than 8 years of age shall be kept away unless continuously supervised.
10. If the supply cord is damaged, it must be replaced by the manufacturer, its service agent or similarly qualified persons
in order to avoid a hazard.
Part 1: Safety Warnings

5
BT 3435
Remarks:
1
Control Panel
6
Door hinge
2
Shelves support
7
Receiving tank
3
Steam tray
8
Door
4
Steam plate
9
Water tank
5
Oil receptor plate
Control panel
Remarks:
1
On/Off key
7
Plus key
2
Program key
8
Minus key
3
Lamp key
9
OK key
4
Timer key
10
Rapid Heat up key
5
Temperature setting key
11
Start/Stop key
6
Display screen
Part 2: Name of Parts

6
•Before using the appliance. Please read this guide carefully. This book contains important information regarding safe
operation, installation and maintenance of the appliance.
•Please keep this guide book in an easy place to find, so it will be easier if necessary to use at any time. Include this
guide book if you are handing the appliance over.
•If you do not understand about the installation of steam oven, you should contact MODENA Call Center to perform the
installation.
•Prepare electrical outlet that is easily accessible to your oven powercord.
Important Safety Information
•Please use the rated current of 10A or more separate outlet. The power socket must be grounded. Do not use loose
or poor contact power outlet, otherwise it may lead to electric shock, short circuit, or fire. If the outlet is shared with
other appliances, there may be abnormal heat that may cause fire.
•When you pull the plug socket, grip the plug ends. Do not pull the power cord when pulling the plug out, otherwise
there might be an electric shock, short circuit, fire and other dangerous hazard
•Do not let the appliance soaked, otherwise there is the risk of a short circuit or electric shock.
•Use AC 187-242V voltage.
•Please remind children not to use the appliance without supervision or play with the appliance. There may be burns,
electric shock, or other hazards.
•Unless done by a professional technician, do not disassemble and repair the appliance yourself.
•If you are not using the appliance, unplug the power plug or turn off the power supply.
•When the power cord is damaged, the cord should be replaced by professional technician.
3.A. Installation
•Open the box of built-in steam oven, and then take out the built-in oven and put it on a flat surface.
•Keep all packaging materials out of reach of children, as they may cause choking or suffocation hazard.
•The appliance must be installed in accordance with the instructions and installed by skilled and experienced people.
Installation errors can be harmful to humans and animals or may damage the property.
3.A.1. INSTALLING THE STEAM OVEN INTO KITCHEN SET
1. The steam oven can be installed on the kitchen table as long the the table hold up to heat or installed at the column.
2. Use the appropriate kitchen set to ensure that the appliance can work well. Frame or panels adjacent to the oven
must be made of heat-resistant material.
3. Cabinet with lacquer-coated exteriormust be assembled with adhesives that can withstand temperatures up to
100°C.
4. Check if the size of the space in the kitchen to put the oven is set according to the size shown in the picture below.
Part 3: Installation
BT 3435 :
A : 560 mm
B : 550 mm
C : 450 mm
ventilation

7
5. Insert oven into the kitchen set space by installing a screw type A into the four holes in the steam oven. Screws
can be found on the side of the oven frame.
6. Connect the power plug to the wall outlet and the oven is ready to use.
7. For the most efficient air circulation, the steam oven must be installed in accordance with the dimensions shown in
Picture 1-2. Rear panel of the cabinet must be removed so that air can circulate freely. Panel where the oven is
installed must have a gap of at least 70 mm at the rear.
3.A.2. Electrical Connections
Steam oven is equipped with a three-pole power cord designed to operate with alternating current at the voltage and
frequency written on the table of specifications.
3.A.3. Connect the board power supply cord to the power
Fit a standard plug in accordance with the load shown in the table of specifications. The appliance must be directly
connected to the electricity using omnipolar switch with opening contact of at least 3 mm installed between the appliance
and the electricity. The switch must be suitable for the load indicated on the label and must comply with the regulation of
electrical currents (grounding wire must not be interrupted by the switch). Power supply cord should be positioned so it
does not contact with temperature above 50°C at any point. Make sure that the correct electrical connection has been made
and is fully compliant with safety regulations.
Before the appliance is connected to a power source, ensure that:
1. The appliance is grounded and the plug is in accordance with the applicable regulations.
2. Electric socket can withstand the appliance’s maximum power indicated on the data label (see below).
3. Voltage is in the range between the values indicated on the data label (see below).
4. The electric socket is compatible with the appliance’s plug. If the socket is incompatible with the plug, ask
the technician to replace it. Do not use extension cords or multiple electric sockets.
5. After mounting the appliance, power supply wiring and outlet should be easily accessible.
6. Cables must not be bent or crushed.
7. Cable must be checked regularly and replaced only by an official technician.
8. The manufacturer disclaims any responsibility, if this safety measures areignored.
Pic . 1
Pic . 2

8
4.A. Starting the steam function
Step 1 : Press the power key , the display will light up and appliance is in standby mode.
Step 2: Press the Time Set button twice, cooking time will be shown on the lower left screen.
Step 3: Press the key or key, set the desired cooking time, then press the "OK" key to confirm.
Step 4: Finally, press the key to start cooking.
4.B. Oven function setting.
4.B.1. Time of day / Alarm Clock / Cooking time / End of time setting
The sequence of cooking modes displayed in the screen as below:
1. Time of Day: Press key for 2 seconds, press / to adjust the time , press the key to confirm
2. Alarm Clock : Press key once time, press / to set the cooking time, press to confirm.
The display will show the symbol .
3. Cooking time “Duration”: Press key twice, press confirm. To set the cooking time, press / . Press
to confirm.
4. End of cooking time “End”: after user sets the cooking time “Duration”, press the key 3 times to setthe end of
cooking time. The oven starts as soon as it is reaching the starting time.
For example: The time is 12:00 now, user sets the cooking time to 0:30 (hour:min), then press to set the end
of time to 12:40. The oven starts to cook at 12:10, and the display shows the end time of cooking.
4.B.2. Oven function setting
1. Press the key to switch on the oven. User can select the different cooking modes by continuously pressing the
key.
2. Temperature can be set by pressing key then press / to set. Then press to confirm after the
cooking mode is selected. Once the cooking mode is fixed, press the key to start cooking, pressrepeatedly
to switch between start and pause.
4.B.3. Descaling function
1. Firstly, take out the water tank, inset detergent and fill it with water halfway. Install the tank on the tank support
inside the steam oven, close the door, press button and choose to start the function. Display screen will
show symbol, then choose descaling function. Set the alarm, then the display will show tap icon .
Part 4: How to Use

9
2. When the alarm goes off, take out water tank, refill halfway and reinstall on the tank support. Close the door, press
key, machine will goes into second cleaning phase.
3. When the alarm goes off again, take out water tank, refill halfway and reinstall it on the tank support. Close the
door, press key,machinewill goes into third and finalcleaning phase.
4.B.4. Rapid heat –up
When the setting temperature exceeds 100 degrees and the pre-heat function hasn’t been finished, user can
press the key to start the rapid heat-up mode. The display will show the symbol continuously.
4.B.5. Child Lock Set
Press key for 2 seconds. The display will show the Child Lock symbol continuously. Press key for
2 seconds to turn of Child Lock until the symbol dissapears.
4.B.6. Temperature setting
In standby mode, Press key, display will show temperature symbol, press the / button to set the
temperature, press the key to confirm.
4.B.7. Cooking mode symbol:
The sequence of cooking modes displayed in the screen as below:
Function
Working parts
Default
temperature
Adustable
temperature
range
Fan motor thaw
50ºC
20 –60ºC
Circle heating element + Fan motor
220ºC
50-225ºC
Grill
220ºC
50-225ºC
Grill element + Fan motor
220ºC
50-225ºC
Steam
100ºC
40-100ºC
Steam + Grill element + Fan motor
120ºC
120-220ºC
Steam + Circle heating element + Fan motor
120ºC
120-220ºC
Steam heat plate descaling
4.B.8. Rapid Heat up
When you select a pure grill and the setting temperature exceeds 100 degrees and the pre –heat function is not
yet completed, user can press the key to start the rapid heat-up mode. This function will use circle heating element
+ total grill heating element + fan with power of 230V / 3050 W

10
4.B.9. Selecting container materials:
Select the appropriate containers depending on the food. Use a non-toxic materials especially those that will endure
high temperature, and remove the lid when using the containers with steam oven. It is advised to use provided
containers such as steam platter. These are the recommended containers:
1. For ingredients such as sweet potatoes, corn, potato, egg, steamed bun, and other relatively large ingredients that
does not drip, you can use any suitable containers.
2. For ingredients such as prawn, crab, chicken wing, chicken, pumpkin, and others that does need to keep the juice,
you can use the steam container.
3. For ingredients such as fish, ribs, large chicken or turkey, meat and others, those will need steam penetration to
prevent the juice from leaking out. You can use oil container for those ingredients.
Warning:
•
Wait until the appliance has cooled down before attempting to clean it.
•
Disconnect it from the power supply, either by pulling the plug out or switching the power off.
•
Do not leave corrosive or acidic substances (lemon juice, vinegar, etc.) on enameled, painted or stainless steel parts.
Cleaning the Steam Oven
•
After finished using the steam oven, let the steam oven door open for several minutes to cool down the steam.
•
Ideally, the inside of the steam oven should be cleaned after each use.
•
Clean the steam oven when the oven is still warm (not hot), so that spilled food on the steam oven surface can be
removed easily.
•
Do not spray water directly onto the appliance, avoid using strong chemical and abrasive detergent
•
Clean the rubber, stainless steel or enameled parts or chrome using a soft sponge and warm soap water or non abrasive
cleaning agent. Use special products to remove stubborn stains. After cleaning, dry the appliance until it is completely
dry.
•
All accessories –except the sliding shelves - can be washed like regular cooking equipment and also safe to put it into
a dishwasher.
•
Do not use any type of steam cleaners or high-pressure cleaning appliance.
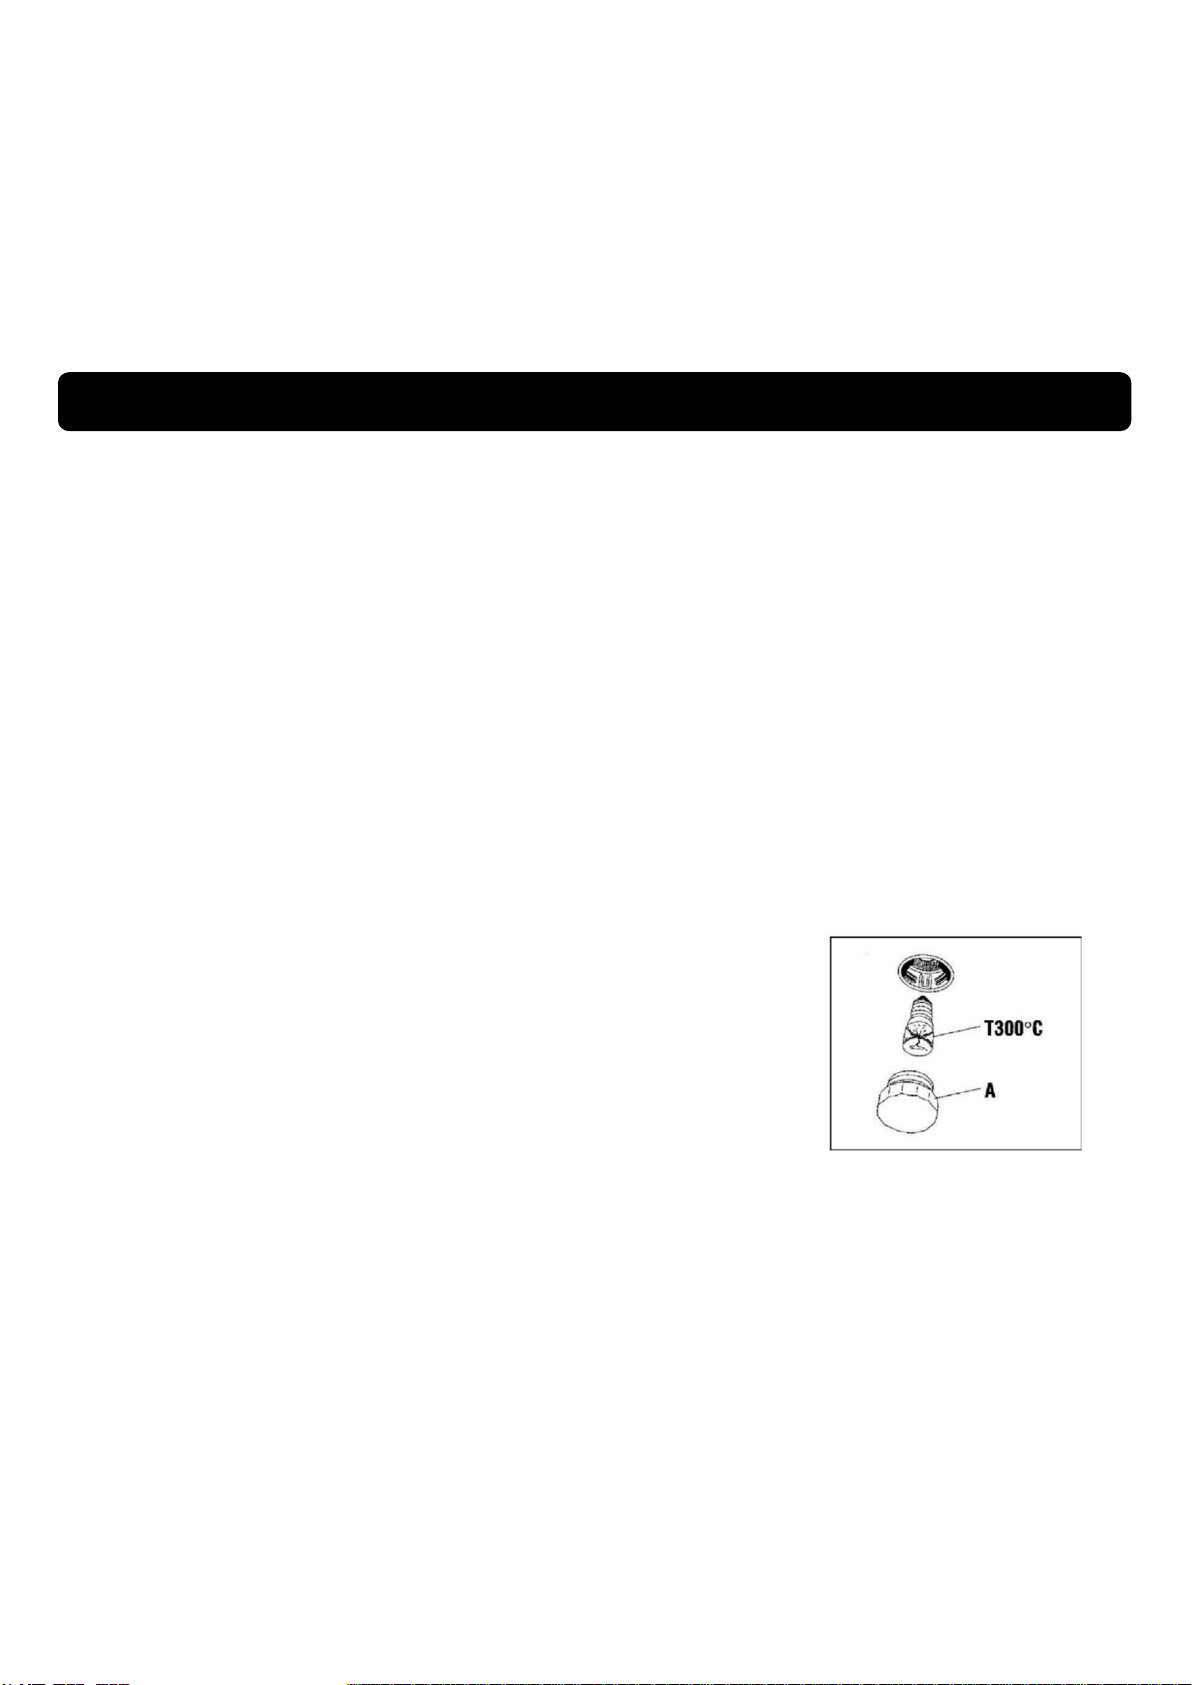
Change the Oven light
•
Disconnect the oven from the power supply, either by pulling the plug
out or by switching off the power supply.
•
Remove the protection glass (A) by turning it counter-clockwise and
replace the burnt out bulb with the same type bulb (high-temperature
lamp300ºC)
•
Replace the burnt out bulb.
•
Reinstall the cover protection A.
Cleaning the oven door
Clean the glass with a sponge and liquid cleaner, then dry with a soft cloth. Do not use abrasive materials or ones with
sharp surfaces to prevent from cracking and scratching the glass.
Cleaning the water tank
When cleaning the tank, First remove the tank cap, then use a damp cloth paired with liquid cleaner to scrub the tank
interior.
Part 5: Maintenance

11
If abnormalities happen when using the appliance, please stop using the appliance and unplug the power cord, then check
the table below. Please contact our Call Center if necessary.
Some of cooking instructions can be found in the table below:
PROBLEM
POSSIBLE CAUSE
RECOMMENDED ACTION
Water alarm
No water inside the tank
Fill the water tank
Broken pumps
Replace the pumps or notify to the
MODENA Call Center.
Control panel cannot be
operated
Appliance is in Child Lock mode
Deactivate Child Lock mode
Broken operation board
Notify MODENA Call Center.
Steaming unfamiliar food
Putting the lid on the food
Remove the lid
No steam generated
Notify MODENA Call Center.
The display shows
Error Code E2
Broken interior sensor
Notify MODENA Call Center.
The display shows
Error Code E3
Interior sensors over
Standard temperature
Unplug to power to cool it down
Or notify MODENA Call Center.
The display shows
Error Code E4
Broken heating plate sensor
Notify MODENA Call Center.
The dispay shows
Error Code E5
Heating plate sensor
Over safe temperature
Unplug the power to cool it down
Or notify MODENA Call Center.
The display shows
Error Code E1
No tank in place or broken tank switch
Install the tank on the tank support
Or notify MODENA Call Center.
Advice and precautions
This appliance is designed and manufactured in compliance with international safety standards. Warnings and instructions
below are for safety reasons and must be read and followed carefully.
Important Safety Instruction
•The appliance is designed for household and indoors use and is not intended for commercial use or industry.
•Appliance should not be installed in an open area. It is dangerous to let the appliance exposed to rain and
typhoon.
•When moving and installing the appliance, always use the handrail available in the sides of theoven.
•Do not touch the side of the appliance with bare feet or wet hands and feet.
•Appliance should be used only by adults in accordance with the instructions in the guide book.
•Do not touch the heating element or a particular part of the oven door when the appliance is used, since some parts
might become very hot. Keep children away from the oven and do not touch the hot parts of the electrical wiring directly.
•Make sure other electronic equipments are not in contact with the hot parts of the oven.
•The open space for ventilation and heat dissipation should not beobstructed.
•Always grab the middle part of the oven handle, the end part of the handle could be hot.
•Always wear gloves when placing or removing the cutlery into or out of the oven.
•Do not use aluminum foil to line the bottom oven.
•Do not put flammable materials into the oven, if the appliance is accidentally turned on, these material may burn.
•Always turn off the appliance when not in use.
•When you disconnect the power cord, always pull from the plug, do not pull the cord.
•Always unplug the power cord from its source when doing maintenance or repairing the appliance. However, if there
is damage on the appliance, do not try to fix it yourself. Repairs that carried out by inexperienced person could
potentially cause injury or further damage to the appliance. Contact MODENA Call Center for repair.
Part 6 : Problem & Solution
Part 7 : Precaution Action

12
•Do not lay or lean heavy objects on the oven door.
•Do not let children play with the appliance.
•Appliances are not to be used by people (including children) with a lack of physical, sensory or mental abilities, or lack
of experience and knowledge about the products unless they have been given supervision or instruction concerning
the usage of the tools by a person responsible for their safety.
•Always turn off the oven before removing the oven rack and plates.
•During the cooking process, fats or oils should be treated carefully because this material might cause fire if it reaches
certain temperature.
•Frequently check the gas hose, to make sure that gas hose is far from hot surface, and not in bent position. Make sure
the outer surface of hose isn’t cracked to prevent leakage.
•Always remember that the area around the gas stove can be hot for a long time (around 30 minutes) after you turn off
the oven.
•Perform routine service on your built-in oven every 3 (three) month, so ay abnormalities on your Built-in oven can be
detected and repaired immediately.
Attention
Disposal
When disposing the packaging, review and comply with local regulations concerning waste management
for a possible recycle. Electronic and electrical products waste should not be disposed together with
regular household waste. This type of waste should be recycled at a special recycling facility. Contact
our local waste management agency or retailer for recycling advice.
•Specifications of this appliance may change without Notice to improve the quality of the product.
MODEL
BT 3435
Oven type
Steam oven + grill
Cooking program
8
Color
Black + stainless
Oven capacity (liter)
36
Grill
Electric
Oven
Electric
Door glass
3 layers
Oven Light
Yes
Thermostat
Yes
Timer
Yes
Oven tray
Yes
Dripping pan
Yes
Voltage
220 –240 V / 50 Hz
Lower heater
1740 W
Back heater
1650 W
Upper/grill Heater
1450 W
Product dimension (L x W x H) mm
595 x 540 x 445
Cut-out dimension (L x W x H) mm
560 x 550 x 450
Weight
28 kg
Part 8 : Specification

13
•These are common food cooking time recommended when using the steam function.
Food type
Weight
Time (minutes)
Fish
650g
15
Crab
500g
25
Shrimp
500g
12
Chicken legs
five or about 650g
30
Chicken
An approximately 1100g
35
Beef
350g
40
Pork
400g
20
Soup
450g
15
Eggs
10 about 650g
15
Pumpkin
850g
20
Potato
550g
30
Corn
550g
30
Buns
10g
18
Rice
400g
30
Appendix 1

11/20
Other manuals for Vicino Series
5
This manual suits for next models
1
Table of contents
Other Modena Oven manuals

Modena
Modena GR 7741GO Owner's manual

Modena
Modena BO 9130 SAM Owner's manual

Modena
Modena Bravo Series Owner's manual

Modena
Modena BO 1635 LAR Owner's manual

Modena
Modena BO Series User manual

Modena
Modena BT Series User manual

Modena
Modena BO Series User manual

Modena
Modena BO 7838 Owner's manual

Modena
Modena Vicino Series Owner's manual

Modena
Modena SA 0624G Owner's manual