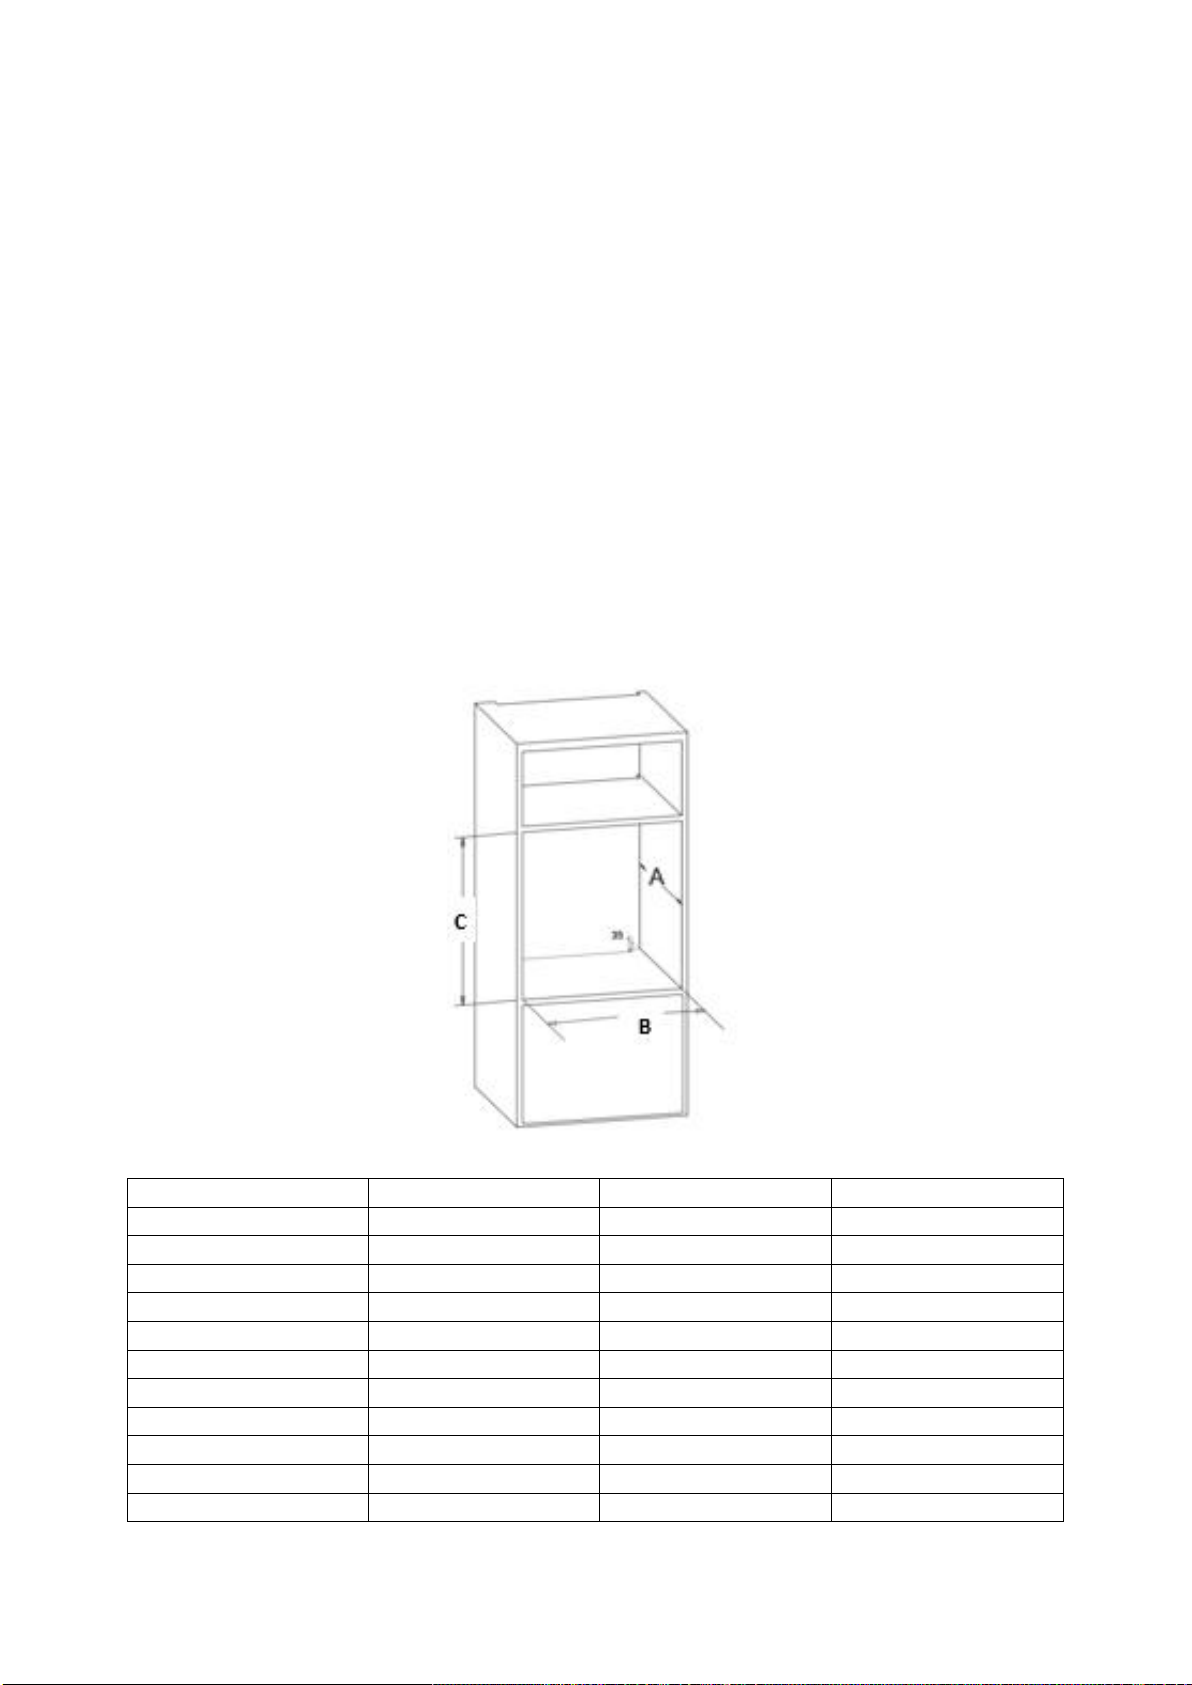
Modena Bravo Series Owner's manual

User
Manual Book
Built-in Oven
Bravo Series
BO 7838, BO 6633
Vicino Series
BO 3435
Magno Series
BO 2733, BO 2663
Raso Series
BO 3660
Profilo Series
BO 1733, BO 2763, BO 2633
Alba Series
BO 4630, BO 4660

2
Thank you for your trust in choosing MODENA products for your household needs. With your satisfaction
as our priority, we constantly aim to deliver stylishly designed products equipped with state-of-the-art
technology to assist you in your daily activities.
This is your guidebook containing everything you need to know about our product. Please reach out to us
if you need further assistance or other information via our Customer Care or our official website
www.modena.com.

3
CONTENTS PAGE
• Introduction 2
• Part 1: Safety Warnings 4
• Part 2: Name of Parts 5
• Part 3: Installation 6
• Part 4: How to use 8
• Part 5: Maintenance 43
•Part 6: Problem & Solution 46
• Part 7: Precaution 47
• Part 8: Specification 48
•APPENDIX 1 50
•APPENDIX 2 50

4
•Please independently use sockets with rated current above 25A. Reliable grounding must be guaranteed. Please
do not use loose or poor contact power sockets, or it easily leads to electric shock, short circuit and fire; if the
equipment share one socket with other electric appliances, fire may be caused for abnormal heating.
•When unplugging socket, hold the plug end with a hand to pull it out; do not unplug with the hand holding power
cord, otherwise electric shock, short circuit, fire and other dangers will be caused.
•Only professional repair technicians can disassemble, repair and transform the equipment.
•If the equipment is idle for a long time, please unplug the power plug or turn off the power supply of the product.
•During use the appliance becomes hot. Care should be taken to avoid touching heating elements inside the oven.
•WARNING: Accessible parts may become hot during use. Young children should be kept away.
•Do not use harsh abrasive cleaners or sharp metal scrapers to clean the oven door glass, since they can scratch
the surface, which may result in shattering of the glass.
•This appliance is not intended for use by persons (including children) with reduced physical, sensory or mental
capabilities, or lack of experience and knowledge, unless they have been given supervision or instruction
concerning use of the appliance by a person responsible for their safety.Children should be supervised to ensure
that they do not play with the appliance.
•WARNING: The appliance and its accessible parts become hot during use.Care should be taken to avoid touching
heating elements.Children less than 8 years of age shall be kept away unless continuously supervised.
•If the supply cord is damaged, it must be replaced by the manufacturer, its service agent or similarly qualified
persons in order to avoid a hazard
Part 1 : Safety Warnings

5
1. Control Panel
2. Deep Tray*
3. Chicken roast skewer *
4. Wire grill inside the tray
5. Standard tray
6. Oven door
7. Light
8. Grilling wire
9. Standard tray
•
Image is a general overview and is not necessarily the same as the product you recerive
•
The features and product specification depend on the product type.
ACCESSORIES (optional)
Deep Tray
Used for pastry, big roasts, watery foods. It can also be used as oil
collecting container if you roast directly on grill with cake, frozen foods
and meat dishes..
Tray / Glass tray *
Used for pastry (cookie, biscuit etc.), frozen foods.
Circular tray *
Used for pastry frozen foods.
Wire grill
Used for roasting or placing foods to be baked, roasted and frozen into
desired rack.
Telescopic rail *
Trays and wire racks can be removed and installed easily thanks to
telescopic rails.
Part 2 : Name of Parts

6
In tray wire grill *
Foods to stick while cooking such as steak are placed on in tray grill
Pizza stone and peel *
They are used for baking pastries such as pizza, bread, pancake and
removing baked food from the oven.
Tray handle *
It is used to hold hot trays.
INSTALLING THE OVEN INTO KITCHEN SET
Important Warnings for Installation
Cooling fan shall take extra steam out and prevent outer surfaces of
appliance from overheating during operation of the oven. This is a
necessary condition for better appliance operation and better cooking.
Cooling fan shall continue operation after cooking is finished. Fan shall
automatically stop after cooling is completed.
A space shall be left behind the compartment where you shall place your
appliance to ensure efficient and proper operation of your appliance. This
space shall not be neglected as it is necessary for the operation of the
ventilation system of the appliance.
Installation and Assembly Of The Oven
Operating space of the appliance shall be determined before starting the installation. Appliance shall not be installed on
areas with high flow of air.
Handle the appliance with two persons at least. Do not drag the appliance to prevent damage to the ground.
Remove all transportation materials inside and outside of the packaging. Remove all materials and documents inside the
product.
Installation Under Counter
Cabinet shall conform with dimensions specified in picture 2.
Picture 2
Part 3: Installation

7
Installation in a High Cabinet
The cabinet shall comply with the dimensions given in picture 3.
In the rear part of the cabin, and at the top and bottom, spaces with the dimensions specified in the picture shall be ensured
to provide the required ventilation.
Picture 3
Installation Conditions
The dimensions of the appliance are given in picture 4.
The furniture surfaces to be installed and the installation materials to be used shall resist a temperature of at least 100 °C.
To prevent the appliance from turning over, the cabinet to be installed shall be fixed and the cabinet floor shall be level.
The floor of the cabinet shall be strong enough to withstand a load of at least 60 kg.
Picture 4
MODEL
A ( mm )
B ( mm )
C ( mm )
BO 1733
550
560
580
BO 2633
550
560
580
BO 2663
570
560
580
BO 2733
550
560
580
BO 2763
570
560
580
BO 3435
560
550
448
BO 3630
570
560
580
BO 4630
550
560
580
BO 4660
570
560
580
BO 6633
550
560
580
BO 7838
550
560
590

8
Placing and Securing the Oven
Place the oven to the cabinet with two or more persons.
Make sure that the frame of the oven and the front of the furniture are
properly aligned. The supply cord shall not be left under the oven or be
stuck or bent between the oven and the furniture.
Secure the oven to the furniture using the screws supplied in the appliance.
Screws shall be installed by putting them through the plastics attached on
the frame of the appliance as shown in picture 5. The screws shall not be
tightened too much. Otherwise, the screw holes may wear out.
Check that the oven does not move after installation. If the oven has not
been installed in accordance with the installation instructions, there is a risk
of overturning during operation.
Picture 5
Electrical Connection
The place where the product shall be installed shall have proper electrical installation. The mains voltage shall comply with
the rating given on the product type plate.
Connection of appliance shall be made in accordance with local and national electrical regulations.
Disconnect the mains power before starting to install the product. Do not connect the product to the mains until the
installation is finished.
At the front of the kitchen counter, a space at least 5 mm high from the bottom of the counter should be left.
CONTROL PANEL
BO 4630 and BO 4660
Part 4: How to Use

9
MODEL
Control Panel
BO 4630
BO 4660
TIMER
BO 4660
Selection button
To select a function.
Plus button
Minus button
BO 4630
Countdown indicator (Alarm)
To set a countdown (alarm), a signal sound after the time has ended.
This function does not affect the operation of the oven.
Time indicator
To set, change and check the time.
Cook Time indicator
To set how long the oven is to be in use.
End Time indicator
To set when the oven is to switch off again.
BO 1733, BO 2633, BO 2663, BO 2733, BO 2763, BO 3630

10
MODEL
Selector Program
Thermostat
Timer
BO 1733
BO 2633
BO 2663
BO 2733
BO 2763
BO 3630

11
Note
:
All functions will start after selecting the temperature with the thermostat knob.
The oven is equipped with:
•
a lower heating element
•
An upper heating element, which according to the cooking mode can be used for grilling or baking.
•
A circular heating element, which surround the fans
Oven Lamp
When you turn the control knob to position
the light will be on
Defrosting with fan
The air at ambient temperature is distributed inside the oven for defrosting food more quickly
and without proteins adulteration
Turnspit
Turn around the knob to the position like picture beside, the turnspit will work.
Natural convection
Both the lower and upper heating elements operate together. The heating process from
2 aim from the top and bottom. This function also able to work with turn spit (rotisserie). Ideal to
cook simultaneously for some foods.
Fan Oven
To use a fan oven, turn the knob program first to fan symbol, and then turn the burner knob to
the bottom stove, fan oven will work after a fire oven on the bottom of the furnace is on. The fan
will not work when the stove top oven is at work. Hot air is distributed evenly in the oven by the
fan. This function is suitable for cooking some foods (meat, fish) at the same time without
affecting the taste and smell. Also used for cooking
pastries.
Back element + oven fan (Convection oven)
Both the fan and the circular heating elements operate together. The hot air distributed inside
the oven. This is ideal for cooking several pastries types.
Medium grill
Hot temperature is emitted from the top with a half of element heater. This feature is allows you
to grilling in smaller quantities economically.
Total grill
Hot temperature is emitted from the top with a full element heater. This feature is used to grilling
large amount or large size. This function also can use turn spit (rotisserie).
Fan assisted total grill
The heated air by the grill heating element is circulated by the fan and helps to distribute the heat
between 50°C and 200°C.The fan assisted grill replaces the turnspit perfectly.
Lower heating element + fan
The heated air by lower heating element is circulated by the fan and helps to distribute the heat
between 50°C and 200°C.
Grill/upper Burner with Automatic Ignition
To use the grill burner, turn the knob to position like the picture beside. Upper burners already
has automatic ignition and make sure the oven door is closed.
Bottom Burner With Automatic Ignition
To use the bottom burner, turn the knob to position the picture. Bottom burner already has
automatic ignition and make sure the oven door is closed.

12
TIMER
BO 2633, BO 2663, BO 2733, BO 3630
•
Timer is equipped with a buzzer that can be adjusted up to a maximum of 60 minutes.
•
Turn the timer knob clockwise to position 60 minutes then turn back anticlockwise to the desire position
•
After The time-out or the knob position back to ● (black point), it will sound a warning sound / alarm
BO 1733, BO 2763
•To use the timer, set the buzzer by turning the knob clockwise. The numbers correspond to minutes
(maximum 120 minutes).
•The end of cooking buzzer does not turn off the oven.
BO 6633
Functions & Operation
In the condition of power connection, or short circuit, PCB will be reset, all functions will return to default.
1.
Press
button to start oven, the press
to select function, then press
to confirm.
2.
When you switch function, the set End working time and Duration time will be invalid.
3.
If working temperature was reset, oven will stop working, and also alarm. Must press
to restart alarm.
4.
New temperature and function setting must be confirmed by pressing OK.
5.
Under function mode, keep pressing
to enter standby mode. And display will show current time.
The sequence of cooking modes displayed in the screen as below:

13
/
B
C
L
/ BO
2663
BCL
/ BO
2633
BCL
TIMER
Electronic timer setting on BO 4660
At BO 4660, Timer serves as a reminder (alarm), it does not affect the oven work.
When the oven has been connected to the electrical supply, the display flashes 0:00. Press Plus button to enter the alarm
setting mode. Press Minus button to enter the alarm setting. Press “function setting” to enter the time setting mode.
Time setting
Press Selection button to enter the time setting mode. Press “+” or “-”to set the time, confirmation will be done
automatically after 3 seconds.
Alarm setting
Alarm function can be adjusted 0:10~99 (minute:second). Press Plus button to enter the alarm setting mode and the
symbol will be displayed in the screen.
Press Plus or Minus to set the time, confirmation will be done automatically after 3 seconds. When the time is over, 0:00
and be shown in the display, and the sound “Di, Di, Di …” happens. After 7 mins, the sound stops and the display
shows the current time. User can also press Plus to stop the alarm sound.
Change or delete the alarm setting
Press Plus to enter the alarm setting again. The symbol flashes in the screen. Press Plus or Minus to amend the
alarm time. When the setting is adjusted to 0:00, the alarm is cancel.
Alarm sound setting.
Press Minus button to enter the setting of alarm sound. Press Selection button to enter the time setting mode. There are
3 types of alarm sounds can be set.
Electronic timer setting on BO 4630
At BO 4630, Timer can be to set the cooking time.
Before use for the first time, set and change the hours according to the daily time
Note:
The oven only operates when the time has been set
When the appliances has been connected to the electrical supply or where there has been a power cut, the power indicator
Time flashes automatically.
1.
To change the time that has already been set, press the selection button repeatedly, until the function indicator Time
flashes.
2.
Set the current time using Plus or Minus button.
After approx. 5 seconds, the flashing stops and the clock displays the time of day set. The oven is now already to use.
Note:
The time can only be changed if neither of automatic functions (Cook Time or End Time) have been set.
Countdown (Alarm)
1.
Press Selection button repeatedly, until the function indicator Countdown flashes.
2.
Using the Plus or Minus button, set the required Countdown (max. 2 hours 30 minutes).
After approx. 5 seconds, the display shows the remaining time. The function indicator Countdown will light up.
When the time has ended, the function indicator flashes and buzzer will ring for 2 minutes. Press any button to switch off
the signal.
Cook time
1.
Press Selection button repeatedly, until the function indicator Cook Time flashes.
2.
Using the Plus or Minus button, set the required cooking time.
After approx. 5 seconds, the display returns to the current time. The function indicator Cook time will light up.

14
When the time has ended, the function indicator will flash, an acoustic signal will sound for 2 minutes and the oven will
switch itself off.
Press any button to switch off the signal and the program me.
End time
1.
Press Selection button repeatedly, until the function indicator End time flashes.
2.
Using the Plus or Minus button, set the required switch-off time.
After approx. 5 seconds, the display returns to the current time. The function indicator End time will light up.
When the time has ended, the function indicator will flash, an acoustic signal will sound for 2 minutes and the oven will
switch itself off.
Press any button to switch off the signal and the program me.
Cook time and End time combined
Cook time and End time can be used simultaneously, if the oven is to be automatically switched on and off at a later time.
1.
Using the function Cook time set the period of time that the dish requires to cook. Example, the cooking time is 1 hour.
2.
Using the function End time, set the time at which the dish is to be ready. Example, the dish is to be ready at 14:05.
3.
The function indicators Cook time and End time light up and the time is shown in the display. Example, the current time
is 12:05.
4.
The oven will automatically switch itself on at the appropriate time as calculated. Example, oven automatically switch
itself on at 13:05 and will switch itself off when the cooking time set has elapsed.
Example, at 14:05 (according to the time that has been set previously, see no. 2)
Indicator light
•
The indicator will be light up until the selected temperature when turning the thermostat knob, and will switch off when
the selected temperature is reached.
•
The indicator for cooling fan will light up when the cooling fan is switch on.
•
And indicator lights grill / turnspit will light up if the player grill / turnspit enabled
BO 7838
Operating Oven Control Unit General View
General View
1. Meat probe
2. Child lock
3. Minute minder
4. Hour
5. Settings
6. Auto cooking
7. Special functions
8. Favourites
9. Cleaning

15
User Entries
1. Return Button
•Short press: Returns back when navigating the menus.
•Long press: When cooking, cancels the cooking cycle.
2. RotaryKnob
•Right / Left turning: Navigates between selections.
•Short press: Enables the selection.
•Long press: Pauses cooking, cleaning and other functions.
3. MENU Button
•Enters to the menu.
•Adds, records and deletes favourites.
•Enables reminder and child lock during cooking cycle.
4. ON / OFF Button
•Short press: Turns on / off the oven.
•Long press: Cancels the cooking cycle and turns off the oven during cooking.
Symbols on the Display
Appliance features a “TFT’” display.
Eco ( Economic ) cooking
Low temp cooking
Meat Probe
Shabbat
Defrost
Yoghurt
Dough
Warm Keeping
Temperature
Temperature symbols of the oven are defined in the following table.
Quick heating ( pre –heating )
Meat Probe
Heat bars ( oven cavity
temperature display )
Temperature Display (°C)
Time Management
The oven time symbol is determined in the following table
Normal Cooking
Delayed Cooking
Minute Minder

16
Cook
The oven cooking symbol is defined in the following table
Lower Resistance
Upper Resistance
Grill Resistance
Turbo Resistance
Turbo Fan
Setting
The oven setting symbol is defined in the following table
Key Tone
Child Lock
Automatic Cooking Menu
The automatic cooking menu symbol is defined in the following table.
Meat
Pizza
Poultry
Bread
Fish
Oven Food
Cake
Spesial
End of Cooking Function
End of Cooking Function menu symbol is defined in the following table.
Save Favorite
Extend Duration
Finish Cooking
When the Oven Is Turned On for the First Time
Oven is deactivated when it is turned on for the first time. Clock that is not updated displays on the screen.
Simply follow several steps below to perform the clock setting;
•Press ON/OFF button to turn on the oven. Then press MENU button to enter the menu.
•Select time of day entering settings sub-menu.
•Make hour and minute adjustment using rotary knob.

17
Cooking Function Displays and Their Features
Lower and upper resistances
Recommended temperature is 200 °
C . Allows cooking from 45 ° C to 240
° C . Up to 6 hours of cooking is
possible .
Grill, Turbo and fan
Recommended temperature is 220
° C . Allows cooking from 120 ° C to
230 ° C . Up to 6 hours of cooking
is possible
Lower resistance , upper resistance
and fan
Recommended temperature is 180
* C . Allows cooking from 45 ° C to
240 ° C . Up to 6 hours of cooking is
possible .
Upper resistances
Recommended temperature is 150
° C . Allows cooking from 120 ° C
to 230 ° C . Up to 2 hours of
cooking is possible .
Turbo and fan
Recommended temperature is 175
° C . Allows cooking from 45 ° C to
240 ° C . Up to 8 hours of cooking is
possible .
Lower resistances
Recommended temperature is 200
° C . Allows cooking from 60 ° C to
230 ° C . Up to 8 hours of cooking
is possible
Lower - upper resistances , turbo
and fan
Recommended temperature is 180
* C . Allows cooking from 60 ° C to
240 ° C . Up to 5 hours of cooking is
possible .
Lower resistances ,Turbo, and Fan
Recommended temperature is 150 °
C . Allows cooking from 45 ° C to 230
° C . Up to 4 hours of cooking is
possible
Grill
Recommended temperature is 180
° C . Allows cooking from i20 ° c to
230 ° C . Up to 1 hours of cooking is
possible
Upper resistances ,Turbo, and Fan
Recommended temperature is 150
° C . Allows cooking from 45 ° C to
230 ° C . Up to 4 hours of cooking
is possible
Grill & Upper resistance
Recommended tempera ture is 200
° C . Allows cooking from 120 ° C to
230 ° C . Up to 1 hours of cooking is
possible .
Grill, Upper Resistance ,and Turnspit
Recommended temperature is 200
° C . Allows cooking from 120 ° C to
230 ° C . Up to 1 hours of cooking
is possible
Grill & Fan
Recommended temperature is
175 ° C . Allows cooking from 120
° C to 230 ° C . Up to 1 hours of
cooking is possible
Grill, Fan ,and Turnspit
Recommended temperature is 175
° C . Allows cooking from 120 ° C to
230 ° C . Up to 1 hours of cooking
is possible
Grill,fan,& upper resistance
Recommended temperature is
185'C . Allows cooking from 120 ° C
to 230 ° C . Up to 1 hours of cooking
is possible .
Grill,Turbo, Fan ,and Turnspit
Recommended temperature is 185
° C . Allows cooking from 120 ° C to
230 ° C . Up to 1 hours of cooking
is possible

18
BO 3435
Remark
1
On/Off Switch
8
Plus button
15
Time and temperature
2
Program button
9
OK button
16
Heat up symbol
3
Light button
10
Heat up button
17
End cooking time
4
Timer button
11
Start/Stop button
18
Child lock symbol
5
Temperature button
12
Cooking mode symbol
19
Temperature setting
6
Display screen
13
Cooking time
20
Light symbol
7
Minus Button
14
Alarm symbol
21
Time of day
Oven function settings:
•Time of day / Alarm Clock / Cooking time / End of time setting
The sequence of cooking modes displayed in the screen as below:
.
key for 2 seconds, press / to adjust the time, press to confirm.1). Time of Day: Press
2). Alarm Clock : Press “” key once, press / to set the cooking time, press to confirm. The display
will show the symbol .
3). Cooking time “Duration”: Press “”key twice, press / to set the cooking time 00:00 (hour:min), press to
confirm.
4). End of cooking time “End”: after user sets the cooking time “Duration”, press the key 3 times to set the end of
cooking time. The oven starts as soon as the start time reaches.
For example: The time is 12:00 now, user sets the cooking time to 0:30 (hour:min), then press to set the end of time
to 12:40. The oven starts to cook at 12:10, and the display shows the end time of cooking.

19
•Function setting
1). Press the “ ” key to switch on the oven. User can between the cooking modes by continuously pressing the “ ”
key.
2). Set the temperature by pressing “ ” key then press / to set the temperature. Press to confirm after the
cooking mode is selected. Once the cooking mode is fixed, press the key “ ” to start cooking, press repeatedly to
switch between the start and pause.
•Rapid heat –up
When the setting temperature exceeds 100 degrees and the pre-heat function hasn’t been finished, user can press the key
to start the rapid heat-up mode. The display shows the symbol continuously.
•Child Lock Set
Press “ ” key for 2 seconds. The display will show the Child Lock symbol “”. To disable the Child Lock, hold
again for 2 seconds until the symbol disappears.
Cooking mode symbols:
The sequence of cooking modes displayed in the screen as below:
Function
Working parts
Default
temperature
Adustable
temperature
range.
Fan motor thaw
50ºC
20 –60ºC
Lower heating element
220ºC
50-250ºC
Lower heating element + Fan motor
220ºC
50-250ºC
Total grill element + Turnspit
220ºC
50-250ºC
Circle heating element + Fan motor
220ºC
50-250ºC
Total grill element + Lower heating element + Turnspit
220ºC
50-250ºC
Total grill element + Lower heating element + Fan motor+
Turnspit
220ºC
50-250ºC
BO 7838
Manual Cooking
Normal cooking
The steps you need to follow to start cooking are explained below.

20
1. The oven is turned on by pressing the on/off button. Then, when the
rotary knob is pressed once, the cooking menu opens.
2. Rotate the rotary knob to navigate between functions. Press the rotary
knob to select a function.
WARNING: While navigating between functions, the temperature values displayed on the temperature display are the
recommended temperature values. Temperature may be changed between maximum and minimum temperatures
specified at 5°C intervals.
3. Rotate the rotating knob to select temperature and press the rotating
knob to select the time.
4. Rotate the rotating knob to select the time
5. Before cooking cycle starts, summary informa- tion screen is displayed.
Press the rotary knob to start cooking or press return button to change
the settings.
6. Once cooking starts, the screen on the side isdisplayed.
WARNING: Simply press the rotary knob for 1 second to pause cooking.
WARNING: Simply press and hold return button for 2 seconds to cancel cooking completely.
WARNING: To change cooking settings; press return button after
pausing the cooking cycle and return back to cooking time, temperature
setting and cooking function adjustment. Cooking cycle can be restarted
with desired settings.
WARNING: Reminder can be set or child lock can be activated
pressing MENU button during cooking.
Other manuals for Bravo Series
1
This manual suits for next models
15
Table of contents
Other Modena Oven manuals

Modena
Modena Bravo Series Owner's manual

Modena
Modena Vicino Series User manual

Modena
Modena BO 6633 Owner's manual

Modena
Modena BT Series User manual

Modena
Modena BO 7838 Owner's manual

Modena
Modena BO Series User manual

Modena
Modena BO Series User manual

Modena
Modena BO 1635 LAR Owner's manual

Modena
Modena BO 4630 Owner's manual

Modena
Modena BO 9130 SAM Owner's manual