Modena Vicino Series Owner's manual

2
Table OfContent
Part 1
: Safety Warnings
3
Part 2
: Name Of Parts
4
Part 3
: Installation
6
Part 4
: How To Use
8
Part 5
: Maintenance
13
Part 6
: Troubleshooting
14
Part 7
: Precaution Action
14
Part 8
: Spesification
15
Thisguidebookexplainseverythingyouneedtoknowaboutyournewproduct.Pleasecontactou
rCustomer Care should you need further assistance through www.modena.com.

3
•
Please independently use sockets with rated current above 16A. Reliable grounding must be
guaranteed. Please do not use loose or poor contact power sockets, or it easily leads to
electric shock, short circuit and fire; if the equipment share one socket with other electric
appliances, fire may be caused for abnormal heating.
•
When unplugging socket, hold the plug end with a hand to pull it out; do not unplug with the hand
holding power cord, otherwise electric shock, short circuit, fire and other dangers will be
caused.
•
Only professional repair technicians can disassemble, repair and transform the equipment.
•
If the equipment is idle for a long time, please unplug the power plug or turn off the power
supply of the product.
•
During use the appliance becomes hot. Care should be taken to avoid touching heating
elements inside the oven.
•
WARNING: Accessible parts may become hot during use. Young children should be kept
away.
•
Do not use harsh abrasive cleaners or sharp metal scrapers to clean the oven door glass,
since they can scratch the surface, which may result in shattering of the glass.
•
This appliance is not intended for use by persons (including children) with reduced physical,
sensory or mental capabilities, or lack of experience and knowledge, unless they have been
given supervision or instruction concerning use of the appliance by a person responsible for
their safety.Children should be supervised to ensure that they do not play with the appliance.
•
WARNING: The appliance and its accessible parts become hot during use.Care should be
taken to avoid touching heating elements.Children less than 8 years of age shall be kept
away unless continuously supervised.
•
If the supply cord is damaged, it must be replaced by the manufacturer, its service agent or
similarly qualified persons in order to avoid a hazard.
PART 1 : SAFETY WARNINGS

4
BT 3435
Notes :
1.
Control Panel
2.
Shelves Support
3.
Steam Tray
4.
Steam Plate
5.
Oil Receptor Plate
6.
Door Hinge
7.
Receiving Tank
8.
Door
9.
Water Tank
Control Panel
Notes :
1.
On / OffKey
2.
Program Key
3.
Lamp Key
4.
Timer Key
5.
Temperature SettingKey
6.
Display Screen
7.
Plus Key
8.
Minus Key
9.
OK Key
10.
Rapid Heat UpKey
11.
Start / StopKey
PART 2 : NAME OF PARTS

5
BT 6435
Notes :
1.
Control Panel
2.
Water Tank
3.
Gate Control Switch
4.
Steaming Rack
5.
Steaming Plate
6.
Oil Receive Tray
7.
Door Hinges
8.
Water Catcher
9.
Door
Panel kontrol
Notes
1
Power On / Off Key
7
Increase Key
2
Function Selection Key
8
Decrease Key
3
Lighting Key / Child Lock Key
9
Presetting Key / Key for opening water
tank
4
Temperature Regulating Key
10
Fast Heating Key
5
Time Setting Key
11
Start / Stop Key
6
Display Screen

6
MODEL
A ( mm )
B ( mm )
C ( mm )
BT 3435
560
550
450
BT 6435
•
Before using the appliance. Please read this guide carefully. This book contains important
information regarding safe operation, installation and maintenance oftheappliance.
•
Please keep this guide book in an easy place to find, so it will be easier if necessary to use at
any time. Include this guide book if you are handing the appliance over.
•
Ifyoudonotunderstand abouttheinstallation of steamoven, youshould contact MODENA Call
Centerto perform theinstallation.
•
Prepare electrical outlet that is easily accessible to your oven powercord.
Important Safety Information
•
Please use the rated current of 10A or more separate outlet. The power socket must be
grounded. Do not use loose or poor contact power outlet, otherwise it may lead to electric
shock, short circuit, or fire. If the outlet is shared with other appliances, there may be abnormal
heat that may causefire.
•
When you pull the plug socket, grip the plug ends. Do not pull the power cord when pulling
the plug out, otherwise there might be an electric shock, short circuit, fire and other dangerous
hazard
•
Do not let the appliance soaked, otherwise there is the risk of a short circuit or electric shock.
•
Use AC 187-242Vvoltage.
•
Pleaseremindchildrennottousetheappliancewithoutsupervisionorplaywiththeappliance.Therema
y be
burns, electric shock, or other hazards.
•
Unlessdone by a professional technician, do notdisassemble and repair the appliance yourself.
•
If you are not using the appliance, unplug the power plug or turn off the power supply.
•
When the power cord is damaged, the cord should be replaced by professional technician.
Installation
•
Open the boxofbuilt-insteam oven, andthen takeout the built-in oven and putiton a flat
surface.
•
Keep all packaging materials out of reach of children, as they may cause choking or
suffocation hazard.
•
Theappliancemustbeinstalledinaccordancewiththeinstructionsand
installedbyskilledandexperienced people. Installation errors can beharmful to humans
andanimalsormaydamagetheproperty.
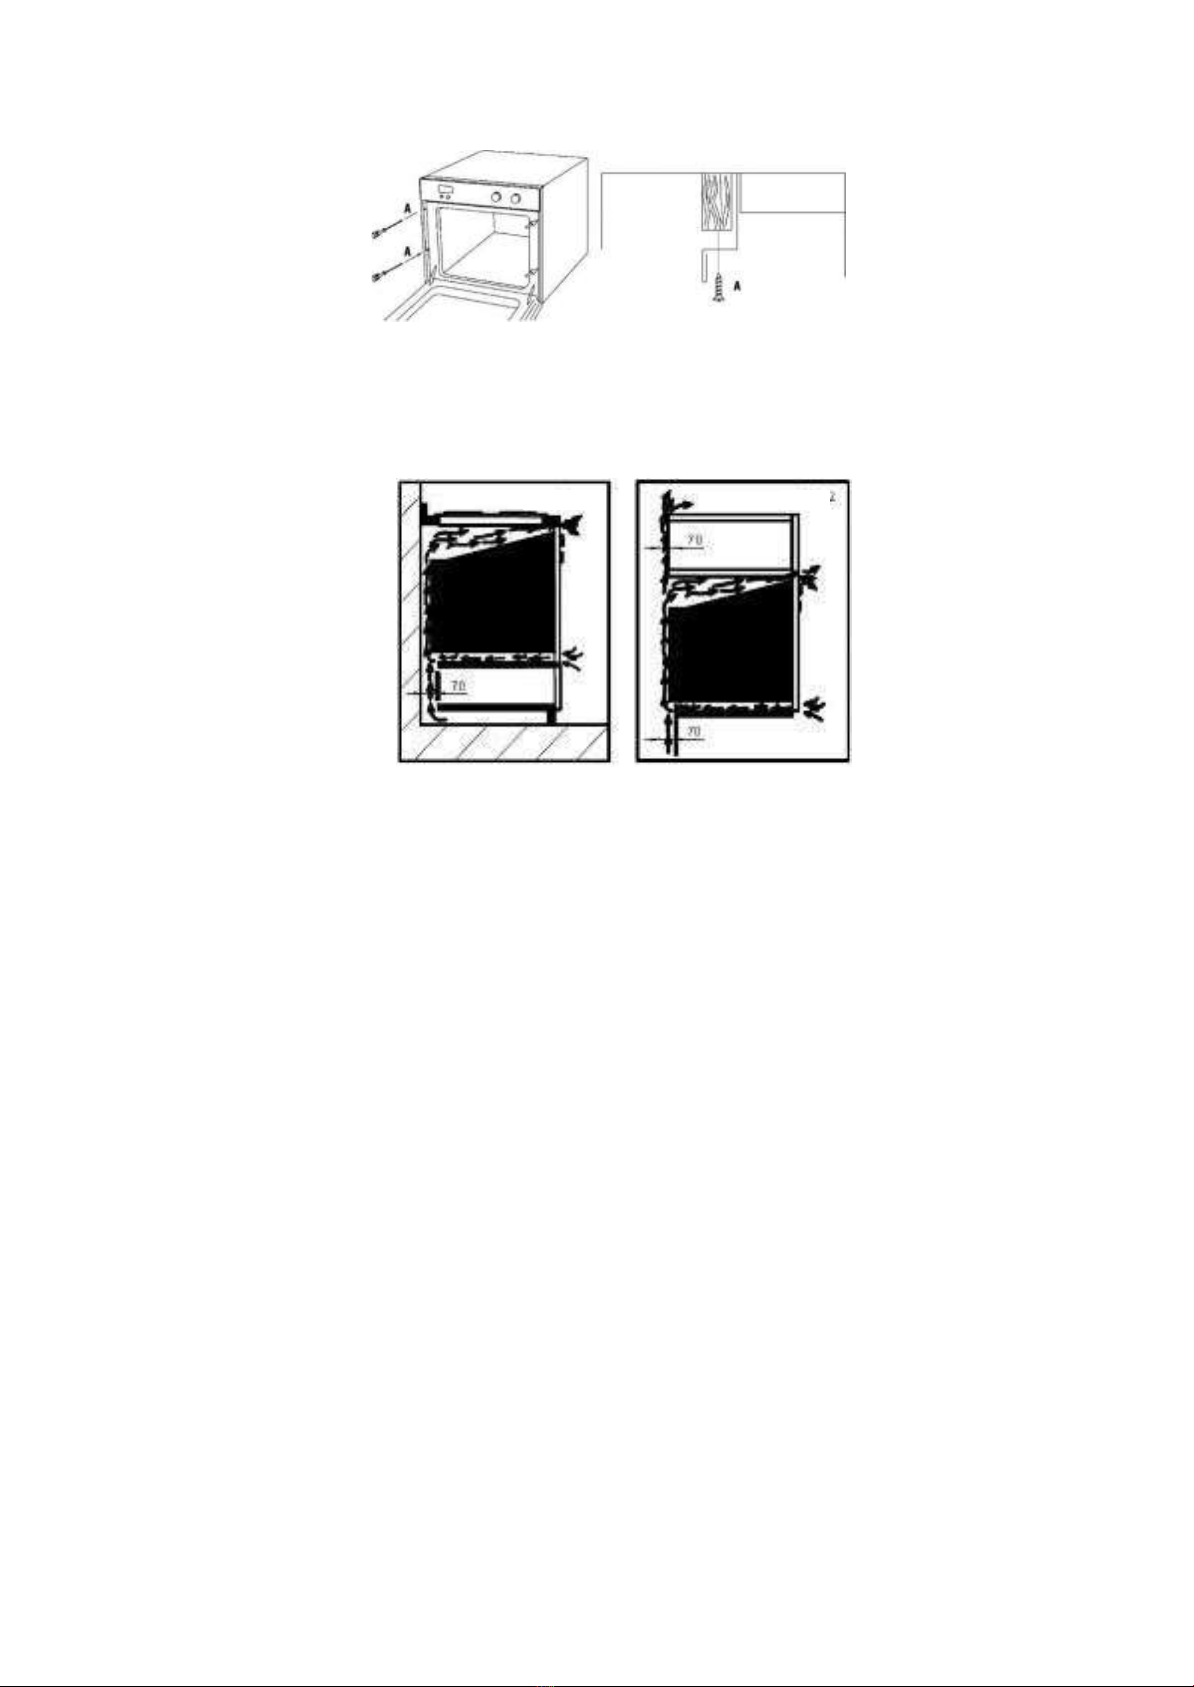
Installing The Steam Oven Into Kitchen Set
1.
Thesteamovencanbeinstalledonthe kitchentableaslongthethetablehold up to
heatorinstalledatthe column.
2.
Usetheappropriatekitchensettoensurethattheappliancecan workwell.Frame
orpanelsadjacenttothe oven must be made of heat-resistant material.
3.
Cabinet withlacquer-
coatedexteriormustbeassembledwithadhesivesthatcanwithstandtemperatures up to 100°C.
4.
Checkifthesizeofthespaceinthe kitchen toputtheoven issetaccording tothesize
showninthe picture below.
PART 3 : INSTALLATION

7
Pic . 1
Pic . 2
5.
Insert oven into the kitchen set space by installing a screw type A into the four holes
in the steam oven. Screws can be found on the side of the oven frame.
6.
Connect the power plug to the wall outlet and the oven is ready to use.
7.
For the most efficient air circulation, the steam oven must be installed in accordance
with the dimensions shown in Picture 1-2. Rear panelofthe cabinet must be removed
so that air can circulate freely. Panel where the oven is installed must have a gap ofat
least 70 mm at therear.
Electrical Connections
Steamovenisequippedwithathree-
polepowercorddesignedtooperatewithalternatingcurrentatthevoltage and frequency written
on the table of specifications.
Connect the board power supply cord to the power
Fit a standard plug in accordance with the load shown in the table of specifications. The
appliance must be directly connected to the electricity using omnipolar switch with
opening contact of at least 3 mm installed between the appliance and the electricity.
The switch must be suitable for the load indicated on the label and must comply with the
regulation of electrical currents (grounding wire must not be interrupted by the switch).
Power supply cord shouldbe positioned so it does not contact with temperature above
50°C at any point. Make sure that the correct electrical connection has been made and
is fully compliant with safety regulations.
Before the appliance is connected to a power source, ensure that:
1.
The appliance is grounded and the plug is in accordance with the applicable regulations.
2.
Electric socket can withstand the appliance’s maximum power
indicated on the data label (see below).
3.
Voltage is in the range between the values indicated on the data label (see below).
4.
The electric socket is compatible with the appliance’splug. If the socket
is incompatible with the plug, ask the technician to replace it. Do not
use extension cords or multiple electric sockets.
5.
After mounting the appliance, powersupply wiring and outlet should be easily accessible.
6.
Cables must not be bent or crushed.
7.
Cable must be checked regularly and replaced only by an official technician.
8.
The manufacturer disclaims any responsibility, if this safety measures areignored.

8
BT 3435
Starting the steam function
Step1:Pressthepowerkey
, the display will light up and appliance is in standby mode.
Step 2: Pressthe Time Set button twice, cooking time will be shown on the lower left screen.
Step 3:Press the key
or key,setthedesiredcookingtime,thenpressthe"OK"keytoconfirm.
Step
4:Finally,pressthe key
to startcooking.
Oven functionsetting.
Time of day / Alarm Clock / Cooking time / End of time setting
The sequence of cooking modes displayed in the screen as below:
•
Time of Day: Press
key for 2 seconds, press
/
to adjust the time , press the
key
to
confirm
•
AlarmClock: Press
key once time, press
/
tosetthecookingtime,press
to
confirm.
•
Thedisplaywillshowthesymbol .
•
Cookingtime“Duration”:Press
keytwice,pressconfirm.Tosetthecookingtime, press
/
.Press
to confirm.
•
End of cooking time“End”:after user set thecooking time“Duration”,press the
key 3
times to set the end of cooking time. The oven starts as soon as it is reaching the
starting time.
For example: The timeis 12:00 now, user set the cooking time to 0:30 (hour:min), then press
to set the end of time to 12:40. The oven starts to cookat 12:10, and the display
shows the end time of cooking.
•
Press the key to switch on the oven. User can select the different cooking modes by
continuously pressing the key.
•
Temperature can be set by pressing
key then press
/
to set. Then press
toconfirmafter the
•
cooking mode is selected. Once the cooking mode is fixed, press the key
to
start cooking, press repeatedly to switch between start and pause.
PART 4 : HOW TO USE

9
Descaling function
Firstly, take out the water tank, inset detergent and fill it with water halfway. Install the tank on the
tank support insidethesteamoven,closethedoor,press
button and choose to startthefunction.
Display screen will show
symbol, then choosedescaling function. Setthealarm, then thedisplay
willshow tap icon .
When the alarm goes off,take out watertank,refill halfway and reinstall on the tank support. Close
the door, press
key, machine will goes into second cleaning phase.
When the alarm goes off again,take out watertank,refill halfway and reinstall it on the tank
support. Close the door, press
key,machine will goes into third and final cleaning phase.
Rapid heat –up
When the setting temperature exceeds 100 degrees and the pre-heat function hasn’t been
finished,user can press the key
to start the rapid heat-upmode.The display will show the
symbol
continuously.
Child LockSet
Press
keyfor 2 seconds.The display will show the Child Locksymbol
continuously.
Press
key for 2 seconds to turn of Child Lock until the symbol dissapears.
Temperature setting
Instandby mode, Press key, display will show temperature symbol, press the
/
buttonto setthe temperature,press the key to confirm.
Cooking modesymbol:
The sequence of cooking modes displayed in the screen as below:
Function
Working parts
Default temperature
Adustable
temperature range
Fan motor thaw
50ºC
20 –60ºC
Circle heating element + Fan motor
220ºC
50-225ºC
Grill
220ºC
50-225ºC
Grill element + Fan motor
220ºC
50-225ºC
Steam
100ºC
40-100ºC
Steam + Grill element + Fan motor
120ºC
120-220ºC
Steam + Circle heating element+ Fan
motor
120ºC
120-220ºC
Steam heat plate descaling

10
Rapid Heatup
When you select a pure grill and the setting temperature exceeds 100 degrees and the pre –
heat function is not yet completed,usercanpressthekeytostarttherapidheat-
upmode.Thisfunctionwillusecircleheatingelement + total grill heating element + fan with
power of 230V / 3050 W
BT 6435
Quick Start
Enable The Heating Function
Step I: Press the power key "
", the display
screen is on, and then the machine is
standby
Step II: Press "
" key for three times to
select the
heating function and then the "
" icon will be
shown at the top-left corner of the display
Step III: Press key "
", and press key "
""
" to
increase / decrease the working
time, and then press key "
", and then
press “ ” “ ” to increase or decrease
working temperature
Step IV: Press key "
" to start the baking
function

11
Detailed Instructions
Standard time setting (clock function)
When the equipment is electrified for the first time, or when it is standby, the user can
keep
pressing the key "
", and then the clock on the display screen will flicker. And then the user
can press key “ ” “ ” to increase or decrease the time on the clock. After adjustment, the
time set will take effect 10 s after adjustment without pressing any key.
Turn-off function
Press key " " once during the service of the oven to stop heating.
Automatic baking mode with time length set
Under this mode, the baking time is preset. The equipment will run immediately after setting.
And heating will stop automatically after the time length set is past. The operation methods
are as follows:
1.
Press key " " to make the machine standby;
2.
Press key " " to choose the baking mode. The function will be changed by
pressing the key every time;
3.
Press key " " to make the temperature value flicker, and then press key " " and "
" to set the highest temperature of baking;
4.
Press key " " to make the minute figure flicker. And then press key " " and " " to
set the baking time. Press key " "and" " once for increasing or decreasing 1min, and
a long press mains continuous increasing or decreasing.
5.
Press key " " to start the baking function;
Automatic baking mode with the baking completion time set (presetting
function)
1.
Press key " " to make the machine standby;
2.
Press key " " to choose the baking mode. The function will be changed by pressing the key
every time
3.
Press key " " to choose the baking mode. The function will be changed by pressing the key
every time;
4.
Press key " " to make the minute figure flicker. And then press key " " and " " to set
the baking time. Presskey " " and " " once for increasing or decreasing 1min, and a long
press
mains continuous increasing or decreasing
5.
Press key " "
and set the baking completion time by pressing "
" and "
";
6.
Press key " " to confirm setting, and the oven will start heating based on the baking
completion
time
Fast heatingfunction
After the baking function is set, if the temperature is higher than 100℃, the user
can press key " " to realize fast heating. The oven will start all the heating pipes to
heat foods until the temperature reaches the value set, and then the oven will
change to the gear of the function set for heating.
As for the descaling function, take out the water tank by pressing "
" and pour a
pack of detergent into the water tank and then add half water to the water tank,
install the water tank into the water tank base of the electric steaming furnace as
well as press " " to select the descaling gear to start working under the standby
state and enter the descaling function after the " " icon is shown in the display
screen until the
steamer gives an alarm and the " " water shortage icon appears on the right of the
display screen. When the water shortage alarm occurs to the electric steaming
furnace, press " " to take out the water tank and then add half clean water,
install the water tank to the water tank base and enable the cleaning function of the
machine for the second cycle by pressing " " key. When the water shortage
alarm happens to the electric steaming furnace again, take out the water tank by
pressing " " and then add half clean water, install the water tank into the electric
steaming furnace and enable the cleaning function of machine for the third cycle by
pressing " " key and finally the whole descaling function ends after the time is
over.

12
Function
Unfreezing
with fan
Back
Heating
Coil +
Fan
Upper
Heating
Coil
Upper
Heating
Coil
+Fan
Steam
Upper
Heating
Coil + Fan
+ Steam
Upper
Heating
Coil +
Steam
Ring
Heating
Coil +
Fan +
Steam
Evaporating
Pan
Descaling
Default
Temperature
50°C
220°C
220°C
220°C
100°C
120°C
120°C
120°C
-
Grilling time and grilling mode of various common meats suggested are as shown in
the following table:
Mode
Types of
Food
Weight
(
Kg
)
Grid on
positions
from bottom
to top
Preheat
Time
Adjust
Temperature
Cooking
Duration (
min
)
Pizza
1
2
15
220
25-35
Mutton
1
2
10
180
40-45
Chicken
1
2
10
180
60-75
Chocolate
Cake
1.5
3
10
160
50-60
Carp
1
2
5
160
55-60
Beef
1.5
4
5
MAX
15-20
Meat Loaf
1
4
5
MAX
25
Hamburg
1
3
5
MAX
7
Mackerel
1.5
2
5
MAX
20-25
Roast
Chicken
1.5
2
5
200
55-60
Large Squid
1.5
2
5
200
40-45
Suggestions about cooking time of common foods
Species
Weight
Time
Fishes
About 650g
15 minutes
Sea crab
About 500g
25 minutes
Shrimp
About 500g
12 minutes
Drumstick
5, about 650g
30 minutes
Rooster
1, about 1100g
35 minutes
Beef
About 350g
40 minutes
Pork
About 400g
20 minutes
Soup
About 450g
15 minutes
Egg
10 About 650g
15 minutes
Pumpkin
About 850g
20 minutes
Potato
About 550g
30 minutes
Corn
About 550g
30 minutes
Steamed stuffed bun
10
18 minutes
Rice
About 400g
30 minutes

13
PART 5 : MAINTENANCE
Wait until the appliance has cooled down before attempting to clean it.
Disconnect it from the power supply, either by pulling the plug out or switching the power off.
Donotleavecorrosiveoracidicsubstances(lemonjuice, vinegar,etc.) on enameled,paintedorstainless
steel parts.
Selecting container materials
Select the appropriate containers depending on the food. Use a non-toxic
materials especially those that will endure high temperature, and remove the lid
when using the containers with steam oven. It is advised to use provided
containers such as steam platter. These are the recommended containers:
•
For ingredients such as sweet potatoes, corn, potato, egg, steamed bun, and
other relatively large ingredients that does not drip, you can use any suitable
containers.
•
For ingredients such as prawn, crab, chicken wing, chicken, pumpkin, and others
that does need to keep the juice, you can use the steam container.
•
For ingredients such as fish, ribs, large chicken or turkey, meat and others,
those will need steam penetration to prevent the juice from leaking out. You
can use oil container for those ingredients.
Cleaning the Steam Oven
•
After finished using the steam oven, let the steam oven door open for several
minutes to cool down the steam.
•
Ideally, the inside of the steam oven should be cleaned after each use.
•
Clean the steam oven when the oven is still warm (not hot), so that spilled food on the
steam oven surface can be removed easily.
•
Do not spray water directly onto the appliance, avoid using strong chemical and abrasive
detergent
•
Clean the rubber, stainless steel or enameled parts or chrome using a soft sponge and
warm soap water or non abrasive cleaning agent. Use special products to remove
stubborn stains. After cleaning, dry the appliance until it is completely dry.
•
All accessories –except the sliding shelves - can be washed like regular cooking
equipment and also safe to put it into a dishwasher.
•
Do not use any type of steam cleaners or high-pressure cleaning appliance.
Change the Oven light
•
Disconnect the oven from the power supply,
either by pulling the plug out or by switching off
the power supply.
•
Remove the protection glass (A) by turning it
counter-clockwise and replace the burnt out
bulb with the same type bulb (high-
temperature lamp300ºC)
•
Replace the burnt out bulb.
•
Reinstall the cover protection A.
Cleaning the oven door
Clean the glass with asponge and liquid cleaner,then dry with asoftcloth. Do not use
abrasive material sorones with sharp surfaces to prevent from cracking and scratching the
glass.
Cleaning the water tank
When cleaning the tank, First remove the tank cap, then use adamp cloth paired with liquid
cleaner to scrub the tank interior.

14
PART 7 : PRECAUTION ACTION
If abnormalities hapen when using the appliance, please stop using the appliances and
unplug the power cord, then check the table below. Please contact our call center if
necessary.
Some of cooking instructions can be found in the table below:
PROBLEM
POSSIBLE CAUSE
RECOMMENDED ACTION
Water alarm
No water inside the tank
Fill the water tank
Broken pumps
Replace the pumps or notify to the
MODENA Call Center.
Control panel cannot
be operated
Appliance is in Child Lock mode
Deactivate Child Lock mode
Broken operation board
Call MODENA Call Center.
Steaming unfamiliar
food
Putting the lid on the food
Remove the lid
No steam generated
Call MODENA Call Center.
The display shows
Error Code E2
Broken interior sensor
Call MODENA Call Center.
The display shows
Error Code E3
(
BT 3435
)
Interior sensors over Standard
temperature
Unplug the power to cool it down Or Call
MODENA Call Center.
The display shows
Error Code E4
Broken heating plate sensor
Call MODENA Call Center.
The dispay shows
Error Code E5
Heating plate sensor
Over safe temperature
Unplug the power to cool it down Or Call
MODENA Call Center.
The display shows
Error Code E1
No tank in place or broken tank
switch
Install the tank on the tank support Or Call
MODENA Call Center.
The display shows
Error Code E8
(
BT 6435
)
The water tank motor breaks down
Call MODENA Call Center.
Advice andprecautions
This appliance is designed and manufactured incompliance with international safety standards.
Warnings and
instructions below are for safety reasons and must be read and followed carefully.
Important SafetyInstruction
•
The appliance isdesigned for household and indoors use and is not intended for
commercial use or industry.
•
Appliance should not be installed in an open area. It is dangerous to let the appliance exposed
to rainand typhoon.
•
When moving and installing the appliance, always usethe handrail available in the sides of the
oven.
•
Do not touch the side ofthe appliance with bare feet or wet hands and feet.
•
Appliance should be used only by adults in accordance with the instructions in the guide book.
•
Do not touch the heating elementor a particular part of the oven door when the appliance
isused, since some parts might become very hot. Keep children away from the oven and do
not touch the hot parts of the electrical wiring directly.
•
Make sure other electronic equipments are not in contact with the hot parts oftheoven.
•
The open space for ventilation and heat dissipation should not beobstructed.
•
Always grab the middle part of the oven handle, the end part ofthe handle could behot.
•
Always weargloves when placing or removing the cutlery into or out of the oven.
•
Do not use aluminum foil to line the bottom oven.
PART 6 : TROUBLESHOOTING

15
PART 8 : SPESIFICATION
•
Do not pu tflammable materials in to the oven, if the appliance is accidentally turned on,
thesematerialmay burn.
•
Always turn off the appliance when not in use.
•
When you disconnect the power cord, always pull from the plug, do not pull the cord.
•
Always unplug the power cord from its source when doing maintenance or repairing
appliance
However, if there
isdamage on the appliance, do not try to fix it yourself. Repairs
that carried out by inexperienced person could potentially cause injuryor further damage to
the appliance. Contact MODENA Call Center for repair.
•
Do not lay or lean heavy objects on the oven door.
•
Do not let children play with the appliance.
•
Appliance are not to be used by people ( including children ) with a lack of physical,
sensoryormen abilities, or lack of experience and knowledge about the products unless they
have being given supervision or instruction concerning the usage of the tools by a person
responsible for they safety
•
Always turn off the oven before removing the oven rack and plates.
•
During the cooking process,fats or oils should be treated carefully because this material
might cause fire if it reaches certain temperature.
•
Frequently check thegas hose,to make sure that gashoseisfar from hot surface, and notinbent
position. Make sure the outer surface of hose isn’t cracked to prevent leakage.
•Always remember that the area round the gas stove can be hot for along time ( around 30 minutes) after
you turn off the oven.
•Perform routine service on your built –in oven every 3 ( three ) month, so a abnormalities on your built –in
oven can be detected and repaired immediately.
Specifications of this appliance may change without Notice to improve the quality of
theproduct.
MODEL
BT 3435
BT 6435
Oven type
Steam oven + grill
Steam oven + grill
Cooking program
8
8
Color
Black + stainless
Black
Oven capacity (liter)
36
36
Grill
Electric
Electric
Oven
Electric
Electric
Door glass
3 layers
3 layers
Oven Light
Yes
Yes
Thermostat
Yes
Yes
Timer
Yes
Yes
Oven tray
Yes
Yes
Dripping pan
Yes
Yes
Voltage
220 –240 V / 50
Hz
220 –240 V / 50
Hz
Lower heater
1740 W
1740 W
Back heater
1650 W
1650 W
Upper/grill Heater
1450 W
1450 W
Product dimension
(L
x W x H)
mm
595 x 540 x 445
595 x 540 x 445
Cut-out dimension
(L
x W x H)
mm
560 x 550 x 450
560 x 550 x 450

16
08/21
Other manuals for Vicino Series
5
This manual suits for next models
2
Table of contents
Other Modena Oven manuals

Modena
Modena GR 7741GO Owner's manual

Modena
Modena SA 0624G Owner's manual

Modena
Modena BO 7838 Owner's manual

Modena
Modena BO 1635 LAR Owner's manual

Modena
Modena Bravo Series Owner's manual

Modena
Modena BO 4630 Owner's manual

Modena
Modena BO 6633 Owner's manual

Modena
Modena BO Series User manual

Modena
Modena BT Series User manual

Modena
Modena Vicino Series User manual