Modena Igienico Series Owner's manual

User
Manual Book
Water Purifier
Igienico Series
RO 9115, RO 8115, RO 8101

2
Thank you for your trust in choosing MODENA products for your household
needs. With your satisfaction as our priority, we constantly aim to deliver stylishly
designed products equipped with state-of-the-art technology to assist you in
your daily activities.
This is your guidebook containing everything you need to know about our
product. Please reach out to us if you need further assistance or other
information via our Customer Care or our official website www.modena.com.

3
CONTENTS PAGE
•Introduction 2
•Part 1 :Name of Parts 4
•Part 2 :Installation 7
•Part 3 :How to Use 11
•Part 4 :Maintenance 13
•Part 5 :Precaution Action 14
•Part 6 :Problem & Solution 16
•Part 7 :Specification 17

4
RO 9115
Remarks:
1. Control Panel
7. Cold water drain
13. Water inlet
2. Water tap
8. Cooling switch
14. Base
3. Body of product
9. Power Cord
4. Water collector
10. Water tank drain
5. Door
11. Hot water drain
6. Heating switch
12. Concentrated water drain
Part 1: Name of Parts
(Front)
(Rear)
(Side)

5
RO 8115
Remarks:
1. Heating lamp
7. Water collector
13. Hot water drain
2. Cooling lamp
8. Door
14. Condenser
3. Filter change lamp
9. Filter reset switch
15. Water drain
4. Control Panel
10. Heating switch
16. Water inlet
5. Water button
11. Cooling switch
6. Water tap
12. Power cord
(Front)
(Rear)

6
RO 8101
Remarks:
1. Hot water button
7. Filter change lamp
13. Power cord
2. Not available
8. Water tap
14. Water drain
3. Cold water button
9. Water collector
15. Condenser
4. Top cover
10. Door
16. Water drain
5. Heating lamp
11. Heating switch
17. Water inlet
6. Cooling lamp
12. Cooling switch
(Front)
(Rear)

7
Please read this instruction manual carefully before operating the unit to ensure safety and proper
usage. Pay attention to the entire sign in either pictures or written explanation.
1. Open the top of the cardboard, take out the foam and accessories. Unpack the product and install
the water collector
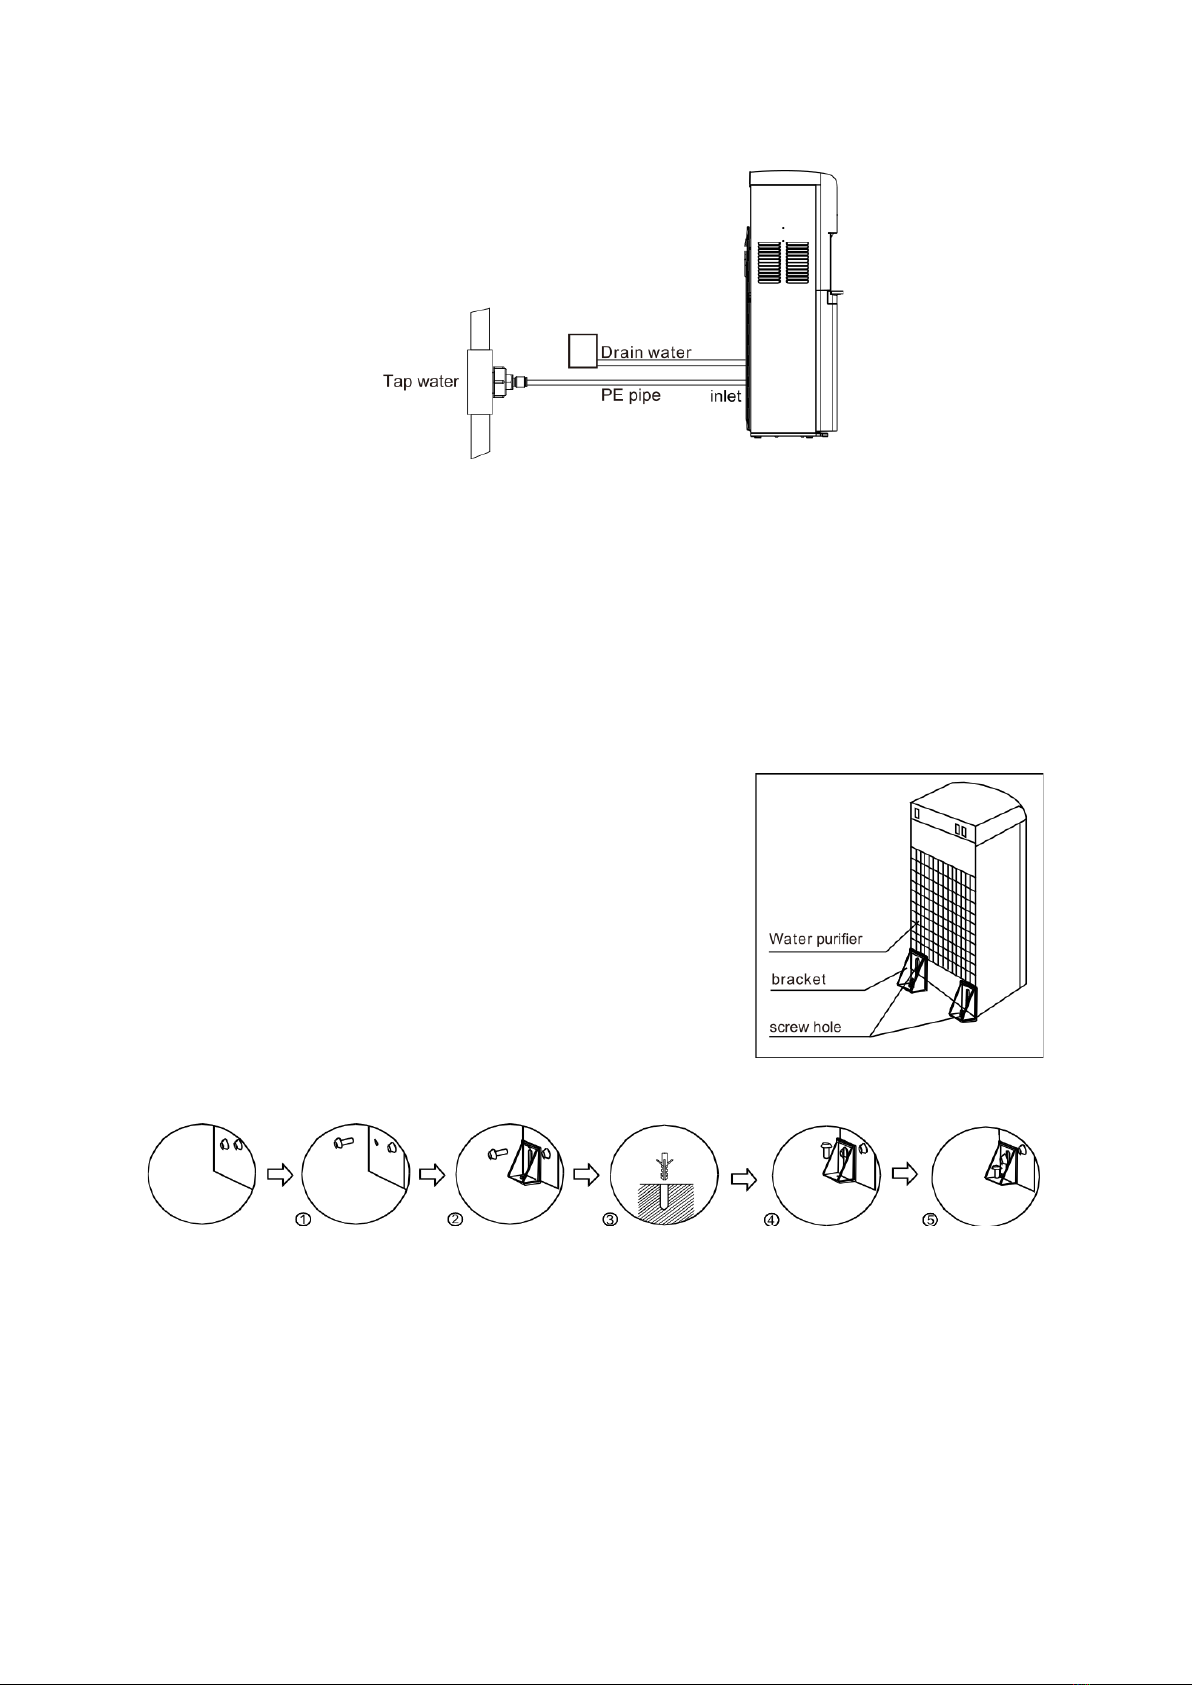
2. Place the product on a flat and stable surface. Provide a minimum of 25 cm distance on each side
from the wall.
3. Leave the product for 1 hour to stabilize the refrigerant in the cooling system
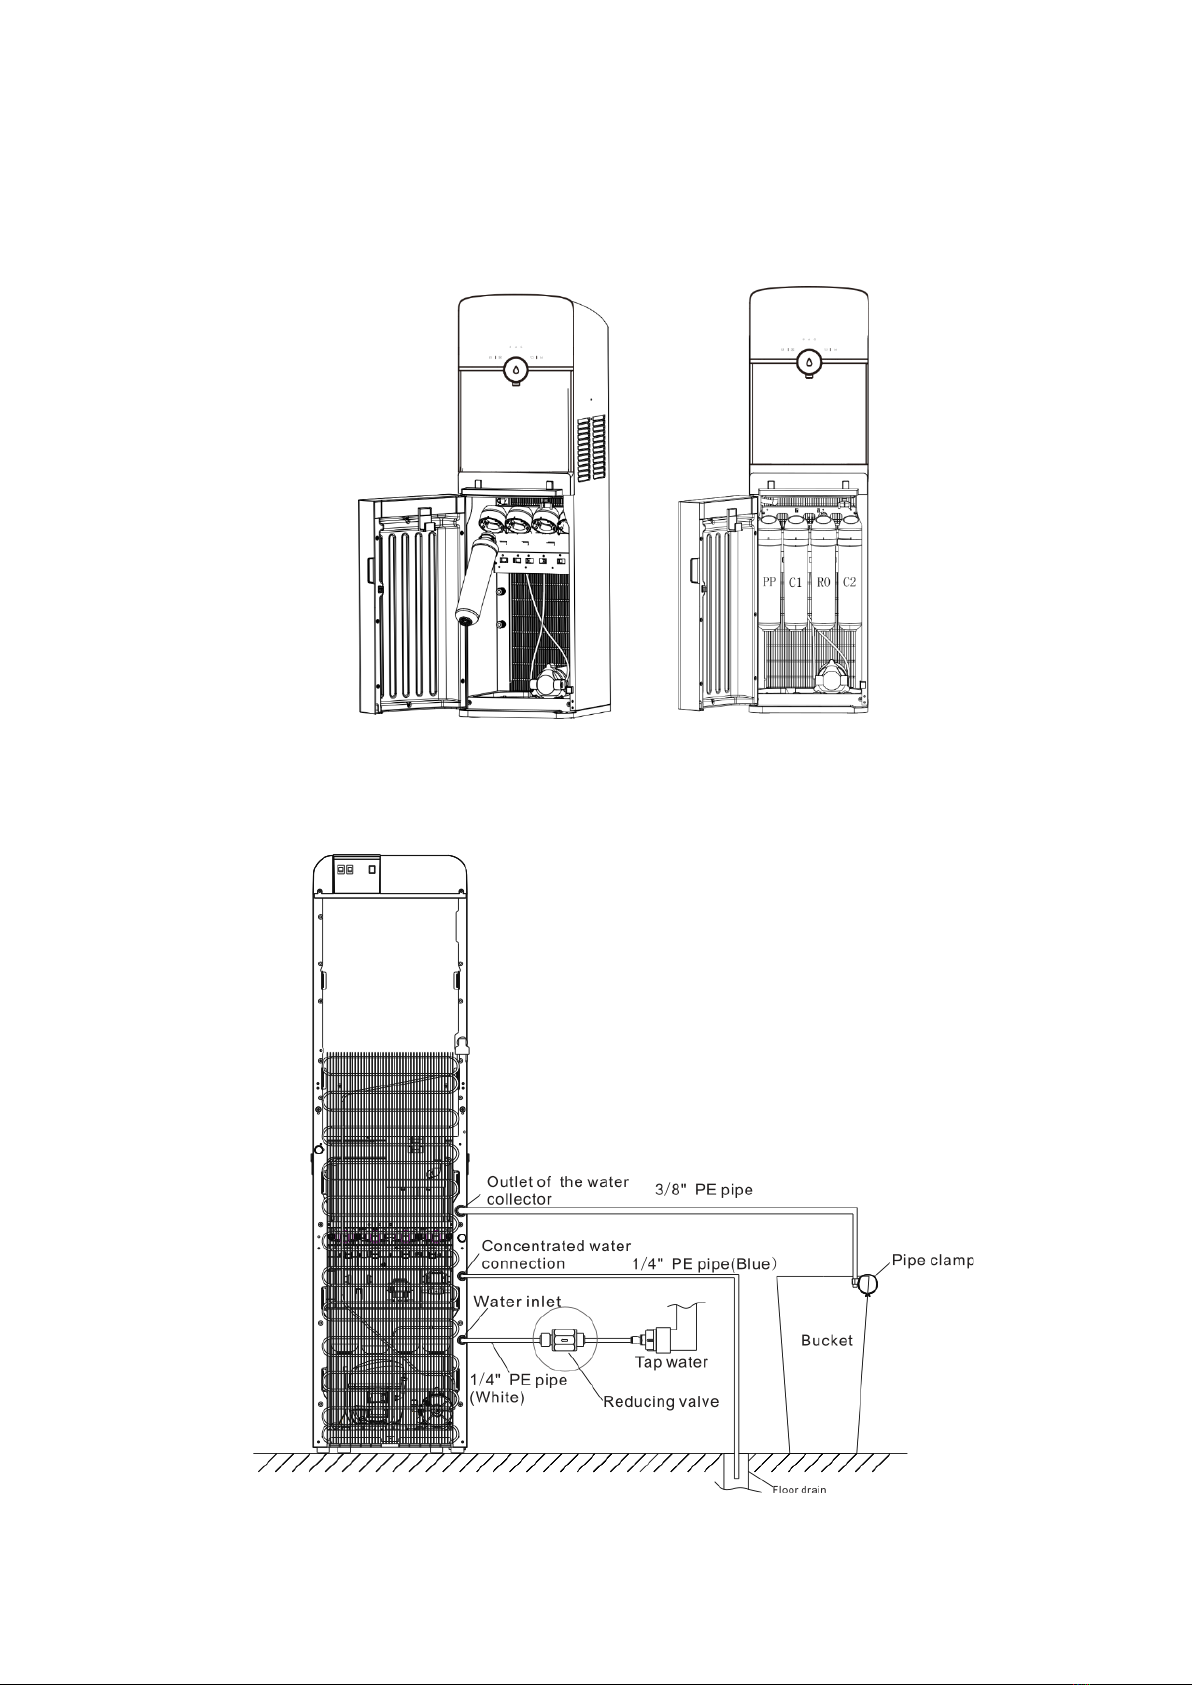
4. Take out the quick joint and connector and install it on the water pipe
5. Use the accessory (filter flushing tip) to clean the filter. Insert the PE pipe to the quick joint. The
arrows represent the water flow direction.
6. Insert Filter#2 C1 (active carbon) to the filter housing, tighten it by turning it counterclockwise and
open the water tap to flush the filter until it doesn’t discharge black water for about 10 minutes. Take
the same step to flush Filter#4 C4 (active carbon).
Part 2: Installation

8
7. Install all filters into the product. Hold the filter in your left hand and filter housing in your right hand,
insert it upwards and tighten it by turning it counterclockwise. The filter installation order is:
Filter#1 PP → Filter#2 C1 → Filter#3 RO → Filter#4 C2
8. Take out the pin of the quick joint at the rear of the product, and then take out the white plug (see
picture below)
RO 9115

9
RO 8115 & RO 8101
9. Insert the PE to the pipe water inlet quick joint and tighten it.
10. When installing or replacing the filters, make sure that the product is turned off and disconnected
from power source.
11. Plug the cable to power socket. Ensure that the plug is properly grounded to prevent electrical
failure. Turn on the heating and cooling switch located at the back of the product.
12. After everything is installed, wait for 2 hours for cooling and 15 minutes for heating of water before
consuming.
To prevent the product from swaying or falling, you can install
brackets accordingly.
1. Loosen the screw on the left and right at the bottom rear of the
product as shown in the picture below
2. Install the bracket on the left and right side
3. Make a hole on the surface where the product is installed
4. Fix the bracket with screw
5. Tighten the screw

10
ATTENTION!
1. This product is designed for indoor use only
2. Ensure that the filters and pipes are properly installed and the door is tightly closed
3. Avoid installing the product on a damp, wet area, and on places with bad electrical
installation. This can result in electrical shock and fire.
4. Do not place flammable materials near the product
5. Do not place the product under direct sunlight or rain because it can reduce product
performance and electrical hazard
6. Do not turn on the heating switch when there is no water inside the water tank or when
there is no water running.
7. Do not modify or extend the power cord because it can cause short circuit and fire
8. Do not touch the back of the product or condenser to prevent electric shock

11
RO 9115 Control Panel:
Remark
Description
UV
UV lamp inside the tank is operating
Purifying
Product is purifying the water
Hot
Heating process is complete
Heating
Heating process is in progress
Cold
Cooling process is complete
Cooling
Cooling process is in progress
Full
Water inside the tank is sufficient
Shortage
Water inside the tank is empty
PP / C’ / RO / C”
If the lamp of each filters are blinking, the filter must be replaced
Healthy Drinking Days
Shows the amount of days since the product is turned on
To reset the count, turn of the product and disconnect it from the power
source for ±2 weeks
How to Use RO 9115:
1. Touch the cold water button , cold water will be dispensed and touch it again to stop dispensing
2. Touch the ambient water button , normal water will be dispensed and touch it again to stop
dispensing
Part 3: How to Use

12
3. Touch the child lock button , then touch the hot water button , hot water will be dispensed.
Touch the hot water button again to stop dispensing
4. Touch the cold water button and ambient water button together for 3 seconds to enter the
filter reset mode. Indicator lamp for the first filter will turn on and the percentage of filter life is
displayed on the lower right of the display. Touch the cold water button for 3 seconds to reset
the filter and the filter life will reset to 100. Touch the cold water button again to switch to another
filter. Touch the cold water button again to exit filter reset mode.
Display Panel RO 8115:
Remark
Description
Heating Lamp
Lamp will turn on when heating process is in progress and will turn
off when completed
Cooling Lamp
Lamp will turn on when cooling process is in progress and will turn
off when completed
Filter Change Lamp
Lamp will blink/flash when the filter needs to be replaced. Contact
the call center for filter replacement.
Hot water button
Hot water selection button
Cold water button
Cold water selection button
Big volume button
Big volume select button
Hot water: ±400 mL / Cold water: ±500 mL
Small volume button
Small volume select button
Hot water: ±200 mL / Cold water: ±250 mL
Water button
Dispense water button
How to Use RO 8115:
Hot water
1. When heating lamp is off, place the glass under the water tap
2. Touch the hot water button , then touch the water button to dispense hot water. Touch the
water button again to stop dispensing
3. Touch the big volume button and hot water button to dispense hot water for ±400 mL
4. Touch the big volume button and hot water button to dispense hot water for ±200 mL
Cold water
1. When the cooling lamp is off, place the glass under the water tap
2. Touch the cold water button , then touch the water button to dispense cold water. Touch the
water button again to stop dispensing
3. Touch the big volume button and cold water button to dispense cold water for ±500 mL
4. Touch the small volume button and cold water button to dispense cold water for ±250 mL

13
RO 8101 Display Panel:
From top to bottom:
Lamp
Description
Heating
Lamp will turn on when heating process is in progress and will turn off
when completed
Cooling
Lamp will turn on when cooling process is in progress and will turn off
when completed
Filter Change
Lamp will blink/flash when the filter needs to be replaced. Contact the call
center for filter replacement.
How to Use RO 8101
The buttons are located on top of the product.
1. Push the hot water button on the left to dispense hot water
2. Push the cold water button on the right to dispense cold water
Note: The middle button on model RO 8101 is not available to use
1. For your safety, always disconnect the plug from the power source before maintenance, cleaning,
and draining.
2. This product has been sterilized before leaving the factory
3. Pipes, water tanks, and heating elements need to be cleaned once a year. Contact the call center
to schedule this maintenance. This will maintain the product in good condition and prolong its
lifetime. Do not attempt to disassemble the product on your own to prevent unwanted damage.
4. Use a soft damp cloth to clean the surface. Use a soft dry cloth to dry. Do not let the water enter
the product.
5. If the product will not be used for a long time, unplug the cable from the power socket and drain the
water inside the water tank.
6. Do not use volatile chemical substances to clean the product.
Filter Replacement Cycle
Filter#1 PP
Filter#2 C1
Filter#3 RO
Filter#4 C2
6 months
6 months
12 months
12 months
Remarks:
•The data above is only for reference. The filter lifetime stated above is based on 10 L water
consumption per day. The filter replacement cycle can vary according to the local water quality and
actual water consumption.
•If you do not know which filter that needs to be replaced, please contact the call center to schedule
filter replacement.
Part 4: Maintenance

14
a. Place the product in an even and stable surface. Avoid damp areas.
Provide a minimum of 20 cm distance from the wall. Do not place
flammable materials near the product
b. To avoid damaging the product, do not connect the power or turn on the
heating switch when the water tank is empty or when there is no water
flow
c. If the product will not be used for a long time, unplug the cable from the
power socket and drain the waters inside the water tank.
d. 6. Do not use volatile chemical substances to clean the product. Use a
soft cloth to clean the product.
e. Do not unplug by pulling the cable, pull the plug. Always unplug with dry
hands
f. Do not put the product horizontally and do not incline more than 45° angle
to prevent damage to the compressors.
g. The thermostat on the product has been adjusted from factory. Do not
attemp to modify the thermostat to prevent damage
Part 5: Precaution Action

15
h. This product is designed for adults. Do not allow children to play with the
appliance or let them hang on the door. The unit might fall and cause
harm. The product is not intended for use by people with reduced physical,
sensory, or mental capabilities or lack of experience with similar products
unless given supervision or instruction concerning the use of the
appliance by a qualified person.
If there is damage to the power cord immediately contact the
MODENA call center for replacement. Replacing the power cord
must be done by personnel with experience and understanding of
electricity. Never replace the power cord by yourself, due to the
dangers that could lead to harm to you and the others.
Attention!
•This symbol indicates that waste electrical and electronic products (WEEE)
should be disposed of separately from the municipal waste stream.
•Old electrical products can contain hazardous substances. Thus, correct
disposal of your old appliance will help to prevent potential negative
consequences for the environment and human health. Your old appliance may
contain reusable parts that could be used to repair other products, and other
valuable materials that can be recycled to conserve limited resources.
•You can take your appliance either to the shop where you purchased the
product, or contact your local government waste office for details of your nearest
authorized WEEE collection point.

16
Please inspect the following problem and symptoms before contacting the call center:
Problem
Possible Cause
Recommended Action
Water is not hot nor cold
•Excessive use of hot/cold
water during short period of
time
•Product is unplugged
•Wait until the
heating/cooling process
is complete
•Plug the cable to the
power socket
Water is not dispensed from
water tap
•Low water pressure
•Filter is not replaced, beyond
the service time
•Check booster pump or
water inlet
•Please contact the call
center for filter
replacement
Water leakage
•Pipe not connected properly
•Water pipe/PE pipe breaks
•Check the pipe for
proper connection
•Replace the PE pipe
*RO 8115 “ ” lamp flashes
*RO 8101, all 4 lamps flashes
•PCB error
•Contact the call center
•Check the PCB on the
base plate. Repair the
machine/dry the PCB
and then turn it on again
Loud noise
•Improper placement or
installation
•Install on a flat and
stable surface
*RO 9115
Display E0
•Water leakage
•Contact the call center
*RO 9115
Display Ec, Ed
•Water level switch failure
•Contact the call center
*RO 9115
Display Fc, E7
•Abnormal heating function
•Abnormal temperature
sensor
•Contact the call center
*RO 9115
Display E6 “
•Water pressure is too low
•Filters needs replacement
•Contact the call center
Part 6: Problem & Solution

17
* Specifications of this appliance may change without notice to improve the quality of the product. The pictures in
this manual are schematic and may not exactly match your product. Values stated on the machine labels or in the
documentation accompanying it are obtained in laboratory in accordance with the relevant standards. Depending
on operational and environmental conditions of the appliance, values may vary
MODEL
RO 8101
RO 8115
RO 9115
Type
Hot & Cold
Hot & Cold
Hot, Normal &
Cold
Lower compartment
Filter storage
Filter storage
Filter storage
Color
Black
Black
White
Hot water output (Liter/hour)
4
4
7.5
Cold water output(Liter/hour)
2
2
4
Hot water capacity (Liter)
1.16
1.16
2
Cold water capacity (Liter)
3.6
3.6
5
High temperature (°C)
≥90
≥90
≥85
Cold temperature (°C)
≤10
≤10
≤10
CFC Free compressor
Yes
Yes
Yes
Thermostat
Yes
Yes
Yes
Water tank material
SUS 304
SUS 304
SUS 304
Heating Power Input (Watt)
384
384
874
Cooling Power Input (Watt)
100
100
120
Product Dimension (L x W x H) mm
310 x 370 x 1040
310 x 370 x 1050
360 x 460 x 1400
Product weight (Kg)
18
19
31.5
Part 7: Specification

11/20
Other manuals for Igienico Series
2
This manual suits for next models
3
Table of contents
Other Modena Water Filtration System manuals