Modena WE 1310 BGWH User manual

User
Manual Book
Water Filtration
WE 1310 BGWH


3
TABLE OF CONTENT
Part 1: Safety Information 4
Precautions 4
Environmental Notice 5
Part 2: Name of Parts 6
Part 3: Quick Start Guide 8
Installation 8
Filter Bypass Mode 9
How to Use 10
Part 4: Maintenance 10
Cleaning and Maintenance 10
Part 5: Troubleshooting 11
Part 6: Specification 12
This guide book explains everything you need to know about your new
product. Please contact our Customer Care should you need further
assistance through www.modena.com.

4
Read the user manual book carefully!
•Do not try to install or turn on the unit without having read the
indicated safety precautions in this manual.
•The dispenser heats water to a temperature of 90°C. It can cause
severe scalding. Please operate it carefully.
•Do not disassemble the electrical parts of this appliance. Any repairs
done by an unauthorized person may cause serious injuries or
properties incident.
•The adult should supervise the children in order to make sure the
children can not play with the appliance.
•The appliance is not intended for use by persons(including children)
with reduced physical, sensory or mental capabilities, or lack of
experience and knowledge, unless they have been given supervision
or instruction concerning use of the appliance by a person
responsible for their safety.
•This appliance is intended to be household use only. Usage outside
the intended use or excessive use may void the warranty.
•Do not modify the power cord. If the power cord is damaged, it must
be replaced by technician with a replacement cable according to the
appliance specification
•To avoid danger of suffocation, keep plastic bag away from babies
and children.
Precautions
•Destroy the carton, plastic bag and other packing materials after the
dispenser is unpacked. Children might use them for play.
•Children require supervision when using the dispenser
•If available, it is recommended to install the anti-tilt bracket at the
back side of this water dispenser to prevent the dispenser from
falling down which could cause injury.
•Plug the water dispenser directly into the socket and ensure secure
connection
•The unit requires proper grounding and the correct voltage
•An appropriate length of power cord is provided to reduce the risks
of becoming entangled in, or tripping over a longer cord.
PART 1: SAFETY INFORMATION

5
•Do not use an extension cord or plug adaptor. Failure may cause
electric shock or risk of fire
•Choose a place that is near a grounded electrical socket. Keep the
dispenser at least 20 cm away from walls and other appliances and
furniture on all 4 sides.
•Do not place the water dispenser sitting over the power cord.
•Do not pull out or insert the plug with wet hands to avoid electric
shock.
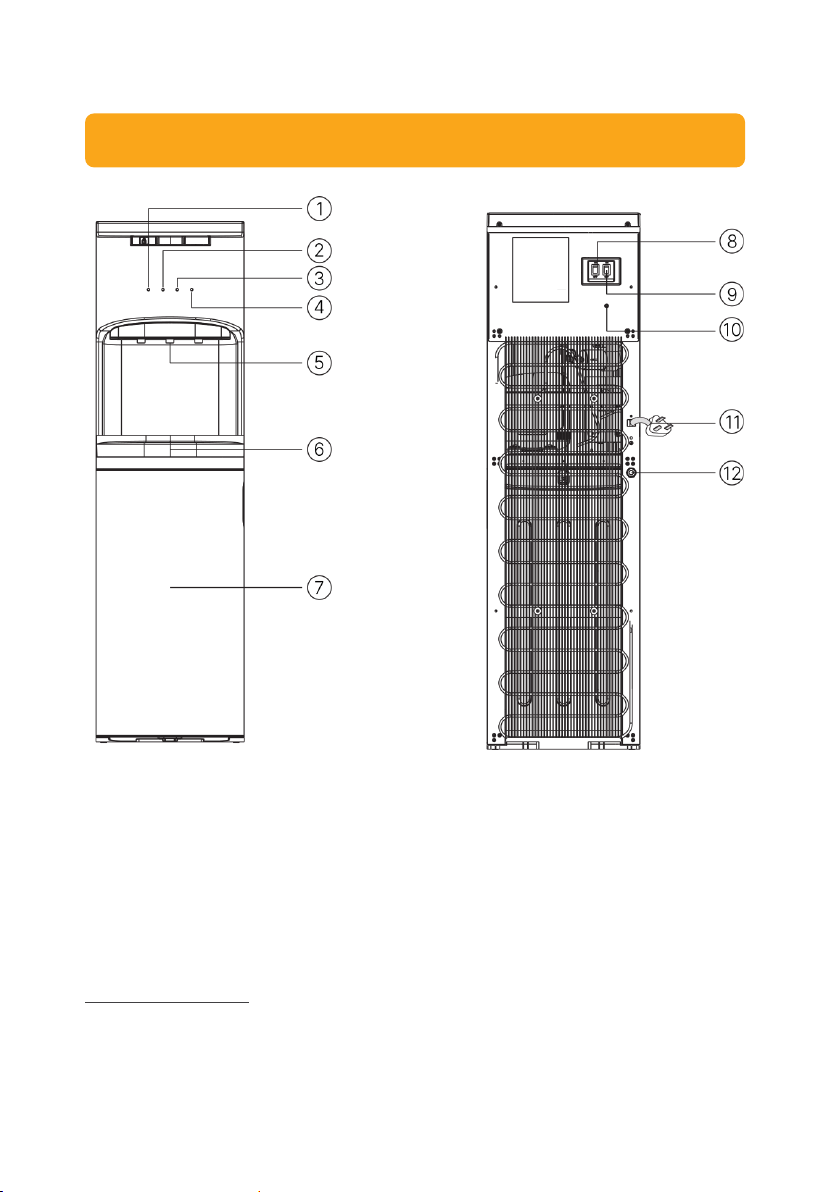
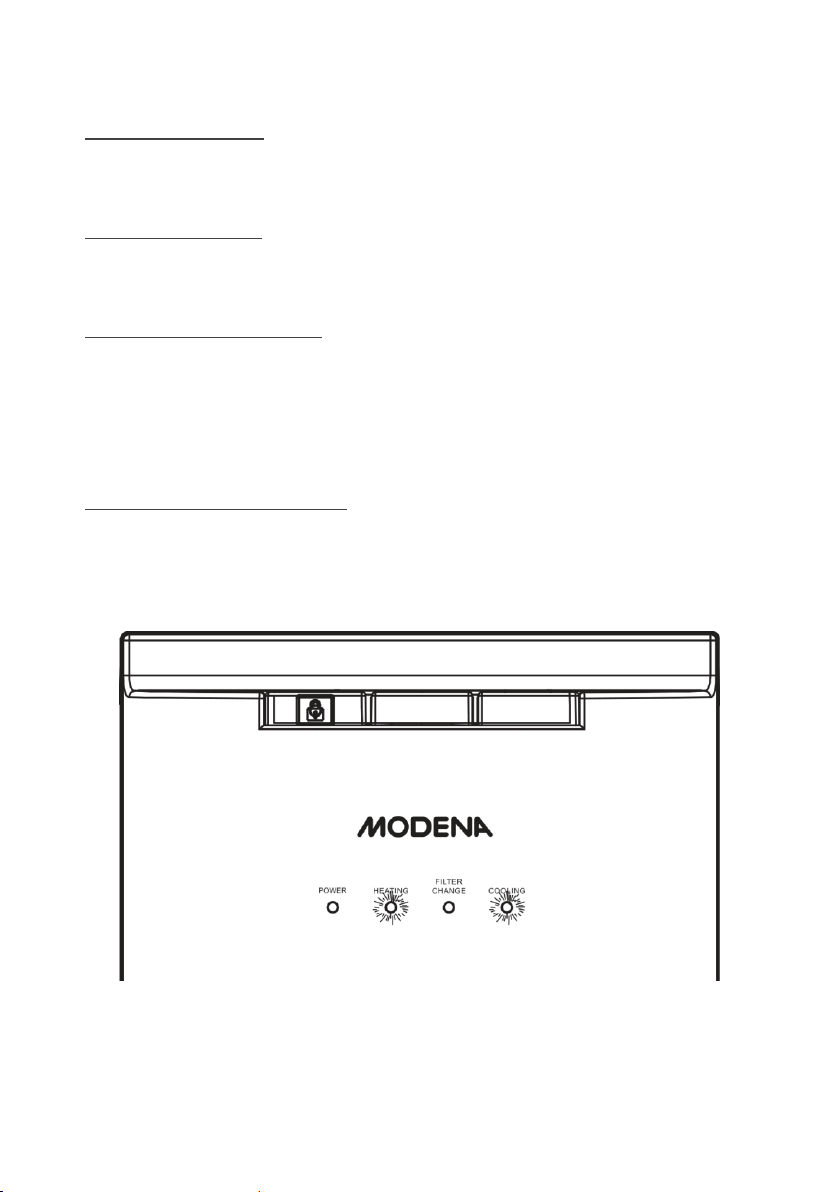
•Use the switch when turning the heating/cooling On/Off. Located on
the back side of water dispenser.
•Do not fasten, twist or tie the power cord. if the power cord is
damaged, it should be replaced by the manufacturer, service
technician or a qualified person to prevent any risk.
•Keep the unit in a dry place and away from direct sunlight. Do not
place the machine on paper or foam. Do not place anything
flammable beside this machine.
•To avoid damage to the unit, do not plug the power cord or turn on
the heating switch until the water can flow out from the hot water
spout when the hot water button be activated.
•Unplug the unit when the unit will not be used for a long period for
the reason of saving electricity.
•Never turn the unit upside down or tilt it more than 45°
•Never use organic liquids polishing chemical to clean the machine.
•The thermostat to control temperature has been set up by
manufacturer. There is no need to adjust it yourself.
Environmental Notice
The packaging material used is recyclable. We recommend
that you separate plastic, paper and cardboard and give
them to recycling agents. To help preserve the environment,
the refrigerant used in this product is R134a
(Hydrofluorocarbon - HFC), which does not affect the ozone
layer and has little impact on the greenhouse effect.
According to WEEE (Waste of Electrical and Electronic Equipment)
guidelines, waste from electrical and electronic devices should be
collected separately. If you need to remove of this appliance in the
future, do not throw it away with the rest of your domestic garbage.
Instead, please take the appliance to the nearest WEEE collecting
agents, where available.

6
Note:
1. Power indicator
2. Heating indicator
3. Filter Change indicator
4. Cooling indicator
5. Water Taps
6. Water Tray
7. Door
8. Cooling switch
9. Heating switch
10. Filter reset switch
11. Power cord
12. Tank drain valve
Power Indicator
The light will turn on when the water dispenser is plugged in.
PART 2: NAME OF PARTS

7
Heating Indicator
This light will turn on when the water is heating and will turn off when it
has reached the correct temperature of 95℃ .
Cooling Indicator
This light will turn on when the water is cooling and will turn off when it
has reached the correct temperature of 4℃ .
Filter Change Indicator
When the cumulative power on time of the dispenser reaches 6 months,
the filter change indicator will flash to remind the filters replacement.
After replacing these two filters, press and hold the black filter reset
switch on the back side behind the top cover for 2 seconds and then
release it, and the filter element light will stop flashing.
Water Shortage Indicator
When there is no water supply because the water in the bottle is empty
for 5 minutes, the heating and cooling lights will flash at the same time.
Please open the door and replace with new water bottle, and then close
the door.

8
Installation
1. Before first use, leave the appliance for 1 hour to stabilize the
refrigerant
2. The default mode from factory is with water filtration mode
3. Install the pipe to the water bottle and install the cover to the bottle
tip.
4. Insert the bottle into the bottom cabinet and close the door
5. Plug the power cord into the power socket. Make sure that the power
source is properly grounded to prevent current leakage. Turn on the
switch in the back of the appliance
6. For first use, the inside of the appliance must be cleaned. Press the
hot and cold water button. Make sure the water is dispensed from
PART 3: QUICK START GUIDE

9
the tap. After the water is dispensed, wait for 20 minutes and remove
the water bottle from the cabinet and drain the water from the unit
by opening the drain water hole cover. Ensure that the power cord
is unplugged when draining the water.
7. If the water is empty, turn of the heating switch before replacing the
bottle with a new one
8. If the Filter Change Indicator is flashing, replace the filter. Filters
must be changed periodically to ensure good performance and
water quality
#1 UF Filter
6-8 months
#2 ACF Filter
6-8 months
Filter Bypass Mode
When the service life of the filter has ended or if you do not want to use
the filters, the blue PE hose can be connected with the white PE hose
according to the figure. The product can be used normally without the
filter.
White PE hose
Blue PE hose
Hose Removal:
Press the tip joint and pull out the hose
to remove it from the fitting
Hose Installation:
Press the hose into the fitting all the way
down and make sure the connection is
tight by pulling the hose slightly

10
How to Use
Dispensing hot water:
1. Position the bottle, glass, pitcher, or cooking pot below the spout
2. Slide the child lock button while pressing the hot water button
3. Release the button once the desired level is achieved
Dispensing normal water:
1. Position the bottle, glass, pitcher, or cooking pot below the spout
2. Press the normal water button
3. Release the button once the desired level is achieved
Dispensing cold water:
1. Position the bottle, glass, pitcher, or cooking pot below the spout
2. Press the cold water button
3. Release the button once the desired level is achieved
Cleaning & Maintenance
1. Ensure the power cord is unplugged before performing cleaning and
maintenance activity
2. Dispense the water from the unit until it’s empty
3. Place a big bucket under the water drain hole on the back of the unit,
unplug the drain cover and empty the remaining water from the tank
4. After it is completely dry, close the drain water cover.
WARNING!
The dispenser heats the water temperature up to 90°C. This can
cause severe burns or scalding. Use it carefully!
PART 4: MAINTENANCE

11
Before contacting service center, check the following table:
Problem
Possible Cause
Recommended Action
Dispenser is not working
Power plug is plugged
incorrectly
Switch is in OFF condition
Ensure the dispenser is
properly plugged into the
power socket and the
switch is turned ON.
The water is not hot or
cold
•Hot or cold water is
dispensed
exccessively in a
short time
•The unit is not
plugged
•Wait for a few
minutes until the
water is hot or cold
•Plug the power cord
into the power
socket and turn on
the heating/cooling
switch
Water is not being
dispensed from water tap
•Water bottle is empty
•The pipe is clogged
•Replace the water
bottle with a new one
•Turn of the switch for
4 hours and then turn
the switch back ON
Loud noise
•Improper installation
•Compressor is
operation
•Pump is operating
•Ensure that the unit
is placed in an even
and stable surface
•The compressor may
produce sound when
operating which is
normal
•The pump may
produce sound when
operating which is
normal
PART 5: TROUBLESHOOTING

12
Model
WE 1310 BGWH
Color
White
Type
Water Filtration
Tank & pipe material
SUS 304
Hot water
2.2 L/hr (≥90°C)
Cold water
2.5 L/hr (≤10°C)
Special feature
Double Filtration
(UF+ACF)
Refrigerant
R134a
Heating power input (Watt)
190
Cooling rated current (Ampere)
1.0
Rated voltage
220-240V~50/60Hz
Product dimension (W×D×H)(mm)
310×360×1090
Product weight (kg)
14
Design and specification can change without prior notice to improve the quality of the
product. The illustration in this manual is schematic and can be different with your actual
product. The values on label or in other documents are according to laboratory test and
relevant standards. Values can vary depending on the actual operational and
environmental condition of the product.
PART 6: SPECIFICATION

08/22
PT MODENA INDONESIA
Jl. Industri Raya I Blok D-8,
Jatiuwung, Tangerang 15135
Table of contents
Other Modena Water Filtration System manuals