manuals.online logo
Brands
  1. Home
  2. •
  3. Brands
  4. •
  5. Moeller
  6. •
  7. Gateway
  8. •
  9. Moeller EASY223-SWIRE User manual

Moeller EASY223-SWIRE User manual

Other Moeller Gateway manuals

Moeller CM4-505-GV1 User manual

Moeller

Moeller CM4-505-GV1 User manual

Moeller SmartWire SWIRE-GW-DP Parts list manual

Moeller

Moeller SmartWire SWIRE-GW-DP Parts list manual

Popular Gateway manuals by other brands

Telecom FM onestream gfx Programming guide

Telecom FM

Telecom FM onestream gfx Programming guide

UfiSpace LoRa GPE810U Quick setup guide

UfiSpace

UfiSpace LoRa GPE810U Quick setup guide

Merak MMk-736F Quick setup guide

Merak

Merak MMk-736F Quick setup guide

Robustel R3010 user guide

Robustel

Robustel R3010 user guide

turck BL20-PG-EN-V3 user manual

turck

turck BL20-PG-EN-V3 user manual

IBM Security Web Gateway Appliance quick start guide

IBM

IBM Security Web Gateway Appliance quick start guide

SSS Siedle Smart Gateway Commissioning instructions

SSS Siedle

SSS Siedle Smart Gateway Commissioning instructions

ADTRAN 424RG Installation

ADTRAN

ADTRAN 424RG Installation

Chorus Hyperfibre XGS-250WX-A user guide

Chorus

Chorus Hyperfibre XGS-250WX-A user guide

Dragino G308 user manual

Dragino

Dragino G308 user manual

Data Domain DD690g Installation and setup guide

Data Domain

Data Domain DD690g Installation and setup guide

Raritan Laptop Release notes

Raritan

Raritan Laptop Release notes

Haivision Torpedo quick start guide

Haivision

Haivision Torpedo quick start guide

ATCOM AG-268 user manual

ATCOM

ATCOM AG-268 user manual

LST M500RFE-AS Specification sheet

LST

LST M500RFE-AS Specification sheet

Vega VEGA BS-3 user manual

Vega

Vega VEGA BS-3 user manual

Kinnex Media Gateway quick start guide

Kinnex

Kinnex Media Gateway quick start guide

2N Telekomunikace 2N StarGate user manual

2N Telekomunikace

2N Telekomunikace 2N StarGate user manual

manuals.online logo
manuals.online logoBrands
  • About & Mission
  • Contact us
  • Privacy Policy
  • Terms and Conditions

Copyright 2025 Manuals.Online. All Rights Reserved.

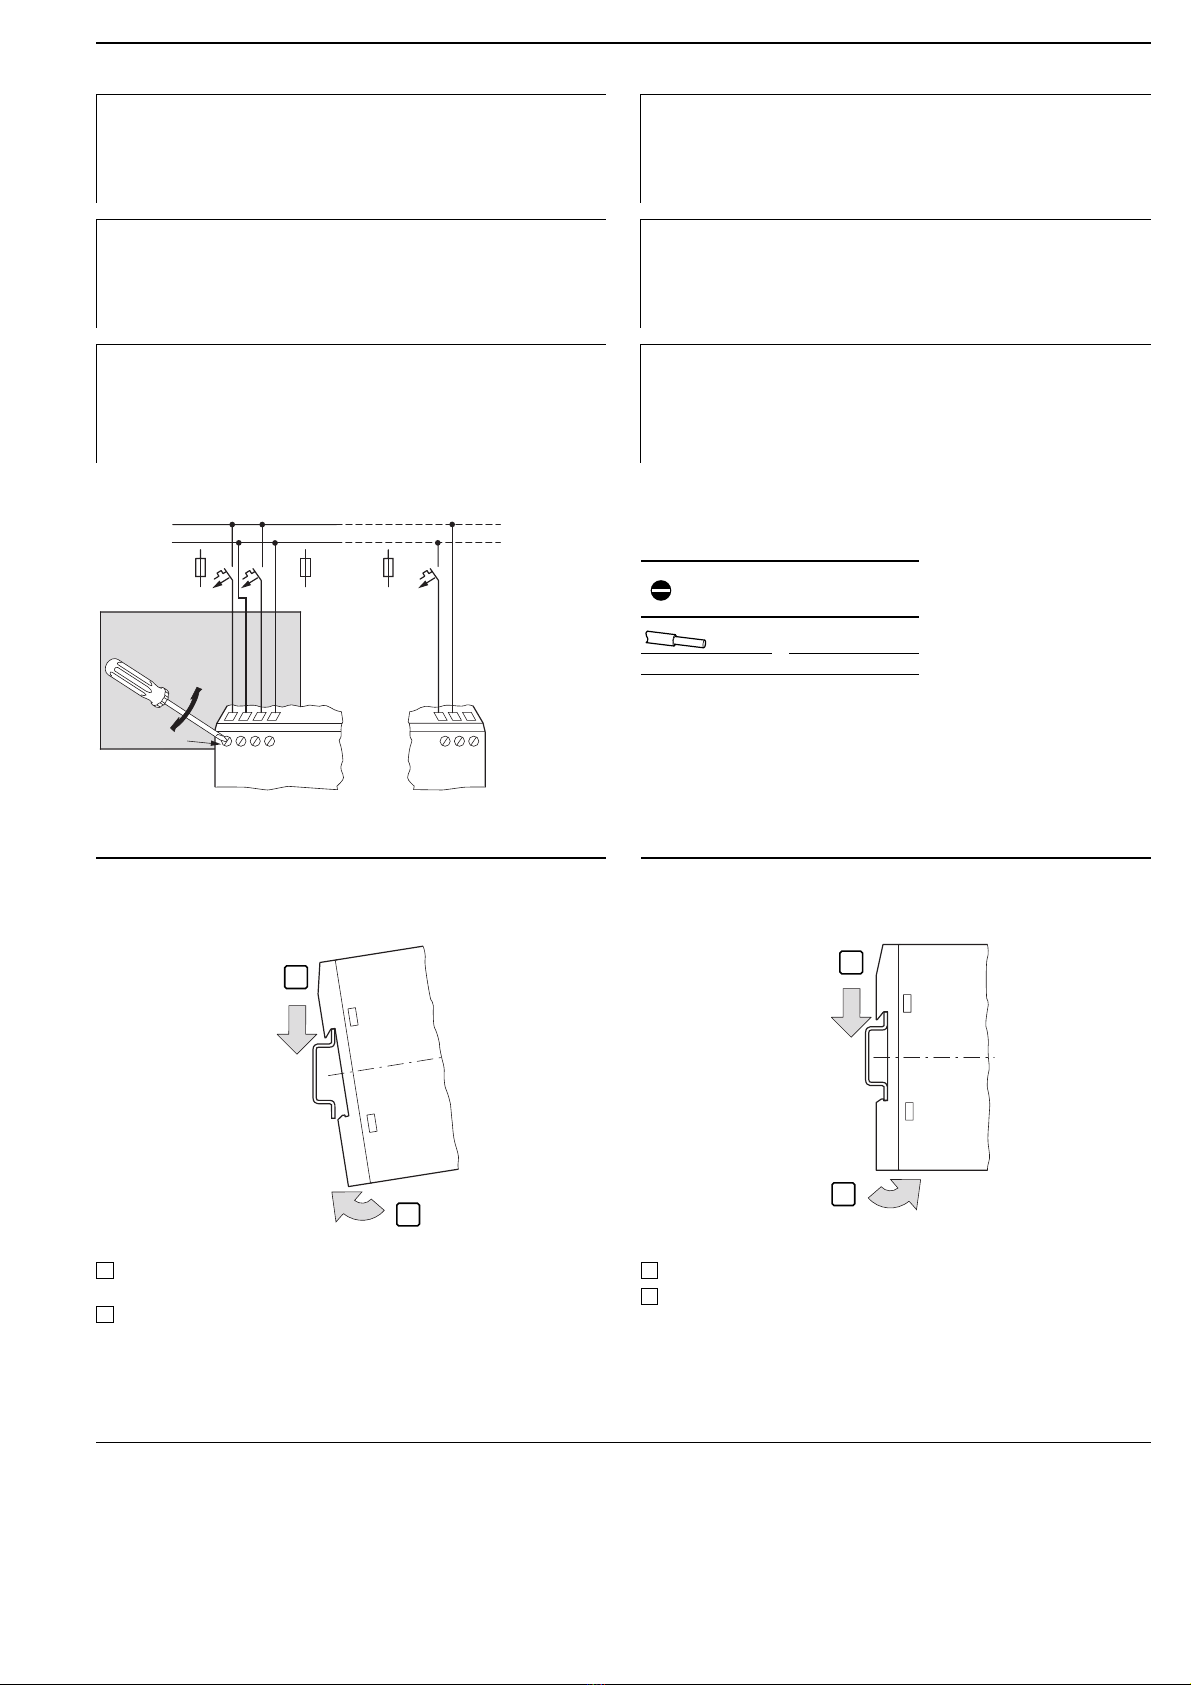
Lebensgefahr durch elektrischen Strom!
Nur Elektrofachkräfte und elektrotechnisch
unterwiesene Personen dürfen die im Folgen-
den beschriebenen Arbeiten ausführen.
Vor Montage/Demontage Steuerspannung abschalten!
Electric current! Danger to life!
Only skilled or instructed persons may carry out the
following operations.
Switch off the control voltage before fitting/removal!
Tension électrique dangereuse !
Seules les personnes qualifiées et averties doivent
exécuter les travaux ci-après. Couper la tension de
commande avant le montage/démontage !
Tensione elettrica: Pericolo di morte!
Solo persone abilitate e qualificate possono eseguire
le operazioni di seguito riportate.
Prima del montaggio/smontaggio, disinserire la
tensione di comando!
Prąd elektryczny! Zagrożenie życia!
Poniższe czynnosci mogą być wykonywane
tylko przez przeszkolony personel.
Wyłącz napięcie sterownicze przed wykonaniem
montażu/demontażu
Электрический ток! Опасно для жизни!
Только специалисты или проинструктированные
лица могут выполнять следующие операции.
Перед монтажом и демонтажем обязательно
отключить напряжение
1/12
A
12/06 AWA2528+1251-2355
Montageanweisung
Installation Instructions
Notice d’installation
Istruzioni per il montaggio
Instrukcja montażu
Инструкция по монтажу
EASY223-SWIRE
AAWB2528+1251-1589…
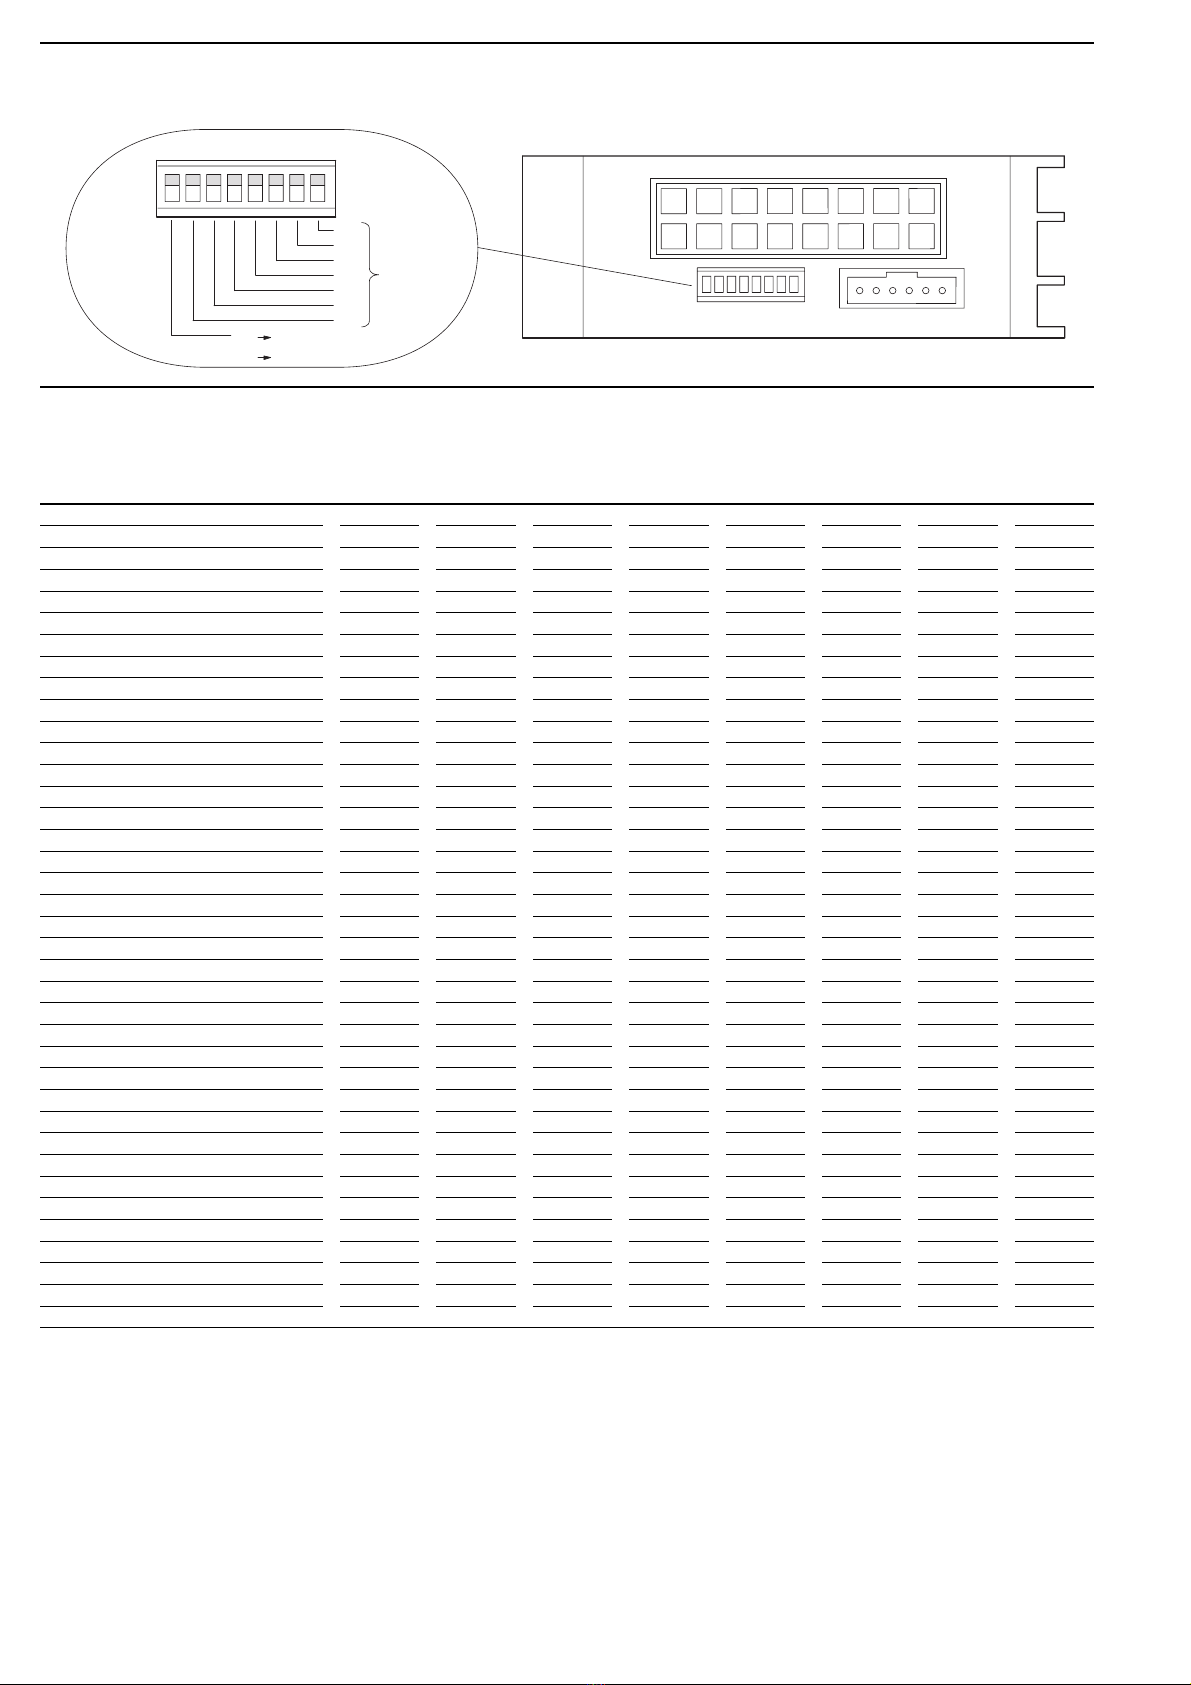
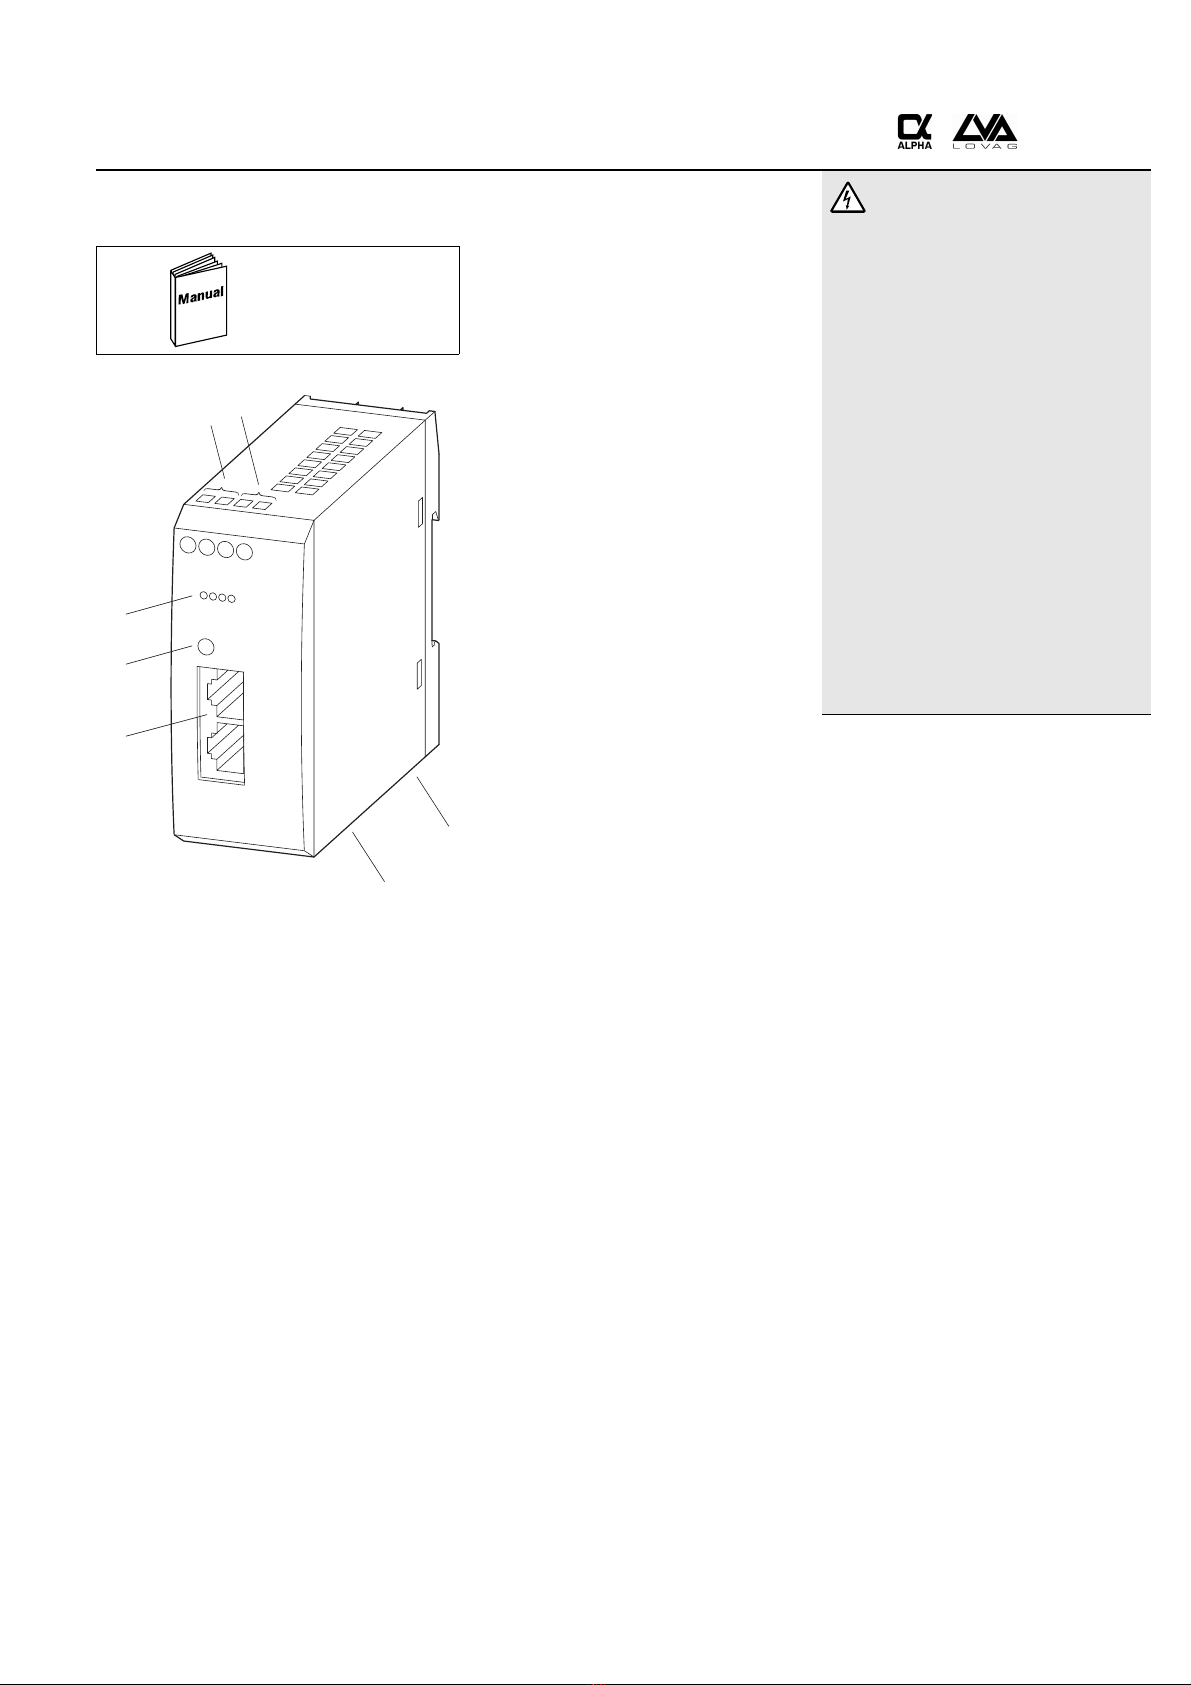
aAnschlussklemmen Gateway, 24 V DC für das Gateway
bAnschlussklemmen AUX, 24 V DC für die Schützspulen
cBuchse Out für SmartWire-Verbindungskabel 6-polig
dDIP-Schalter Betriebsart und Adresskodierung (siehe Tabelle)
eRJ-45-Buchsen Bus In und Bus Out, für easyNet-/CANopen-Anschluss
fKonfigurationstaste Config:
Mit der Konfigurationstaste erstellen Sie die SmartWire-Sollkonfiguration.
Drücken Sie die Config-Taste bis die Ready-LED schnell zu blinken beginnt
(ca. 1 sec.) Dann können Sie die Config-Taste loslassen.
gStatus LEDs (von links): Ready, U-AUX, Bus, SmartWire
aMorsetti di collegamento gateway, 24 V DC per il gateway
bMorsetti di collegamento AUX, 24 V DC per le bobine del contattore
cPresa out per cavo di collegamento SmartWire a 6 poli
dInterruttore DIP Modalità di funzionamento e codificazione indirizzo (vedere tabella)
ePresa RJ-45 bus in e bus out, per collegamento easyNet/CANopen
fTasto di configurazione Config:
Con il tasto di configurazione si attiva la configurazione standard SmartWire.
Premere il tasto Config finché il LED Ready inizia a lampeggiare velocemente
(1 sec. ca.). Quindi si può rilasciare il tasto Config.
gLED di stato (da sinistra): Ready, U-AUX, bus, SmartWire
aGateway terminals, 24 V DC for gateway
bAUX terminals, 24 V DC for contactor coils
cOut socket for SmartWire connection cable 6-pole
dDIP switch operating mode and address coding (see table)
eRJ-45 sockets Bus In and Bus Out, for easyNet/CANopen connection
fConfiguration key Config:
Create the SmartWire setpoint configuration via the configuration key.
Press the Config key until the Ready LED starts flashing quickly (approx. 1 sec.).
Then release the Config key.
gStatus LEDs (from left): Ready, U-AUX, Bus, SmartWire
aZaciski Gateway, 24 V DC dla Gateway
bZaciski pomocnicze AUX, 24 V DC dla cewek styczników
cGniazdo wyjsciowe dla 6-biegunowego kabla łączeniowego SmartWire
dPrzełącznik DIP trybu pracy i adresowania (patrz tabela)
eGniazdo RJ-45 Buswejsciowe i wyjsciowe, dla przyłączenia easyNet/CANopen
fPrzycisk konfiguracyjny Config:
Za pomocą przycisku konfiguracyjnego utwórz konfigurację dla setpoint SmartWire.
Wcisnij przycisk konfiguracyjny aż dioda LED-Ready zacznie szybko błyskać (ok.1s.)
Nastepnie zwolnij przycisk konfiguracyjny.
gDiody LED statusu (od lewej): Ready, U-AUX, Bus, SmartWire
aBornes passerelle, 24 V CC
bBornes AUX, 24 V CC pour les bobines contacteur
cPrise femelle de sortie pour câble de connexion SmartWire 6 pôles
dSélecteur DIP mode de fonctionnement et codage d’adresses (voir tableau)
ePrises femelle RJ-45 bus d’entrée et bus de sortie, pour connexion easyNet/CANopen
fBouton de configuration Config :
Pour réaliser la configuration de consigne SmartWire. Appuyer sur le bouton
Config jusqu’au clignotement rapide de la DEL Ready (1 sec. env.).
Relâcher ensuite le bouton.
gDEL d’état (de gauche) : Ready, U-AUX, Bus, SmartWire
aТерминалы обмена данными, 24 В постоянного тока для шлюза
bТерминалы AUX, 24 В постоянного тока для обмоток контактора
cВыходной разъем для соединительного кабеля SmartWire, 6-полюсн.
dDIP-переключатель рабочих режимов и адресного кодирования (см. табл.)
eРазъемы RJ-45 для входной и выходной шины, для быстрого открытого
соединения easyNet/CANopen
fКлавиша конфигурации Config:
Конфигурация заданной величины SmartWire создается с помощью
клавиши конфигурации. Нажмите клавишу Config и удерживайте ее,
пока светодиод Ready не начнет быстро мигать (примерно 1 с).
Затем отпустите клавишу Config.
gСветодиоды состояния (слева направо): Ready (Готов), U-AUX,
Bus (Шина), SmartWire
a
e
d
c
b
f
g
2/12
12/06 AWA2528+1251-2355
Einstellung CANopen-Adresse und Betriebsart – Setting CANopen address and operating mode – Réglage de l’adresse CANopen
etdu mode de fonctionnement – Impostazione indirizzo CANopen e modalità di funzionamento– Nastawy CANopen-
adresy i tryb pracy – Настройкаадреса и рабочегорежима CANopen
Betriebsart/Adresse
Operating mode/address
Mode de fonctionnement/Adresse
Modalità di funzionamento/indirizzo
Tryb pracy/adres
Рабочий режим/адрес
easyNet
CANopen
(1)
64
(2)
32
(3)
16
(4)
8
(5)
4
(6)
2
(7)
1
(8)
easyNet 0xxxxxxx
CAN 1xxxxxxx
2 10000010
3 10000011
4 10000100
5 10000101
6 10000110
7 10000111
8 10001000
9 10001001
10 10001010
11 10001011
12 10001100
13 10001101
14 10001110
15 10001111
16 10010000
… 1 …………………
… 1 …………………
111 11101111
112 11110000
113 11110001
114 11110010
115 11110011
116 11110100
117 11110101
118 11110110
119 11110111
120 11111000
121 11111001
122 10101111
123 11111011
124 11111100
125 11111101
126 11111110
127 11111111
127 #(0) 0 0 000000
127 #(1) 0 0 000001
1 = ON, 0 = OFF, 1…64 = Adresseinstellung, (n) DIP-Einzelschalter Nummerierung
# (0/1) die Adresseinstellungen 0 und 1 werden vom EASY223-SWIRE als 127 gewertet.
1 = ON, 0 = OFF, 1…64 = address setting, (n) DIP single switch numbering
# (0/1) the address settings 0 and 1 are evaluated as 127 by the EASY223-SWIRE.
1 = ON, 0 = OFF, 1…64 = réglage d’adresse, (n) numérotation chaque sélecteur DIP
# (0/1) les réglages d’adresses 0 et 1 sont analysés par EASY223-SWIRE comme 127.
1 = ON, 0 = OFF, 1…64 = impostazione indirizzo, numerazione interruttore singolo (n) DIP
# (0/1) le impostazioni di indirizzo 0 e 1 sono valutate da EASY223-SWIRE come 127.
1 = ON, 0 = OFF, 1...64 = wybó adresów, (n) pojedynczy przełącznik numerujący DIP
# (0/1)nastawy adresu 0 i1 są przetwarzane przez EASY223-SWIREna 127 .
1 = ON (ВКЛ), 0 = OFF (ВЫКЛ), 1…64 = настройка адреса, (n) номер одного DIP-переключателя
# (0/1) настройки адреса 0 и 1 оцениваются как 127 с помощью EASY223-SWIRE.
off easyNet
on CANopen
off
on
1
1
2
4
8Node-
address
16
32
64
2345678
3/12
12/06 AWA2528+1251-2355
Anschlüsse – Connections – Connexions – Collegamenti – Przyłącza – Соединения
Spannungsversorgung – Power supply – Tension d’alimentation – Tensionedi alimentazione – Napięcie zasilania – Питание
Einbaulage – Mounting position– Positiondemontage – Posizione di montaggio– Pozycja montażu –Положение установки
senkrecht – vertical– verticale – verticale – pionowa – верт.
hGateway, Aux und optional verwendete SmartWire-Power-Module SWIRE-PF
müssen – einzeln abgesichert – aus einer 24-V-DC-Spannungsquelle versorgt
werden!
Sicherheitsvorkehrungen (NOT-AUS) in der äußeren Aux-Beschaltung des
EASY223-SWIRE und SWIRE-PF vornehmen.
hI moduli SmartWire Power SWIRE-PF utilizzati come gateway, aux e
opzionali – singolarmente assicurati – devono essere alimentati da una
sorgente di tensione di 24 V DC!
Effettuare le misure di sicurezza (arresto d’emergenza) nel circuito aux
esterno del EASY223-SWIRE e del SWIRE-PF.
hGateway, Aux and optionally used SmartWire power module SWIRE-PF must
be supplied by one 24 V DC power supply unit, but individually protected
against short-circuit !
Carry out safety measures (EMERGENCY STOP) in the external Aux circuit
of the EASY223-SWIRE and SWIRE-PF.
hGateway, Aux i opcjonalny moduł zasilający SmartWire SWIRE-PF
muszą być zasilane z jednego zasilacza 24 V DC, ale indywidualnie zabezpieczone
przed zwarciem!
Zrealizować srodki bezpieczeństwa (Emergency Stop) w zewnętrznych obwodach
pomocniczych Aux urządzeń EASY223-SWIRE iSWIRE-PF.
hPasserelle, AUX et modules d’alimentation SmartWire SWIRE-PF utilisés en
option doivent – protégés individuellement – être alimentés par une source
de tension 24 V CC !
Prendre les mesures de sécurité (ARRET D’URGENCE) en circuit Aux externe
de l’ EASY223-SWIRE et SWIRE-PF.
hШлюз, Aux (Вспом.) и опциональный модуль питания SmartWire
SWIRE-PF должны питаться от одного источника 24 В постоянного
тока и иметь индивидуальную защиту от короткого замыкания!
Необходимо принять меры безопасности (АВАРИЙНОЕ
ОТКЛЮЧЕНИЕ) для внешнего контура Aux (Вспом.) для
EASY223-SWIRE и SWIRE-PF.
Montage – Fitting – Montaggio – Montaż– Монтаж Demontage – Dismantling – Démontage – Smontaggio –
Demontaż – Демонтаж
aufsetzen – place in position – mettre en place – appoggiare –
osadzić –осадить
rasten– latch in– encliqueter– inserireascatto– zatrzasnąć – зафиксировать
schieben – push – pousser – inserire – docisnąć – задвинуть
abziehen – remove– retirer – estrarre– wysunąć –снять
24V
0.6 x3.5 x100
L01+
L01–
1 A 3A
U
e
= 24 V H
(20.4 – 28.8 V H)
0V24V0V 24V0V 0V
3A
EASY223-SWIRE SWIRE-PF
0.6 Nm
FAZ-Z3FAZ-Z30.6 x3.5 EASY223-SWIRE
AWG22…AWG16
0.5…1.5 mm2
1
2
3
4
1
2
3
4
4/12
12/06 AWA2528+1251-2355
easyNet/CANopen
Anschluss – Connection – Connexion – Collegamento – Przyłączanie –Соединение
Geografischer Ort, Platz
Geographical location, location
Emplacement physique, position
Posizione fisica, posizione utente
Lokalizacja, położenie
Местоположение
Teilnehmeradresse
Slave address
Adresse du participant
Indirizzo utente
Adres Slave
Адрес подчиненного устройства
easyNet (n = 8), CAN (n = 127)
aSteuerung: easy800, MFD-CP8…, EC4-200, XC100/200
bBus: easyNet oder CANopen
cSmartWire-Gateway: EASY223-SWIRE (SmartWire-Master)
dSmartWire-Verbindungskabel: SWIRE-CAB-…
eBusabschlusswiderstand: EASY-NT-R
aControllore: easy800, MFD-CP8…, EC4-200, XC100/200
bBus: easyNet o CANopen
cGateway SmartWire: EASY223-SWIRE (SmartWire master)
dCavo di collegamento SmartWire: SWIRE-CAB-…
eResistenza terminale del bus: EASY-NT-R
aController: easy800, MFD-CP8…, EC4-200, XC100/200
bBus: easyNet or CANopen
cSmartWire gateway: EASY223-SWIRE (SmartWire master)
dSmartWire connection cable: SWIRE-CAB-…
eBus termination resistor: EASY-NT-R
aSterownik: easy800, MFD-CP8, EC4-200, XC100/200
bBus: easyNet lub CANopen
cGateway SmartWire: EASY223-SWIRE (master SmartWire)
dKabel łączeniowy SmartWire: SWIRE-CAB-
eRezystor końcowy: EASY-NT-R
aAutomate : easy800, MFD-CP8…, EC4-200, XC100/200
bBus: easyNet oder CANopen
cPasserelle SmartWire : EASY223-SWIRE (Maître SmartWire)
dCâble de connexion SmartWire : SWIRE-CAB-…
eRésistance de terminaison bus : EASY-NT-R
aКонтроллер: easy800, MFD-CP8…, EC4-200, XC100/200
bШина: easyNet или CANopen
cШлюз SmartWire: EASY223-SWIRE (управляющ. SmartWire)
dСоединительный кабель SmartWire: SWIRE-CAB-…
eСогласующий резистор шины: EASY-NT-R
verbinden –connect –connecter – collegare –połączyć –соед
trennen, entriegeln – disconnect, unlock – sectionner, déverrouiller –
sezionare, sbloccare – rozłączyć ,odblokować –разъед
trennen, herausziehen – disconnect, remove –sectionner, débrocher –
sezionare, rimuovere– rozłączyć, wyciągnąć – удал
Bus-Buchsenbelegung (easyNet und CAN)
Bus socket assignment (easyNet and CAN)
Affectation prise femelle bus (easyNet et CAN)
Disposizione prese bus (easyNet e CAN)
Przyporządkowanie gniazda (easyNet iCAN)
Назначение разъема шины (easyNet иCAN)
Busabschluss (easyNet und CAN)
Bus termination (easyNet and CAN)
Terminaison bus (easyNet et CAN)
Terminale bus (easyNet e CAN)
Zakończenie sieci (easyNet iCAN)
Оконцовка шины (easyNet иCAN)
CANopen-Schnittstelle nach CIA Spezifikation DS301V4.0
CANopen interface to CIA specification DS301V4.0
Interface CANopen selon specification CIA DS301V4.0
Interfaccia CANopen secondo la specifica CIA DS301V4.0
Złącze CANopen według specyfikacji CIA DS301V4.0
Интерфейс CANopen по спецификации CIA DS301V4.0
Erster und letzter Platz mit EASY-NT-R
First and last location with EASY-NT-R
Première et dernière positions avec EASY-NT-R
Prima ed ultima posizione con EASY-NT-R
Pierwsze i ostatnie miejsce za pomocą EASY-NT-R
Первое и последнее местоположение с EASY-NT-R
n
1
1
e
e
2
2
c
3
3
n
cc
ddd
a
b
1
2
3
1
2
3
Bus
In
Bus
Out
1 8 1 8
1(E)CAN_H
2(E)CAN_L
3 GND (Ground)
4 SELECT_IN
1(E)CAN_H
2(E)CAN_L
3 GND (Ground)
4 SELECT_OUT
5/12
12/06 AWA2528+1251-2355
Anschluss SmartWire-Bus
Connection SmartWire-Bus
Connexion bus SmartWire
Collegamento bus SmartWire
Przyłączanie SmartWire-Bus
Соединительная шина SmartWire-Bus
aSmartWire-Gateway: EASY223-SWIRE (SmartWire-Master)
bSmartWire-Verbindungskabel: SWIRE-CAB-…
cSmartWire-Modul, z. B. SWIRE-DIL
dSmartWire-Power-Modul: SWIRE-PF
(kein SmartWire-Teilnehmer, nur Spannungsversorgung)
eSmartWire-Abschlussstecker: SWIRE-CAB-000
aGateway SmartWire: EASY223-SWIRE (SmartWire master)
bCavo di collegamento SmartWire: SWIRE-CAB-…
cModulo SmartWire, ad es. SWIRE-DIL
dModulo SmartWire Power: SWIRE-PF
(nessun utente SmartWire, solo alimentazione)
eSpina terminale SmartWire: SWIRE-CAB-…
aSmartWire gateway: EASY223-SWIRE (SmartWire Master)
bSmartWire connection cable: SWIRE-CAB-…
cSmartWire module, e.g. SWIRE-DIL
dSmartWire power module: SWIRE-PF (no SmartWire station, only power supply)
eSmartWire termination connector: SWIRE-CAB-000
aGateway SmartWire: EASY223-SWIRE(master SmartWire)
bKabel łączeniowy SmartWire: SWIRE-CAB-
cModuł SmartWire, np. SWIRE-DIL
dModuł zasilający Power SmartWire: SWIRE-PF
(bez żadnej stacji SmartWire, tylko zasilacz)
eZacisk łączący SmartWire: SWIRE-CAB-000
aPasserelle SmartWire : EASY223-SWIRE (Maître SmartWire)
bCâble de connexion SmartWire : SWIRE-CAB-…
cModule SmartWire, par exemple SWIRE-DIL
dModule d’alimentation SmartWire : SWIRE-PF
(sans participant SmartWire, tension d’alimentation uniquement)
eConnecteur de terminaison SmartWire : SWIRE-CAB-000
aШлюз SmartWire-Gateway: EASY223-SWIRE (управляющ. SmartWire)
bСоединительный кабель SmartWire: SWIRE-CAB-…
cМодуль SmartWire, напр. SWIRE-DIL
dБлок питания SmartWire: SWIRE-PF
(без станции SmartWire, только питание)
eОконечный разъем SmartWire: SWIRE-CAB-000
verbinden – connect–connecter –collegare – połączyć –соед
trennen, herausziehen – disconnect, remove – sectionner, débrocher –
sezionare, rimuovere – rozłączyć, wysunąć – удал
1234141516
cde
easyNet/CAN
b
a
1
2
1
2
6/12
12/06 AWA2528+1251-2355
CAN-Schirmerdung – Screen earth CAN – Mise à la terre du blindage CAN – Collegamento alla terra dello schermo CAN –
Uziemianie ekranu CAN – CAN Заземлениеэкрана
Adressierung – Addressing– Adressage – Indirizzamento– Adresowanie –Адрес
easyNet
Erstinbetriebnahme mit einem einzelnen EASY223-SWIRE als NET-Teilnehmer – Initialcommissioning with a single EASY223-SWIRE as NET station –
Première mise en service avec un seul EASY223-SWIRE comme participant NET – Prima messa in servizio con un singolo EASY223-SWIREcome utente NET –
Pierwsze uruchomienie EASY223-SWIRE jako stacji w sieci NET– Начальный запускс однойEASY223-SWIRE в качестве станции NET
Adressierung über den bereits konfiguriertenTeilnehmer 1. Voraussetzung: Teilnehmer 1 ist imBetriebszustand STOP.
Addressing via the already configured station 1. Requirement: station 1 is in operating status STOP.
Adressage via le participant 1 déjà configuré. Condition : Le participant 1 est en état d’ARRET.
Indirizzamento all’utente 1 già configurato. Premessa: l’utente 1 è nello stato di funzionamento STOP.
Adresowanie przez już skonfigurowaną stację 1. Wymaganie: stacja 1 jest w trybie Stop.
Адресация через уже сконфигурированную станцию 1. Требование: станция 1 имеет рабочее состояние STOP.
Sondermenü easy800, MFD-CP8… und EC4-200 – Special menu easy800, MFD-CP8… and EC4-200 – Menu spécial easy800, MFD-CP8… et EC4-200 –
Menu speciale easy800, MFD-CP8… e EC4-200 – Menu specjalne easy800, MFD-CP8… iEC4-200 – Специальноеменюeasy800, MFD-CP8…и EC4-200
afür Hutschiene – for top-hat rail – pour profilé-support – per guida –
na szynie montażowej DIN – для верхней направляющей
bfür Montageplatte – for mounting plate – pour platine de montage –
per piastra di montaggio – na płycie montażowej – для монтажной панели
M4
ZB4-102-KS1
ZB4-102-KS1
ZB4-102-KS1
ZB4-102-KS1
FM 4/TS 35
(Weidmüller)
KLBü 3-8 SC
(Weidmüller)
D
NET...
COM...
LINK...
NET-PARAMETER..
TEILNEHMER...
KONFIGURATOR...
SICHERHEIT...
SYSTEM...
MENUESPRACHE...
KONFIGURATOR... 11
202
30
40
50
60
70
80
Pos.
usw.
NET-ID
KONFIGURIEREN? KONFIGUARTION
WIRD
AUSGEFUEHRT.
NET-PARAMETER..
TEILNEHMER...
KONFIGURATOR...
GB
NET...
COM...
LINK...
NET-PARAMETERS...
STATION...
CONFIGURATOR...
SECURITY...
SYSTEM...
MENU LANGUAGE..
CONFIGURATOR... 11
202
30
40
50
60
70
80
Pos.
etc.
NET-ID
CONFIGURE? CONFIGUARTION
IN
PROGRESS.
NET-PARAMETERS...
STATION...
CONFIGURATOR...
7/12
12/06 AWA2528+1251-2355
Änderung der Master-ID und Zustandsanzeige der SmartWire-Ein-/Ausgangs-Operanden
Modification of the master ID and status display of the SmartWire On/Off operands
Modification ID maître et affichage d’état des opérandes SmartWire entrée/sortie
Modifica del ID master e dell’indicazione di stato degli operandi iningresso/uscita SmartWire
Zmiana ID urządzenia Master i statusu wyswietlania stanów On/Off SmartWire
Модификация управляющего ID и дисплея состояния операнд SmartWire On/Off (Вкл/Выкл)
aMFD-CP8-NT im Terminalmodus
beasy800, MFD-CP8-NT, EC4-200 mit NET-ID 1
cLogische Verbindung zum EASY223-SWIRE über easyNet und Teilnehmer 1
aMFD-CP8-NT nella modalità terminale
beasy800, MFD-CP8-NT, EC4-200 con NET-ID 1
cCollegamento logico a EASY223-SWIRE attraverso easyNet e utente 1
aMFD-CP8-NT in terminal mode
beasy800, MFD-CP8-NT, EC4-200 with NET-ID 1
cLogical connection with EASY223-SWIRE via easyNet and station 1
aMFD-CP8-NT w trybie pracy terminala
beasy800, MFD-CP8-NT, EC4-200 zNET-ID 1
cPołączenie logiczne z EASY223-SWIRE za pomocą easyNet i stacji 1
aMFD-CP8-NT en mode terminal
beasy800, MFD-CP8-NT, EC4-200 avec NET-ID 1
cLiaison logique vers EASY223-SWIRE via easyNet et participant 1
aMFD-CP8-NT врежиме терминала
beasy800, MFD-CP8-NT, EC4-200 с NET-ID 1
cЛогическое соединение с EASY223-SWIRE через easyNet и станцией 1
D
Rollup-Dialog
„Verbindung“
Gerät =
Gerät NT X
Kommunikations-
Ansicht
Verbindung =
Online
Rollup-Dialog
„Anzeige“
Display & Tasten
NT X = NET-ID EASY223-SWIRE, z.B./e.g./p.ex./ad es./np./например:4
EASY-SOFT-PRO
TEILNEHMER ID: X
BAUDRATE: 9600B
COM...
MENUESPRACHE...
BELEUCHTUNG: 60%
KONTRAST: +2
COM...
MENUESPRACHE...
BELEUCHTUNG: 60%
KONTRAST: +2
OK ESC *
MFD-CP4-800
TEILNEHMER ID: X
STARTE MODUS
PARAMETER
STELLE UHR...
INFORMATION...
TERMINALMODUS...
TERMINALMODUS...
Verbindung
wird
hergestellt...
OK OK
ID: X = NET-ID EASY223-SWIRE, z. B./e.g./p.ex./ad es./np./например:4
MFD-CP8-NT
STOP å RUN
INFORMATION...
MENUE-SPRACHE...
NET...
SWIRE-DIAG:
.2345678910111213141516
NT4 ID...5678 RUN
NET-ID: 4
BAUDRATE: 500
BUSDELAY: 0
MASTER-ID: 3
OK
STOP RUN å
INFORMATION...
MENUE-SPRACHE...
NET...
NEUE PARAMETER !
SICHERN: Æ
æOK ESC
1SI.2.. SQ.. SD.
2SI.... SQ.. SD.
3SI.... SQ.. SD.
4SI.... SQ.. SD.
Zustandsanzeige der SmartWire-Ein-/Ausgangs-Operanden
Status display of theSmartWireOn/Off operands
Affichage d’état des opérandes SmartWire entrée/sortie
Indicazione di stato degli operandi in ingresso/uscita SmartWire
Status wyswietlania stanów On/Off SmartWire
Дисплей состояния операнд SmartWire On/Off (Вкл/Выкл)
ESC ESC
NET-ID 1
a
b
c c
OK
ESC
OK
8/12
12/06 AWA2528+1251-2355
aMFD-CP8-NT im Terminalmodus
beasy800, MFD-CP8-NT, EC4-200 mit NET-ID 1
cLogische Verbindung zum EASY223-SWIRE über easyNet und Teilnehmer 1
aMFD-CP8-NT nella modalità terminale
beasy800, MFD-CP8-NT, EC4-200 con NET-ID 1
cCollegamento logico a EASY223-SWIRE attraverso easyNet e utente 1
aMFD-CP8-NT in terminal mode
beasy800, MFD-CP8-NT, EC4-200 with NET-ID 1
cLogical connection with EASY223-SWIRE via easyNet and station 1
aMFD-CP8-NT w trybie pracy terminala
beasy800, MFD-CP8-NT, EC4-200 zNET-ID 1
cPołączenie logiczne z EASY223-SWIRE za pomocą easyNet i stacji 1
aMFD-CP8-NT en mode terminal
beasy800, MFD-CP8-NT, EC4-200 avec NET-ID 1
cLiaison logique vers EASY223-SWIRE via easyNet et participant 1
aMFD-CP8-NTв режиме терминала
beasy800, MFD-CP8-NT, EC4-200 с NET-ID 1
cЛогическое соединение с EASY223-SWIRE через easyNet и станцией 1
GB
NET-ID 1
a
b
c c
Rollup Dialog
„Connection“
Device =
Device NT X
Communikation
View
Connection =
Online
Rollup Dialog
„Display“
Display & Buttons
NT X = NET-ID EASY223-SWIRE, z.B./e.g./p.ex./ad es./np./например:4
EASY-SOFT-PRO
STATION-ID: X
BAUDRATE: 9600B
COM...
MENUE LANGUAGE..
LIGHTING: 60%
CONTRAST: +2
COM...
MENUE LANGUAGE..
LIGHTING: 60%
CONTRAST: +2
OK ESC *
MFD-CP4-800
STATION ID: X
START MODE
PARAMETER
SET CLOCK...
INFORMATION...
TERMINAL MODE...
TERMINAL MODE...
Connection
establishment
in progress...
OK OK
ID: X = NET-ID EASY223-SWIRE, z. B./e.g./p.ex./ad es./np./например:4
MFD-CP8-NT
STOP å RUN
INFORMATION...
MENUE LANGUAGE..
NET...
SWIRE-DIAG:
.2345678910111213141516
NT4 ID...5678 BUSY
NET-ID: 4
BAUDRATE: 500
BUSDELAY: 0
MASTER-ID: 3
OK
STOP RUN å
INFORMATION...
MENUE LANGUAGE..
NET...
NEW PARAMETERS !
ACTIVATE Æ
æOK ESC
1SI.2.. SQ.. SD.
2SI.... SQ.. SD.
3SI.... SQ.. SD.
4SI.... SQ.. SD.
Zustandsanzeige der SmartWire-Ein-/Ausgangs-Operanden
Status display of the SmartWire On/Off operands
Affichage d’état des opérandes SmartWire entrée/sortie
Indicazione di stato degli operandi in ingresso/uscita SmartWire
Status wyswietlania stanów On/Off SmartWire
Дисплей состояния операнд SmartWire On/Off (Вкл/Выкл)
ESC ESC
OK
ESC
OK
9/12
12/06 AWA2528+1251-2355
Erstinbetriebnahme als CANopen -Teilnehmer – Initial commissioning as CANopen station – Première mise en service comme
participantCANopen – Prima messa in servizio come utente CANopen – Pierwsze uruchomienie jako stacji CANopen –
Первый ввод в эксплуатацию станции CANopen
Voreinstellungen des EASY223-SWIRE bei Auslieferung:
– Betriebsart easyNet
– Node-ID = 127
– Schreibzugriff über den CANopen-Master
Software-Voraussetzungen:
– easySoft-CoDeSys ab Version 2.3.5, mit dem aktuellen Service Pack
– EDS-Datei zum EASY223-SWIRE zur Verwendung an einem beliebigen
CANopen-Master
Inbetriebnahmeschritte
1) DIP-Schalter auf Betriebsart CANopen schalten
2) CANopen-Adresse (Node-ID) einstellen (siehe Betriebsart und Adresseinstellung)
3) Geräte verdrahten, CAN-Bus und SmartWire installieren und bei allen Geräten
die Versorgungsspannung anschließen
Preimpostazioni del EASY223-SWIRE alla consegna:
– Modalità di funzionamento easyNet
– Node-ID = 127
– Accesso di scrittura attraverso il master CANopen
Requisiti del software:
– easySoft-CoDeSys dalla versione 2.3.5, con il Service Pack aggiornato
– File EDS per EASY223-SWIRE per l’uso su un qualsiasi master CANopen
Passi per la messa in servizio
1) Azionare il contattore DIP sulla modalità di funzionamento CANopen
2) Impostare l’indirizzo CANopen (Node-ID) (vedere modalità di funzionamento e
impostazione dell’indirizzo)
3) Cablare gli apparecchi, installare CAN-Bus e SmartWire e collegare tutti gli
apparecchi alla tensione di alimentazione
Factory setting of EASY223-SWIRE
– Operating mode easyNet
– Node ID = 127
–Write access via CANopen master
Software requirements:
– easySoft-CoDeSys from Version 2.3.5, with the current service pack
– EDS file for EASY223-SWIRE for use at any CANopen master
Commissioning steps
1) Switch DIP switch to operating mode CANopen
2) Set CANopen address (node ID) (see operating mode and address setting)
3) Wire the devices, install CAN bus and SmartWire and connect all devices
with the power supply
Nastawy fabryczne EASY223-SWIRE:
–Tryb pracy easyNet
–Węzeł ID = 127
–Dostęp do zapisu przez CANopen Master
Wymagania oprogramowania:
–easySoft-CoDeSys od wersji 2.3.5, z aktualnym service pack
–Plik EDS dla EASY223-SWIRE dla zastosowania w dowolnym CANopenMaster
Pasos a seguir para lapuesta en servicio
1)Colocar el interruptor DIP enmodo de funcionamiento CANopen
2)Configurar dirección CANopen (ID nodo) (véase modo de funcionamiento
y configuración dedirección)
3)Cablearaparatos, instalar bus CAN ySmartWire y conectar a todos los aparatos
laalimentación eléctrica
Préréglages de EASY223-SWIRE à la livraison :
– Mode d’exploitation easyNet
– Nœud ID = 127
– Accès d’écriture via le maître CANopen
Conditions logicielles :
– easySoft-CoDeSys à partir de la version 2.3.5, avec le pack service actuel.
– Fichier EDS de EASY223-SWIRE pour utilisation sur un maître CANopen quelconque
Etapes de mise en service :
1) Mettre le sélecteur DIP sur mode d’exploitation CANopen
2) Régler l’adresse CANopen (nœud ID) (voir mode d’exploitation et réglage d’adresse)
3) Connecter les appareils, installer le bus CAN et le SmartWire et raccorder la tension
d’alimentation sur tous les appareils.
Заводская настройка EASY223-SWIRE
– Рабочий режим easyNet
– ID узла = 127
– Доступ для записи через мастер CANopen
Требования к программному обеспечению:
– easySoft-CoDeSys, версия 2.3.5, текущий пакет обновлений
– Файл EDS для EASY223-SWIRE для использования с любым мастером
CANopen
Этапы ввода в эксплуатацию
1) Установите DIP-переключатель в положение рабочего режима CANopen
2) Установите адрес CANopen (ID узла) (см. настройку рабочего
режима и адреса)
3) Подключите проводные соединения, установите шину CAN и SmartWire,
подключите все устройства к источнику питания
10/12
12/06 AWA2528+1251-2355
LED-Status – LED status – DEL d’état– LED di stato– Diody LED-status-Светодиод состояния
Ready-LED
U-AUX-LED
aAUS Keine Spannungsversorgung für das Gateway und die SmartWire-Teilnehmer vorhanden
oder interner Fehler im Gateway.
bGRÜN dauernd Spannungsversorgung und SmartWire-Konfiguration OK, das SmartWire-Gateway und das
zugeordnete, steuernde Gerät mit Schreibzugriff sind im RUN, über easyNet/CAN werden
Nutzdaten ausgetauscht.
cGRÜN blinkend Spannungsversorgung und SmartWire-Konfiguration OK, das SmartWire-Gateway und das
zugeordnete, steuernde Gerät mit Schreibzugriff sind im STOP, über easyNet/CAN werden
Leerdaten ausgetauscht.
dGRÜN schnell blinkend Nach Drücken der Config.-Taste ermittelt das SmartWire-Gateway die Istkonfiguration am
SmartWire-Bus und speichert diese als neue Sollkonfiguration. Mit Beginn des schnellen
Blinkens können Sie die Config.-Taste loslassen.
aOFF No power supply for the gateway and SmartWire stations or internal error in the gateway.
bGREEN permanent Power supply and SmartWire configuration OK, the SmartWire gateway and the assigned
controlling device with write access are in RUN status, user data is exchanged via easyNet/CAN.
cGREEN flashing
Power supply and SmartWire configuration OK, the SmartWire gateway and the assigned
controlling device with write access are in STOP status, blank data is exchanged via easyNet/CAN.
dGREEN fast flashing After pressing the Config key the SmartWire gateway determines the actual configuration at
the SmartWire bus and stores it as the new setpoint configuration. When fast flashing starts,
release the Config key.
aARRET
Absence de tension pour la passerelle et les participants SmartWire ou défaut interne dans passerelle.
bVERT permanent Tension d’alimentation et configuration SmartWire ok, passerelle SmartWire et l’appareil de
commande correspondant avec accès d’écriture en MARCHE, données utilisateur échangées via
easyNet/CAN.
cVERT clignoteur Tension d’alimentation et configuration SmartWire ok, passerelle SmartWire et l’appareil de
commande correspondant avec accès d’écriture en ARRET, données fictives échangées via
easyNet/CAN.
dVERT clignoteur rapide Après actionnement du bouton Config, la passerelle SmartWire détermine la configuration
réelle sur le bus SmartWire et enregistre celle-ci comme nouvelle configuration de consigne.
Dès clignotement rapide, vous pouvez relâcher le bouton Config.
aOFF Nessuna alimentazione disponibile per il gateway e l’utente SmartWire oppure errore interno
nel gateway.
bVERDE costante Alimentazione e configurazione SmartWire OK, il gateway SmartWire e l’apparecchio assegnato
da comandare con accesso discrittura sono in RUN,sueasyNet/CAN sono scambiatidatiutili.
cVERDE lampeggiante Alimentazione e configurazione SmartWire OK, il gateway SmartWire e l’apparecchio assegnato
da comandare con accesso di scrittura sono in STOP, su easyNet/CAN sono scambiati dati vuoti.
dVERDE lampeggiante
velocemente Premendo il tasto Config il gateway SmartWire rileva la configurazione reale sul bus SmartWire
e la memorizza come nuova configurazione standard. Con l’inizio del lampeggiamento veloce
si può rilasciare il tasto Config.
1OFFBrak napięcia zasilania dla gateway i stacji SmartWire lub błąd wewnętrzny w gateway.
bZIELONA ciągła Zasilanie i konfiguracja SmartWire jest OK, SmartWire gateway i przypisane urządzenie sterujące
z dostępem do zapisu są w trybie RUN, dane użytkownika są wymieniane za pomocą
easyNet/CAN.
cZIELONA błyskająca Zasilanie i konfiguracja SmartWire jest OK, SmartWire gateway i przypisane urządzenie sterujące
z dostępem do zapisu są w trybe STOP, za pomocą easyNet/CAN wymieniane są
puste dane.
dZIELONA błyskająca szybko Po wcisnięciu przycisku konfiguracyjnego SmartWire gateway okresla aktualną konfigurację sieci
SmartWire i zachowuje jako setpoint. Kiedy rozpocznie się szybkie błyskanie, zwolnij przycisk
konfiguracyjny.
aВЫКЛ Нет питания шлюза и станций SmartWire, или внутренняя ошибка шлюза.
bЗЕЛЕНЫЙ светодиод
ровно светится Питание и конфигурация SmartWire в порядке, шлюз SmartWire и назначенный
контроллер с доступом записи в состоянии RUN, идет обмен данными пользователя
через easyNet/CAN.
cЗЕЛЕНЫЙ светодиод
мигает Питание и конфигурация SmartWire в порядке, шлюз SmartWire и назначенный
контроллер с доступом записи в состоянии STOP, идет обмен “пустыми” данными
через easyNet/CAN.
dЗЕЛЕНЫЙ светодиод
быстро мигает После нажатия клавиши Config шлюз SmartWire определяет реальную
конфигурацию шины SmartWire и сохраняет ее как новую конфигурацию заданной
величины. Как только светодиод начнет быстро мигать, отпустите клавишу Config.
aAUS Keine Spannungsversorgung für die Schützspulen vorhanden.
bGRÜN Spannungsversorgung OK
aOFF No power supply for the contactor coils.
bGREEN Power supply OK
aARRET Absence de tension pour les bobines de contacteur.
bVERT Tension d’alimentation OK
aOFF Nessuna alimentazione disponibile per le bobine del contattore.
bVERDE Alimentazione OK
aOFFBrak napięcia zasilającego dla cewek styczników.
bZIELONA Napięcie zasilające OK
aВЫКЛ Питание на обмотках контактора отсутствует.
bЗЕЛЕНЫЙ Питание в порядке
d
t
b
t
c
t
a
t
b
t
a
t