Moller Medical Docon7 Multicharger User manual

Docon® 7
Multicharger
10-bay quick charger
Instructions for use
en

IMPORTANT
READ CAREFULLY BEFORE USE
KEEP THESE INSTRUCTIONS FOR FUTURE CONSULTATION
© Möller Medical GmbH
All rights reserved.
No part of this document may be reproduced or translated in any form or by any means without the prior
written permission of Möller Medical GmbH. The latest version of the information, specifications and illustra-
tions providedin theseinstructions for use isindicated bytheversion number onthelast page. Möller Medical
GmbHreserves therighttomake changes tothe technology, functions, specifications, designandinformation
at any time and without prior notification.

Docon7Multicharger
Table of contents
Page 3 of 26
Table of contents
1General safety instructions.......................................................................... 5
Explanation of the safety symbols used ..........................................................5
Symbols used in the instructions for use..........................................5
Symbols on the device..................................................................... 5
Symbols on the retail packaging......................................................5
Explanation of the conventions applied ...........................................................6
Manufacturer's liability.....................................................................................7
Owner's duty of care .......................................................................................7
2Purpose..........................................................................................................9
Proper use - intended use...............................................................................9
Combination with other products.....................................................................9
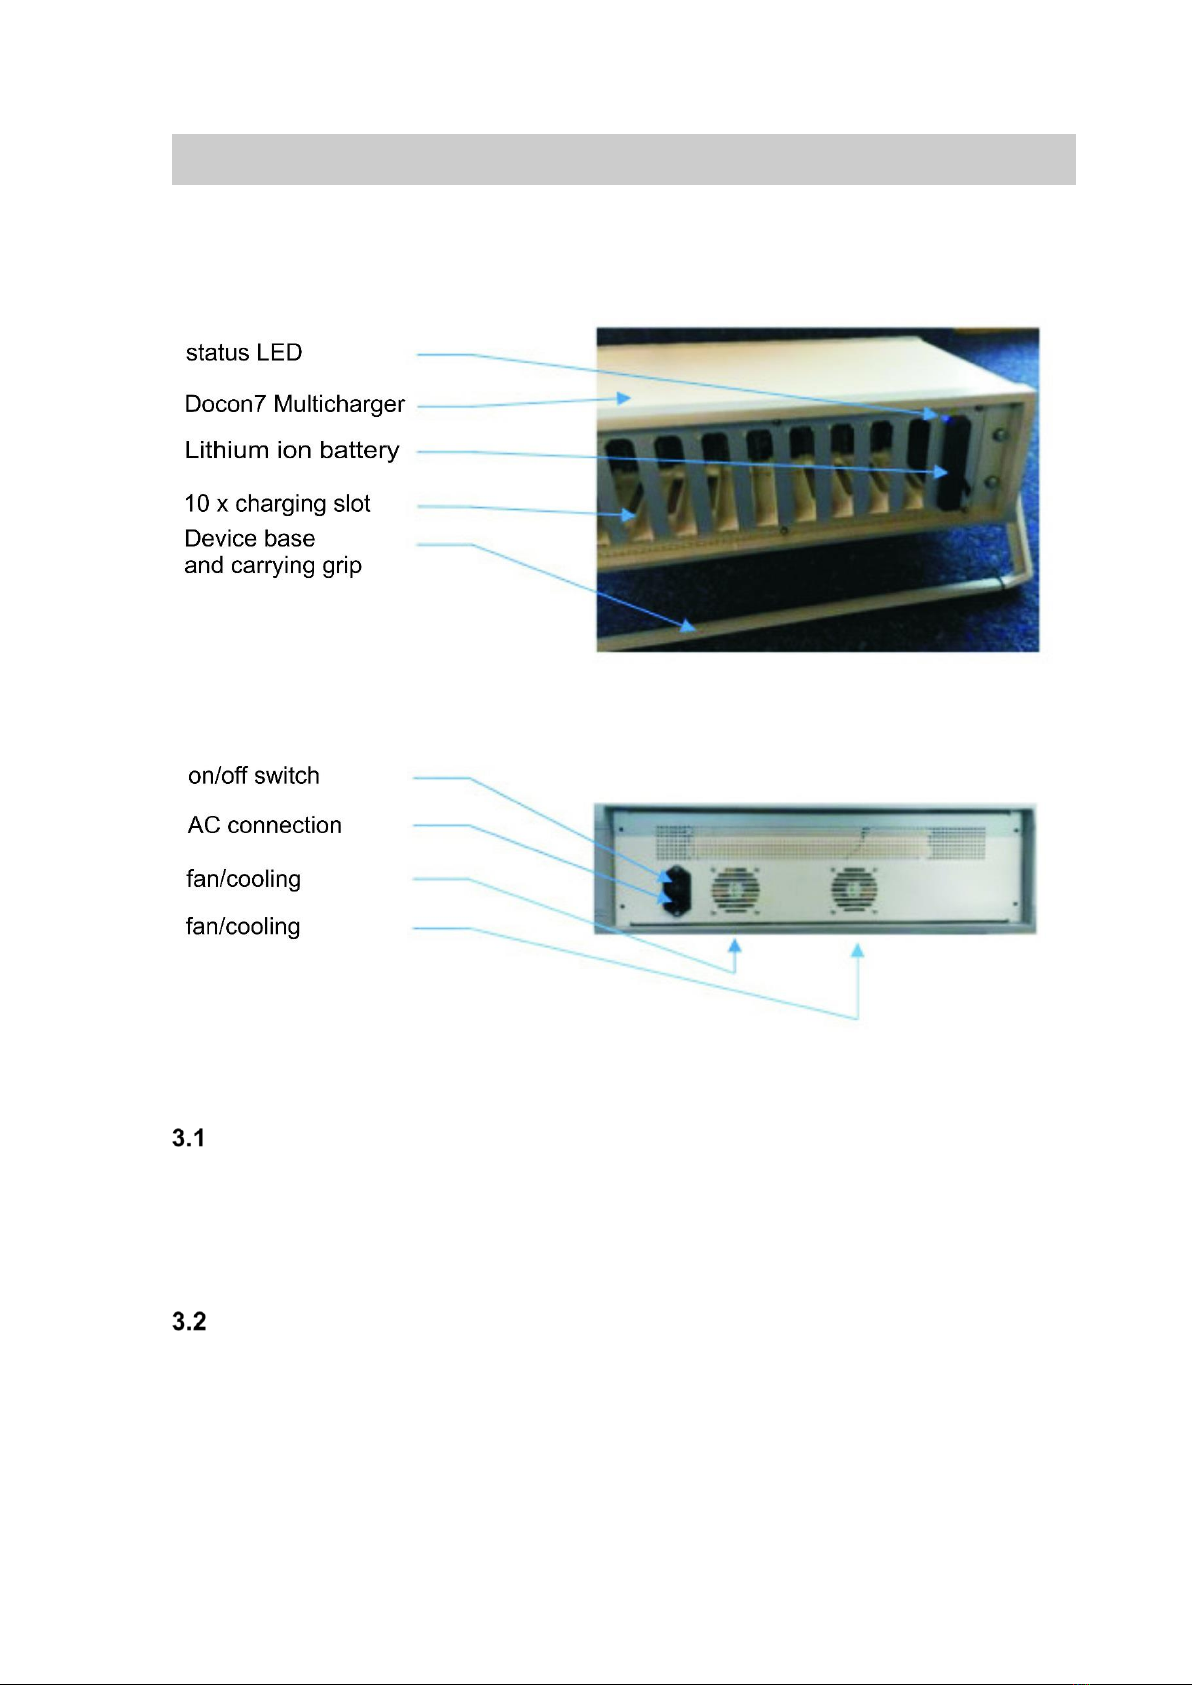
3Product description .................................................................................... 10
Docon7 Multicharger charging bay................................................................10
ON/OFF switch and connection options ........................................................10
Device feet and grip......................................................................................11
Status display................................................................................................11
Cooling..........................................................................................................11
Overview of signal statuses...........................................................................11
4Installation and start-up.............................................................................. 12
Transport and storage instructions................................................................ 12
Unpacking the device and inspecting scope of delivery.................................12
Commissioning the Docon7 Multicharger......................................................12
Connecting ....................................................................................13
Switching on..................................................................................13
Switching off.................................................................................. 13

Docon7Multicharger
Table of contents
Page 4 of 26
5Application and operation.......................................................................... 14
Charging the battery......................................................................................14
Storage conditions ........................................................................................ 14
6Troubleshooting..........................................................................................15
7Service......................................................................................................... 16
8Care.............................................................................................................. 18
Cleaning and disinfection of the Docon7 Multicharger...................................18
Service..........................................................................................................18
Service documents........................................................................18
Transport.......................................................................................................18
Disposal........................................................................................................ 19
9Annex...........................................................................................................20
Technical data............................................................................................... 20
Electromagnetic emissions............................................................................21
Electromagnetic resistance ...........................................................................22
Recommended safety distances ...................................................................24
Accessories...................................................................................................25

Docon7Multicharger
General safety instructions
Page 5 of 26
1 General safety instructions
Explanation of the safety symbols used
In these operating instructions visual symbols are used to highlight important instructions. Ob-
serving these instructions is the prerequisite for preventing hazards to patients and operating
personnel, as well as for avoiding damage to or malfunctioning of the device.
Symbols used in the instructions for use
Caution
Information
Symbols on the device
Serial number
Compliance with the Low-Voltage Directive 2014/35/EU
Consult instructions for use
Return and disposal according to WEEE Directive
Caution
Symbols on the retail packaging
Catalogue number
Batch code
Serial number

Docon7Multicharger
General safety instructions
Page 6 of 26
Keep dry
Limitation
Temperature limitation
Manufacturer
Fragile, handle with care
Further information on the symbols used can be found on our homepage: www.moeller-
medical.com/glossary-symbols
The performance, safety and electromagnetic compatibility of the device may
be affected by the use of non-original parts.
Explanation of the conventions applied
Various typefaces are used in these instructions for easier reference.
Typeface
Use
Bold
Buttons used in operating procedures
Italics
Device options, buttons and references to chap-
ters and sections in copy.

Docon7Multicharger
General safety instructions
Page 7 of 26
Manufacturer's liability
The manufacturer is responsiblefor the safety, reliability and serviceability of the device in the
following cases:
Assembly, expansions, resetting, changes and repairs are
performed by individuals authorised by the manufacturer.
The electrical installation in the room in question complies
with the relevant requirements and regulations (e.g. VDE
0100, VDE 0107 or IEC specifications).
The device is used in accordance with the instructions for
use and the country-specific regulations and special na-
tional requirements are observed.
The conditions stated in the technical data are observed.
The manufacturer undertakes to accept returned old devicesaccording to the WEEE Directive.
Owner's duty of care
The owner of the device must accept responsibility for the proper operation of the device.
Whenever the Docon7 Multicharger is handled and used, detailed acquaintance and com-
pliance with these instructions for use is essential.
Performance and safety may be impaired if OEM device parts are not used.
All work which requires tools must be performed by the manufacturer's technical service or
parties authorised by the latter.

Docon7Multicharger
General safety instructions
Page 8 of 26
The Docon7 Multicharger may not be modified.
Liquids may not be allowed penetrate parts of the device under electrical volt-
age.
When cleaning, ensure that no cleaning agent gets into the connector/sockets.
Disconnect the Docon7 Multicharger from the mains voltage before cleaning.
Replace connecting cables of all kinds, even if they are only slightly damaged;
make sure not to run over cables with carts etc.
Keep cables away from sources of heat. This is to avoid the risk of the insula-
tion from melting, potentially causing a fire or electrocution.
Do not force the connector plug into the socket.
Do not pull on the cable when removing the plug.
Do not expose the Docon7 Multicharger to excessive heat or fire.
Do not subject the Docon7 Multicharger to major impacts.
If excessive heat, fumes or smoke are noticed, immediately disconnect the Do-
con7 Multicharger from the power supply.
Do not extinguish the Docon7 Multicharger with water in the event of fire.
Do not block the rear of the device around the fans either directly or indirectly,
sufficient air circulation and heat dissipation must be ensured.
Any serious incident that has occurred in relation to the device should be re-
ported to the manufacturer and he competent authority of the Member State in
which the user and/or the patient is established.

Docon7Multicharger
Purpose
Page 9 of 26
2 Purpose
Proper use - intended use
The Docon7 Multicharger is used to recharge the Docon7 lithium ion batteries (93005614).
The Docon7 Multicharger can accommodate up to 10 batteries at a time. The charge status
is displayed visually. Defective batteries are detected and this is also indicated visually. Once
charging is complete, the charger automatically switches to trickle charging.
No form of use other than the intended use described here is permitted.
Combination with other products
Only use products which have been specified and approved by the device manufacturer.
Article numbers and accessories for the Docon7 Multicharger
Lithium ion battery pack
Nominal voltage: 22.2 V / 4500 mAh
93005614
Connecting cable
93001047

Docon7Multicharger
Product description
Page 10 of 26
3 Product description
Figure 1: Docon7 Multicharger
Docon7 Multicharger charging bay
Each charging bay of the Docon7 Multicharger works independently, i.e., up to 10 batteries
can be charged independently of each other.
The bays are equipping an anti-twist guard for increased safety when inserting the batteries.
ON/OFF switch and connection options
The Docon7 Multicharger is switched on and off using the switch at the back of the device.
There is also a AC connection socket at the back (IEC socket). The mains cable is plugged
into this to supply the Docon7 Multicharger with the required operating voltage.

Docon7Multicharger
Product description
Page 11 of 26
Device feet and grip
For tabletop operation, the Docon7 Multicharger must be placed on the feet provided.
Alternatively, the grip can be used as a stand. If the device is at a low operating height, the
charging bays can be easily accessed and the status LEDs are easier to see.
The Docon7 Multicharger can be transported using the carrying grip when there are no bat-
teries in the charging bays.
Status display
The status LEDs on the front of the device (above each charging bay) provide information on
the operating and charging status of the device and battery.
Cooling
There are two fans next to the ON/OFF switch, these dissipate any system heat which is
created inside the device during charging into the ambient air.
Do not block the back of the device around the fans either directly or indi-
rectly; sufficient air circulation and heat dissipation must be ensured.
A safety distance of at least 15 cm must be maintained between the device
and the next nearest obstacle.
Overview of signal statuses
The following signal statuses are indicated by the LEDs above each battery bay.
Status
Color
LED
Operating mode, fault
(no battery inserted)
Red
On
Operating mode, charging
Blue
On
Operating mode, charging complete
Green
On
Operating mode, fault
(with battery inserted)
Red
On

Docon7Multicharger
Installation and start-up
Page 12 of 26
4 Installation and start-up
Ensure that the packaging is undamaged on delivery. The carrier must be
notified immediately of any transport damage. Check the Docon7 Mul-
ticharger for damage. If the product show signs of defects, it may not be used
and the supplier is to be notified immediately.
Transport and storage instructions
Temperature:
-20°C to +50°C
Humidity:
less than 90% rel. humidity
Weight with packaging:
8000 g
Dimensions of the Docon7 Multicharger with pack-
aging:
Width x Height x Depth
620 mm x 450 mm x 300 mm
Unpacking the device and inspecting scope of delivery
On delivery, the Docon7 Multicharger consists of the device itself, a connecting cable, the
instructions for use and a cardboard packaging. When unpacking ensure that no parts are left
in the packaging.
It is recommended to retain the packaging for any service requests and not
to dispose of it.
Only ship the Docon7 Multicharger in its original cardboard packaging in
order to avoid damage during transport.
The standard Docon7 Multicharger version has the following scope of supply:
1 x Docon7 Multicharger
1 x AC connection cable
1 x instructions for use
Commissioning the Docon7 Multicharger
Whenever the Docon7 Multicharger is handled and used, detailed acquaintance and com-
pliance with these instructions for use is essential.

Docon7Multicharger
Installation and start-up
Page 13 of 26
Connecting
Set up the device in the desired position with the feet at the bottom.
Insert the connecting cable into the power supply input socket at the back of the device.
Insert the connecting cable into a mains socket. Pay attention to the voltage indicated on the
identification plate.
Switching on
1. To switchthe Docon7 Multicharger on, press the ON switch at the back of thedevice.
2. All 10 LEDs on the front of the device will then light up red and the Docon7 Mul-
ticharger is ready for use.
Switching off
1. After completing the charging processes, turn the Docon7 Multicharger off by press-
ing the ON/OFF switch.

Docon7Multicharger
Application and operation
Page 14 of 26
5 Application and operation
Charging the battery
1. Insert the battery to be charged (with the rounded side facing upward) as far as it will
go into one of the charging bays.
2. Once it is properly positioned, the LED changes it status color to blue and charging
begins automatically.
3. When the LED changes color to green, this indicates that charging is complete.
4. Now remove the battery from the bay.
If the batteries remain in the Docon7 Multicharger after charging, the device
switches over to trickle charging.
The charge time for empty batteries is approx. 4.5h.
If the respective LED on the Docon7 Multicharger is red and not green after
charging, either the charging device or the battery itself could be defective. (See
Troubleshooting, page 15).
Storage conditions
After use, store the Docon7 Multicharger in accordance with the storage conditions (see
Technical data, page 20).

Docon7Multicharger
Troubleshooting
Page 15 of 26
6 Troubleshooting
A number of faults are listed in this chapter which could occur in connection with the Docon7
Multicharger.
Several remedies may be possible for each fault. The suggested solutions should be per-
formed in the stated order until the fault is remedied. The Docon7 Multicharger must always
be switched off when connecting and disconnecting plug connections. If the solutions listed
below do not remedy the fault, contact the Möller Medical Service Centre.
Problem
Solution
The Docon7 Multicharger
will not turn on.
Check the power supply at the mains socket
used.
Check the connecting cable
Fault due to moisture in the
plug connection.
Remove the plug from the device and allow the
connections to dry.
The Docon7 Multicharger
fails to charge
Check the display. The LEDs on the charger must
be blue.
If the LEDs are not on:
Check the socket and the connecting cable.
If the LEDs are red:
Check the battery's level indicator (this may be
defective)
If the LEDs are green:
Check the battery's level indicator (it may be fully
charged already)
If you are unable to remedy the fault, please contact your Möller Medical GmbH service team
or distributor.

Docon7Multicharger
Service
Page 16 of 26
7 Service
The Docon7 Multicharger may not be opened by user. Service measures may
only be performed by service teams that have received appropriate training from
the manufacturer.
Only send cleaned and disinfected devices to the service team.
If returning the Docon7 Multicharger, ensure that the device is appropriately dis-
infected to avoid the risk of infection.

Docon7Multicharger
Service
Page 17 of 26
Manufacturer
Möller Medical GmbH
Wasserkuppenstr. 29-31
36043 Fulda, Germany
Tel: +49 (0) 661 / 9 41 95-0
Fax: +49 (0) 661 / 9 41 95-850
http://www.moeller-medical.com
Email: info@moeller-medical.com
Service
Tel.: +49 (0) 661 / 9 41 95-108
Fax: +49 (0) 661 / 9 41 95-850
E-mail: service@moeller-medical.com
Distributor:

Docon7Multicharger
Care
Page 18 of 26
8 Care
Cleaning and disinfection of the Docon7 Multicharger
To rule out any risk to the user, pull all connecting cables out of the Do-
con7 Multicharger before cleaning.
Do not use sharp objects for cleaning.
No moisture must be allowed to penetrate into the device. Therefore,
spray disinfectants may not be used directly on the device.
Lint-free, soft tissues are to be used for wipe-down disinfection and clean-
ing.
Clean using a cloth dampened with mild soap solution or 70% isopropane solution.
After cleaning, disinfect the surfaces of the Docon7 Multicharger with a pH-neutral, approved
detergent-alcohol based disinfectant with up to 70% alcohol (e.g. propan-1-ol, recommended
disinfectant: Meliseptol®). During disinfection, follow the instructions of the disinfectant manu-
facturer.
Ensure that the cleaning agents and disinfectants have completely evaporated before using
the Docon7 Multicharger.
Visual inspection: The connections and plugs of the cables to be connected must be free of
all types of soiling.
Service
Service documents
The service documents required to maintain the device can be requested from the manufac-
turer's authorised service partners.
Transport
The Docon7 Multicharger may only be transported as per the conditions of transport (see
Technical data on page 20).
If the Docon7 Multicharger is sent to the service team, it must be packed in its original pack-
aging as this provides the device with the best possible protection from external damage.

Docon7Multicharger
Care
Page 19 of 26
Please note that the Docon7 Multicharger is an electromechanical device.
It may not be thrown. If condensation forms after the device is transported in
the cold and set up in a warm room, the Docon7 Multicharger should not be
switched on until the condensation has evaporated. Please keep a special
lookout for any condensation on the connection sockets. The warm-up and
cool-down phases are based on a room temperature of 20°C.
Transport temperature
Warm-up / cool-down phase
- 20°C
90 minutes
50°C
30 minutes
Disposal
Docon7 Multicharger and accessories
This device contains materials which must be disposed in accordance with
environmental regulations. The European Directive 2012/19/EU on waste
electrical and electronic equipment (WEEE2) applies to this device. The
identificationplate of the device bears the symbol of the crossed out garbage
bin.
Return devices and batteries which are no longer used to Möller Medical GmbH. This ensures
that the device is disposed in compliance with the national requirements of the WEEE Di-
rective.

Docon7Multicharger
Annex
Page 20 of 26
9 Annex
Technical data
General characteristics
Order number REF:
00003841
Dimensions of the device
Without carrying grip
With carrying grip
Length x width x height
516 mm x 306 mm x 171 mm
575 mm x 450 mm x 171 mm
Weight [kg]:
7000 g
Energy value:
1 J with load from impact
Electrical connection input of the Docon7 Multicharger
Voltage:
230 V AC
Frequency:
50 Hz
Power:
300 VA
Output
25.2 V DC, 1 A
Protection class:
I
Protection rating:
IP X0
Transport and storage instructions
Temperature:
-20°C to +50°C
Humidity:
less than 90% relative humidity
Weight with packaging:
8000 g
Dimensions of packaging:
Width x height x depth
620 mm x 450 mm x 300 mm
Air pressure:
700 –1050 hPa
Operating conditions:
Temperature:
+10 °C to +40 °C
Humidity:
Air pressure:
Operating altitude:
30 % to 75 % relative humidity
790 –1050 hPa
< 2000 m
Device service life
8 years
This manual suits for next models
1
Table of contents
Other Moller Medical Medical Equipment manuals

Moller Medical
Moller Medical Docon SealM User manual

Moller Medical
Moller Medical LiquoGuard 7 User manual

Moller Medical
Moller Medical Vibrasat power User manual

Moller Medical
Moller Medical LiquoGuard 7 User manual

Moller Medical
Moller Medical Liposat power User manual

Moller Medical
Moller Medical LiquoGuard 7 User manual

Moller Medical
Moller Medical Docon 7 User manual