TECHNICAL DATA
Beschreibung
Description
Abmessungen
Dimensions
Spannung
Voltage
Leuchtmittel
Light source
Systemleistung
Power consumption
Schutzarzt
Protection class
Artikelnummer
Product code
GEBRAUCHSANLEITUNG / USER MANUAL
MOUNTING INSTRUCTION
A – 4600 Wels, Europastraße 45 Tel.: +43 7242 698 - 0
MONTAGE- UND SICHERHEITSHINWEISE
Das Montieren der Leuchte darf nur durch fachkundiges Personal
erfolgen.
Für Schäden, die durch unsachgemäße Montage oder Inbetriebnahme
entstehen, übernimmt der Hersteller keinerlei Haftung.
Bei jeglichen Arbeiten oder Beschädigungen an der Leuchte ist der
Strom abzuschalten!
Teile der Leuchte werden im Betrieb sehr heiß (Verbrennungsgefahr).
Berühren Sie auf keinen Fall das Leuchtmittel oder umgebene Teile
(z.B. Glas oder Reflektor).
Leds sind wartungsfreie elektronische Bauteile, die durch
unsachgemäße Behandlung beschädigt oder zerstört werden können.
Das Öffnen des Led Gehäuses oder die Verrichtung jeglicher Arbeiten
an der LED führen zum Verlust des Gewährleistungsanspruchs
gegenüber dem Hersteller.
INSTALLATION AND SAFETY INSTRUCTIONS
Installation luminaires may only be done by a qualified person.
The manufacturer does not take any responsibility for damages caused
by faulty installation or shortening.
During workings on the luminaire or in the event of damage to the
luminaire the power supply must be switched off.
Parts of the luminaire get very hot during operation. (Risk of burn!)
Never touch the light source or parts close to the light source such as
glasses or reflectors.
Leds are maintainance-free electronic components that can be
damaged or destroyed trough inappropriate handling. Opening the Led
housing or carrying out any type of work on the Led will void any
warranty claim against the manufacturer.
63901MA
V4 27.03.2017
ONE ROW SYSTEM
Hängeleuchte
pendant
X
X
230V AC
50/60Hz
LED
LED
21W / 42W, 31W / 62W,
41 / 82W
IP20
IP20
639-xxx
639-xxx
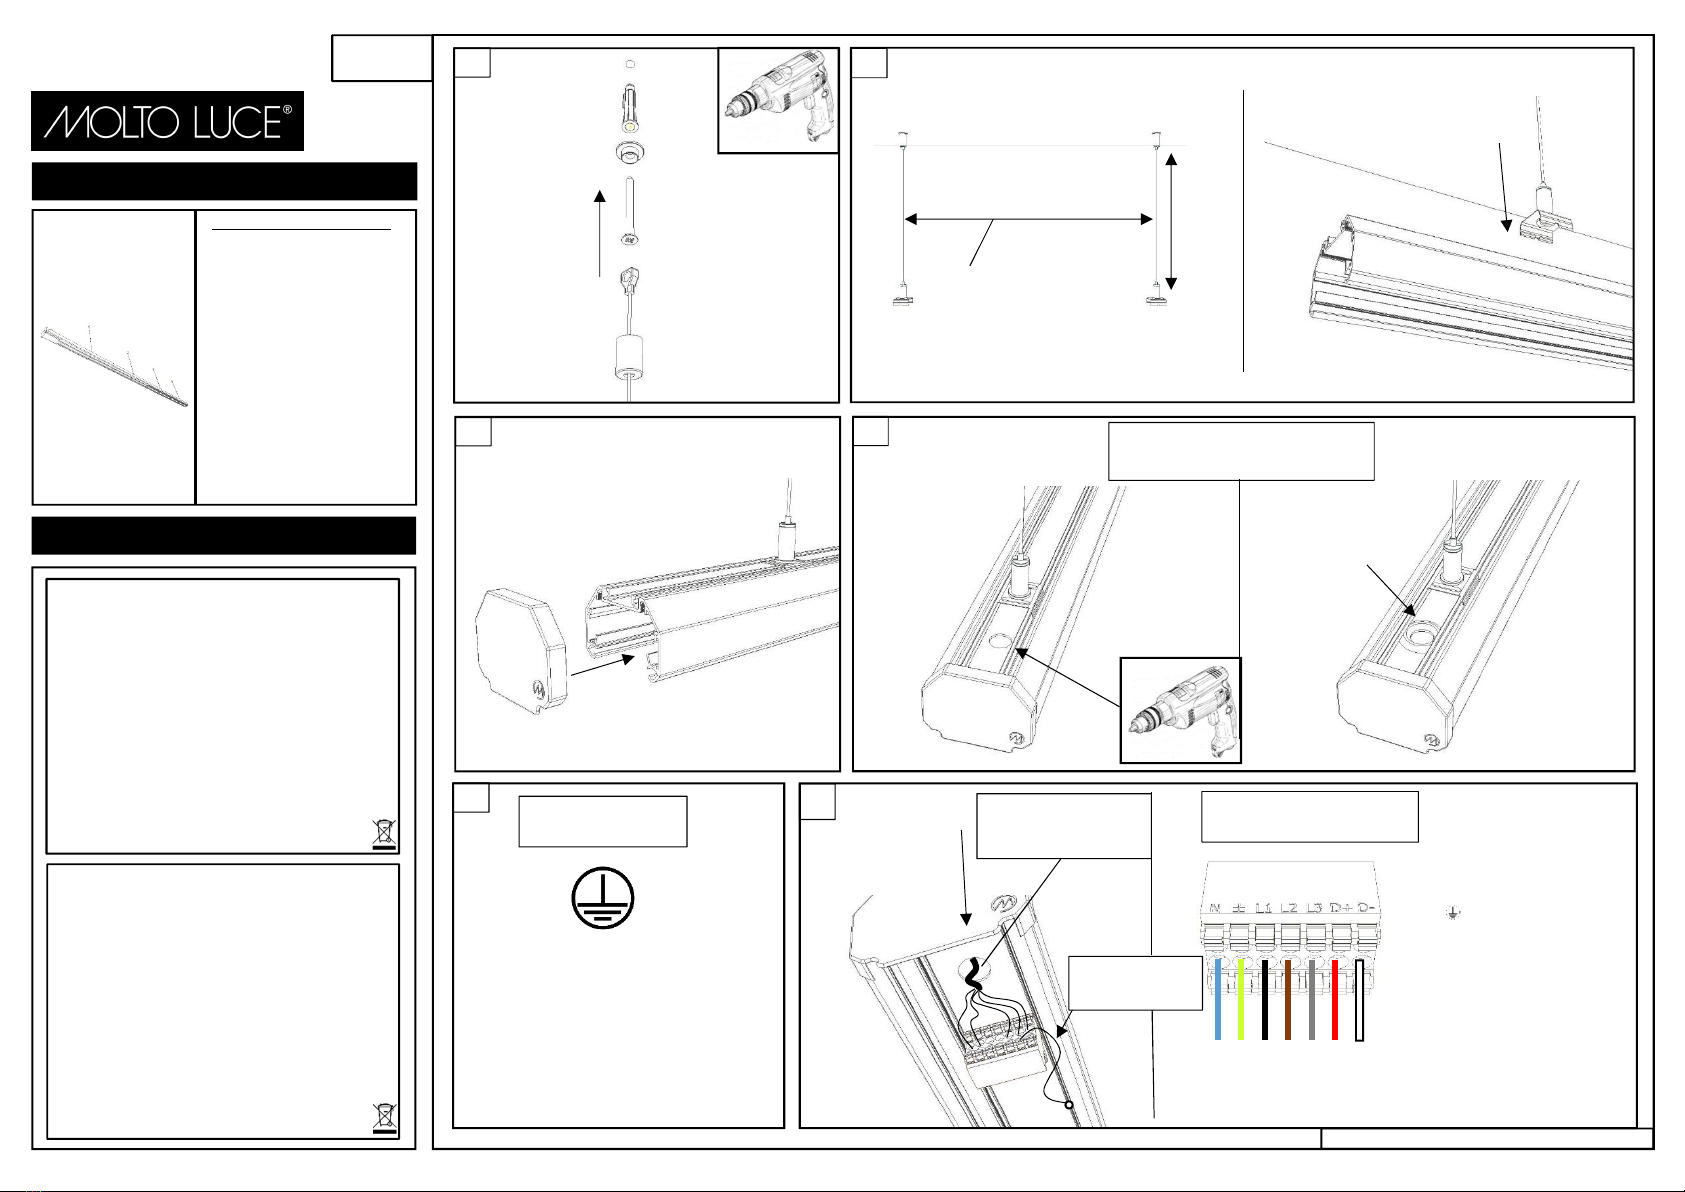
Abstand = max. 3m
Distance = max. 3m
Max. 3m.
Max. 3m.
KUNDENSEITIGE EINSPEISE METHODE
THE POWER SUPPLY CAN BE
Durchführungstülle
Grommet
6
7 POL. CONNECTION DIAGRAM
1 2 3 4 5 6 7 1 = N blau, blue
2 = gelb/grün, yellow green
3 = L1 schwarz, black
4 = L2 braun, brown
5 = L3 grau, gray
6 = D+ rot, red
7 = D - weiß, white
Erdung anschrauben.
Connect the grounding
contact with the profile.
max. Belastung pro Abhängung 16kg!
max. load per suspension 35.2 lbs!
Durchgangsverdrahtung 2,5mm²
Trough wiring 2,5mm²
PROTECTION CLASS 1
Alle elektrisch leitfähigen Gehäuseteile des
Betriebsmittels sind mit dem Schutzleitersystem der
festen Elektroinstallation verbunden.
All electrically conductive housing parts are connected
to the protective conductor system of the fixed electrical
installation.
Gilt nur bei Lichteinsatzbestückung!
Only if the lighting insert is installed in
the profile.
Einspeisekabel nach der
Durchführung Zugentlasten!!
The feed cable must be strain
relief by the customer!!


