Momentum TOPOGRAPH User manual

English
English
This watch is an analog quartz watch equipped with an altimeter. In addition to
its usefulness as a normal watch, the watch has functions particularly useful for
mountain climbing and hiking.
1

English
Table of Contents
Precautions for Use .............................................................................. 3
Basic Functions of the Altimeter .............................................................. 5
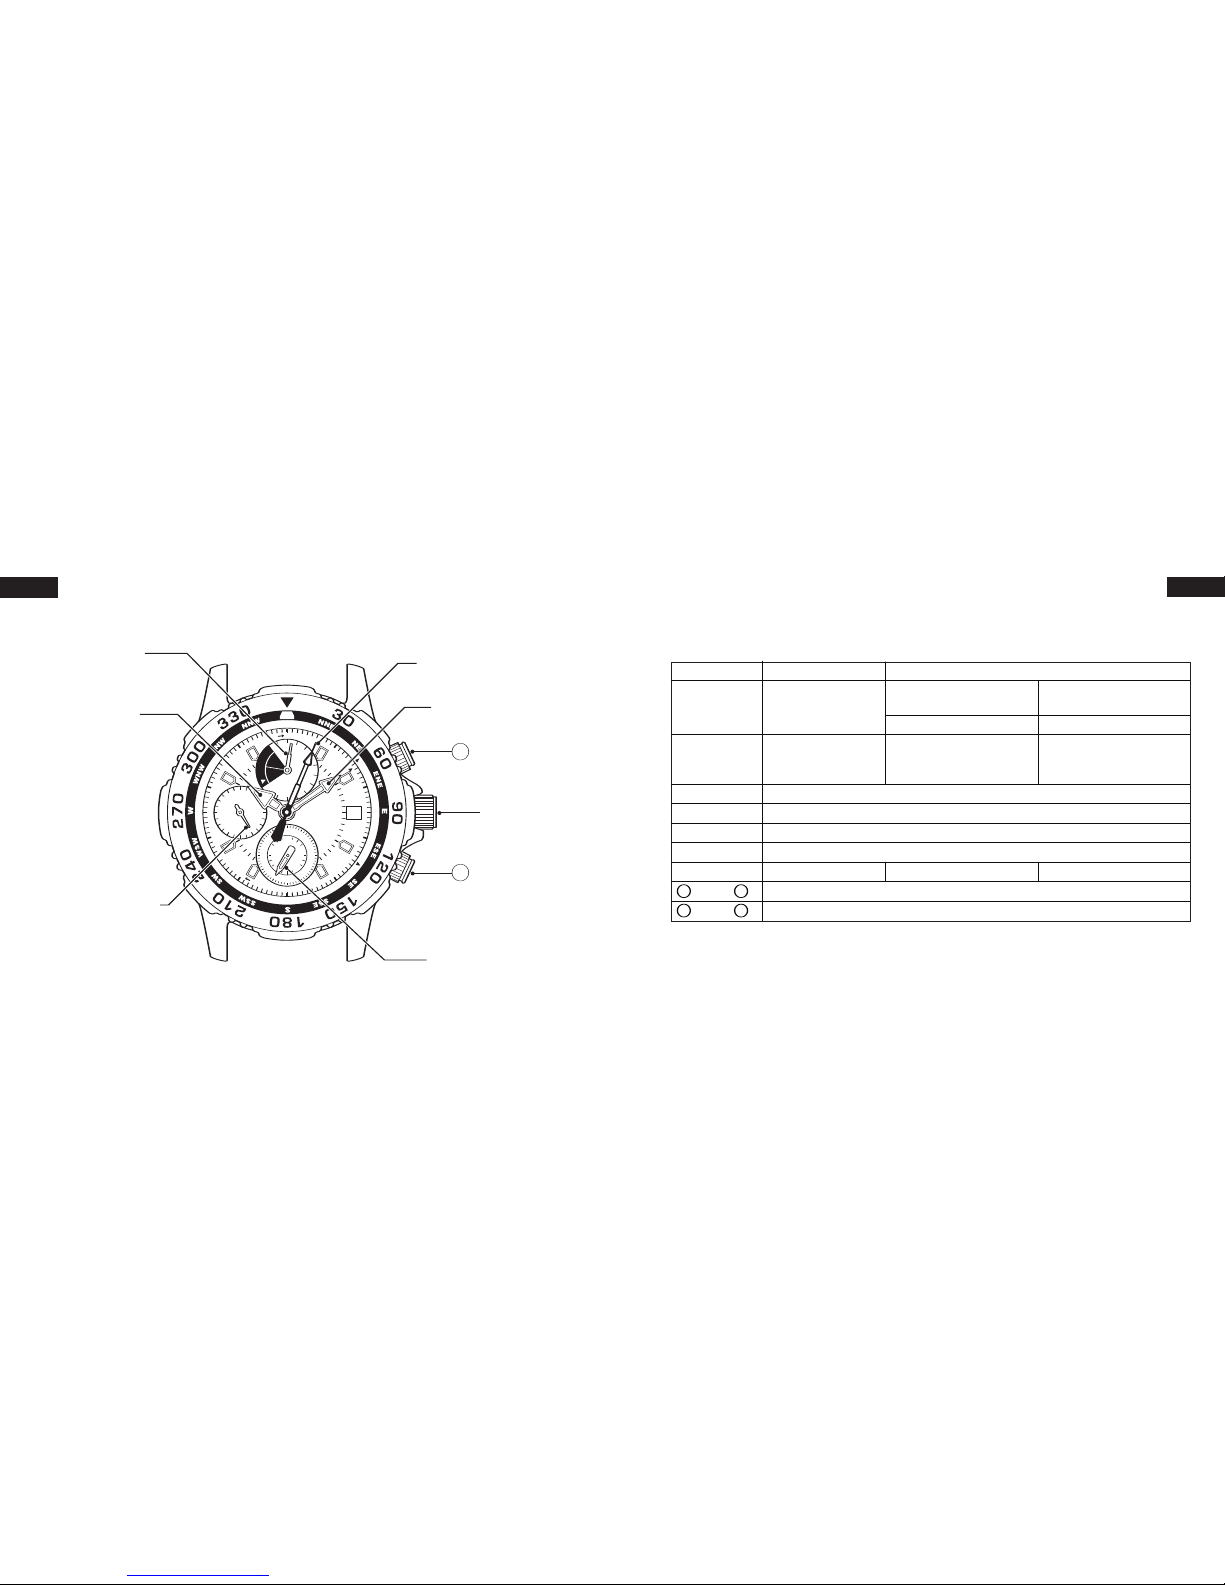
Name of Parts .................................................................................... 6
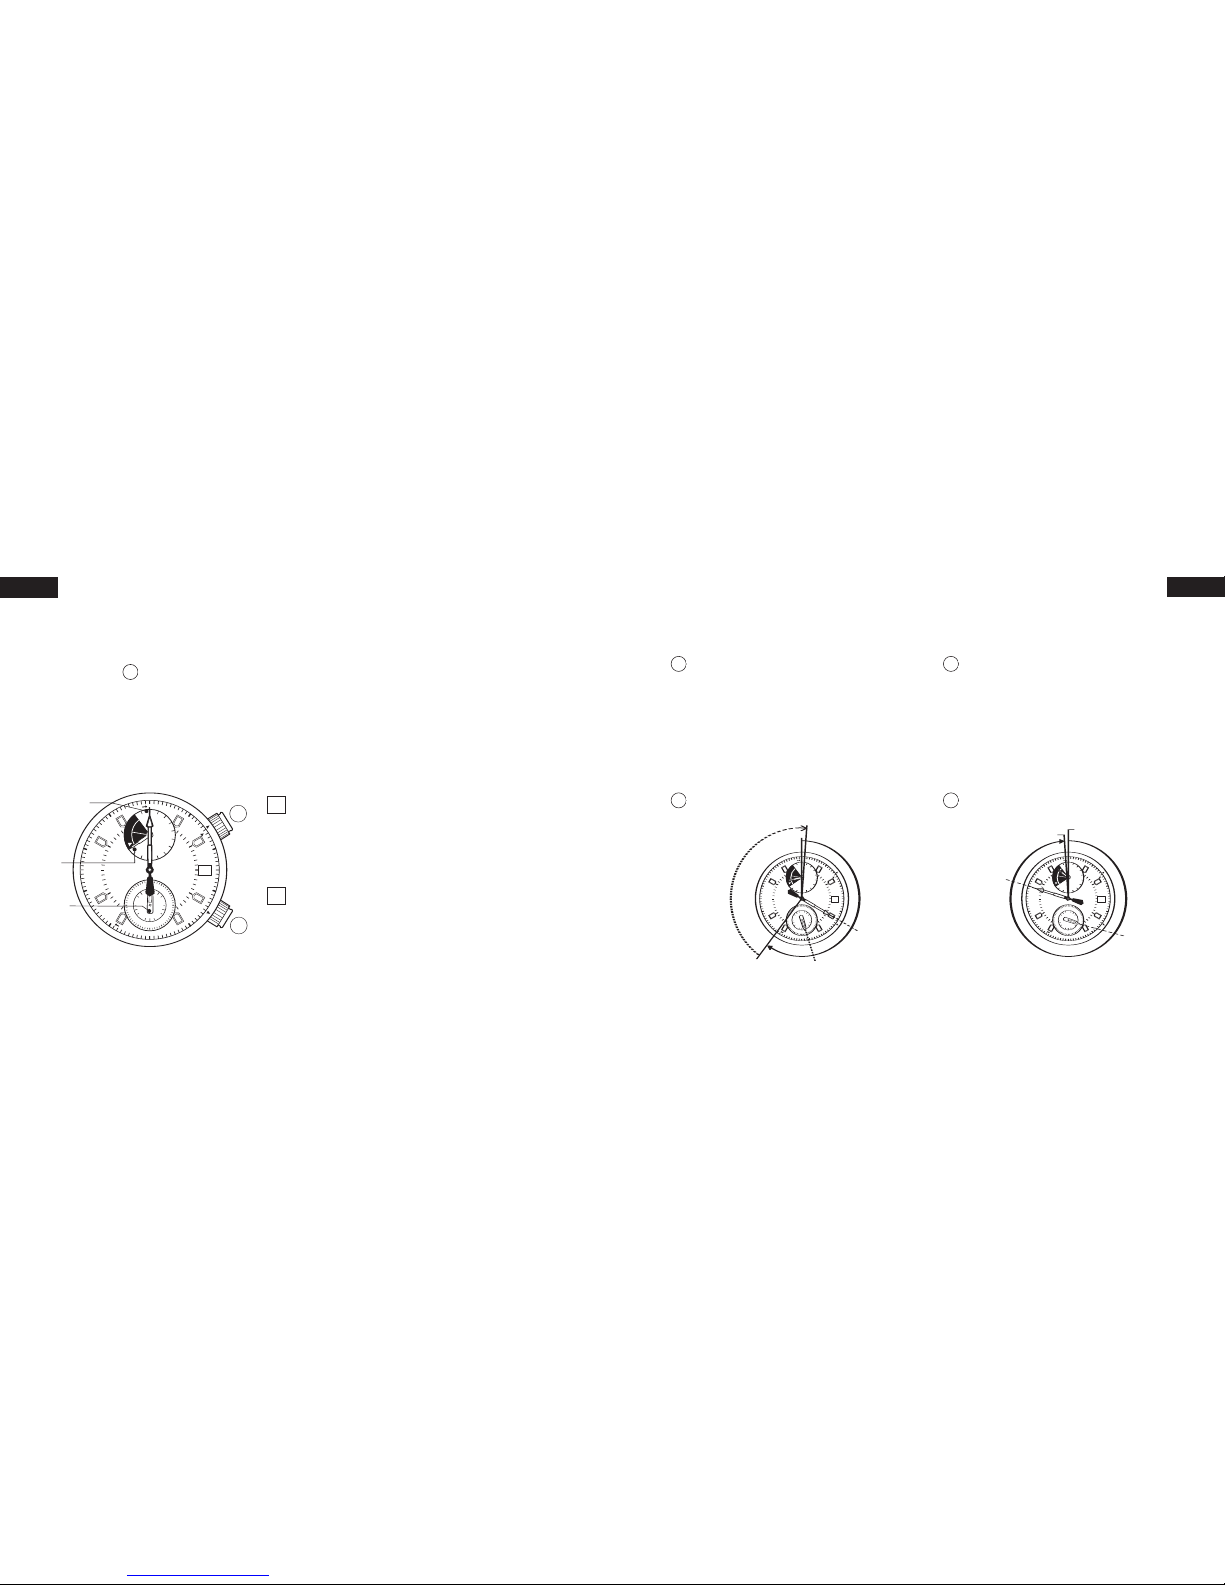
A. Operating Instructions .................................................................... 7
B. Setting the Time and Date ................................................................ 8
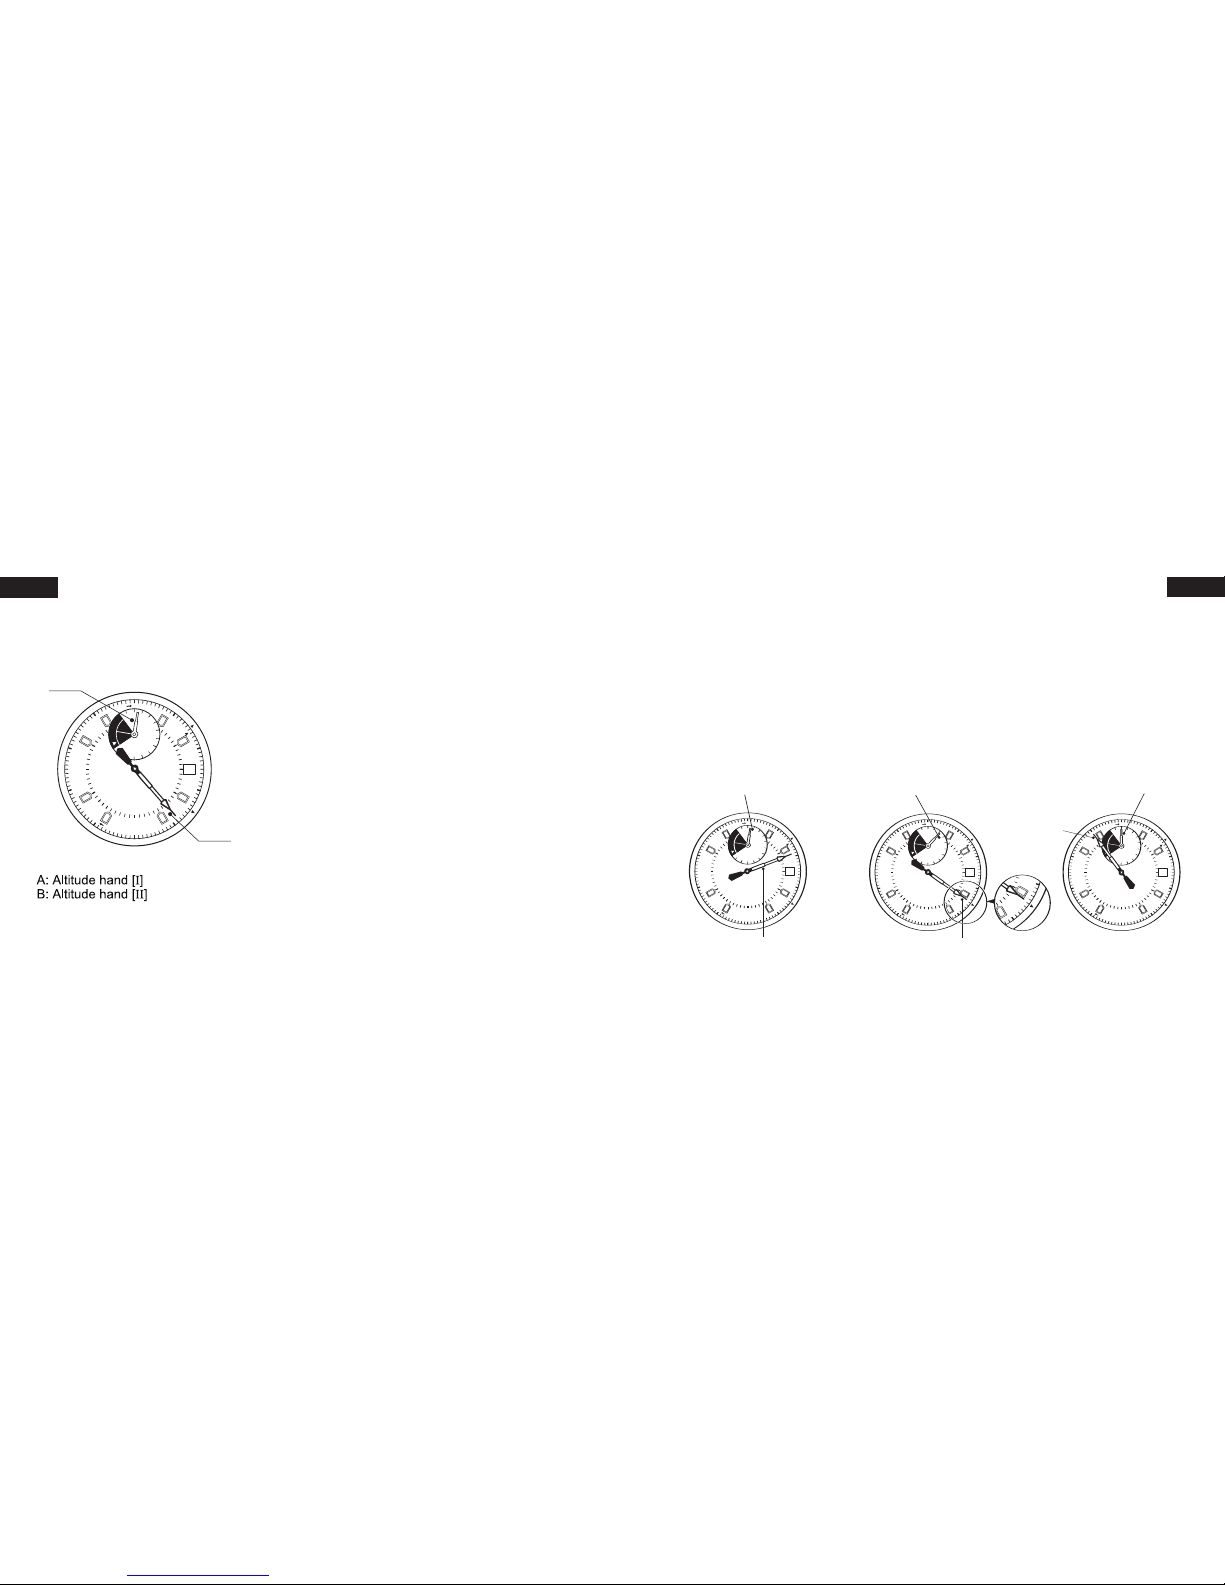
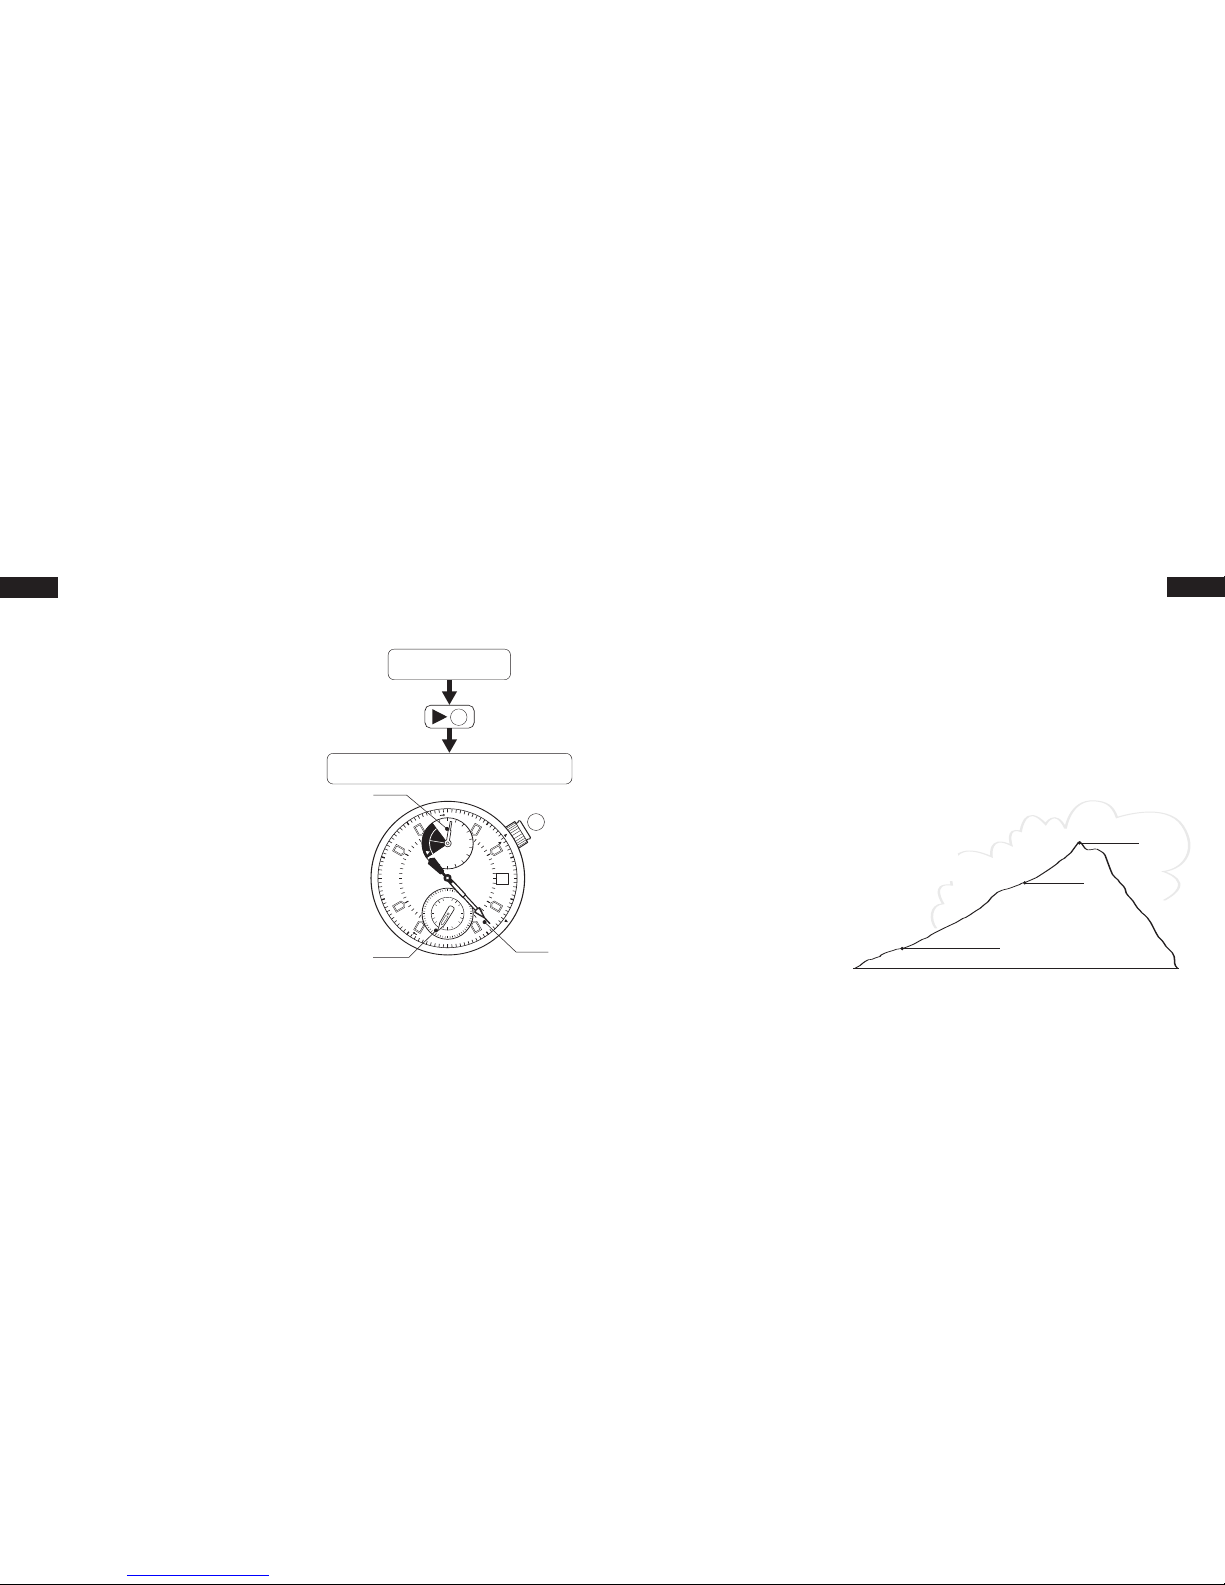
C. Altimetry ........................................................................................ 10
D. Altitude Compensation .................................................................... 13
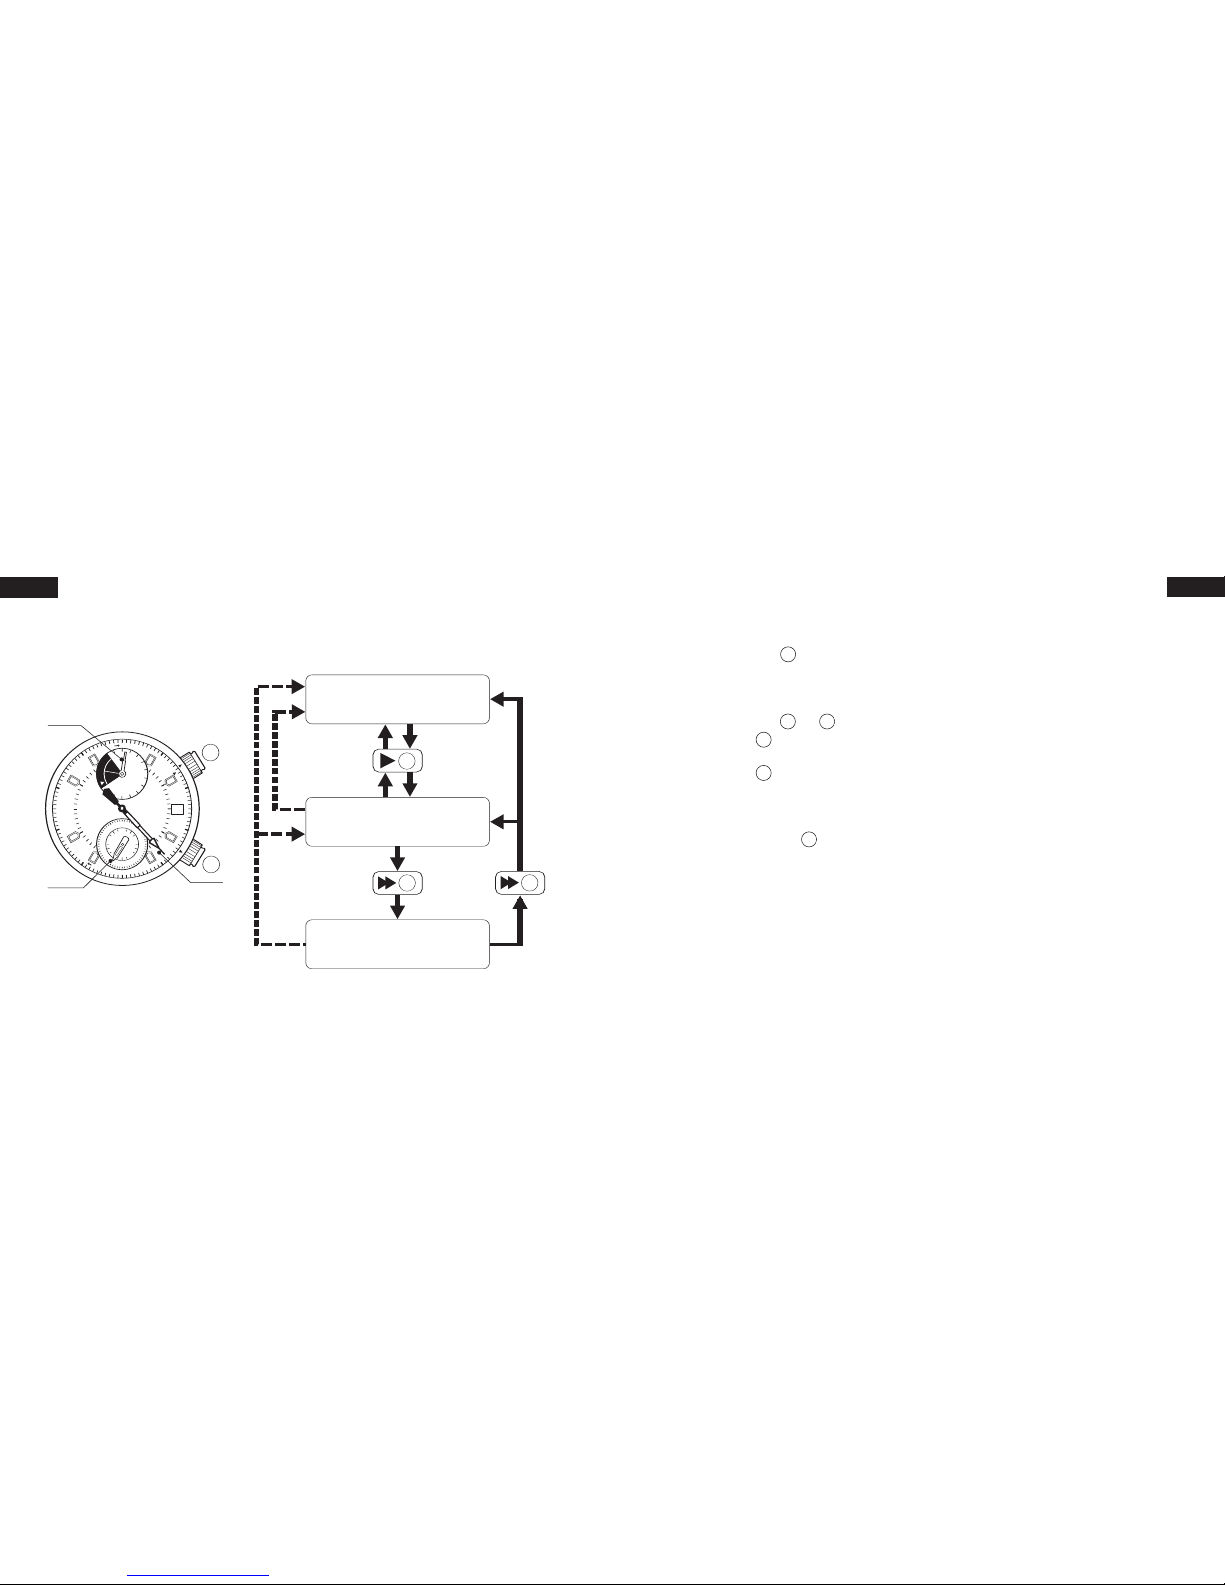
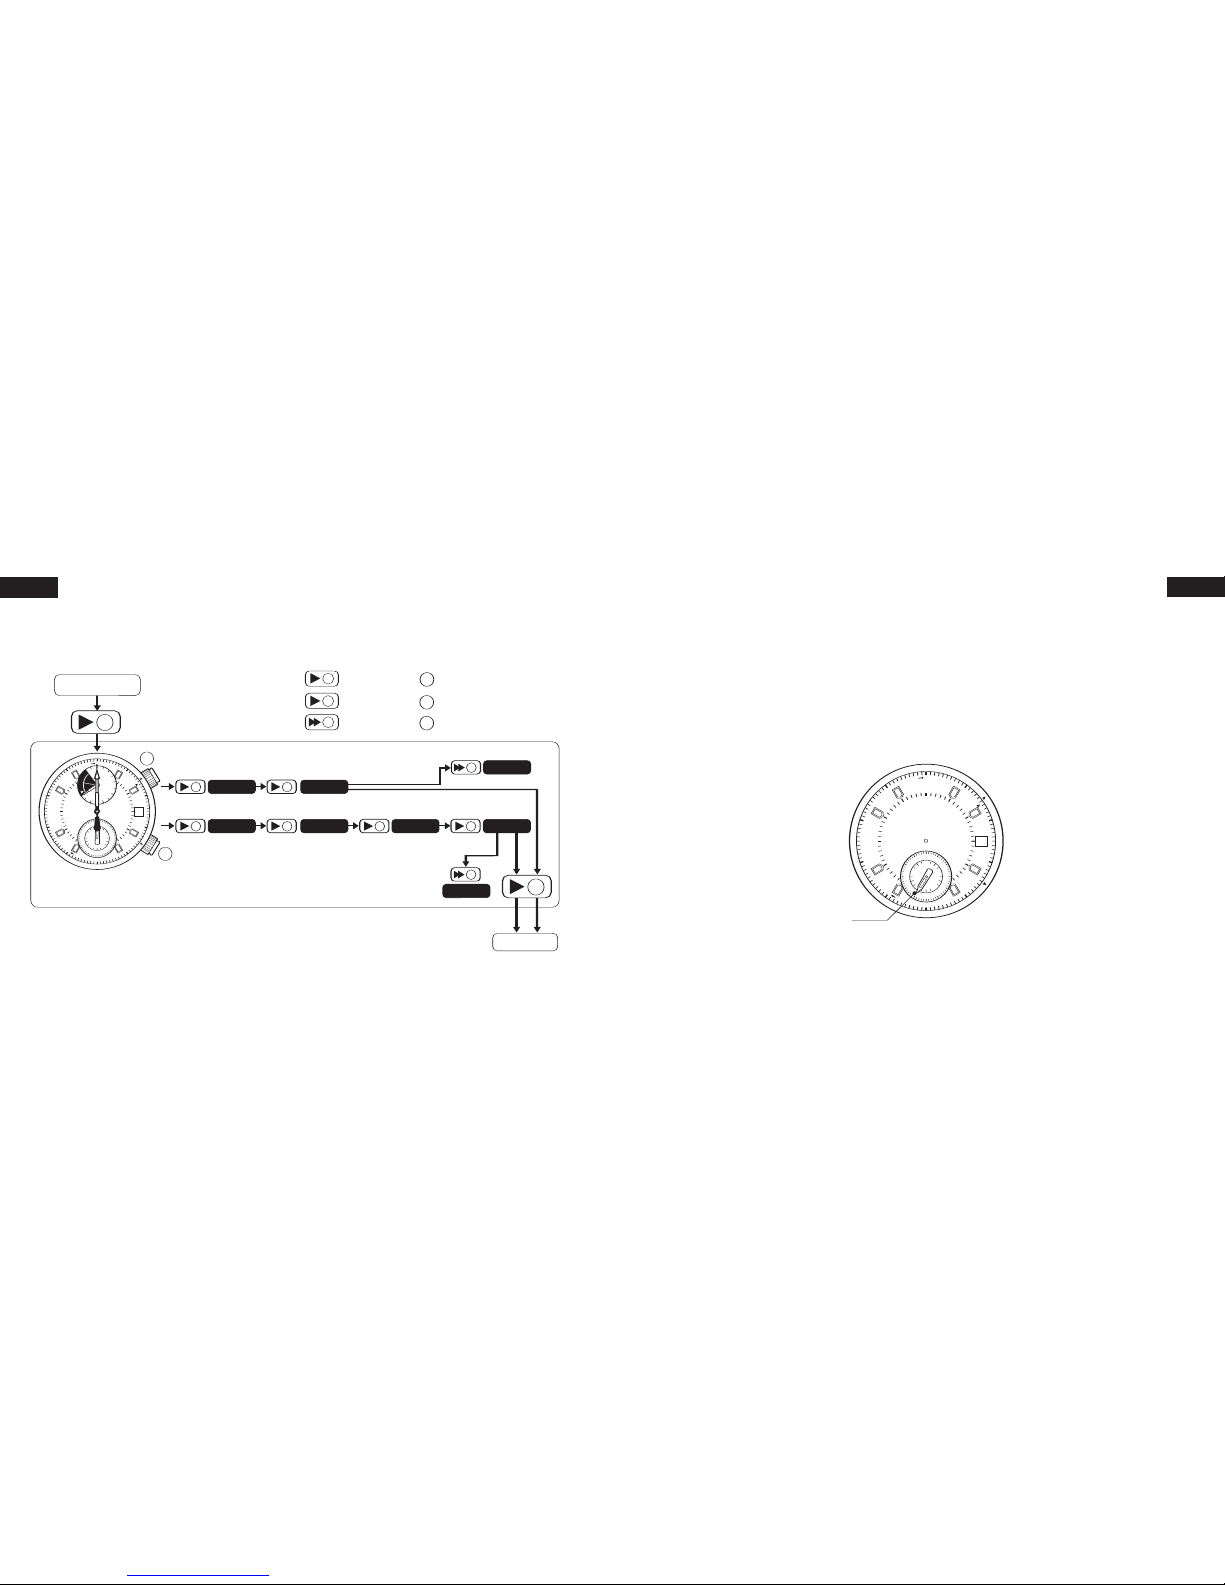
E. Chronograph .................................................................................. 16
F. Battery-Low Warning Function .......................................................... 19
G. Adjusting Hands To “0” Position ...................................................... 20
H. Precautions for Handling .................................................................. 21
I. Product Specifications ...................................................................... 22
English
Precautions for Use
This watch is not a measuring instrument authorized by official authorities. Do
not use the altimetry function to judge situations involving danger. The following
precautions should be adequately understood before using the altimeter. Please
remember that the altimetry function should be used only as general reference.
(1) Do not Use the Altimetry Function When. . .
The altimeter should not be used in the following situations:
•When judging your actions or situation involving danger in an environment
where the temperature changes drastically.
•In an environment where pressure is subject to change, such as in an airplane
or building (correct measurement cannot be obtained).
•When the altitude changes greatly within a short time.
•In case of special handling other than normal use, not described in this
manual.
(2) Altimetry Function
The altitude displayed by this watch is relative altitude based on the sensored
air pressure and “The international standard atmospheric pressure and
altitude”. Therefore, display of measured altitude will change if air pressure
changes, even if measurement is made in the same place. The time delay from
32

English
Basic Functions of the Altimeter
This watch is designed to calculate altitude from changes in air pressure by using the relationship between air pressure
and altitude, based on the conditions for standard atmosphere* specified by the International Civil Aviation Organization
(ICAO). To obtain correct altitude on the watch, altitude must be aligned with an accurate point (triangulation station or
benchmark). Such operation is called "altitude correction" (see page 12).
*Standardatmosphere: ICAO StandardAtmosphereadopted by the ICAO in 1964, whereby 1013.25 hPa at 15°Cis
specified as elevation 0. However, air pressure continuously changes at any given place. This watch’s operating are
based on ISA standards. The following chart provides an outline of ISA standard configurations. (from International
Standard Atmospheric)
English
measurement to
display of altitude is approximately 5 seconds (in continuous altimetry mode).
Therefore, this altimetry function may not be used in sports as sky diving, etc.
where altitude changes greatly within a short time.
After 30 minutes, Continuous Altimetry Mode will automatically change to
Altimetry Mode in which measurement is made every hour. To resume Contin-
uous AltimetryMode, operate the watch as explained in the instruction manual.
In order to efficiently use the altimetryfunction of this watch, the altitude must
always be corrected for your location, clearly indicated with the altitude.
(3) Pressure Sensor
Do not disassemble the pressure sensor used in this watch or poke it with a thin
rod. Take care that no dust enters the pressure sensor.
(4) Battery
The service life of the battery used in this watch is two years after loading a new
battery with the watch used under normal conditions (see "Battery life" under "J.
Product Specifications"). However, the service life depends on the conditions
under which the functions are used. Thus, early replacement of the battery is
recommended.
54
Altitude (m)
Atmospheric Pressure (hPa)
Temperature (°C) Temperature difference every 1,000 m
5,000 540.2 –17.5
4,000 616.4 –11.0
3,000 701.1 –4.5 Approx. 6.5 °C
2,000 795.0 2.0
1,000 898.7 8.5
0 1,013.25 15.0
(from International Standard Atmospheric)

English
A: Operating Instruction
English
Name of Parts
76
-30 10
20
30
40
50
ALTITUDE
SEC
MIN
24
20
16 8
4
12
HOUR
0
8
2
4
6
60
10
50
30
40
20
1/20SEC
SRC
7
0
0
4
0
0
T
M
E
.
C
H
R
.
3
0
0
8
0
0
9
0
0
A
L
T
I
T
U
D
E
0
U
N
I
T
:
m
1
0
0
A
L
T
.
T
M
E
.
2
0
0
6
0
0
5
0
0
0
90
80
10
50
70
40
30
MIN
S
T
.
S
T
P
.
2
0
SEC
60
7
100m
C
H
R
N
2
Mode hand :B
Hour hand :D
24-hour hand :F
A: Function hand
C: Minute hand
E: Crown
G: Second hand
1
Button
Button
Name Time Mode Chronograph Mode
Altitude hand Ι... Indicates measurements Indicates measurements
A:
Function hand
Unit: 10 m of less than 1 minute. of 1 minute or over.
Chronograph second hand Chronograph minute hand
Altitude hand ΙΙ ... Indicates chronograph Indicates chronograph
B:Mode hand Unit: 1,000 m measurements of less measurements of
than 1 minute. 1 minute or more.
C:Minute hand Always displays minutes.
D:Hour hand Always displays hours.
E:Crown Used to set the time and date.
F:24-hour hand Always displays 24-hour time in conjunction with the hour hand.
G:Second hand Displays seconds
Chronograph 1/20 second hand
Chronograph second hand
1:Button 1
Chronograph start/stop/reset, continuous altimetry, elevation compensation
2:Button 2Switching modes among Time, Chronograph and Altitude Correction
V : Pressure (altimetry) sensor: .........Detects the atmospheric pressure and displays as
altimetry via an IC.

English
Be careful of A.M. and P.M. with the 24-hour hand.
Push the crown back to its original position. The watch will then resume
with the correct time.
2. Setting the Date
Pull the crown out one step.
Set the desired date by turning the crown.
Push the crown back to its original position.
Note:If you set the date between the hours of 9 PM and 1 AM, the date may
not change according to the calendar.
*If your watch is of a type with a screw-lock crown, tighten the crown after
setting the time and/or date.
English
B. Setting the Time and Date
[Time Mode]
• The Time Mode displays both
12- and 24-hour time.
• The hour, second and 24-hour
hands indicate the time even
when the watch is in
Chronograph Mode.
[Setting the Time and Date]
1. Setting the Time
If your watch is of a type with a
screw-lock crown, unscrew the
crown.
Pull the crown out two steps.
The second hand will spin rapidly
and stop at 0.
Set the hours and minutes to the
current time by turning the crown.
98
24
20
16 8
4
12
HOUR
0
8
2
4
6
60
10
50
30
40
20
1/20SEC
SRC
7
0
0
4
0
0
T
M
E
.
C
H
R
.
3
0
0
8
0
0
9
0
0
A
L
T
I
T
U
D
E
0
U
N
I
T
:
m
1
0
0
A
L
T
.
T
M
E
.
2
0
0
6
0
0
5
0
0
0
90
80
10
50
70
40
30
MIN
S
T
.
S
T
P
.
2
0
SEC
60
7
C
D
FG
Setting
the time
Setting
the date
1
2
3
1
2
3

English
2. Reading the Altimetry Display
(1) Altitude from 0 (2) Altitude from 1,000 (3) Altitude from -300
to 1,000 m to 2,000 m to 0 m
* The figure below shows * The figure below shows * The figure below shows
an altitude of 190 m. an altitude of 1,350 m. an altitude of -100 m.
English
C. Altimetry 1. Altimetry
•The altimeter automatically measures
altitude every hour in Time Mode.
•The altimeter measures and displays
from -300 to 5,000 m in 10 m
gradation.
•Altitude hand [I] (A) is interconnected
with altitude hand [II] (B) to display
the current altitude.
Altitude hand [I] (A): Displays the
altitude in 10 m gradation.
Altitude hand [II] (B): Displays the
altitude in 1,000 m gradation.
Note: The altimeter displays "-300 m"
for an altitude of less than -300
m, and "5,000 m" for over than
5,000m.
1110
-30 10
20
30
40
50
ALTITUDE
SEC
MIN
7
0
0
4
0
0
T
M
E
.
C
H
R
.
3
0
0
8
0
0
9
0
0
A
L
T
I
T
U
D
E
0
U
N
I
T
:
m
1
0
0
A
L
T
.
T
M
E
.
2
0
0
6
0
0
5
0
0
0
90
80
10
50
70
40
30
MIN
S
T
.
S
T
P
.
2
0
SEC
60
7
100m
C
H
R
A
B
-30 10
20
30
40
50
ALTITUDE
SEC
MIN
7
0
0
4
0
0
T
M
E
.
C
H
R
.
3
0
0
8
0
0
9
0
0
A
L
T
I
T
U
D
E
0
U
N
I
T
:
m
1
0
0
A
L
T
.
T
M
E
.
2
0
0
6
0
0
5
0
0
0
90
80
10
50
70
40
30
MIN
S
T
.
S
T
P
.
2
0
SEC
60
7
100m
C
H
R
-30 10
20
30
40
50
ALTITUDE
SEC
MIN
7
0
0
4
0
0
T
M
E
.
C
H
R
.
3
0
0
8
0
0
9
0
0
A
L
T
I
T
U
D
E
0
U
N
I
T
:
m
1
0
0
A
L
T
.
T
M
E
.
2
0
0
6
0
0
5
0
0
0
90
80
10
50
70
40
30
MIN
S
T
.
S
T
P
.
2
0
SEC
60
7
100m
C
H
R
X
4
0
0
T
M
E
.
C
H
R
.
3
0
40
30
-30 10
20
30
40
50
ALTITUDE
SEC
MIN
7
0
0
4
0
0
T
M
E
.
C
H
R
.
3
0
0
8
0
0
9
0
0
A
L
T
I
T
U
D
E
0
U
N
I
T
:
m
1
0
0
A
L
T
.
T
M
E
.
2
0
0
6
0
0
5
0
0
0
90
80
10
50
70
40
30
MIN
S
T
.
S
T
P
.
2
0
SEC
60
7
100m
C
H
R
X
Altitude hand [Ι] (A)
indicates 190 m.
Altitude hand [Ι] (A)
indicates 350 m.
Altitude hand [ΙΙ]
(B) points to a position
equivalent to -0.1.
Altitude hand [Ι] (A)
indicates -100 m.
Altitude hand [ΙΙ]
(B) points to a position
equivalent to 350 m.
Altitude hand [ΙΙ]
(B) points to a position
equivalent to 350 m.

English
D. Altitude Compensation
[Altitude Compensation]
The altitude displayed by this watch is relative altitude based on standard
atmosphere. To obtain the correct altitude during mountain climbing, the al-
titude displayed by this watch must be aligned with an accurate altitude at
ageographical point of reference (triangulation station, first-order benchmark,
an altitude on an accurate map, etc.). Such an operation is called "altitude
correction." If air pressure changes 1 hPa, the altitude difference will be
approximately 10 m.
Therefore, altitude compensation must be
made several times a day if the
weather changes drastically
during mountain
climbing.
English
3. Continuous Altimetry
The watch shows continuous changes in
altitude once every 5 seconds for 30
minutes after the starting measurement
for altitudes.
• Measuring the Altitudes Press button
2once in Time Mode. The second
hand changes to operate on an
extended 2-second increments basis.
This indicates that the watch is now
in Continuous AltimetryMode.
Pressing button 2 once returns the
watch to Altimeter Mode. Also, the
watch will automatically return to
Altimeter Mode 30 minutes after
being set to Continuous Altimetry
Mode even if no button is pressed.
1312
2
Time Mode
Continuous Altimetry Mode
(Irregular 2-second increments)
-30 10
20
30
40
50
ALTITUDE
SEC
MIN
0
8
2
4
6
60
10
50
30
40
20
1/20SEC
SRC
7
0
0
4
0
0
T
M
E
.
C
H
R
.
3
0
0
8
0
0
9
0
0
A
L
T
I
T
U
D
E
0
U
N
I
T
:
m
1
0
0
A
L
T
.
T
M
E
.
2
0
0
6
0
0
5
0
0
0
90
80
10
50
70
40
30
MIN
S
T
.
S
T
P
.
2
0
SEC
60
7
X
100m
C
H
R
A
2
B
G
First altitude compensation
(at a reference point such as
triangulation station, etc.)
Starting point
300m
1,500m
2,000m
Second altitude compensation
(at a reference point)
Summit

[Compensating the Altitude]
The current altitude can be
corrected within a range of
±300 m.
English
Compensation
a) Press button for more than 2 seconds in Time Mode (or Continuous
Altimetry Mode). The second hand (G) changes to indicate 0.5-second
increments. This indicates that the watch is now in Altitude Compensation
Mode.
b) Press button or to correct the altitude.
•Button : Altitude Hand [I] (A) decrement up by 10 m in each time
the button is pressed.
•Button : Altitude Hand [I] (A) increment by 10 m in each time the
button is pressed.
c) After compensation is completed, return to Time Mode (or Continuous
AltimetryMode).
Pressing button for more than 2 seconds returns the watch to Time
Mode (or Continuous Altimetry Mode).
Note: If the watch is left in Altitude Compensation Mode for more
than 1 minute it will automatically return to Time Mode (or
Continuous Altimetry Mode. Auto Return)
English
1514
2
2
2
Time Mode
Continuous
Altimetry Mode
Altitude
Compensation Mode
Auto Return
Auto Return
[After 1 minute of
leaving the watch
as-is]
[Thirty minutes
after starting
measurement]
-30 10
20
30
40
50
ALTITUDE
SEC
MIN
0
8
2
4
6
60
10
50
30
40
20
1/20SEC
SRC
7
0
0
4
0
0
T
M
E
.
C
H
R
.
3
0
0
8
0
0
9
0
0
A
L
T
I
T
U
D
E
0
U
N
I
T
:
m
1
0
0
A
L
T
.
T
M
E
.
2
0
0
6
0
0
5
0
0
0
90
80
10
50
70
40
30
MIN
S
T
.
S
T
P
.
2
0
SEC
60
7
X
100m
C
H
R
A
2
B
G
1
(0.5-second increments)
2
21
2
1
2

English
3. Reading the Chronograph's Scales
English
E. Chronograph
1. Changing to Chronograph Mode
Press button once in Time Mode. The function hand (A) and the second hand (G) will
move forward to the 0 position. The mode hand (B) will advance to SEC (seconds). The
watch is now in Chronograph Mode (reset).
*If the watch is left in Reset Chronograph Mode for 3 minutes it will automatically return to Time Mode.
2. Chronograph Measurement
Amaximum of 99 minutes and 59 seconds may be measured by the chronograph. After
that, measurement stops automatically and the chronograph returns to the reset position.
Measurements of less than 1 minute
The chronograph measures in units of 1/20 (0.05 seconds).
Measurement is indicated by the chronograph's 1/20 hand (G)
and the chronograph's second hand (A). The mode hand (B)
indicates the SEC (seconds) zone.™
Measurements of over 1 minute
The chronograph measures in one second increment.
Measurement is indicated by the chronograph's second hand (G)
and the chronograph's minute hand (A). The mode hand (B)
indicates the MIN (minutes) zone.
1716
-30 10
20
30
40
50
ALTITUDE
SEC
MIN
0
8
2
4
6
60
10
50
30
40
20
1/20SEC
SRC
7
0
0
4
0
0
T
M
E
.
C
H
R
.
3
0
0
8
0
0
9
0
0
A
L
T
I
T
U
D
E
0
U
N
I
T
:
m
1
0
0
A
L
T
.
T
M
E
.
2
0
0
6
0
0
5
0
0
0
90
80
10
50
70
40
30
MIN
S
T
.
S
T
P
.
2
0
SEC
60
7
X
100m
C
H
R
2
A
G
1
B
[Resetting the chronograph]
-30 10
20
30
40
50
ALTITUDE
SEC
MIN
0
8
2
4
6
60
10
50
30
40
20
1/20SEC
SRC
7
0
0
4
0
0
T
M
E
.
C
H
R
.
3
0
0
8
0
0
9
0
0
A
L
T
I
T
U
D
E
0
U
N
I
T
:
m
1
0
0
A
L
T
.
T
M
E
.
2
0
0
6
0
0
5
0
0
0
90
80
10
50
70
40
30
MIN
S
T
.
S
T
P
.
2
0
SEC
60
7
X
100m
C
H
R
-30 10
20
30
40
50
ALTITUDE
SEC
MIN
0
8
2
4
6
60
10
50
30
40
20
1/20SEC
SRC
7
0
0
4
0
0
T
M
E
.
C
H
R
.
3
0
0
8
0
0
9
0
0
A
L
T
I
T
U
D
E
0
U
N
I
T
:
m
1
0
0
A
L
T
.
T
M
E
.
2
0
0
6
0
0
5
0
0
0
90
80
10
50
70
40
30
MIN
S
T
.
S
T
P
.
2
0
SEC
60
7
X
100m
C
H
R
00 minute
99 minutes
18 seconds
80 minutes
00 second
33 seconds
0.45 seconds60 seconds
A
f
t
e
r
6
0
s
e
c
o
n
d
s
,
t
h
e
h
a
n
d
s
f
o
r
w
a
r
d
s
t
o
t
h
e
1
-
m
i
n
u
t
e
p
o
s
i
t
i
o
n
.
1
2
Measurements of less than 1 minute: Values are indicated
by the chronograph's second hand (A) and 1/20 hand
(G). To read seconds, use the outer scales. In Fig. a on the
left, the chronograph displays 33.45 seconds.
Once 60 seconds is reached, the second hand (A) will
change to the minute hand and indicate 1 minute.
Measurements of more than 1 minute: Values are
indicated by the chronograph's minute hand (A) and
second hand (G). To read minutes, use the outer scales. In
Fig. b on the left, the chronograph indicates 80 minutes
and 18 seconds (1 hour, 20 minutes and 18 seconds).
Once 100 minutes is reached, measurement
automatically stops and the chronograph returns to the
reset position.
1 2
1 2
Measurements of less than 1 minute Measurements of over 1 minute
Fig. a Fig. b
1

4. Operating the Chronograph Mode
Note: The chronograph will be reset if the crown is pulled out
two steps during chronograph measurement.
English
F. Battery-Low Warning Function
Accurate altimetry measurements cannot be made when the battery is low. To
prevent inaccurate measurement, the altimeter stops measurement and the
second hand (G) moves in 2-second increments to notify of battery low. Altitude
hands I and II will stop at the altitude position where measurement has been
stopped.
English
1918
Start
Reset
Stop
Start RestartStop
Reset
Stop
Time Mode
1
1
2
2
2 2
2 2
2
2 2
2
1
Time Mode
(1) General measurement
(2) Accumulated measurement
Press button 1
Press button 2
Press button 2for 2 second or more.
2
1
-30 10
20
30
40
50
ALTITUDE
SEC
MIN
0
8
2
4
6
60
10
50
30
40
20
1/20SEC
SRC
7
0
0
4
0
0
T
M
E
.
C
H
R
.
3
0
0
8
0
0
9
0
0
A
L
T
I
T
U
D
E
0
U
N
I
T
:
m
1
0
0
A
L
T
.
T
M
E
.
2
0
0
6
0
0
5
0
0
0
90
80
10
50
70
40
30
MIN
S
T
.
S
T
P
.
2
0
SEC
60
7
X
100m
C
H
R
0
8
2
4
6
60
10
50
30
40
20
1/20SEC
SRC
7
0
0
4
0
0
T
M
E
.
C
H
R
.
3
0
0
8
0
0
9
0
0
A
L
T
I
T
U
D
E
0
U
N
I
T
:
m
1
0
0
A
L
T
.
T
M
E
.
2
0
0
6
0
0
5
0
0
0
90
80
10
50
70
40
30
MIN
S
T
.
S
T
P
.
2
0
SEC
60
7
G

English
H. Precautions for Handling
[Pressure Sensor]
• The sensor cover is for protecting the
pressure sensor. Do NOT remove it.
• The sensor area of this watch requires
proper ventilation. If the sensor area is
cealed with foreign articles, the altimetry
function will not operate correctly.If the
sensor area is clogged with dust, sand
or other dirt, take it to our Service Center.
•If water has entered and frozen in the
sensor area, the sensor may not operate
correctly. If water has entered the watch,
dry it thoroughly before using it. The
watch can suffer substantial damage
from contact with salt water.If such
contact occurs, it should be thorougly
rinsed with fresh water immediately.
English
G. Adjusting Hands To “0” Position
Use the following steps to adjust the hands to the “0” position if the chronograph hands do
not point to the “0” position after battery replacement or when resetting the chronograph, or
if the seconds hand does not return to the “0” position when the crown is pulled out two steps.
1. Pull the crown out two steps.
2. Depress buttons 1 and 2 simultaneously for more
than 2 seconds. The function hand (A) will moves
lightly.
3. Press button 2 and respectively align the function
hand (A) and the mode hand (B) to the zero
position. (The function
hands (A) is interlocked with the mode hand (B).)
Depressing the button will advance the
function/mode hands.
4. Press button1to align the second hand to the zero
position. * Depressing the button will advance the
second hand.
5. Push the crown back to its original position.
Function hand (A) will change to Altimetry Mode.
NOTE: Make sure to perform zero positioning every time after replacing the battery.
Otherwise, correct altimetry and chronograph measurement may not be performed.
2120
-30 10
20
30
40
50
ALTITUDE
SEC
MIN
24
20
16 8
4
12
HOUR
0
8
2
4
6
60
10
50
30
40
20
1/20SEC
SRC
7
0
0
4
0
0
T
M
E
.
C
H
R
.
3
0
0
8
0
0
9
0
0
A
L
T
I
T
U
D
E
0
U
N
I
T
:
m
1
0
0
A
L
T
.
T
M
E
.
2
0
0
6
0
0
5
0
0
0
90
80
10
50
70
40
30
MIN
S
T
.
S
T
P
.
2
0
SEC
60
7
X
100m
C
H
R
N
10
20
30
40
50
ALTITUDE
SEC
MIN
60
10
50
30
40
20
7
0
0
4
0
0
T
M
E
.
C
H
R
.
3
0
0
8
0
0
9
0
0
A
L
T
I
T
U
D
E
0
U
N
I
T
:
m
1
0
0
A
L
T
.
T
M
E
.
2
0
0
6
0
0
5
0
0
0
90
80
10
50
70
40
30
MIN
S
T
.
S
T
P
.
2
0
SEC
60
C
H
R
2
1

English
Chronograph function:
Maximum measured display: 99 minutes
and 59 seconds
Measurements of less than1 minute are in
1/20 (0.05) second gradation
Measurements of more than 1 minute are
in one second increment
Battery-low warning function
•Battery life: ..................................Approx. 2 years
Operating conditions:
When using the continuous altimetry
function for 30 minutes and the
chronograph for 100 minutes per day
•Battery number: ........................... SR 927W
English
I. Product Specifications
•Model: ........................................Analog quartz watch with altimeter
•Accuracy of time: .........................±20 seconds/month (5 to 35°C)
•Quartz frequency: ........................32,768 Hz
•Accuracy of altimetry:....................±150 (relative accuracy when measured
according to standard atmosphere)
Assured accuracy temperature range:
10 to 40°C
•Operating temperature range:........ –20 to 55°C
•Additional functions:......................Calendar (date)
Altimetry function: –300 to 5,000 m
(in 10 m gradation)
Normal altimetry measurements:
every hour.
Continuous altimetry measures:
every5seconds (for 30 minutes)
Altitude correction function:
Compensation can be made up to ±300 m
2322

Deutsch
Deutsch
Diese mit einem Höenmesser ausgestattete analoge Quarzuhr verfügt neben den
normalen Uhrfunktionen über Sonderfunktionen, die besonders beim
Bergsteigen und Wandernvon Nutzen sind. (Bitte beachten Sie, daß die
Resultate der Höhenmeßfunktion nur als grober Anhalt zu betrachten sind.)
English
2524

Deutsch
Vorsichtsmaßnahmen bei Gebrauch
Dieser Uhr ist kein amtlich zugelassenes Meßinstrument.
Verlassen Sie sich bei Beurteilung von gefährlichen Situationen keinesfalls auf die
Meßergebnisse des Höhenmessers.
Machen Sie sich unbedingt vor Nutzung des Höhenmessers mit den nachstehend aufgeführten
Vorsichtsmaßnahmen vertraut. Und denken Sie immer daran, daß die
Höhenmeßfunktion nur grobe Anhaltswerte liefert.
(1) Fälle, in denen die Nutzung der Höhenmeßfunktion unterbleiben sollte.
In den nachstehenden Fällen sollte der Höhenmesser nicht genutzt werden:
•Beurteilung der eigenen Aktionen oder gefährlicher Situationen in einem Umfeld mit
drastischen Temperaturschwankungen.
•In einem Umfeld mit Druckschwankungen z.B. in einem Luftfahrzeug oder Gebäude
(korrekte Messung unmöglich).
•Erhebliche Höhenänderungen innnerhalb kurzer Zeit.
•Nutzung der Uhr in einer Weise, wie sie normalerweise nicht in dieser Bedienungsanleitung
vorgesehen ist.
(2) Höhenmeßfunktion
Diese Uhr zeigt die relative Höhe an, basierend auf dem mit dem Sensor gemessenen
Luftdruck und “dem internationalen Standardluftdruck und der Standardhöhe”. Daher ändert
sich der angezeigte Höhenmeßwertmit dem Luftdruck, auch wenn die Messung am selben
Deutsch
Inhaltsverzeichnis
Vorsichtsmaßnahmen bei Gebrauch ....................................................... 27
Grundfunktions des Höhenmessers ......................................................... 28
Name of Parts...................................................................................... 30
A. Bedienungsanweisungen ................................................................... 31
B. Einstellung von Uhrzeit und Datum ..................................................... 32
C. Höhenmeßfunktion ........................................................................... 34
D. Höhenkorrektur ................................................................................ 37
E. Stoppuhr........................................................................................... 40
F. Batterie-Warnanzeige ........................................................................ 43
G. Rückstellung auf Nullposition ............................................................ 44
H. Vorsichtsmaßnahmen ........................................................................ 45
I. Technische Daten ............................................................................... 46
2726

Höhe (m) Luftdruck Temperature (°C) Temperaturdifferenz alle 1.000 m
5,000 540.2 –17.5
4,000 616.4 –11.0
3,000 701.1 –4.5 Ca. 6,5 °C
2,000 795.0 2.0
1,000 898.7 8.5
0 1,013.25 15.0
g(aus “International Standard Atmospheric”)
Grundfunktions des Höhenmessers
Diese Uhr ist zur Berechnung der Höhe gemäß den Änderungen des Luftdrucks bestimmt, und zwar anhand der Beziehung zwischen
Luftdruck und Höhe, basierend auf den Bedingungen der Standardatmosphärel nach den Festlegungen der ICAO ("International Civil
Aviation Organization"). Zur Bestimmung der richtigen (absoluten) Höhe an der Uhr ist der angezeigte Höhenwert mit einem
Bezugspunkt zu vergleichen, dessen Höhe genau bekannt ist (z.B. Triangulationspunkt oder Höhenmarke). Dieser Vorgang wird als
"Höhenkorrektur" bezeichnet (siehe Seite 12).
*Standardatmosphäre: Die von der ICAO im Jahr 1964 eingeführte ICAO-Standard-atmosphäre setzt bei einer Temperatur von
15°C einen Luftdruck von 1013,25 hPa mit einer Elevation von 0 gleich. Der Luftdruck ändert sich jedoch ständig an jedem
beliebigen Ort.
Der Betrieb dieser Uhr beruht auf ISA-Normen. Die folgende Tabelle einen Überblick über die ISA Wetezuordunungen.
Deutsch
Ort erfolgt. Von der Ausführung der Höhenmessung bis zur Anzeige des Höhenmeßwerts
vergehen ca. 5 Sekunden (im Dauerhöhenmeßbetrieb). Die Höhenmeßfunktion darf daher
nicht bei der Ausübung von Sportarten genutzt werden, bei denen in kurzer Zeit erhebliche
Höhenänderungen auftreten (z.B. "Sky Diving").
Nach 30 Minuten wird automatisch von Dauerhöhenmeßbetrieb auf normalen
Höhenmeßbetrieb umgeschaltet, in dem die Messung stündlich erfolgt. Zur Fortsetzung des
Dauerhöhenmeßbetriebs ist gemäß den entsprechenden Anweisungen in der
Bedienungsanleitung vorzugehen. Um die Höhenmeßfunktion der Uhr effizient nutzen zu
können, ist die Höhe stets in bezug auf den eigenen Standortzu korrigieren.
(3) Drucksensor
Keinesfalls den Drucksensor der Uhr zerlegen oder mit dünnen, spitzen Objekten auf ihn
drücken. Dafür sorgen, daß kein Staub in den Drucksensor eindringt.
(4) Batterie
Die Lebensdauer der Batterie für diese Uhr beträgt unter normalen Betriebsbedingungen zwei
Jahre (siehe "Batterielebensdauer" unter Abschnitt "J. Technische Daten"). Die Lebensdauer
richtet sich jedoch erheblich nach den Nutzungsbedingungen der Funktionen, so daß sich auf
jeden Fall stets ein möglichst frühzeitiger Batterieaustausch empfiehlt.
2928

Deutsch
A. Bedienungsanweisungen
Deutsch
Name of Parts
3130
-30 10
20
30
40
50
ALTITUDE
SEC
MIN
24
20
16 8
4
12
HOUR
0
8
2
4
6
60
10
50
30
40
20
1/20SEC
SRC
7
0
0
4
0
0
T
M
E
.
C
H
R
.
3
0
0
8
0
0
9
0
0
A
L
T
I
T
U
D
E
0
U
N
I
T
:
m
1
0
0
A
L
T
.
T
M
E
.
2
0
0
6
0
0
5
0
0
0
90
80
10
50
70
40
30
MIN
S
T
.
S
T
P
.
2
0
SEC
60
7
100m
C
H
R
N
2
Betriebs- :B
Stundenzeiger :D
24-Stunden- :F
A: Funcionszeiger
C: Minutenzeiger
E: Krone
G: Sekundenzeiger
1
Taste
Taste
zeiger
artenzeiger
Bezeichnung Zeitmeßbetrieb Stoppuhrbetrieb
Höhenzeiger ... Anzeige von Meßwerten Anzeige von Meßwerten von
A:
Functionszeiger
Maßeinheit: 10/100m unter 1 Minute 1 Minute oder mehr
Stoppuhr-Sekundenzeiger Stoppuhr-Minutenzeiger
Betriebs- Höhenzeiger ... Anzeige von Stoppuhr- Anzeige von Stoppuhr-
B:artenzeiger Maßeinheit: 1.000 m Meßwerten unter Meßwerten von
1Minute 1 Minute oder mehr
C:
Minutenzeiger
Stets Minutenanzeige
D:
Stundenzeiger
Stets Stundenanzeige
E:Krone Zur Einstellung von Uhrzeit und Datum
F:
24-Stundenzeiger
Stets Anzeige der Uhrzeit im 24-Stunden-Format zusammen mit dem Stundenzeiger
G:
Sekundenzeiger
Sekundenanzeige 1/20-Sekundenzeiger Sekundenzeiger der
der Stoppuhrfunktion Stoppuhrfunktion
1:Taste 1Start/Stop/Rücksetzung der Stoppuhrfunktion, Dauerhöhenmeßbetrieb, Höhenkorrektur
2:Taste 2Umschaltung zwischen Zeitanzeige, Stoppuhrbetrieb und Höhenkorrektur
V : Drucksensor (für Höhenmessung): .....Erfassung des Luftdrucks und Anzeige als Höhenmeßwert mit
Hilfe eines ICs.
N

Deutsch
rasch bis in die Stellung 0, wo er anhält.
Durch Drehen der Krone die aktuelle Uhrzeit in Stunden und Minuten
einstellen.
Bei der Einstellung des 24-Stunden-Zeigers sind Vormittags- und
Nachmittagsstunden (A.M. und P.M.) zu beachten.
Die Krone in ihre Ausgangsposition zurückdrücken. Daraufhin beginnt die
Uhr mit der Messung der korrekten Uhrzeit.
2. Einstellung des Datums
Die Krone eine Einraststellung herausziehen.
Durch Drehen der Krone das gewünschte Datum einstellen.
Die Krone in ihre Ausgangsposition zurückdrücken.
Hinweis: Wird das Datum zwischen 21.00 Uhr und 1.00 Uhr des folgenden
Tages eingestellt, so erfolgt u.U. kein kalendergerechter
Datumswechsel.
*Verfügt Ihre Uhr über eine Krone mit Schraubarretierung, so ist die Krone
nach Einstellung von Uhrzeit/Datum durch entsprechendes Drehen zu
verriegeln.
Deutsch
B. Einstellung von Uhrzeit und Datum
[Zeitanzeigebetrieb]
•Im Zeitanzeigebetrieb wird die Uhrzeit
sowohl im 12- als auch 24-Stunden-
Format angezeigt.
•Der Stunden-, Sekunden- und 24-
Stundenzeiger zeigen stets die aktuelle
Uhrzeit an, und zwar auch dann, wenn
die Uhr im Stoppuhrbetrieb ist.
[Einstellung von Uhrzeit und Datum]
1. Einstellung der Uhrzeit
Verfügt Ihre Uhr über eine Krone mit
Schraubarretierung, so ist die Krone
zunächst durch entsprechendes Drehen zu
entriegeln.
Die Krone zwei Einraststellungen
herausziehen.
Daraufhin dreht sich der Sekundenzeiger
3332
24
20
16 8
4
12
HOUR
0
8
2
4
6
60
10
50
30
40
20
1/20SEC
SRC
7
0
0
4
0
0
T
M
E
.
C
H
R
.
3
0
0
8
0
0
9
0
0
A
L
T
I
T
U
D
E
0
U
N
I
T
:
m
1
0
0
A
L
T
.
T
M
E
.
2
0
0
6
0
0
5
0
0
0
90
80
10
50
70
40
30
MIN
S
T
.
S
T
P
.
2
0
SEC
60
7
C
D
FG
Einstellung
der Uhrzeit
Einstellung
des Datums
1
2
1
2
3
3

Deutsch
2. Ablesen der Höhenmesser-Anzeige
(1) Höhe von 0 (2) Höhe von 1000 (3) Höhe von –300
bis 1000 m bis 2000 m bis 0 m
*Die nachstehende Abblidung * Die nachstehende Abbildung * Die nachstehende Abbildung
zeigt eine Höhe von 190 m. zeigt eine Höhe von 1350 m. zeigt eine Höhe von –100 m.
Deutsch
C. Höhenmeßfunktion
1. Höhenmessung
•Im Zeitanzeigebetrieb mißt der Höhenmesser
automatisch jede Stunde die Höhe.
•Der Höhenmesser ist für die Messung und
Anzeige der Höhe im Bereich von -300 bis
5000 m ausgelegt. (Skaleneinheit: 10 m)
• Höhenzeiger I (A) wirkt mit Höhenzeiger
II (B) zur Anzeige der aktuellen Höhe
zusammen.
Höhenzeiger I (A): Anzeige der Höhe in
Einheiten von 10 m.
Höhenzeiger II (B): Anzeige der Höhe in
Einheiten von 1000 m.
Hinweis: Bei Höhen von weniger als -300 m
und über 5000 m zeigt der
Höhenmesser "-300 m" oder
”5000“ m an.
3534
-30 10
20
30
40
50
ALTITUDE
SEC
MIN
7
0
0
4
0
0
T
M
E
.
C
H
R
.
3
0
0
8
0
0
9
0
0
A
L
T
I
T
U
D
E
0
U
N
I
T
:
m
1
0
0
A
L
T
.
T
M
E
.
2
0
0
6
0
0
5
0
0
0
90
80
10
50
70
40
30
MIN
S
T
.
S
T
P
.
2
0
SEC
60
7
100m
C
H
R
A
B
A: Hohenzeiger Ι
B: Hohenzeiger ΙΙ
-30 10
20
30
40
50
ALTITUDE
SEC
MIN
7
0
0
4
0
0
T
M
E
.
C
H
R
.
3
0
0
8
0
0
9
0
0
A
L
T
I
T
U
D
E
0
U
N
I
T
:
m
1
0
0
A
L
T
.
T
M
E
.
2
0
0
6
0
0
5
0
0
0
90
80
10
50
70
40
30
MIN
S
T
.
S
T
P
.
2
0
SEC
60
7
100m
C
H
R
-30 10
20
30
40
50
ALTITUDE
SEC
MIN
7
0
0
4
0
0
T
M
E
.
C
H
R
.
3
0
0
8
0
0
9
0
0
A
L
T
I
T
U
D
E
0
U
N
I
T
:
m
1
0
0
A
L
T
.
T
M
E
.
2
0
0
6
0
0
5
0
0
0
90
80
10
50
70
40
30
MIN
S
T
.
S
T
P
.
2
0
SEC
60
7
100m
C
H
R
X
4
0
0
T
M
E
.
C
H
R
.
3
0
40
30
-30 10
20
30
40
50
ALTITUDE
SEC
MIN
7
0
0
4
0
0
T
M
E
.
C
H
R
.
3
0
0
8
0
0
9
0
0
A
L
T
I
T
U
D
E
0
U
N
I
T
:
m
1
0
0
A
L
T
.
T
M
E
.
2
0
0
6
0
0
5
0
0
0
90
80
10
50
70
40
30
MIN
S
T
.
S
T
P
.
2
0
SEC
60
7
100m
C
H
R
X
Höhenzeiger [Ι] (A)
zeigt 190 m an.
Höhenzeiger [Ι] (A)
zeigt 350 m.
Höhenzeiger [ΙΙ] (B) zeigt
auf eine Position, die einer
Höhe von -0.1 entspricht.
Höhenzeiger [Ι] (A)
izeigt -100 m.
Höhenzeiger [ΙΙ] (B) zeigt
auf eine Position, die einer
Höhe von 350 m entspricht.
Höhenzeiger [ΙΙ] (B) zeigt
auf eine Position, die einer
Höhe von 350 m entspricht.

1
Zeitanzeigebetrieb
Dauerhöhenmeßbetrieb
(Anzeige in 2-Sekunden-Schritten)
-30 10
20
30
40
50
ALTITUDE
SEC
MIN
0
8
2
4
6
60
10
50
30
40
20
1/20SEC
SRC
7
0
0
4
0
0
T
M
E
.
C
H
R
.
3
0
0
8
0
0
9
0
0
A
L
T
I
T
U
D
E
0
U
N
I
T
:
m
1
0
0
A
L
T
.
T
M
E
.
2
0
0
6
0
0
5
0
0
0
90
80
10
50
70
40
30
MIN
S
T
.
S
T
P
.
2
0
SEC
60
7
X
100m
C
H
R
A
2
B
G
Deutsch
D. Höhenkorrektur
[Höhenkorrektur]
Die von dieser Uhr angezeigte Höhe ist die relative Höhe, basierend auf der
Standardatmosphäre. Zur Bestimmung der korrekten Höhe beim Bergsteigen ist der von der
Uhr angezeigte Höhenmarke mit der genau bekannten Höhe an einem geografischen
Bezugspunkt (z.B. Triangulationspunkt, Höhenmarke erster Ordnung oder Höheneintragung
auf einer zuverlässigen Karte) in Übereinstimmung zu bringen. Dieser Vorgang wird als
"Höhenkorrektur" bezeichnet. Eine Luftdruckänderung von 1 hPa
entspricht einer Höhendifferenz von ca. 10 hPa. Daher ist
z.B. bei Wetterumschlägen während des
Bergsteigens mehrmals täglich eine
Höhenkorrektur fällig.
Deutsch
3. Dauerhöhenmessung
Nach dem Auslösen der Höhenmessung
zeigt die Uhr 30 Minuten lang kontin- uierlich
alle 5 Sekunden die Höhe an.
• Höhenmessung Im Zeitanzeigebetrieb
die Taste einmal drücken. Daraufhin
wechselt der Sekundenzeiger auf
Anzeige in 2-Sekunden-Schritten über
zur Bestätigung dafür, daß die Uhr im
Dauerhöhenmeßbetrieb arbeitet.
Durch Drücken der Taste wird die Uhr
auf Höhenmeßbetrieb zurückgestellt.
Darüber hinaus erfolgt im
Dauerhöhenmeßbetrieb nach 30
Minuten die automatische Rückschaltung
auf Höhenmeßbetrieb, auch wenn keine
Taste gedrückt wird.
36
Erste Höhenkorrektur
(z.B. an einem
Triangulationspunkt
als bezugspunkt) Startpunkt
300m
1.500m
2.000m
Zweite Höhenkorrektur
(an einem Bezugspunkt)
Gipfel
37
2
2

Deutsch
Korrektur
a) Im Zeitanzeigebetrieb (oder Dauerhöhenmeßbetrieb) die Taste 2 mehr als 2
Sekunden lang drücken. Daraufhin wechselt der Sekundenzeiger (G) auf
Anzeige in 0,5-Sekunde-Schritten über zur Bestätigung dafür, daß die Uhr
nun im Höhenkorrekturbetrieb arbeitet.
b) Zur Höhenkorrektur die Taste 1oder 2drücken.
• Taste : Bei jedem Tastendruck wird der Höhenzeiger I (A) um 10 m
zurückgestellt.
•Taste : Bei jedem Tastendruck wird der Höhenzeiger I (A) um 10 m
vorgestellt.
c) Nach erfolgter Korrekltur auf Zeitanzeigebetrieb (oder
Dauerhöhenmeßbetrieb) zurückschalten. Durch Drücken der Taste 2 für mehr
als 2 Sekunden wird die Uhr auf Zeitanzeigebetrieb (oder
Dauerhöhenmeßbetrieb) zurückgeschaltet.
Hinweis: Bleibt die Uhr über 1 Minute lang im Höhenkorrekturbetrieb, so s
chaltet sie automatisch auf Zeitanzeigebetrieb (oder
Dauerhöhenmeßbetrieb) zurück
(Automatische Rückschaltung).
Deutsch
2
2
2
Zeitanzeigbetrieb
Dauerhöhenmeßbetrieb
Höhenkorrektur
Automatische
Rückschaltung
[Nach 1 Minute
ohne einen
Bedienvorgang]
Automatische
Rückschaltung
[30Minutennach
Beginn der
Messung]
(Anzeige in 0,5-Sekunden-Schritten)
-30 10
20
30
40
50
ALTITUDE
SEC
MIN
0
8
2
4
6
60
10
50
30
40
20
1/20SEC
SRC
7
0
0
4
0
0
T
M
E
.
C
H
R
.
3
0
0
8
0
0
9
0
0
A
L
T
I
T
U
D
E
0
U
N
I
T
:
m
1
0
0
A
L
T
.
T
M
E
.
2
0
0
6
0
0
5
0
0
0
90
80
10
50
70
40
30
MIN
S
T
.
S
T
P
.
2
0
SEC
60
7
X
100m
C
H
R
A
2
B
G
1
[Korrektur der Höhe]
Die aktuelle Höhe läßt sich in
einem Bereich von ±300 m
korrigieren.
3938
1
2
Table of contents
Languages:
Other Momentum Watch manuals

Momentum
Momentum VS-1 User manual

Momentum
Momentum AQUAMATIC User manual

Momentum
Momentum 4 Operating instructions

Momentum
Momentum Flatline Chrono User manual

Momentum
Momentum VS-3 abc watch Installation guide

Momentum
Momentum HEARTWARE Installation guide

Momentum
Momentum Ten User manual

Momentum
Momentum Three User manual

Momentum
Momentum 12 User manual

Momentum
Momentum VS-1 Installation guide
Popular Watch manuals by other brands

Eterna
Eterna ARTENA user manual

Casio
Casio 2524 user guide

TMI Products
TMI Products VD87 Operation manual

Casio
Casio QW-1475 manual

Christopher Ward
Christopher Ward C40 SpeedHawk Owner's handbook

Chronos Manufactures
Chronos Manufactures Richtenburg R-12300 Lugano Instruction manual / International Guarantee