Monacor img Stage Line LC-9RTX User manual

LC-9RTX
Best.-Nr. 38.5440
®
MONACOR INTERNATIONAL GmbH & Co. KG
•
Zum Falsch 36
•
28307 Bremen
•
Germany
Copyright
©
by MONACOR INTERNATIONAL. All rights reserved. A-1260.99.01.07.2011
wwwwww..iimmggssttaaggeelliinnee..ccoomm
1
2
3
4
5
6
7
Funkfernsteuerung
für Lichteffektgeräte
Bitte lesen Sie diese Anleitung vor dem Betrieb
gründlich durch und heben Sie sie für ein späteres
Nachlesen auf.
1 Einsatzmöglichkeiten
Mit der LC-9RTX lassen sich 4 Lichteffektgeräte
(z. B. LED-620RGBW, LED-640RGBW, TWIST-
50LED oder TWIST-52LED) über die anmeldefreie
Funkfrequenz 433,92 MHz auf bis zu 100m Entfer-
nung unabhängig steuern.
2 Wichtige Hinweise für den Gebrauch
Die Geräte (Sender und Empfänger) entsprechen
allen erforderlichen Richtlinien der EU und sind des-
halb mit gekennzeichnet.
GVerwenden Sie die Geräte nur im Innenbereich
und schützen Sie sie vor Tropf- und Spritzwas-
ser, hoher Luftfeuchtigkeit und Hitze (zulässige
Einsatztemperatur 0 – 40 °C).
GVerwenden Sie zum Reinigen nur ein trockenes,
weiches Tuch, auf keinen Fall Chemikalien oder
Wasser.
GWerden die Geräte zweckentfremdet, falsch ange-
schlossen, nicht richtig bedient oder nicht fachge-
recht repariert, kann keine Haftung für daraus re-
sultierende Sach- oder Personenschäden und
keine Garantie für die Geräte übernommen werden.
3 Inbetriebnahme
1) Den Stecker (1) des Funkempfängers am Licht-
effektgerät anschließen und dieses einschalten.
2) Die Rückseite des Empfängers ist magnetisch
und kann so am Metallgehäuse eines Lichtef-
fektgeräts befestigt werden.
3) Zum Einlegen einer Batterie das Batteriefach auf
der Rückseite des Senders öffnen (Abb. 3).
Eine 12-V-Batterie vom Typ A23/8LR23 (z. B.
LRV-08 aus dem Sortiment von MONACOR) wie
in Abb. 4 in das Batteriefach einsetzen und den
Deckel wieder schließen.
4 Bedienung
1) Zum Zuweisen des Funkempfängers zu einer
Tastengruppe [1 – 4] des Senders die Taste
SET UP (4) drücken. Solange die LED SIGNAL
(3) blinkt, eine Taste (7) der gewünschten Gruppe
am Sender drücken. Die LED flackert kurz und
erlischt dann. Der Empfänger kann anschließend
weiteren Tastengruppen zugewiesen werden.
2) Zum Löschen der Zuordnung des Empfängers
die Taste SET UP ca. 5 s gedrückt halten, bis die
LED SIGNAL leuchtet. Jetzt die Taste noch ein-
mal kurz drücken. Die LED erlischt nach kurzem
Flackern.
3) Wird eine Taste am Sender gedrückt, leuchtet die
LED (6). [Anderenfalls die Batterie im Sender
überprüfen.] Ist der Empfänger der gedrückten
Taste zugeordnet, leuchtet zur Empfangsbestäti-
gung die LED SIGNAL. Die Funktionen der Tas-
ten STAND-BY, FUNCTION und MODE der je-
weiligen Tastengruppe sind abhängig vom ver-
wendeten Lichteffektgerät und in dessen Anlei-
tung beschrieben. Die zu den Tasten gehörenden
Status-LEDs STAND-BY (2) und MODE (5) be-
finden sich am Empfänger.
Änderungen vorbehalten.
Sollen die Geräte endgültig aus dem
Betrieb genommen werden, übergeben Sie
sie zur umweltgerechten Entsorgung einem
örtlichen Recyclingbetrieb. Verbrauchte
Batterien dürfen nicht in den Hausmüll geworfen
werden. Geben Sie sie nur in den Sondermüll
(z. B. Sammelbehälter bei Ihrem Einzelhändler).
Wireless Remote Controller
for Light Effect Units
Please read these operating instructions carefully
prior to operation and keep them for later reference.
1 Applications
With the LC-9RTX, four light effect units (e. g. LED-
620RGBW, LED-640RGBW, TWIST-50LED or
TWIST-52LED) are controlled independently via the
licence-free radio frequency 433.92 MHz at a dis-
tance of up to 100 m.
2 Important Notes
The units (transmitter and receiver) correspond to
all relevant directives of the EU and are therefore
marked with .
GThe units are suitable for indoor use only. Protect
them against dripping water and splash water,
high air humidity and heat (admissible ambient
temperature range 0 – 40 °C).
GFor cleaning only use a dry, soft cloth; never use
water or chemicals.
GNo guarantee claims for the units and no liability
for any resulting personal damage or material
damage will be accepted if the units are used for
other purposes than originally intended, if they
are not correctly connected or operated, or if they
are not repaired in an expert way.
3 Setting the Controller in Operation
1) Connect the plug (1) of the wireless receiver to
the light effect unit. Switch on the light effect unit.
2) The rear side of the receiver is magnetic and
thus easily attached to the metal housing of a
light effect unit.
3) To insert a battery, open the battery compartment
on the rear side of the transmitter (fig. 3).
Insert a 12 V battery of type A23/8LR23 (e. g.
LRV-08 from MONACOR) into the battery com-
partment according to fig. 4, then close the cover.
4 Operation
1) To assign the wireless receiver to a button block
[1 – 4] of the transmitter, press the button SET
UP (4). While the LED SIGNAL (3) keeps flash-
ing, press a button (7) of the desired button block
on the transmitter. The LED flickers briefly before
it is extinguished. Assign the receiver to further
button blocks, if required.
2) To delete the assignment of the receiver, keep
the button SET UP pressed for approx. 5 sec-
onds until the LED SIGNAL lights up. Briefly
press the button once again. The LED flickers
briefly before it is extinguished.
3) When you press a button on the transmitter, the
LED (6) lights up. [If it fails to light up, check the
battery in the transmitter.] If the receiver has
been assigned to the button pressed, the LED
SIGNAL lights up to confirm reception. The func-
tions of the buttons STAND-BY, FUNCTION and
MODE of the corresponding button block depend
on the light effect unit used. For their descriptions
see the corresponding instruction manual. The
status LEDs STAND-BY (2) and MODE (5) be-
longing to the buttons can be found on the re-
ceiver.
Subject to technical modification.
If the units are to be put out of operation
definitively, take them to a local recycling
plant for a disposal which is not harmful to
the environment. Used batteries must not
be placed in the household waste; always take
them to a special waste disposal, e. g. collection
container at your retailer.
D A CH GB

LC-9RTX
Best.-Nr. 38.5440
®
MONACOR INTERNATIONAL GmbH & Co. KG
•
Zum Falsch 36
•
28307 Bremen
•
Germany
Copyright
©
by MONACOR INTERNATIONAL. All rights reserved. A-1260.99.01.07.2011
wwwwww..iimmggssttaaggeelliinnee..ccoomm
1
2
3
4
5
6
7
Télécommande sans fil
pour jeux de lumière
Veuillez lire la présente notice avec attention avant
le fonctionnement et conservez-la pour pouvoir
vous y reporter ultérieurement.
1 Possibilités dʼutilisation
Avec la LC-9RTX, vous pouvez gérer de manière in-
dépendante 4 jeux de lumière (par exemple LED-
620RGBW, LED-640RGBW, TWIST-50LED ou
TWIST-52LED) via la fréquence radio 433,92 MHz
(sans déclaration) jusquʼà 100 m.
2 Conseils importants dʼutilisation
Les appareils (émetteur et récepteur) répondent à
toutes les directives nécessaires de lʼUnion euro-
péenne et portent donc le symbole .
GLes appareils ne sont conçus que pour une utili-
sation en intérieur. Protégez-les de tout type de
projections dʼeau, des éclaboussures, dʼune hu-
midité élevée dʼair et de la chaleur (plage de tem-
pérature de fonctionnement autorisée : 0 – 40 °C).
GPour le nettoyage, utilisez un chiffon sec et doux,
en aucun cas de produits chimiques ou dʼeau.
GNous déclinons toute responsabilité en cas de
dommages matériels ou corporels résultants si
les appareils sont utilisés dans un but autre que
celui pour lequel ils ont été conçus, sʼils ne sont
pas correctement branchés, utilisés ou ne sont
pas réparés par une personne habilitée, en outre,
la garantie deviendrait caduque.
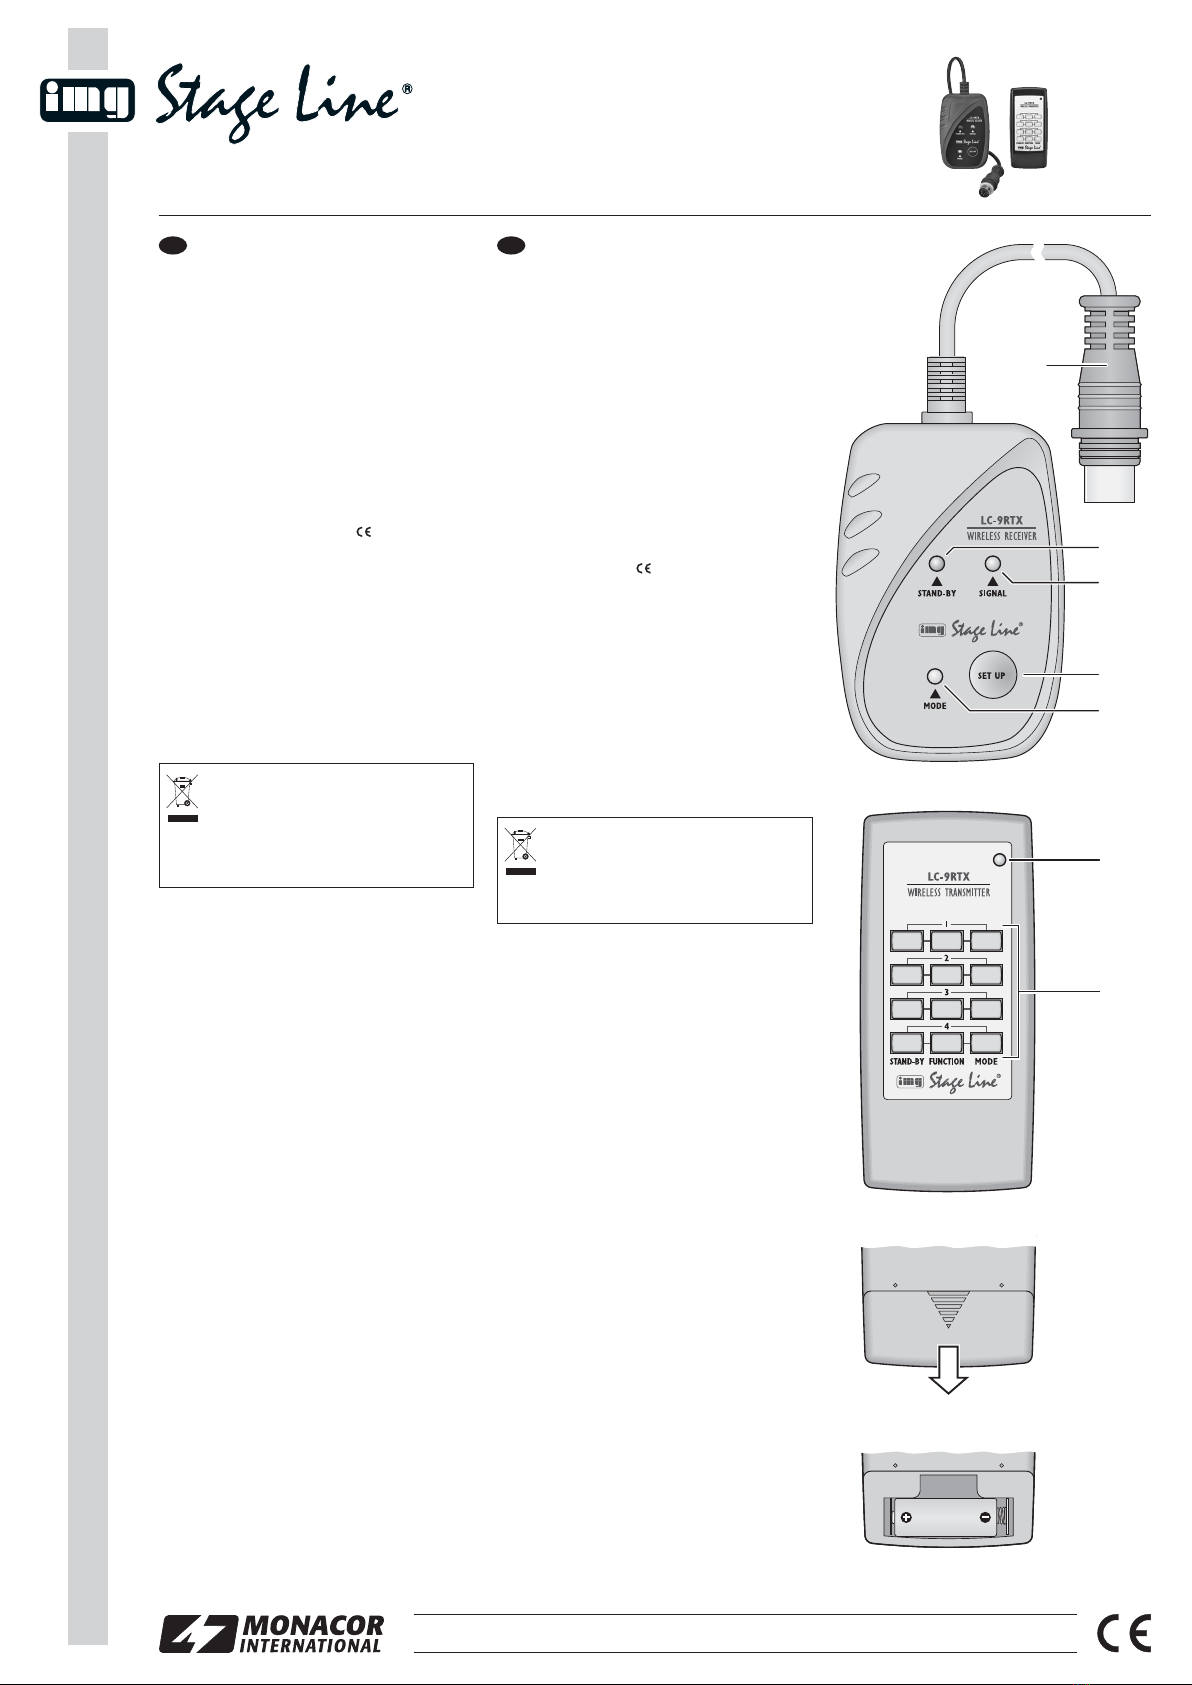
3 Fonctionnement
1) Reliez la fiche (1) du récepteur sans fil au jeu de
lumière et allumez ce dernier.
2) La face arrière du récepteur est aimantée, elle
peut être facilement fixée sur le boîtier métallique
dʼun jeu de lumière.
3) Pour insérer une batterie, ouvrez le compartiment
batterie sur la face arrière de lʼémetteur
(schéma 3). Insérez une batterie 12 V de type
A23/8LR23 (p. ex. LRV-08 de la gamme MONA-
COR) dans le compartiment batterie, comme in-
diqué sur le schéma 4, et refermez le couvercle.
4 Utilisation
1) Pour attribuer le récepteur radio à un groupe de
touches [1 – 4] de lʼémetteur, appuyez sur la
touche SET UP (4). Tant que la LED SIGNAL (3)
clignote, appuyez sur une touche (7) du groupe
souhaité sur lʼémetteur. La LED scintille briève-
ment puis sʼéteint. Assignez ensuite le récepteur
à dʼautres groupes de touches, si besoin.
2) Pour effacer lʼattribution du récepteur, maintenez
la touche SET UP enfoncée 5 secondes environ
jusquʼà ce que la LED SIGNAL brille. Appuyez
une nouvelle fois brièvement sur la touche. La
LED scintille brièvement puis sʼéteint.
3) Si une touche est enfoncée sur lʼémetteur, la
LED (6) brille. [Sinon, vérifiez la batterie dans
lʼémetteur]. Si le récepteur a été attribué à la
touche enfoncée, la LED SIGNAL brille pour
confirmer la réception. Les fonctions des touches
STAND-BY, FUNCTION et MODE de chaque
groupe de touches dépendent du jeu de lumière
utilisé ; voir leurs descriptions dans la notice
dʼutilisation correspondante. Les LEDs dʼétat
STAND-BY (2) et MODE (5), appartenant aux
touches se trouvent sur le récepteur.
Tout droit de modification réservé.
Lorsque les appareils sont définitivement
retirés du service, vous devez les déposer
dans une usine de recyclage adaptée pour
contribuer à leur élimination non polluante.
Ne jetez pas les batteries usagées dans la poubelle
domestique. Déposez-les dans un container spéci-
fique ou ramenez-les chez votre revendeur détaillant.
Radiocomando per unità
per effetti di luce
Vi preghiamo di leggere attentamente le presenti
istruzioni prima della messa in funzione e di con-
servarle per un uso futuro.
1 Possibilità dʼimpiego
Con LC-9RTX è possibile comandare 4 unità per ef-
fetti di luce (p. es. LED-620RGBW, LED-640RGBW,
TWIST-50LED o TWIST-52LED) in modo indipen-
dente fino ad una distanza di 100 m per mezzo della
frequenza 433,92 MHz che non richiede registra-
zione.
2 Avvertenze importanti per lʼuso
Gli apparecchi (trasmettitore e ricevitore) sono con-
formi a tutte le direttive richieste dellʼUE e pertanto
portano la sigla .
GUsare gli apparecchi solo allʼinterno di locali e
proteggerli dallʼacqua gocciolante e dagli spruzzi
dʼacqua, da alta umidità dellʼaria e dal calore
(temperatura dʼimpiego ammessa fra 0 e 40 °C).
GPer la pulizia usare solo un panno morbido,
asciutto; non impiegare in nessun caso acqua o
prodotti chimici.
GNel caso dʼuso improprio, di collegamenti sba-
gliati, dʼimpiego scorretto o di riparazione non a
regola dʼarte degli apparecchi, non si assume
nessuna responsabilità per eventuali danni con-
sequenziali a persone o a cose e non si assume
nessuna garanzia per gli apparecchi.
3 Messa in funzione
1) Collegare la spina (1) del radioricevitore con
lʼunità per effetti di luce e accendere lʼunità.
2) Il retro del ricevitore è magnetico e perciò è pos-
sibile fissarlo al contenitore metallico di unʼunità
per effetti di luce.
3) Per inserire una batteria, aprire il vano batteria sul
retro del trasmettitore (Fig. 3). Inserire nel
vano una batteria di 12 V del tipo A23/8LR23
(p. es. LRV-08 del programma di MONACOR)
come dimostrato in fig. 4, e richiudere il coperchio.
4 Funzionamento
1) Per assegnare il radioricevitore ad un gruppo di
tasti [1 – 4] del trasmettitore, premere il tasto SET
UP (4). Mentre il LED SIGNAL (3) lampeggia, sul
trasmettitore premere un tasto (7) del gruppo de-
siderato. Il LED tremola brevemente e si spegne
poi. Successivamente, il ricevitore può essere
assegnato ad altri gruppi di tasti.
2) Per cancellare lʼassegnazione del ricevitore,
tener premuto il tasto SET UP per 5 secondi ca.,
finché non si accende il LED SIGNAL. A questo
punto premere ancora una volta brevemente il
tasto. Il LED si spegne dopo un breve tremolio.
3) Se si preme un tasto sul trasmettitore, si ac-
cende il LED (6). [Altrimenti controllare la batte-
ria del trasmettitore.] Se il ricevitore è assegnato
al tasto premuto, come conferma della ricezione
si accende il LED SIGNAL. Le funzioni dei tasti
STAND-BY, FUNCTION e MODE dei vari gruppi
di tasti dipendono dallʼunità per effetti di luce e
sono descritte nelle relative istruzioni. I LED di
stato STAND-BY (2) e MODE (5) relativi ai tasti
si trovano sul ricevitore.
Con riserva di modifiche tecniche.
Se si desidera eliminare gli apparecchi
definitivamente, consegnarli per lo smalti-
mento ad unʼistituzione locale per il rici-
claggio. Non gettare le batterie scariche o
difettose nelle immondizie di casa bensì negli ap-
positi contenitori (p. es. presso il vostro rivendi-
tore).
F B CH I

Control Remoto Inalámbrico
para Juegos de Luces
Lea atentamente estas instrucciones de funciona-
miento antes de utilizar el aparato y guárdelas para
usos posteriores.
1 Aplicaciones
Con el LC-9RTX, se controla cuatro juegos de luces
(p. ej. LED-620RGBW, LED-640RGBW, TWIST-
50LED o TWIST-52LED) independientemente me-
diante la frecuencia de radio 433,92 MHz, que no
requiere licencia, a una distancia de hasta 100 m.
2 Notas Importantes
Los aparatos (emisor y receptor) cumplen con todas
las directivas relevantes de la UE y por lo tanto
están marcados con el símbolo .
GLos aparatos están adecuados para su aplica-
ción sólo en interiores. Protéjalos de goteos y sal-
picaduras, elevada humedad del aire y calor
(temperatura ambiente admisible: 0 – 40 ºC).
GUtilice sólo un paño suave y seco para la limpieza;
no utilice nunca ni productos químicos ni agua.
GNo podrá reclamarse garantía o responsabilidad
alguna por cualquier daño personal o material re-
sultante si los aparatos se utilizan para otros
fines diferentes a los originalmente concebidos,
si no se conectan correctamente, no se utilizan
adecuadamente o no se reparan por expertos.
3 Puesta en Marcha del Controlador
1) Conecte el conector (1) del receptor inalámbrico
al juego de luces. Active el juego de luces.
2) La parte posterior del receptor es magnética y
por lo tanto se puede adherir fácilmente a la car-
casa metálica de un juego de luces.
3) Para insertar una batería, abra el compartimento
de la batería de la parte posterior del emisor
(fig. 3). Inserte una batería de 12 V del tipo
A23/8LR23 (p. ej. LRV-08 de MONACOR) en el
compartimento de la batería como en la fig. 4,
luego cierre la tapa.
4 Funcionamiento
1) Para asignar el receptor inalámbrico a un bloque
de botones [1 – 4] del emisor, pulse el botón SET
UP (4). Mientras el LED SIGNAL (3) esté parpa-
deando, pulse el botón (7) del bloque de boto-
nes del emisor que quiera. El LED parpadea bre-
vemente antes de apagarse. Asigne el receptor
a más bloques de botones si es necesario.
2) Para borrar la asignación del receptor, mantenga
pulsado el botón SET UP unos 5 segundos hasta
que se ilumine el LED SIGNAL. Pulse el botón
brevemente una vez más. El LED parpadea bre-
vemente antes de apagarse.
3) Cuando pulse un botón en el emisor, se ilumi-
nará el LED (6). [Si no se ilumina, compruebe la
batería del emisor.] Si el receptor se ha asignado
al botón pulsado, se ilumina el LED SIGNAL
para confirmar la recepción. Las funciones de los
botones STAND-BY, FUNCTION y MODE del
bloque de botones correspondiente dependen
del juego de luces que se utilice. Vea el manual
de instrucciones correspondiente para sus des-
cripciones. Los LEDs de estado STAND-BY (2) y
MODE (5) pertenecientes a los botones se pue-
den encontrar en el receptor.
Sujeto a modificaciones técnicas.
Si va a poner los aparatos fuera de servi-
cio definitivamente, llévelos a la planta de
reciclaje más cercana para que su elimi-
nación no sea perjudicial para el medioam-
biente. Las baterías gastadas no deben deposi-
tarse en el contenedor normal; llévelas a un conte-
nedor especial, p. ej. al contenedor de su vendedor.
LC-9RTX
Best.-Nr. 38.5440
Bezprzewodowy zestaw
kontrolera do diodowych
efektów świetlnych
Przed rozpoczęciem użytkowania proszę dokładnie
zapoznać się z niniejszą instrukcją i zachować ją do
wglądu.
1 Zastosowanie
Zestaw LC-9RTX pozwala na niezależne sterowa-
nie czterema diodowymi efektami świetlnymi (np.
LED-620RGBW, LED-640RGBW, TWIST-50LED
lub TWIST-52LED). Transmisja sygnału sterującego
odbywa się bezprzewodowo na dozwolonej częs-
totliwości 433,92 MHz, na odległość do 100 m.
2 Środki bezpieczeństwa
Urządzenia (nadajnik oraz odbiornik) spełniają
wszystkie wymagania norm UE dlatego zostały
oznaczone symbolem .
GUrządzenie przeznaczone jest wyłącznie do
użytku wewnątrz pomieszczeń. Należy chronić je
przez wodą, dużą wilgotnością oraz wysoką tem-
peraturą (dopuszczalny zakres wynosi 0 – 40 °C).
GDo czyszczenia używać suchej miękkiej ściereczki;
nie stosować środków chemicznych ani wody.
GProducent ani dostawca nie ponoszą odpowie-
dzialności za wynikłe szkody: uszkodzenie
sprzętu lub obrażenia użytkownika, jeśli urzą-
dzenie było używane niezgodnie z ich przezna-
czeniem, nieprawidłowo zamontowane, podłą-
czone lub obsługiwane bądź poddane nieautory-
zowanej naprawie.
3 Przygotowanie do pracy
1) Podłączyć wtyk (1) odbiornika do efektu świet-
lnego. Włączyć efekt świetlny.
2) W tylnej części odbiornika znajduje się magnes,
pozwalający na przymocowanie go do metalowej
obudowy efektu świetlnego.
3) Aby włożyć baterię, otworzyć pokrywę komory
bateryjnej na tylnej stronie nadajnika (rys. 3).
Włożyć 12 V baterię typu A23/8LR23 (np. LRV-08
marki MONACOR), zgodnie z pokazaną polary-
zacją na rys. 4, następnie zamknąć pokrywę.
4 Obsługa
1) Aby przypisać bezprzewodowy odbiornik do
bloku przycisków [1 – 4] nadajnika, wcisnąć przy-
cisk SET UP (4). Podczas gdy dioda SIGNAL (3)
miga, wcisnąć przycisk (7) żądanego bloku przy-
cisków nadajnika. Dioda zacznie migać szybciej,
po czym zgaśnie. Analogicznie przypisać kolejne
bloki przycisków, jeżeli trzeba.
2) Aby skasować przypisanie odbiornika, przytrzy-
mać wciśnięty przycisk SET UP przez około 5
sekund, aż zapali się dioda SIGNAL. Następnie
wcisnąć ponownie na krótko przycisk. Dioda za-
cznie migać szybciej, po czym zgaśnie.
3) Po wciśnięciu przycisku na nadajniku, zapali się
dioda (6). (Jeżeli się nie zapala, sprawdzić bate-
rię nadajnika.) Jeżeli odbiornik przypisano do
wciśniętego przycisku, dioda SIGNAL zapali się
potwierdzając odbiór sygnału. Funkcje przyci-
sków STAND-BY, FUNCTION oraz MODE po-
szczególnych bloków, zależą od funkcji efektów
świetlnych. Ich funkcje należy sprawdzić w in-
strukcjach obsługi. Opis wskaźników statusu
STAND-BY (2) oraz MODE (5), przypisanych do
przycisków podane są na odbiorniku.
Z zastrzeżeniem możliwości zmian.
Po całkowitym zakończeniu eksploatacji,
urządzenie należy oddać do punktu recy-
klingu, aby nie zaśmiecać środowiska. Zu-
żyte baterie należy wyrzucać do specjal-
nie oznaczonych pojemników, nie do zwykłych
koszy na śmieci.
®
MONACOR INTERNATIONAL GmbH & Co. KG
•
Zum Falsch 36
•
28307 Bremen
•
Germany
Copyright
©
by MONACOR INTERNATIONAL. All rights reserved. A-1260.99.01.07.2011
wwwwww..iimmggssttaaggeelliinnee..ccoomm
1
2
3
4
5
6
7
PLE
This manual suits for next models
1
Other Monacor Remote Control manuals