manuals.online logo
Brands
  1. Home
  2. •
  3. Brands
  4. •
  5. Monacor
  6. •
  7. Speakers System
  8. •
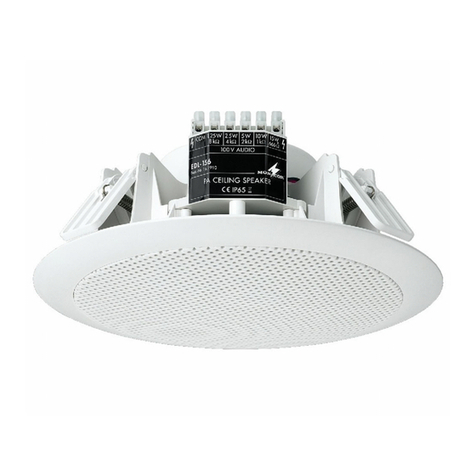
  9. Monacor ESP-15/WS User manual

Monacor ESP-15/WS User manual

ELA-HiFi-Wand- /
Deckenlautsprecher
Bitte lesen Sie diese Anleitung vor der Installation
gründlich durch und heben Sie sie für ein späteres
Nachlesen auf.
1 Verwendungsmöglichkeiten
Dieser ELA-Lautsprecher ist speziell für den Einsatz in
ELA-Anlagen konzipiert, die mit 100-V-Technik arbeiten.
Er lässt sich in Decken oder Wände mit einer Stärke von
8 – 35 mm einbauen. Durch die 2-Wege-Ausführung
(Breitbandlautsprecher plus Kalottenhochtöner) wird
eine besonders gute Klangwiedergabe erreicht.
2 Wichtige Hinweise für den sicheren Gebrauch
Der Lautsprecher entspricht allen erforderlichen Richt-
linien der EU und ist deshalb mit gekennzeichnet.
GVerwenden Sie den Lautsprecher nur im Innenbe-
reich. Schützen Sie ihn von Tropf- und Spritzwasser,
hoher Luftfeuchtigkeit und Hitze (zulässiger Einsatz-
termperturbereich: 0 – 40 °C).
GVerwenden Sie für die Reinigung nur ein trockenes,
weiches Tuch, auf keinen Fall Chemikalien oder
Wasser.
GWird der Lautsprecher zweckentfremdet, nicht fach-
gerecht montiert, falsch angeschlossen oder über-
lastet, kann keine Haftung für daraus resultierende
Sach- oder Personenschäden und keine Garantie
für den Lautsprecher übernommen werden.
3 Montage
1) In die Decke bzw. in die Wand ein Loch von
115 mm × 190 mm sägen.
2) Den elektrischen Anschluss herstellen (Kapitel 4).
3) Zur Montage mit Hilfe des beiliegenden Hakens
das Schutzgitter herausziehen.
4) Den Lautsprecher in die Decke bzw. in die Wand
einsetzen und durch Anziehen der vier Montage-
schrauben das Lautsprechergehäuse festklem-
men. Das Schutzgitter wieder einsetzen.
4 Elektrischer Anschluss
Warnung: Im Betrieb liegt berührungsgefähr-
liche Spannung bis 100 V an der Anschlusslei-
tung an. Die Installation darf nur durch Fach-
personal erfolgen. Isolieren Sie unbedingt die
nicht benutzten Adern der Anschlussleitung.
Achten Sie auf die richtige Leistungsanpas-
sung. Eine falsche Anpassung führt zur Zerstö-
rung des ELA-Verstärkers!
B
Soll der Lautsprecher endgültig aus dem Be-
trieb genommen werden, übergeben Sie ihn
zur umweltgerechten Entsorgung einem örtli-
chen Recyclingbetrieb.
1) Falls die ELA-Anlage eingeschaltet ist, diese zuerst
komplett ausschalten!
2) Den Lautsprecher über den Transformatoreingang
anschließen: Die schwarze Ader und eine der an-
deren farbigen Adern, die der gewünschten Nenn-
belastung durch den Lautsprecher entspricht, mit
dem Ausgang des ELA-Verstärkers verbinden.
3) Beim Anschluss von mehreren Lautsprechern da-
rauf achten, dass die Lautsprecher alle gleich ge-
polt werden (schwarze Ader = Minuspol).
Änderungen vorbehalten.
PA HiFi Wall and Ceiling Speaker
Please read these operating instructions carefully
prior to installation and keep them for later reference.
1 Applications
This PA speaker is especially designed for applica-
tions in PA systems operating with 100 V technique. It
can be built into ceilings or walls with 8 to 35 mm thick-
ness. Due to the 2-way design (full range speaker plus
dome tweeter) an especially good sound reproduction
is obtained.
2 Important Safety Notes
The speaker corresponds to all required directives of
the EU and is therefore marked with .
GThe speaker is suitable for indoor use only. Protect
it against dripping water and splash water, high air
humidity and heat (admissible ambient temperature
range 0 – 40 °C).
GFor cleaning only use a dry, soft cloth, by no means
chemicals or water.
GNo guarantee claims for the speaker and no liability
for any resulting personal damage or material dam-
age will be accepted if the speaker is used for other
purposes than originally intended, if it is not correctly
installed or connected, or if it is overloaded.
3 Mounting
1) Saw a hole of 115 mm × 190 mm into the ceiling or
wall.
2) Make the electrical connection (chapter 4).
3) For mounting pull out the protective grille by means
of the supplied hook.
4) Insert the speaker into the ceiling or wall, and fix the
speaker cabinet by tightening the four mounting
screws. Insert the protective grille again.
4 Electrical Connection
Warning: During operation there is a hazard of
contact at the connection cable with a voltage
of up to 100 V. The installation must only be
made by authorized personnel.
Insulate in any case the cores of the connec-
tion cable which are not used.
Pay attention to the correct power matching. In
case of wrong matching, the PA amplifier will
be destroyed!
B
If the speaker is to be put out of operation de-
finitively, take it to a local recycling plant for a
disposal which is not harmful to the environ-
ment.
1) In case the PA system is switched on, first switch it
off completely!
2) Connect the speaker via the transformer input: Con-
nect the black core and one of the other coloured
cores, which corresponds to the desired rated load
by the speaker, to the output of the PA amplifier.
3) When connecting several speakers, observe that
the speakers are polarized in the same way (black
core = negative pole).
Subject to change.
ESP-15/WS Best.-Nr. 16.1550
220mm
61mm
min. 8mm
max. 35mm
190mm
MONACOR INTERNATIONAL GmbH & Co. KG • Zum Falsch 36 • 28307 Bremen • Germany
Copyright©by MONACOR INTERNATIONAL. All rights reserved. A-0975.99.02.06.2011
®
GB
D A CH
Technische Daten
Frequenzbereich
Nennbelastbarkeit /Impedanz
Einbauöffnung
Einbautiefe
Abmessungen
Gewicht
Specifications
Frequency range
Power rating /Impedance
Mounting hole
Mounting depth
Dimensions
Weight
ESP-15/WS
60 – 20 000 Hz
15 WRMS / 666 Ω
7,5 WRMS /1,33 kΩ
4W
RMS / 2,5 kΩ
2W
RMS /5kΩ
1WRMS /10kΩ
115 × 190 mm
61 mm
146 × 220 × 70 mm
1,3 kg
Aderfarbe Nennbelastung
schwarz gemeinsamer Anschluss
grün 1W
gelb 2W
orange 4W
rot 7,5 W
braun 15 W
Core Colour Rated Load
black common connection
green 1W
yellow 2W
orange 4W
red 7.5 W
brown 15 W
Haut-parleur HiFi, PA de
plafond/mur
Veuillez lire la présente notice avec attention avant
lʼinstallation et conservez-la pour pouvoir vous y re-
porter ultérieurement.
1 Possibilités dʼutilisation
Ce haut-parleur PA est spécialement conçu pour une
installation dans des systèmes de sonorisation PA
fonctionnant en ligne 100 V. Il peut être installé dans
des plafonds ou murs dʼune épaisseur de 8 à 35 mm.
À cause du système 2 voies (haut-parleur large-bande
plus haut-parleur dʼaigu à dôme) une très bonne re-
production sonore est atteinte.
2 Conseils importants de sécurité
Le haut-parleur répond à toutes les directives néces-
saires de lʼUnion européenne et porte donc le sym-
bole .
GLe haut-parleur nʼest conçu que pour une utilisation
en intérieur. Protégez-le des éclaboussures, de tout
type de projections dʼeau, dʼune humidité élevée de
lʼair et de la chaleur (température ambiante admis-
sible 0 – 40 °C).
GPour le nettoyer, utilisez un chiffon sec et doux, en
aucun cas de produits chimiques ou dʼeau.
GNous déclinons toute responsabilité en cas de dom-
mages matériels ou corporels résultants si le haut-
1) Si lʼinstallation PA est allumée, veillez à la débran-
cher complètement!
2) Reliez le haut-parleur via lʼentrée transformateur:
connectez le conducteur noir et un des autres
conducteurs de couleur qui correspond à la puis-
sance nominale souhaitée par le haut-parleur, à la
sortie de lʼamplificateur PA.
3) Si vous branchez plusieurs haut-parleurs, veillez à
ce quʼils aient tous la même polarité (conducteur
noir: pôle moins).
Tout droit de modification réservé.
Altoparlante PA HiFi
per il montaggio a parete o soffitto
Vi preghiamo di leggere attentamente le presenti istru-
zioni prima dellʼinstallazione e di conservarle per un
uso futuro.
1 Possibilità dʼimpiego
Questo altoparlante PA è stato realizzato per lʼimpiego
in impianti PA con uscita audio 100 V. Può essere
montato in soffitti o pareti con spessore fra 8 e 35 mm.
Grazie alla versione a 2 vie (altoparlante a larga banda
più tweeter a cupola), si ottiene una riproduzione par-
ticolarmente buona del suono
2 Avvertenze di sicurezza
Lʼaltoparlante è conforme a tutte le direttive richie-
ste dellʼUE e pertanto porta la sigla .
GUsare lʼaltoparlante solo allʼinterno di locali. Proteg-
gerlo dallʼacqua gocciolante e dagli spruzzi dʼacqua,
da alta umidità dellʼaria e dal calore (temperatura
dʼimpiego ammessa fra 0 e 40 °C).
GPer la pulizia usare solo un panno morbido, asciutto;
non impiegare in nessun caso prodotti chimici o ac-
qua.
GNel caso dʼuso improprio, di montaggio sbagliato, di
collegamenti sbagliati o di sovraccarico dellʼaltopar-
lante, non si assume nessuna responsabilità per
eventuali danni consequenziali a persone o a cose e
non si assume nessuna garanzia per lʼaltoparlante.
3 Montaggio
1) Praticare unʼapertura di 115 mm × 190 mm nella
parete o nel soffitto.
2) Eseguire il collegamento elettrico (cap. 4).
3) Per il montaggio staccare la griglia di protezione
con lʼaiuto del gancio in dotazione.
4) Inserire lʼaltoparlante nel soffitto o nella parete e fis-
sare il contenitore stringendo le quattro viti di mon-
taggio. Rimettere la griglia di protezione.
4 Collegamento elettrico
Attenzione: Durante il funzionamento, nei cavi
è presente una tensione pericolosa al contatto
fino a 100 V. Lʼinstallazione deve essere fatta
solo da personale specializzato. Isolare asso-
lutamente i conduttori non utilizzati del cavo di
collegamento.
Rispettare il corretto adattamento alla potenza
per non rischiare di distruggere lʼamplificatore
PA!
B
Se si desidera eliminare lʼaltoparlante definiti-
vamente, consegnarlo per lo smaltimento ad
unʼistituzione locale per il riciclaggio.
1) Se lʼimpianto PA è acceso occorre dapprima spe-
gnerlo completamente.
2) Collegare lʼaltoparlante tramite lʼingresso del tra-
sformatore: collegare il conduttore nero più un altro
conduttore colorato (a seconda della potenza no-
minale dellʼaltoparlante) con lʼuscita dellʼamplifica-
tore PA.
3) Se si collegano più altoparlanti fare attenzione che
la polarità sia identica per tutti gli altoparlanti (con-
duttore bianco o nero = negativo).
Con riserva di modifiche tecniche.
ESP-15/WS Best.-Nr. 16.1550
220mm
61mm
min. 8mm
max. 35mm
190mm
MONACOR INTERNATIONAL GmbH & Co. KG • Zum Falsch 36 • 28307 Bremen • Germany
Copyright©by MONACOR INTERNATIONAL. All rights reserved. A-0975.99.02.06.2011
®
I
F B CH
Caractéristiques techniques ESP-15/WS
60 – 20 000 Hz
15 WRMS / 666 Ω
7,5 WRMS /1,33 kΩ
4W
RMS / 2,5 kΩ
2WRMS /5kΩ
1WRMS /10kΩ
115 × 190 mm
61 mm
Bande passante
146 × 220 × 70 mm
1,3 kg
Puissance nominale /Impédance
Ouverture de montage
Profondeur de montage
Dimensions
Poids
Dati tecnici
Banda passante
Potenza nominale /Impedenza
Apertura di montaggio
Profondità di montaggio
Dimensioni
Peso
Couleur conducteur Puissance nominale
noir branchement commun
vert 1W
jaune 2W
orange 4W
rouge 7,5 W
marron 15 W
Colore conduttore Potenza nominale
nero collegamento comune
verde 1W
giallo 2W
arancio 4W
rosso 7,5 W
marron 15 W
parleur est utilisé dans un but autre que celui pour
lequel il a été conçu, sʼil nʼest pas correctement ins-
tallé, branché ou sʼil y a surcharge ; en outre, la ga-
rantie deviendrait caduque.
3 Montage
1) Découpez dans le plafond ou mur un trou de
115 mm × 190 mm.
2) Effectuez le branchement électrique (voir chapitre 4).
3) Pour le montage retirez la grille de protection à
lʼaide du crochet livré.
4) Placez le haut-parleur dans le plafond ou mur, fixez
le boîtier à lʼaide des quatre vis. Replacez la grille.
4 Branchements électriques
Attention: Pendant le fonctionnement, une
tension de contact dangereux jusquʼà 100 V
est présente au câble de connexion. Seul un
personnel qualifié peut effectuer les branche-
ments. Isolez les conducteurs inutilisés du
câble de branchement en tout cas.
Veillez à adapter la puissance correctement.
Une puissance erronée conduit à la destruc-
tion de lʼamplificateur PA!
B
Lorsque le haut-parleur est définitivement retiré
du circuit de distribution, vous devez le déposer
dans une usine de recyclage adaptée pour
contribuer à son élimination non polluante.

This manual suits for next models

1

Other Monacor Speakers System manuals

Monacor img Stage Line LR-1000SAT User manual

Monacor

Monacor img Stage Line LR-1000SAT User manual

Monacor EAM-17DT User manual

Monacor

Monacor EAM-17DT User manual

Monacor IMG StageLine MEGA-110MK2 User manual

Monacor

Monacor IMG StageLine MEGA-110MK2 User manual

Monacor ESP-1000AB⁄ WS User manual

Monacor

Monacor ESP-1000AB⁄ WS User manual

Monacor LO-600 User manual

Monacor

Monacor LO-600 User manual

Monacor PAB-82WP/WS User manual

Monacor

Monacor PAB-82WP/WS User manual

Monacor DN-200 User manual

Monacor

Monacor DN-200 User manual

Monacor EDL-255/WS User manual

Monacor

Monacor EDL-255/WS User manual

Monacor TXA-400 User manual

Monacor

Monacor TXA-400 User manual

Monacor MKA-60SET/SW User manual

Monacor

Monacor MKA-60SET/SW User manual

Monacor EDL-222/ WS User manual

Monacor

Monacor EDL-222/ WS User manual

Monacor TXA-602/SW User manual

Monacor

Monacor TXA-602/SW User manual

Monacor EDL-180/SI User manual

Monacor

Monacor EDL-180/SI User manual

Monacor EDL-115/WS User manual

Monacor

Monacor EDL-115/WS User manual

Monacor DNL-660 User manual

Monacor

Monacor DNL-660 User manual

Monacor EDL-435/WS User manual

Monacor

Monacor EDL-435/WS User manual

Monacor IMG STAGELINE PAK-308M/SW User manual

Monacor

Monacor IMG STAGELINE PAK-308M/SW User manual

Monacor EUL-75-WS User manual

Monacor

Monacor EUL-75-WS User manual

Monacor MKS-26/SW User manual

Monacor

Monacor MKS-26/SW User manual

Monacor EUL-2/SW User manual

Monacor

Monacor EUL-2/SW User manual

Monacor ESP-232/SW User manual

Monacor

Monacor ESP-232/SW User manual

Monacor IMG STAGELINE LR-1000SAT User manual

Monacor

Monacor IMG STAGELINE LR-1000SAT User manual

Monacor PAB-52WP/WS User manual

Monacor

Monacor PAB-52WP/WS User manual

Monacor ESP-315/SW User manual

Monacor

Monacor ESP-315/SW User manual

Popular Speakers System manuals by other brands

Pyle PDICBT57 user manual

Pyle

Pyle PDICBT57 user manual

Goldmund Logos Anatta user manual

Goldmund

Goldmund Logos Anatta user manual

AMX ACV-2100 ACENDO VIBE quick start guide

AMX

AMX ACV-2100 ACENDO VIBE quick start guide

RBH Sound SIGNATURE SERIES owner's manual

RBH Sound

RBH Sound SIGNATURE SERIES owner's manual

BLACKMORE BJC-15X2BT manual

BLACKMORE

BLACKMORE BJC-15X2BT manual

Bose SB600 manual

Bose

Bose SB600 manual

Nxg 52C owner's manual

Nxg

Nxg 52C owner's manual

Definitive Technology PowerMonitor 900 brochure

Definitive Technology

Definitive Technology PowerMonitor 900 brochure

Sony HT-A3000 Startup guide

Sony

Sony HT-A3000 Startup guide

Bang & Olufsen BeoSound 6 user manual

Bang & Olufsen

Bang & Olufsen BeoSound 6 user manual

Teufel Concept D 500 THX Technical description and operating instructions

Teufel

Teufel Concept D 500 THX Technical description and operating instructions

Okayo GPA-580 Series user manual

Okayo

Okayo GPA-580 Series user manual

MAJORITY SNO-BAR-BLK-2 Instruction guide

MAJORITY

MAJORITY SNO-BAR-BLK-2 Instruction guide

Varta MARINE S65 instruction manual

Varta

Varta MARINE S65 instruction manual

Karma TIGER 8A instruction manual

Karma

Karma TIGER 8A instruction manual

Bowers & Wilkins DM1600 instruction manual

Bowers & Wilkins

Bowers & Wilkins DM1600 instruction manual

Monkey Banana Turbo4 user manual

Monkey Banana

Monkey Banana Turbo4 user manual

LG AR502PS owner's manual

LG

LG AR502PS owner's manual

manuals.online logo
manuals.online logoBrands
  • About & Mission
  • Contact us
  • Privacy Policy
  • Terms and Conditions

Copyright 2025 Manuals.Online. All Rights Reserved.