manuals.online logo
Brands
  1. Home
  2. •
  3. Brands
  4. •
  5. Monacor
  6. •
  7. Speakers System
  8. •
  9. Monacor MKS-26/SW User manual

Monacor MKS-26/SW User manual

ELECTRONICS FOR SPECIALISTS ELECTRONICS FOR SPECIALISTS ELECTRONICS FOR SPECIALISTS ELECTRONICS FOR SPECIALISTS ELECTRONICS FOR SPECIALISTS ELECTRONICS
MKS-26/SW Bestell-Nr. •Order No. 0132370
MKS-26/WS Bestell-Nr. •Order No. 0132380
MONACOR INTERNATIONAL GmbH & Co. KG • Zum Falsch 36 • 28307 Bremen • Germany
Copyright©by MONACOR INTERNATIONAL. All rights reserved. A-1611.99.02.01.2020
MKS-26/WS
MONACOR
INTERNATIONAL
ZUM FALSCH 36
28307 BREMEN
GERMANY
c
b
a a
Set d’enceintes
Cette notice s’adresse aux utilisateurs sans connais-
sances techniques particulières. Veuillez lire la pré-
sente notice avant le fonctionnement et conser-
vez-la pour pouvoir vous y reporter ultérieurement.
1 Possibilités d’utilisation
Ces enceintes miniatures sont conçues pour des applica-
tions universelles. Elles peuvent être posées librement
ou fixées sur un mur via les supports livrés.
2 Conseils importants
Les enceintes répondent à toutes les directives néces-
saires de l’Union européenne et portent donc le sym-
bole .
•
Les enceintes ne sont conçues que pour une utilisa-
tion en intérieur. Protégez-les de tout type de pro-
jections d’eau, des éclaboussures, d’une humidité
élevée de l’air et de la chaleur (plage de température
de fonctionnement autorisée : 0– 40°C).
•
Pour le nettoyage utilisez uniquement un chiffon doux
et sec, en aucun cas de produits chimiques ou d’eau.
•
Nous déclinons toute responsabilité en cas de dom-
mages matériels ou corporels résultants si les en-
ceintes sont utilisées dans un but autre que celui pour
lequel elles ont été conçues, si elles ne sont pas correc-
tement montées ou branchées ou s’il y a surcharge;
en outre, la garantie deviendrait caduque.
Lorsque les enceintes sont définitivement
retirées du service, vous devez les déposer
dans une usine de recyclage adaptée pour
contribuer à leur élimination non polluante.
CARTONS ET EMBALLAGE
PAPIER À TRIER
3 Installation
1) Eteignez l’amplificateur auquel les enceintes doivent
être reliées pour que le câble haut-parleur ne soit
pas porteur de tension !
2) Si vous n’utilisez pas les supports muraux (b), as-
semblez les deux pièces caoutchouc (a) et (c) livrées,
puis mettez-les dans l’encoche sur la face arrière des
enceintes.
3) Si vous utilisez les supports muraux (b), assemblez-les
selon le schéma ci-dessous. Serrez la vis de chaque
étrier de sorte que l’articulation soit mobile mais
puisse soutenir le poids de l’enceinte.
Si besoin, faites passer le câble haut-parleur via
le passage de câble du support. Vissez les supports
à l’endroit souhaité sur le mur. Une fois le branche-
ment électrique des enceintes effectué, mettez-les
sur les pivots des supports. Utilisez les petites pièces
caoutchouc (a) pour les sécuriser.
4) Reliez les enceintes aux sorties haut-parleur de l’am-
plificateur. Veillez à ce que les haut-parleurs aient
tous la même polarité (borne de branchement rouge
= pôle plus, borne noire = pôle moins).
Tout droit de modification réservé.
Pair of Speaker Systems
These instructions are intended for users without
any specific technical knowledge. Please read
these instructions carefully prior to operation and
keep them for later reference.
1 Applications
These miniature speaker systems are designed for uni-
versal applications. Place the speaker systems as desired
or use the brackets provided to install them on a wall.
2 Important Notes
The speaker systems correspond to all relevant direc-
tives of the EU and are therefore marked with .
•
The speaker systems are suitable for indoor use only.
Protect them against dripping water and splash
water, high air humidity and heat (admissible ambi-
ent temperature range: 0– 40°C).
•
For cleaning only use a dry, soft cloth; never use water
or chemicals.
•
No guarantee claims for the speaker systems and no
liability for any resulting personal damage or mate-
rial damage will be accepted if the speaker systems
are used for other purposes than originally intended,
if they are not correctly installed or connected, or if
they are overloaded.
If the speaker systems are to be put out of
operation definitively, take them to a local
recycling plant for a disposal which is not
harmful to the environment.
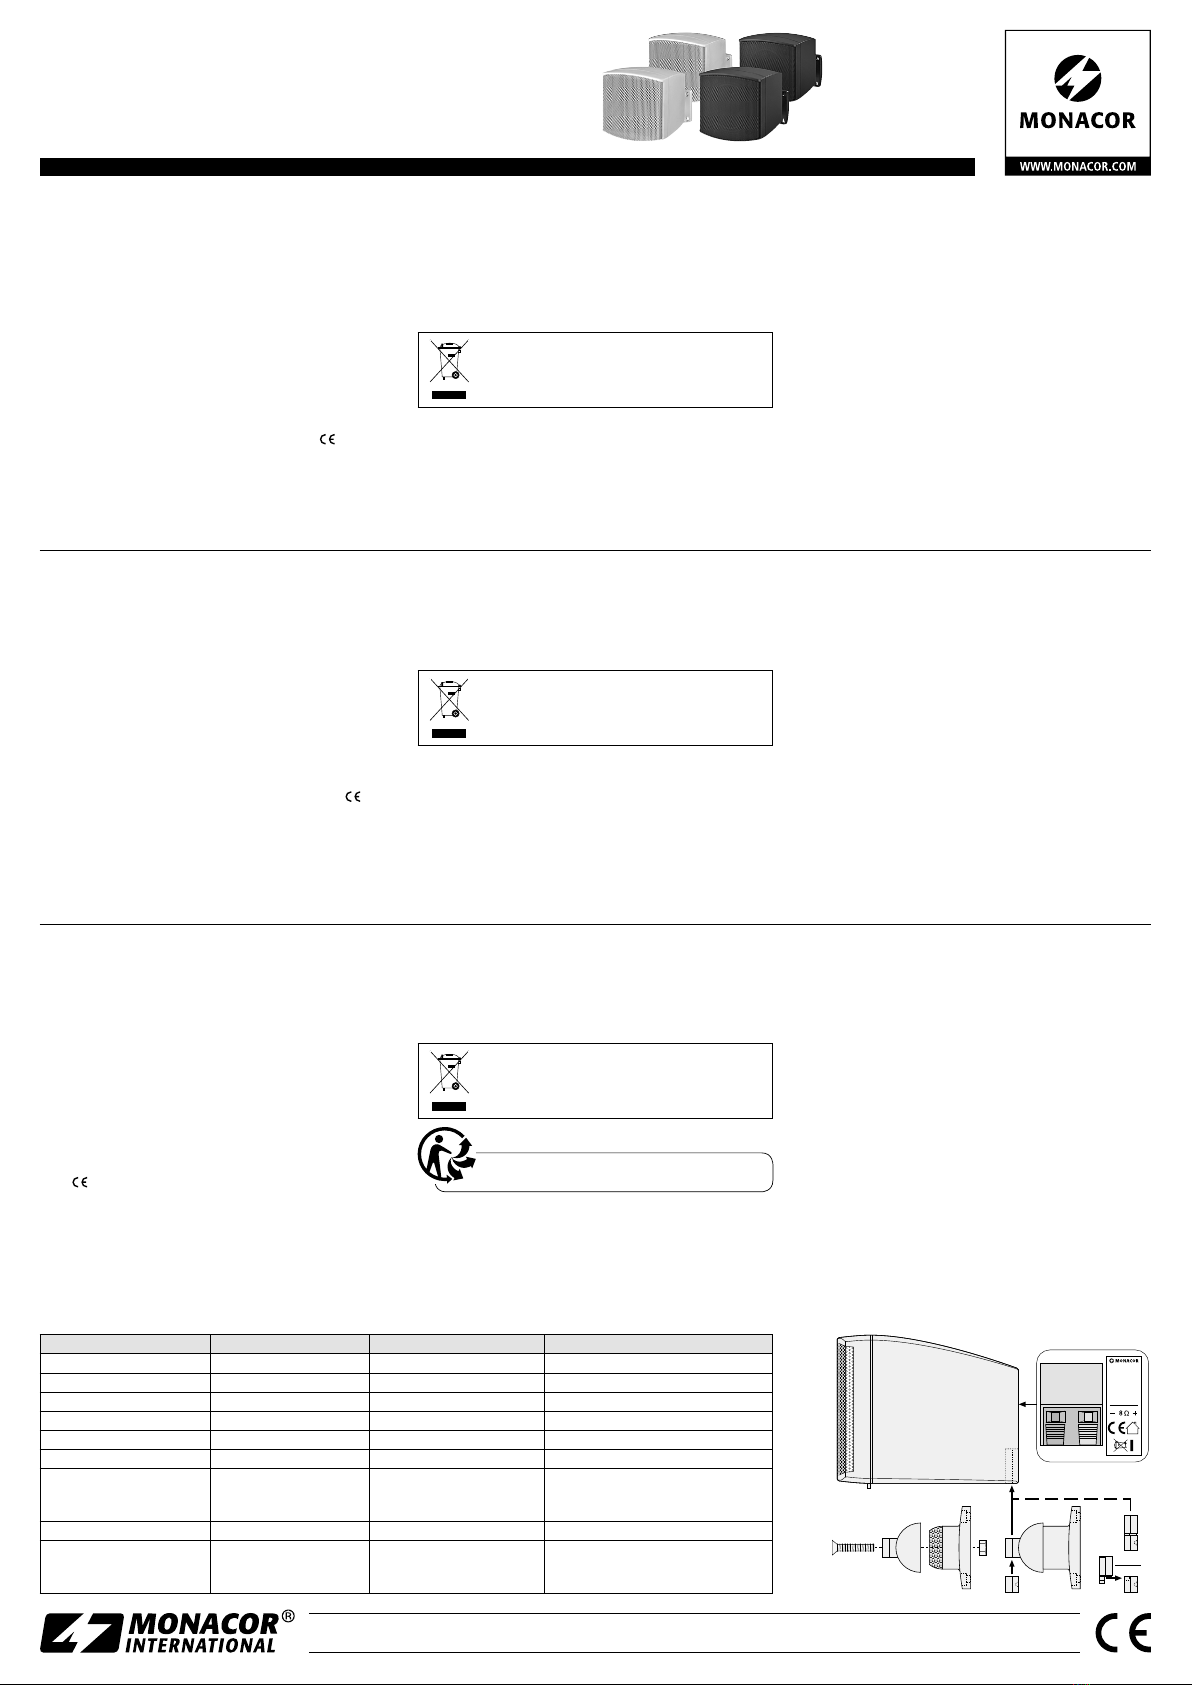
3 Installation
1) Switch off the amplifier to which the speaker systems
are to be connected so that the speaker cable will
not carry any voltage!
2) If the wall brackets (b) are not used, join the two
rubber parts (a) and (c) supplied with each speaker,
then push the parts into the recess on the rear of
each speaker system.
3) If the wall brackets (b) are used, assemble them
according to the figure below. Fasten the screw of
each bracket so that the ball joint is movable but
still able to bear the weight of the speaker system.
Pull the speaker cable through the cable inlet of
the bracket, if required. Fasten the brackets to a suit-
able place on the wall. After making the electrical
connection of the speaker systems, place the speaker
systems on the pivots of the brackets. Use the small
rubber parts (a) to secure the brackets.
4) Connect the speaker systems to the speaker outputs
of the amplifier. Make sure that all speaker systems
have the same polarity (red terminal = positive pole,
black terminal = negative pole).
Subject to technical modification.
Lautsprecherboxen-Paar
Diese Bedienungsanleitung richtet sich an Benut-
zer ohne besondere Fachkenntnisse. Bitte lesen
Sie die Anleitung vor dem Betrieb gründlich durch
und heben Sie sie für ein späteres Nachlesen auf.
1 Verwendungsmöglichkeiten
Diese Miniatur-Lautsprecherboxen sind universell ein-
setzbar. Sie können frei aufgestellt oder mit dem beilie-
genden Halter an einer Wand montiert werden.
2 Wichtige Hinweise
Die Lautsprecherboxen entsprechen allen relevanten
Richtlinien der EU und sind deshalb mit gekenn-
zeichnet.
•
Die Lautsprecherboxen sind nur zur Verwendung im
Innenbereich geeignet. Schützen Sie sie vor Tropf-
und Spritzwasser, hoher Luftfeuchtigkeit und Hitze
(zulässiger Einsatztemperaturbereich 0– 40°C).
•
Verwenden Sie zum Reinigen nur ein trockenes, wei-
ches Tuch, nie Wasser oder Chemikalien.
•
Werden die Lautsprecherboxen zweckentfremdet,
nicht fachgerecht montiert, falsch angeschlossen
oder überlastet, kann keine Haftung für daraus re-
sultierende Sach- oder Personenschäden und keine
Garantie für die Lautsprecherboxen übernommen
werden.
Sollen die Lautsprecherboxen endgültig aus
dem Betrieb genommen werden, übergeben
Sie sie zur umweltgerechten Entsorgung
einem örtlichen Recyclingbetrieb.
3 Installation
1) Den Verstärker ausschalten, an den die Lautsprecher
angeschlossen werden sollen, damit die Lautspre-
cherleitung spannungsfrei ist!
2) Werden die Wandhalter (b) nicht verwendet, jeweils
zwei Gummistücke (a) und (c) zusammenstecken und
in die Aussparung auf der Rückseite der Lautspre-
cherboxen schieben.
3) Werden die Wandhalter (b) verwendet, diese nach
der Abbildung unten zusammenschrauben. Jeweils
die Schraube so fest ziehen, dass das Kugelgelenk
beweglich ist, aber auch das Gewicht der Box halten
kann.
Bei Bedarf jeweils die Lautsprecherleitung durch
die Kabeldurchführung der Halterung ziehen. Die
Halterungen an geeigneter Stelle der Wand fest-
schrauben. Nach dem elektrischen Anschluss der
Boxen diese auf die Zapfen der Halterungen ste-
cken. Zur Sicherung die kleineren Gummistücke (a)
verwenden.
4) Die Boxen an die Lautsprecherausgänge des Verstär-
kers anschließen. Dabei darauf achten, dass die Laut-
sprecher alle gleich gepolt werden (roter Klemman-
schluss = Pluspol, schwarzer Anschluss = Minuspol).
Änderungen vorbehalten.
DeutschEnglishFrançais
Technische Daten Specifications Caractéristiques techniques MKS-26/SW • MKS-26/WS
Belastbarkeit, gesamt Total power rating Puissance, totale 20W
Nennbelastbarkeit Power rating (RMS) Puissance nominale (RMS) 10W
Max. Frequenzbereich Max. frequency range Bande passante max. 150 – 22 000 Hz
Impedanz Impedance Impédance 8 Ω
Kennschalldruck Sensitivity Pression sonore 88 dB (1W/1 m)
Maximaler Nennschalldruck Max. rated SPL Pression sonore nom. max. 100 dB
Lautsprecherbestückung Speaker configuration Configuration enceinte
6,5-cm-Breitbandlautsprecher (2,5”)
6.5 cm (2.5”) full range speaker
haut-parleur large bande 6,5 cm (2,5”)
Abmessungen, Gewicht Dimensions, weight Dimensions, poids 90 × 90 × 115 mm, 450g
Anschlüsse Connections Branchements
Lautsprecher-Klemmanschluss
spring-loaded speaker terminal
bornier haut-parleur
ELECTRONICS FOR SPECIALISTS ELECTRONICS FOR SPECIALISTS ELECTRONICS FOR SPECIALISTS ELECTRONICS FOR SPECIALISTS ELECTRONICS FOR SPECIALISTS ELECTRONICS
MKS-26/SW Bestell-Nr. •Order No. 0132370
MKS-26/WS Bestell-Nr. •Order No. 0132380
MONACOR INTERNATIONAL GmbH & Co. KG • Zum Falsch 36 • 28307 Bremen • Germany
Copyright©by MONACOR INTERNATIONAL. All rights reserved. A-1611.99.02.01.2020
MKS-26/WS
MONACOR
INTERNATIONAL
ZUM FALSCH 36
28307 BREMEN
GERMANY
c
b
a a
Para zestawów głośnikowych
Niniejsza instrukcja przeznaczona jest dla użyt-
kowników, którzy nie posiadają wiedzy i doświad-
czenia technicznego. Przed rozpoczęciem użytko-
wania proszę zapoznać się z instrukcją, a następnie
zachować ją do wglądu.
1 Zastosowanie
Niniejsze miniaturowe zestawy głośnikowe przezna-
czone są do uniwersalnych zastosowań. Należy ustawić
je na solidnym podłożu lub zamontować do ściany, za
pomocą dołączonych uchwytów.
2 Środki bezpieczeństwa
Zestawy głośnikowe spełniają wszystkie wymagania
norm UE dzięki czemu zostały oznaczone symbolem .
•
Zestawy głośnikowe przeznaczone są tylko do zasto-
sowań wewnętrznych. Należy chronić je przez wodą,
dużą wilgotnością oraz wysokimi temperaturami
(dopuszczalny zakres 0– 40°C).
•
Do czyszczenia należy używać suchej i miękkiej ście-
reczki, nie używać wody ani środków chemicznych.
•
Producent i dostawca nie ponoszą odpowiedzialności
za powstałe szkody: uszkodzenia sprzętu bądź obra-
żenia użytkownika, jeżeli zestaw głośnikowy był uży-
wany niezgodnie z przeznaczeniem, niepoprawnie
zainstalowany, podłączony lub przeciążony.
Po całkowitym zakończeniu eksploatacji,
urządzenie należy oddać do punktu recy-
klingu, aby nie zaśmiecać środowiska.
3 Montaż
1) Przed przystąpieniem do podłączania należy bez-
względnie wyłączyć wzmacniacz, aby kabel głośni-
kowy nie znajdował się pod napięciem!
2) Jeżeli uchwyt montażowy (b) nie będzie wykorzy-
stywany, połączyć dwie gumowe zaślepki (a) i (c), i
wsunąć je w wycięcie na tylnej stronie obudowy.
3) Jeżeli uchwyt montażowy (b) będzie wykorzysty-
wany, zmontować go w sposób pokazany na ry-
sunku. Przykręcić śrubę do uchwytu w taki sposób,
aby możliwa była regulacja na przegubie kulowym.
Przeciągnąć kabel głośnikowy przez przepust w
uchwycie, jeżeli trzeba. Przykręcić uchwyt w odpo-
wiednim miejscu na ścianie. Po podłączeniu kabla do
głośnika, umieścić go na trzpieniu uchwytu. Zabez-
pieczyć połączenie gumową zaślepką (a).
4) Połączyć zestaw głośnikowy z wyjściami wzmacnia-
cza. W przypadku podłączania kilku zestawów gło-
śnikowych, zwrócić uwagę, aby wszystkie miały jed-
nakową polaryzację (czerwony terminal = dodatni
biegun, czarny terminal = ujemny biegun).
Z zastrzeżeniem możliwości zmian.
Pareja de Recintos
Estas instrucciones van dirigidas a usuarios sin nin-
gún conocimiento técnico específico. Lea atenta-
mente estas instrucciones antes de utilizar el apa-
rato y guárdelas para usos posteriores.
1 Aplicaciones
Estos recintos miniatura están diseñados para todo tipo
de aplicaciones. Coloque los recintos según convenga
o utilice los soportes entregados para instalarlos en la
pared.
2 Notas Importantes
Los recintos cumplen con todas las directivas relevan-
tes de la UE y por lo tanto están marcados con el sím-
bolo .
•
Los recintos están adecuados para utilizarlos sólo
en interiores. Protéjalos de goteos y salpicaduras,
elevada humedad del aire y calor (temperatura am-
biente admisible: 0– 40ºC).
•
Utilice sólo un paño suave y seco para la limpieza; no
utilice nunca ni agua ni productos químicos.
•
No podrá reclamarse garantía o responsabilidad
alguna por cualquier daño personal o material re-
sultante si los recintos se utilizan para otros fines
diferentes a los originalmente concebidos, si no se ins-
talan o conectan correctamente o si se sobrecargan.
Si va a poner los recintos fuera de servicio
definitivamente, llévelos a la planta de reci-
claje más cercana para que su eliminación no
perjudique el medioambiente.
3 Instalación
1) ¡Primero desconecte el amplificador al que se conec-
tarán los recintos de modo que el cable de altavoz
no contenga ningún voltaje!
2) Si no se utilizan los soportes de pared (b), junte las
dos partes de caucho (a) y (c) entregadas con cada
altavoz, luego presione las partes dentro del hueco
de la parte posterior de cada recinto.
3) Si se utilizan los soportes de pared (b), ensámblelos
de acuerdo con la figura a continuación. Fije el tor-
nillo de cada soporte de modo que la articulación
de rótula se pueda mover pero que todavía pueda
sostener el peso del recinto.
Tire del cable de altavoz a través de la entrada de
cable del soporte, si es necesario. Fije los soportes
en un lugar adecuado de la pared. Después de rea-
lizar la conexión eléctrica de los recintos, coloque
los recintos en los pivotes de los soportes. Utilice las
pequeñas partes de caucho (a) para asegurar los so-
portes.
4) Conecte los recintos a las salidas de altavoz del am-
plificador. Asegúrese de que todos los recintos tie-
nen la misma polaridad (terminal rojo = polo posi-
tivo, terminal negro = polo negativo).
Sujeto a modificaciones técnicas.
Coppia di casse acustiche
Queste istruzioni sono rivolte all’utente senza co-
noscenze tecniche specifiche. Vi preghiamo di leg-
gerle attentamente prima della messa in funzione
e di conservarle per un uso futuro.
1 Possibilità d’impiego
Queste casse acustiche mini sono previste per impieghi
universali. Possono essere collocate liberamente op-
pure possono essere montate a una parete per mezzo
dei supporti in dotazione.
2 Avvertenze importanti
Le casse acustiche sono conformi a tutte le direttive
rilevanti dell’UE e pertanto portano la sigla .
•
Le casse acustiche sono previste solo per l’uso all’in-
terno di locali. Proteggerle dall’acqua gocciolante e
dagli spruzzi d’acqua, da alta umidità dell’aria e dal
calore (temperatura d’impiego ammessa fra 0 e 40°C).
•
Per la pulizia usare solo un panno morbido, asciutto;
non impiegare in nessun caso acqua o prodotti chi-
mici.
•
Nel caso d’uso improprio, di montaggio non a regola
d’arte, di collegamenti sbagliati o di sovraccarico
delle casse, non si assume nessuna responsabilità per
eventuali danni consequenziali a persone o a cose e
non si assume nessuna garanzia per le casse.
Se si desidera eliminare le casse definitiva-
mente, consegnarle per lo smaltimento ad
un‘istituzione locale per il riciclaggio.
3 Installazione
1) Spegnere l’amplificatore al quale si devono collegare
le casse perché i cavi degli altoparlanti siano senza
tensione!
2) Se non si usano i supporti a parete (b) unire i due
pezzi di gomma (a) e (c) e inserirli negli incavi sul
retro delle casse.
3) Se si usano i supporti (b) a parete, avvitarli come di-
mostrato dall’illustrazione in basso. Stringere la vite
al punto tale che lo snodo sferico si possa muovere
ma che la vite possa resistere al peso dalla cassa.
Se necessario, far passare il cavo dell’altoparlante
attraverso il passacavi del supporto. Avvitare i sup-
porti in punti adatti della parete. Dopo il collega-
mento elettrico delle casse inserirle sui perni dei
supporti. Per assicurarle usare i pezzi più piccoli (a)
di gomma.
4) Collegare le casse con le uscite per altoparlanti
dell’amplificatore. Fare attenzione che tutti gli alto-
parlanti abbiano la stessa polarità (morsetto rosso =
polo positivo, morsetto nero = polo negativo).
Con riserva di modifiche tecniche.
ItalianoEspañolPolski
Dati tecnici Especificaciones Specyfikacja MKS-26/SW • MKS-26/WS
Potenza musicale Potencia total Moc całkowita 20W
Potenza nominale (RMS) Potencia nominal (RMS) Moc znamionowa RMS 10W
Gamma max. di frequenze Rango máx. de frecuencias Max pasmo przenoszenia 150 – 22 000 Hz
Impedenza Impedancia Impedancja 8 Ω
Sensibilità Sensibilidad Czułość 88 dB (1W/1 m)
Press. son. nominale max. SPL máx. Max poziom SPL 100 dB
Altoparlanti Configuración de altavoz Rozmiar głośnika
Altoparlante a larga banda di 6,5 cm (2,5”)
Altavoz Full Range de 6,5 cm (2,5”)
6,5 cm (2,5”) pełnopasmowy
Dimensioni, peso Dimensiones, peso Wymiary, waga 90 × 90 × 115 mm, 450 g
Contatti Conexiones Złącza
Morsetti per altoparlanti
Terminal de altavoz
Terminal głośnikowy

This manual suits for next models

3

Other Monacor Speakers System manuals

Monacor EDL-412/WS User manual

Monacor

Monacor EDL-412/WS User manual

Monacor MKS-26/SW User manual

Monacor

Monacor MKS-26/SW User manual

Monacor TXA-620CD User manual

Monacor

Monacor TXA-620CD User manual

Monacor PA-1200M User manual

Monacor

Monacor PA-1200M User manual

Monacor ESP-5HQ User manual

Monacor

Monacor ESP-5HQ User manual

Monacor MKA-60/WS User manual

Monacor

Monacor MKA-60/WS User manual

Monacor IMG STAGELINE LR-1000SAT User manual

Monacor

Monacor IMG STAGELINE LR-1000SAT User manual

Monacor ESP-315/SW User manual

Monacor

Monacor ESP-315/SW User manual

Monacor ETS-422TW/WS User manual

Monacor

Monacor ETS-422TW/WS User manual

Monacor EUL-2 User manual

Monacor

Monacor EUL-2 User manual

Monacor EDL-110/WS User manual

Monacor

Monacor EDL-110/WS User manual

Monacor PA ESP-232/SW User manual

Monacor

Monacor PA ESP-232/SW User manual

Monacor CARPOWER PRESET-1 User manual

Monacor

Monacor CARPOWER PRESET-1 User manual

Monacor PAB-52WP/WS User manual

Monacor

Monacor PAB-52WP/WS User manual

Monacor SP-1/SW User manual

Monacor

Monacor SP-1/SW User manual

Monacor ESP-415-WS User manual

Monacor

Monacor ESP-415-WS User manual

Monacor EDL-115/WS User manual

Monacor

Monacor EDL-115/WS User manual

Monacor img Stage Line LR-1000SAT User manual

Monacor

Monacor img Stage Line LR-1000SAT User manual

Monacor TXA-604/SW User manual

Monacor

Monacor TXA-604/SW User manual

Monacor EUL-42/SW User manual

Monacor

Monacor EUL-42/SW User manual

Monacor EUL-30/SW User manual

Monacor

Monacor EUL-30/SW User manual

Monacor IMG StageLine MEGA-110MK2 User manual

Monacor

Monacor IMG StageLine MEGA-110MK2 User manual

Monacor DN-303ST User manual

Monacor

Monacor DN-303ST User manual

Monacor MEGA-110MK2 User manual

Monacor

Monacor MEGA-110MK2 User manual

Popular Speakers System manuals by other brands

OXS Dolby Atmos S5 user manual

OXS

OXS Dolby Atmos S5 user manual

Samsung HW-K650 user manual

Samsung

Samsung HW-K650 user manual

Pioneer PDP-S22-LR Service manual

Pioneer

Pioneer PDP-S22-LR Service manual

Crystal Acoustics CASB320 user manual

Crystal Acoustics

Crystal Acoustics CASB320 user manual

Klipsch ProMedia 2.1 Wireless owner's manual

Klipsch

Klipsch ProMedia 2.1 Wireless owner's manual

Thiel Model 01 user guide

Thiel

Thiel Model 01 user guide

Philips SBCBA250/05 Specifications

Philips

Philips SBCBA250/05 Specifications

Lynx ionic-100 Quick user guide

Lynx

Lynx ionic-100 Quick user guide

TEMPO ULTRA 502 installation instructions

TEMPO ULTRA

TEMPO ULTRA 502 installation instructions

Nxg Signature Si852 installation guide

Nxg

Nxg Signature Si852 installation guide

Audio Authority A-3780 owner's guide

Audio Authority

Audio Authority A-3780 owner's guide

Martin Audio MLA Mini user guide

Martin Audio

Martin Audio MLA Mini user guide

Roycetron LS-6001 Operation instructions

Roycetron

Roycetron LS-6001 Operation instructions

Nexo PS8 user manual

Nexo

Nexo PS8 user manual

Pioneer SP-SB23W operating instructions

Pioneer

Pioneer SP-SB23W operating instructions

Klipsch iFi owner's manual

Klipsch

Klipsch iFi owner's manual

Pioneer S-FCRW2700 XTW/UC operating guide

Pioneer

Pioneer S-FCRW2700 XTW/UC operating guide

Devine MOH 15A user manual

Devine

Devine MOH 15A user manual

manuals.online logo
manuals.online logoBrands
  • About & Mission
  • Contact us
  • Privacy Policy
  • Terms and Conditions

Copyright 2025 Manuals.Online. All Rights Reserved.