MONDEX AURA E2 User manual

Installation and operating instructions
AURA E2 heater

2INSTALLATION AND OPERATING INSTRUCTIONS AURA 12/2022
TABLE OF CONTENTS
1 General safety instructions 3
2 AURA heater 4
3 Heater assembly and installation 4
Stacking the stones 5
4 Technical specications 6
Heater power and voltage 6
Heater dimensions 6
Required amount of stones 6
Minimumdistancestoinammablematerial 6
5 General instructions for users of AURA heaters 7
Note 7
Installationcable 7
Additional connection options 7
6 Things to keep in mind when using the heater 7
First heating 7
Sauna room 7
Temperature control 7
Heating time 7
Water thrown on heater 7
Sauna room structure 8
7 Wall mount installation 8
8 Installation instructions 9
Heater installation 9
Installation instructions for the thermostat
and controller 10
9 Wiring diagram 11
Controller card wiring, heater 11
Controller card wiring, controller 11
10 Heater control and operation 12
Switching on the heater 12
Starting the heating process 12
Timing of the heating process 12
Starting the heating 12
Stopping the heating or timing process 13
Quick start of the heating process 13
Parental control 13
Error codes 13
11 Troubleshooting 14
Heater does not heat up 14
Warnings 14
12 Warranty and maintenance 15
Warranty 15
Maintenance and spare parts 15
Natural stone as material 15
Changing the heater stones 15
Heater maintenance history 16

3
INSTALLATION AND OPERATING INSTRUCTIONS AURA 12/2022
• Electricalconnectionsmayonlybemadebyanelectricianwithavalidinstallationauthorisation
in accordance with the current regulations.
• TheMondexelectricheaterissuitableforuseinafamilysauna,one(1)heaterpersaunaroom.
Retain the installation and operating instructions for further reference.
• Alwayschecktheadequacyofthereprotectiondistances!
• Failuretoobservetheconnectioninstructionsmaycreatearehazard!
• Alwayscheckthesaunaroombeforeswitchingtheheateron!
• Alwayscheckthatthecontrollerhasswitchedtheheateroafterthesettimeperiod!
• Duetotheriskofre,donotusethesaunatodryclothesorlaundry.
• Exercisecautionwithahotheater,becausetheheaterstonesandmetalpartsbecomeveryhot
andcancauseburns.
• Thesteamrisingfromtheheaterishotandcancauseburns.
• Children,disabledandillpersonsusingthesaunashouldbesupervised.
• Children may not play with the device.
• A child must not carry out any cleaning or maintenance unattended.
• Benchesandoorsmaybeslippery,somovearoundthesaunawithcaution.
• Donotgotoahotsaunaundertheinuenceofnarcoticsubstances(alcohol,drugs,narcotics,etc.)
• Astonecompartmentwithtoofewstonesorlledimproperlycreatesarehazard!
• Coveringtheheatercreatesarehazard.
Thisdevicemaybeusedbychildrenwhoare8yearsofageorolder,aswellasbypersonswhose
physical,sensoryormentalabilitieshavedeterioratedorwholackofexperienceandknowledge,
onlyundersupervisionorwhentheyhavebeeninstructedonthesafeuseofthedeviceandthey
understandthehazardsassociatedwithusingthedevice.
This device complies with the requirements of:
Mondex pursues an active policy of product development and continuous improvement. For this
reason,Mondexreservestherighttomakechangesrelatingtothedesignandtechnicalspecications
of their products without prior notice.
1 GENERAL SAFETY INSTRUCTIONS
To ensure safe use of the sauna, please read these safety instructions rst!

4INSTALLATION AND OPERATING INSTRUCTIONS AURA 12/2022
2 AURA HEATER
3 HEATER ASSEMBLY AND INSTALLATION
Heater assembly
1. Store the heater in its original package in an upright position and in a
warm and dry location until it is installed.
2. The package includes the heater, thermostat sensor, electronic
controllerandtherequiredcables.Inspecttheheatercomponents
visually. If you notice any discrepancies, please contact the store from
whichyoupurchasedtheheater.Donotexposeheaterpartstoblows
anddentingwhentakingitoutofthepackage.Thesauna’soorsurface
shouldalsobeproperlyprotectedbeforeyoubegintheinstallation.
3.Donotlifttheheaterbythejacket.
4.Anelectricianshouldconnectthewiresbeforetheheaterisinstalled.If
theheateristobeembeddedinthebenchstructure,itmustbelowered
throughthebenchesbeforemakingtheelectricalconnections.Ifneeded,
thepositionoftheheatercanbene-tunedbyusingtheadjustablelegs.
Observethesafetydistancesbetweentheheaterandanyinammable
materialinaccordancewiththetableonpage6.
5.Theheaterisinstalledsothatitleansagainstawallusingthebracket
provided(seethedimensionsonpage8).
6.Tofacilitateinstallation,adjusttheheater’sfeetsothattheyextendout
by8–9cm(atleastby5cm).Installtheheaterontheoorandadjustthe
feet so that the heater stands upright.
NOTE!Removeallplasticlmbeforeusingtheheater.

5
INSTALLATION AND OPERATING INSTRUCTIONS AURA 12/2022
Stacking the stones
Thesuitablestonesizeis5–10cmindiameter.
Use protective gloves.
• Only use stones with rough cutting surfaces,
intendedforsaunaheaters.Suitablestone
materialsincludeperidotite,olivinediabase,and
olivine.
• The use of ceramic “stones” and soft soapstone
objectsisforbidden.Itmaydamagetheheating
resistors.
• Rinse any dust o of the heater stones before
stacking them in the heater.
When stacking the stones inside the Aura heater,
ensure that the resistors remain upright and
straight.Donotbendtheresistorssothattheyare
in contact with the metal structures of the heater.
NOTE! Do not remove the bands around the
resistors. If there are two bands, one of them is
located at approximately 20 cm from the bottom
and another approximately 10–15 cm from the
top. They keep the resistors apart from each
other and prevent them from deteriorating
prematurely.
Ensuresucientaircirculationaroundtheresistors
byleavingspacesbetweenthestonesstacked
betweentheresistors.Ifthestonesarestacked
too tightly in the middle section, it will extend the
heating process and may result in the premature
failure of the resistors.
Theresistorsshouldbesurroundedbystonesonall
sides.
Note! Ensure that the resistors do not touch the
heater’s frame anywhere. There must always be
a stone between a resistor and the frame.
Donotmakeaheapofstonesontopoftheheater!
Do not use the heater without the stones!
Dentscausedbytheuserarenotcoveredby
Mondex’swarrantyorotherproductliability.When
stackingthestones,becarefulnottodentthe
heater’s metal surfaces to avoid damaging them.

6INSTALLATION AND OPERATING INSTRUCTIONS AURA 12/2022
4 TECHNICAL SPECIFICATIONS
AURA 6.6
6.6 kW
400 V 3N~
5 x 1,5 mm²
3 x 10 A
1010
405
310
5–9m³
70 kg
HEATER
Power
Voltage
Connectingcable
Fuse
Height(mm)
Width(mm)
Depth(mm)
Saunasize
Amount of stones
AURA 9.0
9.0 kW
400 V 3N~
5 x 2,5 mm²
3 x 16 A
1010
405
310
8-15m³
70 kg
MINIMUM DISTANCES TO INFLAMMABLE MATERIAL
MODEL A B C D
AURA 6.6 900 2000 100 75
AURA 9.0 900 2,000 120 75
A A
B
NOTE! Ensure that when installing the safety collar, dimension Dis measured from the front surface of
theheatertothebenchstructures!
CD
C
D

7
INSTALLATION AND OPERATING INSTRUCTIONS AURA 12/2022
5 GENERAL INSTRUCTIONS FOR USERS OF AURA HEATERS
Note
Electricalconnectionsmayonlybemadebyanelectricianwithavalidinstallationauthorisation
accordingtothecurrentregulations.TheAuraelectricheaterissuitableforuseinafamilysauna,one
(1)heaterpersaunaroom.Retaintheinstallationandoperatinginstructionsforfurtherreference.
Installation cable
UserubbercableH07RN-Fasaconnectioncable.
Additional connection options
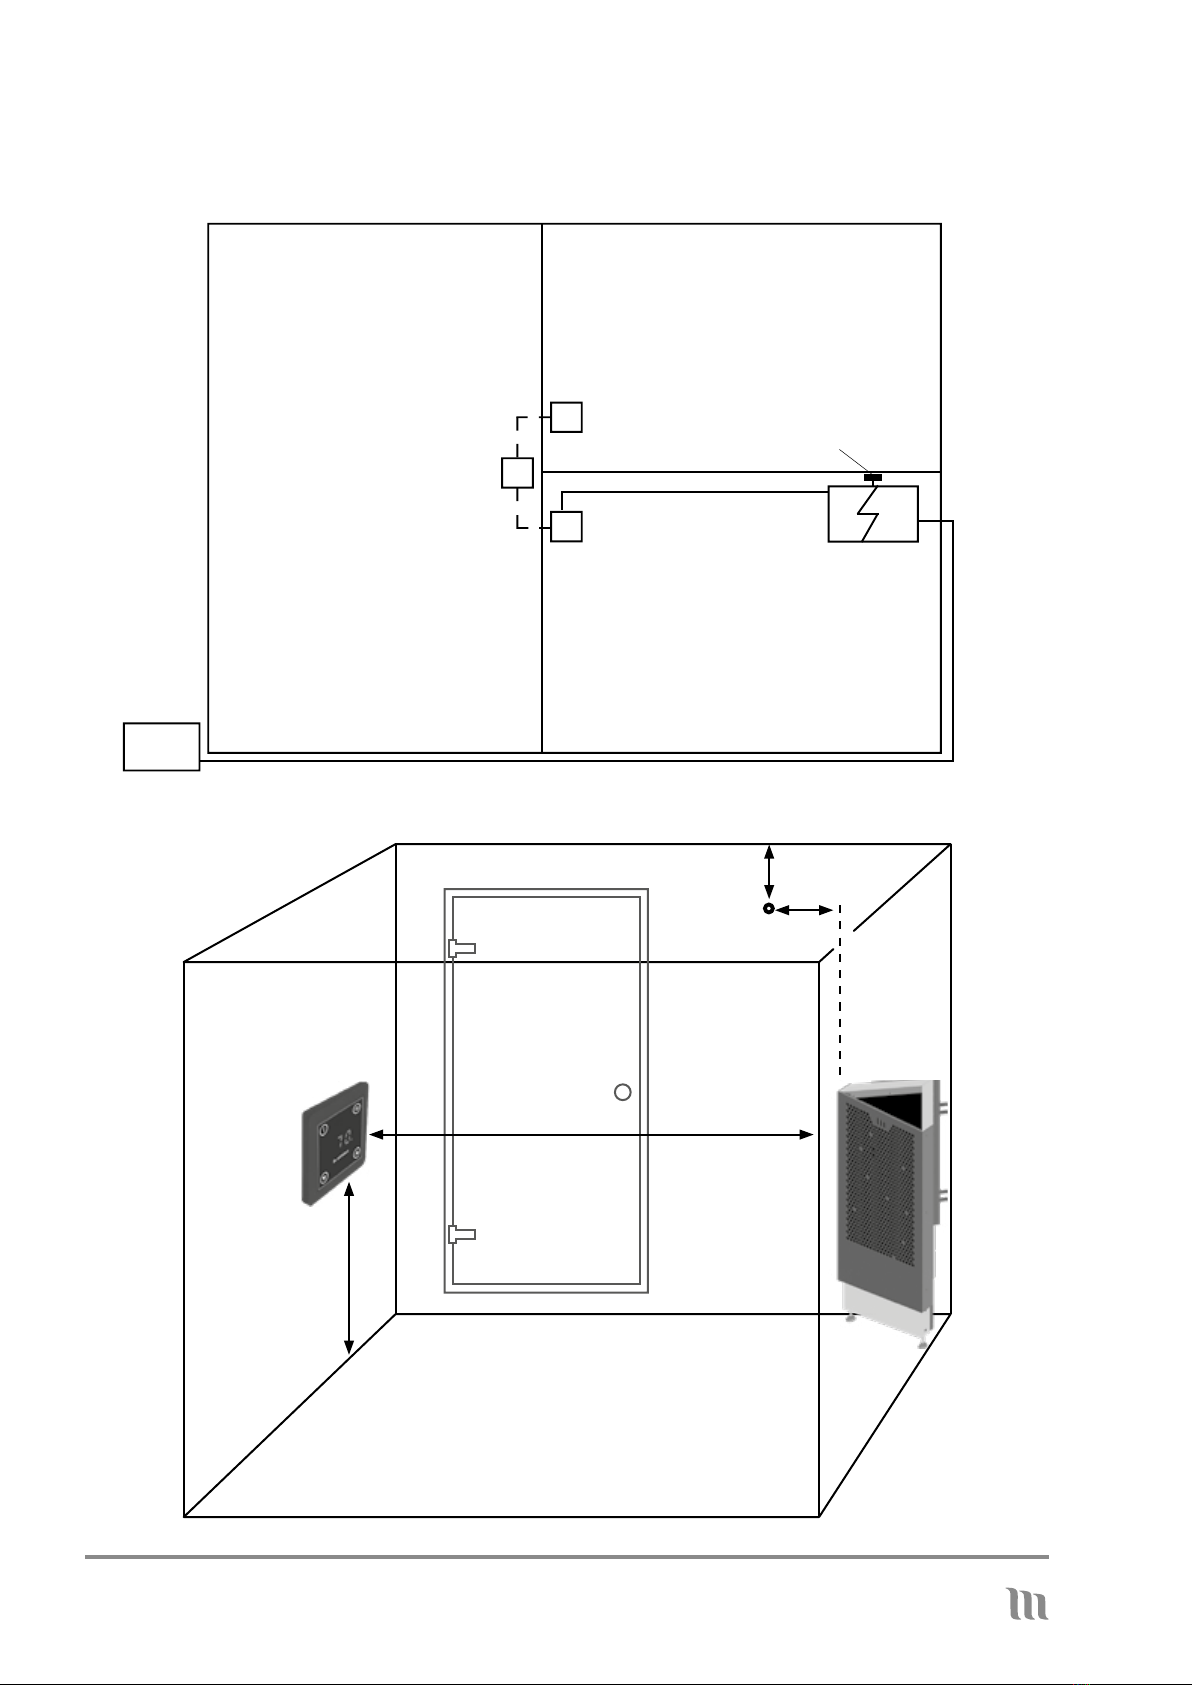
Controlofelectricheatingwiththeheater:Theelectricheatingcontrolcableisbroughtdirectly
totheheater’sjunctionboxandfurthertotheheater’sterminalblockwitharubbercablethatis
dimensionallyidenticaltotheincomingcable.
NOTE! Failure to observe the connection instructions may cause a re hazard!
NOTE! Remove all plastic lm before using the heater!
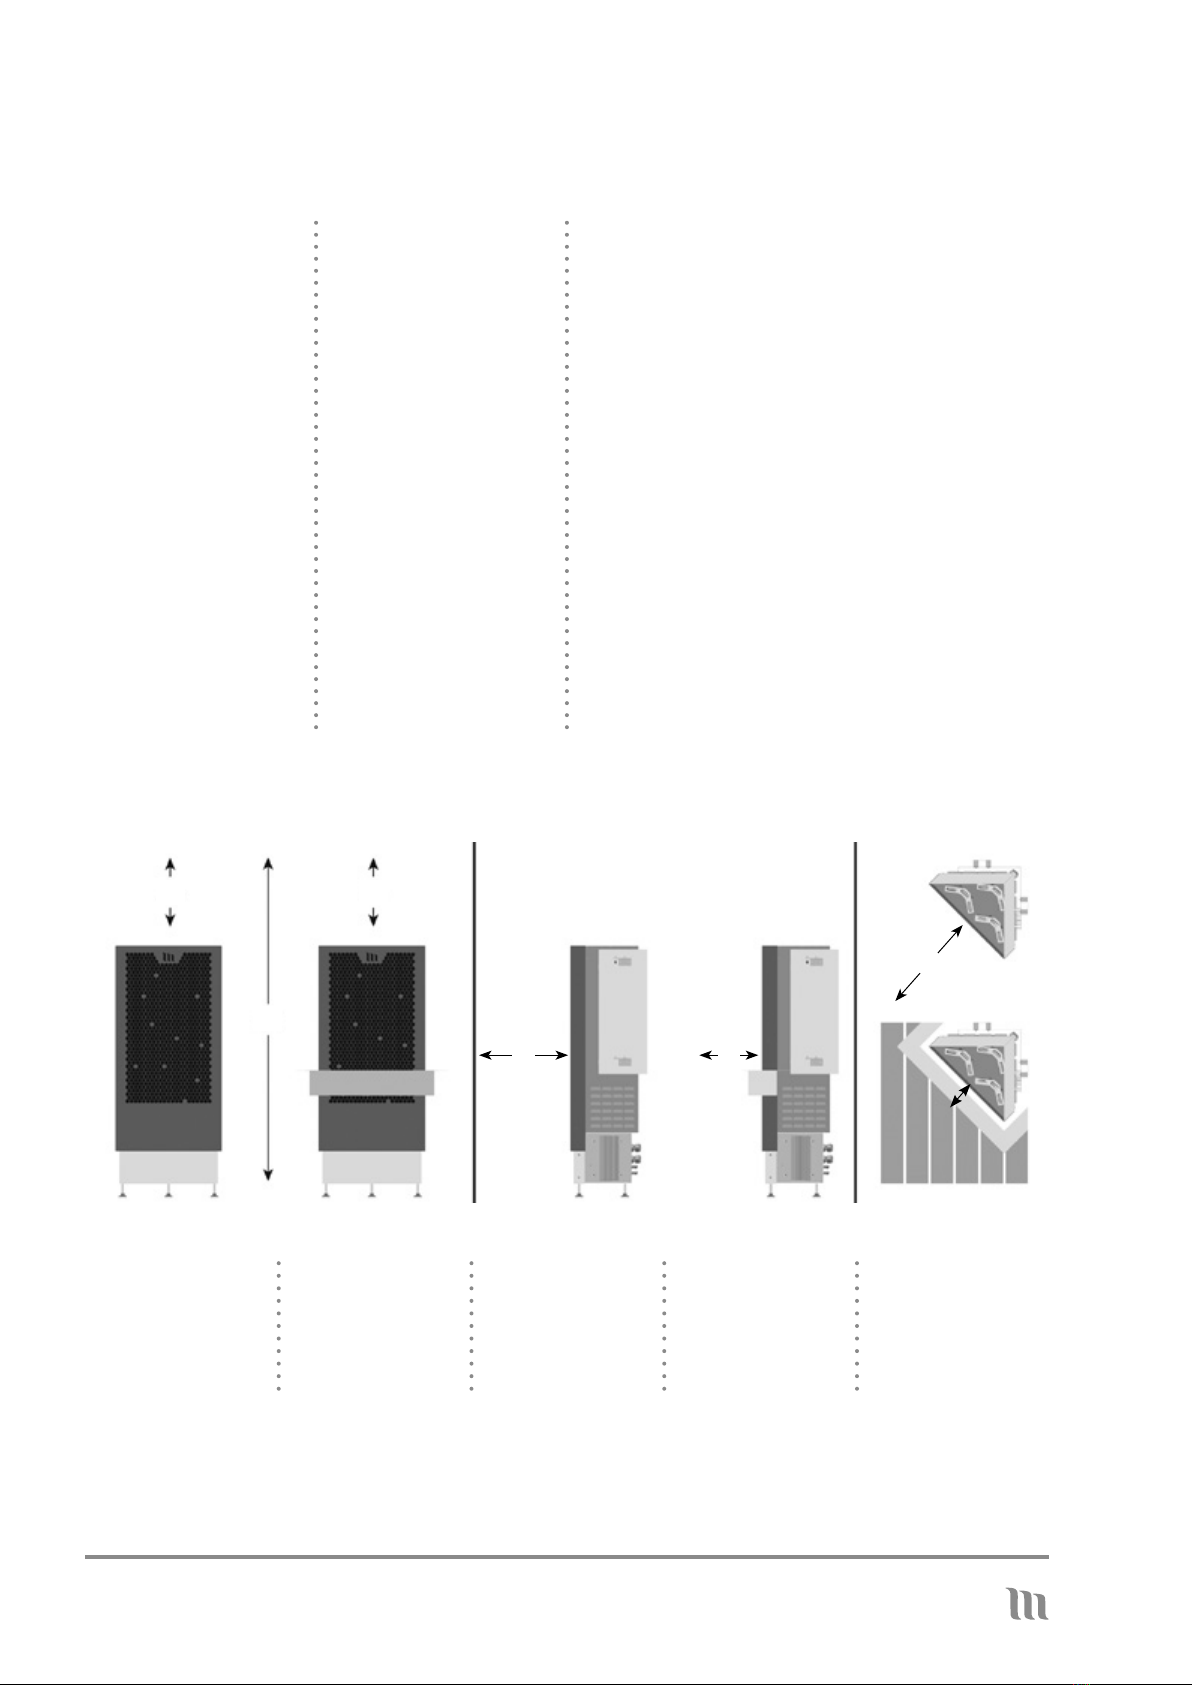
6 THINGS TO KEEP IN MIND WHEN USING THE HEATER
First heating
Duringtherstheating,theresistorsmayemitfumes.Therefore,ensurethattheroomisproperly
ventilated. NOTE! Please also read the user instructions for the controller!
Sauna room
Alwayscheckthesaunaroombeforeswitchingtheheateron!Alwaysmakesurethatthetimerhas
switchedthepoweroafterthesettimeperiod!
Temperature control
Thetemperatureisadjustedatthecontroller(seepage12).Theactualheatingtimedependsonthe
dimensions,structureandthermalinsulationofthesauna.Thetemperatureinthesaunaroomcanbe
maintainedatthedesiredlevelwiththethermostat.Ifthetemperatureofthesaunaroombecomes
dangerouslyhighforanyreason,theoverheatingprotectorwillswitchtheheater’spowero.The
causeofoverheatingmustalwaysbeinvestigated.Thepowercanbeswitchedonagainbypressingthe
overheatingprotectorresetbutton(seepage17).
Heating time
Anexcessiveheatingtimeconsumesenergyanddoesnotimprovethesteamingproperties.Thebest
steamisachievedbykeepingthesauna’sheatingtimerelativelyshort,atabout30–60min.,according
tothesizeofthesaunaandtheheater’spower.Thesizeofthesauna,theglassdoor,windows,or
materials used may require a longer heating time.
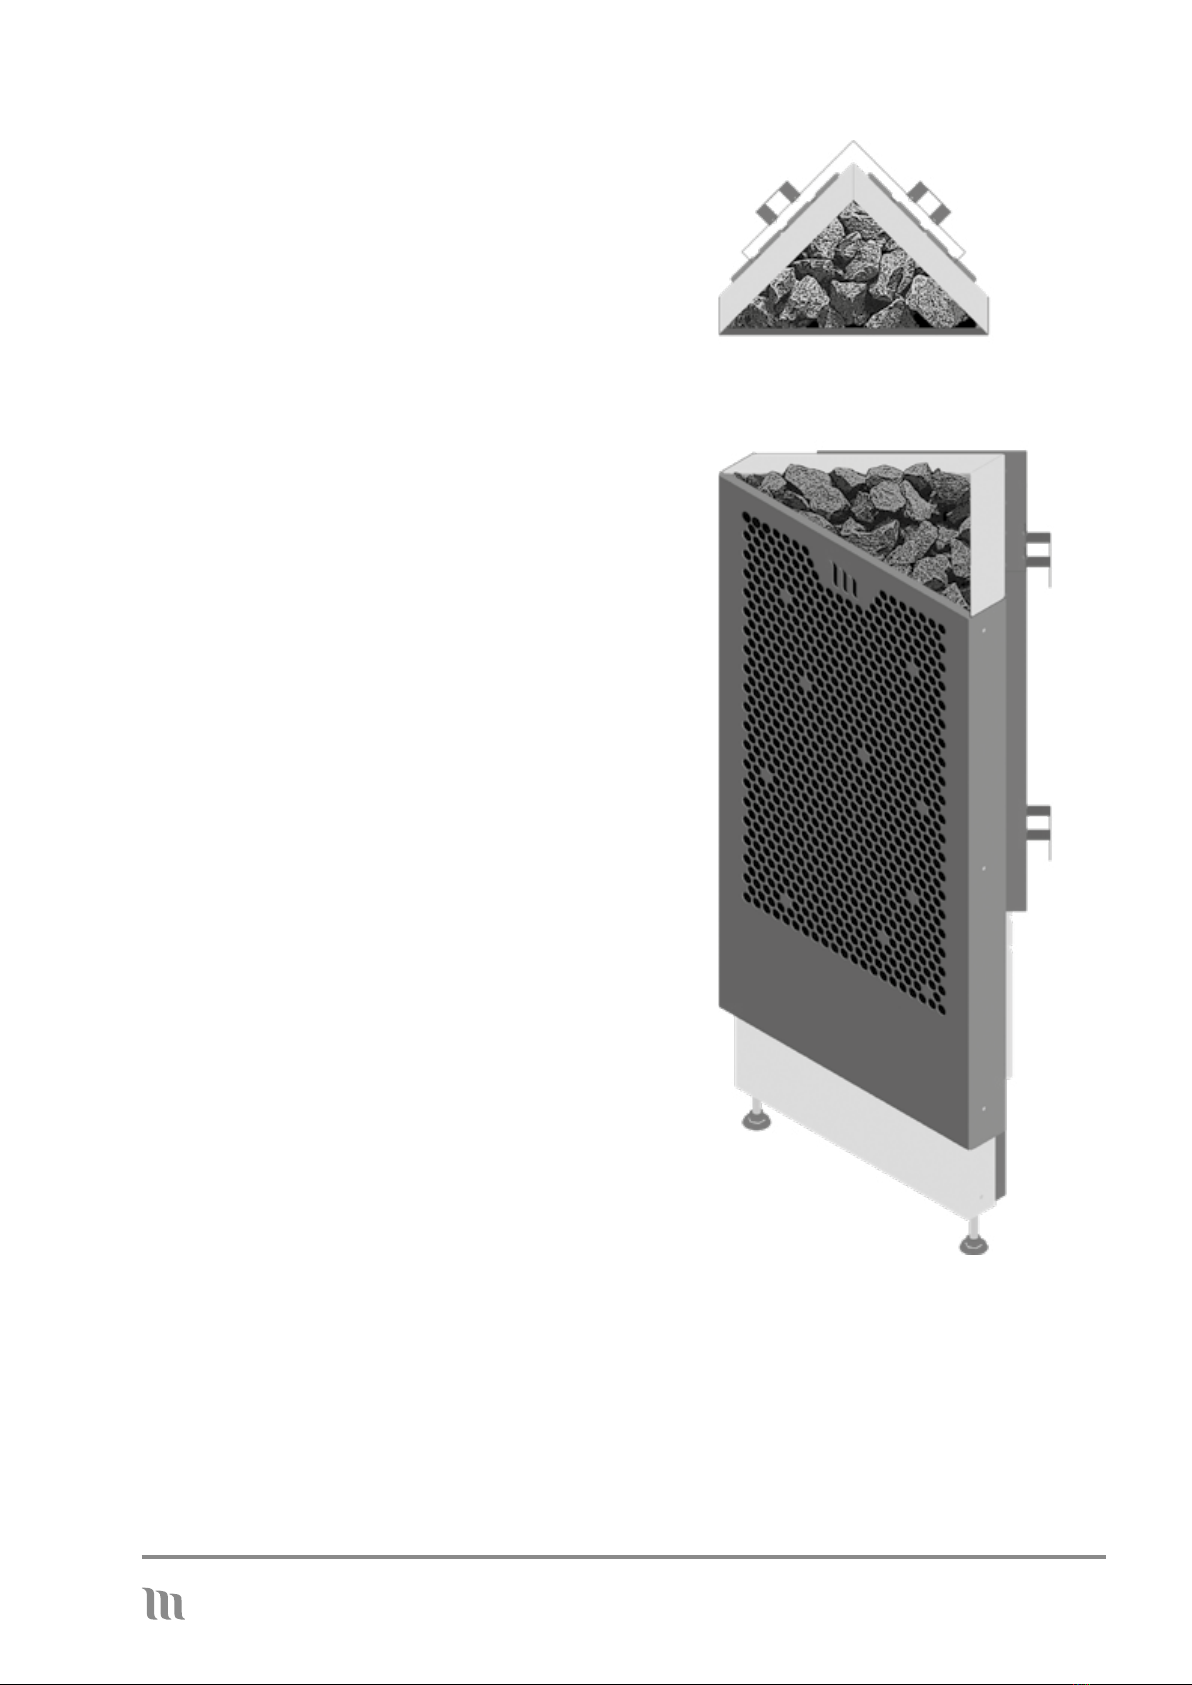
Water thrown onto the heater
Werecommendusinghandwarmwater.Thewatershouldbefreshhouseholdwater.Throwingthe
water onto the heater sides / lower stones generates softer steam. If you want steam that feels hotter
and more intense, pour plenty of warm water on top of the heater all at once. Do not use sea water or
chlorinated water.

8INSTALLATION AND OPERATING INSTRUCTIONS AURA 12/2022
71
FLOOR
50 159 7150159
71 50 159 7150159
51.5
min. 936 max. 986
51.5
min. 936 max. 986
L RL R
7 WALL MOUNT INSTALLATION
Seepage6fortheheater’sminimumdistancestoinammablematerials.
NOTE!Keepinmindthattheadjustablefeetaddtothetotalheightoftheheater.
Sauna room structure
The sauna and its ceiling, in particular, should have good thermal insulation, as heat tends to escape
throughtheceiling.Duetothemoisture,werecommendthatyouusealuminiumpaper.Thesizeofthe
heatershouldbeselectedaccordingtothesizeofthesauna(incubicmetres).Inadditiontocalculating
thepowerneedfortheregularsaunastructure(glasswool–foil–wood),thefollowingshouldbetaken
into consideration. If the sauna has any uninsulated wood, tile or concrete surfaces or the walls are
madeoflogs,theheaterpowerneedstobeincreased.Foreveryuninsulatedsquaremetre,theheater
powerneedincreasesbythesameamountasifincreasingthespacevolumeby1.2m3 andontimber
surfacesby1.5m3.Thefactorforglasssurfaces(glasswalls,doorsanduninsulatedstonesurfaces)is
also 1.2 m3 persquaremetre.Inborderlinecases,youshouldchooseaheaterwithhigherpower.
Thesaunaneedsecientventilationforagoodoxygenlevelandasucientamountoffreshair.
The air in the sauna needs to change at least 6 times per hour. For a sauna with an electric heater,
mechanicalventilationisthemostconvenientventilationmethod.Thesupplyairshouldbeprovided
throughaninletlocated500mm,ataminimum,abovetheheater,eitheronthewallorintheceiling.
NOTE:thedistanceofanundirectedinletairvalvefromthetemperaturesensormustbeatleast1,000
mm,whilethedistanceofaninletairvalvedirectedawayfromthesensormustbeatleast500mm.
Theexhaustvalveshouldbeplacedontheoppositewall,asfarawayfromtheheaterandascloseto
theoorlevelaspossible.Itishighlyrecommendabletoinstallanexhaustairvalveintheceilingaswell
for an easier removal of moisture after sauna sessions.
Formoreinformation,refertotheconstructioninstructionsandbuildingregulations.

9
INSTALLATION AND OPERATING INSTRUCTIONS AURA 12/2022
8 INSTALLATION INSTRUCTIONS
Installation of external control and sensor
The type E2 heater package includes:
Controller Temperature sensor
Thewall-mountedsensorisplacedabovethe
heater.
Thetemperaturesensormustbeinstalledsothat
itcannotbeaectedbyinletair.
Place the sensor the following way: 10 cm in a
vertical distance from the ceiling, and 10 cm in
ahorizontaldistancefromtheheater(compare
sketchonpage10).
Placethereinforcingplatebetweenthewall/box
and the plastic clip.
The plastic clip is either mounted to the wall
usingthreescrewsoraxedtothebottomof
themountingbox.Theplasticclipiscoveredrst
withacoverplateandnallywiththecontrol
panel.Thelengthofthesensorcableis10m.
Cut the excess wire and connect the other
end to the heater. When installing the control
panel,makesurethatthecablesdonotbecome
detachedorbend.
Control panel
Reinforcing plate
Plastic clip
Cover plate

10 INSTALLATION AND OPERATING INSTRUCTIONS AURA 12/2022
INSTALLATION INSTRUCTIONS FOR THE THERMOSTAT AND CONTROLLER
Controller
max. 99 cm
min. 1 m
Thecontrollermustbeplacedataminimumdistanceof
1 m from the heater
10 cm
10 cm
Sensor
on the
wall
Supplycable5x1.5mm2/ 5 x 2.5 mm2
Sensor
Fuse
box
Controller
Sauna
Changing
room
Utility
room
Heater

11
INSTALLATION AND OPERATING INSTRUCTIONS AURA 12/2022
9 WIRING DIAGRAM
OVERHEATING PROTECTOR
RLY1, RLY3, RLY5 RLY2, RLY4, RLY6
N
L1
L2
L3
P2
PE F2/5A
Controller card wiring, heater Controller card wiring, controller
N N L1 L2 L3 P2
1 White
2 Brown
3 Green
4 Yellow
5 Grey
6 Pink
Display:
1 Brown
2 White
3 Blue
4 Yellow
Sensor:
1 White
2 Brown
3 Green
4 Yellow
5 Grey
6 Pink
Heater:
Temperature
sensor
1 Brown
2 White
3 Blue
4 Yellow
Note! The termi-
nal screws must
face the wall.

12 INSTALLATION AND OPERATING INSTRUCTIONS AURA 12/2022
10 HEATER CONTROL AND OPERATION
DOWN
ON/OFF
UP
MENU
Switching on the heater
Theheaterisswitchedonbypressingthe
ON/OFFbutton.
Ifthreelinesappearonthedisplay,thebuttons
are locked.
Thebuttonscanbeunlockedby
pressing the ON/OFF and MENU
buttonssimultaneouslyuntilallLEDsegmentson
thedisplayarelit(asshowninthepicture).
Theheaterisswitchedonbypressingthe
ON/OFFbuttonagain.
Starting the heating process
When the heater is switched on, the duration of
heatinglastusedisdisplayed(thedefaultvalueis
2hours).
Thedurationofheatingcanbe
changedbyusingtheUPandDOWN
buttons,eitherbyrepeatedlypressingthem
brieyorbykeepingthemdepressedlonger.The
timewillchangein30-minuteincrements.
Thetargettemperaturelastusedcanbe
displayedbypressingtheMENUbutton.
Thetemperaturecanbechangedby
usingtheUPandDOWNbuttons,
eitherbyrepeatedlypressingthembrieyorby
keeping them depressed longer.
Timing of the heating process
Thetimingsettingisdisplayedbypressing
theMENUbuttonagain.
The right-hand decimal point on the display is
lit to indicate that the timing setting is displayed.
Thesettingcanbechangedbyusing
theUPandDOWNbuttons,eitherby
repeatedlypressingthembrieyorbykeeping
themdepressedlonger.Thetimewillrstchange
in30-minuteincrements,andaftertenhours,in
one-hourincrements.
IfthetiminghasbeensetandtheON/OFF
buttonispressed,thetimingwillstartrst,
and only then the actual heating process.
During the timing, the right-hand decimal point
on the display is blinking to indicate that the
timing is in progress.
Thetimingsettingcanbechangedduringthe
timingprocessbyusingtheUPand
DOWNbuttons,eitherbyrepeatedly
pressingthembrieyorbykeeping
them depressed longer.
Ifthetimingsettingischangedtozero,or
theON/OFFbuttonispressedduringthe
timing process, the timing process ends, and the
heating process starts immediately.
Starting the heating
The duration of heating is displayed again
bypressingtheMENUbuttononemore
time.Youcannowstarttheheatingby
pressingtheON/OFFbutton.Thecurrent
temperaturewillbedisplayed,andtheright-hand
decimal point on the display is lit to indicate that
the heating process is in progress.

13
INSTALLATION AND OPERATING INSTRUCTIONS AURA 12/2022
Thetargettemperaturecanbe
adjustedbyusingtheUPandDOWN
buttons.Whenthetargettemperaturehasbeen
adjusted,thecurrenttemperaturewillagainbe
displayed after a while. The remaining heating
timeisdisplayedbypressingtheMENU
buttonduringtheheatingprocess.
Thedurationofheatingcannowbe
changedbyusingtheUPandDOWN
buttons,andthecurrenttemperaturewillbe
displayedwhenthechangehasbeenmade.If
thedurationofheatingischangedtozero,the
heating stops immediately.
Stopping the heating or timing process
Theheatercanbeturnedobypressing
theON/OFFbuttonforawhileduringthe
heating or timing process or any other state.
Quick start of the heating process
Theheatingprocesscanbestartedquickly
bypressingtheMENUbutton.Thissetsthe
duration of heating to two hours and the target
temperaturetothevaluelastused(thedefault
valueis70°C).
If three lines appear on the display,
thebuttonsarelocked.Thebuttons
canbeunlockedbypressingtheON/OFFand
MENUbuttonssimultaneouslyuntilallLED
segmentsonthedisplayarelit(asshowninthe
picture).
Error codes
When a known fault situation arises, an error code is displayed. It has one of the following
meanings:
Theheatingprocesscanbestartedby
pressingtheMENUbuttonagain.
Parental control
The heater has a menu for separately set
parameters.
Youcanenterthemenubypressing
theMENUandON/OFFbuttons
simultaneouslyforawhile.Theabbreviationof
therstparameterwillbedisplayed.
Thecurrentvalueoftheparametercanbe
displayedbypressingtheMENUbutton.
You can change the parameter value
byusingtheUPandDOWNbuttons.
Thechosenparametervaluecanbesaved
bypressingtheMENUbuttonsothatthe
abbreviationoftheparameterisagaindisplayed.
Youcanleavethemenubypressingthe
ON/OFFbutton.Thiswillalsoswitchthe
heatero.
Parameter Abbreviation Value range Default value
Buttonlocking --- ON/OFF ON
Error code Meaning
E01 The overheating protector has tripped
E02 The thermal sensor is out of order
E03 The thermal sensor is not connected

14 INSTALLATION AND OPERATING INSTRUCTIONS AURA 12/2022
11 TROUBLESHOOTING
HEATER DOES NOT WARM UP
Check the heater fuses at the fuse box
Is the power on?
Check that all three heating resistors are glowing then the heater is on
Has the overheating protector tripped?
–>Thisisresetbypressingthebuttoninthesensorboxuntilaclickisheard.Thecauseofoverheating
mustalwaysbedeterminedbeforetheheaterisswitchedonagain!Ifnecessary,contactthedealeror
manufacturer.
WARNINGS
- Duetoariskofre,donotusethesaunatodryclothesorlaundry.
- Exercisecautionwithahotheater,sincetheheaterstonesandmetalpartsbecomeveryhotandcan
causeburns.
- Thewatersteamrisingfromtheheaterishotandcancauseburns.
- Children,disabledandillpersonswhoareusingthesaunashouldbesupervised.
- Benchesandoorsmaybeslippery,thereforemoveinthesaunawithcaution.
- Donotgotoahotsaunaundertheinuenceofnarcoticsubstances(alcohol,drugs,narcotics,etc.)

15
INSTALLATION AND OPERATING INSTRUCTIONS AURA 12/2022
12 WARRANTY AND MAINTENANCE
WARRANTY
Forheatersandcontrolunitsinprivateuse,thewarrantyistwo(2)years.Incommercial/professional
use,thewarrantyisthree(3)months.Commercialusereferstofacilitiesinwhichtheheaterisin
useonacontinuousbasis,suchastnesscentres,swimmingpools,housingcompaniesetc.Itisnot
recommendedthattheheaterisonforlongerthansix(6)hoursatatime.Retainthesalesreceiptor
warrantycard.Thewarrantydoesnotcoverexternalorinternalmechanicaldamagecausedby,for
example, the impacts of stones or the heater falling over. The warranty also does not cover defects
causedbyactsofnature,suchaslighting,ordamagecausedbyovervoltage.Pleasealsoseechapter
“Changing the heater stones”. Removing or re-stacking of heater stones are not covered by the
warranty in a potential warranty maintenance.Themanufacturerwillnotcompensatethebuyer
forexpensesincurredbyaproductdefectormalfunction,losscausedbydisruptionofbusiness
operations, or any other direct or indirect damage. For more detailed warranty terms and conditions,
pleaseseewww.mondex./en/product-support/.
MAINTENANCE AND SPARE PARTS
Incaseofafaultthatcannotbesolved,pleasecontactthestorewhereyoupurchasedtheheateror
emailinfo@mondex..SparepartscanbepurchasedfromMondexdistributorsandthemanufacturer.
Whenpurchasingspareparts,pleaserefertothename,power,serialnumberandmanufacturingdate
of the heater to ensure you receive the correct parts.
NATURAL STONE AS MATERIAL
Smallpebblesorpiecesmaycomeothenaturalstoneusedintheheater.Asthisisnotafailureof
theorganicmaterialbutanaturalfeaturethatcannotbepredictedatthetimeofmanufacturingthe
product,themanufacturerisnotresponsibleforanydamage.
CHANGING THE HEATER STONES
Re-stacktheheaterstonesandreplaceanyerodedstonesannually,moreoftenifusedintensively
(everythreemonthsincommercial/professionaluse).Thegoodconditionandproper,spacious
stackingofthestonesaroundtheresistorsinsidetheheaterensureasucientairowbetweenthe
resistors. If this is not done annually, proper air ow may be obstructed and the resistors may
fail prematurely; this is not covered by the warranty.

DATE MEASURE
Werecommendchangingtheheaterstonesatone-yearintervals.Changethemmoreregularlyifthe
heater is used often.
HEATER MAINTENANCE HISTORY
Technical support:info@mondex.
Premec Oy
Kettukallionkatu 4
84100 Ylivieska,
Finland
info@mondex.
www.mondex.
Table of contents
Other MONDEX Heater manuals