Monster Digital Monster Vision User manual

1
HD Quick Start Guide

2
English v1.04
THANK YOU
Thank you for purchasing the Monster Vision™ HD Action Sport Camera by Monster Digital! This
Quick Start Guide will help get you started using your camera in no time. We hope you will
be able to take awesome videos and amazing photos with your camera. Feel free to share
them with us and we might post them on our website, YouTube™ channel, Facebook,
Instagram etc.
If you ever have any issues or want to learn more please reach out to us through any number
of means all listed on our website. We will get your question answered or problem solved
right away. Also be sure to register your camera at MonsterDigital.com
Please be safe and have tons of fun!
- The Monster Vision Team

3
Physical Features
1. Power/Mode/Back Button 5. Charging Indicator (blue)
2. Lens 6. OK/Shutter/Menu Button
3. Display Screen 7. Battery Cover
4. Activity Indicator (red) 8. Battery Cover Release

4
Physical Features
9. Microphone 12. Mini HDMI output (type C)
10. USB Port 13. + Zoom in
11. microSD Card Slot 14. –Zoom out

5
1. Install and Charge the Battery
1a. Slide the battery door switch to release the battery door. Insert the battery with the
contacts up, facing you when looking at the display screen.
1b. Connect the camera with the included USB cable to a USB power source like a computer
or phone charger. We recommend a 1-amp or higher power source. The blue charging
indicator will turn on while charging and off when fully charged.
It will take 2-4 hours to fully charge depending on the power source.
USB Cable

6
2. Memory Card Installation
2a. MICRO SD CARD INSTALLATION AND REMOVAL
Find the included microSD card and remove it from the case. With the display screen toward
you and the label of the memory card facing you, insert the card into the slot. Push it all the
way in with your finger or thumbnail until it clicks.
To remove, gently press in on the edge of the card with your finger or thumbnail, then release
and the card will pop out.
Note: There is no internal memory so a memory card must be installed to record.

7
3. Power
3a. ON/OFF
Press the MODE button for 2 seconds to turn the camera ON
Press the MODE button for 4 seconds to turn the camera OFF
3b. AUTO POWER OFF
To save power the camera will turn off when not in use.
The time to turn off is adjustable in the settings menu.
Options are 1, 3, 5, 10 minutes or OFF to keep the camera on constantly.
3c. CHARGING
When charging, the indicator is blue. When fully charged the light will turn off.
3d. BATTERY LEVEL
When the battery is extremely low this icon will appear on the display.
If possible, connect the camera to a charger right away.
When the icon flashes red, the camera is about to shut down.
The camera will record for approximately 2.5 hours based on Monster Digital engineering
testing. Actual performance may vary based on settings, environmental conditions and
other factors. Maximum battery capacity will normally decrease with time and use.
Additional batteries available, sold separately. See our website or your retailer for details.

8
4. Videos, Photos and Playback
The Monster Vision HD camera has 3 modes, Video, Photo and Playback.
Press the Mode button on the front of the camera to cycle through modes.
4a. VIDEO MODE
When the camera is turned on it will be in video mode.
Press OK to start and stop recording.
Recording will stop automatically when the memory card is full or the battery is extremely low.
VIDEO DISPLAY SCREEN
1. Video mode icon
2. Video resolution is HD quality (720p@30fps)
3. Time available to record on the memory card
4. microSD card is installed (X if no card)
5. Battery status
6. Exposure is 0 (Options -3, -2, -1, 0, 1, 2, 3)
7. White Balance is in Automatic mode
(Options - Daylight, Cloudy, Tungsten, Fluorescent)
8. Charging indicator is Blue when charging
9. Activity indicator is Red when recording or active
When zooming, ZOOM status is in the bottom right hand corner above the battery icon.

9
4b. PHOTO MODE
Press OK to take a photo.
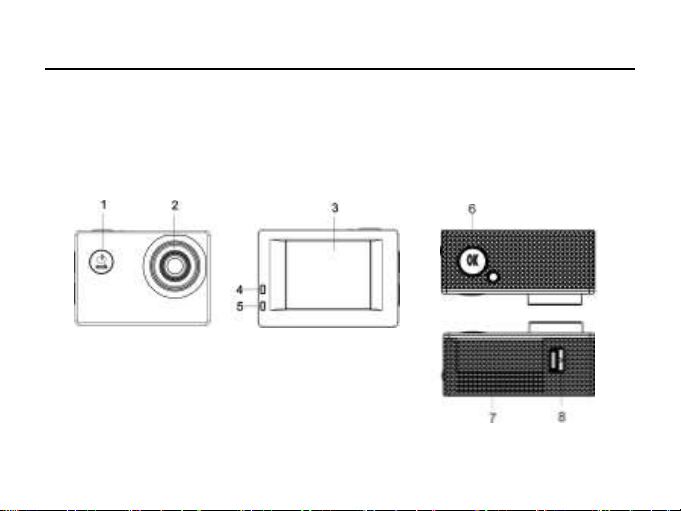
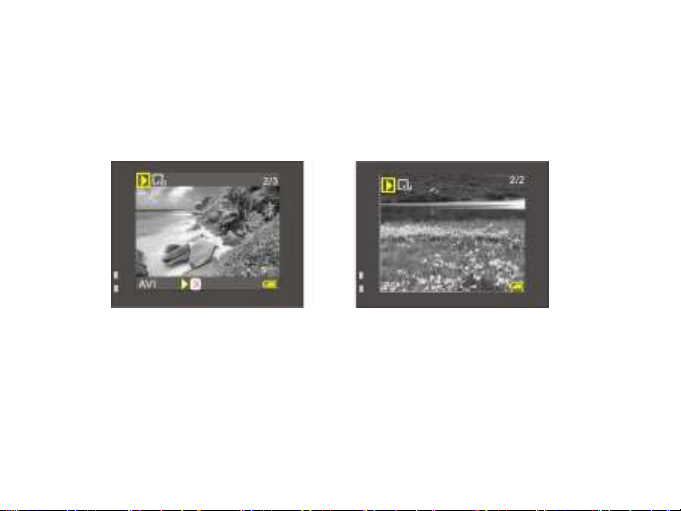
PHOTO DISPLAY SCREEN
1. Photo Mode Icon
2. Photo size icon (Options 1.3, 3 or 5 Mega Pixels)
3. Number of photos available
4. microSD card is installed (X if no card)
5. Battery status
6. Sharpness setting Normal (Options Sharp, Normal, Soft)
7. Exposure is 0 (Options -3, -2, -1, 0, 1, 2, 3)
8. Picture quality setting (Options Super Fine, Fine, Normal)
9. White Balance is in Automatic mode
(Options - Daylight, Cloudy, Tungsten, Fluorescent)
10. Charging indicator, Blue when charging
11. Activity indicator is Red when recording or active
When zooming, ZOOM status is in the bottom right hand corner above the battery icon.
ADDITIONAL PHOTO FEATURES ACCESSED BY MENU (hold OK for 2 sec.)
Multi Snapshot –Select to take 3 photos in 2 seconds
Self-timer –set to take a photo after a 2, 5, or 10-second delay

10
4c. PLAYBACK MODE
Press the MODE button one or two times to enter Playback Mode.
Press the –or + buttons to review files.
The file type (AVI –video or JPG –photo) is shown in the bottom left corner of the
display screen.
Video File –Press OK to play Photo File
Delete, Protect, Rotate
Under the playback menu photos and videos can be deleted or protected.
Also photo files can be rotated 90, 180 or 270 degrees.
To access the menu, press OK for two seconds. When the menu comes up press OK again,
then use the –button to select “Rotate”. Press mode twice to exit.

11
5. Menus There
are different menus for each mode
Video Menu Photo Menu Settings Menu Playback Menu
Press the OK button for 2 seconds to open the menu
Press - or + button to change tabs
Press OK to select the tab
Press - or + to move up or down
Press OK to select
Press the Mode button to go back and exit

12
6. Effects
There are 20 in-camera photo and video effects to chose from.
To access effects from either photo or video mode
Press the OK button for 3 seconds to open the menu
Press OK then use the –, + buttons to highlight “Effect” and press OK
Select the effect you would like to use then press OK.
Finally, press MODE twice to exit.
7. Playback on a TV
Connect the camera to a TV with a mini HDMI cable (type C to A) to playback videos and
photos on your big screen. You cannot connect the camera to a computer for playback or
recording via HDMI. Use the USB cable for that. HDMI cable not included.

13
8. Connecting to a PC or Mac
When connected to a computer via USB, the camera can function as a card reader
or a USB camera.
8a. Card Reader Mode
PC - When the camera is connected with a micro USB cable (included) the
memory card will appear in My Computer.
MAC - On a Mac the memory card will appear in Finder, under Devices.
8b. PC Camera Mode
With camera power OFF connect the camera to a computer with a micro USB cable,
press and hold the POWER and OK buttons at the same time for 2 seconds to enter PC
Camera mode.

14
Specifications*
Image Sensor
1.3 MP CMOS
Function Modes
Video, Photo and Playback
Lens
F2.4 f=3.0mm, 120° wide angle
Display
1.77 inches LCD
Photo Resolution
1.3MP, 3MP 5MP (3MP Default)
Video Resolution
HD: 1280x720 at 30 frames per second
File Formats
Video
AVI
Picture
JPG
Storage Medium
microSD Card (up to 32GB)
USB Port
High-speed USB 2.0 port
Battery
External 400mAh, 3.7V rechargeable lithium-ion, ≈2.5 hrs. record time
Dimensions
59 x 41 x 24.5mm 51g (2.32" W x 1.61 H x .96 D, 1.8 oz.) with battery
Languages
English, Spanish, Portuguese, French, German, Italian, Dutch, Greek,
Czech, and Romanian
*subject to change without notice

15
System Requirements
Operating
System
PC Camera Mode
PC: Microsoft Windows XP (SP3), Vista, 7, 8
MAC: OS X v10.8.0 or later
Storage Device Mode
(MSDC)
PC: Microsoft Windows 2000, XP, Vista, 7, 8
MAC: OS X v10.0.0 or later
CPU
Intel Pentium equivalent or better
Internal Memory
More than 1GB
Sound card and Graphic card
Direct X8 or better
Hard Disk
More than 2GB memory space
Available Port
USB 2.0 or 3.0

16
FCC STATEMENT
This device complies with Part 15 of the FCC Rules. Operation is subject to the following two conditions:
(1) This device may not cause harmful interference, and
(2) This device must accept any interference received, including interference that may cause undesired
operation.
NOTE: This equipment has been tested and found to comply with the limits for Class B digital devices, pursuant
to Part15 of the FCC rules. These limits are designed to provide reasonable protection against harmful
interference in a residential installation. This equipment generates, uses and can radiate radio frequency
energy and, if not installed and used in accordance with the instructions, may cause harmful interference to
radio communications. However, there is no guarantee that interference will not occur in a particular
installation. If this equipment does cause harmful interference to radio or television reception, which can be
determined by turning the equipment off and on. The user is encouraged to try to correct the interference by
one or more of the following measures.
- Reorient or relocate the receiving antenna.
- Increase the separation between the equipment and receiver.
- Connect the equipment into an outlet on a circuit different from that to which the receiver is connected.
- Consult the dealer or an experienced radio/TV technician for help.
Use of a shielded cable is required to comply with class B limits in Subpart B of Part 15 of the FCC rules. Do not
make any changes or modification to the equipment unless otherwise specified in the manual. If such
changes or modifications should be made, you could be required to stop operation of the equipment.

17
INDUSTRY CANADA STATEMENT
IC Notice to Users English/French in accordance with RSS GEN Issue 4:
This device complies with Industry Canada license exempt RSSs. Operation is subject to the
following two conditions:
1. This device may not cause interference; and
2. This device must accept any interference, including interference that may cause
undesired operation of the device
Cet appareil est conforme avec Industrie Canada RSS standard exempts de licence (s). Son
utilization est soumise à les duex conditions suivantes:
1. Cet appareil ne peut pas provoquer d’interférences; et
2. Cet appareil doit accepter toute interference, y compris les interferences
quipeuvent causer un mauvais fonctionnement du dispositive
This Class B digital apparatus complies with Canadian ICES-003. Cet appareil numérique de la
classe B est conforme à la norme NMB-003 du Canada

18
REGULATORY INFORMATION
To see the complete list of country certifications, visit http://www.monsterdigital.com/
Monster, the MC logo, the Monster logo, Monster Vision and Monster Digital, are
trademarks or registered trademarks of Monster Products, Inc., or its subsidiaries in
the U.S. and other countries. Mac is a trademark of Apple Inc., registered in the
U.S. and other countries. Windows and Vista are registered trademarks of
Microsoft Corporation in the United States and other countries. Trademarks and
registered trademarks are property of their respective owners.
1-year Limited Warranty –See website for details
www.MonsterDigital.com/warranty
©2016 Monster Digital
P.O. Box 941774 Simi Valley,
CA 93094
Table of contents
Other Monster Digital Action Camera manuals