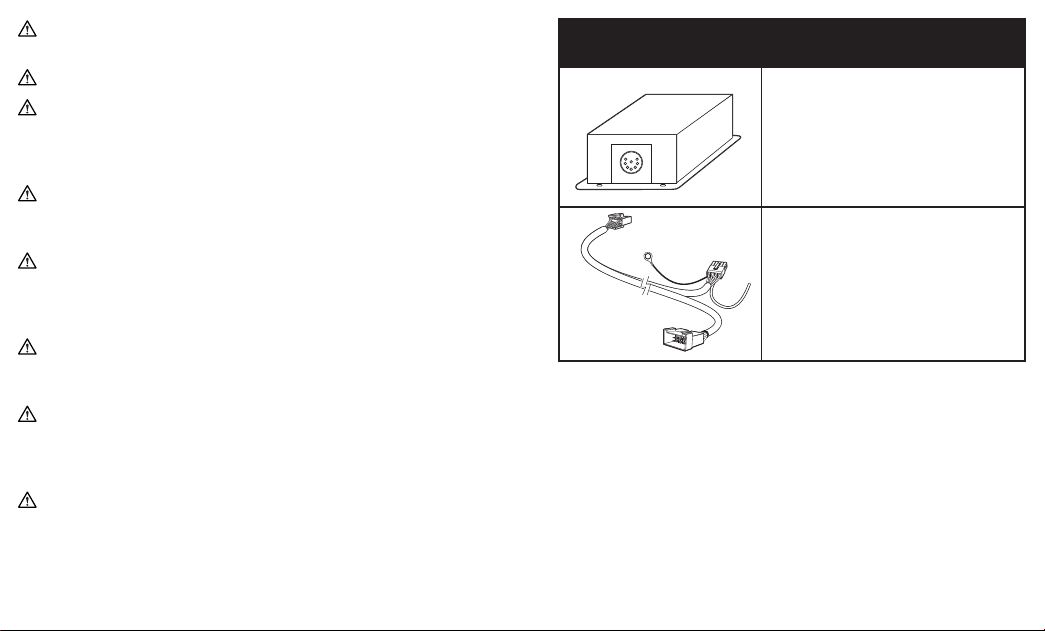
Monster iCruze MPC FX IM-GM1 Operation manual

ICRUZE INTERFACE MODULE
MPC FX IM-GM1
INSTALLATION & USER GUIDE

IMPORTANT NOTE:
This cable and/or module is for use
in installations that typically have a CD changer
installed from the factory or are prewired
for one in a non-dash location. It is a complicated
installation and professional installation
is HIGHLY recommended.
The installation of iCruze will disconnect
and cease the normal operation and function
of the factory-installed CD changer, satellite
radio, and/or DVD entertainment systems.
The Monster® Factory•Linx™ Interface Cable(s)
and/or Module(s) enclosed are custom designed
for your particular vehicle. Because every vehicle
is different, unique adaptors are required to make
your iCruze® installation and operation function
exactly as it was designed. Each is designed
and tested to fit correctly and made from the top
quality materials for trouble-free operation.
A NOTE FROM THE HEAD MONSTER
Thank you for purchasing the Monster
Factory•Linx™ iCruze®—one of the most exciting
products Monster has ever offered. Monster
worked closely with the engineers at Apple
to design iCruze to give you the most reliable,
most complete control of your iPod® through
your factory car stereo. iCruze also gives you
a direct connection for crystal clear sound
quality. And it charges your iPod the entire
time you’re driving, so when you leave
the car your iPod is charged up and ready
to go. You’ll soon be wondering how
you ever got along without your iPod
and iCruze in your car.
When you put music, driving and iPod
together, Life is Good.
Monsterously,
Noel Lee,
The Head Monster
Noel Lee,
The Head Monster

LOSS OF CERTAIN EXISTING FUNCTIONS
Use and installation of iCruze requires disconnection and loss
of use of any existing factory installed non-integrated CD-changer
(i.e. trunk, center console, under seat).
iCruze is not compatible with some vehicles that have existing,
factory installed integrated CD changers. Typically this is an in-dash
CD changer. Call your dealer and ask if your factory stereo has a CD
or CD changer port/option on the rear of the stereo. If yes, then it
is iCruze compatible.
Existing factory installed vehicle features, such as Satellite Radio,
DVD entertainment systems, navigation systems and video cameras
may be impacted by or cease to function with use and installation
of iCruze, if these components were connected to the CD changer
port. Check the iCruze in-store selection guide, visit iPodiCruze.com,
or call customer service at 1-415-840-2000 (9am–5pm Monday
through Friday PT) for more details.
INSTALLATION SAFETY PRECAUTIONS & WARNINGS
Monster is not responsible for any damage to your vehicle while
installing iCruze. The wiring and installation of the iCruze requires
technical skill. Monster recommends iCruze installation by a MECP
certified professional car audio technician. If you choose to install
yourself, be aware that specialized car stereo removal tools may
be needed and can be found available for purchase on our
website iPodiCruze.com.
Make sure you have purchased the correct Monster Factory•Linx
Interface Cable and/or Module. See the iCruze Factory•Linx
in-store selection guide or visit iPodiCruze.com to ensure you have
everything you need to install iCruze in your car. Double check
the iCruze in-store selection guide, visit iPodiCruze.com, or call
customer service at 1-415-840-2000 (9am–5pm Monday through
Friday PT) for more details.
If your factory stereo is protected by an anti-theft code, have
the code available so you can use your stereo once re-connected.
Consult your car owner’s manual or contact your local car dealer
for more information.
Before installing iCruze, remove the cable from the negative
battery terminal. Failure to do so may cause electrical shock
and/or injury.
iCruze is designed to be installed in the dash near the car stereo.
Installation elsewhere or in a dusty or moist area may cause
problems or product failure.
Many connectors in your car may look the same. Do not force
or alter the cable connectors to fit. Failure to do so may damage
your vehicle’s electronics, cause shock or fire.
While installing iCruze, make sure to avoid sharp edges which
can damage wiring. Failure in doing so may cause iCruze to not
work or result in a fire.
Do not attempt to take iCruze apart. The internal circuits are static
sensitive and contain no user serviceable parts.
IMPORTANT iPOD® FUNCTION NOTES & SAFETY
Monster is not responsible for any lost data on your iPod
even during normal use of this product.

Monster is not responsible for damage caused to your iPod
from misuse.
iCruze is compatible with iPod models with dock connector.
You should never leave or store your iPod in your vehicle
for an extended amount of time. Failure to do so may damage
your iPod from heat, cold and moisture extremes. See your iPod
manual for acceptable temperature ranges.
For added safety and security while driving, Monster recommends
placing the iPod in your glove box or other stow-away location such
as a center console.
Your iPod must have certain firmware for proper iCruze
compatibility. Minimum: version 1.2 for iPod Mini, version 1.0
for iPod Photo and version 2.2 for iPod. Visit apple.com/support
for more information.
When you unplug the iPod from the iCruze, you will notice that
the iPod will display the iCruze logo for a short time which is normal.
It will revert back to the usual screen shortly after this time period.
The functions and control of your iPod may differ depending
on your radio. iCruze is limited by the available functions of your
radio. I.E.- If your radio does not have a shuffle/random this feature
will not be available.
iCruze utilizes playlists on your iPod to access music. Be sure
to refer to your installation and user guide that came with iCruze
for more details on how to optimize your playlist for use with
the main iCruze unit.
INCLUDED ITEMS
(1) Monster Performance
Car™ Factory•Linx™
iCruze® Interface Module
Part #153494
(1) Monster Performance
Car™ Factory•Linx™
iCruze® Interface Cable
Part #156795
BEFORE YOU BEGIN
Because iCruze emulates a CD changer, if your vehicle currently has
a CD changer installed, it will need to be unplugged for the iCruze
to operate. Should you experience a problem, please call Customer
Service at 1-415-840-2000 (9am–5pm Monday through Friday PT)
to report it.
IMPORTANT: Please completely read and review the installation
guide that came with iCruze BEFORE you begin this installation
for steps required prior to Interface Cable installation.

INSTALLATION
Review the installation guide that came with iCruze for installation
steps required prior to Interface Cable/Module installation.
WARNING:
IF YOU HAVE NOT ALREADY DISCONNECTED THE NEGATIVE
TERMINAL OF THE BATTERY, DO SO NOW. WE HIGHLY
RECOMMEND CONSULTING YOUR OWNERS MANUAL
FOR VEHICLE SPECIFIC INSTRUCTIONS AND PRECAUTIONS
REGARDING BATTERY CONNECTIONS.
Step 1
Get the Interface Cable from the main iCruze package.
This Interface Cable has a separate yellow wire that needs to be
connected to constant 12 volt power. Do not use the radio harness
or the cigarette lighter as a source for this power. Consult your car’s
factory service manual for alternate locations preferably right off
the fusebox. An MECP certified installation professional can also help.
To prevent cutting the car’s wire harness, a T-Tap-type connector
is recommended (be certain to use the proper size T-Tap to ensure
a reliable connection).
Step 2
Locate the wire you will use that has 12 volts constant power. Mark
this wire or put your T-tap connector on it if you are using one,
but do not connect the yellow wire from the iCruze Interface Cable
to it yet. You will do this in Step 4.
Installation Diagram/ Location Overview

Step 3
The Interface Cable from the iCruze
box (steps 1-3) plugs into the “OEM
Interface” port on iCruze with
the rectangular or Molex® end, while
the other round end goes directly
into the Interface Module IM-GM1.
Make sure to leave the yellow wire
handy for Step 4.
Step 4
WARNING:
DO NOT ATTEMPT TO MAKE THIS CONNECTION UNLESS
YOU HAVE THE EXPERIENCE AND KNOWLEDGE TO DO SO.
INCORRECT CONNECTIONS MAY CAUSE MALFUNCTION OF CAR
STEREO AND OTHER ELECTRICAL SYSTEM COMPONENTS. CONSULT
AN MECP CERTIFIED INSTALLER IF YOU DO NOT HAVE THE TOOLS
OR KNOWLEDGE TO MAKE THIS CONNECTION.
The Interface Cable in the Interface Module IM-GM1 package looks like
a “T” and has a pair of wires outside of the black jacketing. The yellow
wire needs 12 volts constant power just like the yellow wire on
the Interface Cable from the iCruze package. You may join the two
yellow wires together and connect to the same 12 volt power source
you found in Step 2.
Step 5
The black wire on the Interface Cable in the Interface Module IM-GM1
package needs to be connected to ground. However, the metal
in the dash area behind the stereo is not suitable. It is isolated from
the chassis to prevent noise. The best location is chassis metal
in the driver’s foot well all the way to the left of the pedals.
Find a portion of metal in this area and connect the black wire from
the Interface Cable. You may have to extend the black wire by adding
more wire to do this.
Step 6
The Interface Cable in the Interface Module IM-GM1 package
has three plastic connectors on it. The smallest male connector
plugs into the other side of the Interface Module IM-GM1
(non-round plug side).
Step 7
This leaves you with two plastic
connectors on the Interface Cable
in the Interface Module IM-GM1
package that look nearly identical
but one is male and the other
female. The male connector plugs
into the back of the factory stereo.
However, you must first unplug
the cable that is already there.
Unplug this connector and insert
it into the matching female connector on the Interface Cable IC-GM1.
Take the remaining male connector on the Interface Cable IC-GM1
and plug it into the back of the stereo.
Though there is only one way to push the connectors in, don’t force
it. Double check that you have the correct Interface Cable for your
installation by reviewing the in-store iCruze Factory•Linx Selection
Guide, by visiting iPodiCruze.com or by calling iCruze Customer
Support at 415-840-2000, Monday through Friday, 9am-5pm (PT).
IM-GM1
Back of Stereo
Step 7
Connect
to Ground
Yellow Wire
Connects
to 12 volt
Constant
Step 3
Yellow
wire to 12V
constant
power
iCruze
iCruze
Interface Cable

Step 8
If your vehicle has XM radio installed, the XM tuner will need
to be disconnected. For all installations, please check to see if there
is an XM tuner by pushing the BAND button on the radio. If XM
or SATELLITE appears in the display, locate the XM tuner location
(see the factory service manual or an MECP professional to locate it)
and disconnect it by unplugging the wires from the tuner. You must
do this even if XM is not active.
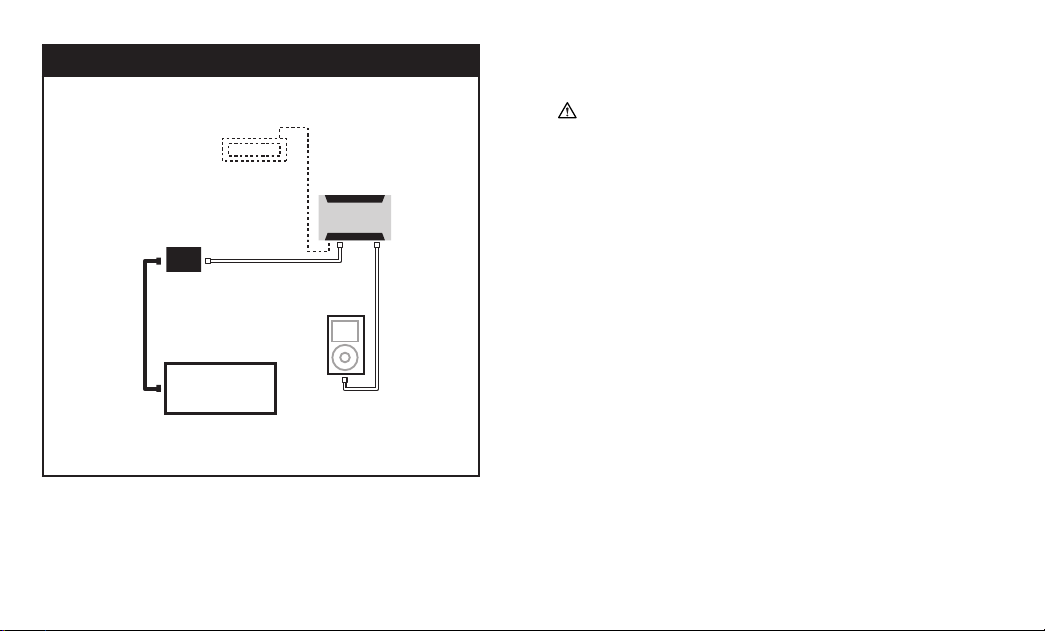
INSTALLATION COMPLETE
Refer back to the installation guide that came with iCruze
to complete your iCruze installation and for more details
on using iCruze functions and features.
OPERATION NOTES
All iCruze functions are supported for your car unless your factory
stereo does not have FF, RW or REPEAT buttons. Support for 10 playlists
(see Creating Playlists in the main iCruze manual). Access the iCruze
using the ‘BAND’ button. The CD/AUX button will not access the iCruze.
When iCruze is first selected, it may take a few seconds for the display
to update as the iCruze gathers information from the iPod®.
CUSTOMER SUPPORT
If you have questions, please try iPodiCruze.com for the latest updates
to manuals, products and more. You can also call 1-415-840-2000
(9am–5pm Monday through Friday PT) for assistance.
LIMITED WARRANTY FOR CONSUMERS
United States
Monster Cable Products, Inc. 455 Valley Drive, Brisbane, CA 94005 USA, 1 (415) 840-2000 (“Monster”)
extends to You this Limited Warranty. Statutory or common law may provide You with additional rights
or remedies, which shall not be affected by this Limited Warranty.
DEFINITIONS
“Adequate Use” means use of the Product (i) within a home or dwelling, (ii) for private (as opposed
to commercial) purposes, (iii) in conformance with all applicable local, state or federal law, code
or regulations (including without limitation building and/or electrical codes), (iv) in accordance
with manufacturer recommendations and/or instructions in the materials and documentation that
accompany the Product, and (v) with proper electrical grounding.
“Authorized Dealer” means any distributor, reseller or retailer that (i) was duly authorized to do
business in the jurisdiction where it sold the Product to You, (ii) was permitted to sell You the Product
under the laws of the jurisdiction where You bought the Product, and (iii) sold You the Product new
and in its original packaging.
“Formal Warranty Claim” means a claim made in accordance with the section “Formal Warranty
Claims” herein.
“Product” means a Product (i) that is listed in the Specifications Table below, (ii) that You bought from
an Authorized Dealer new and in its original packaging, and (iii) whose serial number, if any, has not
been removed, altered, or defaced.
“Product Defect” means a defect, malfunction, non-conformance to this Limited Warranty, or other
inadequacy of the Product that existed at the time when You received the Product from an Authorized
Dealer and that causes a failure of the Product to perform in accordance with Monster’s documentation
accompanying the Product, unless such failure has been caused completely or partly by (a) any use
other than Adequate Use, (b) transportation, neglect, negligence misuse or abuse by anyone other
than Monster’s employees; (c) alteration, tampering, modification, or installation of the product by
anyone other than a Monster employee; (d) accident (other than a malfunction that is caused by a
Product Defect), including power surges; (e) maintenance or service of the Product by anyone other
than a Monster employee; (f) exposure of the Product to heat, bright light, sun, liquids, sand or other
contaminants; or (g) acts outside the control of Monster, including without limitation acts of God, fire,
storms, earthquake or flood.
“Warranty Period” means the time period during which Monster must have received Your Formal
Warranty Claim. The different Warranty Periods related to Product Defects are defined in the
Specifications Table below. The Warranty Period commences on the date when You purchased or
received (whichever occurs later) the Product from an Authorized Dealer as evidenced by the Authorized
Dealer’s invoice, sales receipt or packing slip. If You do not have written proof of the date of purchase
or receipt, then the Warranty Period commences three (3) months after the date when the Product left

Monster’s factory as evidenced by Monster’s records. The Warranty Period ends after the time defined in the
Specifications Table has expired or after You have transferred ownership of the Product, whichever occurs
earlier. Also, You must call Monster and obtain a Return Authorization Number (as described under “How
to Make a Claim”) within two (2) months after You discover a Product Defect (or should have discovered
it, if such Product Defect was obvious).
“You” means the first individual person that purchased the Product in its original packaging from an
Authorized Dealer. This Limited Warranty does not apply to persons or entities that bought the Product
(i) in used or unpackaged form, (ii) for resale, lease or other commercial use, or (iii) from someone other
than an Authorized Dealer.
SCOPE OF THIS LIMITED WARRANTY
PRODUCTS. If a Product contained a Product Defect when You bought it from an Authorized Dealer
and Monster receives a Formal Warranty Claim from You within two (2) months after You discover such
Product Defect (or should have discovered it, if such Product Defect was obvious) and before the end of the
Warranty Period for Product Defects applicable to the affected Product, then Monster will provide You with
one of the following remedies: Monster will (1) repair or, at Monster’s sole discretion, replace the Product,
or (2) refund to You the purchase price You paid to the Authorized Dealer for the affected Product if repair
or replacement is not commercially practicable or cannot be timely made. NOTE: MONSTER DOES NOT
ASSUME ANY LIABILITY FOR ANY INCIDENTAL, CONSEQUENTIAL OR INDIRECT DAMAGES UNDER THIS
LIMITED WARRANTY. SOME STATES DO NOT ALLOW THE EXCLUSION OR LIMITATION OF INCIDENTAL OR
CONSEQUENTIAL DAMAGES, SO THE ABOVE LIMITATION OR EXCLUSION MAY NOT APPLY TO YOU.
GENERAL PROVISIONS
CHOICE OF LAW/JURISDICTION. This Limited Warranty and any disputes arising out of or in connection
with this Limited Warranty (“Disputes”) shall be governed by the laws of the State of California, USA,
excluding conflicts of law principles and excluding the Convention for the International Sale of Goods. The
courts located in the State of California, USA shall have exclusive jurisdiction over any Disputes.
OTHER RIGHTS. THIS LIMITED WARRANTY GIVES YOU SPECIFIC LEGAL RIGHTS, AND YOU MAY ALSO HAVE
OTHER RIGHTS, WHICH VARY FROM STATE TO STATE. THIS LIMITED WARRANTY EXTENDS ONLY TO YOU
AND CANNOT BE TRANSFERRED OR ASSIGNED. If any provision of this Limited Warranty is unlawful, void
or unenforceable, that provision shall be deemed severable and shall not affect any remaining provisions.
In case of any inconsistency between the English and other versions of this Limited Warranty, the English
version shall prevail.
Registration. Please register Your Product at www.monstercable.com. Failure to register will not diminish
Your warranty rights.
SPECIFICATIONS TABLE
PRODUCT MODEL NUMBER WARRANTY PERIOD FOR PRODUCT
MPC FX IM-GM1 Two (2) Years
FORMAL WARRANTY CLAIM
HOW TO MAKE A CLAIM. (1) Call, or write to, Monster within two (2) months after You discover a
Product Defect (or should have discovered it, if such Product Defect was obvious); (2) Give a detailed
explanation of how the damage occurred; (3) Obtain a Return Authorization Number; (4) Upon receipt
of a claim form (which may be sent to You after You filed Your Formal Warranty Claim), fill out the
claim form entirely; (5) Return the Products, shipping prepaid by You (to be refunded if You are entitled
to a remedy under the Scope of this Limited Warranty), to Monster for verification of damage, along
with a copy of Your original sales receipts and proof of purchase (UPC label or packing slip) for such
Products, the completed claim form, and printed Return Authorization Number on the outside of the
return package (the claim form will include instructions for return).
TOLL-FREE TELEPHONE NUMBERS. United States: 1-877-800-8989 (toll-free), or 1-415-840-2000.
ADDRESS: Monster Cable Products, Inc. 455 Valley Drive, Brisbane, CA 94005 USA
FURTHER PROCEEDINGS. Monster will determine whether a Product Defect existed. Monster may, at
its discretion, direct You to obtain a repair estimate at a service center. If a repair estimate is required,
You will be instructed on how to properly submit the estimate and the resulting invoice to Monster for
payment. Any fees for repairs may be negotiated by Monster.
TIMING. If You bring a Formal Warranty Claim and fully comply with all terms and conditions of this
Limited Warranty, Monster will use its best efforts to provide You with a remedy within thirty (30)
days after receipt of Your Formal Warranty Claim (if You reside in the United States - forty-five (45)
days if You reside elsewhere), unless obstacles outside Monster’s control delay the process.
Ver.12/14/2004 – US ©2005 Monster Cable Products, Inc.

455 Valley Drive
Brisbane, CA 94005 USA
Visit us on the Web at
MonsterPerformanceCar.com
rm 162706
Monster iCruze is designed and engineered
in the USA, and manufactured to Monster
quality specifications in China.
© Copyright 2005 Monster Cable Products, Inc.
455 Valley Drive, Brisbane CA 94005 USA
Monster, Monster Performance Car, Factory•Linx, QuickCruze, the Monster
Performance Car logo and the product design are the products
of registered or unregistered trademarks of Monster Cable Products, Inc.
or its subsidiaries in the U.S. and abroad. iCruze and Soundgate are
registered and unregistered trademarks of The Putnum Group, Inc. iPod,
Apple are trademarks of Apple Computer, Inc. Alpine is a registered
trademark of Alpine Electronics, Inc. Jaguar is a trademark of Jaguar Cars
Limited. Images and illustrations shown may vary from actual product.
Specifications subject to change without notice.
Table of contents
Other Monster Automobile Accessories manuals

Monster
Monster iCarCharger 800 User manual

Monster
Monster iCruze MPC FX IC-AUD1 Operation manual

Monster
Monster MDP 700 User manual

Monster
Monster iCruze MPC FX IC-MB1 Operation manual

Monster
Monster iCarPlay Wireless 1000 Instruction Manual

Monster
Monster PowerPlug USB 600 User manual

Monster
Monster iCruze MPC FX IM-NIS1 User manual

Monster
Monster iCarPlay Direct Connect 2000 Instruction Manual

Monster
Monster iCarPlay Wireless 250 User manual

Monster
Monster AirTalk Instruction Manual