SVENSKA - MONTERINGSINSTRUKTION
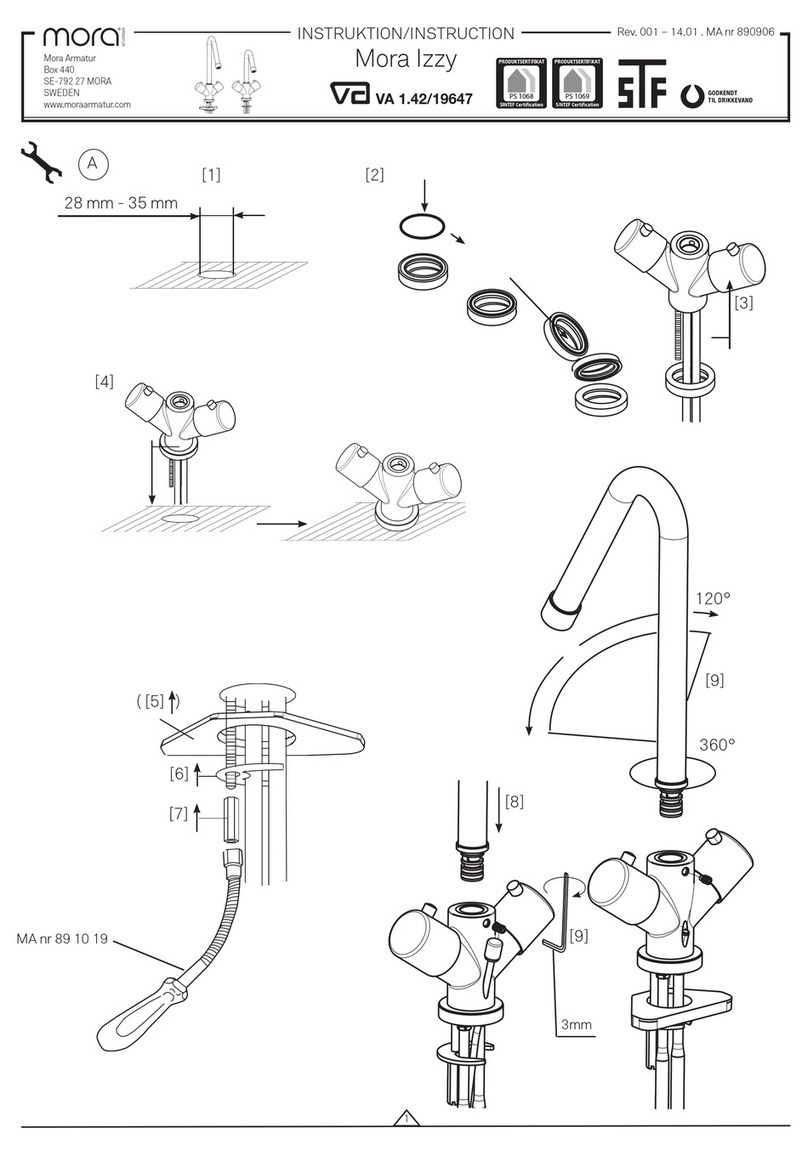
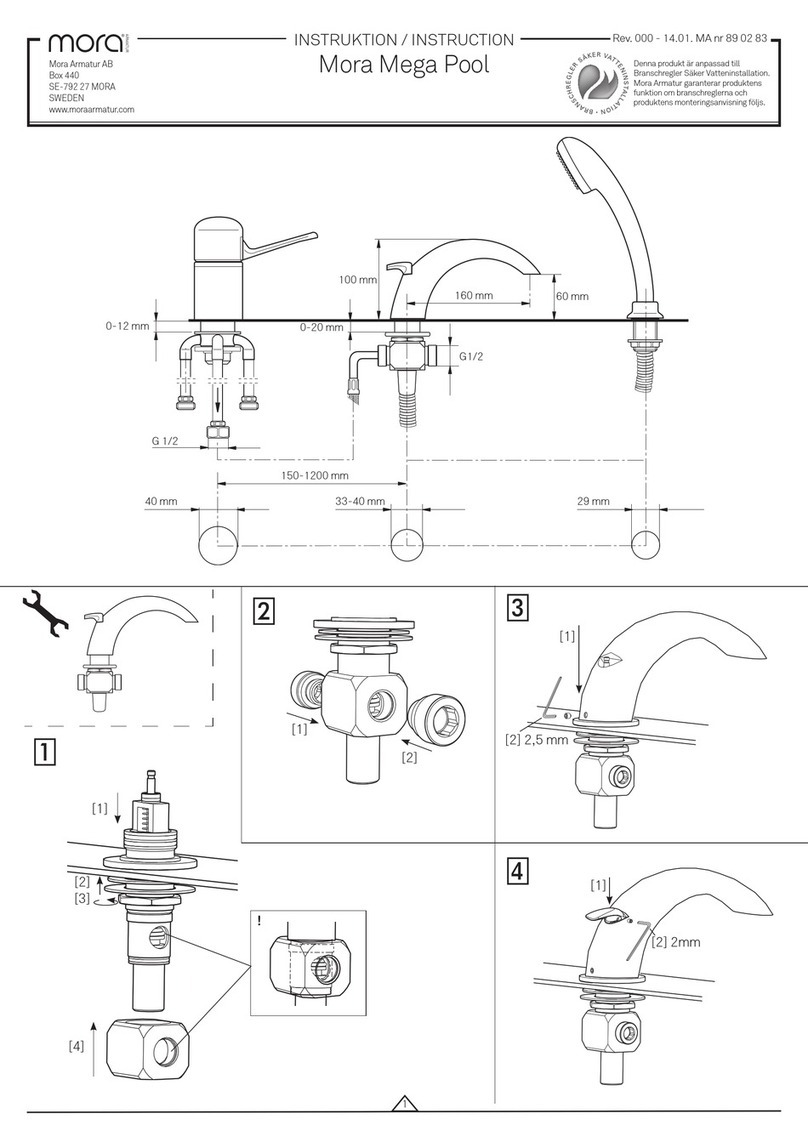
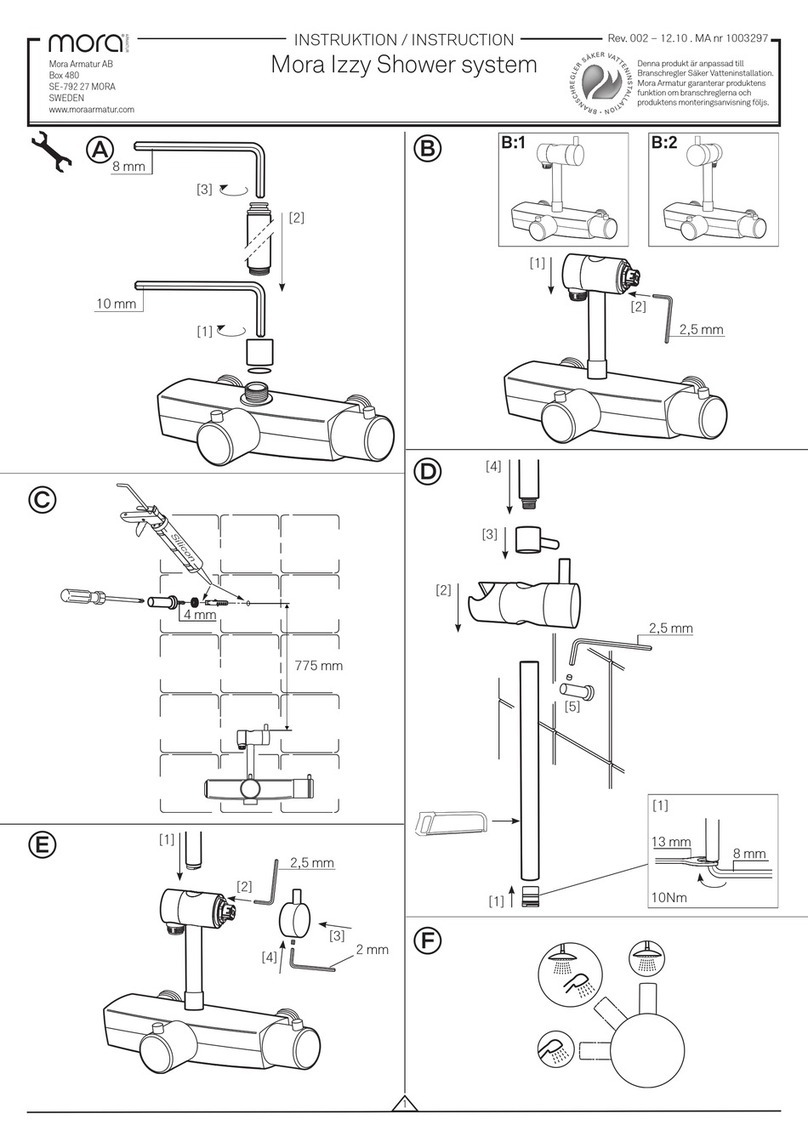
OBS! Vid installation måste ledningarna fram till blandaren renspolas innan
blandaren monteras. Skruva fast blandaren med kopplingsmuttrarna. Skruva
fast ev. utloppspip med dragomkastare i blandarhuset med insexskruven.
OBS! Vid installation i utrymmen där frysrisk kan föreligga (exempelvis
fritidshus): Lösgör blandaren och töm den noggrant på vatten.
Byte eller rengöring av TDU-insats. Vid
Blandaren reagerar inte vid osäkerhet kontakta din VVS-installatör.
temperaturinställning. Blanda-
ren ger enbart kallt eller varmt
Fel temperatur vid inställning
Kalibrering av blandaren. Vrid tempera-
av temperaturen. turratten moturs mot stoppet. Demontera
ratten. Sätt på vattnet och känn på temp-
eraturen, med handen eller med en
termometer. Vrid spindeln medurs för
kallare och moturs för varmare vatten.
Då önskad vattentemperatur erhållits, ca
38° C, monteras temperaturratten så att
tryckknappen kommer i linje med marker-
Infettning av känselkropp. Dra ur känsel-
kroppen från element-hållaren. Fyll hålet
till hälften med armaturfett. Byte av känsel-
kropp behöver mycket sällan utföras.
, kom ihåg att stänga av vattnet till blandaren!
Färgytbehandling bevaras bäst genom rengöring med mjuk trasa och tvållös-
ning, eftersköljning med rent vatten och polering med torr trasa. Man får absolut
Färgytbehandling bevaras bäst genom rengöring med mjuk trasa och tvållös-
ning, eftersköljning med rent vatten och polering med torr trasa. Man får absolut
Färgytbehandling bevaras bäst genom rengöring med mjuk trasa och tvållös-
inte använda kalklösande, sura eller sandhaltiga skurmedel. För att avlägsna
ning, eftersköljning med rent vatten och polering med torr trasa. Man får absolut
inte använda kalklösande, sura eller sandhaltiga skurmedel. För att avlägsna
ning, eftersköljning med rent vatten och polering med torr trasa. Man får absolut
kalkfl äckar, använd hushållsättika och spola efter med vatten.
inte använda kalklösande, sura eller sandhaltiga skurmedel. För att avlägsna
kalkfl äckar, använd hushållsättika och spola efter med vatten.
inte använda kalklösande, sura eller sandhaltiga skurmedel. För att avlägsna
Blandaren reagerar inte vid osäkerhet kontakta din VVS-installatör.
temperaturinställning. Blanda-
ren ger enbart kallt eller varmt
av temperaturen. turratten moturs mot stoppet. Demontera
ratten. Sätt på vattnet och känn på temp-
eraturen, med handen eller med en
termometer. Vrid spindeln medurs för
kallare och moturs för varmare vatten.
Då önskad vattentemperatur erhållits, ca
38° C, monteras temperaturratten så att
tryckknappen kommer i linje med marker-
kroppen från element-hållaren. Fyll hålet
till hälften med armaturfett. Byte av känsel-
kropp behöver mycket sällan utföras.
ENGLISH - INSTALLATION INSTRUCTION
At new installations the inlet tubes must be fl ushed before fi xing the
mixer. Fasten the mixer by screwing the connectors. Fasten eventyally the outlet
spout with diverter with the hexagon screw in the valve body.
At installations where a risk of frost will be present (especially in vacated
premises), the mixer shall be loosened and drained off from water.
Temperature fl uctuations.
Replace or clean the TDU-insert (pressure
No reaction when setting balance unit). When uncertain please
the temperature. Only cold or contact your plumber.
Calibration of the mixer. Turn the temp-
setting the temperature. erature handle counter-clockwise towards
the stop button. Dismount the handle. Turn
on the water and feel the temperature with
the hand or a thermometer. Turn the
spindle clockwise for colder and counter-
clockwise for warmer water. When desired
water temperature is obtained, about
38°C, the temperature handle is mounted
so that the stop button will bi in line with
the mark on the valve body.
Greasing of the sensor unit. Pull out the
sensor from the element holder. Fill half of
the hole with silicone grease. Replacement
of the sensor is very seldom necessary.
please remember to turn off the water supply to the
Coloured surfaces can be preserved in the best way by a regular cleaning with a
Cleaning
Coloured surfaces can be preserved in the best way by a regular cleaning with a
Cleaning
soft cloth and a soap solution, rinse with clean water and polish with a dry cloth.
Coloured surfaces can be preserved in the best way by a regular cleaning with a
soft cloth and a soap solution, rinse with clean water and polish with a dry cloth.
Coloured surfaces can be preserved in the best way by a regular cleaning with a
No scouring posder containing softening-acid nor sand must be used. In order to
soft cloth and a soap solution, rinse with clean water and polish with a dry cloth.
No scouring posder containing softening-acid nor sand must be used. In order to
soft cloth and a soap solution, rinse with clean water and polish with a dry cloth.
remove lime deposits please use household-vinegar and rinse with water.
No scouring posder containing softening-acid nor sand must be used. In order to
remove lime deposits please use household-vinegar and rinse with water.
No scouring posder containing softening-acid nor sand must be used. In order to
No reaction when setting balance unit). When uncertain please
the temperature. Only cold or contact your plumber.
setting the temperature. erature handle counter-clockwise towards
the stop button. Dismount the handle. Turn
on the water and feel the temperature with
the hand or a thermometer. Turn the
spindle clockwise for colder and counter-
clockwise for warmer water. When desired
water temperature is obtained, about
38°C, the temperature handle is mounted
so that the stop button will bi in line with
the mark on the valve body.
sensor from the element holder. Fill half of
the hole with silicone grease. Replacement
of the sensor is very seldom necessary.
DANSK - MONTERINGSANVISNING
NB! Ved installation skal ledningerne skylles rene inden montering af blandingsbatteriet. Skru eventuelt udløbstud med omskifter i batterikroppen fast med sekskant-
skruen. NB! Ved installation i fritidshuse o.l., hvor der kan være risiko for frostskader, skal blandingbatteriet løsnes og tømmes for vand.
Temperatursvingninger. Blandingsbatteriet reagerer ikke
Ombyt eller rengør TDU-indsats. Ved usikkerhed kontakt din VVS-installatør.
ved temperaturindstilling. Blandingsbatteriet giver kun
Forkert temperatur ved indstilling af temperaturen.
Kalibrering af blandingsbatteriet. Drej temperaturhåndtaget mod urets retning til
stoppet. Demonter håndtaget. Luk op for vandet og føl temperaturen med hånden
eller med et termometer. Drej spindlen i urets retning for koldere og mod urets
retning for varmere vand. Når den ønskede vandtemperatur er opnået, ca. 38°C,
monteres temperaturhåndtaget således at trykknappen er i linie med markeringen
Indfedtning af føler. Træk føleren ud fra elementholderen. Fyld halvdelen af hullet
med siliconefedt. œmbytning af føler er meget sjældent nødvendigt..
, husk at lukke for vandet til blandingsbatteriet!
Farvede overfl ader kan bedst vedligeholdes ved rengøring med en blød klud og en sæbeopløsning, skyl efter med rent vand og poler med en tør klud.
Man må absolut ikke anvende afkalknings-, skurende eller sandholdige rengøringsmaterialer. Ved fjernelse af kalkpletter kan anvendes husholdnings-
eddike og efterskylning med vand.
stoppet. Demonter håndtaget. Luk op for vandet og føl temperaturen med hånden
eller med et termometer. Drej spindlen i urets retning for koldere og mod urets
retning for varmere vand. Når den ønskede vandtemperatur er opnået, ca. 38°C,
monteres temperaturhåndtaget således at trykknappen er i linie med markeringen
med siliconefedt. œmbytning af føler er meget sjældent nødvendigt..


