manuals.online logo
Brands
  1. Home
  2. •
  3. Brands
  4. •
  5. Morphy Richards
  6. •
  7. Fryer
  8. •
  9. Morphy Richards IBFRYDAY User manual

Morphy Richards IBFRYDAY User manual

FFrryyddaayyffrryyeerrss
This guarantee is valid in the UK and Ireland
only. It is in your interest to retain the retailers receipt as
proof of purchase. Please quote the following information if
the product develops a fault. These numbers can be found
on the base of the product.
Model No. Serial No.
All Morphy Richards Products are individually tested
before leaving the factory. In the unlikely event of any
appliance proving to be faulty within 28 days of purchase it
should be returned to the place of purchase for it to be
replaced.
If the fault develops after 28 days and within 24 months
of original purchase, you should contact the helpline number
quoting Model number and Serial number on the product,
or write to the address below. You will be asked to return
the product (in secure, adequate packaging)to the address
below along with a copy of proof of purchase. Subject to the
exclusions set out below (see ‘Exclusions’) the faulty
appliance will then be repaired or replaced and dispatched
usually within 7 working days of receipt.
If for any reason this item is replaced during the 2 year
guarantee period, the guarantee on the new item will be
calculated from original purchase date. Therefore it is vital to
retain your original till receipt or invoice to indicate the date
of initial purchase.
To qualify for the 2 year guarantee the appliance must
have been used according to the manufacturers instructions.
For example kettles should have been regularly descaled or
an iron cord should have been stored as recommended by
the instructions.
EXCLUSIONS
Morphy Richards shall not be liable to replace or repair
the goods under the terms of the Guarantee where:
1 The fault has been caused or is attributable to accidental
use, mis-use, negligent use or used contrary to the
manufacturers recommendations or where the fault has
been caused by power surges or damage caused in
transit.
2 The appliance has been used on a voltage supply other
than that stamped on the products.
3 Repairs have been attempted by persons other than our
service staff (or authorised dealer).
4 Where the appliance has been used for hire purposes or
non-domestic use.
5 Morphy Richards are not liable to carry out any type of
servicing work, under the guarantee.
6 Plastic filters for all Morphy Richards kettles and coffee
makers are not covered by the guarantee.
This guarantee does not confer any rights other than
those expressly set out above and does not cover any claims
for consequential loss or damage. This guarantee is offered
as an additional benefit and does not affect your statutory
rights as a consumer.
The After Sales Division, Morphy Richards Ltd, Mexborough, South Yorkshire, England, S64 8AJ
Helpline (office hours): UK (local rate) 08450 777700, Republic of Ireland 1800 409119
TTwwooyyeeaarrgguuaarraanntteeee
2
IIMMPPOORRTTAANNTT
SSAAFFEEGGUUAARRDDSS
1Read all instructions.
2To protect against electric shock do not
immerse cord, plugs, or plastic body in
water or other liquid.
3Close supervision is necessary when any
appliance is used near children. Children
should never be allowed to operate this
appliance.
4Unplug from outlet when not in use and
before cleaning. Allow to cool before
putting on or taking off parts, and before
cleaning the appliance.
5Do not operate any appliance with a
damaged cord or plug or after the
appliance malfunctions or has been
damaged in any manner. Telephone
Morphy Richards for advice.
6The use of accessory attachments not
recommended by the appliance
manufacturer may cause injuries.
7Do not use outdoors.
8Do not let cord hang over the edge of
the table or counter and keep it away
from hot surfaces.
9Keep your appliance away from any hot
burners and heated ovens.
10 The oil in the fryer will stay hot for some
time after it is switched off. NEVER
attempt to move your fryer until it is
completely cool. To lift the fryer use the
recessed handle grips at the sides.
11 Do not use appliance for other than
intended use.
12 Never connect the fryer to the electricity
supply without placing oil in the non-stick
tank first.
13 If using solid fat, melt gently in a separate
pan then pour into the non-stick tank
part of the assembled fryer before
switching the fryer on. Do not melt the
solid fat in the frying basket as this may
damage the fryer.
14 Never operate fryer with oil level below
the minimum mark or above the
maximum mark.
15 Never leave the fryer unattended when
connected to the electricity supply.
16 Be careful not to touch those surfaces of
the fryer which become hot when you
are cooking, eg at or near joint of the lid
and body.
17 Never attempt to pour oil out of the
fryer when the fryer and oil are hot -
allow to cool first.
18 Whilst the lid of the fryer is water
immersable, the plastic body of the fryer
must never be immersed in water. The
external surfaces of the plastic fryer body
should only be cleaned by wiping with a
hot, damp cloth. They should then be
thoroughly dried. (Please refer to
‘Cleaning your Fryer’ section of this
leaflet on page 6).
19 Never lean over the fryer when opening
the lid, as any trapped steam created by
the cooking process (which has not
escaped through the filter) will be
released when the lid is opened.
20 On completion of frying and before
opening the lid, always raise the basket
and wait a few seconds to allow steam
pressure to subside.
21 Always dry food BEFOREFRYING eg.
chips which are too wet can cause the
hot oil to froth excessively.
SAVE THESE
INSTRUCTIONS
EElleeccttrriiccaallrreeqquuiirreemmeennttss
Check that the voltage on the rating plate of
your appliance corresponds with your house
electricity supply which must be A.C. (Alternating
Current).
FFoorraapppplliiaanncceessssuupppplliieeddwwiitthhffiitttteeddpplluugg
If the socket outlets in your home are not
suitable for the plug supplied with this appliance,
the plug should be removed and the appropriate
one fitted.
Note: The plug removed from the mains lead, if
severed, must be destroyed as a plug with bared
flexible cord is hazardous if engaged into a live
socket outlet.
WARNING: THIS APPLIANCE MUST
BE EARTHED.
If you use a 13 amp BS1363 plug, a 13 amp
BS1362 fuse must be fitted.
FFeeaattuurreessooffyyoouurrffrryyeerr
⁄Spring loaded removable lid
¤Lid seal
‹Safety viewing window
›Basket with 1kg (2.2lb) food capacity
fiBasket release button
flBasket handle
‡Non-stick coated tank
·Timer with bell or on/off switch varies by model
‚Safety lid release bar
„Power on light
‰Heating indicator light
ÂVariable temperature control certain models only
ÊCarrying handle
ÁCord storage
Ë‘Coolwall’ easy-clean body
3
Ê
⁄
Ë
‚
·
‡
›
„
fl
‹
fi
‰
Á
¤
Â
BBeeffoorreeuussiinnggffoorrtthhee
ffiirrssttttiimmee
With your fryer disconnected from the
electricity supply, remove the basket and lid (as
described later) and wash by hand in hot soapy
water. Wipe the exterior and interior of the body
with a damp cloth. DONOTIMMERSE THE
BODY IN WATER. Dry all parts thoroughly and
replace the basket and lid.
IInnssttrruuccttiioonnssffoorruussee
OOppeenniinnggtthheelliidd
To unlock the
safety lid, press the
release bar ‚at the
front/bottom A.
The lid is spring
loaded and will rise
up on its own.
RReemmoovviinnggtthhee
bbaasskkeett
The basket in
your fryer can be
raised or lowered
with the lid open or
closed. To do this, lift
up the handle until it
clicks into the
horizontal position.
The basket is now
raised. Open the lid
fully to remove the
basket B. When
cooking make sure that you shake excess oil or fat
from your food into the tank before removing the
basket.
FFiilllliinnggwwiitthhooiill
We recommend
you use corn,
groundnut, vegetable
or rapeseed oil. Use
a good quality solid
fat if you prefer but
remember never to
mix your oils or fats.
1Pour your oil into the fryer until it reaches the
maximum level indicated in the tank C
(approximately 2.2 litres of oil). Alternatively
melt solid fat gently in a separate pan before
transferring to the tank (approximately 1.8kg of
solid fat or solid oil).
2Lightly smear the inside of the viewing window
with either cold oil or fat to inhibit any
condensation that may occur, so that you can
watch your food while it cooks.
3Replace the basket and lower into the oil by
pressing the lid release button and returning the
handle to the recessed position.
4Close the lid of
the fryer by
pressing down at
both sides of the
lid, this prevents
steam
escaping D.
5Plug the fryer into
the mains socket
and switch on.
DO NOT CONNECT THE FRYER TO THE
ELECTRICITY SUPPLY IF THERE IS NO OIL
OR FAT IN THE TANK.
6On models with timer, rotate the dial to 30
minutes. This will switch on the fryer and allow
the oil to heat up G. On models with on/off
switch, switch to on position. The power on
light „will light.
7Now set the variable thermostat Â(if fitted)
to the required temperature E. A cooking
guide is given at the end of this instruction
booklet.
4
MAX MIN
A
B
C
E
D
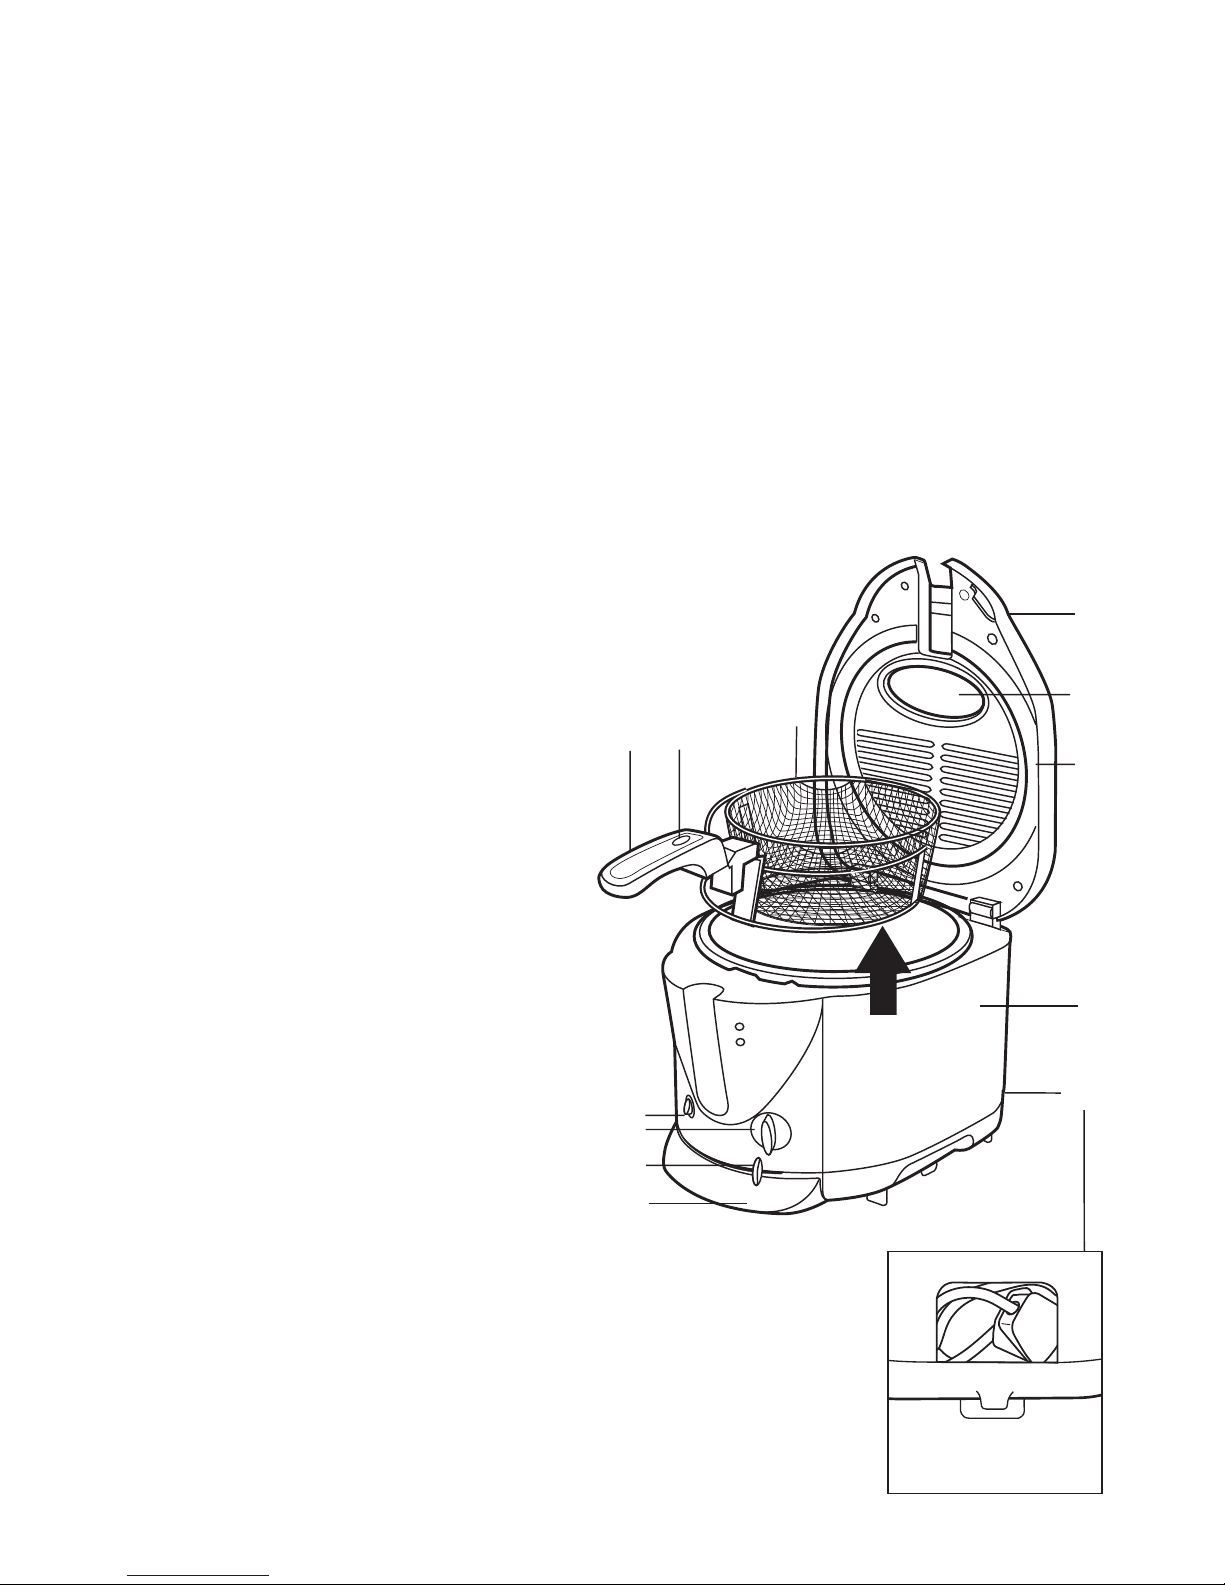
CCooookkiinnggiinnyyoouurrffrryyeerr
PPrreehheeaattiinngg
After approximately 15 minutes, the oil is
at the right temperature and cooking results will be
all the better. The light indicator ‰ may come on
and go out once or twice with thermostat changes.
DDuurriinnggffrryyiinngg
The indicator light ‰may come on and go out
several times as the correct preset temperature is
maintained.
There are two methods of cooking in your
fryer; one general method for most food stuffs and
another for home-battered products.
GGeenneerraallccooookkiinnggmmeetthhoodd
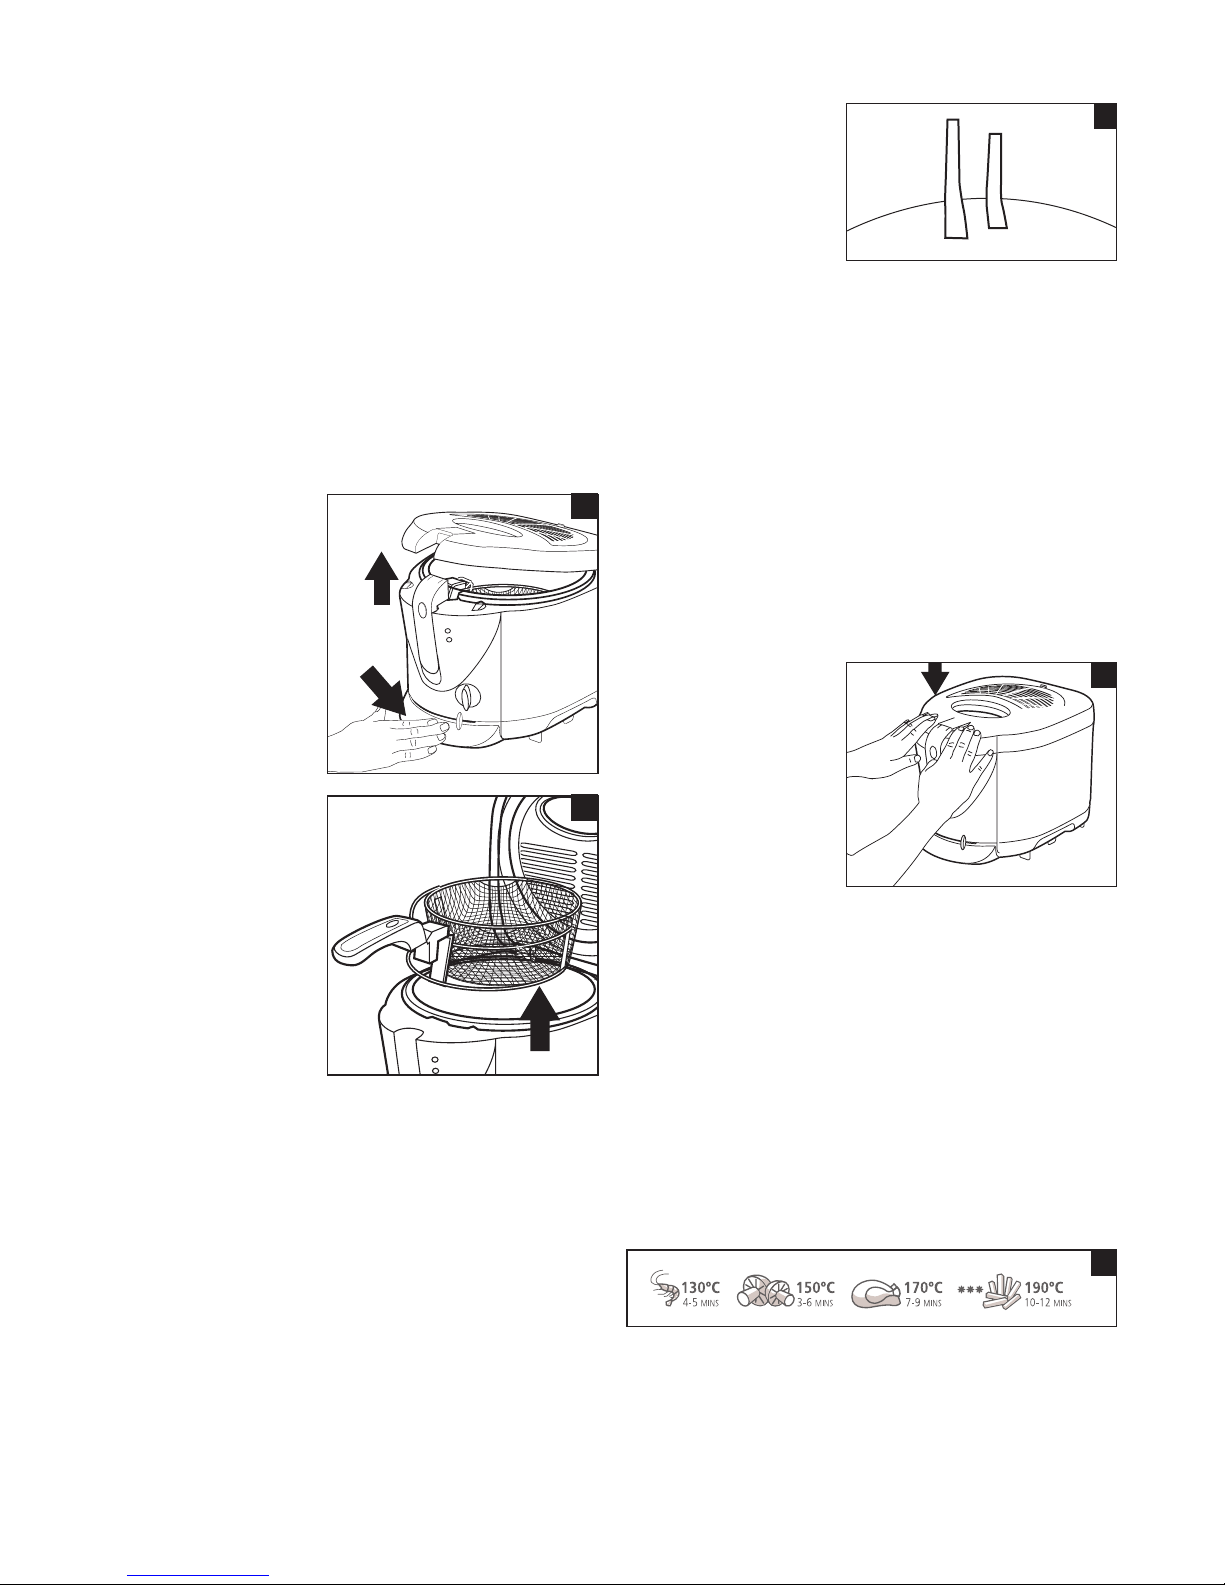
1When the correct temperature for cooking has
been reached, raise the basket and lock it into
its raised position. Open the lid of the fryer and
place the food to be cooked, which should be
as dry as possible, into the raised basket of your
fryer. THE BASKET SHOULD ALWAYS BE IN
THE RAISED POSITION WHEN IT IS TO BE
FILLED WITH FOOD.
2Close the lid and lower the basket into the oil
or fat.
3Check the progress of your food during cooking
by raising the basket and using the safety
viewing window to make sure that your food is
brown enough.
4When your food is cooked, raise the basket and
WAIT A FEW SECONDS before opening
the lid as this allows the steam pressure to
subside. However, care should still be taken
when opening the lid, as some steam may still
be released.
CCooookkiinngghhoommee--bbaatttteerreeddffooooddss
This method allows for the fact that if wet
batter is placed in the basket prior to cooking, the
food may stick. This method of cooking requires
extreme care.
1Ensure that the correct temperature has been
reached (approximately 15 minutes pre-
heating). Leaving the basket in the down
position, open the lid of the fryer.
2Coat the raw food in the batter and allow to
drain slightly to get rid of excess coating. Very
carefully and slowly, lower the coated
food into the hot oil, using a suitable
implement or tongs. This allows the batter
to become solid and prevents it sealing to the
mesh of the basket.
Remember to take care as the oil may
spit as the food is added.
3Close the lid and allow the food to cook.
You may now follow the instructions as given in
‘general cooking method’, using the rise & fall
basket.
AFTER USE, DISCONNECT YOUR FRYER
FROM THE ELECTRICITY SUPPLY BY
REMOVING THE PLUG FROM THE WALL
SOCKET.
TTiimmeerr
Some models
have a built-in timer.
To obtain the best
results, use the timer
in conjunction with
the cooking chart in
the last section of these instructions.
The timer F should be set and started before
the fryer basket and food are lowered into the hot
oil.
1Turn the timer knob to the desired time (after
the oil has preheated to the selected
temperature).
2At the end of the selected time, the in-built bell
will sound.
3If you need more frying time after the set time
has elapsed, turn the dial to 10 minutes and
check the frying process until the food is
cooked. Turn the timer to the OFF position.
5
F
6
HHiinnttssaannddttiippss
• Always ensure that you use a good quality lard
or oil for deep frying. Corn, groundnut,
vegetable or rapeseed oil are ideal. Do not use
margarine, butter or olive oil.
• Take into account the food to be cooked
before you select your frying temperature. As a
general guide precooked foods need a higher
cooking temperature than raw foods.
• Select your cooking utensils with care. Do not
use utensils which may melt. Metal utensils
become hot and should, therefore, have
insulated handles. When using metal utensils
TAKE CARE NOT TO DAMAGE THE
SPECIAL NON-STICK COATING IN THE
TANK.
• Do not use your fryer under wall mounted
cupboards which could prevent you opening
the lid fully.
• Cook your food thoroughly. Remember that
your food may begin to turn golden brown
before it is cooked through.
• Your fryer will always be ready for use if you
store cooled and filtered oil inside, with the lid
closed.
• All foodstuffs, particularly frozen food and
potatoes, contain moisture. When lowered into
the hot oil or fat the water in the food turns
into steam. Most of the steam escapes through
the filter in the lid. The steam which is trapped
escapes when you open the lid of your fryer -
SO CARE IS NEEDED.
• Do not lean over the fryer when pressing the
lid release button as the lid mechanism causes
the lid to spring open.
• Old potatoes are ideal for making chips. Your
chips should be evenly sized so that they cook
evenly and should be rinsed and dried before
they are fried.
CClleeaanniinngg
CLEANING SHOULD ONLY BE CARRIED
OUT WHEN THE FRYER IS SWITCHED
OFF AND THE PLUG IS REMOVED
FROM THE SOCKET. YOUR FRYER
SHOULD HAVE COMPLETELY COOLED.
ALWAYS REMOVE THE CHARCOAL
FILTER BEFORE CLEANING THE LID
(certain models only).
RReeppllaacceeaabblleecchhaarrccooaallffiilltteerr
Your fryer is fitted with a white anti-grease filter
which collects grease from passing steam and a
black charcoal filter to reduce odours. The filters
can be used approximately 12 times before
replacement, depending upon the quantity of food
fried each time.
Replace the filters as follows.
1Remove the plug from the mains socket
2Unclip and lift out the filter panel from the top
of the fryer and remove both the black and
white filters and
dispose of them.
3Insert the new
filters, white
down, black up,
into the filter
recess.
4Replace the filter
lid onto the top
of the fryer.
Contact the
customer helpline
using the helpline
number on the
front of this
booklet for
replacement
filters.
G
7
RReemmoovvaabblleewwaasshhaabblleelliidd
Open fryer lid to vertical position and lift
upwards H.
Lid with permanent
filter. DO NOT REMOVE
THE MESH FILTER
To clean wash in hot
soapy water. Lid with
permanent filter should be
washed regularly.
Lid with removable
charcoal filter.
To clean lift out the
filter panel, REMOVE THE
FILTER and wash the lid
and filter panel only in hot
soapy water.
ENSURE THE LID IS
THOROUGHLY DRIED. To replace the lid, slot
into position vertically and close. The fryer lid
should be washed at regular intervals.
BBaasskkeettaannddhhaannddllee
The basket and its handle can be hand washed
in warm soapy water. THEY SHOULD BE
THOROUGHLY DRIED AFTERWARDS.
EEaassyyttoocclleeaannttaannkk
When the oil has completely cooled, the non-
stick coated tank can be cleaned as follows.
PLEASE FOLLOW THESE DIRECTIONS
CAREFULLY.
1Remove the lid as described above and then
remove the basket.
2To empty the fryer, pour the oil out through
the pouring lip area and filter through fine
muslin or absorbent paper placed in a suitable
funnel J.
3The inside of the tank can be washed by hand
with hot soapy water but make sure that you
do not damage the special non-stick interior by
using abrasives or sharp instruments.
Note: If solid fat
is used for cooking,
the basket should be
removed when
cooking is completed
and washed
separately. The fryer
should then be
allowed to cool
COMPLETELY
before removing the
majority of the solid
fat with a plastic
spatula or spoon.
(We recommend
the use of plastic
utensils to prevent
damaging the non-
stick lining of the
tank). The tank can
then be washed.
4Dry the tank
thoroughly.
You may store
your filtered oil in
the fryer if you make
sure that it is
covered by the lid.
Your oil should be replaced after about
10 cooking sessions and this is usually an
ideal opportunity to clean the tank
thoroughly.
TThheeffrryyeerrbbooddyy
The exterior should only be cleaned by wiping
with a hot damp cloth. and then thoroughly dried.
NEVER IMMERSE THE BODY OF YOUR
FRYER IN WATER OR ANY OTHER
LIQUID.
J
K
H
Morphy Richards Limited, Mexborough,
South Yorkshire, England S64 8AJ 443/8036/10 Rev OI8/00
Morphy Richards products are intended for household use only.
Morphy Richards has a policy of continuous improvement in product quality and design.
The Company, therefore, reserves the right to change the specification of its models at any time.
CCoonnvveerrssiioonnttaabbllee,,
ffrryyiinnggttiimmeess&&
tteemmppeerraattuurreecchhaarrtt
CCoonnvveerrssiioonnttaabbllee
The temperature control (if fitted) is calibrated
in degrees C. To enable you to cook recipes
marked in ºF, use the following approximate table.
°C °F
150 300
170 340
190 375
FFrroozzeennffooooddss
• Where possible refer to the packet instructions
for cooking guide.
• Do not exceed 900gms/2lb when cooking
frozen food. Size and shape of the food usually
determines a smaller weight.
• In general frozen food requires a high cooking
temperature.
FFiixxeeddtteemmppeerraattuurreeffrryyeerr
• All food will be fried at a preset temperature
(approx 185ºC).
• In general frozen food requires this
temperature, refer to packet instructions for
cooking time.
• For fresh food keep a check on the frying
process, check that the food is completely
cooked before eating.
• Generally a crispy browned outer surface is an
indication that the food is cooked.
FFrryyiinnggttiimmeess&&tteemmppeerraattuurreecchhaarrtt
(certain
models only)
These frying times are intended as a guide only
and should be adjusted to suit quantity or thickness
of food and your own taste.
Chips
Fresh chips (1kg) 190°C10-12 minutes
Frozen chips see packet
Fish
Scampi - frozen in crumbs
just enough to loosely
cover the basket area See packet
Whitebait - just enough to
cover the basket area 190°C1-2 minutes
Fresh Cod or Haddock
in batter 190°C5-10 minutes
Frozen Cod or Haddock
in batter 170°C10-15 minutes
Frozen Plaice190°C5-6 minutes
Meat
Frozen Hamburgers
(2oz/50g) 150°C3-5 minutes
Frozen veal escalopes 170°C3-8 minutes
Chicken
Chicken portions in crumbs
small/medium size 170°C15-20 minutes
Chicken portions in
crumbs large size 170°C20-30 minutes
Fresh chicken drumsticks
in crumbs 170°C15 minutes

Other Morphy Richards Fryer manuals

Morphy Richards IB45065 User manual

Morphy Richards

Morphy Richards IB45065 User manual

Morphy Richards 45078 PROFESSIONAL STEEL FRYER User manual

Morphy Richards

Morphy Richards 45078 PROFESSIONAL STEEL FRYER User manual

Morphy Richards 3-in-1 basket fryer User manual

Morphy Richards

Morphy Richards 3-in-1 basket fryer User manual

Morphy Richards Harry Ramsden’s 45362 User manual

Morphy Richards

Morphy Richards Harry Ramsden’s 45362 User manual

Morphy Richards Coffeemaker User manual

Morphy Richards

Morphy Richards Coffeemaker User manual

Morphy Richards IB45410 User manual

Morphy Richards

Morphy Richards IB45410 User manual

Morphy Richards 480001 User manual

Morphy Richards

Morphy Richards 480001 User manual

Morphy Richards 480002 User manual

Morphy Richards

Morphy Richards 480002 User manual

Morphy Richards DF45079 User manual

Morphy Richards

Morphy Richards DF45079 User manual

Morphy Richards bowl fryer User manual

Morphy Richards

Morphy Richards bowl fryer User manual

Morphy Richards IB45460 User manual

Morphy Richards

Morphy Richards IB45460 User manual

Morphy Richards DF45070M User manual

Morphy Richards

Morphy Richards DF45070M User manual

Morphy Richards Compact Fryer User manual

Morphy Richards

Morphy Richards Compact Fryer User manual

Morphy Richards IB45470 User manual

Morphy Richards

Morphy Richards IB45470 User manual

Morphy Richards 45081 User manual

Morphy Richards

Morphy Richards 45081 User manual

Morphy Richards DF45075M User manual

Morphy Richards

Morphy Richards DF45075M User manual

Morphy Richards MRAF72BK User manual

Morphy Richards

Morphy Richards MRAF72BK User manual

Morphy Richards REMOVABLE BOWL FRYER - REV 1 User manual

Morphy Richards

Morphy Richards REMOVABLE BOWL FRYER - REV 1 User manual

Morphy Richards IB45061 User manual

Morphy Richards

Morphy Richards IB45061 User manual

Morphy Richards 480003 User manual

Morphy Richards

Morphy Richards 480003 User manual

Morphy Richards DF45040 User manual

Morphy Richards

Morphy Richards DF45040 User manual

Morphy Richards ESSENTIALS COOLWALL FRYER User manual

Morphy Richards

Morphy Richards ESSENTIALS COOLWALL FRYER User manual

Morphy Richards 7984 User manual

Morphy Richards

Morphy Richards 7984 User manual

Popular Fryer manuals by other brands

Modernhome ARIA CPA-895 user guide

Modernhome

Modernhome ARIA CPA-895 user guide

Silvercrest SHFR 1450 A1 operating instructions

Silvercrest

Silvercrest SHFR 1450 A1 operating instructions

Domo DO509FR Instruction booklet

Domo

Domo DO509FR Instruction booklet

essentiel b EFP 7SP manual

essentiel b

essentiel b EFP 7SP manual

Kambrook KAF500 Instruction booklet

Kambrook

Kambrook KAF500 Instruction booklet

nedis KADF300FSR quick start guide

nedis

nedis KADF300FSR quick start guide

Emeril Lagasse Pressure Air Fryer Plus Y6D-AF-36B owner's manual

Emeril Lagasse

Emeril Lagasse Pressure Air Fryer Plus Y6D-AF-36B owner's manual

Simple Living Products SLP-SM-SB1 owner's manual

Simple Living Products

Simple Living Products SLP-SM-SB1 owner's manual

Domo DO535FR Instruction booklet

Domo

Domo DO535FR Instruction booklet

Princess 01.183318.01.750 instruction manual

Princess

Princess 01.183318.01.750 instruction manual

Gourmia GTF7530 user manual

Gourmia

Gourmia GTF7530 user manual

FriFri Eco 4 Specifications

FriFri

FriFri Eco 4 Specifications

dyras AIRF-32L instructions

dyras

dyras AIRF-32L instructions

Kalorik USK FT 4 operating instructions

Kalorik

Kalorik USK FT 4 operating instructions

Essilor MNU 180 user manual

Essilor

Essilor MNU 180 user manual

Breville Halo+ manual

Breville

Breville Halo+ manual

Frymaster 2836 Series quick start guide

Frymaster

Frymaster 2836 Series quick start guide

Ninja Foodi MAX XXXL quick start guide

Ninja

Ninja Foodi MAX XXXL quick start guide

manuals.online logo
manuals.online logoBrands
  • About & Mission
  • Contact us
  • Privacy Policy
  • Terms and Conditions

Copyright 2025 Manuals.Online. All Rights Reserved.