manuals.online logo
Brands
  1. Home
  2. •
  3. Brands
  4. •
  5. Mottura
  6. •
  7. Safe
  8. •
  9. Mottura HOKEY HE 8000 Product information sheet

Mottura HOKEY HE 8000 Product information sheet

Casseforti Elettroniche HOKEY®
HOKEY®Electronic Safes
Istruzioni e Garanzia
Instructions and Guarantee
MOTTURA SERRATURE DI SICUREZZA S.p.A.
Strada Antica di Francia, 34
10057 Sant’Ambrogio (TO) - ITALIA
Tel. +39.011.934.31.11 - Fax +39.011.931.24.27
www.mottura.it - e-mail: [email protected]
cod. 99205 / 02-2007
Gentile cliente,
La ringraziamo per aver scelto questo prodotto e Le raccomandia-
mo di leggere e conservare queste istruzioni per poterle consulta-
re in caso di necessità.
Condizioni di Garanzia
Questa cassaforte, prodotta e collaudata dalla Mottura serrature
di sicurezza SpA, è garantita da ogni difetto di fabbricazione
secondo la normativa vigente Italiana.
La garanzia è operativa se viene esibito al personale dell’assisten-
za tecnica il documento fiscale della vendita che riporti gli estremi
identificativi del prodotto.
Per garanzia si intende la sostituzione o riparazione delle parti
riscontrate difettose all’origine per vizi di fabbricazione, escluse
spese di trasporto da e per i centri di assistenza, spese che resta-
no a carico del cliente.
In caso di ripetuto guasto della stessa origine o di guasto non ripa-
rabile, si provvederà ad insindacabile giudizio della Mottura ser-
rature di sicurezza SpA alla sostituzione completa del prodotto. La
garanzia sul prodotto sostituito continuerà fino alla fine del con-
tratto originario.
Non sono coperti da garanzia i danni derivanti da un’installazione
non conforme alle istruzioni riportate su questo pieghevole, da
negligenza, trascuratezza o uso non corrispondente alle modalità
di funzionamento illustrate, da manutenzione effettuata da perso-
nale non autorizzato, trasporto senza le dovute cautele e comun-
que da circostanze che non possono derivare da difetti di fabbrica-
zione.
La Mottura serrature di sicurezza SpA declina inoltre ogni respon-
sabilità per eventuali danni causati a persone o cose derivanti
dalla mancata osservanza di tutte le precauzioni d’uso qui riporta-
te.
Nel caso si rendesse necessario l’intervento a domicilio, il cliente è
tenuto a corrispondere – se richiesto – un diritto di chiamata per
le spese di trasferimento del personale tecnico autorizzato.
Irischi di trasporto saranno a carico del cliente se effettuato con
invio diretto; a carico del tecnico autorizzato se il prodotto viene
ritirato e trasportato dal tecnico stesso.
Istruzioni di Installazione ed Uso
Avvertenze
• Non riporre per alcuna ragione esplosivi, liquidi infiammabili,
acidi o sostanze tossiche
• Non installare la cassaforte in luoghi soggetti a vibrazioni mec-
caniche, a condensa, ad eccessiva umidità e a temperatura
superiori a 52° centigradi.
• La cassaforte non è impermeabile e non è ignifuga, quindi evi-
tare luoghi con possibili infiltrazioni di liquidi o troppo vicini a
sorgenti di calore.
Mottura serrature di sicurezza SpA declina ogni responsabilità
per eventuali danni a persone o cose derivanti dalla mancata
osservanza delle precauzioni d’uso e di installazione qui indicate.
Le caratteristiche dei prodotti riportate su queste istruzioni posso-
no essere soggette a variazioni da parte della Mottura serrature di
sicurezza SpA, in ogni momento e senza preavviso.
Installazione
L’apertura del portello avviene automaticamente tramite una molla
che lo spinge verso l’esterno, dopo aver digitato la combinazione.
Accertarsi pertanto che il piano d’appoggio scelto sia perfettamente
orizzontale per consentire la corretta apertura del portello.
Apertura del portello a 90° a destra o a sinistra (fig. 1-2).
Dear Customer,
Thank-you for having chosen this product.
Please remember to read these instructions and keep them handy
for consultation in case of need.
Conditions of Guarantee
This safe, manufactured and tested by Mottura Serrature di
Sicurezza S.p.A., is guaranteed free of all manufacturing defects
according to the Italian current laws.
The guarantee is valid if the official sales receipt is presented to the
staff of the technical assistance with all the identifying details of
the product indicated.
The guarantee covers the replacement or repair of the parts found
to be defective through a manufacturing fault, and excludes ship-
ping costs to and from the assistance centres, which are payable by
the customer.
In the case of repeated failure as a result of the same fault or of a
non-repairable fault, Mottura Serrature di Sicurezza S.p.A. reser-
ves the final judgement as to the complete replacement of the pro-
duct.
The guarantee on the replaced product will continue until expiry of
the original contract.
The guarantee does not cover faults arising from an installation
which did not follow the instructions in this manual, from negli-
gence, carelessness or use that does not conform to the operating
functions illustrated, from maintenance effected by unauthorised
personnel, from shipping without due care and from any other cir-
cumstances that cannot derive from manufacturing defects.
Mottura Serrature di Sicurezza S.p.A. also declines any responsi-
bility for damage caused to persons or objects deriving from lack of
compliance with all the precautions for use indicated here.
Should technical assistance be required on site, the customer is
required to pay – if requested – a fee for the travel costs of the
authorised technical personnel.
All shipping risks will be born by the customer if this is done direc-
tly by him, and by the technical personnel if the product is collec-
ted and transported by them.
Instructions for Installations and Use
Note
• Do not, under any circumstances, place explosives, inflammable
liquids, acids or toxic substances inside the safe.
• Do not install the safe in places subject to vibration, condensa-
tion, excessive humidity or temperatures over 52°C.
• The safe is not water of fireproof; locations with possible infiltra-
tion of liquid or too close to sources of heat must therefore be
avoided.
Mottura Serrature di Sicurezza S.p.A. also declines any responsi-
bility for damage caused to persons or objects deriving from lack of
compliance with all the precautions for use and installation indi-
cated here.
The characteristics of the products may be subject to modification
by Mottura Serrature di Sicurezza S.p.A. at any time and without
notice.
Installation
The door opens automatically thanks to a spring that pushes it out-
wards after the combination has been entered. Therefore, ensure that
the safe is placed perfectly horizontally to ensure the door can open
correctly. The door can open 90° to the right or to the left (fig. 1-2).
Apertura tirare a destra
Open to the right
fig. 1
Apertura tirare a sinistra
Open to the left
fig. 2
HE 8000 HE 8020 HE 8100
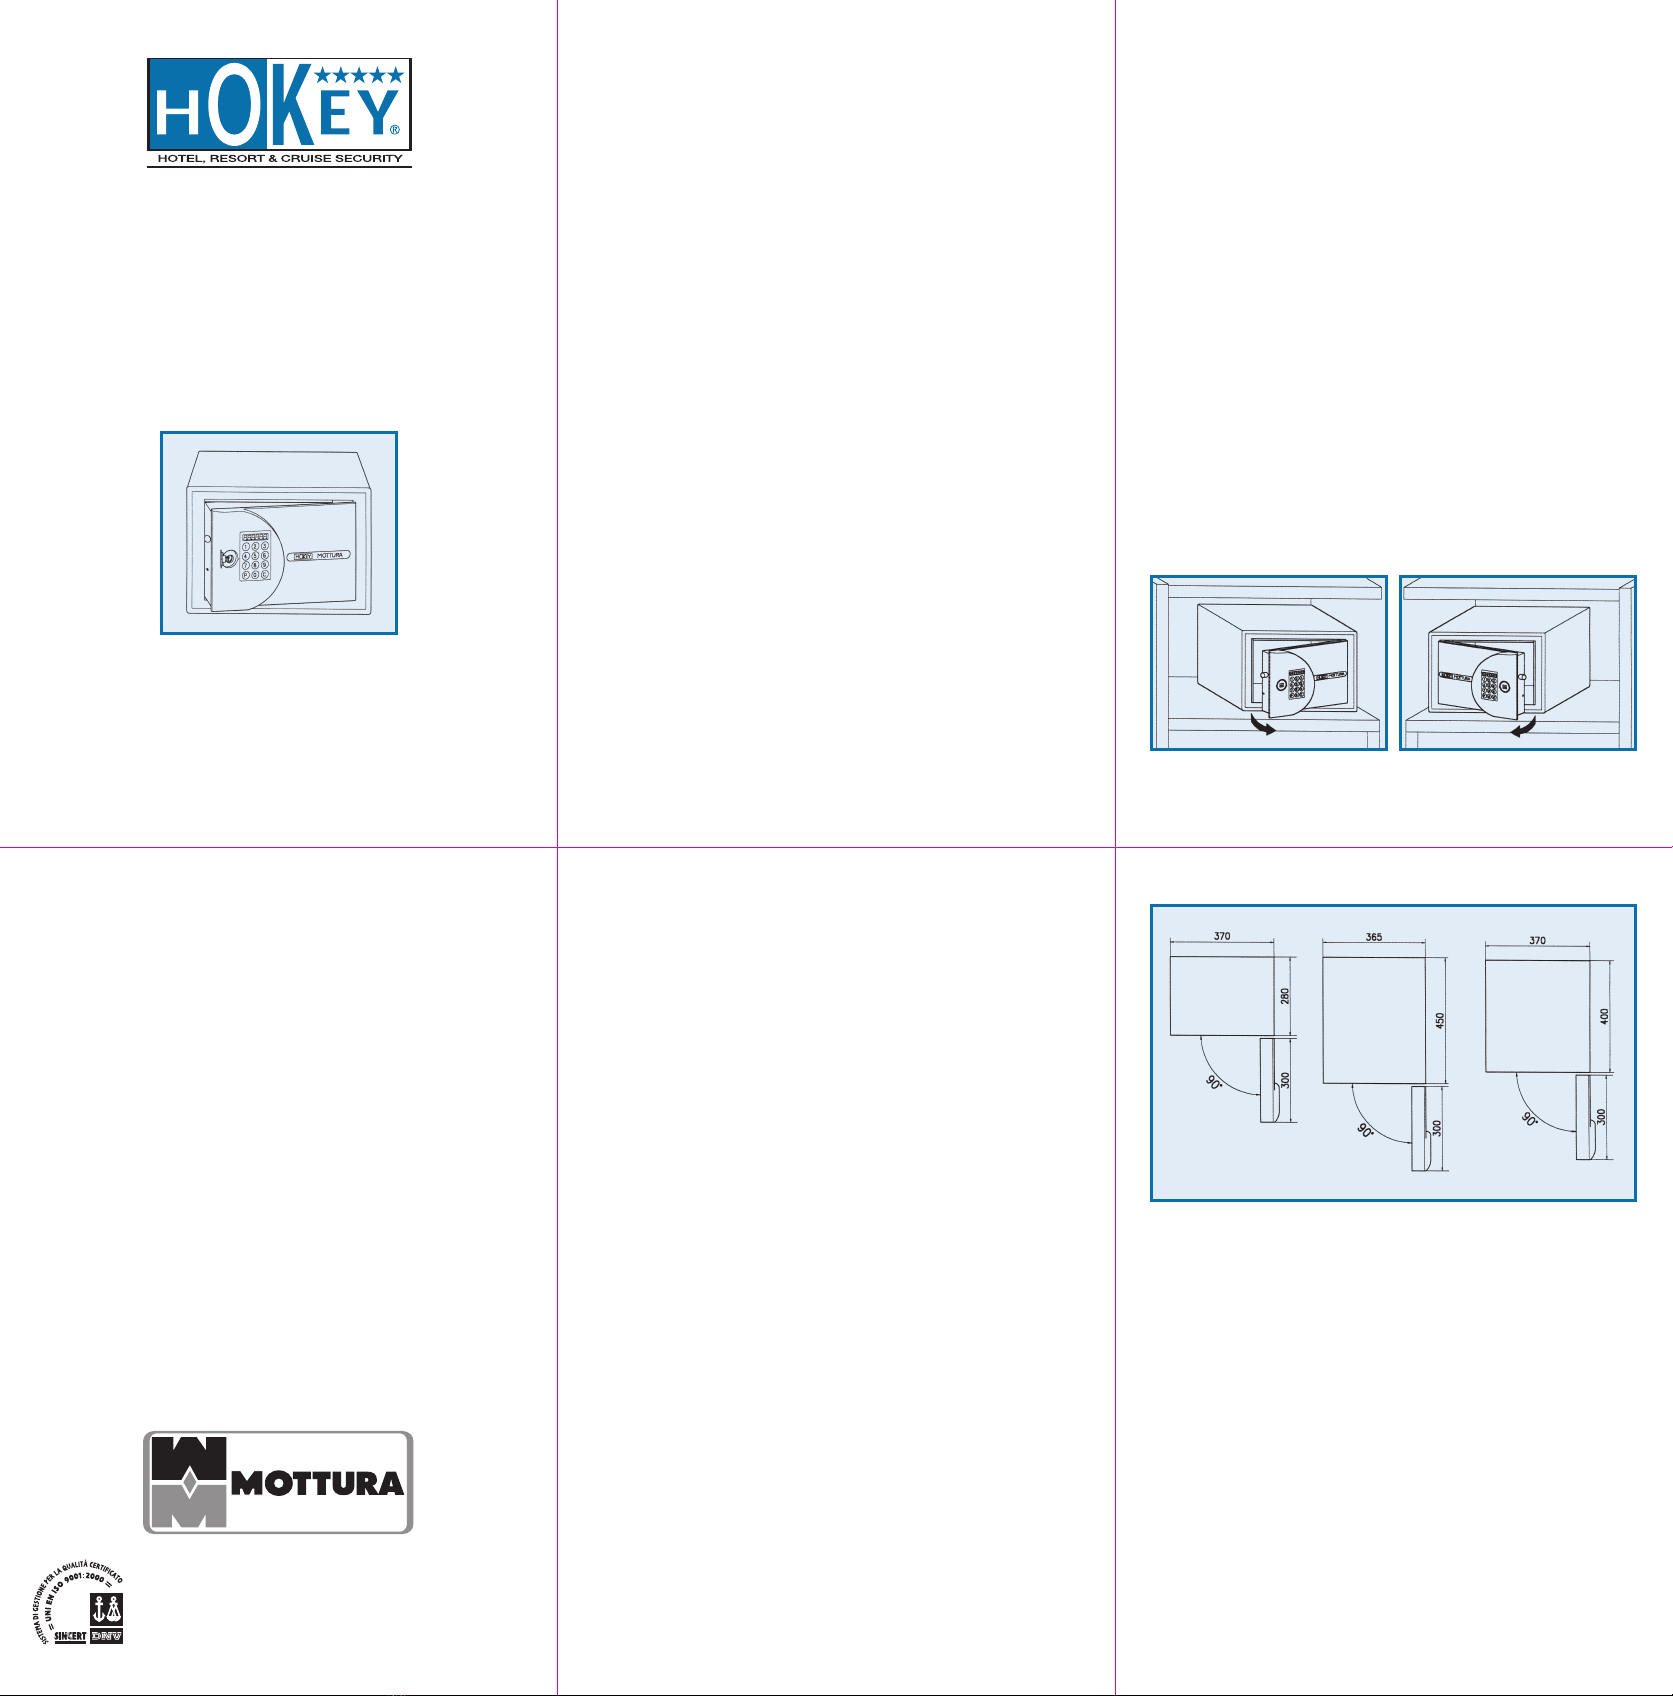
Iquattro fori alla base e nella parte posteriore della cassaforte
possono essere usati per l’ancoraggio sui rispettivi piani di appog-
gio, orizzontale e verticale (fig. 3) scegliendo tasselli o viti adegua-
ti ai materiali da forare (legno, muratura o altro).
La cassaforte è fornita con portello sbloccato e con le pile. Si con-
siglia di provare ad impostare una nuova combinazione di 6 cifre
seguendo le istruzioni riportate sul lato interno del portello oppu-
re sul cartoncino adesivo posto all’interno della cassaforte.
In caso una temporanea dimenticanza della combinazione in fase
di prova delle operazioni di chiusura ed apertura è sufficiente digi-
tare il codice 111111, che è il codice master di serie già impostato
su tutte le casseforti elettroniche HOKEY®.
Dopo aver provato le operazioni di apertura e chiusura, si racco-
manda di cambiare subito il codice master seguendo attenta-
mente le istruzioni riportate sulla busta RISERVATO che accom-
pagna le casseforti facenti parte dello stesso ordinativo.
Apertura di emergenza con cilindro europeo
Sotto il coperchio in plastica, posto a lato della tastiera (fig. 4), si
trova il cilindro che consente, in qualsiasi momento si rendesse
necessario, l’apertura manuale della cassaforte con le chiavi in
dotazione, che raccomandiamo di tenere in luogo riservato.
Vengono fornite 2 chiavi per ordini di 1 sola cassaforte e di 5 chia-
viper ordini di due o più casseforti (nella versione standard).
In caso di blocco o malfunzionamenti della combinazione elettroni-
ca o pile totalmente scariche, èsempre possibile aprire la cas-
saforte con la chiave di sblocco meccanica.
Per ripristinare il normale funzionamento della combinazione
elettronica, dopo aver usato la chiave di emergenza, occorre effet-
tuare questa sequenza di operazioni:
• a porta aperta e catenaccio fuori, estrarre la chiave
• premere Ped impostare una nuova combinazione (che non
modifica il codice master attivo)
•tenere premuto verso l’alto il microinterruttore posto sul lato
inferiore del portello
• a questo punto il catenaccio rientra e la cassaforte è di nuovo
pronta all’uso.
Apertura di Emergenza con Batteria Esterna
Nelle versioni predisposte, in caso di batterie completamente sca-
riche, è possibile aprire la cassaforte tramite batteria esterna
(alcalina, tipo PP3 da 9 volt).
• Aprire il coperchietto di plastica a lato della tastiera
• Inserire il cavetto con la batteria collegata
• Digitare il codice di apertura
• Aprire la cassaforte e sostituire la batterie interne
Check up batterie
Si consiglia di far eseguire questa semplice operazione almeno una
volta al mese, dal personale di servizio:
• a display spento premere il tasto C
• batterie cariche: si illuminano per qualche secondo due righe a
centro display
• batterie scariche (da sostituire): compare a display per qualche
secondo la scritta HELP
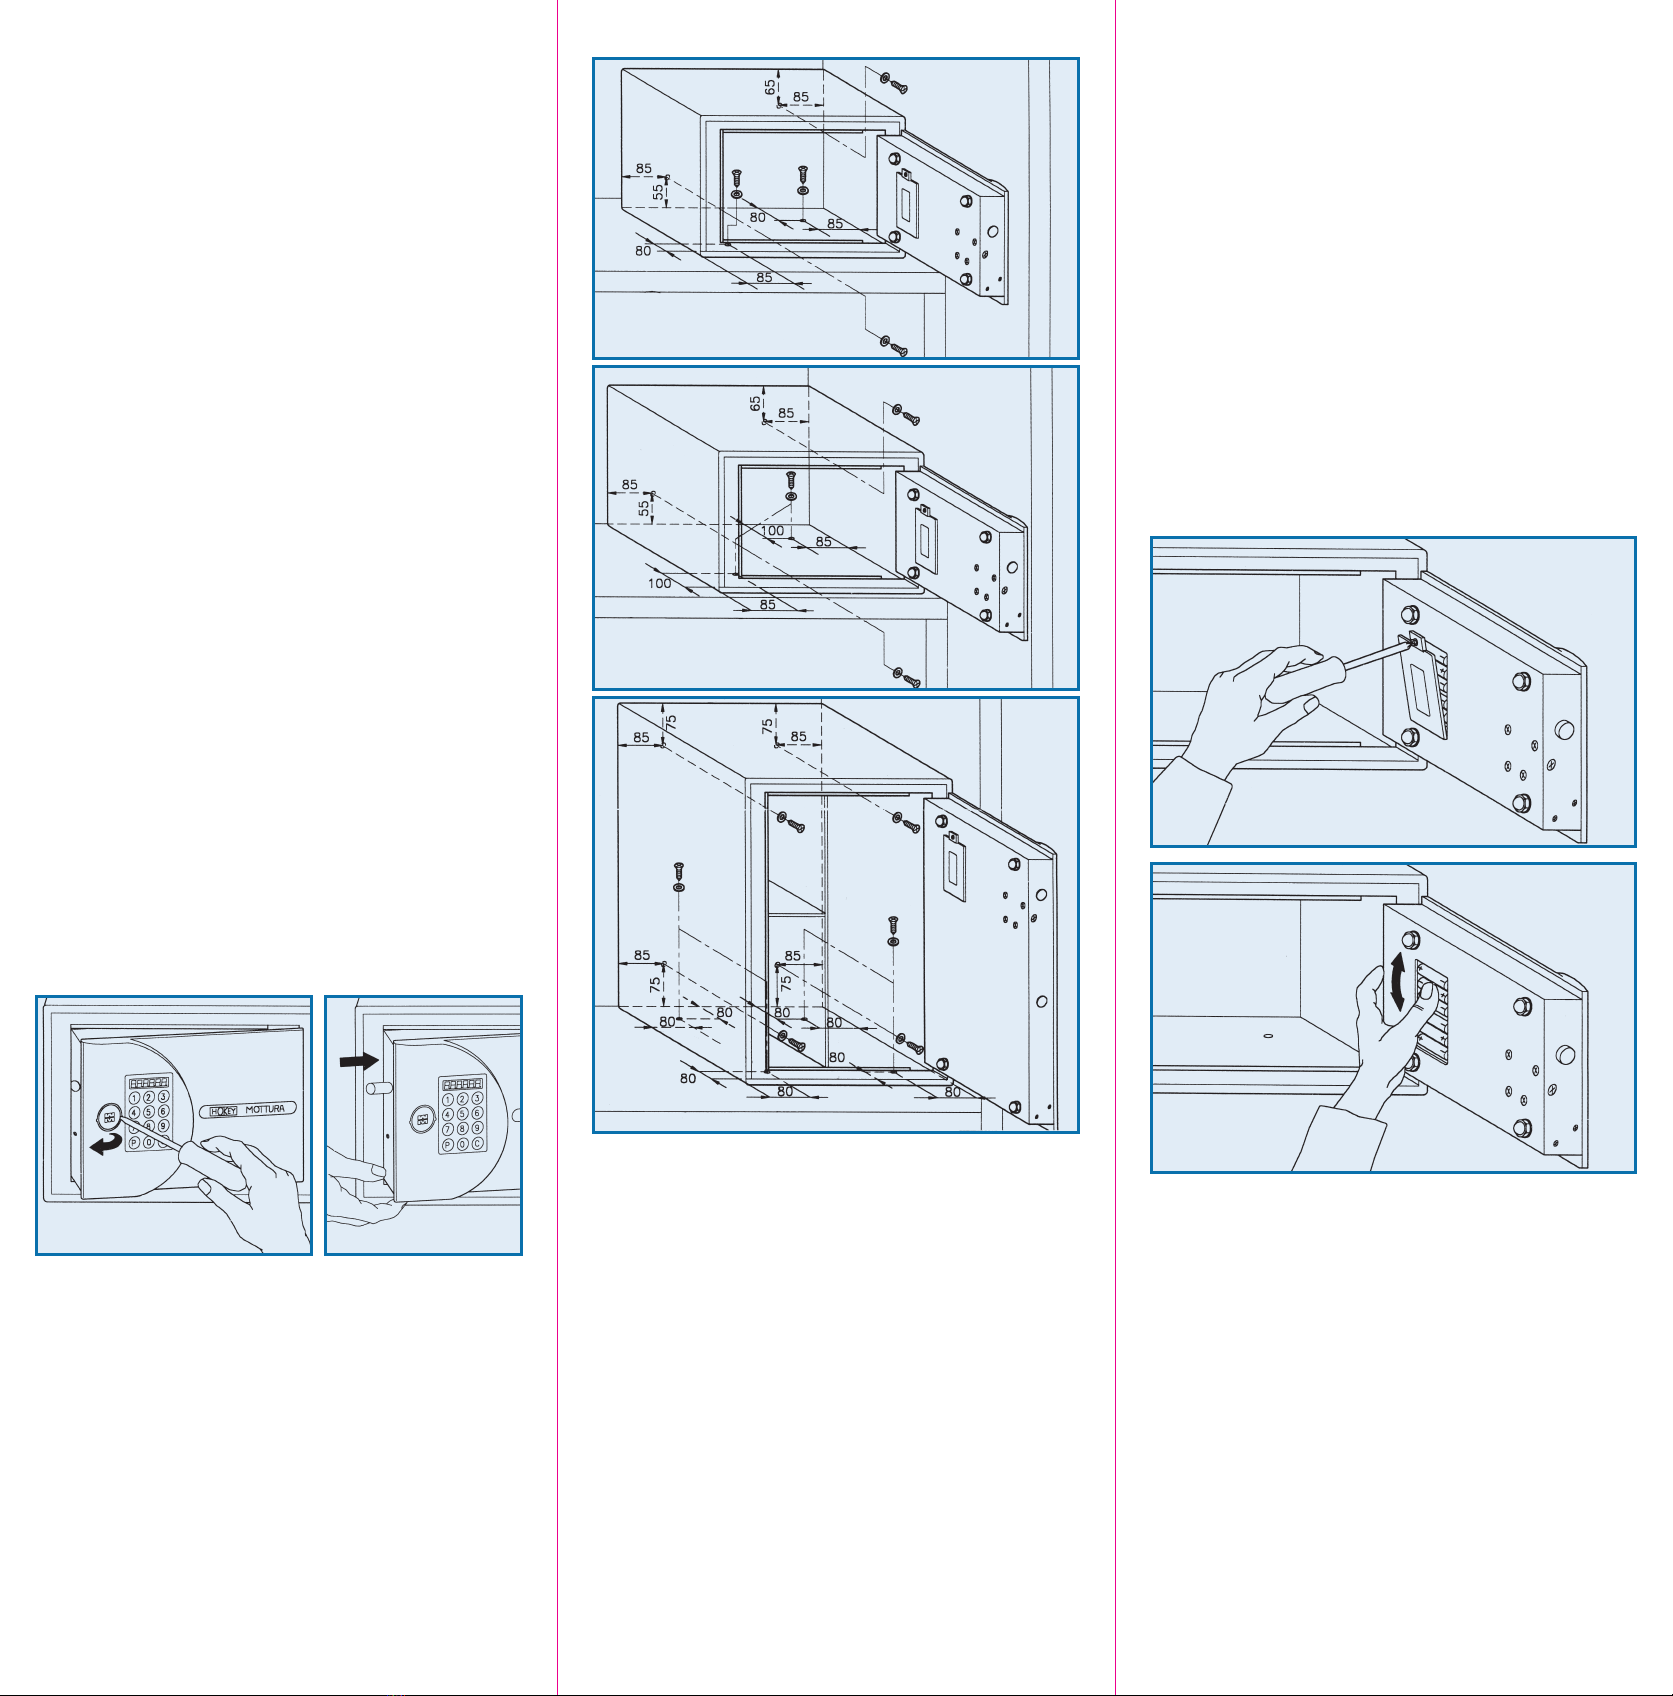
Sostituzione delle batterie
• Svitare con un cacciavite la vite del coperchio sul lato interno
del portello (fig. 5)
• Rimuovere le vecchie batterie e inserire le nuove, facendo atten-
zione a rispettare le polarità indicate nel vano portabatterie
• Esercitando una leggera pressione con il dito (fig. 6), accertarsi
che le batterie siano tutte inserite correttamente nel vano por-
tabatterie e richiudere il coperchio
• Provare A PORTA APERTA il funzionamento, secondo le istru-
zioni sul portello
• Usare esclusivamente batterie alcaline AA LR 6 da 1,5 Volt
• Non disperdere le batterie usate nell’ambiente
Manutenzione e pulizia
Usare un panno umido e detergenti neutri, senza sostanze abrasive
fig. 3
fig. 4
fig. 5
fig. 6
HE 8000/8010
HE 8020/8030
HE 8100/8110
The four holes in the base and rear of the safe can be used to anchor
it in place horizontally and vertically (fig. 3). Use plugs or screws
that are appropriate to the material to be drilled (wood, masonry
or other).
The safe is supplied with the door unlocked and the batteries to be
installed in their compartment. It is recommended that a new 6-
digit combination be entered following the instructions shown on
the inside of the door and on the self-adhesive label placed within
tha safe.
Should the combination be temporarily forgotten during this
testing of the opening and closing procedures, simply key in
111111, this being the standard master code set for all HOKEY®
electronic safes.
After testing opening and closing of the safe, it is recommended
that the master code be changed immediately, by carefully
following the instructions shown on the envelope marked CONFI-
DENTIAL enclosed to the safes in each order.
Emergency opening with the European cylinder
The cylinder placed under the plastic lid located the one side of the
keyboard (fig. 4), enables the manual opening of the safe at any time
this should prove necessary, using the keys supplied (which should
be kept in a secret, secure location). Two keys are provided for
orders of only one safe, and five keys for orders of two or more safes.
Should the electronic combination malfunction or block, or the bat-
teries lose their charge completely, it is always possible to open
the safe with the mechanical master key.
In order to restore the normal functioning of the electronic combina-
tion after using the emergency key, the following sequence of opera-
tions needs to be followed:
•extract the key with the door open and the bolts shot
•press Pand set a new combination (this does not affect the cur-
rent master code)
•press and hold depressed the switch located on the lower side of
the door
•at this point, the bolts will slide back in place and the safe is once
again ready for use.
Emergency Opening with External Battery
In case of power failure, it is possible to open the safe with external
power supply (alkaline, type PP3 9 volts)
• Remove the round cover located near the keyboard
• Connect the cable (included) to the external battery
• Digit opening code
• Open the safe and change the internal batteries
Battery Check
It is recommended to have this simple operation effected at least
once a month by the personnel responsible:
• press button Cwith the display off
• batteries charged: two lines at the centre of the display light up
for a few seconds.
• batteries flat (replacements required): the word HELP appears
for a few seconds on the display.
Replacing the Batteries
• use a screwdriver to unscrew the lid on the inner side of the door
(fig. 5)
• remove the old batteries and insert new ones, taking care to
respect the polarity indicated in the battery compartment
• press lightly with a finger (fig. 6) to check that the batteries have
been inserted into the compartment correctly and close the lid
• test the safe’s operation WITH THE DOOR OPEN, following the
instructions on the door
• only use alkaline 1.5 Volt AA LR 6 batteries
• dispose of the batteries at a proper collection point
Maintenance and Cleaning
Use a damp cloth and neutral detergents without abrasive sub-
stances.

This manual suits for next models

2

Popular Safe manuals by other brands

SentrySafe P005K owner's manual

SentrySafe

SentrySafe P005K owner's manual

Stack-On QAS-1845-B instructions

Stack-On

Stack-On QAS-1845-B instructions

Stealth Tactical Dorm User instruction manual

Stealth

Stealth Tactical Dorm User instruction manual

ECOSAFE 3032ARD instruction manual

ECOSAFE

ECOSAFE 3032ARD instruction manual

Honeywell 5410 Operations & installation guide

Honeywell

Honeywell 5410 Operations & installation guide

AHB 430120581 instruction manual

AHB

AHB 430120581 instruction manual

F.F. Group 41604 Original instructions

F.F. Group

F.F. Group 41604 Original instructions

Stack-On PWS-15522-B instructions

Stack-On

Stack-On PWS-15522-B instructions

Barska AX12476 manual

Barska

Barska AX12476 manual

Clarke CS150F Operation & maintenance instructions

Clarke

Clarke CS150F Operation & maintenance instructions

Paragon 7775 Deluxe Safe operating manual

Paragon

Paragon 7775 Deluxe Safe operating manual

J.Burrows Suresafe Anchor user manual

J.Burrows

J.Burrows Suresafe Anchor user manual

no-flame 57114 instruction manual

no-flame

no-flame 57114 instruction manual

HMF 4615001 instruction manual

HMF

HMF 4615001 instruction manual

RHINO METALS Longhorn LSB1014 owner's manual

RHINO METALS

RHINO METALS Longhorn LSB1014 owner's manual

Arregui Supra instructions

Arregui

Arregui Supra instructions

Stack-On QAS-1514 instructions

Stack-On

Stack-On QAS-1514 instructions

SnapSafe Super Titan XL owner's manual

SnapSafe

SnapSafe Super Titan XL owner's manual

manuals.online logo
manuals.online logoBrands
  • About & Mission
  • Contact us
  • Privacy Policy
  • Terms and Conditions

Copyright 2025 Manuals.Online. All Rights Reserved.