Moulinex Masterchef gourmet Installation guide

www.moulinex.com
max
masterchef gourmet
max
B2
B
D
D3
D2
D1
A
C
A4
A3
A2
A1
A5
C2
C1
C3
A6
A7
B1
E
F
F7
F8
F5
F1
F6
F4
G
G5
G6
G2
G1
G4
G3
H
H1
H2
H3
H4
H6
H5
F3 F2
32
p. 9 - 16
p. 17 - 24
p. 25 - 32
p. 33 - 40
p. 41 - 48
p. 49 - 56
p. 57 - 64
p. 65 - 72
p. 73 - 80
Ref. 0828538
FR
EN
NL
DE
IT
SV
NO
DA
FI
FR
EN
NL
DE
IT
SV
NO
DA
FI
MO_KITCHEN-MACHINE-MC-GOURMET_0828538_EO_FR-EN-NL-DE-IT-SV-NO-DA-FI 15/12/10 08:45 PageC1

2.1c 3.1a
3.1b 3.2a
3.2b 3.3a
3
4
1
2
1
2
3
4
5
1
2
44
3
1
2
2
1
1.1a 1.1 b
1.1c 1.1d
2.1a 2.1b
1
1
1
22
1
2
2
2
4
3
1
2
3.3b 4.1a
4.1b 4.1c
5.1a
5.1b
5.1b
1
2
3
4
22
1
5
1
2
3
4
1
2
3
5.1c
44
3
1
2
654
MO_KITCHEN-MACHINE-MC-GOURMET_0828538_EO_FR-EN-NL-DE-IT-SV-NO-DA-FI 15/12/10 08:45 PageC5

7
5.1c 5.2a
5.2b 5.2c
6
1
2
2
13
1
2
5
MO_KITCHEN-MACHINE-MC-GOURMET_0828538_EO_FR-EN-NL-DE-IT-SV-NO-DA-FI 15/12/10 09:08 Page7

8
MO_KITCHEN-MACHINE-MC-GOURMET_0828538_EO_FR-EN-NL-DE-IT-SV-NO-DA-FI 15/12/10 09:08 Page8

Nous vous remercions d’avoir choisi un appareil de la gamme MOULINEX exclusivement prévu pour la
préparation des aliments, à usage domestique à l’intérieur de la maison.
Les accessoires contenus dans le modèle que vous venez d’acheter sont représentés sur l’étiquette
située sur le dessus de l’emballage.
• Lisez attentivement le mode d’emploi avant la première utilisation de votre appareil : une utilisation
non conforme au mode d’emploi dégagerait le fabricant de toute responsabilité.
• Cet appareil n’est pas prévu pour être utilisé par des personnes (y compris les enfants) dont les
capacités physiques, sensorielles ou mentales sont réduites ou des personnes dénuées d’expérience ou
de connaissance, sauf si elles ont pu bénéficier, par l’intermédiaire d’une personne responsable de
leur sécurité, d’une surveillance ou d’instructions préalables concernant l’utilisation de l’appareil. Il
convient de surveiller les enfants pour s’assurer qu’ils ne jouent pas avec l’appareil.
• Vérifiez que la tension d’alimentation de votre appareil correspond bien à celle de votre installation
électrique. Toute erreur de branchement annule la garantie.
• Votre appareil est destiné uniquement à un usage domestique et culinaire et à l’intérieur de la maison.
• Débranchez toujours l’appareil dès que vous cessez de l’utiliser et lorsque vous le nettoyez.
• N’utilisez pas votre appareil s’il ne fonctionne pas correctement ou s’il a été endommagé. Dans ce cas,
adressez-vous à un centre agréé (voir liste dans le livret service).
• Toute intervention autre que le nettoyage et l’entretien usuel par le client doit être effectuée par un
centre agréé (voir liste dans le livret service).
• Ne mettez pas l’appareil, le câble d’alimentation ou la fiche dans l’eau ou tout autre liquide.
• Ne laissez pas le câble d’alimentation pendre à portée de mains des enfants, être à proximité ou en
contact avec les parties chaudes de l’appareil, près d’une source de chaleur ou sur un angle vif.
• Si le câble d’alimentation ou la fiche sont endommagés, n’utilisez pas l’appareil. Afin d’éviter tout
danger faites-les obligatoirement remplacer par un centre agréé (voir liste dans le livret service).
• Ne passez pas les accessoires au micro-ondes.
DESCRIPTION
a - Bloc moteur
a1 Variateur électronique de vitesse
a2 Bouton de déverrouillage de la tête
multifonctions (a3)
a3 Tête multifonctions
a4 Sortie rapide (bol mixeur / centrifugeuse
/ broyeur)
a5 Trappe de sécurité
a6 Sortie accessoires mélangeurs (pétrin,
fouet multibrins, malaxeur)
a7 Range-cordon
b - Ensemble bol
b1 Bol inox
b2 Couvercle
c - Accessoires mélangeurs
c1 Pétrin
c2 Malaxeur
c3 Fouet multibrins
d - Bol mixeur (selon modèle)
d1 Bol
d2 Couvercle
d3 Bouchon doseur
e - Adaptateur hachoir / coupe-légumes (selon
modèle)
f - Tête hachoir (selon modèle)
f1 Corps métal
f2 Vis
f3 Couteau
f4 Grille gros trous
f5 Grille petits trous
f6 Ecrou
f7 Poussoir
f8 Plateau
g - Coupe-légumes (selon modèle)
g1 Magasin tambour
g2 Poussoir
g3 Tambour Atrancher
g4 Tambour Crâpé gros
g5 Tambour Drâpé fin
g6 Tambour Ereibekuchen
h - Centrifugeuse (selon modèle)
h1 Poussoir
h2 Couvercle
h3 Filtre rotatif
h4 Corps réceptacle
h5 Bec verseur
h6 Levier de verrouillage
CONSEILS DE SECURITE
9
FR
MO_KITCHEN-MACHINE-MC-GOURMET_0828538_EO_FR-EN-NL-DE-IT-SV-NO-DA-FI 15/12/10 09:08 Page9

• Pour votre sécurité, n’utilisez que des accessoires et des pièces détachées adaptés à votre appareil, vendus
en centre agréé.
• Retirez toujours le bol mixeur (d) ou la centrifugeuse (h) avant d’actionner le bouton de déverrouillage
(a2) de la tête multifonctions (a3).
• Avec l’accessoire tête hachoir (f), utilisez toujours le poussoir (f7) pour guider les aliments dans la
cheminée, jamais les doigts, ni fourchette, ni cuillère, ni couteau ou tout autre objet.
• Ne touchez jamais les pièces en mouvement et attendez l’arrêt complet de l’appareil avant d’enlever
les accessoires.
• Des précautions doivent être prises lors de la manipulation des couteaux affutés (d, f, g) lorsqu’on vide
les bols et lors du nettoyage : ils sont extrêmement coupants.
• Ne touchez ni les fouets, ni le pétrin lorsque l’appareil est en fonctionnement.
• Ne laissez pas pendre les cheveux longs, écharpes, cravates etc.. au-dessus de l’appareil en
fonctionnement.
• N’introduisez jamais d’ustensiles (cuillère, spatule ...) par la cheminée des couvercles (b2), (d2) ou
(h2) ainsi que du magasin tambour (g1).
• Ne faites pas fonctionner le bol mixeur (d1) sans couvercle (d2).
• N’utilisez qu’un accessoire à la fois.
• N’utilisez pas les bols (b1, d1) comme récipients (congélation, cuisson, stérilisation, …)
• Ne pas utiliser l’accessoire centrifugeuse si le filtre rotatif (h3) est endommagé.
• Avant la première utilisation, lavez toutes les pièces des accessoires à l’eau savonneuse (sauf
l’adaptateur (e) : voir § nettoyage) Rincez et séchez.
• Placez l’appareil sur une surface plane, propre et sèche, assurez-vous que le bouton variateur (a1) est
bien en position « 0 » puis branchez votre appareil.
• Pour mettre en marche, vous avez plusieurs possibilités :
- Marche intermittente (pulse) : Tournez le bouton variateur (a1) sur la position « pulse » par
impulsions successives pour un meilleur contrôle des préparations.
- Marche continue : Tournez le bouton variateur (a1) sur la position désirée de « 1 » à « max » selon
les préparations effectuées.
Vous pouvez la modifier en cours de préparation.
• Pour arrêter l’appareil, ramenez le bouton (a1) sur le « 0 ».
Important : L’appareil ne pourra démarrer que si la trappe (a5) et la tête (a3) sont verrouillées.
Si vous déverrouillez la trappe (a5) et/ou la tête (a3) en cours de fonctionnement, l’appareil
s’arrêtera aussitôt. Reverrouillez la trappe et/ou la tête, revenez en position « 0 » sur le bouton
de commande (a1), puis procédez normalement pour la mise en marche de l’appareil en
sélectionnant la vitesse souhaitée.
Votre appareil de cuisine est équipé d’un micro processeur qui contrôle et analyse la puissance en
fonctionnement. En cas de charge trop importante, votre appareil s’arrêtera tout seul. Pour
redémarrer votre appareil, ramenez votre bouton rotatif (a1) sur la position «0» et retirez une partie de
vos ingrédients. Laissez votre appareil reposer quelques minutes. Vous pouvez alors sélectionner la
vitesse souhaitée pour terminer votre préparation.
1 - MÉLANGER / PÉTRIR / BATTRE / ÉMULSIONNER / FOUETTER
Selon la nature des aliments, le bol inox (b1) et son couvercle (b2) vous permettent de préparer jusqu’à
1.2 kg de pâte.
ACCESSOIRES UTILISES :
- Bol inox (b1).
- Couvercle (b2).
- Pétrin (c1) ou malaxeur (c2) ou fouet multibrins (c3).
MISE EN SERVICE
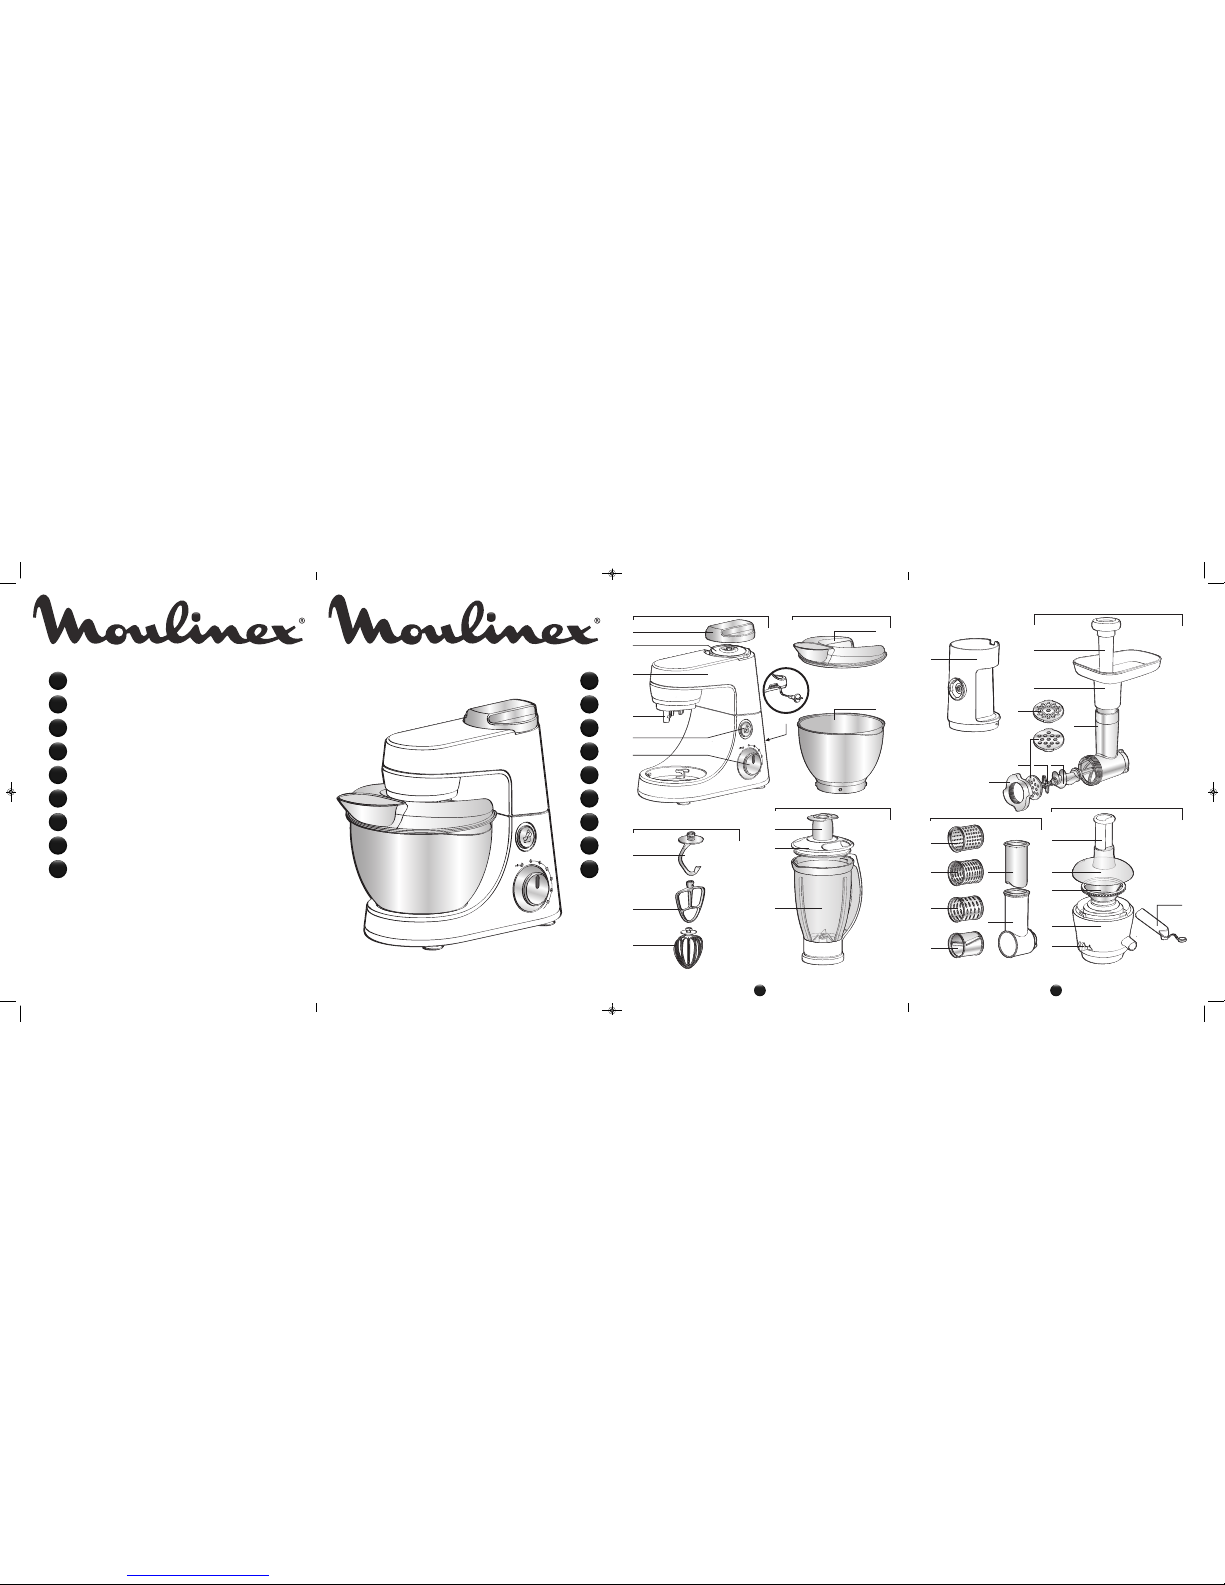
La numérotation des paragraphes est en correspondance avec la numérotation des schémas encadrés.
10
FR
MO_KITCHEN-MACHINE-MC-GOURMET_0828538_EO_FR-EN-NL-DE-IT-SV-NO-DA-FI 15/12/10 09:08 Page10

1.1 - MONTAGE DES ACCESSOIRES
• Appuyez sur le bouton (a2) pour déverrouiller la tête multifonctions (a3) et levez-là jusqu’en butée.
• Verrouillez le bol inox (b1) (sens horaire) sur l’appareil et mettez les ingrédients.
• Insérez l’accessoire désiré (c1, c2 ou c3) sur la sortie (a6), enfoncez et donnez un quart de tour dans
le sens anti-horaire pour bloquer l’accessoire dans son logement.
• Ramenez la tête multifonctions (a3) en position horizontale : appuyez sur le bouton (a2) et baissez
manuellement la tête multifonctions (a3) jusqu’à ce qu’elle se verrouille (retour du bouton (a2) dans
sa position initiale).
• Glissez le couvercle (b2) sur le bol inox (b1).
Remarque : L’utilisation du couvercle n’est pas obligatoire. Il permet d’éviter le risque d’éclaboussure
ou de projection.
• Assurez-vous que la trappe (a5) est bien verrouillée (sens horaire) sur la sortie rapide (a4).
1.2 - MISE EN MARCHE
Démarrez en tournant le bouton variateur (a1) sur la position désirée selon la recette.
• L’appareil se met aussitôt en fonctionnement.
Vous pouvez ajouter des aliments par l’orifice du couvercle (b2) au cours de la préparation.
• Pour arrêter l’appareil, ramener le bouton (a1) sur « 0 ».
Conseils :
- Pétrir
- Utilisez l’accessoire pétrin (c1) à la vitesse « 1 ».
Vous pouvez pétrir jusqu’à 500g de farine (ex : pain blanc, pain aux céréales, pâte brisée, pâte sablée,
…).
- Mélanger
- Utilisez le malaxeur (c2) à la vitesse « 1 » à « max ».
Vous pouvez mélanger jusqu’à 1.2 kg de pâte légère (quatre-quarts, biscuits…).
- N’utilisez jamais le malaxeur (c2) pour pétrir les pâtes lourdes.
- Battre / émulsionner / fouetter
- Utilisez le fouet multibrins (c3) à la vitesse « 1 » à « max ».
- Vous pouvez préparer : mayonnaise, aïoli, sauces, blancs en neige (jusqu’à 8 blancs d’œufs), chantilly
(jusqu’à 500 ml)
…
- N’utilisez jamais le fouet multibrins (c3) pour pétrir des pâtes lourdes ou mélanger des pâtes
légères.
1.3 - DEMONTAGE DES ACCESSOIRES
• Attendez l’arrêt complet de l’appareil.
• Retirez le couvercle (b2).
• A l’aide du bouton (a2), déverrouillez la tête multifonctions (a3) et levez-la en position haute.
• Débloquez l’accessoire (c1), (c2) ou (c3) de la tête multifonctions en poussant l’accessoire vers la tête
et en lui faisant effectuer un quart de tour dans le sens horaire.
• Retirez le bol inox.
2 - HOMOGÉNÉISER / MÉLANGER / MIXER (SELON MODÈLE)
Selon la nature des aliments, le bol mixeur (d) vous permet de préparer jusqu’à 1.5l de mélanges épais
et 1.25l de mélanges liquides.
ACCESSOIRES UTILISES :
- Bol mixeur (d).
2.1 - MONTAGE DES ACCESSOIRES
• Amenez la tête multifonctions (a3) en position horizontale : appuyez sur le bouton (a2) et baissez
manuellement la tête multifonctions (a3) jusqu’à ce qu’elle se verrouille (retour du bouton (a2) dans
sa position initiale).
• Déverrouillez la trappe de sécurité (a5) de la sortie rapide (a4) en la tournant dans le sens anti-horaire
puis ôtez-la.
11
FR
MO_KITCHEN-MACHINE-MC-GOURMET_0828538_EO_FR-EN-NL-DE-IT-SV-NO-DA-FI 15/12/10 09:08 Page11

• Assurez-vous que l’appareil est bien à l’arrêt avant de verrouiller le bol mixeur (d).
• Verrouillez le bol mixeur (d) sur la sortie (a4) en le tournant dans le sens horaire.
• Mettez les aliments dans le bol mixeur, et verrouillez le couvercle (d2) muni du bouchon doseur (d3),
en le tournant dans le sens anti-horaire.
2.2 - MISE EN MARCHE
• Démarrez en tournant le bouton variateur (a1) sur la position désirée selon la recette.
Pour un meilleur contrôle du mixage et une meilleure homogénéisation de la préparation, utilisez la
position «Pulse».
Vous pouvez ajouter des aliments par l’orifice du bouchon doseur (d3) en cours de préparation.
• Pour arrêter l’appareil, ramener le bouton (a1) sur « 0 ».
Conseils :
Vous pouvez préparer :
- des potages finement mixés, des veloutés, des compotes, des milks-shake, des cocktails.
- des pâtes légères (crêpes, beignets, clafoutis, far ...).
- Lors du mixage, si les ingrédients restent collés aux parois du bol, arrêtez l’appareil, retirez le bol
mixeur, faites tomber les ingrédients sur les lames, puis repositionnez votre bol mixeur pour poursuivre
votre préparation.
• Ne remplissez jamais le bol mixeur avec un liquide bouillant.
• N’utilisez pas le bol mixeur à vide.
• Utilisez toujours le bol mixeur avec son couvercle.
• N’enlevez jamais le couvercle avant l’arrêt complet de l’appareil.
• Dans le bol mixeur, mettez toujours les ingrédients liquides avant les ingrédients solides.
2.3 - DEMONTAGE DE L’ACCESSOIRE
• Attendez l’arrêt complet de l’appareil pour retirer le bol mixeur en le déverrouillant dans le sens anti-
horaire et remettez en place la trappe (a5) en la verrouillant sur la sortie (a4) (sens horaire).
3 - HACHER (SELON MODÈLE)
ACCESSOIRES UTILISES :
- Adaptateur hachoir / coupe-légumes (e)
- Tête hachoir assemblée (f)
3.1 - MISE EN PLACE DE L’ADAPTATEUR HACHOIR
• Appuyez sur le bouton (a2) pour déverrouiller la tête multifonctions (a3) et levez-là jusqu’en butée.
• Positionnez l’adaptateur (e) et verrouillez le dans le sens anti-horaire de manière à avoir la sortie
dans le prolongement de l’appareil.
• Ramenez la tête multifonctions (a3) en position horizontale en appuyant de nouveau sur le bouton
(a2).
3.2 - ASSEMBLAGE DE LA TETE HACHOIR
• Prenez le corps (f1) par la cheminée en plaçant l’ouverture la plus large vers le haut.
• Introduisez la vis (f2) (axe long en premier) dans le corps (f1).
• Positionnez le couteau (f3) sur l’axe court qui dépasse de la vis (f2) en dirigeant les arêtes tranchantes
vers l’extérieur.
• Placez la grille choisie (f4 ou f5) sur le couteau (f3) en faisant correspondre les deux ergots avec les
deux encoches du corps (f1).
• Vissez fortement l’écrou (f6) sur le corps (f1) dans le sens horaire, sans toutefois le bloquer.
• Vérifiez le montage. L’axe ne doit ni avoir de jeu, ni pouvoir tourner sur lui-même. Dans le cas contraire,
recommencez les opérations précédentes.
3.3 - MISE EN PLACE DE LA TETE HACHOIR SUR L’APPAREIL
• Présentez la tête hachoir assemblée (f) inclinée vers la droite, face à la sortie de l’adaptateur (e), faites
correspondre les deux baïonettes de la tête hachoir avec les deux encoches de l’adaptateur. Engagez
à fond la tête hachoir dans l’adaptateur puis ramenez la cheminée de la tête hachoir à la verticale
12
FR
MO_KITCHEN-MACHINE-MC-GOURMET_0828538_EO_FR-EN-NL-DE-IT-SV-NO-DA-FI 15/12/10 09:08 Page12

jusqu’au blocage en tournant dans le sens anti-horaire.
• Placez le plateau amovible (f8) sur la cheminée.
3.4 - MISE EN MARCHE, CONSEILS ET DEMONTAGE
• Assurez-vous que la trappe de sécurité (a5) est bien verrouillée (sens horaire) sur la sortie rapide (a4).
• Placez un récipient pour recueillir la préparation devant l’appareil.
• Mettez en marche en tournant le variateur (a1) sur la vitesse « 3 » ou « 4 ».
• Introduisez la viande dans la cheminée morceau par morceau à l’aide du poussoir (f7). Ne poussez
jamais l’ingrédient avec les doigts ou avec des ustensiles dans la cheminée.
• Pour arrêter l’appareil, tournez le variateur sur la vitesse « 0 » et attendez l’arrêt complet de l’appareil.
• Déverrouillez la tête hachoir dans le sens inverse du montage.
Conseils :
- Préparez toute la quantité d’aliments à hacher (pour la viande, éliminez les os, cartilages et nerfs et
coupez-la en morceaux de 2x2cm environ).
- Assurez-vous que votre viande soit bien décongelée.
- En fin d’opération, vous pouvez faire passer quelques petits morceaux de pain afin de faire sortir tout
le hachis.
4 - RAPER / TRANCHER (SELON MODÈLE)
ACCESSOIRES UTILISES :
- Adaptateur hachoir / coupe-légumes (e)
- Coupe-légumes assemblé (g)
- Tambours (selon modèle)
4.1 - MONTAGE DES ACCESSOIRES
• Appuyez sur le bouton (a2) pour déverrouiller la tête multifonctions (a3) et levez-là jusqu’en butée.
• Positionnez l’adaptateur (e) et verrouillez le dans le sens anti-horaire de manière à avoir la sortie
dans le prolongement de l’appareil.
• Ramenez la tête multifonctions (a3) en position horizontale en appuyant de nouveau sur le bouton
(a2).
• Assurez-vous que la trappe de sécurité (a5) est bien verrouillée (sens horaire) sur la sortie rapide (a4).
• Présentez le magasin tambour (g1) incliné vers la droite, face à la sortie de l’adaptateur (e), faites
correspondre les deux baïonettes du magasin tambour avec les deux encoches de l’adaptateur. Engagez
le à fond et ramenez la cheminée du magasin à la verticale jusqu’au blocage en tournant dans le sens
anti-horaire.
• Insérez dans le magasin le tambour choisi, et assurez-vous qu’il est intégralement rentré dans le
magasin.
4.2 - MISE EN MARCHE ET CONSEILS
• Placez un récipient pour recueillir la préparation devant l’appareil.
• Mettez en marche en tournant le variateur (a1) sur la vitesse « 3 » pour trancher et sur la vitesse « 4 »
pour râper.
• Introduisez les aliments dans la cheminée du magasin et guidez les à l’aide du poussoir (g2). Ne
poussez jamais l’ingrédient avec les doigts ou avec des ustensiles.
• Pour arrêter l’appareil, tournez le variateur sur la vitesse « 0 » et attendez l’arrêt complet de l’appareil.
• Déverrouillez le magasin tambour dans le sens inverse du montage.
• Vous pouvez préparer avec les tambours :
- Râper gros C (g4) / râper fin D (g5) : carottes, céleri-rave, pommes de terre, fromage,…
- Trancher épais A (g3) : pommes de terre, carottes, concombres, pommes, betteraves,…
- Reibekuchen E (g6): pommes de terre, parmesan …
5 - CENTRIFUGER FRUITS ET LEGUMES (SELON MODELE)
ACCESSOIRES UTILISES :
- Centrifugeuse assemblée (h).
13
FR
MO_KITCHEN-MACHINE-MC-GOURMET_0828538_EO_FR-EN-NL-DE-IT-SV-NO-DA-FI 15/12/10 09:08 Page13

5.1 - ASSEMBLAGE DE LA CENTRIFUGEUSE
• Placez le filtre (h3) au centre du corps réceptacle (h4).
• Verrouillage du couvercle : tournez en sens anti-horaire et verrouillez le couvercle (h2) sur le corps
réceptacle (h4) (position cadenas fermé).
• Verrouillage global : poussez le levier de verrouillage (h6) en position cadenas fermé.
5.2 - MISE EN PLACE DE LA CENTRIFUGEUSE SUR L’APPAREIL
• Amenez la tête multifonctions (a3) en position horizontale : appuyez sur le bouton (a2) et baissez
manuellement la tête multifonctions (a3) jusqu’à ce qu’elle se verrouille (retour du bouton (a2) dans
sa position initiale).
• Déverrouillez et ôtez la trappe (a5) de la sortie (a4) en la tournant dans le sens anti-horaire.
• Assurez-vous que l’appareil est bien à l’arrêt avant de verrouiller la centrifugeuse (h).
• Verrouillez la centrifugeuse assemblée sur la sortie (a4) en la tournant dans le sens horaire, de manière
à avoir la sortie pour le bec verseur dans l’alignement de l’appareil.
• Emboitez le bec verseur (h5) sur le corps réceptacle (h4).
5.3 - MISE EN MARCHE ET CONSEILS
• Mettez un grand verre sous le bec verseur (h5).
• Mettez en marche en tournant le variateur (a1) sur la vitesse « 3 ».
• Coupez les fruits et/ou légumes en morceaux.
• Introduisez les dans la cheminée du couvercle (h2) et poussez les lentement à l’aide du poussoir (h1).
Ne poussez jamais avec les doigts ou avec des ustensiles.
• Ne pas traiter plus de 5 fois 500g d’aliments en continu, sans laisser votre appareil reposer
complètement.
• Pour obtenir un meilleur rendement, nettoyez le filtre tous les 300 g d’ingrédients.
• Important : Lorsque le corps réceptacle à pulpe est plein, arrêtez l’appareil et videz le corps réceptacle.
• Pour arrêter l’appareil, tournez le variateur sur la vitesse « 0 » et attendez l’arrêt complet de l’appareil.
• Attendez l’arrêt complet du filtre rotatif avant de retirer l’ensemble de l’appareil.
• Pour retirer la centrifugeuse, déverrouillez-la en la tournant dans le sens anti-horaire.
• Positionnez le levier de verrouillage (h6) en position cadenas ouvert. Ouvrez le couvercle (position
cadenas ouvert). Vous pouvez alors retirer le filtre (h3) pour le nettoyer et vider le corps réceptacle
(h4).
Conseils :
• Vous pouvez réaliser des jus tels que : carottes, tomates, pommes, raisins, framboises,…
• Pelez les fruits à peau épaisse, retirez les noyaux, ôtez la partie centrale des ananas.
• Il est impossible d’extraire le jus de certains fruits et légumes : bananes, avocats, mûres, etc…
• Vous pouvez préparer des jus avec différents fruits et légumes sans nettoyer à chaque fois la
centrifugeuse, les saveurs ne se mélangent pas, il suffit juste de passer un peu d’eau dans la
centrifugeuse en la faisant fonctionner pour la rincer entre chaque jus différent.
• Consommez rapidement les jus après leur préparation, et ajoutez du jus de citron pour les conserver
quelques heures au frais.
6 - MISE A LONGUEUR DU CORDON
Pour une utilisation plus confortable ou pour le rangement, vous pouvez réduire la longueur du cordon
en le poussant à l’intérieur du bloc moteur (a) par l’ouverture située à l’arrière (a7).
7 - HACHER TRÈS FINEMENT DES PETITES QUANTITÉS (SELON MODÈLE)
ACCESSOIRE UTILISE :
- Broyeur assemblé.
Vous pouvez avec le broyeur :
- Hacher en quelques secondes en pulse: figues sèches, abricots secs…..
Quantité / temps maxi : 100g / 5 s
Ce broyeur n’est pas prévu pour des produits durs comme le café.
14
FR
MO_KITCHEN-MACHINE-MC-GOURMET_0828538_EO_FR-EN-NL-DE-IT-SV-NO-DA-FI 15/12/10 09:08 Page14

• Débranchez l’appareil.
• Ne plongez pas le bloc moteur (a) ni l’adaptateur (e) dans l’eau ou sous l’eau courante. Essuyez-les
avec un chiffon sec ou à peine humide.
• Pour un nettoyage plus facile, rincez rapidement les accessoires après leur utilisation. Démontez
complètement l’accessoire tête hachoir. Manipulez toutes les lames avec précautions, elles peuvent
vous blesser.
• Lavez, rincez et essuyez les accessoires : ils passent au lave-vaisselle à l’exception de l’ensemble des
composants métalliques de la tête hachoir : corps (f1), vis (f2), couteau (f3), grilles (f4 et f5), écrou
(f6).
• Les grilles (f4) et (f5) ainsi que le couteau (f3) doivent rester gras. Enduisez-les d’huile alimentaire
afin de les préserver.
Astuces :
• En cas de coloration de vos accessoires par les aliments (carottes, oranges, …) frottez-les avec un
chiffon imbibé d’huile alimentaire puis procédez au nettoyage habituel.
• Bol mixeur (d) : versez de l’eau chaude additionnée de quelques gouttes de savon liquide dans le bol
mixeur. Fermez le couvercle. Mettez-le en place sur l’appareil et donnez quelques impulsions. Une fois
enlevé, rincez le bol à l’eau courante et laissez sécher (bol renversé).
Ne rangez pas votre appareil dans un environnement humide.
Si votre appareil ne fonctionne pas, vérifiez :
- Le branchement de votre appareil.
- Le verrouillage de chaque accessoire.
- La présence et le verrouillage de la trappe de sécurité (a5) lorsque la sortie rapide (a4) n’est pas
utilisée.
- Le verrouillage horizontal de la tête multifonctions (a3).
Votre appareil de cuisine est équipé d’un micro processeur qui contrôle et analyse la puissance en
fonctionnement. En cas de charge trop importante, votre appareil s’arrêtera tout seul. Pour redémarrer
votre appareil, ramenez votre bouton rotatif (a1) sur la position «0» et retirez une partie de vos
ingrédients. Laissez votre appareil reposer quelques minutes. Vous pouvez alors sélectionner la vitesse
souhaitée pour terminer votre préparation.
Votre appareil ne fonctionne toujours pas ? Adressez-vous à un centre agréé (voir liste dans le livret
service).
NETTOYAGE
RANGEMENT
SI VOTRE APPAREIL NE FONCTIONNE PAS, QUE FAIRE ?
ELIMINATION DES MATERIAUX D’EMBALLAGE ET DE L’APPAREIL
L’emballage comprend exclusivement des matériaux sans danger pour l’environnement,
pouvant être jetés conformément aux dispositions de recyclage en vigueur.
Pour la mise au rebut de l’appareil, se renseigner auprès du service approprié de votre
commune.
PRODUITS ELECTRONIQUES OU ELECTRIQUES EN FIN DE VIE
Participons à la protection de l’environnement !
Votre appareil contient de nombreux matériaux valorisables ou recyclables.
Confiez celui-ci dans un point de collecte pour que son traitement soit effectué.
15
FR
MO_KITCHEN-MACHINE-MC-GOURMET_0828538_EO_FR-EN-NL-DE-IT-SV-NO-DA-FI 15/12/10 09:08 Page15

Vous pouvez personnaliser votre appareil et vous procurer auprès de votre revendeur habituel ou d’un
centre service agréé les accessoires suivants :
Attention : aucun accessoire ne pourra vous être vendu sans présentation de votre notice d’uti-
lisation ou de votre appareil.
ACCESSOIRES
Bol inox
Couvercle de bol inox
Pétrin
Malaxeur
Fouet multibrins
Bol mixeur
Centrifugeuse
Broyeur
Adaptateur hachoir / coupe-légumes
Tête hachoir
Coupe légumes :
- A : trancher
- C : râper gros
- D : râper fin
- E : reibekuchen
16
FR
MO_KITCHEN-MACHINE-MC-GOURMET_0828538_EO_FR-EN-NL-DE-IT-SV-NO-DA-FI 15/12/10 09:08 Page16

Thank you for choosing an appliance from the MOULINEX range, which is intended exclusively for the
preparation of food and is only for indoor, domestic use.
The accessories contained in the model you have bought are represented on the label located on
the top of the packaging.
• Read the instructions for use carefully before using your appliance for the first time: the manufacturer
shall accept no liability in the event of any use that does not comply with the instructions.
• This appliance is not designed to be used by persons (including children) with reduced physical,
sensorial or mental capacities, or by people with no prior knowledge or experience, except where they
have benefited from supervision or previous instructions relating to the use of the appliance, from a
person responsible for their safety. Children must be supervised to ensure that they do not play with
the appliance.
• Check that the power rating of your appliance corresponds to your electrical supply. Any connection
fault invalidates the warranty.
• Your appliance is intended only for domestic culinary use, in an indoor setting and under supervision.
• Always unplug the appliance as soon as you have finished using it and when you are cleaning it.
• Do not use the appliance if it is not working properly or if it has been damaged. Contact an authorised
service centre (see list in the service booklet).
• Any maintenance other than routine cleaning and upkeep by customers must be carried out by an
approved service centre (see list in the service booklet).
• Do not place the appliance, the supply cable or the plug in water or any other liquid.
• The power cord must be kept out of the reach of children and must not be placed near or come into
contact with the hot parts of the appliance, sources of heat or sharp corners.
• If the power cable or the plug are damaged, do not use the appliance. To maintain safety, these parts
must be replaced by an approved service centre (see list in the service booklet).
• Do not place the accessories in a microwave oven.
• For your own safety, use only accessories and spare parts designed for your appliance and sold in an
DESCRIPTION
a - Motor unit
a1 Electronic speed selector
a2 Multi-function head (a3) release button
a3 Multi-function head
a4 High speed outlet (blender jug / juice
extractor / grinder)
a5 Safety cover
a6 Mixer accessories outlet (kneader, balloon
whisk, mixer)
a7 Power cord storage
b - Bowl assembly
b1 Stainless steel bowl
b2 Lid
c - Mixer accessories
c1 Kneader
c2 Mixer
c3 Balloon whisk
d - Blender jug (depending on model)
d1 Jug
d2 Lid
d3 Measuring cup
e - Mincer / vegetable slicer attachment
(depending on model)
f - Mincer head (depending on model)
f1 Metal body
f2 Feed screw
f3 Blade
f4 Large-hole screen
f5 Small-hole screen
f6 Nut
f7 Pusher
f8 Tray
g - Vegetable slicer (depending on model)
g1 Drum body
g2 Pusher
g3 Slicer drum A
g4 Coarse grater drum C
g5 Fine grater drum D
g6 Reibekuchen drum E
h - Juice extractor (depending on model)
h1 Pusher
h2 Lid
h3 Rotary filter
h4 Juice collector
h5 Pouring spout
h6 Locking lever
SAFETY INSTRUCTIONS
17
EN
MO_KITCHEN-MACHINE-MC-GOURMET_0828538_EO_FR-EN-NL-DE-IT-SV-NO-DA-FI 15/12/10 09:08 Page17

approved service centre.
• Always remove the blender (d) or the juice extractor (h) before pressing the multi-function head (a3)
release button (a2).
• Always use the pusher (f7) with the mincer head accessory (f), to guide food in the feed tube. Never
use your fingers, a fork, a spoon, a knife or any other object.
• Never touch any moving parts. Wait for the appliance to come to a complete stop before removing
accessories.
• Handle the sharp blades (d, f, g) carefully when emptying the bowls and when cleaning: they are
extremely sharp.
• Do not touch the whisks or the kneader when the appliance is running.
• Do not allow long hair, scarves, ties etc. to dangle over the appliance during operation.
• Never insert utensils (spoon, spatula, etc.) through the feed tube in the lids (b2), (d2) or (h2) in the
drum body (g1).
• Do not run the blender jug (d1) without its lid (d2).
• Use only one accessory at a time.
• Do not use the bowls (b1, d1) as containers for freezing, cooking or sterilisation.
• Do not use the juice extractor if the rotary filter (h3) is damaged.
• Before using for the first time, wash all accessory parts in soapy water (except for the attachment (e):
see § Cleaning) Rinse and dry.
• Place the appliance on a flat, clean and dry surface. Make sure that the selector button (a1) is in "0"
position and plug in your appliance.
• You have several options for starting your appliance:
- Intermittent operation (pulse): Turn the selector button (a1) to the "pulse" position. Using a
succession of pulses can give you better control when preparing certain foods.
- Continuous operation: Turn the selector button (a1) to the desired position from "1" to "max"
depending on the food you are preparing.
You can change it as required during preparation.
• To stop the appliance, turn the button (a1) to "0".
Important : The appliance will start only if the cover (a5) and the head (a3) are locked. The
appliance will stop immediately if you unlock the cover (a5) and/or the head (a3) during
operation. Lock the cover and/or the head, turn the control button (a1) to the "0" position, and
then start the appliance normally by selecting the desired speed.
Your appliance comes with a microprocessor that controls and analyses the operating power. If the load
becomes too high, your appliance will stop automatically. To restart your appliance, turn the rotary
button (a1) to the "0" position and remove some of your ingredients. Allow your appliance to cool down
for a few minutes. You can then select the desired speed to complete your preparation.
1 - MIXING / KNEADING / BEATING / EMULSIFYING / WHISKING
You can prepare up to 1.2 kg of dough using the stainless steel bowl (b1) and its lid (b2) depending on
the food.
ACCESSORIES USED:
- Stainless steel bowl (b1).
- Lid (b2)
- Kneader (c1) or mixer (c2) or balloon whisk (c3)
1.1 - ASSEMBLING THE ACCESSORIES
• Press the button (a2) to release the multi-function head (a3) and raise it until it locks in place.
• Lock the stainless steel bowl (b1) (clockwise) on the appliance and put in the ingredients.
BEFORE FIRST USE
The paragraph numbering corresponds to the numbers in the diagrams.
18
EN
MO_KITCHEN-MACHINE-MC-GOURMET_0828538_EO_FR-EN-NL-DE-IT-SV-NO-DA-FI 15/12/10 09:08 Page18

• Insert the desired accessory (c1, c2 or c3) on the outlet (a6), push and rotate it anti-clockwise a
quarter turn to lock the accessory in its housing.
• Place the multi-function head (a3) to the horizontal position: press the button (a2) and manually lower
the multi-function head (a3) until it locks (the button (a2) returns to its initial position).
• Slide the lid (b2) over the stainless steel bowl (b1).
Note: It is not essential to use the lid but it prevents splashing.
• Make sure that the cover (a5) is locked correctly (clockwise) on the high-speed outlet (a4).
1.2 - USAGE
Start by turning the selector button (a1) to the desired position according to the recipe.
• The appliance starts running immediately.
You can add food through the hole in the lid (b2) during preparation.
• To stop the appliance, turn the button (a1) to "0".
Tips:
- Kneading
- Use the kneader accessory (c1) at speed "1".
You can knead up to 500 g of flour (e.g. white bread, grain bread, short crust pastry, etc.).
- Mixing
- Use the mixer (c2) at speed "1" to "max".
You can mix up to 1.2 kg of light dough (light cake mixture, sponge cake, biscuit or cookie dough).
- Never use the mixer (c2) to knead heavy dough.
- Beating / emulsifying / whisking
- Use the balloon whisk (c3) at speed "1" to "max".
- You can prepare: mayonnaise, aioli, sauces, whisked egg whites (up to 8 egg whites), whipped cream
(up to 500 ml), meringues etc.
- Never use the balloon whisk (c3) to knead heavy dough or mix light dough.
1.3 - DISMANTLING THE ACCESSORIES
• Wait for the appliance to come to a complete stop.
• Remove the lid (b2).
• Using the button (a2), release the multi-function head (a3) and raise it to the upper position.
• Release the accessory (c1), (c2) or (c3) from the multi-function head by pushing the accessory into
the head and rotating it clockwise a quarter turn.
• Remove the stainless steel bowl.
2 - BLENDING/MIXING (DEPENDING ON MODEL)
Depending on the nature of the food, you can use the blender (d) to prepare up to 1.5 L of thick mixtures
and 1.25 L of liquid mixtures.
ACCESSORIES USED :
- Blender jug (d)
2.1 - ASSEMBLING THE ACCESSORIES
• Place the multi-function head (a3) in the horizontal position: press the button (a2) and manually
lower the multi-function head (a3) until it locks (the button (a2) returns to its initial position).
• Unlock the safety cover (a5) from the high-speed outlet (a4) by rotating it anti-clockwise and then
remove it.
• Make sure that the appliance is switched off before locking the blender (d).
• Lock the blender jug (d) on the outlet (a4) by rotating it clockwise.
• Place the food in the blender jug, and lock the lid (d2) fitted with the measuring cap (d3), by rotating
it anti-clockwise.
19
EN
MO_KITCHEN-MACHINE-MC-GOURMET_0828538_EO_FR-EN-NL-DE-IT-SV-NO-DA-FI 15/12/10 09:08 Page19

2.2 - USAGE
• Start by turning the selector button (a1) to the desired position according to the recipe.
Use the "Pulse" position for better mixing control and for a better blending of your preparation.
You can add food through the hole in the measuring cap (d3) during preparation.
• To stop the appliance, turn the button (a1) to "0".
Tips :
You can prepare:
- finely blended soups, cream soups, stewed fruit, milkshakes and cocktails.
- liquid batter (pancake, fritters, Yorkshire pudding, waffles, clafoutis and custard flans).
If ingredients stick to the sides of the bowl when mixing, stop the appliance. Remove the blender, and
push the food down onto the blades and put your blender back to continue your preparation.
• Never fill the blender jug with boiling liquid. Only use liquids or foods at simmering temperatures or
below.
• Never run the blender jug empty.
• Always use the blender jug with its lid.
• Never remove the lid before the blades have stopped completely.
• Always pour liquid ingredients into the blender jug first before adding solid ingredients.
2.3 - DISMANTLING THE ACCESSORY
• Wait for the appliance to come to a complete stop before removing the blender by unlocking it in the
anti-clockwise direction and put back the cover (a5) by locking it on the outlet (a4) (clockwise).
3 - MINCING (DEPENDING ON MODEL)
ACCESSORIES USED :
- Mincer / vegetable slicer attachment (e)
- Assembled mincer head (f)
3.1 - FITTING THE MINCER ATTACHMENT
• Press the button (a2) to release the multi-function head (a3) and raise it until it locks in place.
• Place the attachment (e) and lock it in the anti-clockwise direction such that the outlet is in alignment
with the appliance.
• Place the multi-function head (a3) in the horizontal position by pressing the button (a2) once again.
3.2 - ASSEMBLING THE MINCER HEAD
• Hold the body (f1) by the feed tube, with the wider opening uppermost.
• Insert the feed screw (f2) (long shaft first) into the body (f1).
• Fit the blade (f3) onto the short shaft protruding from the feed screw (f2) with the cutting edges facing
outwards.
• Fit the chosen screen (f4 or f5) on the blade (f3), aligning the two lugs with the two notches in the
body (f1).
• Screw the nut (f6) home on the body (f1) in the clockwise direction, without locking it.
• Check the assembly. The shaft should have no play, neither should it be able to turn on its own.
Otherwise, repeat the assembly procedure.
3.3 - FITTING THE MINCER HEAD ON THE APPLIANCE
• Facing the attachment outlet (e), insert the assembled mincer head (f) inclined to the right, aligning
the two bayonets in the mincer head with the two notches in the attachment. Push the mincer head
home into the attachment and turn the mincer head anti-clockwise until it latches with the feed tube
in the vertical position.
• Place the removable tray (f8) on the feed tube.
20
EN
MO_KITCHEN-MACHINE-MC-GOURMET_0828538_EO_FR-EN-NL-DE-IT-SV-NO-DA-FI 15/12/10 09:08 Page20

3.4 - USAGE, TIPS AND DISMANTLING
• Make sure that the safety cover (a5) is locked correctly (clockwise) on the high-speed outlet (a4).
• Place a container to collect the preparation in front of the appliance.
• Run the appliance by turning the selector (a1) to speed "3" or "4".
• Push the meat, piece by piece, down the feed tube, using the pusher (f7). Never push the ingredients
down the feed tube with your fingers or any other utensil.
• To stop the appliance, turn the selector to "0" speed and wait for the appliance to come to a complete
stop.
• Unlock the mincer head in the reverse order of the assembly.
Tips :
- Prepare all of the foodstuffs to be minced (for meat, remove the bones, gristle and tendons and cut
it into pieces of approximately 2 x 2 cm).
- Make sure that frozen meat is thoroughly thawed.
- At the end of the operation, you can feed a few small pieces of bread into the feed tube to clear any
meat remaining in the machine.
4 - GRATING / SLICING (DEPENDING ON MODEL)
ACCESSORIES USED :
- Mincer / vegetable slicer attachment (e)
- Assembled vegetable slicer (g)
- Drums (depending on model)
4.1 - ASSEMBLING THE ACCESSORIES
• Press the button (a2) to release the multi-function head (a3) and raise it until it locks in place.
• Place the attachment (e) and lock it in the anti-clockwise direction such that the outlet is in alignment
with the appliance.
• Place the multi-function head (a3) in the horizontal position by pressing the button (a2) once again.
• Make sure that the safety cover (a5) is locked correctly (clockwise) on the high-speed outlet (a4).
• Facing the attachment (e) outlet, insert the drum body (g1) inclined to the right, aligning the two
bayonets in the drum body with the two notches in the attachment. Push the drum body home and
turn the drum body anti-clockwise until it latches with the feed tube in the vertical position.
• Insert the chosen drum into the body, and make sure that it is fully engaged in the body.
4.2 - USAGE AND TIPS
• Place a container to collect the preparation in front of the appliance.
• Run the appliance by turning the selector (a1) to speed "3" to slice and to speed "4" to grate.
• Place the food in the feed tube on the body and press down with the pusher (g2). Never push the
ingredients with your fingers or any other utensil.
• To stop the appliance, turn the selector to "0" speed and wait for the appliance to come to a complete
stop.
• Unlock the drum body in the reverse order of the assembly.
• Use the drums to :
- Grate coarsely C (g4) / grate finely D (g5): carrots, celery, potatoes, cheese, etc.
- Slice thickly A (g3): potatoes, carrots, cucumbers, apples, beetroot, etc.
- Reibekuchen E (g6): potatoes, parmesan, etc.
5 - EXTRACTING JUICE FROM FRUITS AND VEGETABLES (DEPENDING ON MODEL)
ACCESSORIES USED :
- Assembled juice extractor (h).
21
EN
MO_KITCHEN-MACHINE-MC-GOURMET_0828538_EO_FR-EN-NL-DE-IT-SV-NO-DA-FI 15/12/10 09:08 Page21

5.1 - ASSEMBLING THE JUICE EXTRACTOR
• Place the filter (h3) in the middle of the juice collector (h4).
• Lock the lid: turn it anti-clockwise and lock the lid (h2) on the juice collector (h4) (closed padlock
position).
• General locking: push the locking lever (h6) to closed padlock position.
5.2 - FITTING THE JUICE EXTRACTOR ON THE APPLIANCE
• Place the multi-function head (a3) in the horizontal position: press the button (a2) and manually
lower the multi-function head (a3) until it locks (the button (a2) returns to its initial position).
• Unlock and remove the cover (a5) from the outlet (a4) by turning it anti-clockwise.
• Make sure that the appliance is switched off before locking the juice extractor (h).
• Lock the assembled juice extractor on the outlet (a4) by turning it clockwise, so as to have the outlet
for the pouring spout aligned with the appliance.
• Fit the pouring spout (h5) on the collector (h4).
5.3 - USAGE AND TIPS
• Place a large glass under the pouring spout (h5).
• Run the appliance by turning the selector (a1) to speed "3".
• Cut the fruits and/or vegetables into pieces.
• Insert them down the feed tube in the lid (h2) push them slowly using the pusher (h1). Never push
the ingredients with your fingers or any other utensil.
• Do not process 500 g of food more than 5 times continuously, without allowing your appliance to cool
down completely.
• For best results, clean the filter after every 300 g of ingredients.
• Important: When the pulp collector is full, stop the appliance and empty the collector.
• To stop the appliance, turn the selector to "0" speed and wait for the appliance to come to a complete
stop.
• Wait until the rotary filter comes to a complete stop before removing the assembly from the
appliance.
• To remove the juice extractor, unlock it by turning it anti-clockwise.
• Place the locking lever (h6) in the open padlock position. Open the lid (open padlock position). You
can then remove the filter (h3) to clean it and empty the collector (h4).
Tips :
• You can make juice from: carrots, tomatoes, apples, grapes, raspberries, etc.
• Peel fruits with thick skins; remove stones and the core of pineapples.
• It is not possible to extract juice from certain fruits and vegetables: bananas, avocado pears,
blackberries, etc.
• You can prepare juices with different fruits and vegetables without having to clean the juice extractor
every time, the flavours will not be mixed. Just run the extractor with a little water to rinse it between
two different juices.
• Drink the juices immediately after preparation, and add lemon juice to keep them in the fridge for a
few hours.
6 - ADJUSTING THE CORD LENGTH
For more comfortable use or for storage, you can reduce the cord length by pushing it inside the motor
unit (a) via the opening on the rear (a7).
22
EN
MO_KITCHEN-MACHINE-MC-GOURMET_0828538_EO_FR-EN-NL-DE-IT-SV-NO-DA-FI 15/12/10 09:08 Page22

7 - FINELY CHOPPING SMALL QUANTITIES (DEPENDING MODEL)
ACCESSORY USED :
- Assembled grinder.
You can use the grinder to :
- Chop in a few seconds by pulsing: dried figs, dried apricots, etc.
Quantity / max time: 100g / 5s
This grinder is not designed for hard products like coffee beans or hard spices.
• Unplug the appliance.
• Do not immerse the motor unit (a) or the attachment (e) in water or under running water. Wipe them
with a dry or slightly damp cloth.
• For easier cleaning, rinse the accessories quickly after use. Dismantle the mincer head assembly fully.
Handle the blades with care to prevent injury.
• Wash, rinse and dry the accessories: they are dishwasher-safe, except for all the metal components in
the mincer head: body (f1), feed screw (f2), blade (f3), screens (f4 and f5), nut (f6).
• The screens (f4) and (f5) as well as the blade (f3) must remain greased. Coat them with cooking oil.
Tips :
• In the event any of your accessories are coloured by food (carrots, oranges, etc.), rub with a cloth
soaked in cooking oil and then clean them as usual.
• Blender jug (d): pour some hot water containing a few drops of washing up liquid into the blender.
Close the lid. Place it on the appliance and pulse a few times. After removing it, rinse the bowl in
running water and allow to dry (bowl upside down).
Do not store your appliance in a humid environment.
If your appliance does not work, check:
- that it is plugged in correctly.
- that the accessories are correctly locked.
- that the safety cover (a5) is present and locked when the high-speed outlet (a4) is not used.
- that the multi-function head (a3) is locked horizontally.
Your appliance comes with a microprocessor that controls and analyses the operating power. If the load
becomes too high, your appliance will stop automatically. To restart your appliance, turn the rotary
button (a1) to the "0" position and remove some of your ingredients. Allow your appliance to cool down
for a few minutes. You can then select the desired speed to complete your preparation.
Your appliance still does not work? Contact an authorised service centre (see the list in the service
booklet).
HELPLINE:
If you have any product problems or queries, please contact our Customer Relations Team first for expert
help and advice:
0845 602 1454 – UK
(01) 677 4003 – Ireland
CLEANING
STORAGE
WHAT TO DO IF YOUR APPLIANCE DOES NOT WORK
23
EN
MO_KITCHEN-MACHINE-MC-GOURMET_0828538_EO_FR-EN-NL-DE-IT-SV-NO-DA-FI 15/12/10 09:08 Page23

You can customise your appliance and obtain the following accessories from your usual retailer or an
authorised service centre:
Caution: you can purchase an accessory only when you present your instruction leaflet or your
appliance.
DISPOSAL OF PACKAGING AND THE APPLIANCE
The packaging is comprised exclusively of materials that present no danger for the
environment and which may therefore be disposed of in accordance with the recycling
measures in force in your area.
For disposing of the appliance itself, please contact the appropriate service of your local
authority.
END-OF-LIFE ELECTRICAL OR ELECTRONIC PRODUCTS
Think of the environment!
Your appliance contains valuable materials which can be recovered or recycled.
Leave it at a local civic waste collection point.
ACCESSORIES
Stainless steel bowl
Stainless steel bowl lid
Kneader
Mixer
Balloon whisk
Blender jug
Juice extractor
Grinder
Mincer / vegetable slicer attachment
Mincer head
Vegetable slicer:
- A: Slicer
- C: Coarse grating
- D: fine grating
- E: reibekuchen
24
EN
MO_KITCHEN-MACHINE-MC-GOURMET_0828538_EO_FR-EN-NL-DE-IT-SV-NO-DA-FI 15/12/10 09:08 Page24
Other manuals for Masterchef gourmet
1
Table of contents
Languages:
Other Moulinex Mixer manuals

Moulinex
Moulinex Masterchef Pro User manual

Moulinex
Moulinex HM 555 Easy Max Power User manual

Moulinex
Moulinex ddf-743 User manual

Moulinex
Moulinex SEVILLE HM500 User manual

Moulinex
Moulinex MASTERCHEF COMPACT QB207138 User manual

Moulinex
Moulinex hand-mixer User manual

Moulinex
Moulinex OH MY CAKE User manual

Moulinex
Moulinex EASY MAX COMPACT User manual

Moulinex
Moulinex Masterchef Pro User manual

Moulinex
Moulinex EASYMAX ABM11A30 User manual