manuals.online logo
Brands
  1. Home
  2. •
  3. Brands
  4. •
  5. Moveis Estrela
  6. •
  7. Indoor Furnishing
  8. •
  9. Moveis Estrela SATRIANI FLEX User manual

Moveis Estrela SATRIANI FLEX User manual

08 01
Passo / Step / Paso 5:
Q
Prepare os fundos Nº 12 e 13 colocando os perfis H ‘P’ entre eles.
Fixe os fundos utilizando pregos 8x8 ‘D’ .
Fixe as Sapatas Laterais ‘M’ nas laterais Nº 01 e 02, utilizando pregos 8x8 ‘D’ .
B
B
B
E
G
E
N
09
07
09
B
C
10
A
A
D
D
DA
D
D
N
11
D
Passo / Step / Paso 6:
Prepare as laterais de gaveta Nº 09 utilizando cavilha ‘E’
e cantoneira ’, fixe com parafusos 3,0 x 10’ ‘C’. ‘F
Posicione no contra fundo Nº 10 e una com os parafusos ‘B’
Una as laterais Nº 09 com a Frente de Gaveta utilizando
parafusos 3,0 x 10 CC Phillips ‘C’.
Fixe os puxadores ‘N’ na peça Nº 07 com parafusos
4,0 x 25 CC phillips ‘G’.
Vire a gaveta com o fundo para cima e fixe utilizando Pregos 8x8 ‘D’
e parafusos 3,0 x 20 CC Phillips, em seguida fixe as
corrediças do lado esquerdo e do lado direito nas peças ‘K’ ‘L’ Nº 09
utilizando parafusos , e parafusos 3,0 x 20 3,0 x 10 ’ CC Phillips ‘C
CC Phillips fixe a cantoneira triangular 14 x14 mm com parafuso ‘ ‘HA’. ’
4,0 x 16 cc phillips‘R’
Passo / Step / Paso 7:
Fixe a etiqueta Moveis Estrela
‘Q’ na Sanefa Nº 06.
Avenida Maracanã, 4800 - Parque Industrial
Arapongas - PR - Brasil
Fone: +55 (43) 3274-8800
www.moveisestrela.com.br
M+D
M+D
M+D
M+D
Perfil H 649 mm
P
D
12
13
D
D
D
D
D
D
D
D
D
D
D
D
D
D
D
D
D
D
D
D
D
D
D
D
D
D
D
N
K
L
A
A
A
A
H
R
CÔMODA SATRIANI FLEX
SATRIANI FLEXDRESSER
CÓMODA SATRIANI FLEX
CERTIFICADO
GARANTIA
90
dias
MANUAL DE INSTRUÇÕES
MANUAL DE INSTRUCCIONES
INSTRUCTION MANUAL
Branco Rosa Azul
Opção em Branco
Rodapé traseiro
Frente e verso
2 cores
"Image merely illustrative, subject to change without prior notice"
"Imágenes ilustratibas, pueden ser cambiadas sin aviso previo "
"Imagens meramente ilustrativas, sujeitas a alterações sem aviso prévio"
Prepare Nº 12 and 13 with ‘P’
Fix 12 and 13 with ‘D’ .
Fix‘M’ in Nº 01 and 02, with ‘D’
Prepare Nº 12 y 13 con ‘P’
Fix 12 y 13 con ‘D’ .
Fix‘M’ en Nº 01 y 02,
con ‘D’ .
D
Prego 8 X 8
34 und.
Perfil H 649 mm
P01 und.
Sapata Lateral
04 und.
M
Nail 8 x 8
Clavo 8 x 8
Side shoes
Zapata lateral
H Perfil 649 mm
Perfil H 649 mm
Fix 11 with and ‘A’, ‘D’
Fix and and ‘K’ ‘L’ in Nº 09 ’ A’. with ‘C ‘
Fix H with ‘R’ ’
Prepare Nº 09 with ‘E’ and fix with ’and ‘C’‘F
Fix 09 in Nº 10 with ‘B’
Fix Nº 09 in the 07 with ‘C’.
Fix ‘N’ in Nº 07 ’.with ‘G
Prepare Nº 09 con ‘E’ y fije con ’y ‘C’‘F
Fije 09 en Nº 10 con ‘B’
Fije Nº 09 en la pieza 07 con ‘C’.
encajar Nº 11 en el canal Nº 07.
Fije ‘N’ en Nº 07 ’.con ‘G
Fije 11 con y ‘A’, ‘D’
Fije y y ‘K’ ‘L’ en Nº 09 ’ A’. con ‘C ‘
Fije Hcon ‘R’ ’
Fix ‘Q’ in Nº 06.
Fije ‘Q’ en Nº 06.
R04 und.
Parafuso 4,0 x 16 CC Phillips
G04 und.
H
16 und.
B
36 und.
A
08 und.
N
Puxador Ursinho
04 und.
Parafuso 4,0 x 40 CC Phillips
Parafuso 3,0 x 20 CC Phillips
Parafuso 4,0 x 25 CCPhillips Cantoneira Triang.14x14 mm
Screw 4,0 X 40CC Phillips
Tornillo 4,0 X 40CC Phillips
Screw 3,0 X 20CC Phillips
Tornillo 3,0 X 20CC Phillips
Screw 4,0 X 25CC Phillips
Tornillo 4,0 X 25CC Phillips
Corner Brace 14 x 14 mm
Abrazadera Metalica 14 x 14 mm
Handle
Tirador
L
K
04 und.
04 und.
Corrediça 350 mm
Sliding rails 350 mm
Rieles 350 mm
Corrediça 350 mm
Sliding rails 350 mm
Rieles 350 mm Screw 4,0 x 16 CC Phillips
Tornillo 4,0 x 16 CC Phillips
E
Cavilha 6 x 30
16 und.
Dowel 6 x 30
Clavija 6 x 30
F08 und.
Cantoneira Bicromatizada
Bicromatizada Corner Brace
Abrazadera Bicromatizada
C
Parafuso 3,0 x 10 CC Phillips
32 und.
Screw 3,0 X 10CC Phillips
Tornillo 3,0 X 10CC Phillips
D
Prego 8 X 8
24 und.
Nail 8 x 8
Clavo 8 x 8
Etiqueta
01 und.
Q
Label
Etiqueta
Utilizar cola nas cavilhas
Use glue with the dowels
Utilizar el pegamento en las
clavijas
F+C
F+C
E
02 07
Passo / Step / Paso 3:
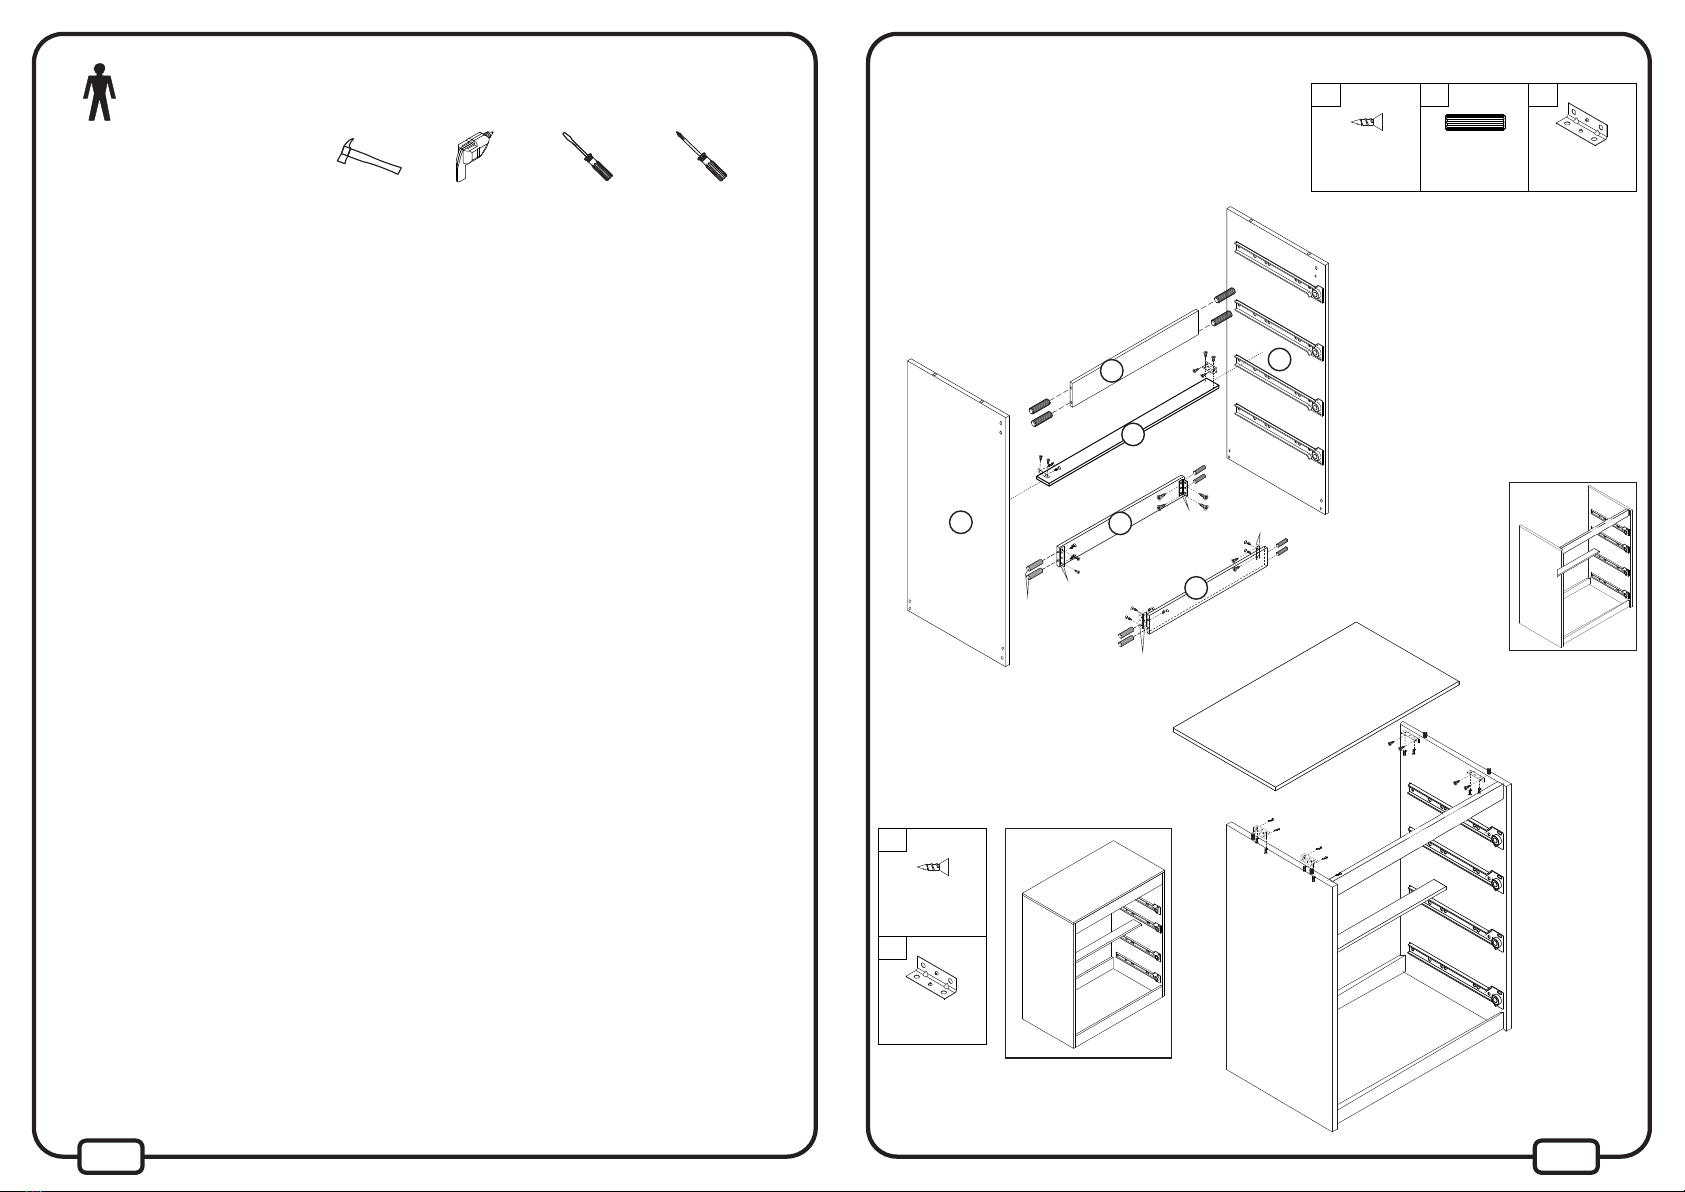
Passo / Step / Paso 4:
E
E
E
C
F
C
C
E
F
E
CC
C
CFE
F
F+C
F+C
01
05
04
06
08
F+C
F+C
F+C
F+C
Dependendo da cor escolhida, o montador deve
inverter o lado da peça n° 06 ou colocar a peça
n° 05 no lugar da sanefa (peça 06).
OBS: Não fixar acessório no lado pintado da peça
n° 05, pois o mesmo oferece opção de montagem
futura.
Prepare o Rodapé Frontal e Traseiro Nº04 e Nº05 utilizando cavilhas ‘E’.
Fixe o rodapé Nº04 e Nº05 na lateral Nº01 e Nº02 utilizando cantoneira
bicromatizada ‘F’ com parafusos 3,0 x 10 CC Phillips ‘C’.
Prepare a Sanefa Nº06 utilizando cavilhas ‘E’.
Fixe a peça Nº06 nas peças Nº01,02,
Fixe a trava Nº 08 na peça Nº01,02 utilizando cantoneira bicromatizada ‘F’
e parafusos 3,0 x 10 CC Phillips ‘C’.
Fixe o Tampo Nº03 na lateral Nº01 e Nº02 utilizando
cantoneira bicromatizada ‘F’ com parafusos ‘C’.
1. Esta embalagem contém peças pequenas, mantenha afastada de crianças até que o produto
esteja montado.
2. As instruções são genéricas, as figuras podem variar.
3. Leia atentamente todas as instruções antes de iniciar a montagem.
4. Separe e guarde a etiqueta de identificação.
5. Confira se os volumes e quantidades de peças descritos no manual estão corretos.
6. Identifique as peças e separe os acessórios.
7. A montagem do produto deverá ser feita em uma superfície limpa e plana. Aconselhamos utilizar a
própria embalagem para forrar o chão a fim de não danificar o produto.
8. Reservar área livre para montagem do produto.
9. Evitar batidas e o contato com objetos cortantes.
10. Não expor o móvel a calor excessivo (luz solar direta), ou umidade elevada.
11. Para limpeza use um pano macio seco ou ligeiramente umedecido com água.
Não use agentes de limpeza ou abrasivos.
Ferramentas Necessárias (Não Inclusas)
Tools needed (not inclued)
Herramientas necesarias (no incluido)
Chave Fenda
Slot Key
Clave de runura
Chave Phillips
Pessoas Necessárias
para montagem
Necessary people
for assembly
Gente necesaria
para la asamblea
1 Adulto
1 Adult
1 Adulto
Parafusadeira
Screwdriver
destornillador
Martelo
Phillips Key
Clave Phillips
hammer
martillo
INFORMAÇÕES SOBRE SEGURANÇA
1. This package contains small parts, keep away from children until the product is assembled.
2. The instructions are generic, the figures may vary.
3. Read all instructions carefully before starting assembly.
4. Separate and store the ID tag.
5. Check if the volumes and quantities of pieces described in the manual are correct.
6. Identify the pieces and separate accessories.
7. The assembly of the product shall be made on a clean and flat surface. We recommend using the
package itself to cover the floor in order not to damage the product.
8. Reserve a specific area to assembly the product.
9. Avoid shocks and contact with sharp objects.
10. Do not expose the furniture to excessive heat (direct sunlight), or high humidity.
11. For cleaning use a dry soft cloth or slightly moistened with water.
Do not use cleaning agents or abrasives
SAFETY INFORMATION
1. Este paquete contiene piezas pequeñas, mantenga alejado de los niños hasta que el producto
esté montado.
2. Las instrucciones son genéricas, los dibujos pueden variar.
3. Lea todas las instrucciones cuidadosamente antes de empezar el montaje.
4. Separar y almacenar la etiqueta de identificación.
5. Verifique si los volúmenes y cantidades de las piezas descritas en el manual estan correctas.
6. Identificar las piezas y separar los accesórios.
7. El montaje del producto se efectuará sobre una superficie limpia y plana. Se recomienda usar el
propio envase para cubrir el suelo con el fin de no dañar el producto.
8. Reserve una área específica para el montaje del producto.
9. Evitar los golpes y el contacto con objetos afilados.
10. No exponga el mueble a un calor excesivo (luz solar directa), o alta humedad.
11. Para la limpieza utilice un paño suave y seco o ligeramente humedecido con agua.
No utilice productos de limpieza o abrasivos
INFORMACIÓN DE SEGURIDAD
Prepare Nº04 and Nº05 with ‘E’.
Fix Nº04 and Nº05 in Nº01 and Nº02 with‘F’ and ‘C’.
Prepare Nº06 with ‘E’.
Fix Nº06 in Nº01 and 02,
Fix Nº 08 in Nº01 and 02 with ‘F’ and ‘C’.
Prepare Nº04 and Nº05 with ‘E’.
Fix Nº04 and Nº05 in Nº01 and Nº02 with‘F’ and ‘C’.
Prepare Nº06 with ‘E’.
Fix Nº06 in Nº01 and 02,
Fix Nº 08 in Nº01 and 02 with ‘F’ and ‘C’.
F06 und.
Cantoneira Bicromatizada
Bicromatizada Corner Brace
Abrazadera Bicromatizada
E
Cavilha 6 x 30
C12 und.
Parafuso 3,0 x 10 CC Phillips
24 und.
Screw 3,0 X 10CC Phillips
Tornillo 3,0 X 10CC Phillips
Dowel 6 x 30
Clavija 6 x 30
F04 und.
Cantoneira Bicromatizada
Bicromatizada Corner Brace
Abrazadera Bicromatizada
C
Parafuso 3,0 x 10 CC Phillips
16 und.
Screw 3,0 X 10CC Phillips
Tornillo 3,0 X 10CC Phillips
Depending on the chosen color , the assembler
must reverse side of the part n ° 06 or place the piece
No. 05 in place of the part 06.
NOTE: Don’t fix accessory in the painted side of the
piece No. 05 , because it offers future assemble option
NOTA: No fijar el accesorio en el lado pintado de la
pieza Nº 05 , ya que ofrece la opción de montar
futuro
Dependiendo del color elegido , el ensamblador
debe invertir lado de la pieza n ° 06,
o poner la pieza 05 en Lugar de la pieza 06
Fix Nº03 in Nº01 and Nº02 with ‘F’ and ‘C’.
Fije Nº03 en Nº01 y Nº02 con ‘F’ y ‘C’.
02
06 03
Passo / Step / Paso 1:
Passo / Step / Paso 2:
C
C
J
C
817 mm
680 mm
397 mm
30
KG
3
KG
3
KG
3
KG
3
KG
I
02
01
E
E
E
E
Fixe as corrediças ‘J’ na lateral direita Nº01 utilizando
parafusos 3,0 x 10 CC Phillips ‘C’.
Fixe as cavilhas ‘E’ no topo
da peça Nº01 .
Fixe as corrediças ‘I’ na lateral esquerda Nº02 utilizando
parafusos 3,0 x 10 CC Phillips ‘C’.
Fixe as cavilhas ‘E’ no topo da peça Nº02 .
C
C
C
J
C
C
C
C
J
C
C
C
C
J
C
C
C
C
C
C
I
importante
posição dos
parafusos na
corrediça
C
C
C
I
C
C
C
I
C
C
C
I
C
C
C
C
J
C
C
C
importante
posição dos
parafusos na
corrediça
PESO SUPORTADO / DIMENSÕES DO PRODUTO MONTADO
SUPPORTED WEIGHT / DIMENSIONS ASSEMBLED PRODUCT
PESO SOPORTADO/ DIMENSIONES PRODUCTO ARMADO
Fix ‘J’ in Nº01 with ‘C’.
Fix ‘E’ in Nº01 .
Fije ‘J’ en Nº01 con ‘C’.
Fije ‘E’ en Nº01 .
Fix ‘I’ in Nº02 with ‘C’.
Fix ‘E’ in Nº02 .
Fije ‘J’ en Nº01 con ‘C’.
Fije ‘E’ en Nº01 .
E
Cavilha 6 x 30
C02 und.
Parafuso 3,0 x 10 CC Phillips
16 und.
J04 und.
Screw 3,0 X 10CC Phillips
Tornillo 3,0 X 10CC Phillips
Dowel 6 x 30
Clavija 6 x 30
Corrediça 350 mm
Sliding rails 350 mm
Rieles 350 mm
E
Cavilha 6 x 30
C02 und.
Parafuso 3,0 x 10 CC Phillips
16 und.
I04 und.
Screw 3,0 X 10CC Phillips
Tornillo 3,0 X 10CC Phillips
Dowel 6 x 30
Clavija 6 x 30
Corrediça 350 mm
Sliding rails 350 mm
Rieles 350 mm
Utilizar cola na
montagem das cavilhas
Use glue with the
dowels
Utilizar el pegamento
en las clavijas
04 05
01
02
03
04
06
07
08
09
09
10
11
12
13
05
IDENTIFICAÇÃO DAS PEÇAS / IDENTIFICATION OF PARTS / IDENTIFICACIÓN DE LAS PIEZAS
01
01
01
Rodapé Frontal 01
01
Sanefa (Rosa/Azul) 01
Frente da Gaveta 04
Trava 01
Contra Fundo
08
Fundo da Gaveta
04
Rodapé Traseiro
Fundo Traseiro A
04
01
01
Fundo Traseiro B
Lateral da Gaveta
Lateral Direita
Lateral Esquerda
Tampo
Right Side
Left Side
Lado Derecho
Lado Izquierdo
01
02
03
04
05
06
07
CÓDIGO
QTD
CÓD.
IDENTIFICATION
OF
PARTS
IDENTIFICACIÓN
DE LAS PIEZAS
IDENTIFICAÇÃO
DAS
PEÇAS
PROD COR
17951006
08
09
10
11
12
13
Surface
Drawer Front
Top Panel (Pink/Blue)
Front Footer
Drawer side
Drawer back
Lock bar
Back bottom A
Back Footer
Drawer bottom
Tapa
Frente del cajón
Panel superior
Rodapie frontal
Lado del cajón
Trasera de cajón
Bloqueo
Fondo trasero A
Rodapie trasero
Fondo del cajón
Back bottom B Fondo trasero B
17951006
17951006
17951006
17951006
17951006
17951006
17951006
17951006
17951006
17951006
17951006
17951006
TECHNICAL ASSISTANCE
When request the technical assistance,
please inform the number of the piece
name and color of the product and also the
batch manufacturing date, that is stamped
on the piece nº 07.
ASISTENCIA TÉCNICA
Al solicitar la asistencia técnica, informe el
número de la pieza, el nombre y el color del
producto y también la fecha de fabricación
del lote, que se estampa en la pieza nº 07
ASSISTÊNCIA TÉCNICA
Ao solicitar assistência técnica, informe o
número da peça, nome e cor do produto e a
data de fabricação do lote que se encontra
carimbado na peça n° 07.
Obs: Produto contém opção de cores
verificar antes de efetuar a montagem,
a cor desejada.
Note: The product contains different color
options, check the desired color before
starting assembly.
Nota: El producto contiene diferentes
opciones de colores, verifique el color
deseado antes de empezar el montaje.
FERRAGENS / IRONMONGERY / HERRAJES
R04 und.
Parafuso 4,0 x 16 CC Phillips
DEG
04 und.
Etiqueta
H
02 und.
O
16 und.
Cavilha 6 x 30
B
36 und. C32 und.
A08 und.
01 und.
Q
Parafuso 3,0 x 10 CC Phillips Prego 8 X 8
58 und.
Cola
Perfil H 649 mm
P
104 und.
N
Puxador Ursinho
01 und.
04 und.
F18 und.
Parafuso 4,0 x 40 CC Phillips
Parafuso 3,0 x 20 CC Phillips Cantoneira Bicromatizada
Sapata Lateral
04 und.
M
J
I04 und.04 und.
Parafuso 4,0 x 25 CCPhillips
Cantoneira Triang.14x14 mm
Screw 3,0 X 10CC Phillips
Tornillo 3,0 X 10CC Phillips
Screw 4,0 X 40CC Phillips
Tornillo 4,0 X 40CC Phillips
Screw 3,0 X 20CC Phillips
Tornillo 3,0 X 20CC Phillips
Screw 4,0 X 25CC Phillips
Tornillo 4,0 X 25CC Phillips
Nail 8 x 8
Clavo 8 x 8
Dowel 6 x 30
Clavija 6 x 30
Side shoes
Zapata lateral
H Perfil 649 mm
Perfil H 649 mm
Bicromatizada Corner Brace
Abrazadera Bicromatizada
Corner Brace 14 x 14 mm
Abrazadera Metalica 14 x 14 mm
Glue
Pegamento Label
Etiqueta
Corrediça 350 mm
Sliding rails 350 mm
Rieles 350 mm
Corrediça 350 mm
Sliding rails 350 mm
Rieles 350 mm
Handle
Tirador
LK 04 und.04 und.
Corrediça 350 mm
Sliding rails 350 mm
Rieles 350 mm
Corrediça 350 mm
Sliding rails 350 mm
Rieles 350 mm
Screw 4,0 x 16 CC Phillips
Tornillo 4,0 x 16 CC Phillips
0 10 20 30 40 50 60 70 80 90 100 110 120mm
B
Parafuso 4,0 x 40 CC Phillips
16 und.
Screw 4,0 x 40 CC Phillips
Tornillo 4,0 x 40 CC Phillips
C104 und.
Parafuso 3,0 x 10 CC Phillips
Screw 3,0 x 10 CC Phillips
Tornillo 3,0 x 10 CC Phillips
D
Prego 8 x 8
58 und.
Nail 8 x 8
Clavo 8 x 8
36 und.
A
Parafuso 3,0 x 20 CC Phillips
Screw 3,0 x 20 CC Phillips
Tornillo 3,0 x 20 CC Phillips
Parafuso 4,0 x 25 CCPhillips
G08 und.
Screw 4,0 x 25 CCPhillips
Tornillo 4,0 x 25 CCPhillips
Parafuso 4,0 x 16 CC Phillips
04 und.
R
Screw 4,0 x 16 CC Phillips
Tornillo 4,0 x 16 CC Phillips
FERRAGENS ESCALA REAL / REAL SCALE IRONMONGERY / HERRAJES EN TAMAÑO COMPLETO

Other Moveis Estrela Indoor Furnishing manuals

Moveis Estrela 27772 User manual

Moveis Estrela

Moveis Estrela 27772 User manual

Moveis Estrela MP 1430 User manual

Moveis Estrela

Moveis Estrela MP 1430 User manual

Moveis Estrela LOVELY User manual

Moveis Estrela

Moveis Estrela LOVELY User manual

Moveis Estrela RETRO MILKA 27765 User manual

Moveis Estrela

Moveis Estrela RETRO MILKA 27765 User manual

Moveis Estrela COMODA CHERRY User manual

Moveis Estrela

Moveis Estrela COMODA CHERRY User manual

Moveis Estrela 27867 User manual

Moveis Estrela

Moveis Estrela 27867 User manual

Moveis Estrela 28126 User manual

Moveis Estrela

Moveis Estrela 28126 User manual

Moveis Estrela 20A User manual

Moveis Estrela

Moveis Estrela 20A User manual

Moveis Estrela 22664 User manual

Moveis Estrela

Moveis Estrela 22664 User manual

Popular Indoor Furnishing manuals by other brands

Next BROOKLYN 192155 Assembly instructions

Next

Next BROOKLYN 192155 Assembly instructions

Sauder Camarin Series quick start guide

Sauder

Sauder Camarin Series quick start guide

Sunnydaze Decor Rosalee RTA-058 manual

Sunnydaze Decor

Sunnydaze Decor Rosalee RTA-058 manual

Monarch Specialties I 2417 Assembly instructions

Monarch Specialties

Monarch Specialties I 2417 Assembly instructions

Global ZIRA Z4272 84FB22 Series Disassembly instructions

Global

Global ZIRA Z4272 84FB22 Series Disassembly instructions

Denver Mattress Hibernation Series Assembly and operation manual

Denver Mattress

Denver Mattress Hibernation Series Assembly and operation manual

Hallowell HOME TEAM LOCKER Assembly instructions

Hallowell

Hallowell HOME TEAM LOCKER Assembly instructions

Office Star Products ProLine II CT7236RT3 operating instructions

Office Star Products

Office Star Products ProLine II CT7236RT3 operating instructions

Dwell Notch 142878 manual

Dwell

Dwell Notch 142878 manual

Otto WF302606 Instructions for use

Otto

Otto WF302606 Instructions for use

meubar LOFT DR6 Assembly instruction

meubar

meubar LOFT DR6 Assembly instruction

Furniture of America Ribeira CM7252CK Assembly instructions

Furniture of America

Furniture of America Ribeira CM7252CK Assembly instructions

meubar YORK SL1 Assembly instruction

meubar

meubar YORK SL1 Assembly instruction

Monarch Specialties I 1287 Assembly instructions

Monarch Specialties

Monarch Specialties I 1287 Assembly instructions

Ironwood GLACIER LPC Assembly instructions

Ironwood

Ironwood GLACIER LPC Assembly instructions

Furniture of America Meadow CM4327C-VN Assembly instructions

Furniture of America

Furniture of America Meadow CM4327C-VN Assembly instructions

WASAGUN DD002 Assembly instructions

WASAGUN

WASAGUN DD002 Assembly instructions

Datum Storage Ez2 Drawer Assembly instructions

Datum Storage

Datum Storage Ez2 Drawer Assembly instructions

manuals.online logo
manuals.online logoBrands
  • About & Mission
  • Contact us
  • Privacy Policy
  • Terms and Conditions

Copyright 2025 Manuals.Online. All Rights Reserved.