MP Biomedicals FastPrep-24 User manual

www.mpbio.com
MP Biomedicals • 29525 Fountain Parkway • Solon, OH 44139 • tel: 1.800.854.0530 • fax: 1.800.334.6999
One Call
One Source
A World of
Biotechnology
Reagents
Instruction ManualInstruction Manual
Precautionary Instructions
The precautionary instructions found in this section and throughout
this manual are indicated by specific symbols. Understand these
symbols and their definitions before operating this equipment. The
definition of these symbols are as follows;
NOTE :- Throughout this manual "NOTE" may be found. These Notes
are helpful information to aid in the particular area of function being
described.
Text with a "CAUTION" indicator will explain
possible Safety infractions that could have the
potential to cause minor to moderate injury or
damage to equipment.
Text with a "WARNING" indicator will explain
possible Safety infractions that will potentially
cause serious injury and equipment damage.
• Read, understand and practice the precautionary an
operating instructions. Know the limitations and hazards associated
with using this unit. Observe the precautionary and operational
decals placed on the unit.
• DO NOT operate this unit in an environment where other devices
are being used that intentionally radiate electromagnetic energy in
an unshielded manner.
• DO NOT use sharp objects such as a pencil point or ballpoint pen to
operate the buttons on the control panel as damage may result.
• This unit should be operated in temperatures between 15º C to 35º
C, transported and stored in temperatures between 5º C to 43º C,
with Relative Humidity ranging from 30%-60%.
• DO NOT disassemble, modify, or remodel the unit or accessories.
and instead
• This device should be kept out of the reach of children.
WARNING
=CAUTION
=WARNING
CAUTION
®
The FastPrep -24 is CE in compliance with the European
Low Voltage and EMC Directives
www.mpbio.com
LISTED
(LABORATORY EQUIPMENT)
3RRV
UL

Model #6004-500
www.mpbio.com

Table of Contents
Section I Introduction ..........................................................................................5
Section II Installation ...........................................................................................6
2.1 Unpacking............................................................................................... 6
2.2 Inspection............................................................................................... 6
2.3 Set-up..................................................................................................... 7
2.4 Connecting the Power............................................................................. 7
Section III Operation............................................................................................8
3.0 Controls & Functions .............................................................................. 8
3.1 Loading & Securing the Samples.............................................................. 9
®
3.2 Preparing the FastPrep -24 for Operation.............................................. 12
®
3.3 Programming the FastPrep -24.............................................................. 12
3.4 Save Programs...................................................................................... 13
Section IV Specifications....................................................................................15
Section V Warranty and Liability..........................................................................16
Section VI Appendices......................................................................................18
2.1 APPENDIX 1 Maintenance & Cleaning......................................................... 18
®
2.2 APPENDIX 2 An Explanation of FastPrep -24 Instrument Speed Settings......21
®
2.3 APPENDIX 3 FastPrep -24 Product Line.......................................................22
®
2.4 APPENDIX 4 Accessories and Spare Parts for FastPrep -24......................... 30
www.mpbio.com
5
I. INTRODUCTION
®
Different parts of FastPrep -24 are shown below: (Fig 1 & 2)
The FastPrep -24 Instrument is a high-speed benchtop homogenizer offering the
ultimate in speed and performance for the lysis of biological samples. Indeed,
simultaneous homogenization of 24 samples in 2ml tubes,12 samples in 15ml
tubes ,48 samples in 2ml tubes or 2 samples in 50ml tubes takes place within
40 seconds.
The FastPrep -24 Instrument uses a unique, optimized motion to disrupt cells
through the multidirectional, simultaneous beating of specialized Lysing Matrix
beads on the sample material.
Developed for difficult and resistant samples, the FastPrep -24 Instrument lyses
thoroughly and quickly any tissues and cells and thus allows easy and reproducible
isolation of stable RNA, active proteins and full-length genomic DNA. Samples and
buffers are added to a Lysing Matrix tube containing specialized Lysing Matrix
beads. The ergonomic design of the instrument ensures an easy loading of the
sample tubes that remains securely sealed during the processing. The
homogenization speed and duration times are digitally controlled. After setting
your speed and time with the touch of a button, just push "run", and in less than a
minute your samples are completely lysed.
Dome
Sample Tubes Holder
Sample Tubes
Right Side Wings
Bowl
Securing Knob (ratchet)
Spoke Plate
Micro Switch
(under Dome)
Dome Clip
(Dome Fastener)
Enclosure
Front Panel
Emergency Switch
Fig. 1 (Front view)
www.mpbio.com
®
®
®

II INSTALLATION
2.1 Unpacking
Carefully remove the FastPrep -24 Instrument and accessories from the shipping
carton.
The list of items included with quantity are given below.
1. AC Power Cord - 1
2. Springs - 8
3. Fuse 10 Amp - 2
4. Screw Driver - 1
5. Instruction Manual - 1
Compare the packing list to the box contents. If there is a discrepancy. call MP
Biomedicals.
CAUTION: Do not lift the device by cover.
2.2 Inspection
Inspect the unit for any damage that may have occurred during shipment.
Should there be any damage, report it to the carrier and contact MP Biomedicals
immediately. Save the packaging material in the event a return is necessary.
2.3 Set-up
To assure safe operation and best result, read this manual before operating the
®
®
FastPrep -24 Instrument. The FastPrep -24 Instrument comes fully assembled,
requiring very little set-up. Install the system on a clean, dry-stable surface
within 4 feet (1.2m) of a compatible electrical outlet.
Ventilation
®
Allow 1-2 inches (3-5 cm) of space around he FastPrep -24 Instrument for proper
ventilation. This unit is "FOR INDOOR USE ONLY". Avoid operating in areas of
excessive humidity or extremes of temperature.
6www.mpbio.com
®
2.4 Connecting the Power
®
The FastPrep 24 can work on 110 VAC/60 Hz or 220 VAC/50 Hz. Make sure the
rocker switch located on the rear panel is OFF when connecting the power.
Connect the power cord to the Instrument (power fixture is at the back side) and
plug it in to a compatible outlet.
This symbolizes Alternating Current
III OPERATION
3.0 CONTROLS & FUNCTIONS
Functions of control panel keys
are given below (Ref. Fig. 2)
1. SET Key - Press this key to select
Speed & Time as displayed on
LCD
Speed: Selectable from 4.0 m/s
to 6.5 m/s. In steps of 0.5 m/s
(Default 4.0 m/s).
Tube holder: Selectable
Time: Selectable from I sec. to
60 sec. in steps of I second.
(Default 20 seconds)
2. RUN Key - To Start or Stop the
Instrument.
3. Key - To Increase the selected
value of speed, tube holder &
time.
4. Key - To Decrease the
selected value of speed ,tube
holder & time.
Fig. 2 (Control Panel)
and to choose program
(model 6004)
list of
tube holders
7
www.mpbio.com
FastPrep®24
RUN
SPEED
TIME
SET
12
3
4
LCD
-
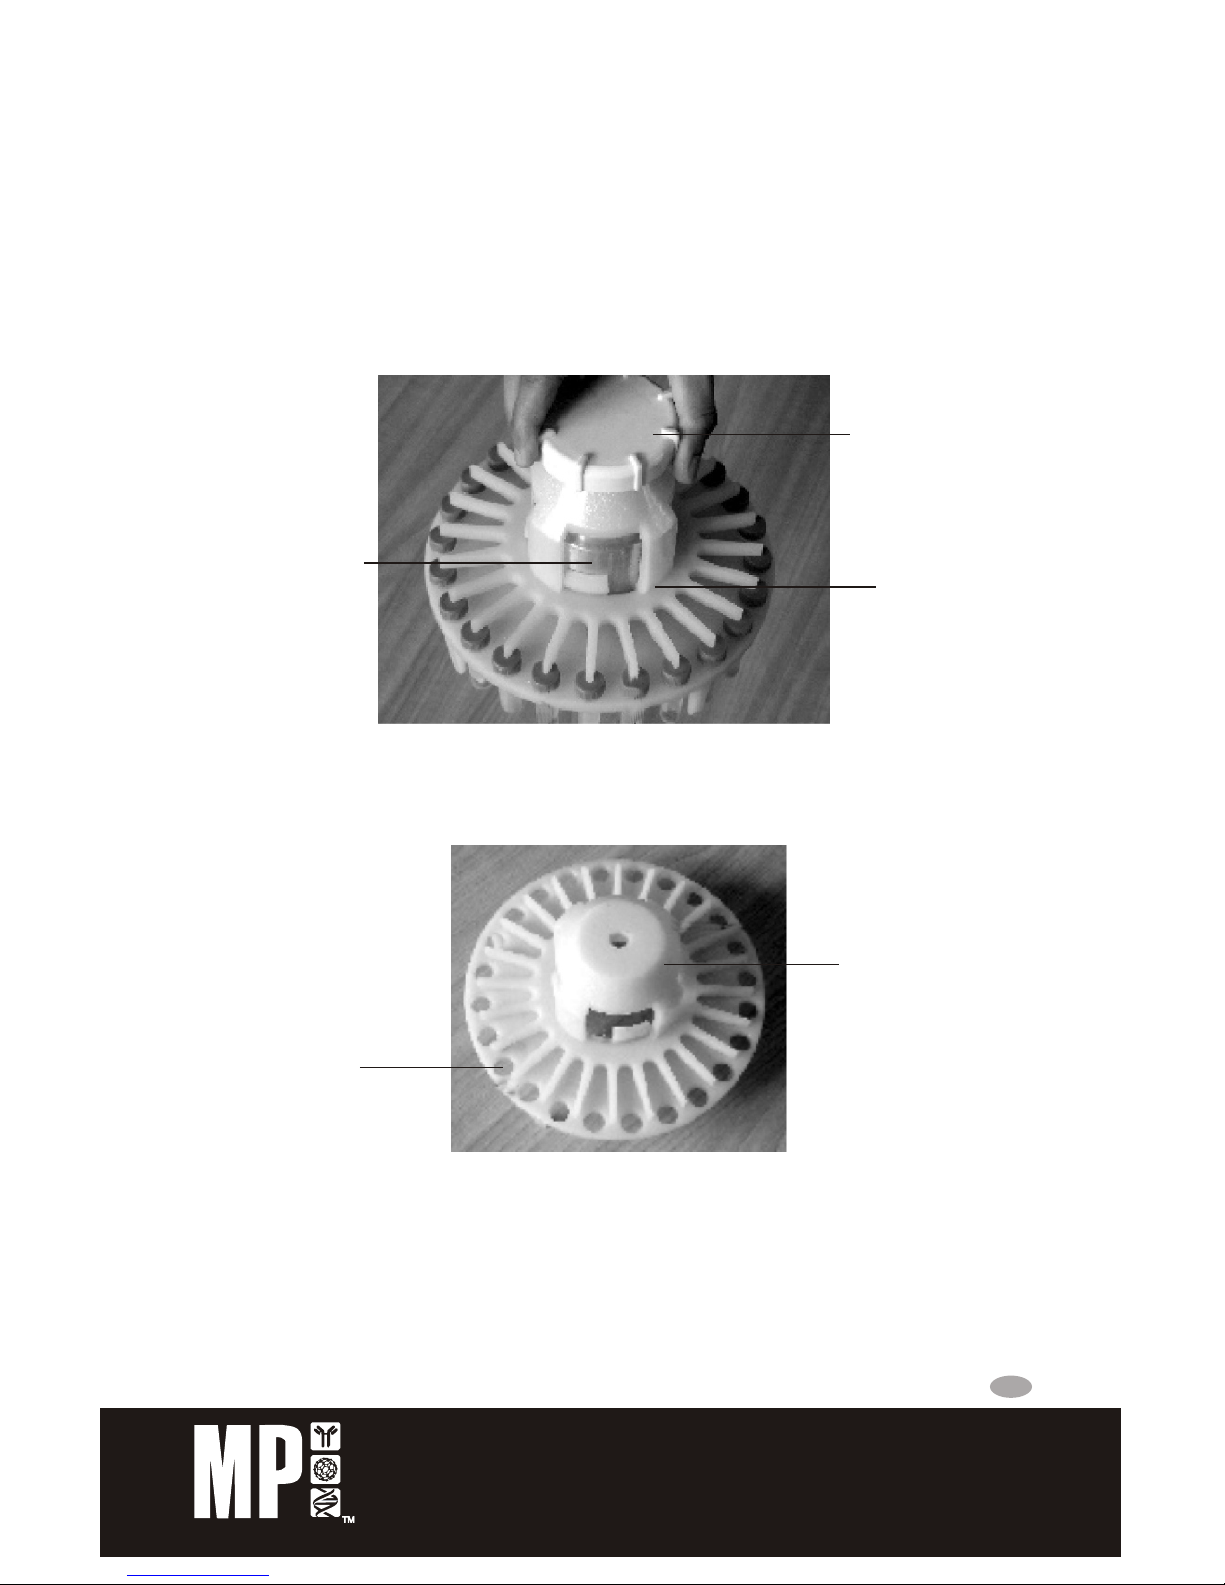
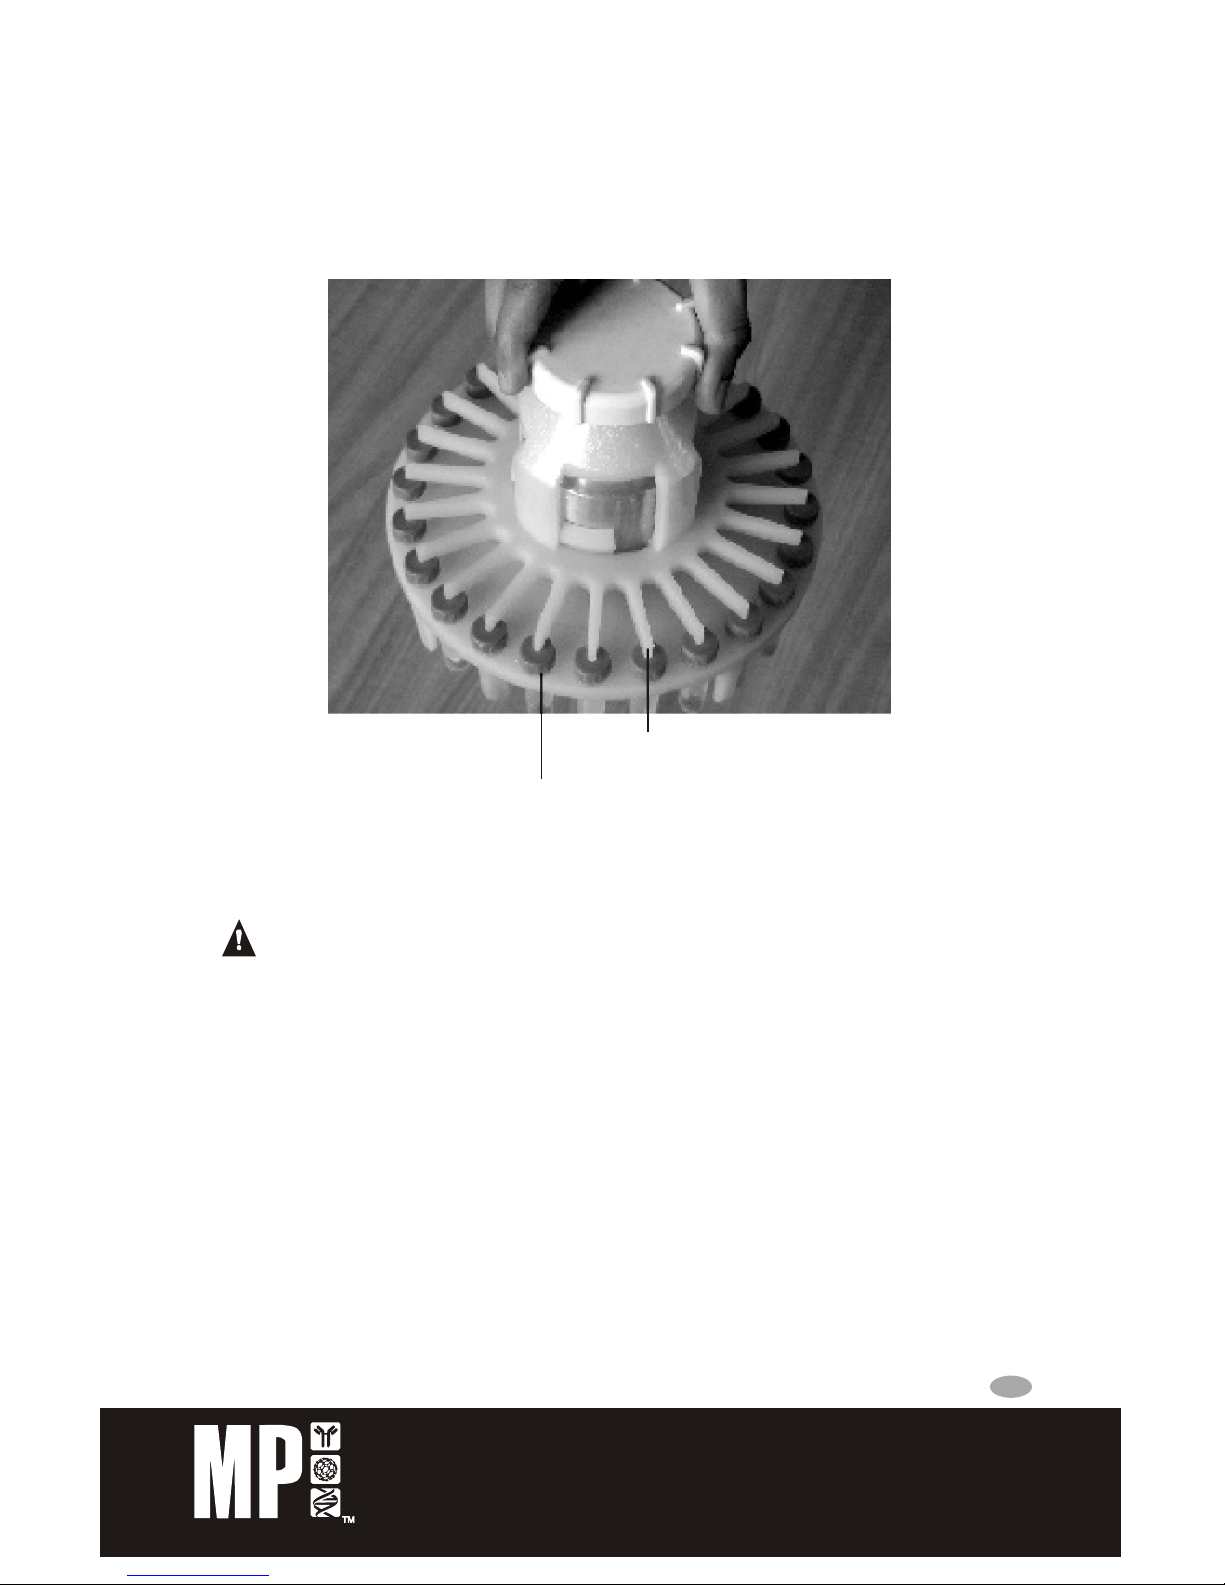
3.1 LOADING & SECURING THE SAMPLES
1. Loosen the securing knob (Ratchet Nut) by rotating counter-clockwise until it
come out (Ref. Fig. 3)
2. Remove the securing knob (ratchet Nut).
Fig. 3
3. Take out the assembly of spoke plate and test tube holder (
Fig. 4
Ref Fig. 6)
9
www.mpbio.com
Securing Knob
(Ratchet Nut)
Spoke Plate
Three Step
Spoke Plate
Tube Holder

4. Sightly uplift the spoke plate and rotate clockwise so that retention spokes
move away from holes to leave them open for loading (Ref. Fig. 5).
Fig. 5
5. Load sample tubes into the cavities of the sample holder, so that they fit
snugly in the holes. It is preferred to position the tubes symmetrically.
6. When all the sample tubes are loaded, place this assembly into the
®
FastPrep -24 Instrument. Align the locking pin of Aluminium three steps with
the holes under the Tube Holder, ensuring its proper placement (Ref. Fig. 6).
Fig. 6
10
Retention Spoke Plate
Sample Holder
www.mpbio.com
Locking Pin
Hole Under the Tube
(for matching)
Aluminium
Three Step
7. Now uplift and rotate the spoke plate counter-clockwise so that the retention
spokes take the position above each sample tube cap. Place the securing
knob (ratchet nut) on this assembly to tighten it completely (Ref. Fig. 7).
Fig. 7
8. Close the dome properly and secure the dome clip.
WARNING: Sample tubes must be secured properly before running the
®
FastPrep -24 Instrument.
11
Sample Tube
Retention Spoke Plate
www.mpbio.com

12
®
www.mpbio.com
3.2 PREPARING THE FastPrep 24 FOR OPERATION
1. Turn the main Rocker Switch ON (
®
2. Factory-set default values automatically program FastPrep -24 to operate at
speed 4.0 m/sec, Tube holder MP:24*2 and run time 20 seconds (to override
these values. See programming)
This symbolizes On and Off supply
3.3 PROGRAMMING THE FastPrep 24
Make sure Emergency Switch is pulled out).
User can take default setting or his own. Five different combination of setting can
be saved as described in next section.
can be changed at this moment. Press por
qkey to change the default Speed to User Selectable Speed. Once speed is selected,
press SET again, flashing of 4.0M/S will stop to indicate that speed has been
selected.
Switch ON Power Supply using Rocker Switch Provided at the Back, Make sure
Emergency Switch is pulled out.
On Power ON the LCD will Show WELCOME followed by MP Bio
Press SET key to start programming
Once SET key is pressed, LCD will show 4.0 M/S which means it's the default
Speed, If Option 1 is needed than press SET key again, the 4.0 M/S message on
LCD will start flashing to indicate that it
-
®
-

In case Default sample tube holder is to be changed, then press SET key, LCD will
show 4.0 M/S , now use pkey to reach upto the message MP:24*2. Press SET key
when this is displayed, LCD will start Flashing, to indicate the sample tube holder can
be changed using por qkey, Once tube holder is selected, press SET key again
,Flashing of LCD will stop to indicate that tube holder has been selected.
NOTE: During tube holder selection LCD will be displayed as
MP:24*2 - QuickPrep Adapter,( Supplied with instrument)
BG:2*50 - BigPrep Adapter, (2 tubes of 50 ml)
TN:12*15 -TeenPrep Adapter, (12 tubes of 15 ml)
CY:24*2 -CryoPrep Adapter, (24tubes of 2 ml)
HG:48*2 - HighPrep Adapter, (48 tubes of 2ml)
CUSTOM - Custom holder
In case Default Time is to be changed, then Press SET key, LCD will show 4.0 M/S
now use pkey to reach upto the message TIME 20 , press SET key when this is
displayed, LCD will start Flashing, to indicate the Run time can be changed using p
or q keys. Once Run time is selected, press SET key again, Flashing of LCD will stop
to indicate that Run time has been selected.
Once speed, tube holder and time have been selected or saved, Press RUN key,
LCD will show SURE ? , press RUN key to start the session.
If you are ready to start, then press the RUN Key again. The motor will start and
display will show count down run time.
If you are not sure then press SET key for selection and changing of desired
speed, tube holder and time.
When the time is over, LCD will display REST 5 Mn
indicating that the motor is at rest for 5 minutes, display will count down to 4, 3, 2, 1
minute. LCD will display READY , AND the program will go back to main menu with
last selection.
Please note, when Speed, tube holder or Run Time Value is flashing [in Selectable
Mode], than during this user can still start the unit directly by pressing RUN key
twice, but these values of Speed or Time will be temporary and they will not be saved
unless SET key is pressed and LCD stops flashing.
13
www.mpbio.com
TM
TM
TM
TM
TM

14 www.mpbio.com
Press RUN Key to stop the instrument at any time during a run LCD will show Stop
the program will go back to main menu with last selection .
Turn OFF the instrument by pressing rocker switch.
3.4 PROGRAMED
MP:24*2 - QuickPrep Adapter,( Supplied with instrument)
Bigprep Adapter,2 tubes of 50 ml
Teenprep Adapter,12 tubes of 15 ml
Cryoprep Ad pter,24tubes of 2 ml
Highprep Ad pter,48 tubes of 2ml
Custom holder
BG:2*50 - BigPrep Adapter, (2 tubes of 50 ml)
TN:12*15 -TeenPrep Adapter, (12 tubes of 15 ml)
CY:24*2 -CryoPrep Adapter, (24tubes of 2 ml)
HG:48*2 - HighPrep Adapter, (48 tubes of 2ml)
CUSTOM - Custom holder
In case Save Mode 1 to 5 is required, then Press SET key, LCD will show 4.0 M/S now
use p key to reach up to the message “Program1 ”, press SET key, display will show
P1 S 4.0 , and value "4.0" will be flashing, which indicates that the speed set in
Program 1 is 4.0 M/S , use por q key to change Speed Value. Once Speed has
been Set press SET key to save in program 1, and now LCD will show P1TH MP.
Letter MP will be Flashing, use por qkey to Set the desired tube holder.
Once tube holder has been set press SET Key to save in Program 1, and now LCD
will show P1 T 20 value “20” will be flashing, use por qkeys to set the desired Run
Time. Press SET key to save the Run Time in Program 1 , when SET key is pressed
LCD will show .Program1 . Similarly follow same instructions to save in Program 2
to 5.
SAVE COMBINATIONS
During Program 1 to 5, Tube holder selection will be displayed as
PX TH MP -
PX TH BG -
PX TH TN -
PX TH CY - a
PX TH HG - a
PX TH CS -
PX= Program 1 to 5
TM
TM
TM
TM
TM
TM
TM
TM
TM

EMERGENCY NOTE: In case any difficulties Push the Emergency Switch to stop
the instrument at any time (on the front panel of the instrument) Ref. Fig. 1
In this, the instrument will be completely isolated from AC mains. Pull the
emergency switch again to make the instrument ready to Restart.
CAUTION:
1. Improper closing of dome will be indicated by display Cancel
2. Please do not run the instrument without the tube holder, as this may cause
damage to the motor shaft.
3. To prevent sample overheating, instrument must rest for 5-10 minutes
between runs.
4. The Instrument should be properly grounded for safe use.
Earth terminal
Temperature Indication:
In case LCD displays "SYS WARM" it is an indication that Critical Parts of the
system are getting Hot. User should provide a PAUSE before next RUN.
In case LCD displays "SYS HOT!" it is an indication that temperature of
critical parts is High. Unit will stop automatically and user will not be able to
make any RUN untill temperare falls down to a safer value.
Overload Indication:
In case there is a wrong selection of Holder or there is a Over Load condition,
LCD will display "OverLoad" . Its an indication that User must make proper
selection of Tube Holder or reduce the number of tubes in Tube Holder.
www.mpbio.com 15

IV SPECIFICATIONS
Controls: Programmable run time, tube holder and speed; LCD
readout
Time: Range: 1-60 Sec
Programmable in 1 sec increments
Speed : Range: 4.0-6.5m/sec
Programmable in 0.5 m/sec increments
Acceleration: <2 seconds to maximum speed
Deceleration: <2 seconds to stop
Weight: 17.9 Kg
Power
Requirement: 110VAC/60Hz or 220 VAC/50 Hz, 400 W
Operating
Temperature: 15ºC to 35ºC
Storage
Temperature: 5ºC to 43ºC
Dimensions
(LXWXH): 33.2 cm X 43.7 cm X 46.5 cm
16 www.mpbio.com

V WARRANTY & LIABILITY
WARRANTY
This product warranty extends to the original consumer/ purchaser of the
product.
WARRANTY DURATION
This product is warranted to the original consumer for a period of one (1) year
from the original purchase date.
WARRANTY COVERAGE
This product is warranted against defective materials. This warranty ceases if
the product has been damaged by accident, in shipment, unreasonable use,
misuse, neglect, improper service, commercial use, repair by unauthorized
personnel or cause not arising out of defect in materials or workmanship. This
warranty does not extend to any units which are used in violation furnished by
manufacturer, or to units which have been altered or modified,
or to damage to
products or parts there of which have had the serial number removed, altered
or defaced or rendered illegible. The warranty doesn't cover normal wear &
tear or replacement of electrical cord, springs, rubber cups, dome, tube
holders, tube-covers, motor and its attachments & other accessories.
WARRANTY DISCLAIMERS
The warranty is in lieu of all warranties expressed or implied and no
representative or person is authorized to assume for manufacturer / any other
liable in connection with the sale of our products. There shall be no claims for
defects or failure of performance or product failure / any theory of tort,
contract or commercial law including, but not limited in negligence, gross
negligence, strict liability, breach of warranty and breach of contract. Some
states do not allow the exclusion or limitation of implied warranties or
consequential damages, so the above laminations may not apply to you.
Manufacturer or its representatives are not responsible or liable for Indirect
special or consequential damages arising out of or in connection with the use
performance of the product or other damage with respect to loss of property
or loss of revenues or profit.
Extended warranty duration on request.
or machine
installed in a contaminated area with no removing possibility,
17
www.mpbio.com

LEGAL REMEDIES
This warranty gives you specific legal rights, and you may also have other
rights that vary from state to state.
WARRANTY PERFORMANCE
During the above one-year warranty period, a product with a defect will be
repaired or replaced with a reconditioned comparable unit at distributors
option when the product is returned to the distributor. The repaired or
replacement product will be in warranty for the balance of the ony-year
warranty period and an additional one-month period. No charge will be made
for such repair or replacement.
CONSUMER SERVICE
For in warranty service for a product covered under the warranty period, no
charge is made for service and return postage. Please return the product
insured, packed with sufficient protection, postage insurance, prepaid to the
address. Any duty / brokerage fee, if any, must be paid by the consumer.
OUT OF WARRANTY SERVICE
There will be charges rendered for repairs made to the product after the
expiration of the aforesaid one (1) year warranty period, after purchaser is
advised appropriately.
The distributor cannot assume responsibility for loss or damage during
shipment. For your protection, carefully pack the product for shipment and
insure it with the carrier. Ensure that you return the unit and accessories
related to your problem and also that you indicate full return address. Also
send a copy of sales receipt or other proof of purchase to determine warranty
status. C.O.D. shipments cannot be accepted.
18 www.mpbio.com

VI APPENDICES
APPENDIX I
MAINTENANCE & CLEANING
®
Maintenance: The FastPrep -24 Instrument requires no scheduled maintenance.
Clean surfaces immediately after contact with sample solutions or reagents.
Fig. 8 (Spring Replacement)
Spring Replacement Instructions: For the long running life of the instrument 8
extra springs are provided. If a spring breaks follow the steps below: (Ref. Fig. 8).
1. Open the dome & Securing knob (ratchet) from the shaft.
2. Remove the sample holder (all plastic pieces).
3. Put the screw driver through the hole provided on the face of aluminium
collared bush holding & unscrew the bottom spring holder & top end of
spring's screw.
4. Remove damaged spring & replace it with the new spring. It is recommended
that both springs to be replaced at the same time.
5. Now reassemble the instrument in reverse order.
19
www.mpbio.com

Fuse Replacement:
Fig. 9 (Fuse Replacement)
CAUTION: Disconnect input power before replacing fuse. For continued fire
protection replace only with specified type & rated fuse. Fuse rating is 10 Amp.
2 extra fuses are provided with accessories. If a fuse blows, follow the steps
below for replacement (Ref. Fig. 9)
1. Ensure that input power is disconnected during replacement of fuse.
2. Take out fuse receptacle from the AC receptacle provided at the back side of
main instrument. A spare fuse is provided in fuse holder. Remove the faulty
fuse and replace with new one.
3. Now insert the fuse receptacle into the AC receptacle carefully.
4. Connect the power cord to the instrument & plug it into a compatible outlet
and turn ON the rocker switch.
20
AC Receptacle
Rocker Switch
Fuse Receptacle
www.mpbio.com

Fig. 10 (Cleaning)
®
Cleaning: The FastPrep -24 Instrument should be cleaned if reagents or sample
solutions spill on or inside the unit. If a sample tube leaks during a run, the
solution will be sprayed on the bowl. Always clean up any spray or spills
immediately using a damp paper towel. Always wear gloves and protective
clothing when cleaning.
®
If potentially infections agents are used in the FastPrep -24 Instrument, spills
should be cleaned immediately, and appropriate decontamination carried out.
®
The FastPrep -24 Instrument may not be resistant to all cleaning regimens
required for all infections agents. Exercise appropriate caution and wear
protective clothing, eyewear and gloves when working with potentially infectious
samples. Contaminated units should be kept in an appropriate biosafety level
facility, and should only be maintained or serviced by personnel trained in safe
handling practices specific to the infectious agent.
21
Bowl
Sample Tubes
www.mpbio.com
Other manuals for FastPrep-24
1
This manual suits for next models
1
Table of contents
Other MP Biomedicals Medical Equipment manuals


Popular Medical Equipment manuals by other brands


Steris
Steris VividImage MON-STE42HD Operation manual

Drive
Drive Bellavita handset Troubleshooting

Blatchford
Blatchford Multiflex Standard Instructions for use

Ferno
Ferno AS-190 user manual

Drive
Drive 15005LP Owner's assembly and operating manual

Chattanooga
Chattanooga Intelect Advanced 2765CS user manual


