MshOt MF31 Series User manual

Thank you for buying our product!
This unit is a precision optical instrument. Our product has been design to provide the highest level of safety, however,
improper operation or negligence in following the instructions in this manual may cause personal injuries and property losses.
In order to ensure your safety, prolong the life of this unit and maintain it properly, please read this manual carefully before
operating this unit.
Caution!
This manual uses the following symbols for safety reminders. Be sure to observe these warnings in order to operate this unit
properly and safely.
Caution!
Negligence in heeding the caution of this
symbol may affect the viewing performance of
this unit.
Provide instructions and skills in operating
this unit.
Reminder!
Negligence in heeding the warning of this
symbol may cause personal injury or damage to
this unit!
!
Warning!
Pay attention to environmental protection.

Safety Reminder
1. Be sure to turn off the power switch and remove the power cord before installing this unit,
replacing the bulb or fuse, plugging and unplugging the power supply.
To prevent electric shock or fire, be sure to turn off the power switch and remove the power
cord before installing this unit, replacing the bulb or fuse, plugging and unplugging the power supply.
2.Do not disassemble
Except the removable parts mentioned herein, no part of this unit shall be removed, otherwise
the performance of this unit may be reduced, or may cause an electric shock, injury or damage to
this unit. Please contact the supplier if any fault occurs.
3.Input voltage
Check if the input voltage is consistent with your local voltage supply. If not, do not operate this
unit and contact the supplier. Improper input voltage may cause a short circuit or fire thereby
causes damage to this unit.
4.Use specific bulb, fuse and power cord
Use of an improper bulb, fuse or power cord may cause damage or fire to this unit. Any extended
power cord used must be grounded (PE).
5. Protect this unit from high temperatures, dampness and foreign objects
To prevent short circuit or any other fault, do not expose this unit to any high temperatures or dampness
environment for a prolonged period of time. A suitable operating environment is designated at a
temperature of 5°C-35°C, and relative humidity of 20%-80% (at 25°C). If water splashes on this unit,
turn off the power switch and remove the power cord immediately, and then wipe the water off with dry cloth. When any
foreign object enters or drips onto this unit, please stop operating the unit and contact the supplier.
6.Heat of light source
The lighting bulb generates high temperatures during operation. Do not touch the collector lens or
lamp box when the lamp is illuminated, and do not touch the bulb within 10 minutes after the lamp
goes out due to high temperatures arising from operation. When replacing the bulb, make sure it has
cooled down properly (the lamp should be off for at least 10min).
★To prevent burn, do not touch the bulb when the lamp is illuminated or within 10min after it goes out.
★To prevent fire, do not place any fibrous product, paper, flammable or explosive material (e.g., gasoline, petroleum
ether, alcohol) near the halogen lamp housing or mercury lamp housing.
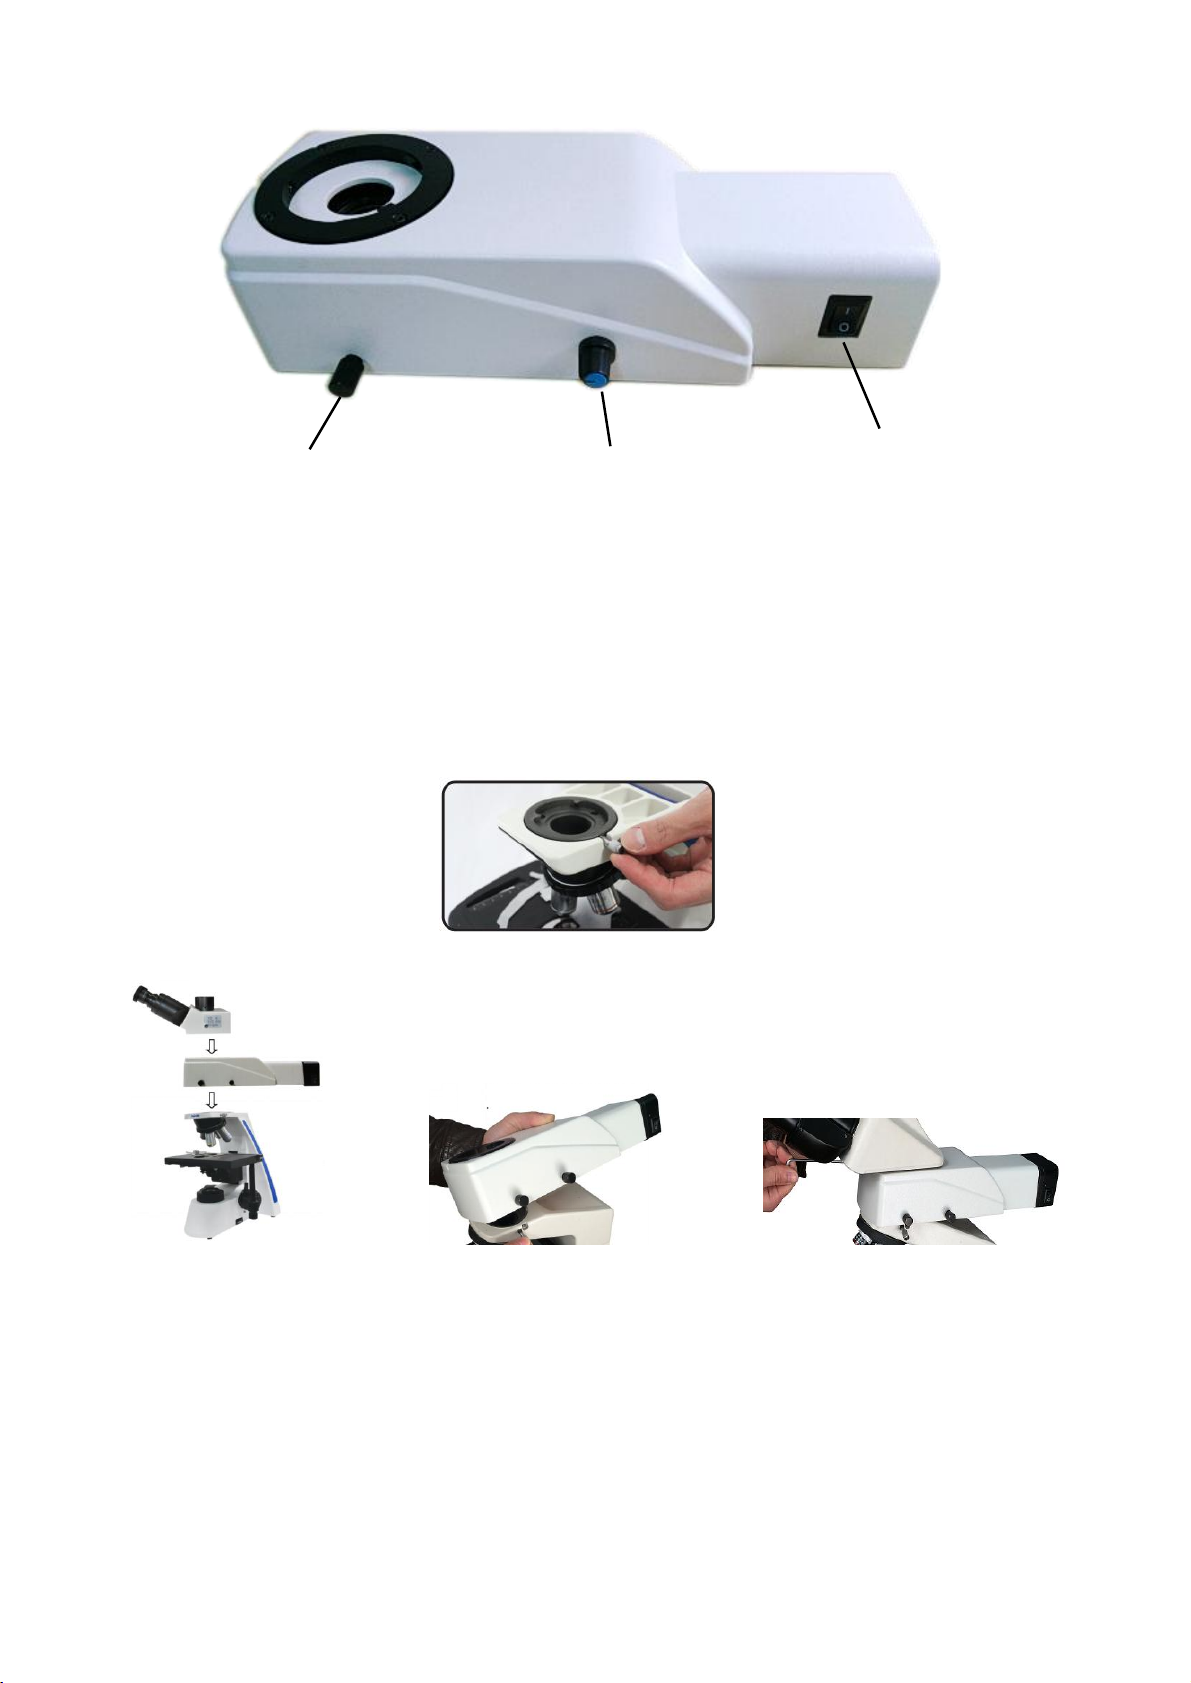
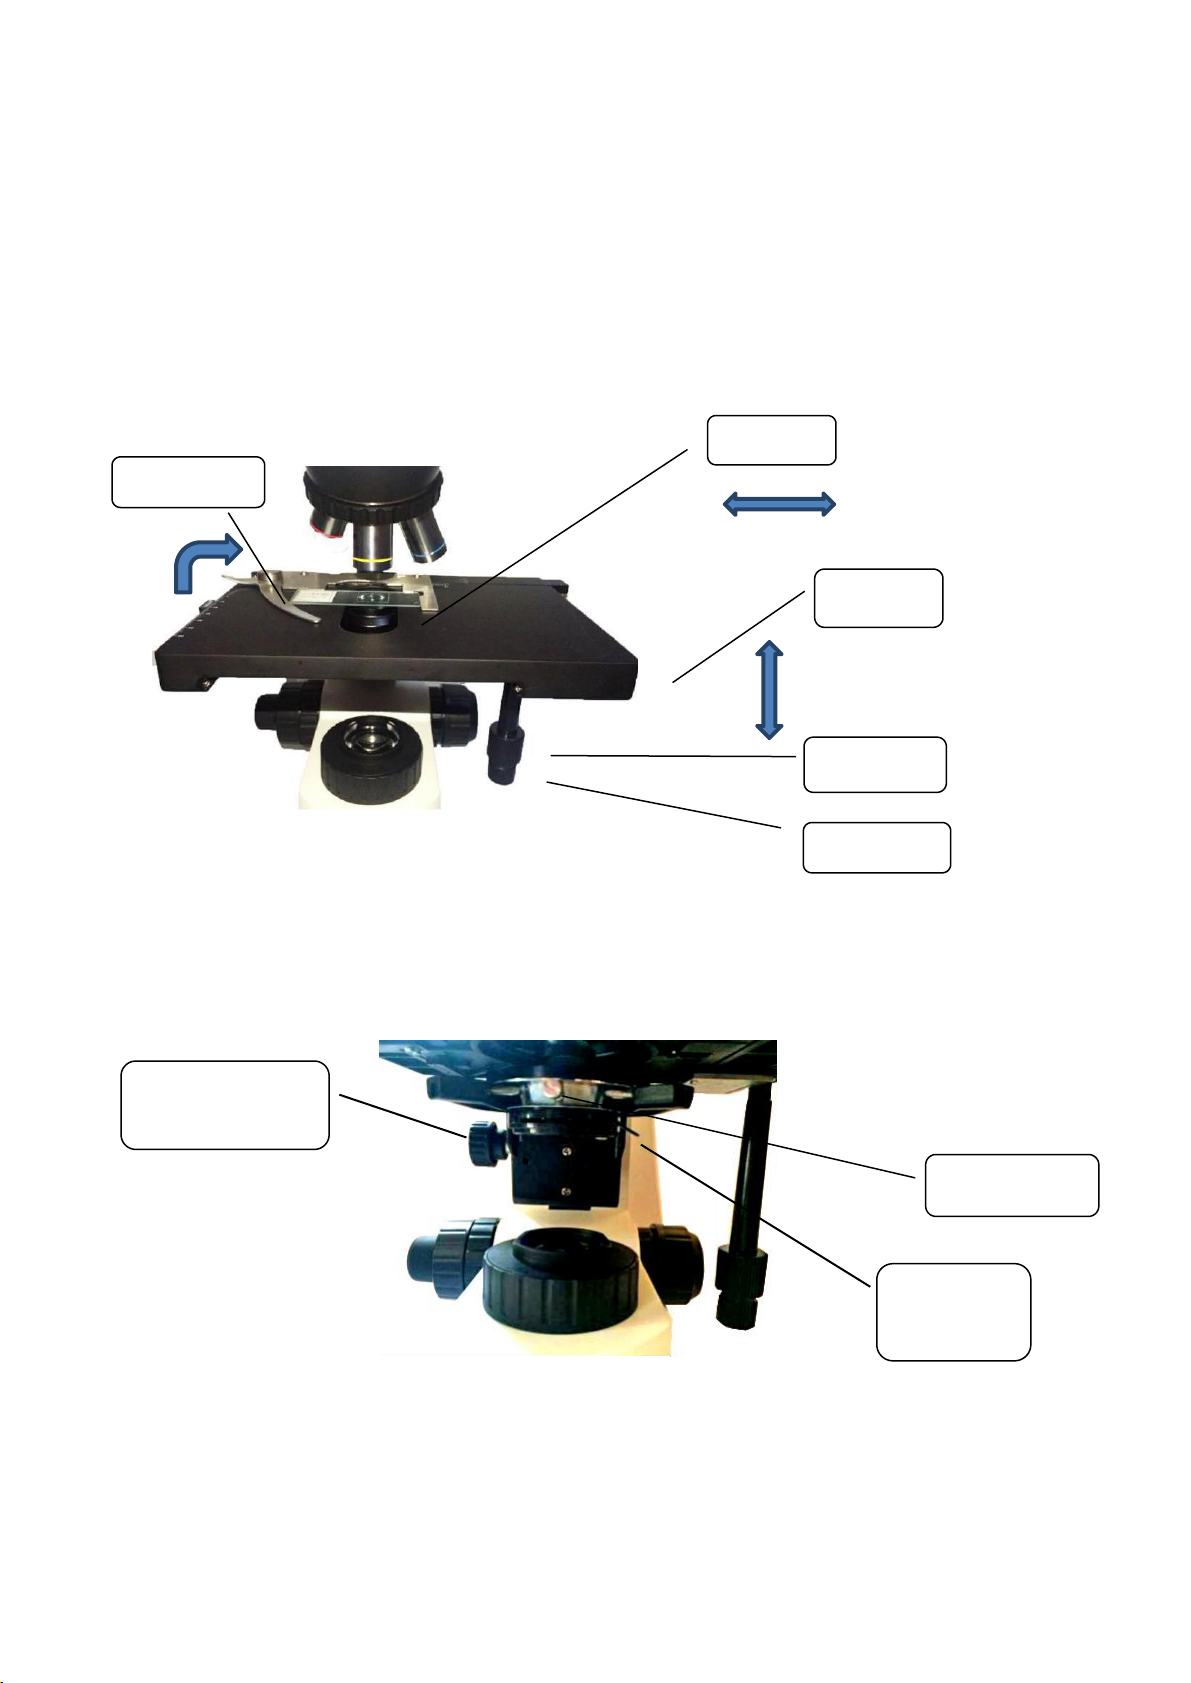
7.Coarse/fine focusing knobs
This unit employs a coarse/fine coaxial focusing mechanism. Do not turn the left/right coarse/fine
focusing knob in the opposite direction. When the objectives lifting device reaches the limit of motion,
do not continue to turn the coarse focusing knob, otherwise the focusing mechanism may be damaged.
8. Storage place
This unit is a precision optical instrument, and improper operation or storage may cause damage
or its precision may be adversely affected. Consider the following when selecting a storage place:
※Avoid placing the unit under direct sunlight, directly under interior lighting or any other bright place.
※A suitable operating environment is designated at a temperature of 5°C-35°C, and relative humidity of 20%-80%
(at 25°C). Do not expose this unit to high temperatures, dampness or dust for a prolonged period of time, otherwise mist
or mold may develop or dust may deposit on the lens, thus cause damage to this unit and shortening its life.
!
Warning!
!
Warning!
!
Warning!
!
Warning!
!
Warning!
!
Warning!
!
Warning!
Caution!

9. Installation of bulb
Do not touch the glass surface of the bulb directly with bare hands. When mounting the bulb, wear
gloves or wrap it with cotton material.
※Wipe off any dirt on the surface of the bulb with a clean cotton fabric dipped in alcohol. If the dirt is not thoroughly
※removed, it would etch the surface of the bulb weakening its brightness and shortening its life.
※Mount the bulb with care to avoid slipping off or injuries to your fingers.
※When replacing the bulb, make sure its contact is intact. If its contact is damaged, the bulb may be disabled or short
circuited.
※When replacing the bulb, the feet should be inserted into the holder as deeply as possible. If the feet are not tightly
inserted, the bulb may go out or short circuit.
10. Instrument handling
This precision optical instrument is heavy and should be handled with care. Strong impact and
rough handling are strictly prohibited, it may cause damage to this unit.
11.Environmental protection
Please dispose the wastes from the packaging and operation of this unit by category such as cartoon, foam,
plastic, bulb and etc. Do not discard the damaged mercury lamp carelessly in order to avoid creating
environmental poll
Caution!
Caution!

Table of Contents
I. Characteristics and applications of this unit ........................................................................... 1
II.Structural features of this unit.................................................................................................. 1~2
III. Installation of this unit.............................................................................................................2~3
IV.Technical specifications..............................................................................................................4
V. Components Operation...............................................................................................................4~8
VI. Using Rmind...............................................................................................................................9
VIII. Troubleshooting......................................................................................................................10

1
I. Characteristics and applications of this unit
MF31 series fluorescence microscope is a multifunctional optical microscope with both of bright field and
fluorescence, it equipped with non chromatic aberration plan achromatic fluorescence objective and wide filed
eyepiece, provides excellent optical performance and the update of the system. Because of the streamline figure
and pastel color, it has more beautiful appearance. It takes high brightness LED illumination with low power
consume and long working life, it’s safe and convenience to use. Transmission lighting LED lamp is easy to use
and exchange. The microscope is widely used in the field of the biology, medicine, industry, agriculture,
immunofluorescence, at the same time it is the perfect research instrument for the department of hospital, teaching
and academy.
II.Structural features of this unit
1. C-mount adapter seat
2. Observation head lever
3. Eyepice
4. Epi illumination fix screw
5. DC adapter port
6. Lever - bright field / fluorescence
7. Microscope body fix screw
8. Fluorescence light barrier
9. Objective
10. Transmitted light power button
(on back of the body)
11. Condenser
12. Coarse and focus system
13. Transmitted light brightness
controller
14. Fluorescence illuminator power
adapter
12V 2A
Figure 01
1
2
3
4
6
9
11
5
10
8
13
12
7
14

2
Figure 02
1.Switch lever 2. Brightness knob 3. Power
III. Installation of this unit
• Connect observation head
1.Loose screw on the top of host.
Step 1 Step 2 Step 3
1
2
3

3
• Connect eyepiece
1.Standard articulated binocular head, there is jump ring inside the eyepiece tube to fix and rotate eyepiece.
2.Insert in eyepiece
• Installation of eyepiece and condenser
Objective installation: clockwise rotate in objective from low times to high times until objective is tightly fixed.
Note: Condenser under stage has been adjusted well, there is no need to install by users again. While need to check its centering in
case of shifting during shipment.

4
Space fuse
IV.Technical specifications
Main Parameter
Total Magnification
40X~1000X(standard)
Mechanical Tube Length
Infinity(∞)
Object Conjugate Distance
Infinity(∞)
Eyepieces
Plan Objective in wide field
WF 10X
FN:Ф22mm
Objective
Port:
Ф30mm
Parfocalization
Distance:
10mm
Trinocular
Iinterpupillary Distance: 50~75mm, light pass 0/50%/100%
Binocular
Optional: Articulated Binocular,30° inclination
Infinity Plan
Achromatic
Objective
4X, 10X, 40X,100X(oil)
Optional: Non cover slip 20X, 40X
Condenser
Abbe Condenser (NA:1.25) can be moved freely up and down
Stage
Double Layer Mechanical Stage, size:210 X 140mm,Moving Range:76 X 50 mm
Epi fluorescence
illumination
3W LED, 12V,2A
Blue LED, EF460~490nm
Optional: Royal blue LED, EF420~480nm
Optional: Green LED, EF510~550nm
Optional: UV LED, 330~380nm
Transmitted light
LED light source, 3W/LED
Power Supply
AC Voltage 85V~265V 50/60Hz,fuse parameter:250V 3.0A
Power light
AC 100-240V 50-60HZ output 4.3V Max:0-750mA adjustable
Digital adapter
0.5X / 1X C-mount adapter
V.Components operation
Figure 03
Power adapter
Brightness
adjust wheel
Fuse box
Power line

5
X direction moving
1. Connect power line to host back bottom side.Set illumination knob (on the left bottom side of microscope host)
to lowest brightness, rotating illumination brightness by need during operation.
Exchange fuse: as figure 03, draw out fuse box and take off trouble fuse,set spare fuse to fuse box. Put box back
to holder.
Attention: Before start power, please make sure voltage if meet the instrument requirement, please do not use
microscope if the voltage is different, it may cause damage or fire.
2.Sample setting
Open slider holder, put on slider with upper to upside. Take notice do not damage slider. The slider should be
even put on the stage, rotate stage moving wheel with X and Y to make slider into light path (as figure 04).
Figure 04
3.Stage sets
Figure 05
Slider
holder
Slider
Y moving
X moving
Stage
Abbey condenser
lift wheel
Lock screw
Aperture
Y direction

6
B
C
4.Condenser adjustment
4.1.1 Abbey condenser lifting wheel(Figure 05):
Through rotate abbey condenser lifting wheel to adjust distance between condenser and slider can
make brightness even to achieve best brightness and contrast.
4.1.2 Aperture adjustment(Figure 05):
Move aperture wheel and change size of aperture to change slider contrast.In common, objective
times smaller, aperture is smaller.
4.1.3 Binocular pupil distance adjustment and diopter
Eyepiece
tube
diopter
Right eyepiece
tube
Eyepiece
e
Eyepiece
tube
Left eyepiece
Figure 06
Attention: Aperture adjustment needs to match with objective field of numerical aperture(FN), FN
is smaller, aperture size should be smaller, otherwise the same. Change field of view brightness
can not achieve through change aperture size and position.
A

7
4.2.1 Pupil distance adjustment
The pupil distance (eye distance) varies from person to person, so before using this instrument,
the pupil distance of the binocular should be readjusted.
A) transfer the eyepiece on the left and right sides to the 0 pairs of lines according to (Figure 06).
B) 10X objective is screwed into the light path, moving specimens to the light path, observing the
eyepiece, adjusting the coarse and find hand wheel to make the image clear.
C) hold the binocular left mirror tube and the right mirror tube respectively, and rotate it according to
(Fig.7) until the specimen is seen by both eyes. Complete coincidence (the process of A to B and then
to C)
4.3.1Visual adjustment
A) transfer the left eyepiece tube and right eyepiece tube to the 0 pairs of lines according to (Figure 06).
move the specimen to the light path.
B) Turn 40 X objective to light path. The right eyepiece is used to observe the specimen in the right
eyesight. Adjust the coarse and find focusing hand wheel to make the specimen clearly visible.
C) Observing the specimen on the left eyepiece. If the imaging is not clear, it is necessary to adjust
the eyepiece's visibility, so that a clear specimen image can be observed in left eye (adjust diopter ring,
the range is: N= + 5 diopter ).
4.4.1 Focus and stopper
A) Loosen the limit handle shown in Figure 07 and turn it into the 10X objective into the light path, and
slowly turn the coarse moving handwheel unit the image is clear in the eyepiece.Roughly clear, then
slowly rotate the micro motion handwheel to make the imaging clear. Turn to other times objective, it
should be properly rotate the hand wheel to make the image clear. The minimum scale handwheel is
0.002mm.
Tension hand
wheel
Looses
Figure 07
B) For convenience observation and avoid objective to touch with the slider, use stopper when focusing
well (figure 07).

8
4.5 Oil immersion
4.5.1 Using 100X objective, you need to add oil medium. Move stage to lowest position by coarse focusing knob,
drop oil on the observation area of specimen.
4.5.2 Rotate oil immersion objective(100X) to working position (the objective is marked with oil).
4.5.3 Adjust coarse focusing knob to slowly lift stage until the oil on slide touch bottom face of objective.
4.5.4 Waggle nosepiece to eliminate bubbles in oil medium, then fix oil objective to make oil full of objective and slide.
4.6 Using epi-fluorescence illumination system
4.6.1. Adjust condenser to the lowest position, diagram to the minimum size, in order to reduce interrupt lights.
4.6.2. If use bright field, pull lever of fluorescence illuminator to blank position.

9
VI. Using remind
1.When moving instrument, please hold the microscope by both hands.
2.Keep all optical components tiny and clear, it is very important.
3.Cover the microscope with dust cover when do not using the microscope.
4.Before wiping dust or dirt, please blow off with air blower.
5.Avoid excessive using solvent lint free cloth, please soak lens paper and cotton swab with solvent before using.
6. 6.It is easy to overstock dirt, dust and oily material on the front side of objective lens. Please use magnifying
glass to check if there is not reference substance or under dark and confused surroundings.
7. If need to take off microscope lens body, please notice do not touch lens outside face to avoid impression.
On it will reduce image definition.
8.This instrument belongs to I type normal standard electrical equipment safety.
9.This instrument does not belongs to AP type or APG type equipment.
10.This instrument is equipment with protection against electromagnetic interference, surge voltage and surge current.
11.High pressure inside, non-professional people please does not open bottom base.
12.The epi fluorescence illumination is only fit to 12V, 2A power adapter.

10
VII.Trouble shooting
Fault
Cause
Disposition
Electric system
No light shown in the field
of view using halogen
lamp
The power switch is not turned
on.
Turn on the power switch.
The halogen lamp is damaged.
Replace the halogen lamp.
The fuse is damaged.
Replace the fuse.
The connector of the electric
chassis is in bad contact.
Check and have professional repair it.
The halogen lamp mounted is
nonconforming.
Use a conforming halogen lamp.
Optical system and imaging
There is a black shadow
on the edge of the field of
view or unevenly
illuminated, making it
impossible to observe the
whole field of view.
The nosepiece has not been
turned to the fixed position.
Turn the nosepiece to the fixed position.
The filament image deviates
from the center of the collector.
Reposition the lighting bulb.
There is dirt or oil on the
surface of the objective,
eyepiece or condenser
Wipe the lens surface or replace the
lens.
Oil or dust is found in the
field of view.
There is oil or dust on the
eyepiece lens.
Wipe the eyepiece.
Defocusing or low
resolution
The objective is damaged.
Repair the objective (by a professional).
There is oil or dust on the
surface of the lens of the
objective or eyepiece.
Wipe the objective or the eyepiece.
The aperture of the aperture
diaphragm is too small.
Adjust the aperture of the aperture
diaphragm based on the objective
magnification (or numerical aperture)
used.
The objective deviates from
the light path.
Turn the nosepiece to the fixed position.
The focal plane of the
image is inclined (brighter
on one side and darker on
the other)
The lighting bulb is seriously
inclined.
Reposition the lighting bulb.
The specimen is not laid flatly.
Lay the specimen flatly on the object
stage and hold it stably.
Mechanical system
The image cannot remain
clear during observation.
The focusing mechanism flows
(slides down) automatically.
Adjust the coarse adjusting hand wheel.
The fine focusing mechanism
fails
Check and have professional repair it.
The stage loosens or is
inclined.
Check and have professional repair it.
Table of contents
Other MshOt Microscope manuals

MshOt
MshOt ML41 Series User manual

MshOt
MshOt MF-UV-LED User manual

MshOt
MshOt TP R200 Guide

MshOt
MshOt MI-BGU-LED-TS100 User manual

MshOt
MshOt MF43-N User manual

MshOt
MshOt MI-BGU-LED IX50 User manual

MshOt
MshOt MF53-N User manual

MshOt
MshOt MZX81 User manual

MshOt
MshOt MZ62 User manual

MshOt
MshOt MI-BGU-LED-CKX53 User manual