MSI MS-7235 User manual

i
G52-72351X5
P965Neo Series
MS-7235(V1.X)Mainboard

ii
CopyrightNotice
The materialinthisdocumentistheintellectual propertyof MICRO-STAR
INTERNATIONAL.Wetakeeverycareinthe preparationof thisdocument, butno
guaranteeisgivenastothecorrectnessofitscontents.Ourproductsareunder
continualimprovementand wereservetherighttomakechangeswithoutnotice.
Trademarks
Alltrademarksarethepropertiesoftheirrespectiveowners.
NVIDIA,theNVIDIAlogo,DualNet, and nForceareregisteredtrademarksortrade-
marksofNVIDIACorporationin theUnitedStatesand/orothercountries.
AMD,Athlon ,Athlon XP,Thoroughbred ,andDuron areregisteredtrade-
marksofAMDCorporation.
Intel®andPentium®areregisteredtrademarksofIntelCorporation.
PS/2and OS®/2areregisteredtrademarksofInternationalBusiness Machines
Corporation.
Windows®95/98/2000/NT/XPareregisteredtrademarksofMicrosoftCorporation.
Netware®isaregisteredtrademarkofNovell,Inc.
Award®isaregisteredtrademarkofPhoenixTechnologiesLtd.
AMI®isaregisteredtrademarkofAmericanMegatrendsInc.
RevisionHistory
Revision RevisionHistory Date
V1.0 ForEurope August2006
TechnicalSupport
Ifaproblemariseswithyoursystemandnosolutioncanbeobtainedfromtheuser’s
manual,pleasecontactyourplaceofpurchaseorlocaldistributor.Alternatively,
pleasetrythefollowing helpresourcesforfurtherguidance.
Visit theMSI websiteforFAQ,technical guide,BIOSupdates,driverupdates,
andotherinformation: http://www.msi.com.tw/program/service/faq/
faq/esc_faq_list.php
Contactourtechnical staff at: http://support.msi.com.tw

iii
SafetyInstructions
CAUTION: Dangerofexplosionifbatteryisincorrectlyreplaced.
Replaceonlywiththe sameorequivalenttype recommendedbythe
manufacturer.
1. Alwaysread thesafetyinstructionscarefully.
2. KeepthisUser’sManualforfuturereference.
3. Keepthisequipmentawayfromhumidity.
4. Laythisequipmentonareliableflatsurfacebeforesetting itup.
5. Theopeningsontheenclosureareforairconvectionhenceprotectstheequip-
ment fromoverheating.DONOTCOVERTHEOPENINGS.
6. Makesurethevoltageofthe powersourceandadjustproperly110/220Vbe-
foreconnectingtheequipmenttothepowerinlet.
7. Placethe powercordsuchawaythatpeoplecannotstepon it. Donotplace
anythingoverthepowercord.
8. AlwaysUnplug thePowerCordbeforeinsertinganyadd-oncardormodule.
9. All cautionsand warningsontheequipmentshouldbenoted.
10. Neverpouranyliquidintotheopeningthatcoulddamage orcauseelectrical
shock.
11. If anyof thefollowing situationsarises, gettheequipmentcheckedbyaservice
personnel:
†Thepowercordorplugisdamaged.
†Liquid haspenetratedintotheequipment.
†Theequipmenthasbeen exposedtomoisture.
†Theequipmenthasnotworkwelloryoucannotgetitworkaccording to
User’sManual.
†Theequipmenthasdroppedand damaged.
†Theequipmenthasobvioussign of breakage.
12.DONOTLEAVETHISEQUIPMENTINANENVIRONMENTUNCONDITIONED,STOR-
AGETEMPERATUREABOVE600C(1400F),IT MAYDAMAGETHEEQUIPMENT.

iv
FCC-BRadio Frequency Interference Statement
Thisequipmenthasbeen
tested and found tocomply
withthe limitsforaClassB
digitaldevice,pursuanttoPart
15of the FCCRules.Theselimitsaredesignedtoprovidereasonable protection
againstharmful interferenceinaresidentialinstallation.Thisequipmentgenerates,
usesand canradiateradiofrequencyenergyand,ifnotinstalledand used in accor-
dancewiththeinstructions,maycauseharmful interferencetoradiocommunications.
However,thereisno guarantee thatinterferencewill notoccurin aparticular
installation.Ifthisequipmentdoescauseharmful interferencetoradioortelevision
reception,whichcanbedeterminedbyturning theequipmentoff and on,the useris
encouragedtotrytocorrecttheinterferencebyone ormoreof themeasureslisted
below. †Reorientorrelocatethereceiving antenna.
†Increasetheseparationbetweentheequipmentand receiver.
†Connecttheequipmentintoanoutleton acircuitdifferentfromthatto
whichthereceiverisconnected.
†Consultthedealeroranexperiencedradio/televisiontechnicianforhelp.
Notice1
Thechangesormodificationsnotexpresslyapprovedbythepartyresponsible for
compliancecould void theuser’sauthoritytooperatetheequipment.
Notice2
Shieldedinterfacecablesand A.C.powercord,ifany,mustbeusedinorderto
complywiththeemissionlimits.
VOIRLANOTICED’ INSTALLATIONAVANTDERACCORDERAURESEAU.
Micro-StarInternational
MS-7235
ThisdevicecomplieswithPart15oftheFCCRules.Operationissubjecttothe
followingtwoconditions:
(1)thisdevicemaynotcauseharmfulinterference,and
(2)thisdevicemustaccept anyinterferencereceived,includinginterferencethat
maycauseundesiredoperation.

v
WEEE (WasteElectricaland ElectronicEquipment) Statement

vi

vii

viii
CONTENTS
CopyrightNotice..............................................................................................................ii
Trademarks.......................................................................................................................ii
RevisionHistory..............................................................................................................ii
Technical Support...........................................................................................................ii
SafetyInstructions.........................................................................................................iii
FCC-B RadioFrequencyInterferenceStatement........................................................iv
WEEE(WasteElectricalandElectronicEquipment)Statement....................................v
English......................................................................................................................En-1
CentralProcessingUnit:CPU............................................................................En-4
Memory....................................................................................................................En-5
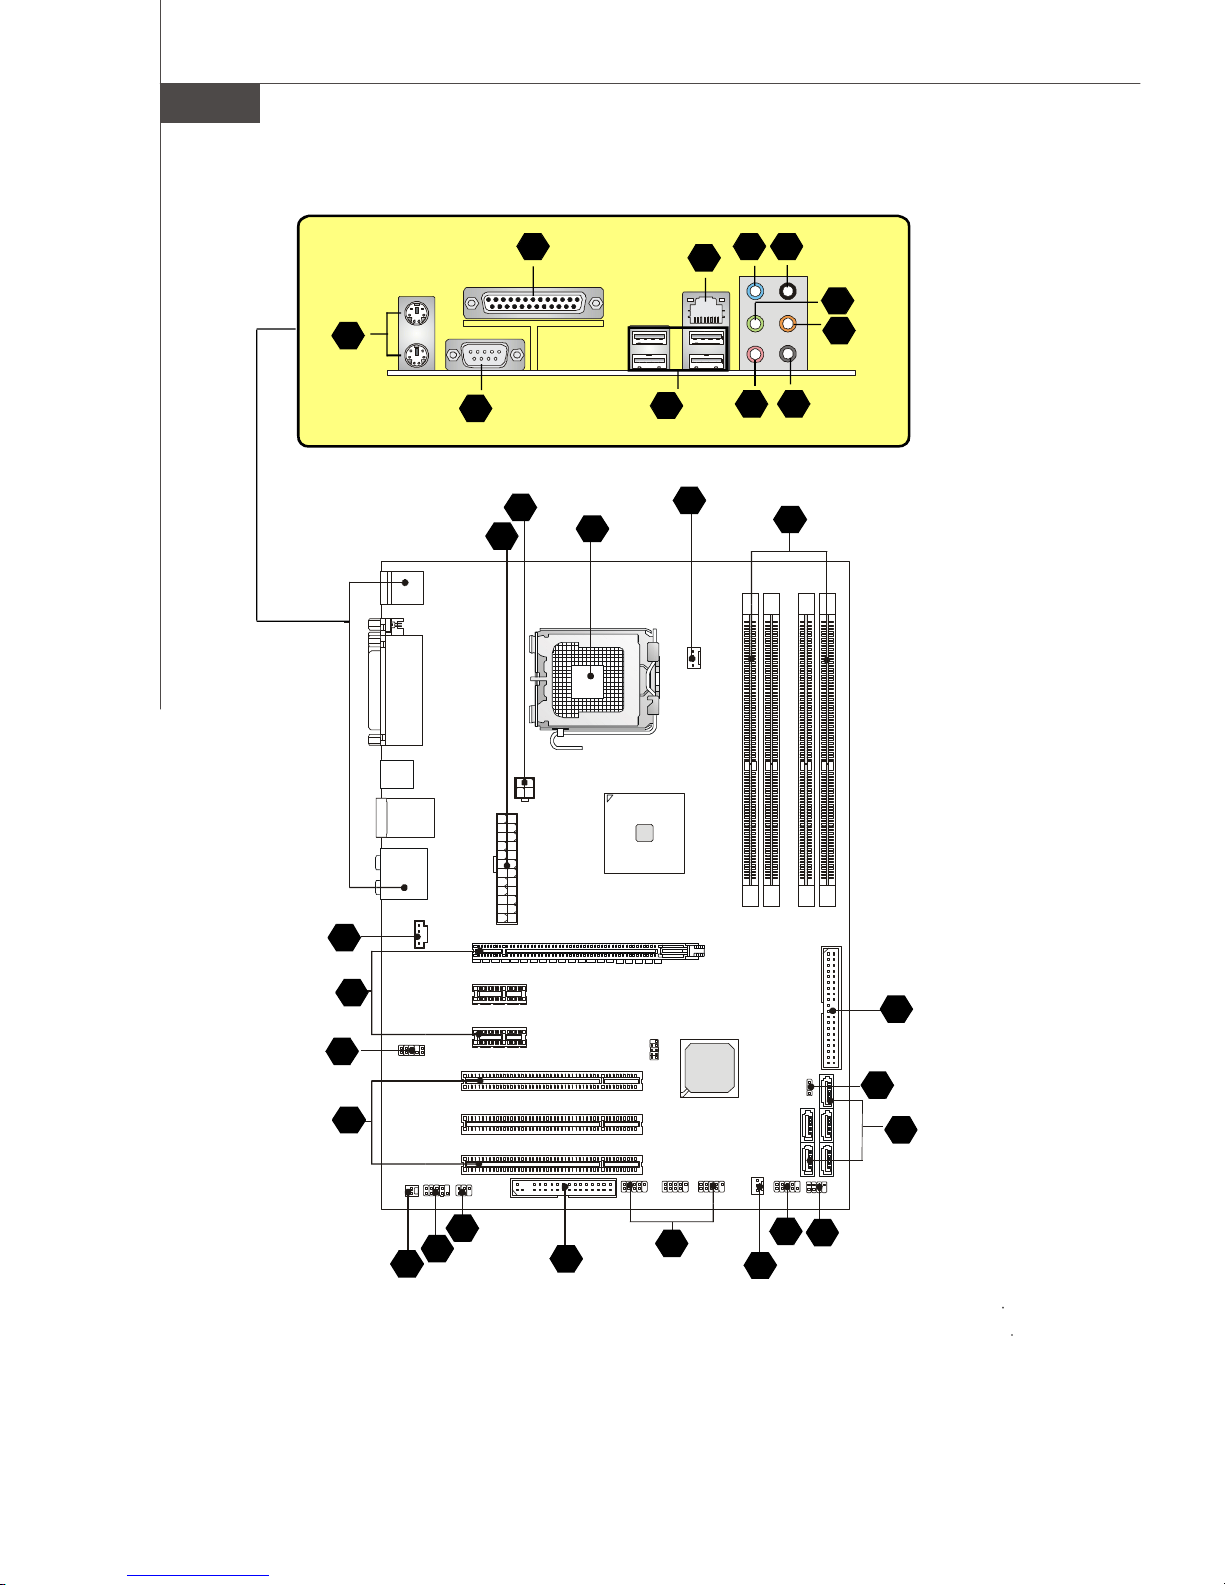
Connectors,Jumper,Slots................................................................................En-6
BackPanel.............................................................................................................En-12
BIOSSetup.............................................................................................................En-14
SoftwareInformation.........................................................................................En-16
German....................................................................................................................De-1
Hauptprozessor:CPU...........................................................................................De-4
Speicher...................................................................................................................De-5
Anschl sse,Steckbr ckenund Slots............................................................De-6
Hinteres Anschlusspaneel.............................................................................De-12
BIOSSetup............................................................................................................De-14
SoftwareInformation........................................................................................De-16
French.......................................................................................................................Fr-1
UnitéCentral DeTraitement:CPU......................................................................Fr-4
Mémoire...................................................................................................................Fr-5
Connecteurs,Cavalier,Slots..............................................................................Fr-6
PanneauArrière...................................................................................................Fr-12
Installation du BIOS..............................................................................................Fr-14
InformationdeLogiciel......................................................................................Fr-16

En-1
InstallationGuide
English
Specifications
ProcessorSupport
-Intel Pentium4,PentiumD,CoreTM 2 seriesprocessorsinLGA775 package
ForthelatestinformationaboutCPU,pleasevisithttp://www.msi.com.tw/program/products/mainboard/mbd/
pro_mbd_cpu_support.php
SupportedFSB
-1066/800/533MHz
Chipset
-NorthBridge:Intel P965 chipset
-SouthBridge:Intel ICH8chipset
MemorySupport
-P965supports8GBatmaximum.
-SupportsDDRII 800/667/533SDRAM
-1GBDDRII 800SDRAMmemorymoduleisnotsupported
-4DIMMsDDRII(240pin/1.8V)
Fortheupdatedsupportingmemorymodules,pleasevisithttp://www.msi.com.tw/program/products/
mainboard/mbd/pro_mbd_trp_list.php
LAN
-SupportsPCILAN10/100/1000FastEthernetbyRealtek8110SC
Audio
-Chipintegrated byRealtek AL883
-Flexible8-channelaudiowithjacksensing
-CompliantwithAzalia1.0Spec
IDE
-1IDEportbyJMicron JMB361
-SupportsUltraDMA66/100/133mode
-SupportsPIO,BusMasteroperationmode
SATA
-4SATAII portsbyICH8 -1SATAII portbyJMicron JMB361
-Supports5SATAIIdevices -Supportsstorageanddatatransfersatupto300MB/s
Floppy
-1floppyport
-Supports1FDDwith360K,720K,1.2M,1.44Mand2.88Mbytes
Connectors
BackPanel
-1PS/2mouseport -1PS/2keyboardport
-1serialport (COM1) -1parallelportsupportingSPP/EPP/ECPmode
-4USB 2.0ports -1LANjack(10/100/1000)
-6flexibleaudiojacks
On-BoardPinheaders
-1IrDApinheader -1frontaudiopinheader
-1serialportpinheader -3USB2.0pinheaders
Slots
-1PCI Expressx16 slot -2PCI Expressx1slots
-3PCI slots -Support3.3V/5VPCI busInterface
FormFactor
-ATX(30.5cmX22.0cm)
Mounting
-6mountingholes

En-2
MS-7235Mainboard
29
31 36 39 42
40
37
4138
35
30
1
6
43
88
4
19
7
27
14
26
12
21
16
23
9
5
31
15
LayoutofP965 NeoSeries
(MS-7235 v1.X)ATXMainboard

En-3
InstallationGuide
English
CentralProcessing UnitSocket En-4 DDRII Sockets:DIMM1~4(dualchannel)En-5
FanPowerConnectors En-6 Floppy DiskDriverConnector En-6
ATA100 HardDisk Connector En-6 SerialATAConnector En-6
FrontPanelConnectors En-7 FrontUSB 2.0Connector En-7
IEEE 1394Connector En-7 FrontPanelAudioConnector En-8
CD-InConnector En-8 ChassisIntrusionSwitchConnector En-8
IrDAInfraredModuleConnector En-8 D-BracketTM 2Connector En-9
ClearCMOSButton En-10 ATX24-PinPowerConnector En-10
ATX12VPowerConnector(2x2-Pin) En-10 ATX12VPowerConnector(1x4-Pin) En-10
PCI Express Slot(x16/x4/x1) En-11 PCISlot En-11
Mouse/ KeyboardportConnector En-12 ParallelPortConnector En-12
SerialPortConnector En-12 IEEE 1394 PortConnector En-12
LAN(RJ-45)Jack En-13 USBConnectors En-13
GreenAudioJack(Line-out) En-13 BlueAudioJack En-13
PinkAudioJack(Mic-In) En-13 OrangeAudioJack En-13
Black AudioJack(RearSurround-Out) En-13 Gray AudioJack (SideSurround-Out) En-13
CoaxialS/PDIF-outConnector En-13
1
Components IndexTable
3
5
7
4
6
9
8
12
14 15
19
21
16
20
25
27
29
23
26
30
31 34
35
37
39
36
38
40
41 42
43
ComponentNumber ComponentNumberpage page
10
HowtousethisInstallation Guide?”
Thisinstallation guideisdesignedforyoutoeasilyinstall themainboard.Followthe stepsbelowtousethisguide:
-Readthespecificationsofthemainboardfirst onpageEn-1.
-FindoutthecomponentwiththecomponentnumberatyourdesirefromthelayoutofthemainboardonpageEn-2.
-Findoutthecomponentdescriptionand installinginstructionswiththe “ComponentsIndexTable”directionandinstall
it.
-SetBIOSandinstall thedriver/utiltityatyourdesire.

En-4
MS-7235Mainboard
The mainboardsupportsIntel processor.ThemainboardusesaCPUsocketcalledSocket-775 foreasyCPU
installation.
Forthelatestinformationabout CPU, please visit http://www.msi.com.tw/program/products/mainboard/mbd/
pro_mbd_cpu_support.php.
1
Central ProcessingUnit:CPU
Overheating
OverheatingwillseriouslydamagetheCPUandsystem,alwaysmakesurethecoolingfancanworkproperlytoprotect
theCPUfromoverheating.
Replacing theCPU
WhilereplacingtheCPU,alwaysturnofftheATXpowersupplyorunplugthepowersupply spowercordfrom grounded
outletfirsttoensurethesafetyofCPU.
Important
CPU& CoolerInstallation ProceduresforSocket775
1. TheCPUsockethasaplasticcaponittoprotectthecontactfromdamage.Beforeyouhaveinstalled
theCPU,alwayscoverittoprotectthesocketpin.
2. Removethecapfromleverhingeside.
3. Thepinsofsocketreveal.
4. Opentheloadlever.
5. Lifttheloadleverup andopentheloadplate.
6. AfterconfirmingtheCPUdirectionforcorrectmating,putdowntheCPUinthesockethousing
frame.BesuretograspontheedgeoftheCPUbase.Notethatthealignmentkeysarematched.
7. VisuallyinspectiftheCPUisseatedwellintothesocket.Ifnot,takeouttheCPUwithpurevertical
motionandreinstall.
8. Covertheloadplateontothepackage.
9. Pressdowntheloadleverlightlyontotheloadplate,andthensecuretheleverwiththehookunder
retentiontab.
10.Align theholeson the mainboardwiththe cooler.Pushdownthecooleruntil itsfourclipsget
wedgedintotheholesofthemainboard.
11.Pressthefourhooksdowntofastenthecooler.Thenrotatethelockingswitch(refertothecorrect
directionmarkedonit)tolockthehooks.
12.Turnoverthe mainboardtoconfirmthattheclip-endsarecorrectlyinserted.
1.ChecktheinformationinBIOSfortheCPUtemperature.
2.WheneverCPUisnotinstalled,alwaysprotectyourCPUsocketpinwiththeplasticcapcoveredtoavoiddamaging.
3.Pleasenotethatthemating/unmatingdurabilityoftheCPUis20cycles.Thereforewesuggestyoudonotplug/unplug
theCPUtoooften.
Important
alignmentkey

En-5
InstallationGuide
English
Memory
DDR
Specification :184-pin,2.5v.
Singlechannel definition :All DIMMslotsareGREENcolor.
Dualchannelsdefinition :DIMM slot(s)on ChannelAaremarkedinGREENcolor.DIMM slot(s)on ChannelBare
markedinPurplecolor.
DDRII
Specification :240-pin,1.8v.
Singlechannel definition :All DIMMslotsareGREENcolor.
Dualchannelsdefinition :DIMM slot(s)on ChannelAaremarkedinGREENcolor.DIMM slot(s)on ChannelBare
markedinOrange color.
64x2=128 pin 56x2=112 pin
40x2=80pin 52x2=104 pin
InstallingDDR/ DDRIIModules
YoucanfindthenotchonthememorymodulesandthevoltontheDIMMslotswhetherDDRorDDRII.Followtheprocedures
belowtoinstallthe DDR/DDRII moduleproperly.
1. TheDDR/DDRIImoduleshasonlyonenotchonthecenterofmodule.Themodulewillonlyfitintherightorientation.
2. InsertthememorymoduleverticallyintotheDIMMslot.Thenpushitinuntilthegoldenfingeronthememorymodule
isdeeplyinsertedinthesocket.
3. Theplastic clipateachsideoftheDIMM slotwill automaticallyclose.
Volt Notch
2
3
Important
-DDRIImodulesare notinterchangeablewithDDRandtheDDRIIstandardisnotbackwardcompatible, youshould
alwaysinstallDDRIImemorymoduleintheDDRIIDIMMslotandinstallDDRmemorymoduleintheDDRDIMMslot.
-Indual-channelmode,makesurethatyouinstallmemorymodulesofthesametypeanddensity indifferent
channelDDR DIMM slots.
-Toenablesuccessfulsystemboot-up,alwaysinsertthememorymodulesintothe DIMM1first.

En-6
MS-7235Mainboard
Connectors,Jumper,Slots
Floppy Disk DriveConnector(FDDconnector)
Themainboardprovidesastandardfloppydiskdriveconnectorthatsupports360K,720K,1.2M,1.44Mand2.88Mfloppy
disktypes.
ATAHardDisk Connector(IDEconnector)
AIDEconnectorcan connectaMasterandaSlavedrive. YoucanconnectCD-ROM/HardDriverandotherIDEdevices.
TheUltraATAinterfaceboostsdatatransferratesbetweenthecomputerandtheharddriveupto100megabytes(MB)per
second.
SerialATAConnector
SATAconnectorsupportsserialATAdataratesof150MB/sand will be marked inORANGEcolor.SATAIIconnector
supportsserialATAdataratesof300MB/sandwillbemarkedinPURPLE/BLUEcolor.EachSATAconnectorcanconnect
to1harddiskdevice.
SATAconnector(Orange)
SATAII connector(Purple/Blue)
SerialATAcable Takeoutthedustcoverandconnect
totheharddiskdevices
ConnecttoSATAconnector
5
6
7
Important
Important
Ifyouinstalltwoharddisksoncable,youmustconfiguretheseconddrivetoSlavemodebysettingitsjumper.Refer
totheharddiskdocumentationsuppliedbyharddiskvendorsforjumpersettinginstructions.
Important
PleasedonotfoldtheSerialATAcableinto90-degreeangle.Otherwise,datalossmayoccurduringtransmission.
FanPowerConnectors
Thefan powerconnectorssupportsystemcooling fanwith+12V.TheCPUFAN1supportsSmartFAN function.When
connectthewiretotheconnectors,alwaystakenotethattheredwireisthepositiveandshouldbeconnectedtothe+12V,
theblackwireisGroundandshouldbeconnectedtoGND.IfthemainboardhasaSystemHardwareMonitorchipseton-
board,youmustuseaspeciallydesignedfanwithspeedsensortotakeadvantageofthefancontrol.
CPUFAN
PleaserefertotherecommendedCPUfansatIntel®officialwebsiteorconsultthevendorsforproperCPUcoolingfan.
Fan/heatsinkwith3or4pinsarebothavailableforCPUFAN.Pleasenotethatonlyinstall4pinsFAN/heatsinksupport
SmartFAN.
SYSFAN/NBFAN/
POWERFAN
SENSORorNC
+12V
GND
4
SENSOR
+12V
GND
Control

En-7
InstallationGuide
English
SPDIF-OutConnector/SPDIF-InConnector
ThesetwoconnectorsareusedtoconnectSPDIF(Sony&PhilipsDigitalInterconnectFormat)interfacefordigitalaudio
transmission.
ConnectedtoSPDIF-out/
SPDIF-inconnector
SPDIFBracket(Optional)
FrontPanelConnectors
ThesetwofrontpanelconnectorsareusedforelectricalconnectiontothefrontpanelswitchesandLEDs.JFP1iscompliant
withIntel FrontPanelI/OConnectivityDesignGuide.
1
29
10
HDD
LED Reset
Switch
Power
LED Power
Switch
JFP1 JFP2
7
8
PowerLED
Speaker
1
2
Front USB 2.0Connector(Yellow)
USB2.0technologyincreasesdatatransferrateuptoamaximumthroughputof480Mbps,whichis40timesfasterthan
USB 1.1,and isidealforconnecting high-speedUSB interfaceperipheralssuchas USBHDD,digitalcameras,MP3
players, printers,modemsandthelike.
10 USBOC
1 2
VCC
USB0-
USB0+
GND
Key(nopin)
VCC
USB1-
USB1+
GND
9
IEEE 1394 Connectors(Green)
The1394pinheaderallowsyoutoconnectIEEE1394portsviaanexternalIEEE1394bracket.
1 2
910
TPA+
Ground
TPB+
Cablepower
Key(nopin)
TPA-
Ground
TPB-
Cablepower
Ground
Connected to1394
connector(withfool-
proofdesign)
IEEE1394Bracket
(Optional)
ConnectedtoUSB
connector
USB2.0Bracket
(Optional)
SPDIF_In
VCC
SPDIF_in
GND
SPDIF_Out
VCC
SPDIF_out
GND
8
9
10
11
Important
NotethatthepinsofVCCandGNDmustbeconnectedcorrectlytoavoidpossibledamage.

En-8
MS-7235Mainboard
FrontPanelAudioConnector
Thefrontpanelaudioconnectorallowsyoutoconnecttothefrontpanelaudioand
iscompliantwithIntel FrontPanelI/OConnectivityDesignGuide.
CD-InConnector
Thisconnectorisprovided forCD-ROMaudio.
12
910
port1_L
port1_R
port2_R
Sense_Send
port2_L
Ground
Presence#
Sense1_Return
Key
Sense2_Return
ChassisIntrusionSwitchConnector
Thisconnectorisconnectedtoa2-pin chassisswitch.Ifthe chassisisopened,the switchwillbeshort. Thesystemwill
recordthisstatusandshowawarningmessage onthescreen.Toclearthe warning,youmustenterthe BIOSutilityand
cleartherecord.
IrDAInfraredModuleConnector
TheconnectorallowsyoutoconnecttoIrDAInfraredmodule.YoumustconfigurethesettingthroughtheBIOSsetuptouse
theIRfunction.ItiscompliantwithIntel FrontPanelI/OConnectivityDesignGuide.
SerialPortHeader
The9-pin headerallowsyoutoconnectserialportviaanexternalCOMportbracket.
1 CINTRU
2
Ground
1
5
6
DCD
SIN
SOUT
DTR
Ground
DSR
RTS
CTS
RI(9)
TV-Out Connector
TheTV-OutconnectorisforyoutoattachaTV-Outbracket.TheTV-OutbracketofferssometypesofTV-Outconnectors.
Selecttheappropriateoneto connecttoantelevisionanditwillbeabletodisplayPCinformation.
3
14
Ground
Yout
Cout
COMPorCVBS
Ground(5)
GND R
L
FrontPanelAudioConnector
Thefrontpanelaudioconnectorallowsyoutoconnecttothe frontpanel
audioandis compliantwithIntel FrontPanelI/OConnectivityDesignGuide.
12
910
AUD_MIC
AUD_MIC_BIAS
AUD_FPout_R
HP_ON
AUD_FPout_L
AUD_GND
AUD_VCC
AUD_RET_R
Key
AUD_RET_L
12
13
14
15
16
17
18
6
5
2
1
NC
VCC5
IRTX
NC
Ground
IRRX
Important
Ifyoudonotwanttoconnecttothefrontaudioheader,pins5&6,9&10havetobejumperedinordertohavesignaloutput
directedtothe rearaudioports.Otherwise,theLine-Outconnectoron thebackpanelwill notfunction.

En-9
InstallationGuide
English
D-Bracket™2Connector
TheconnectorisforyoutoconnectD-Bracket™2.D-Bracket™2isaexternalUSBBracketthatsupportbothUSB1.1&
2.0spec.ItintegratesfourLEDsandallowsuserstoidentifysystemproblemthrough16variouscombinationsofLED
signals.The4LEDscandebugallproblemsthatfailthesystem,suchasVGA,RAMorotherfailures.Thisspecialfeature
isveryusefulfortheoverclockingusers.Theseuserscanusethefeaturetodetectifthereareanyproblemsorfailures.
ConnectedtotheUSBpinheader
inYELLOW color
ConnectedtoD-Bracket™
2Connector
LEDs
1
9
2
10
DBG1
DBG1
DBG3
DBG4
Key
DBR1
DBR2
DBR3
DBR4
NC
D-Bracket™2
(Optional)
12
34
BIOSSignOn
Thiswillstart showinginformation
aboutlogo,processorbrandname,
etc...
TestingBaseandExtendedMemory
Testing basememoryfrom240Kto
640Kandextendedmemoryabove
1MBusingvariouspatterns.
AssignResourcestoall ISA.
InitializingHardDriveController
This will initializeIDEdriveand
controller.
Initializing FloppyDriveController
Thiswill initializeFloppyDriveand
controller.
BootAttempt
Thiswillsetlowstackandbootvia
INT19h.
OperatingSystemBooting
SystemPowerON
TheD-LEDwillhang hereifthe
processorisdamaged ornotin-
stalledproperly.
InitializingKeyboardController.
TestingVGABIOS
Thiswill startwriting VGAsign-on
messagetothescreen.
ProcessorInitialization
Thiswillshowinformationregarding
theprocessor(likebrandname,sys-
tembus,etc...)
TestingRTC(RealTimeClock)
Description
Red Green
LEDssignal
12
34
12
34
12
34
12
34
12
34
12
34
12
34
12
34
DescriptionLEDssignal
12
34
12
34
12
34
12
34
12
34
12
34
12
34
12
34
EarlyChipsetInitialization
MemoryDetectionTest
Testingonboardmemorysize.The
D-LEDwillhangifthememorymod-
uleisdamaged ornot installed
properly.
DecompressingBIOSimagetoRAM
forfastbooting.
InitializingVideoInterface
This will startdetecting CPUclock,
checkingtypeofvideoonboard.Then,
detectandinitializethevideoadapter.
19

En-10
MS-7235Mainboard
PowerSupplyAttachment
Beforeinsertingthepowersupplyconnector,alwaysmakesurethatallcomponents
areinstalledproperlytoensurethatnodamagewillbecaused.Allpowerconnectors
onthe mainbnoardhavetoconnecttotheATXpowersupplyandhaveto workto-
gethertoensurestableoperationofthemainboard.
ATX24-PinPowerConnector
ThisconnectorallowsyoutoconnectanATX24-pinpowersupply.ToconnecttheATX
24-pinpowersupply,makesuretheplugofthepowersupplyisinsertedintheproper
orientationandthepinsarealigned.Thenpushdownthepowersupplyfirmlyintothe
connector.
ATX12VPowerConnector(2x2-Pin)
These12Vpowerconnectorsisused toprovidepowertotheCPU.
ATX12VPowerConnector(2x4-Pin)
These12Vpowerconnectorsisused toprovidepowertotheCPU.
ATX12VPowerConnector(1x4-Pin)
These12Vpowerconnectorsisusedtoprovidepowertothegraphicscard.
8 4
1
5GND
GND
GND
GND
+12V
+12V
+12V
+12V
1
34
2
GND
12V
GND
12V
ATX20-PinPowerConnector
ThisconnectorallowsyoutoconnectanATX20-pinpowersupply.ToconnecttheATX
20-pinpowersupply,makesuretheplug ofthe powersupplyis insertedintheproper
orientationand thepinsarealigned.Thenpush downthepowersupplyfirmlyintothe
connector.
1
1020
11
3.3V
3.3V
GND
5V
GND
5V
GND
PWROK
5VSB
12V 5V
5V
-5V
GND
GND
GND
PS-ON
GND
-12V
3.3V
21
22
25
24
23
4
2
1
3
5V
GND
GND
12V
1
1224
13
+3.3V
+3.3V
GND
+5V
GND
+5V
GND
PWROK
5VSB
+12V
+12V
+3.3V GND
+5V
+5V
+5V
NC
GND
GND
GND
PS-ON#
GND
-12V
+3.3V
ClearCMOSButton
TheCMOSRAMonboardhasapowersupplyfromexternalbatterytokeepthedataofsystemconfiguration.WiththeCMOS
RAM,thesystemcanautomatically bootOSeverytimeitisturnedon.Ifyouwanttoclearthesystemconfiguration,usethe
ClearCMOSButtontocleardata.Press thebuttoninthemiddleoftheconnectortop sidetoclearthedata.
20
Important
MakesurethatyoupoweroffthesystembeforeclearingCMOSdata.

En-11
InstallationGuide
English
PCI Express Slots(x16/x4/x1)
The PCIExpress slot, asahigh-bandwidth,lowpincount, serial,interconnecttechnology.PCIExpress architecture
providesahighperformanceI/OinfrastructureforDesktopPlatformswithtransferratesstartingat2.5Gigatransfersper
second overaPCI Expressx1lane forGigabitEthernet, TVTuners,1394 controllers,and generalpurposeI/O.Also,
desktop platformswithPCIExpress Architecturewill be designed todeliverhighestperformanceinvideo, graphics,
multimediaandothersophisticatedapplications.Moreover,PCIExpressarchitectureprovidesahighperformancegraph-
icsinfrastructureforDesktopPlatformsdoublingthecapabilityofexistingAGP8xdesignswithtransferratesof4.0GB/
soveraPCIExpressx16laneforgraphicscontrollers.Youcaninserttheexpansioncardstomeetyourneeds.Whenadding
orremovingexpansioncards,makesurethatyouunplugthepowersupplyfirst.
PCIExpressx16Slot
PCI Express x4 Slot
PCI Express x1 Slot
PCI(PeripheralComponentInterconnect)Slot
ThePCIslotsallowyoutoinserttheexpansioncardstomeetyourneeds.Whenaddingorremovingexpansioncards,make
surethatyouunplugthepowersupplyfirst.Meanwhile,readthedocumentationfortheexpansioncardtomakeanynecessary
hardwareorsoftwaresettingsfortheexpansioncard,suchasjumpers,switchesorBIOSconfiguration.
AGP(AcceleratedGraphics Port) Slot
TheAGPslotallowsyoutoinserttheAGPgraphicscard.AGPisan interfacespecificationdesignedforthethroughput
demandsof3Dgraphics.Itintroducesa66MHz,32-bitchannelforthegraphicscontrollertodirectlyaccessmainmemory.
28
27
26

En-12
MS-7235Mainboard
BackPanel
Mouse/KeyboardConnector
ThestandardPS/2 mouse/keyboardminiDINconnectorforattachingaPS/2 mouse/keyboard.Youcan plugaPS/2
mouse/keyboarddirectlyintothisconnector.Theconnectorlocationandpinassignmentsareasfollows:
IEEE1394 Port
The1394portonthebackpanelprovidingtheconnectionfor1394device.
PS/2Mouseconnector(Green/6-pinfemale)
PS/2Keyboardconnector(Purple/6-pinfemale)
ParallelPortConnector
AparallelportisastandardprinterportthatsupportsEnhancedParallelPort(EPP)andExtendedCapabilitiesParallelPort
(ECP)mode.
SerialPortConnector
Theserialportisa16550Ahighspeedcommunicationportthatsends/receives16bytesFIFOs.Youcanattachaserial
mouseorotherserialdevicesdirectlytotheconnector.
(9-PinMaleDINConnector)
13 1
1425
(25-pinfemalecentronicconnector)
15
69
VGAConnector
TheDB15-pinfemaleconnectortoconnectaVGAmonitor.
(15-PinFemaleDINConnector)
DigitalPanelConnector
The DVI (DigitalVisualInterface)connectorallowsyou toconnectan LCD monitor.It providesahigh-speed digital
interconnectionbetweenthecomputeranditsdisplaydevice.ToconnectaLCDmonitor,simplyplugyourmonitorcableinto
theDVIconnector,andmakesurethattheotherendofthecableisproperlyconnectedtoyourmonitor.(refertoyourmonitor
manualformoreinformation.)
1
24
17
8
15
1115
29
30
33
32
31
34
Important
PleasenotethattheDVIconnectordoesnotsupportconnectingthe D-SubtoDVIconverter.
This manual suits for next models
1
Table of contents
Languages:
Other MSI Motherboard manuals

MSI
MSI B150M NIGHT ELF User manual

MSI
MSI MS-6167 User manual

MSI
MSI 870A-G54 series User manual

MSI
MSI MS-98F6 User manual

MSI
MSI Z790 EDGE WIFI User manual

MSI
MSI MAG B760M MORTAR MAX WIFI User manual

MSI
MSI A75A-G35 Series User manual

MSI
MSI 945G Neo User manual

MSI
MSI X99A GAMING PRO CARBON User manual

MSI
MSI MS-96B3 User manual

MSI
MSI KT3 Ultra2-C MS-6593 User manual

MSI
MSI K8NGM-V Series User manual

MSI
MSI X299 XPOWER GAMING AC User manual

MSI
MSI 925XE Neo Platinum User manual

MSI
MSI MAG B550M MORTAR WIFI User manual

MSI
MSI K9MM-V User manual

MSI
MSI ATX BX1 User manual

MSI
MSI 990FXA-GD65 Series User manual

MSI
MSI G52-MA00353 User manual

MSI
MSI MS-7204 User manual