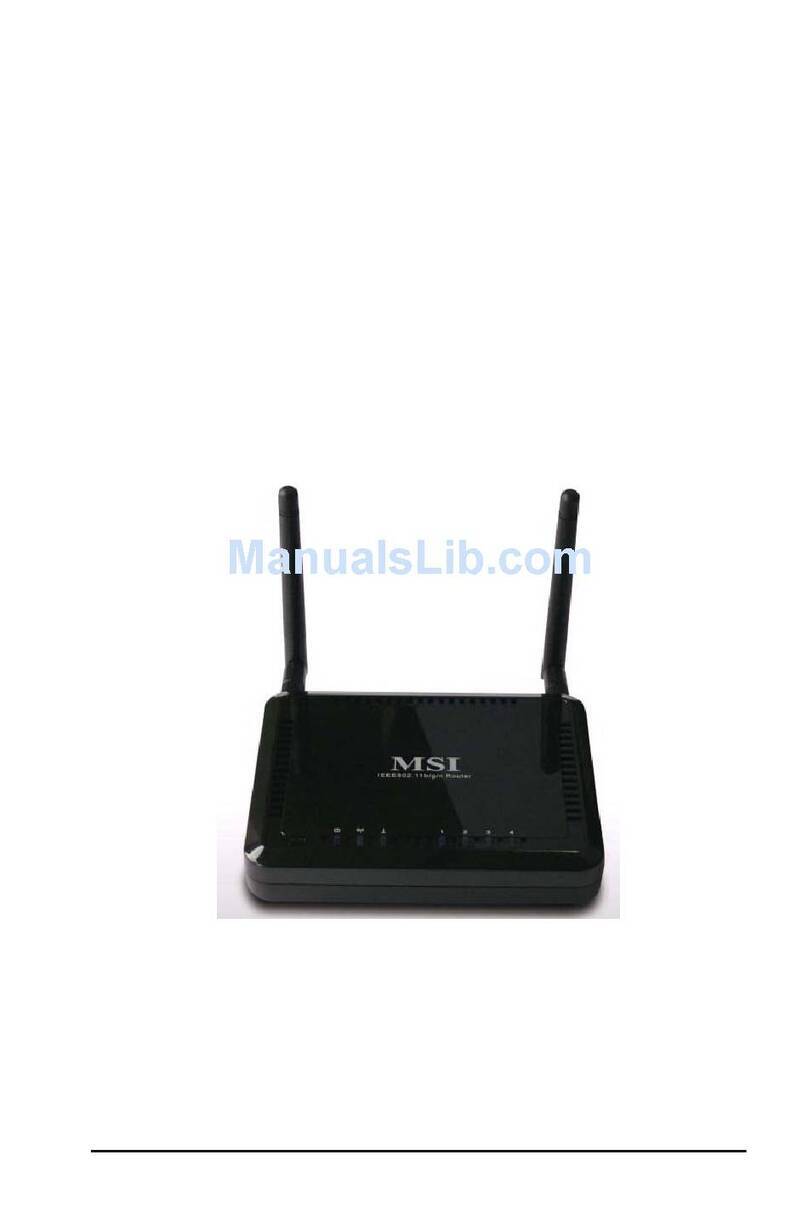
MSI RG54GS2 User manual

MSIRG54GS2
802.11b/gWirelessRouter
PlusUSBPrintServer
MICRO-STARINT L

FCCCaution
1. ThedevicecomplieswithPart 15ofthe FCCrules. Operationissubjectto
thefollowingtwoconditions:
(1)Thisdevicemaynot causeharmful interference,and
(2) Thisdevice mustacceptanyinterferencereceived,including interference
that may causeundesiredoperation.
2. FCCRFRadiationExposureStatement: The equipment complieswithFCC
RFradiation exposurelimitsset forthfor anuncontrolledenvironment.
Thisequipmentshouldbe installed andoperated withaminimum
distanceof 20centimetersbetween theradiator and yourbody.
3. ThisTransmitter mustnot beco-locatedoroperating inconjunction with
anyother antenna or transmitter.
4. Changesormodificationstothisunit not expresslyapprovedbythe
partyresponsiblefor compliancecouldvoidtheuserauthoritytooperate
theequipment.
CopyrightNotice
Thematerialinthisdocument istheintellectualpropertyof MICRO-STARINTERNA-
TIONAL.Wetakeeverycareinthe preparationofthisdocument,but noguaranteeis
givenastothe correctnessofitscontents. Ourproductsareunder continualimprove-
ment andwereserve therighttomakechangeswithout notice.
Trademarks
MicrosoftWindowsandInternetExplorerareregistered trademarksortrademarksof
Microsoft Corporation.
Allbrand names,icons, and trademarksused inthismanualarethe solepropertyoftheir
respectiveowners.
TechnicalSupport
Visit the MSIwebsiteforFAQ, technicalguide, driverand softwareupdates,
andotherinformation: http://www.msi.com.tw/.
Contactourtechnicalstaffat: support@msi.com.tw.
RevisionHistory
Revision History Date
V1.0 FirstRelease June2005

ImportantSafetyPrecautions
Alwaysread andfollowthese basicsafetyprecautionscarefullywhenhandlingany
pieceofelectroniccomponent.
1. Keep this User sGuide forfuturereference.
2. Keep thisequipmentawayfromhumidity.
3. Laythisequipmentonareliableflatsurface beforesetting it up.
4. Theopeningson the enclosurearefor air convectionhenceprotectsthe
equipment fromoverheating.
5. Allcautionsand warningsontheequipmentshouldbenoted.
6. Neverpouranyliquidintotheopening thatcoulddamage or causeelectrical
shock.
7. If anyof the following situationsarises, get theequipmentcheckedbya
servicepersonnel:
Liquidhaspenetratedintothe equipment
Theequipmenthasbeen exposed tomoisture
Theequipmenthas notworkwell or youcannotget it work
accordingtoUser sManual
Theequipment hasdroppedanddamaged
Ifthe equipmenthasobvioussignofbreakage
8. DONOTLEAVETHISEQUIPMENTINANENVIRONMENT
UNCONDITIONED,STORAGETEMPERATURE ABOVE60O COR
BELOW-20OC,ITMAYDAMAGETHEEQUIPMENT.
Toprotecttheglobalenvironmentandasanenvironmentalist,
MSImustremindyouthat...
UndertheEuropeanUnion("EU")Directive onWasteElectrical
andElectronicEquipment, Directive 2002/96/EC,whichtakes ef-
fectonAugust13,2005, productsof"electricalandelectronic
equipment"cannotbediscarded asmunicipalwasteanymoreand
manufacturersofcoveredelectronicequipmentwillbeobligated
totake back suchproductsat theendof their usefullife.MSIwill
complywiththeproducttakebackrequirementsat theend of life
of MSI-branded productsthat aresoldintotheEU. Youcanreturn
theseproductstolocalcollectionpoints.
WEEE Statement
CONTENTS
1.ENGLISH................................................................................1-1
2.DEUTSCH...............................................................................2-1
3. FRAN AIS.............................................................................3-1
4.ESPAŃOL...............................................................................4-1
5.ITALIANO...............................................................................5-1
6. NEDERLANDS........................................................................6-1
7. ČESKY...................................................................................7-1
8. PORTUGUĘS..........................................................................8-1
9. POLSKI..................................................................................9-1
10. РУCCKИЙ.............................................................................10-1
11.ENGLIS.................................................................................11-1
12.ENGLI..................................................................................12-1
13. TÜRK E................................................................................13-1
14. .......................................................................................14-1
15. ................................................................................15-1
16. 體中文...............................................................................16-1
!"#
体中文

1-1
ENGLISH
ENGLISH

1-2
>>>Before You Begin
ThisQuickUser sGuideistohelp youinstalltheRG54GS2
quicklyandeasily.Inthisguide,you can knowyour
RG54GS2well and completetheinstallationthrough this
guide.
Pleasenotethatall figuresinthisguideareforreference
only;the actualsetup screensmaybe varyon different
system.Forthenetworkadapter ssetting,pleasereferto
Appendix.Formoreinformation,pleaserefertotheUser
ManualintheCD-ROMorvisit MSIwebsite: http://www.
msi.com.tw.
Antenna
LANLEDs
The Green lightgrowswhen a
computer/deviceconnectedtore-
spectiveport. The LEDblinksdur-
ing datatransmission.
WAN LED
The Green lightgrowswhencon-
necttoaxDSL/Cablemodemor
Ethernetdevice.TheLEDblinks
during datatransmission.
FrontView
USBLED
The Green lightgrows
whenaUSB printer con-
nectstotheUSBport.
WLANLED
The Green light growstoindi-
catethestatus of RG54GS2 s
wirelessnetwork.
StatusLED
The Green lightindicates
thestatus of RG54GS2.
ResetButton
Press and hold(using a
pointedobject, suchasa
stretched clip)thisbutton
longer than asecond tore-
startthe RG54GS2. Longer
than5secondswillreload
thefactorydefaultsettings.
PowerLED
The Green light
growstoindi-
catethepower
adapteris
connected.
>>>ProductView
StatusLED 1.Flashoncepersecond:Worksnormally.
2.Flashveryfast: FirmwareupgradefailedorROMnot
burninflashcompletely.
3.Flashirregularly:Hardwareerrorcaused bysomecom
ponent broken.

1-3
ENGLISH
BackView
LANPorts
The RG54GS2 provides four10/
100MbpsRJ-45ports,allowing
connectiontocomputersand other
networkdevices.
WAN Port
The10/100MbpsEthernetport
provides connectiontoyourxDSL/
CableModemor Ethernet devices.
USBPrinterPort
The USB 1.1portisused tocon-
necttheprinter toprovideprint
server function.
PowerJack
Connectthe enclosed power
adaper toprovide powertothe
RG54GS2.
ConnectingCables
1.ToaccesstotheInternet,connectone endofan
EthernetcabletotheWANportofRG54GS2,andthe
otherendtoyourxDSL/Cable Modem.
2. Forwiredconnection tothenetworkdevices, connect
oneend ofan Ethernet cabletotheLANport(1~4)of
RG54GS2, andtheotherendtoyourcomputers/
devices.
3.ToconnecttheUSB printer,connectone end of the
USBcabletotheUSB portofRG54GS2,andthe other
end toyourprinter.
4. Forwirelessconnection,install thewirelessadapters
ontoyourcomputers,and you havetoconfigurere
spectivesettingsonyourcomputers(refertoyour
wireless adapter'smanual)totakefulladvantagesof
theRG54GS2.

1-4
>>>MSIConfigurationUtility
Connectoneend of anEthernet cable totheLANport (1~4)
ofRG54GS2,and theotherendtoyourcomputers
Step1
DefaultSettings
SSID MSI
Channel 7
User admin
Password admin
IPAddress 192.168.1.254
Subnet Mask 255.255.255.0
Encryption Disable
TheMSIRG54GS2providesyouaconvenientutilitytocus-
tomizethenetworksettings.Wheneveryouwanttocon-
figuretherespectivesettings,openyourwebbrowser(e.
g. InternetExplorer),and typethedefaultIPaddress 192.
168.1.254 inthe Addressbarand press[Enter].Then, type
admin intheUsernameand Passwordbox,then click OK.
Step2

1-5
ENGLISH
Step3 TheHomewindowoftheConfigurationUtilitywill appear
asbelow,whichprovidestwooptionstoselect: Setup
Wizard and CustomizedConfiguration.
The SetupWizard providesastep-by-steptoguide you
throughthe basicsettingsofthegateway.Generally,
aftercompleting thestepsin thisoption,yourRG54GS2
canconnecttotheISPandyourclientcomputerscanac-
cess totheInternetwithoutanyproblem.If youwantto
configurethe settingsaccording yournetworkenvironment,
pleaserefertothe instructioninthe UserManualtocom-
pletethe settingsinCustomized Configuration.
Select SetupWizard then click Next tocontinue Step 4.

1-6
Step4 According totheconnectiontypeyouareusing,clickthe
respectiveoptiontoconfigurethesettings.Ifyouarenot
sureofwhichsettingtoselect, pleasecontactyourInternet
ServiceProvider.
Clickone oftheoptionsaboveand entertheinformation
required,andthenclick Next tocontinue Step 5.
Step5 1.StaticIP
Ifyourbroadband access isthrough axDSLmodemand
yourISP assignedyouastaticIPaddress,select thisoption.
Enterthe InternetIPAddress acquiredfromtheISP
provider.

1-7
ENGLISH
2. DynamicIP
If yourbroadband access isthroughacable modem,se-
lectthisoption.Beforeusingthissetting,yourcomputer
shouldberegisteredon the ISP snetwork.
3.DynamicIP*(Bigpond Cable)
SpecialsettingsforspecificarealikeAustrila.
4. PPPoE
If yourbroadband access isthrough axDSLmodemand
yourISP didnot assignyouastaticIPaddress,selectthis
option. Enteryour UserName and Password fordial-up
network
Click CloneMac tocopythe MAC
addressofthenetworkadapterin
yourcomputerautomatically. You
canalsotype in theMACaddress
manually.

1-8
5.PPTP/L2TP
Theseoptionsareusedmostlyin Europe.SelectyourIP
Modeand enter MyIPAddress, ServerIPAddress,
UserName and Password.(Fordetailsonsettingthe
twooptions,pleaseaskyourISPformoreinstructions.)
Step6 Click Finish then select Reboot toenablethesettings.

1-9
ENGLISH
>>>AdvancedSettings
Afterthesettingsarecompleted,you canfine tune the
settingsbyselecting CustomizedConfiguration.The
stepsarethe sameas Step2, butselect Customized
Configuration instead,thenclick Advanced. Forfurther
information, pleaserefertotheUserManualin theCD-ROM
orvisitMSIwebsite: http://www.msi.com.tw.
If you wanttosetup theprintserver,pleaseselectCus-
tomizedConfiguration => Setup => PrintServer.For
advancedsettings,pleaserefertotheUserManual.

1-10
Appendix
Beforeyouconnecttothenetwork,pleasemakesurethe
networkadapterinyourcomputerisconfiguratedproperly.
Followthestepsbelowtofinishthesettungs.
1.For Microsoft WindowsXP
Goto Start -->Right
clickon MyNetwork
Places --> Properties
-->Rightclickon Local
Area Connection and
select Properties.
2.Select InternetProtocol (TCP/IP) thenclick Proper-
ties.
Select
Click
>>>

1-11
ENGLISH
3.Select Obtainan IPaddressautomatically then click
OK.
Select
Click

DEUTSCH

2-2
>>> BevorSiebeginnen
DieseSchnellanleitungsollIhnen dabeihelfen, denRG54GS2
schnellund einfachzuinstallieren.Mit dieserAnleitunglernen
Sie denRG54GS2kennen,und Sieerfahren, wiedieInstal-
lationSchrittfürSchrittausgeführt wird.
BeachtenSie,dass alleAbbildungen indieserAnleitungnur
einAnhaltspunktseinkönnen;esistmöglich,dassdie
tatsächliche Bildschirmanzeigeje nachverwendetemSys-
temabweichenkann.Informationenzuden Einstellungen
desNetzadaptersfindenSieim Anhang.Weitere
InformationenfindenSieimBenutzerhandbuchaufderCD-
ROMund aufderMSI-Website: http://www.msi.com.tw.
Antenne
LAN-LEDs
Die Grüne Lampenleuchten, wennein
Computer/Gerätan denentsprechenden
Anschlussangeschlossenist. Während
derDatenübertragungblinken dieLEDs.
WAN-LED
Die Grüne Lampe leuchtet, wenn
einxDSL-/Kabelmodemoderein
Ethernetgerätangeschlossenist.
WährendderDatenübertragung
blinktdieLED.
Ansichtvonvorne
USB-LED
Die GrüneLampeleuchtet,
wenn einUSB-Drucker an
denUSB-Anschluss
angeschlossen ist.
WLAN-LED
Die Grüne Lampeleuchtet,
umden Statusdes
drahtlosen Netzwerks des
RG54GS2anzuzeigen.
Status-LED
DiegrüneLampezeigt den
Status des RG54GS2 an.
Resettaste
DrückenSie(mit einemspitzenGegenstand,z.
B.einerauseinander gebogenen Büroklammer)
etwas längeralseine Sekunde aufdieseTaste,
umdenRG54GS2neuzustarten.WennSie
längerals5Sekundenauf dieseTastedrücken,
werden dieWertewiederaufdie
Standardeinstellungenzurückgesetzt.
Betriebsanzeige-LED
Die Grüne Lampeleuchtet,
wenndasGerätmit Strom
versorgtwird.
>>> Produktansicht
Status-LED1.Blinkteinmal proSekunde:normaleFunktion.
2.Blinktsehrschnell:Firmwareupgradefehlgeschlagen
oderROMnichtvollständig gespeichert.
3.Blinktunregelmäßig:Hardwarefehleraufgrund
beschädigterKomponente.

2-3
DEUTSCH
Ansichtvonhinten
LAN-Anschlüsse
Der RG54GS2 verfügt übervier
10/100Mbps RJ-45-A-
Anschlüsse,an dieComputer
undandereNetzwerkgeräte
angeschlossenwerdenkönnen.
WAN-Anschluss
Anden 10/100Mbps
Ethernetanschlusskönnendas
xDSL-/Kabelmodemoderandere
Ethernetgeräteangeschlossen
werden.
USB-Druckeranschluss
Anden USB-1.1-Anschluss kann
derDruckerangeschlossen
werden.
Netzanschluss
Anden Netzanschluss wirdder
Netzadapter angeschlossen, um
den RG54GS2 mitStromzu
versorgen.
AnschließenderKabel
1.Schließen SiefürdenZugang zumInternetdaseine
EndeeinesEthernetkabelsandenWAN-Anschluss
desRG54GS2unddasandereEndeanIhrxDSL-/
Kabelmodeman.
2.SchließenSiefüreineKabelverbindungzuden
Netzwerkgerätendaseine EndeeinesEthernetkabels
andenLAN-Anschluss desRG54GS2(1-4)und das
andereEndeandenComputer/dieGerätean.
3.SchließenSiefürdieVerbindung mitdemUSB-
Druckerdaseine Ende desUSB-KabelsandenUSB-
AnschlussdesRG54GS2unddasandereEndean
denDruckeran.
4.SchließenSiefüreineDrahtlosverbindung die
DrahtlosadapterandieComputeranundkonfigurieren
Sie dieEinstellungen derComputer(lesenSieim
BenutzerhandbuchdesDrahtlosadaptersnach),um
den RG54GS2optimalnutzenzukönnen.

2-4
>>>
MSI-Konfigurationsprogramm
Schritt 1 SchließenSie ein Ende einesEthernetkabelsanden LAN-
Anschluss desRG54GS2(1-4)und dasandereEndean
IhreComputeran.
Schritt 2 DerMSIRG54GS2verfügt überein praktisches
Hilfsprogramm,mitdemSiedieNetzwerkeinstellungen
vornehmenkönnen.Wenn Siedieentsprechenden
Einstellungen ändernmöchten, öffnenSie den
Webbrowser(z.B.InternetExplorer) und tippenSieinder
Adresszeile dieStandard-IP-Adresse 192.168.1.254 ein
unddrückenSie auf[Enter].Tippen Siedannbeim
Benutzernamenund imPasswortfeld admin einundklicken
SieaufOK.
Standardeinstellungen
SSID MSI
Channel (Kanal) 7
User(Benutzer) admin
Password(Passwort) admin
IPAddress (IP-Adresse) 192.168.1.254
Subnet Mask(Subnetz-Maske)255.255.255.0
Encryption(Verschlüsselung)Disable(deaktiviert)

2-5
DEUTSCH
Schritt 3 AufdemBildschirmerscheintdasHauptfensterdes
Konfigurationsprogramms(s.u.). DiesesbietetIhnenzwei
Optionen: Setup Wizard(Setupassistent) und Custom-
izedConfiguration (BenutzerdefinierteKonfiguration).
Beim SetupWizard(Setupassistent) werdenSieSchritt
fürSchrittdurchdie Grundeinstellungen desGateway
geführt.NormalerweisekönnenSienachAusführenaller
SchrittemitdemRG54GS2eineVerbindungzum
Internetdienstanbieterherstellen,unddieClient-Computer
könnenproblemlosauf dasInternet zugreifen.Wenn Sie
dieEinstellungen entsprechendIhrerNetzwerkumgebung
konfigurierenmöchten,lesenSieimBenutzerhandbuch
imAbschnitt CustomizedConfigurationnach.
WählenSie Setup Wizard(Setupassistent) und klicken
Sieauf Next(Weiter) und fahrenSiefort mit Schritt 4.
Other manuals for RG54GS2
3
Table of contents
Languages:
Other MSI Wireless Router manuals

MSI
MSI RG54SE User manual

MSI
MSI RG54SE User manual

MSI
MSI RG-54G3 User manual

MSI
MSI RG300EX LITE User manual

MSI
MSI RG-54G3 User manual

MSI
MSI RG70SE User manual

MSI
MSI RG300EX LITE User manual

MSI
MSI RG300EX LITE User manual

MSI
MSI RG60G - Wireless Router User manual

MSI
MSI RG60G - Wireless Router Instruction manual