MSW MSW-TRB-300 User manual

EXPONDO.DE
TUBE ROLLE BENDER
MSW-TRB-300
BEDIENUNGSANLEITUNG
User manual | Instrukcja obsługi | Návod k použití | Manuel d´utilisation | Istruzioni per l‘uso | Manual de instrucciones

Deutsch
English
Polski
Česky
Français
Italiano
Español
3
7
11
15
19
23
27
INHALT | CONTENT | TREŚĆ | OBSAH | CONTENU | CONTENUTO | CONTENIDO
2Rev. 06.07.2020
PRODUKTNAME ROHRBIEGEMASCHINE
PRODUCT NAME TUBE ROLLE BENDER
NAZWA PRODUKTU GIĘTARKA DO RUR
NÁZEV VÝROBKU RUČNÍ OHÝBAČKA TRUBEK
NOM DU PRODUIT CINTREUSE DE TUBE A GALETS
NOME DEL PRODOTTO PIEGATRICE PER TUBI
NOMBRE DEL PRODUCTO MÁQUINA DOBLADORA DE TUBOS
MODELL
MSW-TRB-300
PRODUCT MODEL
MODEL PRODUKTU
MODEL VÝROBKU
MODÈLE
MODELLO
MODELO
IMPORTEUR
EXPONDO POLSKA SP. Z O.O. SP. K.
IMPORTER
IMPORTER
DOVOZCE
IMPORTATEUR
IMPORTATORE
IMPORTADOR
ADRESSE VON IMPORTEUR
UL. NOWY KISIELIN-INNOWACYJNA 7, 66-002 ZIELONA GÓRA | POLAND, EU
IMPORTER ADDRESS
ADRES IMPORTERA
ADRESA DOVOZCE
ADRESSE DE L'IMPORTATEUR
INDIRIZZO DELL'IMPORTATORE
DIRECCIÓN DEL IMPORTADOR
TECHNISCHE DATEN
Parameter Werte
Produktname ROHRBIEGEMASCHINE
Modell MSW-TRB-300
Abmessungen [mm] 1550x550x1090
Gewicht [kg] 66,6
Bearbeitungswinkel [°] 0-130
Werkstückdicke [mm] 1,5-4
Die Begrie "Gerät" oder "Produkt" in den Warnungen
und Beschreibung des Handbuchs beziehen sich auf
ROHRBIEGEMASCHINE.
2.1. SICHERHEIT AM ARBEITSPLATZ
a) Halten Sie Ihren Arbeitsplatz sauber und gut
beleuchtet. Unordnung oder schlechte Beleuchtung
können zu Unfällen führen. Seien Sie voraussichtig,
beobachten Sie, was getan wird und bewahren
Sie Ihren gesunden Menschenverstand bei der
Verwendung des Gerätes.
b) Dieses Gerät ist nicht dafür geeignet, durch Personen,
einschließlich Kindern, mit eingeschränkten
physischen, sinnlichen oder geistigen Fähigkeiten,
sowie mangelnder Erfahrung und/oder mangelndem
Wissen benutzt zu werden. Als Ausnahme gilt, wenn
diese durch eine für ihre Sicherheit zuständige Person
beaufsichtigt werden, oder Gebrauchsanweisungen
erhalten haben.
c) Dieses Gerät darf nur durch entsprechend geschulte,
zur Bedienung geeignete und physisch gesunde
Personen bedient werden, die die vorliegende
Anleitung gelesen und verstanden haben.
d) Wenn Beschädigungen oder Unregelmäßigkeiten
während der Arbeit des Geräts festgestellt werden,
sofort die Arbeit einstellen und den Verantwortlichen
benachrichtigen.
e) Bei Zweifel, ob das Produkt ordnungsgemäß funktioniert
oder wenn Schäden festgestellt werden, wenden Sie sich
bitte an den Kundendienst des Herstellers.
f) Das Produkt darf nur vom Hersteller repariert werden.
Reparieren Sie es nicht selbst!
g) Kinder und Unbefugte dürfen am Arbeitsplatz nicht
anwesend sein. (Unachtsamkeit kann zum Verlust der
Kontrolle über das Gerät führen).
h) Während der Bearbeitung von Werkstücken auf die
Anwesenheit von Unbefugten und deren Sicherheit
achten.
i) Während der Bearbeitung das Werkstück genau
beobachten, damit bei Gefahr rechtzeitig reagiert
werden kann oder Schäden am Werkstück vermieden
werden können.
j) Ordnung halten und nach der Bearbeitung Staub,
Splitter und unnötige Teile des Werkstücks entfernen.
k) Wenn mehrere Werkstücke hergestellt werden, diese
vor und nach der Bearbeitung so lagern, damit die
Ordnung an der Arbeitsstelle garantiert wird.
2.2. PERSÖNLICHE SICHERHEIT
a) Es ist nicht gestattet, das Gerät im Zustand der
Ermüdung, Krankheit, unter Einuss von Alkohol,
Drogen oder Medikamenten zu betreiben,
wenn diese die Fähigkeit das Gerät zu bedienen,
einschränken.
b) Seien Sie aufmerksam und verwenden Sie Ihren
gesunden Menschenverstand beim Betreiben
des Gerätes. Ein Moment der Unaufmerksamkeit
während der Arbeit kann zu schweren Verletzungen
führen.
c) Benutzen Sie persönliche Schutzausrüstung, die für
den Betrieb des Gerätes entsprechend den in Punkt 1
der Symbolerläuterungen vorgegebenen Maßgaben
erforderlich ist. Die Verwendung geeigneter
und zertizierter persönlicher Schutzausrüstung
verringert das Verletzungsrisiko.
3
Rev. 06.07.2020
1. ALLGEMEINE BESCHREIBUNG
Diese Anleitung ist als Hilfe bei der sicheren und
zuverlässigen Nutzung gedacht. Das Produkt wurde strikt
nach den technischen Vorgaben und unter Verwendung
modernster Technologien und Komponenten sowie unter
Wahrung der höchsten Qualitätsstandards entworfen und
angefertigt.
VOR INBETRIEBNAHME MUSS DIE ANLEITUNG
GENAU DURCHGELESEN
UND VERSTANDEN WERDEN.
Für einen langen und zuverlässigen Betrieb des Geräts muss
auf die richtige Handhabung und Wartung entsprechend
den in dieser Anleitung angeführten Vorgaben geachtet
werden. Die in dieser Anleitung angegebenen technischen
Daten und die Spezikation sind aktuell. Der Hersteller
behält sich das Recht vor, im Rahmen der Verbesserung der
Qualität Änderungen vorzunehmen.
ERLÄUTERUNG DER SYMBOLE
Gebrauchsanweisung beachten.
ACHTUNG! oder WARNUNG! oder HINWEIS!
um auf bestimmte Umstände aufmerksam zu
machen (Allgemeines Warnzeichen).
Augenschutz benutzen.
Handschutz benutzen.
Fußschutz benutzen.
ACHTUNG! Scharfe Elemente.
Schnittverletzungen an Gliedmaßen.
ACHTUNG! Warnung vor Handverletzungen.
Nur zur Verwendung in geschlossenen Räumen.
HINWEIS! In der vorliegenden Anleitung sind
Beispielbilder vorhanden, die von dem tatsächlichen
Aussehen der Maschine abweichen können.
Die originale Anweisung ist die deutschsprachige Fassung.
Sonstige Sprachfassungen sind Übersetzungen aus der
deutschen Sprache.
ACHTUNG!Lesen Sie alle Sicherheitshinweise und
alle Anweisungen durch. Die Nichtbeachtung der
Warnungen und Anweisungen kann zu elektrischen
Schlägen, Feuer und/oder schweren Verletzungen bis
hin zum Tod führen.
2. NUTZUNGSSICHERHEIT
HINWEIS! Kinder und Unbeteiligte müssen bei der
Arbeit mit diesem Gerät gesichert werden.
BEDIENUNGSANLEITUNG

18
7
3
56
1 2
4
5
Rev. 06.07.2020
d) Überschätzen Sie Ihre Fähigkeiten nicht. Halten Sie
Balance und Gleichgewicht während der Arbeit. Dies
gibt Ihnen eine bessere Kontrolle über das Gerät im
Falle unerwarteter Situationen.
e) Tragen Sie keine lose Kleidung oder Schmuck.
Halten Sie Haare, Kleidung und Handschuhe von
beweglichen Teilen fern. Lose Kleidung, Schmuck
oder lange Haare können durch bewegliche Teile
ergrien werden.
f) Alle Einstellwerkzeuge und Schlüssel vor dem
Gebrauch des Werkzeugs entfernen. Ein Gerät
oder ein Schlüssel, die im rotierenden Teil des
Gerätes gelassen werden, können schwere
Körperverletzungen verursachen.
g) Der zu verarbeitende Sto soll frei von
Verunreinigungen sein.
h) Während der Arbeit des Geräts in keine beweglichen
Teile oder Zubehörelemente greifen.
i) Schutzhandschuhe verwenden, um Verletzungen
durch scharfe Kanten zu vermeiden.
j) Keine Elemente aus festen Stoen bearbeiten.
k) Es ist untersagt, in den Aufbau des Geräts
einzugreifen, um seine Parameter oder Konstruktion
zu ändern.
2.3. SICHERE ANWENDUNG DES GERÄTS
a) Überhitzen Sie das Gerät nicht. Verwenden Sie
geeignete Werkzeuge für die entsprechende
Anwendung. Richtig ausgewählte Geräte und der
sorgsame Umgang mit ihnen führt zu besseren
Arbeitsergebnissen.
b) Nicht verwendete Werkzeuge sind außerhalb
der Reichweite von Kindern sowie von Personen
aufzubewahren, welche weder das Gerät selbst, noch
die entsprechende Anleitung kennen. In den Händen
unerfahrener Personen können derlei Geräte eine
Gefahr darstellen
c) Halten Sie das Gerät im einwandfreien Zustand.
Überprüfen Sie vor jeder Arbeit, ob allgemeine
Schäden vorliegen oder Schäden an beweglichen
Teilen (Bruch von Teilen und Komponenten oder
andere Bedingungen, die den sicheren Betrieb der
Maschine beeinträchtigen könnten). Im Falle eines
Schadens muss das Gerät vor Gebrauch in Reparatur
gegeben werden.
d) Halten Sie das Gerät außerhalb der Reichweite von
Kindern.
e) Reparatur und Wartung von Geräten dürfen nur
von qualiziertem Fachpersonal und mit Original-
Ersatzteilen durchgeführt werden. Dadurch wird die
Sicherheit bei der Nutzung gewährleistet.
f) Um die vorgesehene Betriebsintegrität des Gerätes
zu gewährleisten, dürfen die werksmäßig montierten
Abdeckungen oder Schrauben nicht entfernt
werden.
g) Beim Transport und beim Verlegen des Gerätes
vom Aufbewahrungsort zum Einsatzort sind
die Sicherheits- und Hygienevorschriften für
die manuelle Handhabung für das Land zu
berücksichtigen, in dem das Gerät verwendet wird.
h) Mit dem Gerät dürfen nur Werkstücke mit Parametern
gemäß den Daten aus der Tabelle der technischen
Daten bearbeitet werden. Das zulässige Ausmaß des
zu bearbeitenden Stoes nicht überschreiten.
i) Keine zwei Werkstücke auf einmal bearbeiten.
j) Lange Werkstücke müssen für die Bearbeitung
abgestützt und stabil sein.
3. NUTZUNGSBEDINGUNGEN
Die Biegemaschine ist ein manuell zu betätigendes
Biegegerȁt fűr Metallteile.
Für alle Schäden bei nicht sachgemäßer Verwendung
haftet allein der Betreiber.
3.1. GERÄTEBESCHREIBUNG
4Rev. 06.07.2020
1. Hauptrahmen
2. Schwenkarmrahmen
3. Gri (auf ein rechteckiges 1'x2'-Element aufgesetzt)
4. Matrize
5. Montageblock
6. Biegeelement
7. Gestell mit Montageönungen
1. Stellen Sie sicher, dass beide Rahmenplatten in die
gleiche Richtung ausgerichtet sind.
2. Pin 1 '' einbauen und schmieren. Stellen Sie sicher,
dass es sich reibungslos auf und ab bewegt.
3. Ziehen Sie die Schrauben ¾ ’fest an, damit der
Schwenkarm unter Druck bewegt werden kann.
4. Schieben Sie das rechteckige Element 1'x2 'über den
Gri, um den Hebel zu bewegen.
5. Zentrieren Sie den Gri und ziehen Sie den Flansch
fest.
Montage des Schwenkarms
6. Entfernen Sie den Stift 1 '' vom Hauptrahmen
und setzen Sie ihn wie gezeigt in die Löcher des
Schwingenarmrahmens ein.
7. Setzen Sie den Stift 7/8 '' gemäß der Zeichnung ein.
8. Befestigen Sie die Schwenkarmrahmenplatten mit
Schrauben ½ Zoll.
9. Achten Sie darauf, keine Unterlegscheiben unter
den Muttern unten oder oben an den Schrauben zu
verwenden.
10. Überprüfen Sie, ob die Schrauben fest angezogen
sind.
11. Die Abstandshalter haben die Abmessungen 1/2 "x 2
5/8".
12. Entfernen Sie Stift 1 '', setzen Sie den
Schwenkarmrahmen in den Hauptrahmen ein, richten
Sie die Löcher aus und setzen Sie Stift 1 '' wie gezeigt
ein.
13. Richten Sie die Schwenkarm an den Löchern im
Hauptrahmen aus.
Installation der Matrize
16. Schließen Sie den Schwenkarm und setzen Sie das
Rohr wie gezeigt in die Matrize ein.
17. Setzen Sie den Montageblock wie gezeigt ein und
sichern Sie ihn mit dem Stift.
Riemen-und Stiftinstallation
18. Legen Sie den Gurt bzw. Riemen um das Rohr,
spannen Sie ihn an und stecken Sie den Stift durch
den Riemen und die Matrize.
3.3. ARBEIT MIT DEM GERÄT
Achtung: Stellen Sie vor Arbeitsbeginn sicher, dass die in
der folgenden Abbildung markierten Stellen gut geschmiert
sind. Stellen Sie gleichzeitig sicher, dass kein Fett an andere
Stellen des Geräts gelangt.
15
14
8
9
10
11 12 13
3
2
15
4
8. Riemen
9. Matrixansch
10. Riemenbefestigungsstift
11. Stift 1’’
12. Stift 7/8’’
13. Stift des Montageblocks
14. Schraubenset ¾’’
15. Schraubenset ½’’
67
8
9
11
10
13
12
14 15
14. Ziehen Sie Stift 1 '' und Stift 7/8 '' im Rahmen des
Schwenkarms heraus, setzen Sie die Matrix ein, setzen
Sie Stift 1 '' in die Rahmenlöcher und die Matrixhülse
ein.
15. Setzen Sie den Stift 7/8 '' in den Schwenkarmrahmen
und das erste Matrizenloch ein.
Installation des Rohrs und des Montageblocks
17
16
k) Das Gerät auf einer stabilen, trockenen und achen
Fläche mit einer Größe montieren, die entsprechend
zum Ausmaß des Geräts und des zu bearbeitenden
Stoes passt.
l) Der Boden am Arbeitsplatz muss rutschhemmend
sein.
ACHTUNG! Obwohl das Gerät in Hinblick
auf Sicherheit entworfen wurde und über
Schutzmechanismen sowie zusätzlicher
Sicherheitselemente verfügt, besteht bei
der Bedienung eine geringe Unfall- oder
Verletzungsgefahr. Es wird empfohlen, bei der
Nutzung Vorsicht und Vernunft walten zu lassen.
3.2. VORBEREITUNG ZUR VERWENDUNG
AUFBAU DES GERÄTES
Achtung: Das Gerät kann auf einem Arbeitstisch oder
Ständer bzw. Gestell montiert werden.
Montage des Hauptrahmens

6Rev. 06.07.2020
Achtung: Beim Biegen eines Rohrs über 120 ° kann ein Rohr
in der Maschine stecken bleiben. Um das Rohr zu lösen,
entfernen Sie zuerst den Stift, der den Gurt blockiert, und
klopfen Sie dann vorsichtig auf das Rohr. Dies erleichtert
das Entfernen.
3.4. REINIGUNG UND WARTUNG
• Hebel und Sperrelemente in sauberem Zustand, ohne
Rückstände von chmierstoen halten.
• Drehelemente und/oder Kontaktoberäche zyklisch
schmieren.
• Verwenden Sie zum Reinigen der Oberäche
ausschließlich Mittel ohne ätzende Inhaltsstoe.
• Lassen Sie nach jeder Reinigung alle Teile gut trocknen,
bevor das Gerät erneut verwendet wird.
• Bewahren Sie das Gerät an einem trockenen, kühlen,
vor Feuchtigkeit und direkter Sonneneinstrahlung
geschütztem Ort auf.
• Wenn das Gerät für einen längeren Zeitraum nicht
verwendet werden sollte, soll es für die Lagerungszeit
mit Schmierfett behandelt werden. Um eine sichere
Nutzung zu garantieren, das überüssige Schmierfett
vor erneutem Gebrauch entfernen.
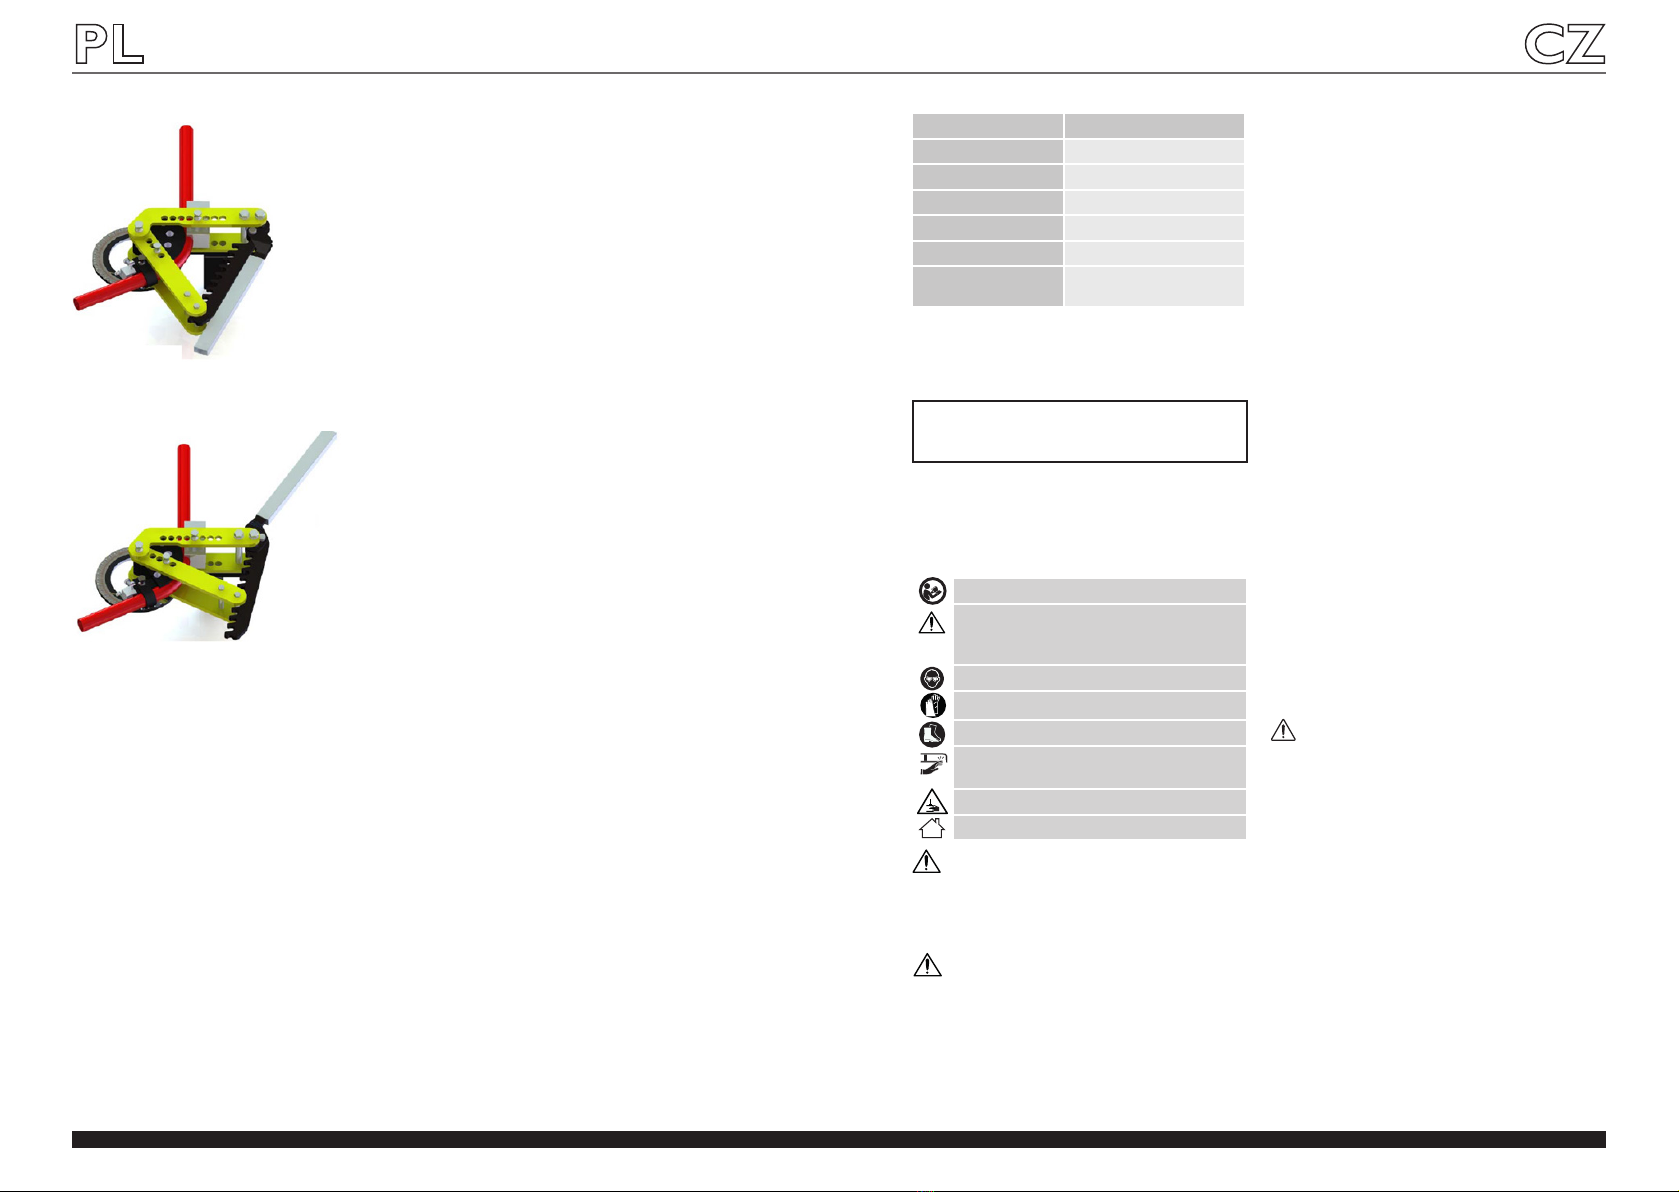
2. Setzen Sie die Bewegung fort, bis Sie die im Bild
gezeigte Position erreichen.
3. Entfernen Sie den Stift 7/8 ''. Drehen Sie den
Schwenkarm gegen den Uhrzeigersinn (achten
Sie darauf, das Rohr nicht zu bewegen). Setzen
Sie den 7/8-Zoll-Stift ein und wiederholen Sie den
Biegevorgang, bis der gewünschte Winkel erreicht
ist.
Biegeanleitung:
1. Ziehen Sie den Gri gemäß dem Pfeil in der
Zeichnung.
TECHNICAL DATA
Parameter description Parameter value
Product name TUBE ROLLE BENDER
Model MSW-TRB-300
Dimensions [mm] 1550x550x1090
Weight [kg] 66,6
Working angle [°] 0-130
Workpiece thickness [mm] 1,5-4
2.1. SAFETY AT THE WORKPLACE
a) Make sure the workplace is orderly and well
lit. A messy or poorly lit workplace may lead to
accidents. Try to anticipate what may happen,
observe what is going on and use common sense
when working with the device.
b) This device is not intended to be used by persons
(including children) with limited physical, sensory
or mental aptitude or lack of experience and/or
knowledge, unless they are supervised by a person
responsible for their safety or have received
instruction from this person as to how the device is
used.
c) This device is not intended to be used by persons
(including children) with limited physical, sensory
or mental aptitudes or lack of experience and/or
knowledge, unless they are supervised by a person
responsible for their safety or have received
instruction from this person as to how the device is
used.
d) This device may be operated by physically t persons
who are properly trained and able to handle the
device and who reviewed this operating manual and
received training in occupational health and safety.
e) In case of doubt whether the product operates
correctly or nding damage please contact the
service centre of the manufacturer.
f) Only the service centre of the manufacturer can
make repairs of the product Do not attempt to make
repairs yourself!
g) Children or unauthorised persons are forbidden
from entering a work station. (A distraction may
result in a loss of control over the device).
h) During workpiece working, take care of strangers
and their safety.
i) Observe the workpiece carefully during working to
avoid its damage and prevent any possible hazard.
j) Maintain order and remove any dust, debris and
waste material after working.
k) If more elements are manufactured, they should be
stored in such a way before and after working that
allows keeping order at the workstation.
2.2. PERSONAL SAFETY
a) Do not use the device when tired, ill or under the
inuence of alcohol, narcotics or medication which can
signicantly impair the ability to operate the device.
b) When working with the device, use common sense
and stay alert. Temporary loss of concentration whilst
using the device may lead to serious injuries.
c) Use personal protection equipment as required for
working with the device, specied in section 1 (Legend).
The use of correct, approved personal protection
equipment reduces the risk of suering an injury.
d) Do not overestimate your abilities. When using the
device keep your balance and remain stable at all
times. This will ensure better control over the device
in unexpected situations.
e) Do not wear loose clothing or jewellery. Keep hair,
clothes and gloves away from moving parts. Loose
clothing, jewellery or long hair may get caught in
moving parts.
f) Before device operation, remove all regulating tools
or wrenches. Any tool or wrench left inside a rotating
part of the device can result in injuries.
7
Rev. 06.07.2020
1. GENERAL DESCRIPTION
The user manual is designed to assist in the safe and
trouble-free use of the device. The product is designed
and manufactured in accordance with strict technical
guidelines, using state-of-the-art technologies and
components. Additionally, it is produced in compliance
with the most stringent quality standards.
DO NOT USE THE DEVICE UNLESS YOU HAVE
THOROUGHLY READ AND UNDERSTOOD THIS
USER MANUAL.
To increase the product life of the device and to ensure
trouble-free operation, use it in accordance with this user
manual and regularly perform maintenance tasks. The
technical data and specications in this user manual are
up to date. The manufacturer reserves the right to make
changes associated with quality improvement.
LEGEND
Read instructions before use.
WARNING! or CAUTION! or REMEMBER!
Applicable to the given situation (general
warning sign).
Wear protective goggles.
Wear protective gloves.
Wear foot protection.
CAUTION! Sharp elements. Limb cut hazard.
ATTENTION! Danger of hand crushing.
Only use inside.
The original operation manual is in German. Other
language versions are translations from German.
PLEASE NOTE! Drawings in this manual are for
illustration purposes only and in some details may
dier from the actual machine.
ATTENTION! Read all safety warnings and all
instructions. Failure to follow the warnings and
instructions may result in an electric shock, re and/
or serious injury or even death.
2. USAGE SAFETY
The terms "device" or "product" are used in the warnings
and instructions to refer to TUBE ROLLE BENDER.
REMEMBER! When using the device, protect
children and other bystanders.
USER MANUAL

18
9
Rev. 06.07.2020
1. Make sure that both frame plates are aligned in the
same direction.
2. Install and lubricate pin 1 ''. Make sure it moves
smoothly up and down.
3. Tighten the screws ¾ ’thoroughly so that the arm can
be moved under pressure.
6. Remove pin 1 '' from the main frame and insert into
the holes of the swing arm frame as shown.
7. Insert pin 7/8 '' according to the drawing.
8. Secure the swivel arm frame plates with screws ½ ’.
9. Make sure not to use pads under the nuts on the
bottom or on the top of the screws.
10. Check that the screws are tightened securely.
11. The spacers have dimensions 1/2 ’’ x 2 5/8 ’’
12. Remove pin 1 '', insert the swivel arm frame into
the main frame, align the holes and insert pin 1 '' as
shown.
13. Align the swivel arm with the holes in the main frame.
Matrix installation
16. Close the swivel arm and place the pipe in the matrix
as shown.
17. Insert the mounting block as shown and secure with
the pin.
Belt and pin installation
18 Place the belt around the pipe, stretch it and put the
pin through the belt and the matrix.
3.3. DEVICE USE
Caution: Before starting work, make sure that the places
marked in the gure below are well lubricated. At the same
time, make sure that grease does not get to other places
on the device.
3
2
15
4
67
8
9
11
10
13
12
14 15
14. Pull out pin 1 '' and pin 7/8 '' in the frame of the swivel
arm, place the matrix, insert pin 1 '' into the frame
holes and the matrix sleeve.
15. Insert pin 7/8 '' into the swivel arm frame and the rst
matrix hole.
17
16
7
3
56
1 2
4
g) The material to be worked should be free of impurities.
h) Do not touch movable parts or accessories during
device operation.
i) Use protective gloves to avoid being hurt by sharp
edges.
j) Do not work elements made of hard materials.
k) It is forbidden to interfere with the structure of
the device in order to change its parameters or
construction.
2.3. SAFE DEVICE USE
a) Do not overload the device. Use appropriate tools for
the given task. A correctly selected device will perform
the task for which it was designed better and in a safer
manner.
b) When not in use, store in a safe place, away from
children and people not familiar with the device, who
have not read the user manual. The device may pose
a hazard in the hands of inexperienced users.
c) Maintain the device in a good technical state. Before
each use check for general damage and especially
check for cracked parts or elements and for any other
conditions which may impact the safe operation of
the device. If damage is discovered, hand over the
device for repair before use.
d) Keep the device out of the reach of children.
e) Device repair or maintenance should be carried out by
qualied persons, only using original spare parts. This
will ensure safe use.
f) To ensure the operational integrity of the device, do
not remove factory tted guards and do not loosen
any screws.
g) When transporting and handling the device between
the warehouse and the destination, take into account
the occupational health and safety principles for
manual transport operations which apply in the
country
h) Use the device to work elements of parameters
conforming with the data given in the technical data
table. Do not exceed the permissible dimensions of
the worked material.
i) Do not work two workpieces at the same time.
j) Long workpieces must be supported and set stably
for working.
k) Mount the device on a stable, dry and at surface
of a size that is adapted to the device and worked
material overall dimensions.
l) The oor at the workstation should be anti-slip
3.1. DEVICE DESCRIPTION
8Rev. 06.07.2020
1. Frame main
2. Swivel arm frame
3. Handle (applied to a 1'x2 'rectangular element)
4. Matrix
5. Fixing block
6. Bending element
7. Stand with mounting holes
15
14
8
9
10
11 12 13
8. Belt
9. Matrix ange
10. Belt attachment pin
11. Pin 1’’
12. Pin 7/8’’
13. Mounting block pin
14. Screws ¾’’
15. Screws ½’’
3.2. PREPARING FOR USE
ASSEMBLING THE DEVICE
CAUTION: The device can be mounted on a work table or stand.
Main frame installation
ATTENTION!Despite the safe design of the device
and its protective features, and despite the use of
additional elements protecting the operator, there
is still a slight risk of accident or injury when using
the device. Stay alert and use common sense when
using the device.
3. USE GUIDELINES
A bending machine is a device designed for manual
bending of metal elements.
The user is liable for any damage resulting from
unintended use of the device.
4. Move the 1 'x 2' rectangular element over the handle
to move the lever.
5. Center the handle, then tighten the ange.
Swivel arm installation
Installation of the pipe and mounting block
Bending instructions:
1. Pull the handle according to the arrow in the drawing.

DANE TECHNICZNE
1. OGÓLNY OPIS
Instrukcja przeznaczona jest do pomocy w bezpiecznym
i niezawodnym użytkowaniu. Produkt jest zaprojektowany
i wykonany ściśle według wskazań technicznych przy
użyciu najnowszych technologii i komponentów oraz przy
zachowaniu najwyższych standardów jakości.
PRZED PRZYSTĄPIENIEM DO PRACY NALEŻY
DOKŁADNIE PRZECZYTAĆ I ZROZUMIEĆ NINIEJSZĄ
INSTRUKCJĘ.
Dla zapewnienia długiej i niezawodnej pracy urządzenia
należy dbać o jego prawidłową obsługę oraz konserwację
zgodnie ze wskazówkami zawartymi w tej instrukcji. Dane
techniczne i specykacje zawarte w tej instrukcji obsługi są
aktualne. Producent zastrzega sobie prawo dokonywania
zmian związanych z podwyższeniem jakości.
OBJAŚNIENIE SYMBOLI
UWAGA! Ilustracje w niniejszej instrukcji obsługi
mają charakter poglądowy i w niektórych
szczegółach mogą różnić się od rzeczywistego
wyglądu produktu.
Instrukcją oryginalną jest niemiecka wersja instrukcji.
Pozostałe wersje językowe są tłumaczeniami z języka
niemieckiego.
Opis parametru Wartość parametru
Nazwa produktu GIĘTARKA DO RUR
Model MSW-TRB-300
Wymiary [mm] 1550x550x1090
Ciężar [kg] 66,6
Kąt gięcia [°] 0-130
Grubość obrabianego
elementu [mm] 1,5-4
PAMIĘTAJ! Należy chronić dzieci i inne osoby
postronne podczas pracy urządzeniem.
2.1. BEZPIECZEŃSTWO W MIEJSCU PRACY
a) Utrzymuj porządek w miejscu pracy i dobre
oświetlenie. Nieporządek lub złe oświetlenie może
prowadzić do wypadków. Należy być przewidującym,
obserwować co się robi i zachowywać rozsądek
podczas używania urządzenia.
b) Urządzenie nie jest przeznaczone do tego, by było
użytkowane przez osoby (w tym dzieci) o ograniczonych
funkcjach psychicznych, sensorycznych i umysłowych
lub nieposiadające odpowiedniego doświadczenia
i/lub wiedzy, chyba że są one nadzorowane przez
osobę odpowiedzialną za ich bezpieczeństwo lub
otrzymały od niej wskazówki dotyczące tego, jak
należy obsługiwać urządzenie.
c) Urządzenie mogą obsługiwać osoby sprawne
zycznie, zdolne do jej obsługi i odpowiednio
wyszkolone, które zapoznały się z niniejszą instrukcją
oraz zostały przeszkolone w zakresie bezpieczeństwa
i higieny pracy.
d) W razie stwierdzenia uszkodzenia lub nieprawidłowości
w pracy urządzenia należy bezzwłocznie zaprzestać
jego użytkowania i zgłosić to do osoby uprawnionej.
e) W razie wątpliwości, czy urządzenia działa poprawnie,
należy skontaktować się z serwisem producenta.
f) Naprawy urządzenia może wykonać wyłącznie serwis
producenta. Nie wolno dokonywać napraw samodzielnie!
g) Na stanowisku pracy nie mogą przebywać dzieci
ani osoby nieupoważnione. (Nieuwaga może
spowodować utratę kontroli nad urządzeniem.)
h) W czasie obróbki elementów należy zwrócić uwagę na
obecność osób postronnych i ich bezpieczeństwo.
i) Należy bacznie obserwować element podczas
obróbki tak aby w odpowiednim czasie zareagować
na zagrożenie lub zapobiec uszkodzeniu elementu.
j) Zachować porządek i usunąć po obróbce wszelkie
pyły, odłamki oraz zbędne części obrabianego
materiału.
k) W przypadku produkcji większej ilości elementów,
elementy przed i po obróbce należy składować tak
aby utrzymać porządek na stanowisku pracy.
2.2. BEZPIECZEŃSTWO OSOBISTE
a) Niedozwolone jest obsługiwanie urządzenia
w stanie zmęczenia, choroby, pod wpływem alkoholu,
narkotyków lub leków, które ograniczają w istotnym
stopniu zdolności obsługi urządzenia.
b) Należy być uważnym, kierować się zdrowym rozsądkiem
podczas pracy urządzeniem. Chwila nieuwagi podczas
pracy, może doprowadzić do poważnych obrażeń ciała.
c) Należy używać środków ochrony osobistej
wymaganych przy pracy urządzeniem
wyszczególnionych w punkcie 1 objaśnienia symboli.
Stosowanie odpowiednich, atestowanych środków
ochrony osobistej zmniejsza ryzyko doznania urazu.
d) Nie należy przeceniać swoich możliwości. Utrzymywać
balans i równowagę ciała przez cały czas pracy.
Umożliwia to lepszą kontrolę nad urządzeniem
w nieoczekiwanych sytuacjach.
e) Nie należy nosić luźnej odzieży ani biżuterii. Włosy,
odzież i rękawice utrzymywać z dala od części
ruchomych. Luźna odzież, biżuteria lub długie włosy
mogą zostać chwycone przez ruchome części.
f) Należy usunąć wszelkie narzędzia regulujące lub
klucze przed użyciem urządzenia. Narzędzie lub klucz
Przed użyciem należy zapoznać się z instrukcją
UWAGA! lub OSTRZEŻENIE! lub PAMIĘTAJ! opisująca
daną sytuacje (ogólny znak ostrzegawczy).
Załóż okulary ochronne.
Stosuj rękawice ochronne
Stosuj ochronę stóp
UWAGA! Ostre elementy. Niebezpieczeństwo
obcięcia kończyn.
UWAGA! Niebezpieczeństwo zgniecenia dłoni
Do użytku tylko wewnątrz pomieszczeń.
2. BEZPIECZEŃSTWO UŻYTKOWANIA
UWAGA! Przeczytaj wszystkie ostrzeżenia
dotyczące bezpieczeństwa oraz wszystkie instrukcje.
Niezastosowanie się do ostrzeżeń i instrukcji może
spowodować porażenie prądem, pożar i/lub ciężkie
obrażenia ciała lub śmierć.
INSTRUKCJA OBSŁUGI
11
Rev. 06.07.2020
Termin „urządzenie” lub „produkt” w ostrzeżeniach
i w opisie instrukcji odnosi się do GIĘTARKI DO RUR.
10 Rev. 06.07.2020
Caution: When bending a pipe above 120 °, a pipe may get
stuck in the machine. Then, to release the pipe, rst remove
the pin blocking the strap and then gently tap the pipe.
This will make it easier to remove.
3.4. CLEANING AND MAINTENANCE
• Keep the levers and adjustment elements clean, free
of remainders of lubricants.
• Rotary elements and/or contact surfaces shall
be kept clean, free of rust traces and periodically
protected with thin lms of specialistic oil.
• Use cleaners without corrosive substances to clean
each surface.
• After cleaning the device, all parts should be dried
before reusing it.
• Store the unit in a dry, cool place, free from moisture
and direct exposure to sunlight.
• In case of longer device disuse, protect it with grease
for the storage period. To ensure safe use, remove
the grease excess before reuse.
2. Continue moving until you reach the position shown
in the picture.
3. Remove pin 7/8 ''. Turn the swivel arm
counterclockwise (being careful not to move the
pipe). Insert 7/8 '' pin and repeat the bending
process until the desired angle is achieved.

13
Rev. 06.07.2020
1. Upewnić się ,że obie płyty ramy są ustawione równo,
w tym samym kierunku.
2. Zainstalować i nasmarować pin 1’’. Upewnić się, że
płynnie przesuwa się w górę i w dół.
3. Dokładnie dokręcić śruby ¾ ‘’ tak by możliwe było
przesuwanie ramienia pod ciśnieniem.
4. Element prostokątny 1’’x2’’ przesunąć nad uchwytem
w celu przełożenia dźwigni.
5. Wypośrodkować uchwyt, następnie dokręcić kołnierz.
Montaż ramienia obrotowego
6. Wyjąć pin 1’’ z ramy głównej i włożyć do otworów
ramy ramienia obrotowego zgodnie z rysunkiem.
7. Włożyć pin 7/8’’ zgodnie z rysunkiem.
8. Skręcić śrubami ½’’ płyty ramy ramienia obrotowego
zabezpieczyć nakrętkami.
9. Należy zwrócić uwagę by nie stosować podkładek
pod nakrętkami na dole ani na górze śrub.
10. Sprawdzić czy śruby są mocno dokręcone.
11. Elementy dystansowe mają wymiary 1/2 ‘’ x 2 5/8’’
12. Wyjąć pin 1’’, włożyć ramę ramienia obrotowego
w ramę główną, wyrównać otwory i włożyć pin 1’’
zgodnie z rysunkiem.
13. Wyrównać ramię obrotowe z otworami ramy głównej.
Instalacja matrycy
16. Zamknąć ramię obrotowe i umieścić rurę w matrycy
zgodnie z rysunkiem.
17. Włożyć blok mocujący zgodnie z rysunkiem
i zabezpieczyć pinem.
Instalacja paska i pinu
18. Umieścić pasek wokół rury, naciągnąć go i przełożyć
pin przez pasek i matrycę.
3.3. PRACA Z URZĄDZENIEM
Uwaga: Przed rozpoczęciem pracy należy zadbać aby miejsca
zaznaczone na rysunku poniżej były dobrze nasmarowane.
Jednocześnie należy dbać by smar nie dostał się w inne
miejsca urządzenia.
Instalacja rury i bloku mocującego
Instrukcja gięcia:
1. Pociągnąć uchwyt zgodnie ze strzałką na rysunku.
67
8
9
11
10
13
12
14 15
14. Wyciągnąć pin 1’’ i pin 7/8’’, w ramie ramienia
obrotowego umieścić matrycę, wsunąć pin 1’’
w otwory ram oraz rękaw matrycy.
15. Wsunąć pin 7/8’’ w ramę ramienia obrotowego oraz
pierwszy otwór matrycy.
17
16
18
7
3
56
1 2
4
pozostawiony w obracającej się części urządzenia
może spowodować obrażenia ciała.
g) Materiał poddawany obróbce powinien być wolny od
zanieczyszczeń.
h) Nie wolno dotykać części lub akcesoriów ruchomych
w trakcie pracy urządzenia.
i) Stosować rękawice ochronne w celu uniknięcia
skaleczenia przez ostre krawędzie.
j) Nie należy obrabiać elementów z twardych
materiałów.
k) Zabrania się ingerowania w konstrukcję urządzenia
celem zmiany jego parametrów lub budowy.
2.3. BEZPIECZNE STOSOWANIE URZĄDZENIA
a) Nie należy przeciążać urządzenia. Używać narzędzi
odpowiednich do danego zastosowania. Prawidłowo
dobrane urządzenie wykona lepiej i bezpieczniej
pracę dla którego zostało zaprojektowane.
b) Nieużywane urządzenia należy przechowywać
w miejscu niedostępnym dla dzieci oraz osób
nie znających urządzenia lub tej instrukcji
obsługi. Urządzenia są niebezpieczne w rękach
niedoświadczonych użytkowników.
c) Utrzymuj urządzenie w dobrym stanie technicznym.
Sprawdzaj przed każdą pracą czy nie posiada
uszkodzeń ogólnych lub związanych z elementami
ruchomymi (pęknięcia części i elementów lub wszelkie
inne warunki, które mogą mieć wpływ na bezpieczne
działanie urządzenia). W przypadku uszkodzenia,
oddaj urządzenie do naprawy przed użyciem.
d) Urządzenie należy chronić przed dziećmi.
e) Naprawa oraz konserwacja urządzeń powinna być
wykonywana przez wykwalikowane osoby przy
użyciu wyłącznie oryginalnych części zamiennych.
Zapewni to bezpieczeństwo użytkowania.
f) Aby zapewnić zaprojektowaną integralność
operacyjną urządzenia, nie należy usuwać
zainstalowanych fabrycznie osłon lub odkręcać śrub
g) Przy transportowaniu i przenoszeniu urządzenia
z miejsca magazynowania do miejsca użytkowania
należy uwzględnić zasady bezpieczeństwa i higieny pracy
przy ręcznych pracach transportowych obowiązujących
w kraju, w którym urządzenia są użytkowane.
h) W urządzeniu obrabiać elementy o parametrach
zgodnych z danymi podanymi w tabeli danych
technicznych. Nie przekraczać dopuszczalnych
wymiarów obrabianego materiału.
i) Nie wolno obrabiać dwóch przedmiotów
jednocześnie.
j) Długie przedmioty obrabiane muszą być podparte
i ustawione stabilnie do obróbki.
k) Urządzenie zamontować na stabilnej, suchej i płaskiej
powierzchni o wielkości odpowiednio dobranej do
gabarytów urządzenia i obrabianego materiału.
l) Podłoga na stanowisku pracy powinna być odporna
na poślizg.
UWAGA! Pomimo iż urządzenie zostało
zaprojektowane tak aby było bezpieczne, posiadało
odpowiednie środki ochrony oraz pomimo użycia
dodatkowych elementów zabezpieczających
użytkownika, nadal istnieje niewielkie ryzyko wypadku
lub odniesienia obrażeń w trakcie pracy z urządzeniem.
Zaleca się zachowanie ostrożności i rozsądku podczas
jego użytkowania.
3. ZASADY UŻYTKOWANIA
Giętarka jest urządzeniem przeznaczonym do ręcznego
zaginania elementów metalowych.
Odpowiedzialność za wszelkie szkody powstałe
w wyniku użytkowania niezgodnego z przeznaczeniem
ponosi użytkownik.
3.1. OPIS URZĄDZENIA
12 Rev. 06.07.2020
1. Rama główna
2. Rama ramienia obrotowego
3. Uchwyt (nakładany na prostokątny element 1’’x2’’)
4. Matryca
5. Blok mocujący
6. Element zginany
7. Stojak z otworami montażowymi
15
14
8
9
10
11 12 13
3
2
15
4
8. Pasek
9. Kołnierz matrycy
10. Pin mocujący pasek
11. Pin 1’’
12. Pin 7/8’’
13. Pin bloku mocującego
14. Śruby ¾’’
15. Śruby ½’’
3.2. PRZYGOTOWANIE DO PRACY
MONTAŻ URZĄDZENIA
Uwaga: Urządzenie można zamontować na stole roboczym
lub na stojaku.
Montaż ramy głównej

14 Rev. 06.07.2020
Uwaga: Podczas gięcia rury powyżej 120° może wystąpić
zablokowanie rury w urządzeniu. Wówczas by zwolnić rurę
należy najpierw wyjąć pin blokujący pasek a następnie
uderzyć delikatnie w rurę. Ułatwi to jej wyjęcie.
3.4. CZYSZCZENIE I KONSERWACJA
• Dźwignie i elementy regulujące należy utrzymywać
w czystości, bez pozostałości substancji smarujących.
• Elementy obrotowe i/lub powierzchnie styku
utrzymywać w czystości, bez śladów rdzy oraz
okresowo zabezpieczać cienkimi warstwami
specjalistycznego oleju.
• Do czyszczenia powierzchni należy stosować
wyłącznie środki niezawierające substancji żrących.
• Po każdym czyszczeniu wszystkie elementy należy
dobrze wysuszyć, zanim urządzenie zostanie
ponownie użyte.
• Urządzenie należy przechowywać w suchym
i chłodnym miejscu chronionym przed wilgocią
i bezpośrednim promieniowaniem słonecznym.
• W przypadku zamiaru dłuższego nieużywania
urządzenia należy na czas przechowywania
zabezpieczyć je smarem. W celu bezpiecznego
użytkowania przed powtórnym użyciem nadmiar
smarowidła należy usunąć.
2. Kontynuować ruch aż do uzyskania pozycji pokazanej
na rysunku.
3. Usunąć pin 7/8’’. Obrócić ramię obrotowe w kierunku
przeciwnym do ruchu wskazówek zegara (uważając
by nie poruszyć rury). Włożyć pin 7/8’’ i powtórzyć
proces gięcia do uzyskanie pożądanego kąta.
TECHNICKÉ ÚDAJE
Popis parametru Hodnota parametru
Název výrobku RUČNÍ OHÝBAČKA TRUBEK
Model MSW-TRB-300
Rozměry [mm] 1550x550x1090
Hmotnost [kg] 66,6
Úhel obrábění [°] 0-130
Tloušťka obráběného
předmětu [mm] 1,5-4
2.1. BEZPEČNOST NA PRACOVIŠTI
a) Na pracovišti udržujte pořádek a dobré osvětlení.
Nepořádek nebo špatné osvětlení mohou vést k
úrazům. Buďte předvídaví a sledujte, co se během
práce kolem vás děje. Při práci se zařízením vždy
zachovávejte zdravý rozum.
b) Zařízení není vhodné k tomu, aby bylo používáno
osobami (včetně dětí) s omezenými fyzickými
senzorickými a mentálními funkcemi, nebo osobami
bez příslušných zkušeností a/nebo znalostí, pakliže
nejsou tyto osoby pod dohledem osoby zodpovědné
za jejich bezpečí nebo od této osoby obdržely pokyny
týkající správného používání zařízení..
c) Zařízení smí obsluhovat fyzicky zdatné osoby, které
s ním umí zacházet, byly příslušně vyškoleny k jeho
obsluze, seznámily se s tímto návodem a byly také
proškoleny v oblasti bezpečnosti a ochrany zdraví při
práci.
d) Pokud zjistíte, že je zařízení poškozené nebo že
nepracuje správně, musíte ho okamžitě přestat
používat a oznámit to příslušné osobě.
e) Budete-li mít pochybnosti, zda výrobek funguje
správně, nebo zjistíte poškození, kontaktujte servis
výrobce.
f) Výrobek může opravovat pouze servis výrobce.
Opravy neprovádějte sami!
g) Na pracovišti se nesmí zdržovat děti a nepovolané
osoby. (Nepozornost může způsobit ztrátu kontroly
nad zařízením.)
h) Během obrábění předmětů věnujte pozornost
přítomnosti dalších osob a jejich bezpečnosti.
i) Během obrábění pečlivě sledujte obrobek tak, abyste
dokázali včas zareagovat na nebezpečí nebo předejít
poškození obrobku.
j) Udržujte pořádek na pracovišti a po skončení
práce odstraňte veškerý prach, úlomky a odpad
z obráběného materiálu.
k) Pokud obrábíte větší množství předmětů, musíte
je před obráběním a po něm skladovat tak, aby na
pracovišti byl stále pořádek.
2.2. OSOBNÍ BEZPEČNOST
a) Nepoužívejte elektrické nářadí, jste-li unaveni nebo
pod vlivem drog, alkoholu nebo léků, které významně
snižují schopnost ovládat zařízení.
b) Při práci se zařízením buďte pozorní, řiďte se zdravým
rozumem. Chvilka nepozornosti při práci může vést k
vážnému úrazu.
c) Používejte osobní ochranné pomůcky vyžadované pro
práci se zařízením, specikované v bodě 1 vysvětlením
symbolů. Používání vhodných, atestovaných osobních
ochranných prostředků snižuje nebezpečí úrazu.
d) Nepřeceňujte své schopnosti. Udržujte stabilní postoj
a rovnováhu po celou dobu práce. To vám umožní
lépe ovládat zařízení v neočekávaných situacích.
e) Nenoste volné oblečení nebo šperky. Vlasy, oděv
a rukavice udržujte v bezpečné vzdálenosti od
rotujících dílů. Volný oděv, šperky nebo dlouhé vlasy
mohou zachytit rotující díly.
f) Před použitím zařízení odstraňte veškeré seřizovací
nářadí nebo klíče. Nářadí nebo klíč odložený v blízkosti
pohyblivé součásti zařízení může způsobit zranění.
g) Obráběný materiál musí být zbavený nečistot.
NÁVOD K OBSLUZE
15
Rev. 06.07.2020
1. VŠEOBECNÝ POPIS
Návod slouží jako nápověda pro bezpečné a spolehlivé
používání výrobku. Výrobek je navržen a vyroben přesně
podle technických údajů za použití nejnovějších technologií
a komponentů a za dodržení nejvyšších jakostních norem.
PŘED ZAHÁJENÍM PRÁCE SI DŮKLADNĚ PŘEČTĚTE
TENTO NÁVOD A UJISTĚTE SE, ŽE JSTE POCHOPILI
VŠECHNY POKYNY.
Pro zajištění dlouhého a spolehlivého fungování zařízení
pravidelně provádějte revize a údržbu v souladu s pokyny
uvedenými v tomto návodu. Technické údaje a specikace
uvedené v návodu jsou aktuální. Výrobce si vyhrazuje právo
provádět změny za účelem zvýšení kvality.
VYSVĚTLENÍ SYMBOLŮ
Před použitím se seznamte s návodem.
UPOZORNĚNÍ! nebo VAROVÁNÍ! nebo
PAMATUJTE! popisující danou situaci (všeobecná
výstražná značka).
Použáívejte ochranné brýle.
Používejte ochranné rukavice.
Používejte ochranou obuv.
UPOZORNĚNÍ! Ostré součásti. Nebezpečí
poranění končetin!
VAROVÁNÍ! Zavěšené břemeno.
K použití pouze ve vnitřních prostorech.
2. BEZPEČNOST POUŽÍVÁNÍ
POZNÁMKA! Přečtěte si tento návod včetně všech
bezpečnostních pokynů. Nedodržování návodu
a pokynů může vést k úrazu elektrickým proudem,
požáru anebo těžkému úrazu či smrti.
Originálním návodem je německá verze návodu. Ostatní
jazykové verze jsou překladem z německého jazyka.
POZOR! Obrázky v tomto návodu jsou ilustrační.
V některých detailech se od skutečného vzhledu
stroje mohou lišit.
Pojem „zařízení“ nebo „výrobek“ v bezpečnostních
pokynech a návodu se vztahuje na RUČNÍ OHÝBAČKA
TRUBEK.
PAMATUJTE! Při práci se zařízením chraňte děti
a jiné nepovolané osoby.

18
17
Rev. 06.07.2020
6. Vyjměte čep 1’’ z hlavního rámu a zasuňte jej do
otvorů rámu otočného ramene, jak je znázorněno.
7. Vložte čep 7/8’’ podle obrázku.
8. Utáhněte šrouby ½’’ desky rámu otočného ramene,
zajistěte maticemi.
9. Ujistěte se, že nepoužíváte podložky pod matice na
spodní ani horní straně šroubů.
10. Zkontrolujte pevné utažení šroubů.
11. Rozpěrky mají rozměry 1/2 ‘’ x 2 5/8’’
12. Vyjměte čep 1’’, vložte rám otočného ramene do
hlavního rámu, zarovnejte otvory a vložte čep 1’’, jak
je znázorněno.
13. Vyrovnejte otočné rameno s otvory v hlavním rámu.
Instalace matrice
16. Zavřete otočné rameno a vložte trubku do matrice
podle obrázku.
17. Vložte montážní blok podle obrázku a zajistěte ho
čepem.
Instalace popruhu a čepu
18. Umístěte popruh kolem trubky, natáhněte jej
a protáhněte čep přes popruh a matrici.
3.3. PRÁCE SE ZAŘÍZENÍM
Poznámka: Před zahájením práce se ujistěte, že místa
vyznačená na obrázku níže jsou dobře promazaná. Současně
zajistěte, aby se mazivo nedostalo na jiná místa v zařízení.
67
8
9
11
10
13
12
14 15
14. Vytáhněte čep 1’’ a čep 7/8’’ v rámu otočného
ramene, vložte matrici, vložte čep 1’’ do otvorů rámu
a objímky matrice.
15. Vložte čep 7/8’’ do rámu otočného ramene a prvního
otvoru matrice.
17
16
3. Šrouby ¾ ‘’ pevně utáhněte, aby se rameno mohlo
pohybovat pod tlakem.
4. Posunutím obdélníkového prvku 1’’x2’’ nad držadlo
posuňte páku.
5. Vycentrujte držadlo a poté utáhněte manžetu.
Montáž otočného ramene
Instalace trubky a montážního bloku
Pokyny k ohýbání:
1. Zatáhněte za rukojeť podle šipky na výkresu.
1. Ujistěte se, zda jsou obě rámové desky vyrovnány
stejným směrem.
2. Namontujte a namažte čep 1’’. Ujistěte se, že se
pohybuje hladce nahoru a dolů.
3
2
15
4
7
3
56
1 2
4
h) Je zakázáno dotýkat se pohyblivých součástí nebo
příslušenství během práce zařízení.
i) Používejte ochranné rukavice, abyste zabránili
poranění o ostré hrany.
j) Výrobce nedoporučuje obrábět předměty z tvrdých
materiálů.
k) Nezasahujte do zařízení, abyste změnili jeho
parametry nebo konstrukci.
BEZPEČNÉ POUŽÍVÁNÍ ZAŘÍZENÍ
a) Zařízení nepřetěžujte. Pro daný úkol používejte vždy
správný typ nářadí. Správně zvolené nářadí lépe
a bezpečněji provede práci, pro kterou bylo navrženo.
b) Nepoužívaná zařízení uchovávejte mimo dosah dětí
a osob, které nejsou seznámeny se zařízením nebo
návodem k obsluze. Zařízení jsou nebezpečná v rukou
nezkušených uživatelů.
c) Zařízení udržujte v dobrém technickém stavu.
Kontrolujte před každou prací jeho celkový stav
i jednotlivé díly a ujistěte se, že je vše v dobrém
stavu, a nehrozí tak uživateli při práci se zařízením
žádné nebezpečí. V případě zjištění poškození nechte
zařízení opravit.
d) Udržujte zařízení mimo dosah dětí.
e) Opravu a údržbu zařízení by měly provádět pouze
kvalikované osoby za výhradního použití originálních
náhradních dílů. Zajistí to bezpečné používání zařízení.
f) Pro zachování navržené mechanické integrity zařízení
neodstraňujte předem namontované kryty nebo
neuvolňujte šrouby.
g) Při přemisťování zařízení z místa skladování na místo
používání berte v úvahu pracovní zásady bezpečnosti
a ochrany zdraví v rámci přenášení břemena platné v
zemi, ve které se zařízení používá.
h) Na zařízení obrábějte pouze obrobky, jejichž
vlastnosti jsou v souladu s údaji v technické tabulce.
Nepřekračujte maximální povolené rozměry
obráběného materiálu.
i) Je zakázáno obrábět dva obrobky současně.
j) Obráběný materiál s nadměrnou délkou musí být při
obrábění podepřený a mít stabilní pozici.
k) Připevněte zařízení na stabilní, suchý a rovný
povrch velikosti odpovídající rozměrům zařízení
a zpracovávaného materiálu.
l) Podlaha na pracovišti musí být odolná proti
uklouznutí.
3.1. POPIS ZAŘÍZENÍ
16 Rev. 06.07.2020
1. Rám hlavní
2. Rám otočného ramene
3. Rukojeť (aplikovaná na 1’’x2’’ obdélníkový prvek)
4. Matrice
5. Upevňovací blok
6. Ohybový prvek
7. Stojan s montážními otvory
15
14
8
9
10
11 12 13
8. Pás
9. Límec matrice
10. Připevňovací čep pásu
11. Čep 1’’
12. Čep 7/8’’
13. Čep montážního kolíku
14. Šrouby ¾’’
15. Šrouby ½’’
3.2. PŘÍPRAVA K PRÁCI
MONTÁŽ ZAŘÍZENÍ
Poznámka: Zařízení lze namontovat na pracovní stůl nebo
stojan.
Montáž hlavního rámu
3. ZÁSADY POUŽÍVÁNÍ
Ohýbačka je zařízení určené pro ruční ohýbání kovových
prvků.
Odpovědnost za veškeré škody vzniklé v důsledku
použití zařízení v rozporu s určením nese uživatel.
POZNÁMKA! I když zařízení bylo navrženo tak, aby
bylo bezpečné, tedy má vhodné bezpečnostní prvky,
tak i přes použití dodatečné ochrany uživatelem při
práci se zařízením nadále existuje malé riziko úrazu
nebo poranění. Doporučuje se zachovat opatrnost
a zdravý rozum při jeho používání.

18 Rev. 06.07.2020
Poznámka: Při ohýbání trubky nad 120 ° se může trubka v
zařízení zaseknout. Pro její uvolnění nejprve odstraňte čep
blokující popruh a potom jemně poklepejte na trubku. To
usnadní odstraňování.
3.4. ČIŠTĚNÍ A ÚDRŽBA
• Páku a regulační součásti udržujte v čistotě, bez
zbytků maziv.
• Pohyblivé součásti a/nebo kontaktní plochy udržujte
v čistotě a bez stop rzi, pravidelně je ošetřujte tenkou
vrstvou speciálního oleje.
• K čištění povrchů používejte výhradně prostředky
neobsahující žíravé látky.
• Po každém čištění je nutno všechny prvky dobre
osušit, než bude zařízení opět použito.
• Zařízení skladujte na suchém a chladném místě,
chráněném proti vlhkosti a přímému slunečnímu
svitu.
• Pokud zařízení nebudete používat delší dobu, musíte
ho před uskladněním ošetřit mazivem. Před dalším
použitím musíte z bezpečnostních důvodů odstranit
ze zařízení přebytek maziva.
2. Pokračujte v pohybu, dokud nedosáhnete polohy
znázorněné na obrázku.
3. Odstraňte čep 7/8’’. Otočné rameno otočte proti
směru hodinových ručiček (dávejte pozor, abyste
nepoškodili trubku). Vložte čep 7/8’’ a opakujte
ohýbání, dokud nedosáhnete požadovaného úhlu.
DÉTAILS TECHNIQUES
Description
des paramètres Valeur des paramètres
Nom du produit CINTREUSE DE TUBE
A GALETS
Modèle MSW-TRB-300
Dimensions [mm] 1550x550x1090
Poids [kg] 66,6
Angle d’usinage [°] 0-130
Épaisseur de la pièce [mm] 1,5-4
Les notions d'« appareil », de « machine » et de « produit
» gurant dans les descriptions et les consignes du manuel
se rapportent à/au CINTREUSE DE TUBE A GALETS.
2.1. SÉCURITÉ AU TRAVAIL
a) La che de l’appareil doit être compatible avec la
prise électrique. Ne modiez d'aucune façon la che
électrique. L'utilisation de la che originale et d'une
prise électrique adaptée diminue les risques de chocs
électriques.
b) Cet appareil ne doit pas être utilisé par des personnes
(enfants compris) ayant des capacités physiques,
mentales ou sensorielles réduites. Sont considérées
comme des exceptions les personnes ayant lu le
mode d‘emploi ou étant complétement responsables
de leur propre sécurité.
c) Seules des personnel ayant suivi une formation
appropriée, qui sont aptes à se servir de l’appareil et
en bonne santé physique peuvent utiliser la machine.
En outre, ces personnes doivent avoir lu le présent
manuel et connaître les exigences liées à la santé et à
la sécurité au travail.
d) En cas de défaut ou de dysfonctionnement de la
machine, cessez immédiatement son utilisation et
signalez-le à la personne autorisée.
e) En cas de doute quant au bon fonctionnement de
l’appareil ou si vous constatez des dommages sur
celui-ci, veuillez communiquer avec le service client
du fabricant.
f) Seul le fabricant doit réparer le produit. Ne tentez pas
de le réparer le produit par vous-même!
g) Aucun enfant ni personne non autorisée ne doit se
trouver sur les lieux de travail. (Le non-respect de
cette consigne peut entraîner la perte de contrôle sur
l’appareil).
h) Lors de l'usinage, soyez attentif à la présence de
personnes non autorisées et veillez à leur sécurité.
i) Surveillez la pièce pendant l'usinage an de
pouvoir réagir à temps en cas de danger et d’éviter
d'endommager la pièce.
j) Veillez à maintenir l'ordre et retirez toute poussière,
débris et morceaux inutiles de la pièce après l'usinage.
k) En cas de production d’un nombre élevé de pièces,
stockez celles-ci de sorte à maintenir le poste de
travail en ordre avant et après le travail.
2.2. SÉCURITÉ DES PERSONNES
a) N’utilisez pas l’appareil lorsque vous êtes fatigué,
malade, sous l’eet de drogues ou de médicaments
et que cela pourrait altérer votre capacité à utiliser
l’appareil.
b) Soyez attentif et faites preuve de bon sens lors que
vous utilisez l’appareil. Un moment d’inattention
pendant le travail peut entraîner des blessures graves.
c) Utilisez l’équipement de protection individuel
approprié pour l’utilisation de l’appareil,
conformément aux indications faites dans le tableau
19
Rev. 06.07.2020
LISEZ ATTENTIVEMENT LE PRÉSENT MANUEL ET
ASSUREZ-VOUS DE BIEN LE COMPRENDRE AVANT
LA PREMIÈRE UTILISATION.
An de garantir le fonctionnement able et durable de
l'appareil, il est nécessaire d'utiliser et d'entretenir ce
dernier conformément aux consignes gurant dans le
présent manuel. Les caractéristiques et les spécications
contenues dans ce document sont à jour. Le fabricant se
réserve le droit de procéder à des modications à des ns
d’amélioration du produit.
SYMBOLES
1. DESCRIPTION GÉNÉRALE
L’objectif du présent manuel est de favoriser une utilisation
sécuritaire et able de l’appareil. Le produit a été conçu
et fabriqué en respectant étroitement les directives
techniques applicables et en utilisant les technologies et
composants les plus modernes. Il est conforme aux normes
de qualité les plus élevées.
Respectez les consignes du manuel.
ATTENTION!, AVERTISSEMENT! et REMARQUE!
attirent l’attention sur des circonstances
spéciques (symboles d’avertissement
généraux).
Portez une protection oculaire.
Portez des protections pour les mains.
Portez un équipement de protection des pieds.
ATTENTION! Éléments tranchants. Risque de
coupures.
ATTENTION! Mise en garde liée à un risque de
blessures des mains.
Pour l’utilisation intérieure uniquement.
REMARQUE! Les illustrations contenues dans le
présent manuel sont fournies à titre explicatif. Votre
appareil peut ne pas être identique.
La version originale de ce manuel a été rédigée en
allemand. Toutes les autres versions sont des traductions
de l’allemand.
ATTENTION! Veuillez lire attentivement toutes les
consignes de sécurité et toutes les instructions. Le
non-respect des instructions et des consignes de
sécurité peut entraîner des chocs électriques, des
incendies, des blessures graves ou la mort.
2. CONSIGNES DE SÉCURITÉ
REMARQUE! Veillez à ce que les enfants et les
personnes qui n'utilisent pas l'appareil soient en
sécurité durant le travail.
MANUEL D‘UTILISATION

21
Rev. 06.07.2020
1. Assurez-vous que les deux plaques du cadre sont
alignées dans la même direction.
2. Installez et lubriez la broche 1 ''. Assurez-vous qu'il
se déplace en douceur de haut en bas.
3. Serrez les vis ¾ ’à fond pour pouvoir déplacer le bras
sous pression.
4. Déplacez l'élément rectangulaire 1 'x 2' sur la poignée
pour déplacer le levier.
5. Centrez la poignée, puis serrez la bride.
Montage du bras pivotant
6. Retirez la broche 1 '' du cadre principal et insérez-
la dans les trous du cadre du bras pivotant comme
indiqué.
7. Insérez la broche 7/8 '' comme indiqué.
8. Serrez les plaques du cadre du bras pivotant avec des
vis ½’’ et xez-les avec des écrous.
9. Veillez à ne pas utiliser de rondelles sous les écrous en
bas ou en haut des vis.
10. Vériez que les vis sont bien serrées.
11. Les entretoises ont 1/2 '' x 2 5/8 '' respectivement
12. Retirez la broche 1 '', insérez le cadre du bras pivotant
dans le cadre principal, alignez les trous et insérez la
broche 1 '' comme indiqué.
13. Alignez le bras pivotant avec les trous du cadre
principal.
16. Fermez le bras pivotant et placez le tuyau dans la
lière comme illustré.
17. Insérez le bloc de montage comme indiqué sur le
dessin et xez-le avec la broche.
Installation de la courroie et des broches
18. Placez la courroie autour du tuyau, étirez-la et passez
la broche à travers la courroie et la matrice.
3.3. UTILISATION DE L'APPAREIL
Attention : Avant de commencer le travail, assurez-vous
que les endroits marqués sur le dessin ci-dessous sont bien
lubriés. En même temps, assurez-vous que la graisse ne
pénètre pas ailleurs dans l'appareil.
67
8
9
11
10
13
12
14 15
14. Retirez la broche 1 '' et la broche 7/8 '', placez la
matrice dans le cadre du bras pivotant, insérez la
broche 1 '' dans les trous du cadre et le manchon de
matrice.
15. Insérez la broche 7/8 '' dans le cadre du bras pivotant
et le premier trou de la matrice.
Installation du tuyau et du bloc de montage
17
16
18
7
3
56
1 2
4
des symboles, au point 1. L’utilisation de l’équipement
de protection individuel adéquat certié réduit le
risque de blessures.
d) Ne surestimez pas vos capacités. Adoptez toujours
une position de travail stable vous permettant de
garder l’équilibre. Vous aurez ainsi un meilleur
contrôle en cas de situations inattendues.
e) Ne portez ni vêtements amples ni bijoux. Tenez vos
cheveux, vos vêtements et vos gants à l’écart des
pièces mobiles. Les vêtements amples, les bijoux et
les cheveux longs peuvent être happés par les pièces
mobiles.
f) Retirez tous les outils de réglage et les clés avant
d'utiliser la machine. Un outil ou une clé laissés dans
la partie mobile de la machine peuvent provoquer des
blessures.
g) Le matériau à usiner doit être exempt d'impuretés.
h) Ne touchez pas aux pièces et aux accessoires mobiles
lorsque l’appareil est en cours d’utilisation.
i) Portez des gants de protection pour éviter les
blessures causées par des bords tranchants.
j) N'usinez pas de matériaux durs.
k) Il est défendu de modier l’appareil pour en changer
les paramètres ou la construction.
2.3. UTILISATION SÉCURITAIRE DE L’APPAREIL
a) Ne faites pas surchauer l’appareil. Utilisez les outils
appropriés à l’usage que vous en faites. Le choix
d’appareils appropriés et l’utilisation soigneuse de
ceux-ci produisent de meilleurs résultats.
b) Les outils qui ne sont pas en cours d’utilisation
doivent être mis hors de portée des enfants et des
personnes qui ne connaissent ni l’appareil, ni le
mode d’emploi s’y rapportant. Entre les mains de
personnes inexpérimentées, ce genre d’appareils peut
représenter un danger.
c) Maintenez l’appareil en parfait état de marche. Avant
chaque utilisation, vériez l’absence de dommages
généraux et au niveau des pièces mobiles (assurez-
vous qu’aucune pièce ni composant n’est cassé et
vériez que rien ne compromet le fonctionnement
sécuritaire de l’appareil). En cas de dommages,
l’appareil doit impérativement être réparé avant
d’être utilisé de nouveau.
d) Tenez l’appareil hors de portée des enfants.
e) La réparation et l’entretien des appareils doivent être
eectués uniquement par un personnel qualié, à
l’aide de pièces de rechange d’origine. Cela garantit
la sécurité d’utilisation.
f) Pour garantir l’intégrité opérationnelle de l’appareil,
les couvercles et les vis posés à l’usine ne doivent pas
être retirés.
g) Lors du transport du lieu de stockage au lieu
d’utilisation, respectez les dispositions d’hygiène et
de sécurité relatives à la manutention manuelle en
vigueur dans le pays d’utilisation. Il en va de même
lors du déplacement de l’appareil.
h) Usinez uniquement les éléments dont les paramètres
sont conformes aux données indiquées dans le
tableau des détails techniques. Les dimensions de
la pièce à usiner ne doivent pas dépasser valeurs
admissibles maximales.
i) N'usinez pas deux pièces en même temps.
j) Des pièces longues doivent être supportées et
stabilisées pour l'usinage.
20 Rev. 06.07.2020
1. Cadre (principal)
2. Cadre de bras pivotant
3. Poignée (appliquée à un élément rectangulaire de 1'x2 ')
4. Matrice
5. Bloc de xation
6. Élément à cintrer
7. Support avec trous de montage
15
14
8
9
10
11 12 13
3
2
15
4
8. Courroie
9. Bride de matrice
10. Broche de xation de ceinture
11. Broche 1’’
12. Broche 7/8’’
13. Broche de bloc de montage
14. Vis ¾’’
15. Vis ½’’
k) Montez la machine sur une surface stable, sèche et
plane, dont les dimensions correspondent à elles de la
machine et du matériau à usiner.
l) Le sol du lieu de travail doit être antidérapant.
3. CONDITIONS D’UTILISATION
La plieuse de tôle est un appareil conçu pour le pliage
manuel de pièces métalliques.
L’utilisateur porte l’entière responsabilité pour
l’ensemble des dommages attribuables à un usage
inapproprié.
3.1. DESCRIPTION DE L'APPAREIL
ATTENTION! Bien que l'appareil ait été conçu en
accordant une attention spéciale à la sécurité et qu'il
comporte des dispositifs de protection, ainsi que des
caractéristiques de sécurité supplémentaires, il n’est
pas possible d’exclure entièrement tout risque de
blessure lors de son utilisation. Nous recommandons
de faire preuve de prudence et de bon sens lorsque
vous utilisez l’appareil.
3.2. Préparation à l'utilisation
MONTAGE DE L’APPAREIL
Attention : L'appareil peut être monté sur une table de
travail ou un support.
Montage du cadre principal
Installation de matrice

22 Rev. 06.07.2020
Attention : Lorsque vous cintrez un tuyau au-dessus de
120°, il peut se coincer dans la machine. Alors, pour libérer
le tuyau, retirez d'abord la goupille bloquant la courroie,
puis appuyez doucement sur le tuyau. Cela facilitera le
retrait.
2. Continuez le déplacement jusqu'à ce que vous
atteigniez la position indiquée sur le dessin.
3. Retirez la broche 7/8 ''. Tournez le bras pivotant
dans le sens antihoraire (en faisant attention de ne
pas déplacer le tuyau). Insérez la goupille de 7/8 ''
et répétez le processus de cintrage jusqu'à ce que
l'angle souhaité soit atteint.
Instructions de cintrage :
1. Tirez la poignée comme indique la èche sur le
dessin.
3.4. NETTOYAGE ET ENTRETIEN
• Veillez à ce que les leviers et les éléments de blocage
demeurent propres et sans résidus de lubriant.
• Lubriez les éléments mobiles et/ou les surfaces de
contact de façon périodique.
• Pour nettoyer les diérentes surfaces, n’utilisez que
des produits sans agents corrosifs.
• Laissez bien sécher tous les composants de l’appareil
après chaque nettoyage, avant de le réutiliser.
• Conservez l’appareil dans un endroit frais et sec, à
l’abri de l’humidité et des rayons directs du soleil.
• En cas de non utilisation prolongée de l’appareil,
lubriez-le à l’aide de graisse pour le protéger
pendant le stockage. An de garantir une utilisation
sûre, éliminez l’excès de graisse avant de réutiliser
l’appareil.
DATI TECNICI
Parametri - Descrizione Parametri - Valore
Nome del prodotto PIEGATRICE PER TUBI
Modello MSW-TRB-300
Dimensioni [mm] 1550x550x1090
Peso [kg] 66,6
Angolo di lavorazione [°] 0-130
Spessore del pezzo in
lavorazione [mm] 1,5-4
2.1. SICUREZZA SUL LAVORO
a) Mantenere la postazione di lavoro pulita e ben
illuminata. Il disordine o una scarsa illuminazione
possono portare a incidenti. Prestare sempre
attenzione, osservare che cosa viene fatto e utilizzare
il buon senso quando si adopera il dispositivo.
b) Questo dispositivo non è adatto per essere utilizzato
da persone, bambini compresi, con ridotte capacità
siche, sensoriali o mentali, così come da privi di
adeguata esperienza e/o conoscenze. Si fa eccezione
per coloro i quali siano sorvegliati da un responsabile
qualicato che si prenda carico della loro sicurezza e
abbia ricevuto istruzioni dettagliate al riguardo.
c) Il dispositivo deve essere utilizzato solo da personale
adeguatamente istruito, sicamente in grado di
utilizzare il dispositivo e in buona salute che abbia
letto questo manuale e conosca le normative di
sicurezza sul posto di lavoro.
d) In caso di constatazione di danno o non conformità
nel funzionamento del dispositivo bisogna
interrompere immediatamente l’uso e informare la
persona delegata.
e) In presenza di dubbi sul corretto funzionamento
del dispositivo o se ci sono dei danni, rivolgersi al
servizio clienti del produttore.
f) Il prodotto può essere riparato soltanto dal fornitore.
Non auto-ripararlo.
g) I bambini e le persone non autorizzate non devono
essere presenti sul posto di lavoro. (La distrazione può
causare la perdita di controllo dell'apparecchiatura).
h) Durante la lavorazione degli elementi bisogna
prestare attenzione alla presenza di persone
estranee e alla loro sicurezza.
i) Bisogna osservare attentamente l’elemento
durante la lavorazione in modo da reagire in tempo
debito al pericolo o prevenire il danneggiamento
dell’elemento.
j) Mantenere l’ordine e rimuovere dopo la lavorazione
tutta la polvere, i resti e le parti superue del
materiale lavorato.
k) Nel caso di una produzione di una quantità maggiore
di elementi, gli elementi prima e dopo la lavorazione
devono essere stoccati in modo da mantenere in
ordine la postazione di lavoro.
2.2. SICUREZZA PERSONALE
a) Non è consentito l'uso del dispositivo in uno stato
di aaticamento, malattia, sotto l'inuenza di alcol,
droghe o farmaci, se questi limitano la capacità di
utilizzare il dispositivo.
b) Fare attenzione e usare il buon senso quando si
utilizza il dispositivo. Un momento di disattenzione
durante il lavoro può causare gravi lesioni.
c) Utilizzare gli strumenti di protezione individuale
necessari al funzionamento dell'apparecchio
conformemente alle speciche indicate nella
spiegazione dei simboli al punto 1. L'uso di dispositivi
di protezione individuale adeguati e certicati riduce il
rischio di lesioni.
d) Non sopravvalutare le proprie abilità. Mantenere
l'equilibrio durante il lavoro. In questo modo è
possibile controllare meglio il dispositivo in caso di
situazioni impreviste.
ISTRUZIONI PER L’USO
23
Rev. 06.07.2020
1. DESCRIZIONE GENERALE
Queste istruzioni sono intese come ausilio per un uso sicuro
e adabile. Il prodotto è stato rigorosamente progettato
e realizzato secondo le direttive tecniche e l‘utilizzo delle
tecnologie e componenti più moderne e seguendo gli
standard di qualità più elevati.
PRIMA DELLA MESSA IN FUNZIONE È NECESSARIO
AVER LETTO E COMPRESO LE ISTRUZIONI D‘USO.
Per un funzionamento duraturo e adabile del dispositivo
assicurarsi di maneggiarlo e curarne la manutenzione
secondo le disposizioni presentate in questo manuale.
I dati e le speciche tecniche indicati in questo manuale
sono attuali. Il fornitore si riserva il diritto di apportare delle
migliorie nel contesto del miglioramento dei propri prodotti.
SPIEGAZIONE DEI SIMBOLI
Leggere attentamente le istruzioni.
ATTENZIONE o AVVERTENZA! o NOTA!
per richiamare l'attenzione su determinate
circostanze (indicazioni generali di avvertenza).
Indossare una protezione per gli occhi.
Utilizzare dei guanti protettivi.
Utilizzare delle scarpe protettive.
ATTENZIONE! Elementi taglienti. Pericolo di
tagli agli arti.
ATTENZIONE! Pericolo di lesione alle mani.
Usare solo in ambienti chiusi.
AVVERTENZA! Le immagini contenute in questo
manuale sono puramente indicative e potrebbero
dierire dal prodotto.
Il manuale originale è stato scritto in tedesco. Le versioni in
altre lingue sono traduzioni dalla lingua tedesca.
ATTENZIONE! Leggere le istruzioni d‘uso e di
sicurezza. Non prestare attenzione alle avvertenze
e alle istruzioni può condurre a shock elettrici,
incendi, gravi lesioni o addirittura al decesso.
2. SICUREZZA NELL‘IMPIEGO
Il termine "apparecchio" o "prodotto" nelle avvertenze
e descrizioni contenute nel manuale si riferisce alla/al
PIEGATRICE PER TUBI.
AVVERTENZA! Quando si lavora con questo
dispositivo, i bambini e le persone non coinvolte
devono essere protetti.

18
25
Rev. 06.07.2020
1. Assicurarsi che entrambe le piastre del telaio siano
allineate nella stessa direzione.
2. Installare e lubricare il perno 1'''. Assicurarsi che si
muova in modo uido verso l'alto e verso il basso.
3. Serrare le viti ¾'' in modo che il braccio possa
muoversi sotto pressione.
4. Spostare l'elemento rettangolare 1''x2''' sopra la
maniglia per riposizionare la leva.
5. Centrare l'impugnatura, quindi serrare la angia.
Montaggio del braccio girevole
6. Rimuovere il perno da 1''' dal telaio principale e
inserirlo nei fori del telaio del braccio girevole come
indicato nel disegno.
7. Inserire il perno 7/8'' come indicato nel disegno.
8. Avvitare le piastre del telaio del braccio girevole da
½"'' e ssare con i dadi.
9. Fare attenzione a non utilizzare rondelle sotto i dadi
nella parte inferiore o superiore dei bulloni.
10. Vericare che i bulloni siano ben serrati.
11. Dimensioni dei distanziatori sono: 1/2''' x 2 5/8''.
12. Rimuovere il perno 1''', inserire il telaio del braccio
girevole nel telaio principale, allineare i fori e inserire
il perno 1''' come indicato nel disegno.
13. Allineare il braccio girevole con i fori del telaio
principale.
Montaggio della matrice
16. Chiudere il braccio girevole e posizionare il tubo nella
matrice come indicato nel disegno.
17. Inserire il blocco di ssaggio come indicato nel
disegno e ssarlo con un perno.
Montaggio della cinghia e del perno
18. Sistemare la cinghia intorno al tubo, allungarla e
inlare il perno attraverso la cinghia e la matrice.
3.3. LAVORARE CON IL DISPOSITIVO
Nota: prima di iniziare il lavoro, assicurarsi che le aree
indicate nella gura sottostante siano ben lubricate. Allo
stesso tempo, assicurarsi che il grasso non entri in altre aree
della macchina.
67
8
9
11
10
13
12
14 15
14. Rimuovere il perno 1''' e 7/8’’, inserire la matrice nel
telaio del braccio girevole, inserire il perno 1''' nei fori
dei telai e angia della matrice.
15. Inserire il perno nel telaio del braccio girevole e nel
primo foro della matrice.
17
16
3
2
15
4
7
3
56
1 2
4
e) Non indossare indumenti larghi o gioielli. Tenere
capelli, indumenti e guanti lontano da parti in
movimento. Vestiti larghi o tenuti all’aria, gioielli
o capelli lunghi possono impigliarsi nelle parti in
movimento.
f) Bisogna rimuovere tutti gli strumenti di regolazione
o le chiavi prima dell’uso del dispositivo. Lo strumento
o la chiave lasciata nella parte rotante del dispositivo
puo causare lesioni.
g) Il materiale soggetto alla lavorazione dovrebbe essere
libero da impurità.
h) Non toccare le parti in movimento o gli accessori
mobili durante il funzionamento del dispostivo.
i) Indossare i guanti protettivi per evitare ferite causate
dai bordi acuti.
j) Non lavorare gli elementi realizzati in materiale duro.
k) È vietato intervenire sulla struttura del dispositivo per
modicare i suoi parametri o la sua costruzione.
USO SICURO DEL DISPOSITIVO
a) Non far surriscaldare il dispositivo. Utilizzare strumenti
appropriati. Dispositivi scelti correttamente e un
attento utilizzo degli stessi portano a risultati migliori.
b) Gli strumenti inutilizzati devono essere tenuti fuori
dalla portata dei bambini e delle persone che non
hanno familiarità con l'unità e le istruzioni. Nelle
mani di persone inesperte, questo apparecchio può
rappresentare un pericolo.
c) Mantenere l'apparecchio in perfette condizioni.
Prima di ogni utilizzo, vericare che non vi siano
danni generali o danni alle parti mobili (frattura di
parti e componenti o altre condizioni che potrebbero
compromettere il funzionamento sicuro della
macchina). In caso di danni, l'unità deve essere
riparata prima dell'uso.
d) Tenere il dispositivo fuori dalla portata dei bambini.
e) La riparazione e la manutenzione dell'attrezzatura
devono essere eseguite esclusivamente da personale
specializzato qualicato e con pezzi di ricambio
originali. Ciò garantisce la sicurezza durante l'uso.
f) Per garantire l'integrità di funzionamento
dell'apparecchio, i coperchi o le viti installati in
fabbrica non devono essere rimossi.
g) Quando si trasporta e si sposta l'apparecchiatura
dal luogo di stoccaggio al luogo di utilizzo,
i requisiti di sicurezza e di igiene per lo spostamento
manuale devono essere rispettati per il Paese in cui
l'apparecchiatura viene utilizzata.
h) Nel dispositivo bisogna lavorare gli elementi con
i parametri conformi alle informazioni indicate nella
tabella dei dati tecnici. Non superare le misure
consentite del materiale lavorato.
i) Non lavorare due oggetti contemporaneamente.
j) Gli oggetti lunghi in lavorazione vanno appoggiati e
posizionati in modo stabile per poi essere lavorati.
k) Posizionare il dispositivo su una supercie stabile,
asciutta e piana con una misura adeguata ll’ingombro
del dispositivo e del materiale lavorato.
l) Il pavimento sul posto di lavoro dovrebbe essere anti-
scivolo.
24 Rev. 06.07.2020
1. Telaio (principale)
2. Telaio del braccio girevole
3. Maniglia (sovrapposta ad un elemento rettangolare
1''x2''')
4. Matrice
5. Blocco di ssaggio
6. Elemento piegato
7. Supporto con fori di montaggio
15
14
8
9
10
11 12 13
1. Cinghia
2. Flangia della matrice
3. Perno di ssaggio della cinghia
4. Perno 1’’
5. Perno 7/8’’
6. Perno del blocco di ssaggio
7. Viti ¾’’
8. Viti ½’’
3.2. PREPARAZIONE AL FUNZIONAMENTO
MONTAGGIO DEL DISPOSITIVO
Nota: l'apparecchio può essere montato su un banco da
lavoro o su un supporto.
Montaggio del telaio principale
ATTENZIONE!Anche se l'apparecchiatura è
stata progettata per essere sicura, sono presenti
degli ulteriori meccanismi di sicurezza. Malgrado
l'applicazione di queste misure supplementari di
sicurezza sussiste comunque il rischio di ferirsi. Si
raccomanda inoltre di usare cautela e buon senso.
3. CONDIZIONI D'USO
La piegatrice è concepito per la piega manuale degli
elementi di metallo.
L'operatore è responsabile di tutti i danni derivanti da
un uso improprio.
3.1. DESCRIZIONE DEL DISPOSITIVO
Montaggio del tubo e blocco di ssaggio
Istruzioni di piegatura:
1. Tirare la maniglia nella direzione della freccia riportata
nel disegno.

26 Rev. 06.07.2020
Nota: Durante la piegatura di un tubo al di sopra dei 120°,
il tubo potrebbe bloccarsi nell'unità. Per rilasciare il tubo,
rimuovere prima il perno di bloccaggio della cinghia e
quindi battere delicatamente il tubo. Questo faciliterà la
rimozione del tubo.
3.4. PULIZIA E MANUTENZIONE
• Le leve e gli elementi di regolazione devono essere
mantenuti puliti, senza resti di sostanze lubricanti.
• Gli elementi rotanti e/o le superci di contatto
devono essere mantenuti puliti, senza segni di
ruggine e periodicamente protetti da sottili strati di
olio di protezione.
• Per pulire la supercie utilizzare solo detergenti
senza ingredienti corrosivi.
• Dopo la pulizia, prima di riutilizzare l'apparecchio,
asciugare tutte le parti.
• Tenere l'apparecchio in un luogo asciutto, fresco,
protetto dall'umidità e dalla luce diretta del sole.
• In caso di inutilizzo prolungato del dispositivo
bisogna proteggere il dispositivo con il lubricante
per il periodo di non utilizzo. Per un utilizzo sicuro
prima del riutilizzo bisogna rimuovere il lubricante
in eccesso.
2. Continuare il movimento no a raggiungere la
posizione indicata in gura.
3. Rimuovere il perno 7/8''. Ruotare il braccio girevole
in senso antiorario (facendo attenzione a non
muovere il tubo). Inserire il perno 7/8'' e ripetere il
processo di piegatura no a raggiungere l'angolo
desiderato.
DATOS TÉCNICOS
Parámetro - Descripción Parámetro - Valor
Nombre del producto MÁQUINA DOBLADORA
DE TUBOS
Modelo MSW-TRB-300
Dimensiones [mm] 1550x550x1090
Peso [kg] 66,6
Ángulo de doblado [°] 0-130
Grosor del elemento
tratado [mm] 1,5-4
2.2.SEGURIDAD PERSONAL
a) No está permitido utilizar el aparato en estado de
fatiga, enfermedad, bajo la inuencia del alcohol,
drogas o medicamentos, ya que estos limitan la
capacidad de manejo del aparato.
b) Actúe con precaución y use el sentido común cuando
maneje este producto. La más breve falta de atención
durante el trabajo puede causar lesiones graves.
c) Utilice el equipo de protección personal necesario
para el empleo de este dispositivo, de acuerdo con
las especicaciones del punto 1 de las explicaciones
de los símbolos. El uso de un equipo de protección
personal apropiado y certicado reduce el riesgo de
lesiones.
d) No sobreestime sus habilidades. Mantenga el
equilibrio durante el trabajo. Esto le da un mejor
control sobre el dispositivo en caso de situaciones
inesperadas.
27
Rev. 06.07.2020
1. DESCRIPCIÓN GENERAL
Este manual ha sido elaborado para favorecer un empleo
seguro y able. El producto ha sido estrictamente diseñado
y fabricado conforme a las especicaciones técnicas y para
ello se han utilizado las últimas tecnologías y componentes,
manteniendo los más altos estándares de calidad.
ANTES DE LA PUESTA EN FUNCIONAMIENTO,
LEA LAS INSTRUCCIONES MINUCIOSAMENTE Y
ASEGÚRESE DE COMPRENDERLAS.
Para garantizar un funcionamiento duradero y able del
aparato, el manejo y mantenimiento deben llevarse a cabo
de acuerdo con las instrucciones de este manual. Los
datos técnicos y las especicaciones de este manual están
actualizados. El fabricante se reserva el derecho de realizar
modicaciones para mejorar la calidad.
EXPLICACIÓN DE LOS SÍMBOLOS
Respetar las instrucciones de uso.
¡ATENCIÓN!, ¡ADVERTENCIA! o ¡NOTA! para
llamar la atención sobre ciertas circunstancias
(señal general de advertencia).
Utilizar protección para los ojos.
Utilizar guantes de protección.
Utilizar calzado de seguridad.
¡ATENCIÓN! Elementos cortantes. Peligro de
amputación.
¡ATENCIÓN! Advertencia de lesiones en manos.
Uso exclusivo en áreas cerradas.
¡ADVERTENCIA! En este manual se
incluyen fotos ilustrativas que podrían no coincidir
exactamente con la apariencia real del dispositivo.
El texto en alemán corresponde a la versión original. Los textos
en otras lenguas son traducciones del original en alemán.
2. SEGURIDAD
¡ATENCIÓN!! Lea todas las instrucciones e
indicaciones de seguridad. La inobservancia de
las advertencias e instrucciones al respecto puede
provocar descargas eléctricas, incendios, lesiones
graves e incluso la muerte.
Conceptos como "aparato" o "producto" en las
advertencias y descripciones de este manual se reeren
a MÁQUINA DOBLADORA DE TUBOS.
2.1. SEGURIDAD EN EL PUESTO DE TRABAJO
a) Mantenga el lugar de trabajo limpio y bien iluminado.
El desorden o la mala iluminación pueden provocar
accidentes. Tenga cuidado, preste atención al trabajo
que está realizando y use el sentido común cuando
utilice el dispositivo.
b) Este aparato no debe ser utilizado por niños, ni
tampoco por personas con capacidades físicas,
sensoriales o mentales reducidas o con falta de
experiencia y/o conocimiento, a menos que sean
supervisadas por un responsable de su seguridad.
c) Este aparato debe ser manipulado exclusivamente por
operarios con la formación adecuada y físicamente
sanos, que hayan leído las presentes instrucciones
y conozcan los requisitos en materia de seguridad y
salud.
d) En caso de detectar un defecto o un problema con
el funcionamiento de la máquina, se debe parar
inmediatamente e informar al responsable autorizado.
e) En caso de duda sobre si el producto funciona
correctamente o si detectara daños, póngase en contacto
con el servicio de atención al cliente del fabricante.
f) El producto solamente puede ser reparado por el
fabricante. ¡No intente repararlo usted mismo!
g) Se prohíbe la presencia de niños y personas no
autorizadas en el lugar de trabajo (la falta de atención
puede llevar a la pérdida de control del equipo).
h) Durante las tareas de doblado, compruebe si hay
cerca terceras personas y preste atención a la
seguridad de estas.
i) Observar con atención el perl durante su doblado
para poder reaccionar adecuadamente en el
momento preciso en caso de un riesgo o evitar daños
en la pieza.
j) Mantener la limpieza, eliminar polvo, suciedad
y fragmentos del material doblado después de
terminar la tarea.
k) En el caso de procesar varias piezas de trabajo, estas
deben colocarse antes y después de su doblado de
forma que el orden en el lugar de trabajo quede
garantizado.
¡ADVERTENCIA! Los niños y las personas no
autorizadas deben estar asegurados cuando trabajen
con esta unidad.
MANUAL DE INSTRUCCIONES

18
29
Rev. 06.07.2020
1. Asegúrese de que ambas placas del marco están
colocadas en línea recta y en la misma dirección.
2. Instale y lubrique la clavija de 1". Asegúrese de que
se desplace hacia arriba y hacia abajo con uidez.
3. Apriete bien el tornillo de ¾ ‘’ de modo que sea
posible desplazar el brazo bajo presión.
4. Desplace el elemento rectangular de 1’’x2’’ sobre el
mango para trasladar la palanca.
5. Centre el mango y después apriete la brida.
Instalación del brazo de rotación
6. Extraiga la clavija de 1" del marco principal e
introdúzcala en los oricios del marco del brazo de
rotación de acuerdo con el dibujo.
7. Introduzca la clavija de 7/8’’ de acuerdo con el dibujo.
8. Ajuste las placas del marco del brazo de rotación
mediante tornillos de ½’’ y asegúrelas con tuercas.
9. No coloque arandelas por debajo de las tuercas en la
parte inferior ni en la parte superior de los tornillos.
10. Compruebe que los tornillos estén bien apretados.
11. Los elementos de distanciamiento tienen unas
dimensiones de 1/2 ‘’ x 2 5/8’’
12. Extraiga la clavija de 1", introduzca el marco del brazo
de rotación en el marco principal, alinee los oricios e
introduzca la clavija de 1" según el dibujo.
13. Alinee el brazo de rotación con los oricios del marco
principal.
16. Cierre el brazo de rotación y coloque la tubería en la
matriz según el dibujo.
17. Coloque el bloque de jación según el dibujo y
asegúrelo con la clavija.
Instalación de la correa y la clavija
18. Coloque la correa alrededor de la tubería, estírela y
pase la clavija a través de la correa y la matriz.
3.3. MANEJO DEL APARATO
Atención: Antes de empezar a trabajar, asegúrese de que
los lugares marcados en el dibujo estén bien lubricados.
Asimismo, tenga cuidado de que el lubricante no alcance
otras partes del aparato.
3
2
15
4
67
8
9
11
10
13
12
14 15
14. Extraiga la clavija de 1" y la clavija de 7/8", coloque la
matriz en el marco del brazo de rotación e introduzca
la clavija de 1" en los oricios de los marcos y la
manga de la matriz.
15. Introduzca la clavija de 7/8" en el marco del brazo de
rotación y el primer oricio de la matriz.
Instalación de la tubería y el bloque de jación
17
16
Instalación del marco principal
7
3
56
1 2
4
e) No utilice ropa holgada o adornos, tales como joyas.
Mantenga el cabello, la ropa y los guantes alejados
de las piezas móviles. La ropa holgada, las joyas o el
cabello largo pueden quedar atrapados en las piezas
móviles.
f) Antes de operar la máquina, quitar cualquier
herramienta o llave de ajuste. Una herramienta o una
llave que permanezca en la parte giratoria de la
máquina, puede causar lesiones.
g) El material a tratar debe estar libre de suciedad.
h) No tocar elementos o accesorios móviles de la
máquina durante su trabajo.
i) Usar guantes protectores para evitar lesiones por
bordes cortantes.
j) Evitar el tratamiento de materiales duros.
k) Se prohíbe realizar cambios en la construcción del
dispositivo para modicar sus parámetros o diseño.
MANEJO SEGURO DEL APARATO
a) No permita que el aparato se sobrecargue. Utilice
las herramientas apropiadas para cada trabajo.
Debe seleccionarse el aparato adecuado para cada
aplicación y utilizarse conforme al n para el que
ha sido diseñado, para conseguir así los mejores
resultados.
b) Mantenga las herramientas fuera del alcance de los
niños y de las personas que no estén familiarizadas
con el equipo en sí o no hayan recibido instrucciones
pertinentes para su uso. En manos de personas
inexpertas este equipo puede representar un peligro.
c) Mantenga el aparato en perfecto estado de
funcionamiento. Antes de cada trabajo, compruébelo
en busca de daños generales o en piezas móviles
(fractura de piezas y componentes u otras
condiciones que puedan perjudicar el funcionamiento
seguro de la máquina). En caso de daños, el aparato
debe ser reparado antes de volver a ponerse en
funcionamiento.
d) Mantenga la unidad fuera del alcance de los niños.
e) La reparación y el mantenimiento de los equipos
solo pueden ser realizados por personal cualicado
y siempre empleando piezas de repuesto originales.
Esto garantiza la seguridad durante el uso.
f) A n de asegurar la integridad operativa del
dispositivo, no se deben retirar las cubiertas o los
tornillos instalados de fábrica.
g) Al transportar o trasladar el equipo desde su lugar
de almacenamiento hasta su lugar de utilización, se
observarán los requisitos de seguridad e higiene para
la manipulación manual en el país en que se utilice el
equipo.
h) Los perles a doblar deben tener los parámetros
indicados en la tabla de datos técnicos. Los perles
a doblar no deben superar las dimensiones admisibles
para su material.
i) Está prohibido trabajar con dos elementos a la vez.
j) Las piezas largas deben estar apoyadas de manera
estable durante el tratamiento.
k) La máquina debe montarse en una supercie
estable, seca y plana, de un tamaño adecuado a sus
dimensiones y al material a doblar.
l) El suelo en el lugar de colocación de la máquina debe
ser antideslizante.
28 Rev. 06.07.2020
1. Marco (principal)
2. Marco del brazo de rotación
3. Mango (colocado sobre el elemento rectangular
1’’x2’’)
4. Matriz
5. Bloque de jación
6. Elemento doblado
7. Soporte con oricios de montaje
15
14
8
9
10
11 12 13
8. Correa
9. Brida de la matriz
10. Clavija de jación de la correa
11. Clavija 1’’
12. Clavija 7/8’’
13. Clavija del bloque de jación
14. Tornillos ¾’’
15. Tornillos ½’’
3.2. Preparación para la puesta en marcha
MONTAJE DE LA MÁQUINA
Atención: El aparato se puede instalar en una mesa de
trabajo o en el soporte.
3. INSTRUCCIONES DE USO
La curvadora sirve para el curvado manual de piezas de
metal.
El usuario es responsable de los daños derivados de un
uso inadecuado del aparato.
3.1. DESCRIPCIÓN DEL APARATO
¡ATENCIÓN! Aunque en la fabricación de
este aparato se ha prestado gran importancia
a la seguridad, dispone de ciertos mecanismos de
protección extras. A pesar del uso de elementos de
seguridad adicionales, existe el riesgo de lesiones
durante el funcionamiento, por lo que se recomienda
proceder con precaución y sentido común.
Instalación de la matriz

30 Rev. 06.07.2020
Atención: Al doblar una tubería más de 120º, esta puede
bloquearse en el aparato. Entonces, para liberar la tubería,
primero saque la clavija de bloqueo de la correa y después
golpee delicadamente la tubería. Eso facilitará sacarla.
2. Continúe el movimiento hasta alcanzar la posición
mostrada en el dibujo.
3. Retire la clavija de 7/8". Gire el brazo de rotación
en el sentido contrario a las agujas del reloj (con
cuidado de no mover la tubería). Introduzca la clavija
de 7/8" y repita el proceso de doblado hasta obtener
el ángulo deseado.
Instrucciones de doblado:
1. Tire del mango del modo que indica la echa en el
dibujo.
3.4. LIMPIEZA Y MANTENIMIENTO
• Las palancas y los elementos de ajuste deben
mantenerse limpios, sin restos de lubricante
• Los elementos giratorios y/o las supercies de
contacto deben mantenerse limpios, sin oxidación y
deben lubricarse periódicamente con una na capa
de aceite especial.
• Para limpiar la supercie, utilice solo productos que
no contengan sustancias corrosivas.
• Después de cada limpieza, deje secar bien todas las
piezas antes de volver a utilizar el aparato.
• Guarde el aparato en un lugar seco, fresco y
protegido de la humedad y la radiación solar directa.
• Si la máquina no se va a utilizar durante un tiempo
prolongado, debe protegerse con grasa antes del
almacenamiento. Para mayor seguridad, eliminar el
exceso de grasa antes de volver a usarla.
NOTES/NOTIZEN
31
Rev. 06.07.2020

expondo.de
CONTACT
expondo Polska sp. z o.o. sp. k.
ul. Nowy Kisielin – Innowacyjna 7
66-002 Zielona Góra | Poland, EU
e-mail: info@expondo.de
UNSER HAUPTZIEL IST DIE ZUFRIEDENHEIT UNSERER KUNDEN!
BEI FRAGEN KONTAKTIEREN SIE UNS BITTE UNTER:
OUR CUSTOMERS‘ SATISFACTION IS OUR MAIN GOAL!
PLEASE CONTACT US WITH QUESTIONS AT:
NASZYM GŁÓWNYM CELEM JEST SATYSFAKCJA KLIENTÓW
W PRZYPADKU PYTAŃ PROSIMY O KONTAKT Z PRZEDSTAWICIELEM
W DANYM KRAJU:
NAŠÍM HLAVNÍM CÍLEM JE SPOKOJENOST NAŠICH ZÁKAZNÍKŮ! V PŘÍPADĚ OTÁZEK
NÁS PROSÍM KONTAKTUJTE NA:
NOTRE BUT PREMIER EST VOTRE SATISFACTION!
POUR TOUTE QUESTION, CONTACTEZ NOUS SUR:
I NOSTRO PRINCIPALE OBIETTIVO È LA SODDISFAZIONE DEI NOSTRI CLIENTI!
PER EVENTUALI DOMANDE PER FAVORE, CI CONTATTINO SOTTO:
NUESTRO OBJETIVO PRINCIPAL ES LA SATISFACCIÓN DE NUESTROS CLIENTES!
SI TIENE PREGUNTAS, POR FAVOR PÓNGANSE EN CONTACTO CON NOSTROS EN:
Table of contents
Languages:
Other MSW Construction Equipment manuals