manuals.online logo
Brands
  1. Home
  2. •
  3. Brands
  4. •
  5. Mueller
  6. •
  7. Kitchen Appliance
  8. •
  9. Mueller WO-110 User manual

Mueller WO-110 User manual

Your satisfaction is guaranteed. If you are not completely
satisfied with our Electric Wine Opener Set and the results it
brings, we insist that you let us know. We'll help make the
Electric Wine Opener Set work for you, or we'll refund your money.
USER MANUAL
Model: WO-110
DO NOT use liquid or abrasive cleaning agents.
NEVER immerse the Electric wine opener in water. DO NOT
place the Electric wine opener in a dishwasher.
Always disconnect before cleaning. The Electric wine opener set
should be wiped clean with a damp cloth or sponge and then
wipe dry.
CAUTION: Corkscrew spiral is sharp. Handle with care.
Store your Electric wine opener in a cool, dry place, and out of
reach of children.
CLEANING AND MAINTENANCE:
Wine Aerator Pourer
Insert the Wine Aerator Pourer into the top
of the bottle to enhance aeration, improve
the wine's flavor, and prevent drips while
pouring.
Vacuum Wine Stopper
To preserve your wine, it is advised to
remove as much air as possible from the
bottle to slow down oxidation. Insert the
Wine Stopper into the bottle. Lift the top
up and push down in a pumping action
numerous times to extract the air until
there is increased pressure in the pump
action. Leave the vacuum stopper in the
bottle until next consummation.
Foil Cutter
Used to remove foil casing on the bottle
before opening. See step 1 in the
"OPERATING YOUR ELECTRIC WINE
OPENER SET" section.
Place the Electric wine opener on top of
the wine bottle, making sure that it
remains as upright as possible at all
times. Align the Corkscrew with the
center of a cork. Touch and hold the
Power button until the cork is fully
removed from the bottle. The corkscrew
will turn in a clockwise direction and
enter the cork, then gradually remove it
from the bottle automatically.
NOTE: Holding the Wine opener at an
angle to the bottle may result in
improper removal of the cork.
Release the Power button, then lift the
Electric wine opener away from the
bottle. Tilt the opener at a 45-degree
angle while holding the Power button to
remove the cork from the corkscrew.
The corkscrew will turn in a counter-
clockwise direction and release the
cork.
USING THE ACCESSORIES:
CHARGING THE ELECTRIC WINE OPENER:
Place the Electric wine opener into the
Charging stand, ensuring that it is firmly in
position and that it is fully engaged with
the recharging connection. You will notice
that the Battery indicator light will flash
green while the device is charging. The
light will turn OFF once fully charged.
Insert the power end of the USB cable into
the base of the Charging stand, and the
other USB end into a USB plug socket.
NOTE: It takes about 3-4 hours for a full
charge, which can open up to 60 bottles of
wine.
3
4
ATTENTION: Keep out of reach of children to avoid injuries!
ATTENTION: You may use 4 disposable AA batteries instead of
the rechargeable ones provided by the manufacturer. In that case,
DO NOT charge the Electric wine opener by connecting it to the
power source.
1
2
TECHNICAL SPECIFICATIONS:
Model Rated Voltage Rated Power Recharging
Current Recharging
Voltage
WO-110 6V 15.5W 250mAh 5V
IMPORTANT SAFEGUARDS
SAVE THESE INSTRUCTIONS
WARNING: The corkscrew spiral is sharp. Handle with care. Hold
the opener by its outer housing only. Keep hands and objects
away from mechanism during operation to prevent injury or
damage.
READ ALL INSTRUCTIONS BEFORE USE
When using an electrical device, basic safety precautions
should always be followed, including the following:
• Do not operate the wine opener after it has malfunctioned in
any way, or if it has dropped or been damaged in any manner.
• When using or recharging the electric wine opener, keep your
workspace clean and free from potential hazards.
• Do not use the unit as a handle to lift or move the inserted
bottle. This may cause the bottle to fall from the opener.
• Never force the wine opener onto a bottle or attempt to speed
up the mechanism. The wine opener will work best when it is
operated at its intended speed.
• Do not touch or adjust the wine opener's mechanism or the
corkscrew spiral. Only hold the wine opener by its body.
• Do not attempt to open bottles if the power button is not
working correctly.
• The use of attachments not recommended or sold by the
manufacturer may cause fire, electric shock, or injury.
• Charge only with the charger provided with the appliance. Do
not attempt to use this charger with any other product.
• Do not let the recharging cord hang over the edge of a table or
counter.
• Do not let the recharging cord contact hot surfaces, including
the stove.
• To protect against the risk of electrical shock, do not put the
electric wine opener in water or other liquid. This may cause
personal injury and/or damage to the product.
• Do not incinerate this device even if it is severely damaged.
Care should be taken with the rechargeable batteries, as these
are flammable when exposed to heat.
• For indoor use only. Do not expose the wine opener or
charging base to rain or other extreme conditions.
• Do not use a Fast Charging Plug to charge this device.
• This device is not intended for use by persons (including
children) with reduced physical, sensory, or mental capabilities,
or lack of experience and knowledge unless they are closely
supervised and instructed concerning the use of the device by a
person responsible for their safety.
• Close supervision is necessary when any device is used by or
near children. Children should be supervised to ensure that they
do not play with the device.
• To protect against fire, do not operate the unit in the presence
of explosive and/or flammable fumes.
• This product is intended for normal domestic household use
only.
• Do not use the wine opener for any other purpose than for its
intended use.
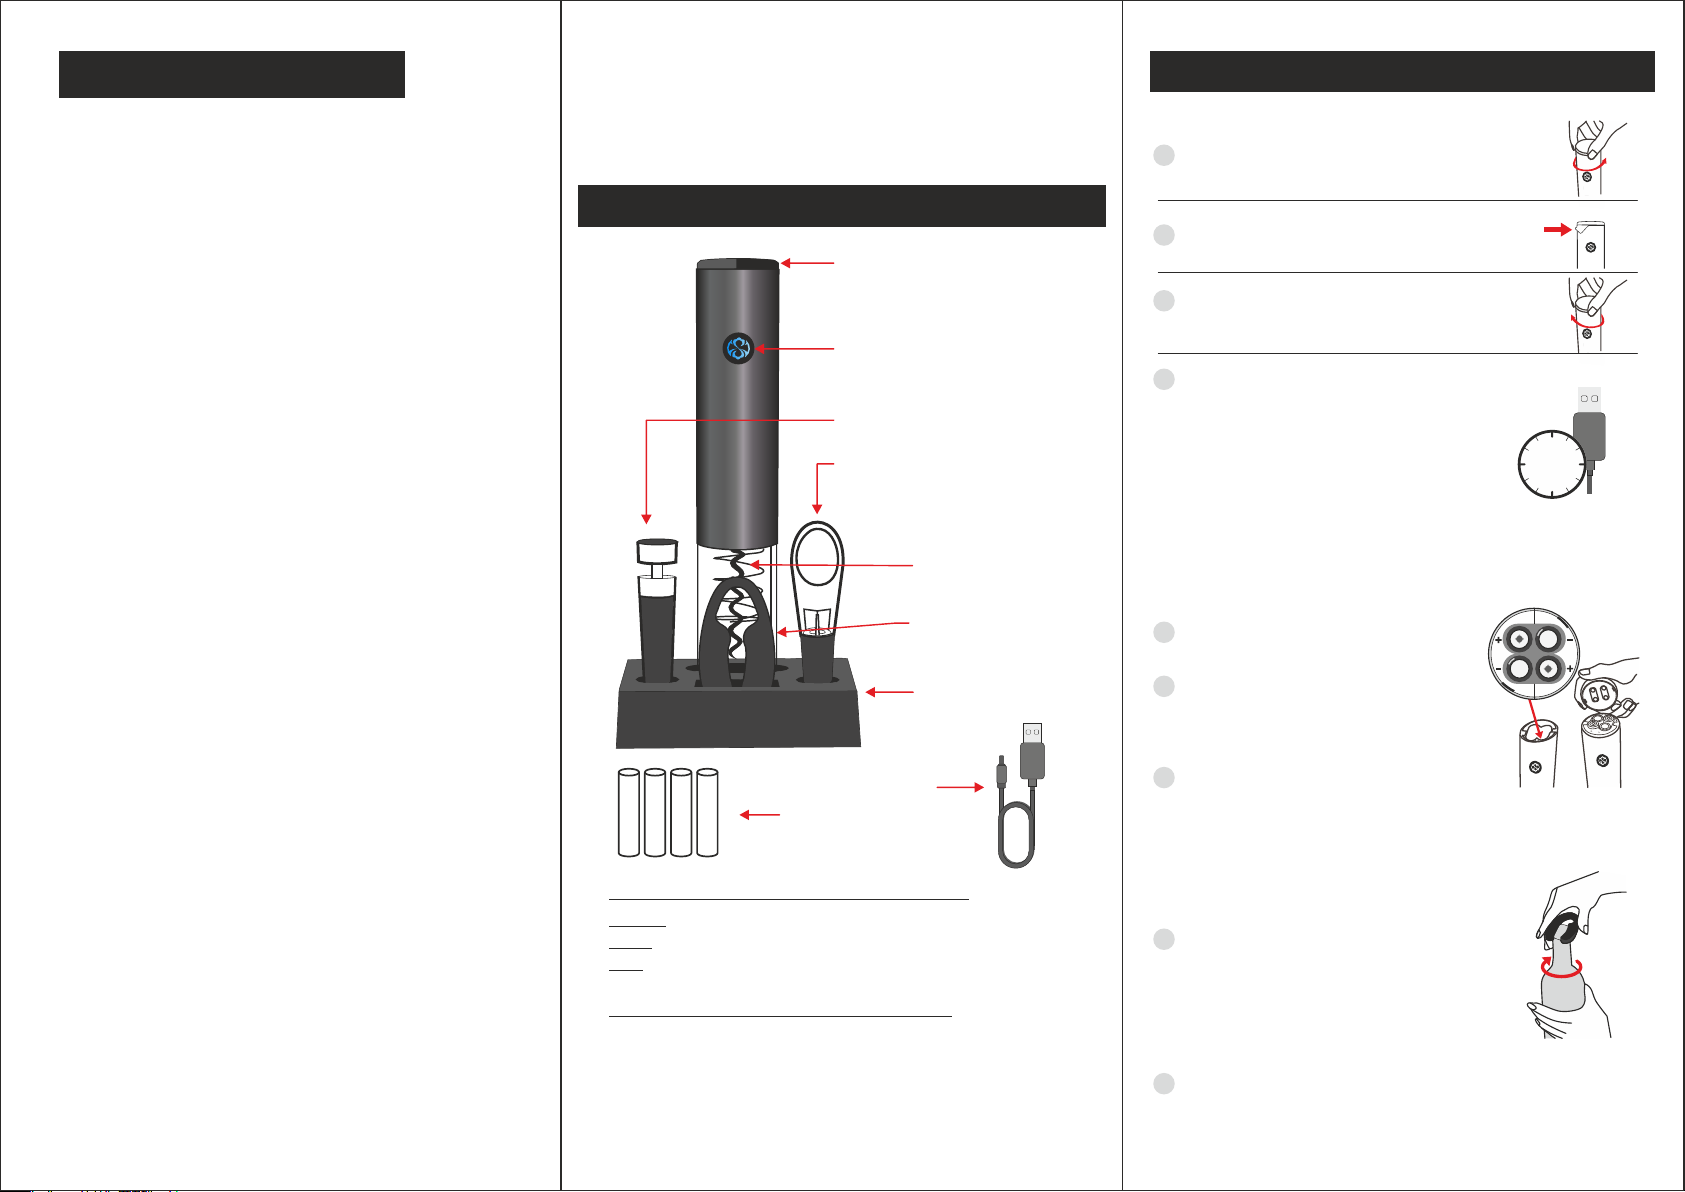
MEET YOUR ELECTRIC WINE OPENER SET
PRIOR TO FIRST USE:
USING YOUR ELECTRIC WINE OPENER SET
Battery cover
BATTERY INDICATOR LIGHT DISPLAY:
GREEN: Batteries fully charged.
Holding your wine opener at a 90-degrees angle will turn the
corkscrew clockwise to remove the cork from the bottle.
BLUE: Sufficient battery level.
DUAL-OPERATION TOUCH BUTTON:
Holding your wine opener at a 45-degree angle will turn the
corkscrew counterclockwise to remove the cork from the
corkscrew.
RED: Low battery.
Corkscrew
Vacuum wine stopper
Foil cutter
Touch power button/
Battery indicator
Wine aerator pourer
Charging stand
USB charging cable
Four rechargeable
batteries
Remove the Battery cover by turning it
counterclockwise.
Reattach the Battery cover by turning it
clockwise to lock in place.
Remove the insulating strip.
Charge the Wine opener for at least 4
hours before using it for the first time by
using the USB cable to connect with
the source of power (e.g., computer,
power outlet).
BATTERY INSTALLATION:
Remove the Battery cover by turning it
counterclockwise.
Reattach the Battery cover and turn
clockwise to lock in place.
Install 4 AA rechargeable batteries
(provided by the manufacturer) in
accordance with the diagram on the
Battery cover.
4
hours
ATTENTION: DO NOT use a Fast Cha-
rging plug!
1
2
3
4
1
2
3
OPERATING YOUR ELECTRIC
WINE OPENER SET:
Remove the foil from the bottle by
using the Foil cutter included. Hold the
lower half of the bottle firmly, and affix
the Foil cutter to the top of the bottle.
Firmly press on both sides, and twist to
remove the foil.
1
Place the bottle you wish to open on a
flat surface.
2

Other Mueller Kitchen Appliance manuals

Mueller W1025-1 User manual

Mueller

Mueller W1025-1 User manual

Mueller KSE-24 User manual

Mueller

Mueller KSE-24 User manual

Mueller MC-14C User manual

Mueller

Mueller MC-14C User manual

Mueller HS-16T User manual

Mueller

Mueller HS-16T User manual

Mueller MC-11SS User manual

Mueller

Mueller MC-11SS User manual

Mueller SmartStick MU-HB-10 User manual

Mueller

Mueller SmartStick MU-HB-10 User manual

Mueller PP-275 User manual

Mueller

Mueller PP-275 User manual

Mueller HS-16G User manual

Mueller

Mueller HS-16G User manual

Mueller MU-MANDO User manual

Mueller

Mueller MU-MANDO User manual

Mueller UltraPop PP-100 User manual

Mueller

Mueller UltraPop PP-100 User manual

Mueller V-Pro User manual

Mueller

Mueller V-Pro User manual

Popular Kitchen Appliance manuals by other brands

Saturn ST-EK8037 manual

Saturn

Saturn ST-EK8037 manual

BOSKA Pro 853560 instruction manual

BOSKA

BOSKA Pro 853560 instruction manual

Enders 7909 instruction manual

Enders

Enders 7909 instruction manual

Kalorik USK PPG 37241 operating instructions

Kalorik

Kalorik USK PPG 37241 operating instructions

Scarlett SC-FD421001 instruction manual

Scarlett

Scarlett SC-FD421001 instruction manual

FoodSaver V4925 owner's manual

FoodSaver

FoodSaver V4925 owner's manual

Course	Housewares B416144 quick start guide

Course Housewares

Course Housewares B416144 quick start guide

AEG SANTO Series operating instructions

AEG

AEG SANTO Series operating instructions

Melissa 643-036 instruction manual

Melissa

Melissa 643-036 instruction manual

cecotec ROCK'NTOAST 3IN1 instruction manual

cecotec

cecotec ROCK'NTOAST 3IN1 instruction manual

Gourmia GMF225 instructions

Gourmia

Gourmia GMF225 instructions

Electrolux EKM7 Series Instruction book

Electrolux

Electrolux EKM7 Series Instruction book

Magio MG-965 instruction manual

Magio

Magio MG-965 instruction manual

Keimling Naturkost Excalibur 56301WH Operation manual

Keimling Naturkost

Keimling Naturkost Excalibur 56301WH Operation manual

Beper 90.071 use instructions

Beper

Beper 90.071 use instructions

Geryon E2900-M user manual

Geryon

Geryon E2900-M user manual

Morphy Richards 46718 owner's manual

Morphy Richards

Morphy Richards 46718 owner's manual

Kenwood A995 manual

Kenwood

Kenwood A995 manual

manuals.online logo
manuals.online logoBrands
  • About & Mission
  • Contact us
  • Privacy Policy
  • Terms and Conditions

Copyright 2025 Manuals.Online. All Rights Reserved.