manuals.online logo
Brands
  1. Home
  2. •
  3. Brands
  4. •
  5. MullToa
  6. •
  7. Toilet
  8. •
  9. MullToa Separera 30 NE User manual

MullToa Separera 30 NE User manual

User Manual for Separera 30 NE
Swedish Ecology AB Klippan 1J S-414 51 Göteborg Sweden
Tel: +46 31 42 29 30 Fax: +46 31 42 49 08 [email protected]
www.mulltoa.com
User Manual for Separera 30 NE
Before installing your new Separera 30 NE, we recommend that you read through this
instruction in its entirety.We know from experience that the faults which may occur,
almost always has to do with installation and maintenance. In order to get a hassle
free use, take a moment and go through the instruction. It is absolutely worth it.
A Separera which has been properly installed, is odour free indoors. If odour
should appear, you have most likely missed or misunderstood something in the
use- and care manual.We mention this now to remind you how important it is
to get the toilet correctly installed from the start; reading this manual is the best
guarantee to reaching full product satisfaction.
Important things to always remember:
The moisture content is an important component of the biological process, so it is
important to retain the moisture as long as possible, even when the toilet is switched
off. – Apart from the natural needs being taken care of during a visit to the toilet,
the only thing that should go into the toilet is toilet paper.
Congratulations on your purchase
of a Separera 30 NE.
1
Solid waste
With normal use, a family of four produces around 7 litres
of solid waste per week.To create compost that is nice
and loose, add a few litres of Special Humus once a week.
You need to base the emptying frequency on how
often the toilet is used and by how many people. For
example, after 4-6 weeks’ use by 4 people it will be
time to switch composting chambers. Lift out the inner
container and carry it out, add a little ordinary topsoil
and put the lid on. Place the container in a shady place in
the garden for post-composting. It takes 6 to 9 months
of post-composting as a rule before the contents can be
used as a fertiliser.
Put a latrine bag in the other inner container and fit
this in place beneath the toilet.
General advice
Wash the urine bowl with water now and again to prevent
salt deposits.
If insects get into the toilet, you can sprinkle BioLet
Insektsstopp on the compost.
If you do experience a bad smell in the room, check
the pipe connections are properly sealed and that there
is an adequate air supply.
To clean the toilet, use only mild detergent. Never
use abrasive cleaning agents.
If you leave the house for more than 2 days, switch off
the fan and put the lid down.
3
How the Separera 30 NE works
This urine separating toilet is constructed from eco-friendly material and is designed to cope with high demand
over many years.What does separating waste mean? Well, the toilet is designed so that on any toilet visit, solid
waste is separated from the liquid (urine).This means that Separera has two chambers, one for urine, and another
for solid waste. Both must be dealt with in accordance with local regulations.
Contacting Environmental Health
Contact Environmental Health office regarding local health regulations.This always applies when installing any
type of toilet.
The Separera box contains
Toilet • Lid • Urine hose (1.5 m) • Special Humus • Insect netting • 2 Composting Chambers (40 litres) • Latrine
Bags (10)
The installation kit (accessories)
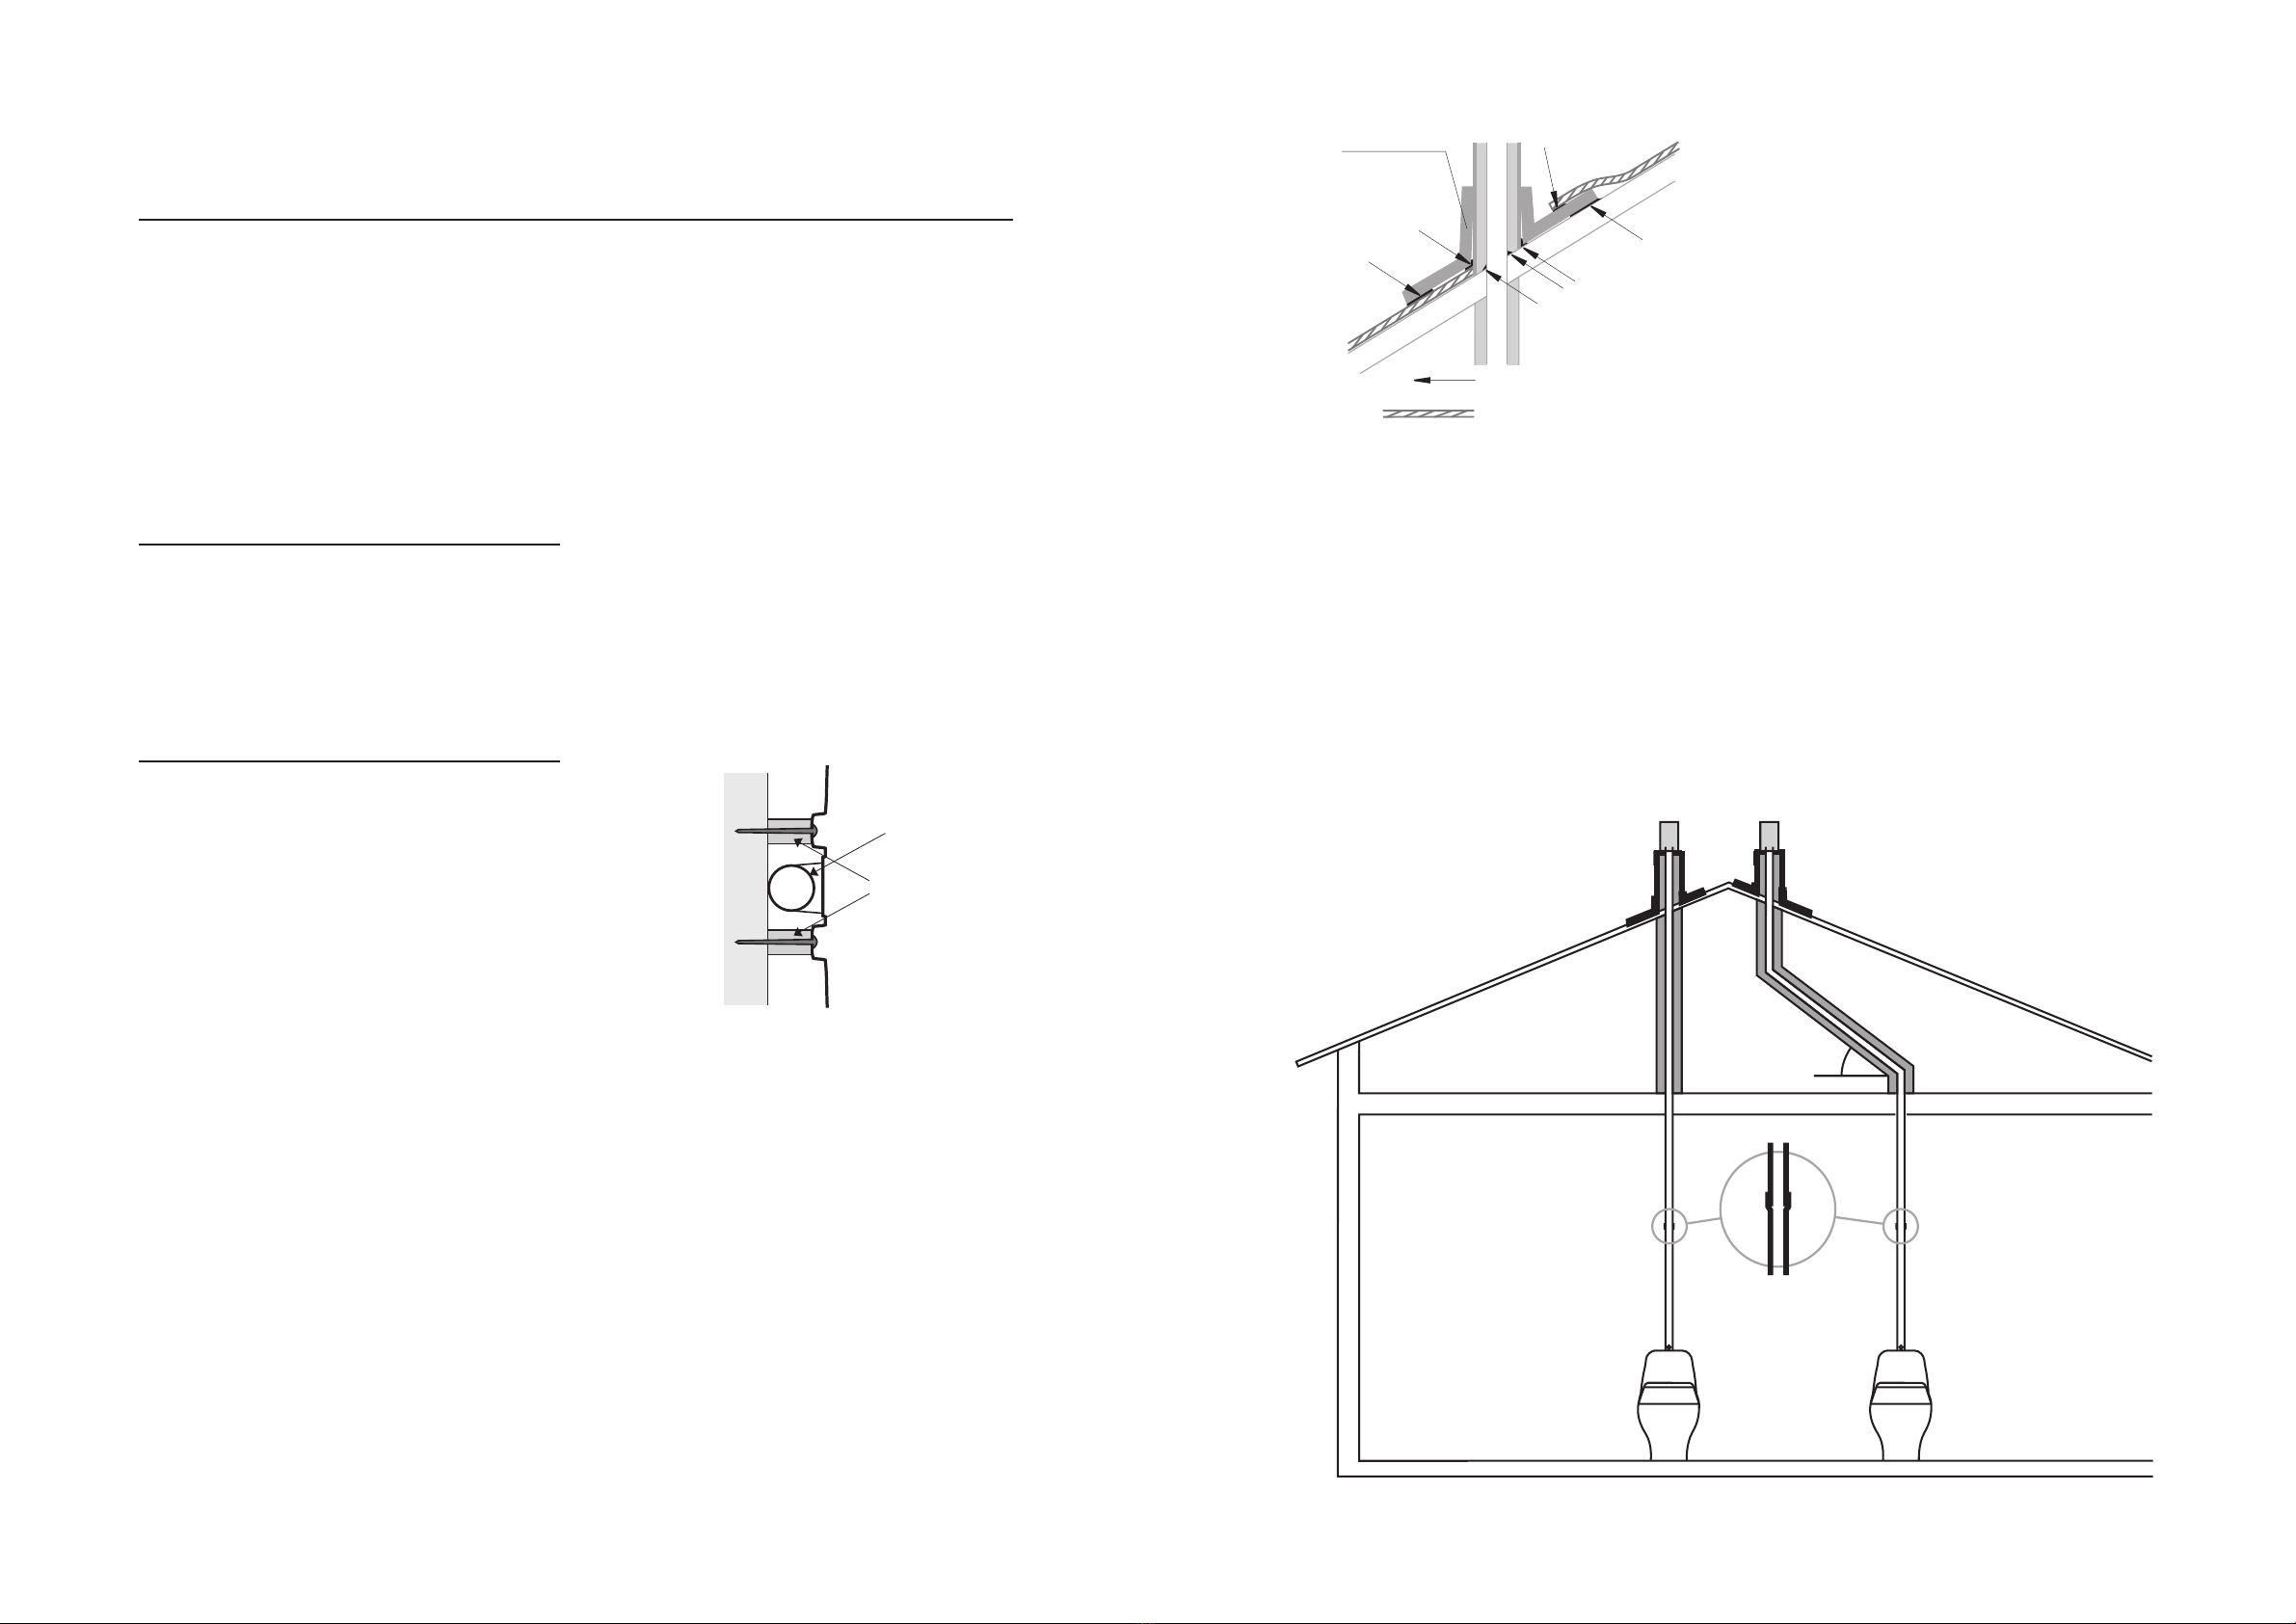
The installation kit contains; ventilation pipes (4x1.1 m ventilation pipe with 55 mm outer diameter), exterior
pipe (1 x 1.1m with 110 mm outer diameter), insulation (2 x 1 m), reducing coupling, roof flashing and insect
netting.
Further accessories
Pipe Bends 30° and 45°, Insulation,Ventilation Pipe, Special Humus, Ejector Tank, Latrine Bags.
Separera in cross section
1. Upper section
2.Toilet seat
3.Air intake
4. Compost cover
5. Compost chamber
6. Inside container with a plastic bag
7. Lower section
8. Removeable lid
9. Cover
2
4
3
2
1
7
6
5
8
9
Urine drainage
Urine can be drained away in a number of different
ways. Check what is required by your local authority;
there are variations depending on ground conditions
and the water table.You should never just deal with it as
you see fit, as this could have a harmful effect.A house-
hold of 4 people will produce around 35 litres of urine
per week; this is equivalent to about 3 kg of artificial fer-
tiliser, which is a considerable amount.
There must be a drop in the hose coming out and away
from the toilet to avoid salt deposits; for longer hoses, it
may be helpful to connect it to a 32 mm PVC pipe.
GREY WATER:
Connect the hose to an existing drainage system such
as a percolation basin or similar. It is important that
pipes have enough of a drop for urine not to remain
standing in the hose. If necessary, the hose may be ang-
led to create a water trap. In this case it is important to
pour through a litre of hot water now and again to pre-
vent the build-up of salt deposits in the hose.
INFILTRATION:
May consist of a pit or a ditch outside the house. Put
large stones/macadam around the hose mouth and then
fill with sand.
EJEKTORTANK:
If you want to use the urine as liquid fertiliser, there is a
special tank available as an accessory; it can be ordered
from your dealer or from us. Urine contains large quan-
tities of nutrient salts, making it a useful fertiliser for
lawns.With the ejector tank you get the correct dilution
for watering; connection to 1/2” garden hose.
MAINTENANCE
The toilet room itself
The toilet can be placed anywhere you like; it does
not need to have a particular room temperature.
However, the composting process will be more rapid
in a warmer room, as the microorganisms thrive in a
warm environment. It must be possible to conduct
urine away from the toilet. Separera is therefore most
suitable as a summer toilet, as there may be problems
with managing the urine in wintertime.
Air supply
Make sure there is a good air supply, for example,
through a 10 mm gap under the door or via a vent.
Air will be evacuated via the toilet, so cross-draughts
must be avoided.
Ventilation
Install the piping according to the below instructions;
•Lift off the upper section (1) of the toilet, remove
the inner container (9).
•Drill or cut a hole in the lower section for the
urine hose, according to chosen option
(7A or 7B).
•Position the lower section (10) against the
external wall of the room.
•Mark for wall brackets, ventilation pipe and hose.
•Measure and drill a hole in the roof for the
ventilation pipe, 55 mm. Saw a hole for the urine
hose (25 mm).
•Pass the urine hose through the floor/wall
and seal with silicone.
INSTALLATION
54
•Cut the exterior pipe to fit the angle of the roof.
•Position the roof flashing – use soapy water to
make this easier. For those with a tin roof, it may
be best to get a metal worked to make some
metal flashing.
•Place the outer pipe with the roof flashing over
the insulated ventilation pipe.
•Adjust the roof flashing to the external roof and
seal firmly with asphalt sealant between the
flashing and the roof.
•Once all the piping is insulated and covered, fit
the reducing coupling on the top, and then fit the
insect netting.
•Place a bag in the composting chamber and fold it
over the edge. Place the container inside the lower
section and check that the metal railing covers the
edge of the urine bowl and that the bag does not
cover the fan.The bag is tightened in the front by
the metal railing and in the back by the handle.
•Pour approximately 5 litres of Special humus into
the toilet.
IMPORTANT! Insulate the pipe according to the
instructions. Do not use pipe bends over 45 degrees
and avoid having more that two; this is to ensure a
natural draught when the toilet is not in use.
Attachment
W
A
L
spacers
pip
Use no more than 2 pipe bends, and none over 45° angle, to ensure a natural draught.
MAX 45°
non-
sleeved
sleeved
pipe
RUBBER
FLASHING
sealing using asphalt sealant
roof covering (tile,
felting or tin/plastic)
•Set the lower section in position and seal between
the floor and the toilet. Connect the urine hose to
the urine bowl. Fix the hose using hose clamps,
being careful not to damage the nipple.
•Mount the ventilation pipes unsleeved end into the
rubber coupling. Screw the toilet securely to the
wall using screws and washers.
•Install the ventilation pipe and seal the passage
through the exterior roof using asphalt sealant to
prevent leaks.
•Insulate all piping that passes through cold spaces
(e.g. in the loft and on the outside of the building)
– this is to prevent condensation.

Other MullToa Toilet manuals

MullToa 65ai User manual

MullToa

MullToa 65ai User manual

MullToa Separera Mini User manual

MullToa

MullToa Separera Mini User manual

MullToa 65ai User manual

MullToa

MullToa 65ai User manual

MullToa 55ai User manual

MullToa

MullToa 55ai User manual

MullToa Separera 30 User manual

MullToa

MullToa Separera 30 User manual

MullToa BioLet 55 User manual

MullToa

MullToa BioLet 55 User manual

MullToa Separera Mini User manual

MullToa

MullToa Separera Mini User manual

MullToa 65ai User manual

MullToa

MullToa 65ai User manual

Popular Toilet manuals by other brands

Sun-Mar GTG owner's manual

Sun-Mar

Sun-Mar GTG owner's manual

Swiss Madison SM-WT470 installation instructions

Swiss Madison

Swiss Madison SM-WT470 installation instructions

Bobrick ClassicSeries 1540 installation instructions

Bobrick

Bobrick ClassicSeries 1540 installation instructions

TMG TMC-29920 quick start guide

TMG

TMG TMC-29920 quick start guide

Camargue CLEAN & DRY installation guide

Camargue

Camargue CLEAN & DRY installation guide

THE BOLD LOOK OF KOHLER K-3977 Installation and care guide

THE BOLD LOOK OF KOHLER

THE BOLD LOOK OF KOHLER K-3977 Installation and care guide

Separett Tiny 1270-01 user manual

Separett

Separett Tiny 1270-01 user manual

clivus multrum CM HP installation manual

clivus multrum

clivus multrum CM HP installation manual

Gordon Ellis & CO SERENITY 64622 quick start guide

Gordon Ellis & CO

Gordon Ellis & CO SERENITY 64622 quick start guide

Laufen Cleanet RIVA H894690 manual

Laufen

Laufen Cleanet RIVA H894690 manual

Toto CS735 Series installation manual

Toto

Toto CS735 Series installation manual

Kohler K-3492 installation guide

Kohler

Kohler K-3492 installation guide

Crosswater MPRO Series installation instructions

Crosswater

Crosswater MPRO Series installation instructions

Dometic CT 4110 installation manual

Dometic

Dometic CT 4110 installation manual

Ideal-Standard E905601 Installation

Ideal-Standard

Ideal-Standard E905601 Installation

Kohler INNATE INTELLIGENT TOILET installation guide

Kohler

Kohler INNATE INTELLIGENT TOILET installation guide

Geberit IDO Trevi 91597 Installation instruction

Geberit

Geberit IDO Trevi 91597 Installation instruction

Premier N2450E Use and care guide

Premier

Premier N2450E Use and care guide

manuals.online logo
manuals.online logoBrands
  • About & Mission
  • Contact us
  • Privacy Policy
  • Terms and Conditions

Copyright 2025 Manuals.Online. All Rights Reserved.