MullToa Separera Mini User manual

Grafisk design och produktion: ADHT. Tryck: Typoprint. 2022
Installation- och bruksanvisning
Separera Mini med urinavlopp
Denna urinseparerande toalett är tillverkad av kretsloppsanpassat material och är konstruerad för att tillfredsställa höga krav
under många år. Vad innebär det att man separerar avfallet? Toaletten är utformad så att den redan vid toalettbesöket skiljer
(separerar) det fasta avfallet från vätskan (urinen). Detta innebär att Separera har två behållare, den ena för urin och den
andra för det fasta avfallet.
Kontakta Miljö- och Hälsoskyddskontoret
Kontakta Miljö- och Hälsovårdskontoret för att bli befriad från latrinhämtningsavgift och för att få reda på lokala, aktuella
hälsovårdsregler. Detta gäller alltid vid installation, oavsett typ av toalett. Omhändertagandet av båda skall ske enligt din
kommuns anvisningar.
Separera kartongen innehåller
Installationspaket för alternativ A (väggenomföring)
Toalettstol • Täcklock • Efterkomposteringskärl med lock • Skruv med distansbrickor enligt alt.A • Ventilationsrör 50 cm för
vägg • Näthuv • Miljöpåse (10 st) • Rörkrök 90 grader • Avloppsslang 1 meter.
Installationspaket för alternativ B (utluftning genom tak)
Ventilationsrör (4x1,1 meter 55 mm ytterdiameter) Ytterrör ( 1 meter 110 mm ytterdiameter) • Isolering (2 x 1 meter)
Reduceringsmuff • Takstos • Näthuv.
Anslutningspaket:
Väggfäste • Rörkrök 90 grader • Skruv
Extra tillbehör
Miljöpåsar • Specialmull • Ejektortank
Separera Mini i
genomskärning
1. El kassett med fläktmotor
2. Anslutningssladd
3. Innerbehållare för fast avfall
4. Urinavlopp
5. Toalettsits mjukstängande
6. Överdel
7. Underdel
8. Insyningsskydd
9. Urinanslutning
1
3
5
6
8
7
9
4
2
Sep-Mini-Bruks-Avlopp-2022-4sid.qxp_Layout 1 2022-05-11 13:27 Sida 2

Verktyg:
Borrmaskin, hålsåg 55 och 35mm, silikon
Lufttillförsel
Se till att lufttillförseln är god, exempelvis genom en luftspalt
under dörren eller ventil. Evakueringen av luften skall ske
genom toaletten, korsdrag bör undvikas.
Montering
Utluftning kan ske genom yttervägg eller upp genom tak.
Alternativ A - utluftning sker genom
yttervägg
Med toaletten medföljer installationssats enligt Alt.A.
1. Lyft av överdelen (6) på toaletten, lyft ur
innerbehållaren (3).
2. Mät upp för ventialtionsdragning genom yttervägg.
höjd 359 mm från golv till centrum hål.
3. Borra upp hål i yttervägg för ventilationsröret
(55 mm).
4. Placera underdelen (7) på plats mot toalettrummets
yttervägg, markera för skruv mot vägg och för
urinavlopp enligt vald dragning (35 mm).
5. Mät upp och gör hål för urinavlopp antingen rakt ut
genom vägg alternativt ner genom golv.Genom Vägg:
höjd över golv c/c 25mmGenom golv: ut från vägg c/c
40mm.Vid montage ut genom vägg säkerställ att röret
har ett fall på minst 2 grader (2cm per meter).
6. Montera ventilationsröret, täta med silikon runt röret
både på insidan och utsidan. Montera näthuv på utsidan.
7. Borra hål (35mm) i golv eller vägg för urinavlopp.
8. Anslut toaletten mot ventilationsröret och
urinavloppet. Skruva fast toaletten i väggen.
9. Placera en påse i innerbehållaren och vik den över
kanten. Montera ramen så den låser påsen. Placera
behållaren i underdelen och kontrollera att påsen
inte täcker fläkten.
10. Montera tillbaka överdelen.
11. Sätt i stickkontakten
INSTALLATION
Alternativ A Alternativ B
Sep-Mini-Bruks-Avlopp-2022-4sid.qxp_Layout 1 2022-05-11 13:28 Sida 3

Alternativ B - utluftning genom tak
För montering behövs tillbehör Installationspaket Tak
och Anslutningssats
1. Lyft av överdelen (6) på toaletten, tag ur
innerbehållaren (3).
2. Montera väggfäste tillfälligt på underdelen (7),
placera underdelen på plats mot vägg, markera för
väggfäste och urinavlopp enligt vald dragning (35 mm).
3. Mät upp och tag hål för urinavlopp ner i golv alternativt
ut genom vägg. (35mm) Vid montage ut genom vägg
säkerställ att röret har ett fall på min 2 grader.
4. Demontera väggfäste från toaletten, gör hål och
montera väggfästet på väggen.
5. Montera vinkelanslutning i anslutningsstosen. Skruva
fast toaletten i väggfästet som redan sitter i väggen.
6. Mät ut och tag upp hål i tak, diameter 55 mm.
7. Montera röret, täta genomgången i yttertaket med
asfaltkitt så att det inte uppstår läckage.
8. Isolera all rördragning från toalettutrymmets innertak
och uppåt - detta för att förhindra kondens.
9. Kapa av ytterröret så att det passar mot takets
vinkel.
10. Trä på takstosen på ytterröret - använd såpvatten
så går det lättare. För den som har plåttak kan det
vara lämpligt att kontakta en plåtslagare för att
göra en plåtstos.
11. Trä på ytterröret över det isolerade ventilationsröret.
12. Justera takstosen mot taket och täta ordentligt med
asfaltkitt mellan stosen och yttertaket.
13. När ytterröret är monterat så sätts reduceringsmuff
och näthuv på plats.
14. Placera en påse i innerbehållaren och vik den över
kanten. Montera ramen så den låser påsen. Placera
behållaren i underdelen och kontrollera att påsen
inte täcker fläkten.
15. Montera tillbaka överdelen.
17. Sätt i stickkontakten.
Sep-Mini-Bruks-Avlopp-2022-4sid.qxp_Layout 1 2022-05-11 13:28 Sida 4

Swedish Ecology AB Klippan 1J S-414 51 Göteborg Sweden
www.mulltoa.com
Det fasta avfallet
Vid normal användning producerar en familj på fyra personer
ca 7 liter fast avfall per vecka.
Man lyfter då ur innerbehållaren och bär ut den, knyter
ihop påsen och flyttar över påsen till efterkomposterings-
kärlet lägger på ett par liter MullToa specialmull eller jord
sätter på locket.
Placera därefter behållaren på en skuggig plats i trädgården
för efterförvaring. Efterförvaringstiden blir i regel 6-9 månader
innan innehållet kan användas som jordförbättringsmedel. Sätt i en
ny miljöpåse, montera ramen över påsen och sätt tillbaka innerbe-
hållaren i toaletten. Kontrolera att påsen inte täcker fläkten
El-anslutning
Separera är godkänd för installation i våtutrymmen. Om näts-
ladden skadas måste den bytas av tillverkaren eller av annan
behörig person.
Allmänna råd
•Man bör emellanåt göra rent urinskålen med varmt vatten för
att förhindra saltavlagringar.
•Har det kommit insekter i toaletten så kan man strö MullToa
Flugstopp på komposten.
•Skulle dålig lukt uppstå i utrymmet så kontrollera att
röranslutningarna är täta och tilluften tillräcklig.
•Vid rengöring av toaletten används endast milda rengörings-
medel utan slipmedel.
•Flugstopp och miljöpåsar kan beställas från vår webshop.
Urinavlopp
Dränering av urinen kan göras på ett flertal sätt. Kontrollera
med Miljö & Hälsoskydd i din kommun vad som gäller; varia-
tioner finns beroende på hur markförhållanden och grundvat-
tennivåer ser ut.
BDT-AVLOPP:
Röret ansluts till befintligt
avlopp som stenkista eller
liknande. Det är viktigt att
rören har tillräckligt fall så
att urinen inte stannar kvar.
Det är viktigt att man slår
i en liter varmt vatten
emellanåt, för att undvika
att det byggs upp saltav-
lagringar i slangen.
INFILTRATION:
Kan bestå av en grop eller ett
dike på utsidan av huset. Bottna
med större sten/makadam
runt slang mynningen och
fyll sedan med sand.
EJEKTORTANK:
För bevattning med urin som
gödning finns en specialtank
som tillbehör; den kan beställas
från inköpsstället eller från oss.
Urinen innehåller stora mängder
närsalter och kan med fördel
användas som gödningsmedel
Med ejektortanken får man
rätt spädning direkt vid
bevattningen; anslutning
till 1/2" trädgårdsslang.
SKÖTSEL
Sep-Mini-Bruks-Avlopp-2022-4sid.qxp_Layout 1 2022-05-11 13:56 Sida 1

1
3
5
6
8
7
9
4
2
User manual for Separera Mini
with urine drainage
This urine separating toilet is constructed from eco-friendly material and is designed to cope with high demand
over many years.What does separating waste mean? Well, the toilet is designed so solid waste is separated from
the liquid (urine).This means that Separera has one container for urine and another for solid waste. Both must
be dealt with in accordance with local regulations.
Contacting Environmental Health
Contact Environmental Health office regarding local health regulations.This applies when installing any type of toilet
The Separera box contains
Toilet with fan • Lid• Urine hose (1.5 m) • Screw with washer for wall bracket according to option A
Ventilation Pipe 50 cm for wall • Insect netting • 2 Composting containers • Latrine Bags (10pcs)
The installation kit contains:
Ventilation pipes (4x1.1m ventilation pipe with 55 mm outer diameter), exterior pipe (1x 1.1m with 110 mm outer
diameter), insulation (2 x 1m), reducing coupling, roof flashing and insect netting.The connection kit used in installation
option B can be ordered from your dealer
Wall connectionkit:
Wallbracket • Pipebend 90 degrees • Screw /washers
Further accesories
Pipe Bends 30° and 45°, Insulation,Ventilation Pipe, Ejector Tank, Latrine Bags.
Separera Mini in
cross section
Grafisk design och produktion: ADHT. Tryck: Typoprint. 2022
1. Fan motor
2. Plug / Cord
3. Inside container with a bag
4. Urine hose
5.Toilet seat, soft close
6. Upper section
7. Lower section
8. Compost cover
9. Urine connection bowl/hose
Sep-Mini-Bruks-Avlopp-2022-EN-4sid.qxp_Layout 1 2022-05-10 14:43 Sida 2

Tools:
Drill, Holesaw for 55 och 35mm, Silicone
Air supply
10 mm gap under the door or a vent.Air will be evacuated
through the toilet, so cross-draughts must be avoided.
Assembly
Ventilation can be either through external wall or up through
the roof.
Option A – ventilation through external wall
The toilet is supplied with an installation kit according to
Option A.
1. Lift the upper section (6) of the toilet, remove the inner
container (3).
2. Measure and mark for the ventilationpipe through the
wall, hole centre 359 mm from the floor.
3. Make a hole in the external wall for the ventilation pipe
(55 mm).
4. Set the lower section in position and mark for fastening
in the wall and urine hose (35mm).
5. Make a hole for the urine hose, either throgh the wall
or floor.
Through wall: up from floor c/c 25mm
Through floor: from wall c/c 40mm.
When the hose is installed through the wall make sure
that you have a slope of at least 2 degrees (2 cm per
meter) to ensure enough drain out from the toilet.
6. Fit the ventilation pipe and seal in- and out- side using
silicone. Fit the insect netting.
7. Pass the urine hose through the floor/wall. Set the lower
section in position and connect to the ventilation pipe.
8. Fasten the toilet securely to the wall using screws and
washers.
9. Place a bag in the composting chamber and fold it over
the edge. Put the frame in position to lock the bag.
Place the container inside the lower section and make
sure that the bag does not cover the fan.
10. Put the upper section back in place.
11. Plug in.
INSTALLATION
Option A Option B
Sep-Mini-Bruks-Avlopp-2022-EN-4sid.qxp_Layout 1 2022-05-10 14:43 Sida 3

Option B – ventilation through the roof
Prior to installation the Installation Kit and
Connection Kit are needed.These can be purchased
from the place where the toilet was bought.
1. Lift the upper section (5) of the toilet, remove the
urine container (8) and waste container (3)
2. Fasten the wallbracket temporairly on the lower
section (7), put the the lower sektion in posision
aginst the wall. Mark for the bracket.
3. Remove the wallbracket from the toilet. Install
the bracket on the wall.
4. Put the 90 degrees bend on the outlet.
Set the lower section in position and fasten it to
the wallbracket.
5. Make a hole in the roof for the ventilation pipe, 55 mm.
6. Install the ventilation pipes unsleeved end into the 90
degrees coupling.
7. Insulate all piping that passes through cold spaces
(e.g. in the attic and on above roof).This is to prevent
condensation.
8. Cut the exterior pipe to fit the angle of the roof.
9. Position the roof flashing. For tin roof, its better to
have a sheetmetal worker to make the flashing.
10. Put the outer pipe with the roof flashing over the
insulated ventilation pipe.
11. Adjust the roof flashing to the external roof and seal
firmly with asphalt sealant between the flashing and
the roof.
12. Once all the piping is insulated and covered, fit the
reducing coupling on top, and then fit the insect netting.
13. Place a bag in the composting chamber and fold it
over the edge. Put the frame in position to lock the bag.
bag. Place the container inside the lower section and
make sure that the bag does not cover the fan.
14. Put back the upper section
15. Plug in
Sep-Mini-Bruks-Avlopp-2022-EN-4sid.qxp_Layout 1 2022-05-10 14:43 Sida 4

Swedish Ecology AB Klippan 1J S-414 51 Göteborg Sweden
www.mulltoa.com
Grafisk design och produktion: ADHT. Tryck: Typoprint. 2022
Solid waste
With normal use, a family of four produces around 7 litres of
solid waste per week.
The emptying frequency depends on usage. For example, after
2-3 weeks use by 4 people it will be time to switch composting
containers.
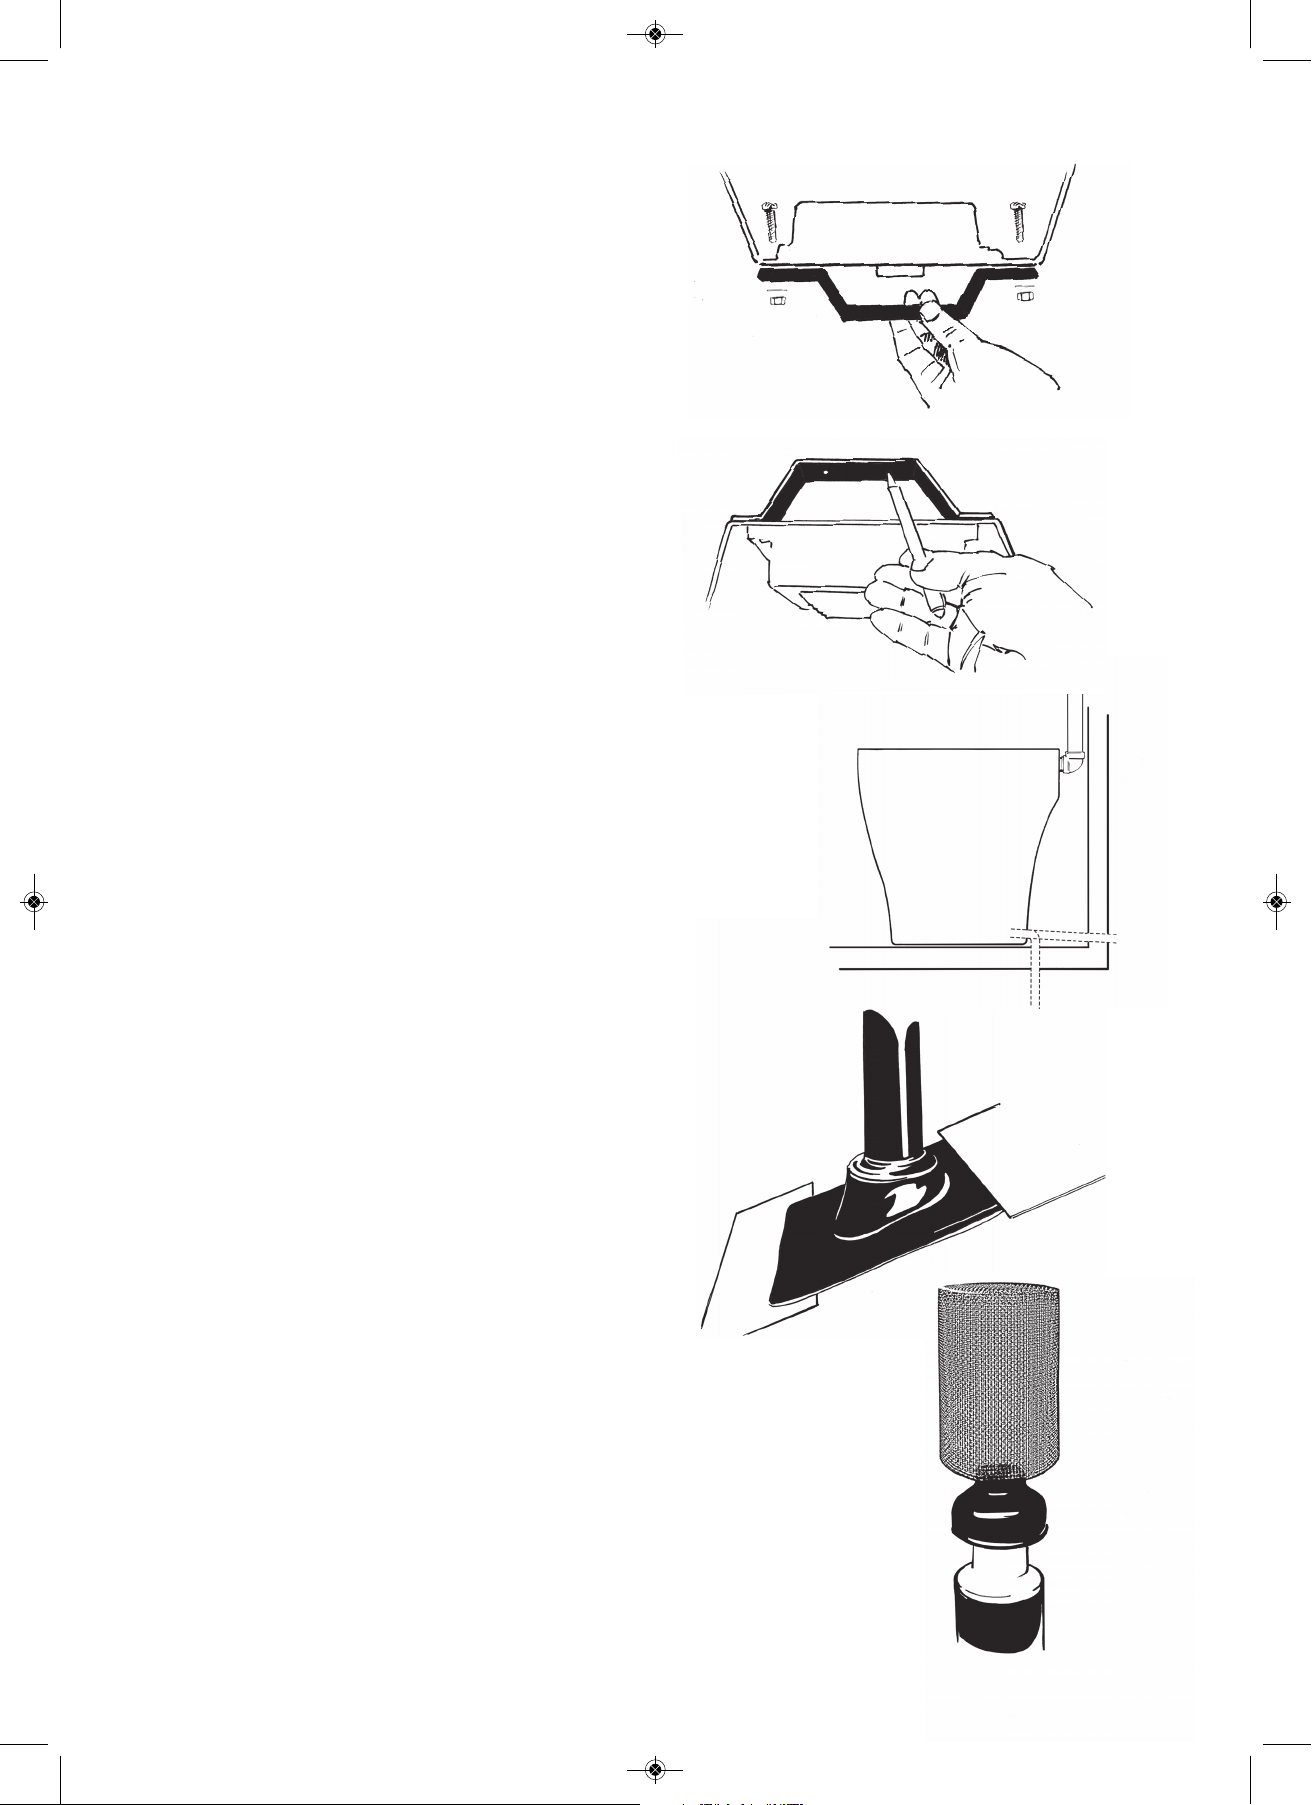
Lift the inner container out and take it out, add a little
topsoil and put the lid on. Place the container in a shady place
for composting. It takes 6 to 9 months of composting before the
contents can be used as a fertiliser. Put a latrine bag in the other
inner container.
Electrical connection
Separera is approved for installation in wet rooms. For
permanent installation, a qualified electrician must install a
multi-pole switch. If the mains supply cable is damaged it must
be replaced by the manufacturer or another qualified person.
General advice
•Flush the urine bowl with water weekly to reduce salt
deposits.
•If insects get into the toilet, you can sprinkle BioLet
Insektsstopp on the compost.
•If you do experience a bad smell in the room, check that
the pipe connections are properly sealed and there is an
air supply.
•To clean the toilet, use only mild detergent. Never use
abrasive cleaning agents.
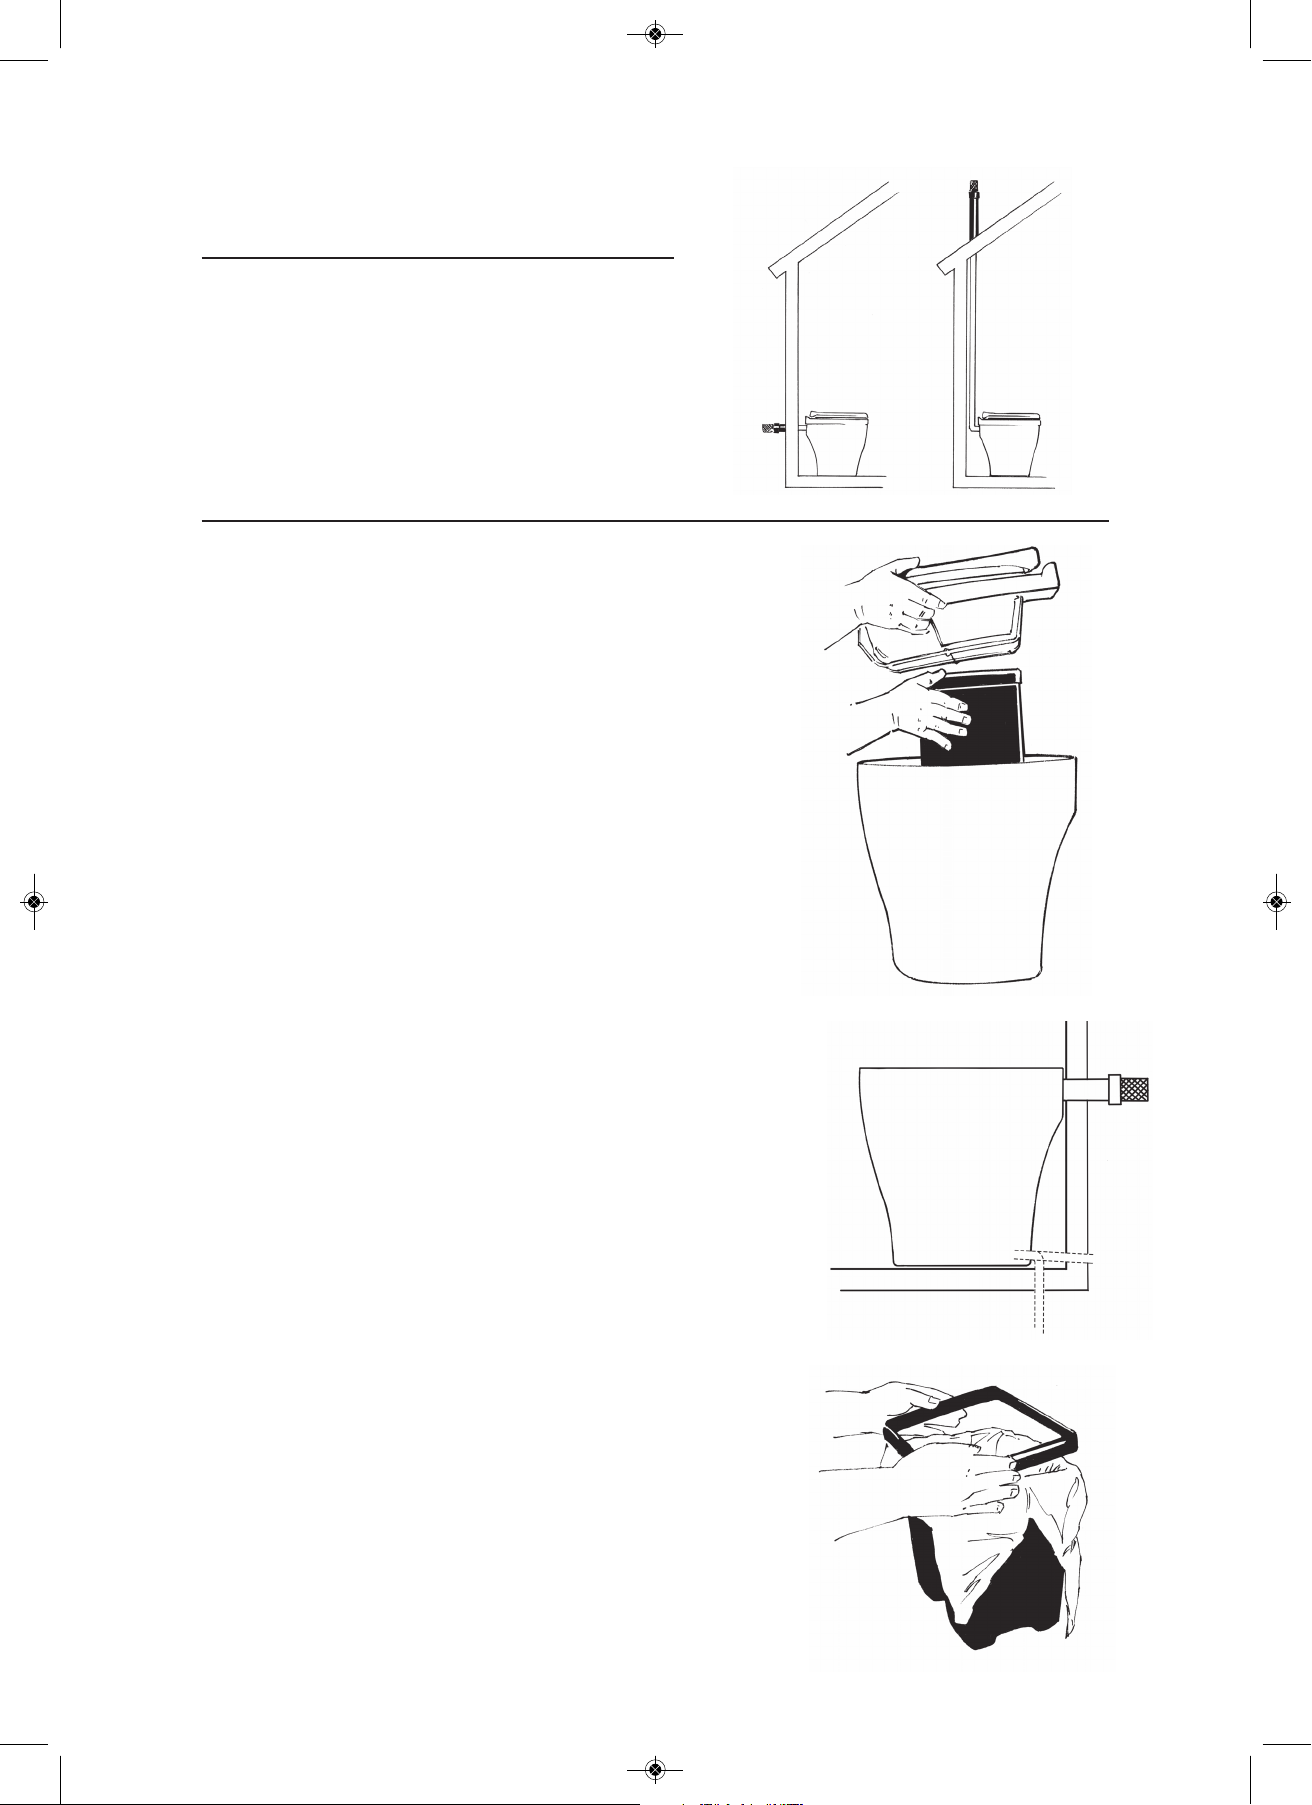
•If the toilet is installed as option B and you leave the
house for more than 2 days, switch off the fan and put the
cover in the toiletopening. If there is a good natural draft
no smell will occour.
•Empty the solid waste regulairly, the bags start to
decompose after 2-3 week.
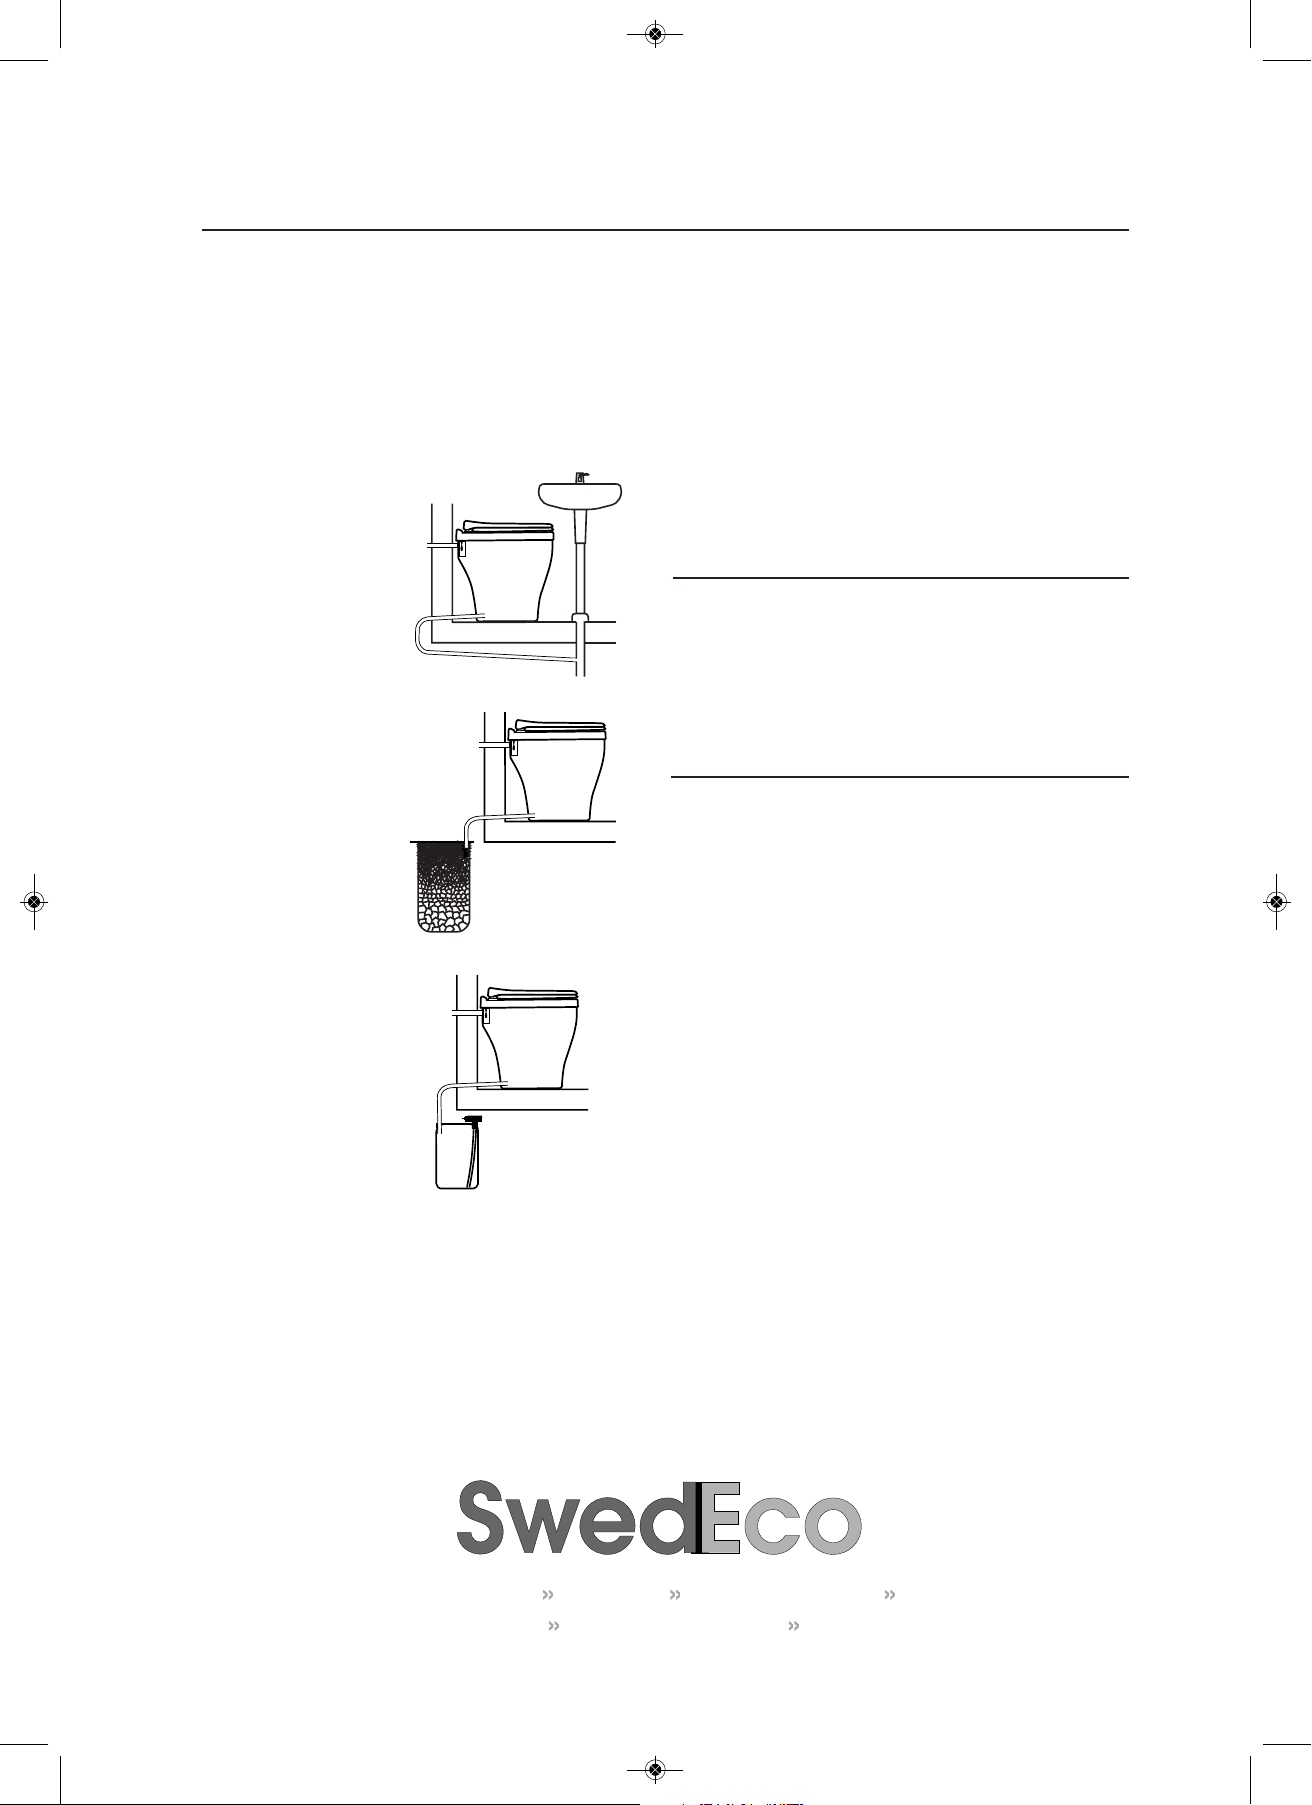
Urine drainage
Urine can be drained away in a number of different ways.
Check what is required by your local authority; there are
variations depending on ground conditions and the water
table.There must be a drop in the hose coming out and
away from the toilet to avoid salt deposits; for longer
distances, its better to connect it to a 32mm PVC pipe.
GREY WATER:
Connect the hose to an
existing drainage system
such as a percolation basin
or similar. It is important
that pipes have enough
drop for urine not to
remain standing in the
hose.
INFILTRATION:
Consist of a pit or a ditch
outside the house. Put
stones/macadam around
the end of the hose and
then fill with sand.
EJEKTORTANK:
If you want to use the urine
as liquid fertiliser, there is a
special tank available as an
accessory; it can be ordered
from your dealer. Urine
contains large quantities
of nutrient salts, making it
a useful fertiliser for lawns.
With the ejector tank you
get the correct dilution for
watering; connecting to 1/2”
garden hose.
MAINTENANCE
Sep-Mini-Bruks-Avlopp-2022-EN-4sid.qxp_Layout 1 2022-05-10 14:43 Sida 1
Table of contents
Languages:
Other MullToa Toilet manuals
Popular Toilet manuals by other brands

Clou
Clou InBe IB/04.01140 installation instructions

Mirabelle
Mirabelle BRADENTON Series installation instructions

DURAVIT
DURAVIT DuraStyle Dry 2808300000 Mounting instructions

iDo
iDo Porsgrund WC-11 Users' installation and service instructions

XCQQ
XCQQ S8L instruction manual

Laufen
Laufen CAPRINO PLUS H841065 installation instructions

iDo
iDo PORSGRUND 91371 manual

Sanela
Sanela SLUN 77A Mounting instructions

Signature Hardware
Signature Hardware GRAYVIK 946603 quick start guide

Gustavsberg
Gustavsberg Artic Series installation instructions

Toto
Toto CST746 installation manual

Bischoff & Bischoff
Bischoff & Bischoff TSE-A / O instruction manual