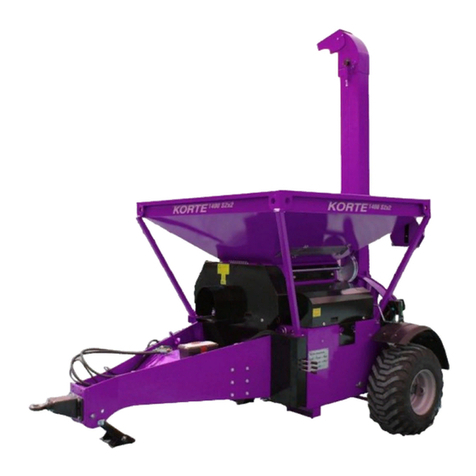
Murska 700HD User manual

Murska 700-1000HD
Manual
Frame
Cassette
Bagger
Version 1.0
13.6.2014
No:
No:
No:

2
TABLE OF CONTENTS
DECLARATION OF CONFORMITY................................................................................................... 3
WARRANTY.......................................................................................................................................... 3
DESCRIPTION....................................................................................................................................... 4
TECHNICAL INFORMATION.............................................................................................................. 6
Safety instructions................................................................................................................................... 7
START-UP............................................................................................................................................ 10
Start-up after delivery ................................................................................................................... 10
Connecting to the tractor............................................................................................................... 10
PTO shaft ...................................................................................................................................... 11
Installing the elevator.................................................................................................................... 12
INSTRUCTIONS FOR USE................................................................................................................. 14
Routine checks before use............................................................................................................. 15
Basic roller adjustments................................................................................................................ 16
Start-up, starting crimping and use ............................................................................................... 20
Ending crimping............................................................................................................................ 21
Brakes............................................................................................................................................ 22
MAINTENANCE.................................................................................................................................. 23
Daily maintenance......................................................................................................................... 23
After the season............................................................................................................................. 24
Lubrication.................................................................................................................................... 24
Maintenance chart......................................................................................................................... 25
INSTRUCTIONS.................................................................................................................................. 26
Changing the roller cassette .......................................................................................................... 26
Screw torque.................................................................................................................................. 31
Pulley assembly............................................................................................................................. 31
POSSIBLE DISRUPTIONS.................................................................................................................. 33
USING THE BAGGER 700-1000HD................................................................................................... 35
NOTES.................................................................................................................................................. 40

3
DECLARATION OF CONFORMITY
WARRANTY
EC declaration of conformity for machinery
(Machinery Directive 2006/42/EY, Appendix II A)
Manufacturer: Aimo Kortteen Konepaja Oy
Address: Pohjolantie 2, P.O. Box 161, FI-84101 YLIVIESKA, Finland
Name and address of the person authorised to compile the technical file:
Name: Aimo Korte Address: P.O. Box 161, FI-84101 YLIVIESKA,
Finland
hereby declares that
Murska ________________________ -crimper
Serial number: …………………………..
Bagger: ……………….
is in conformity with the relevant provisions of the Machine Directive
2006/42/EY
Place, Date: Ylivieska 20.12.2013
Allekirjoitus:
Aimo Korte
Warranty policy
We grant the product a one-year guarantee.
Any raw material or manufacturing defect appearing during the guarantee
period will be repaired by our maintenance service or the product will be
replaced with a new, equivalent product. A repaired or new product will be
delivered at our expense to the same address as the original product.
The buyer is responsible for returning the defective product to us immediately
at his or her expense.
The guarantee shall not cover normal wear and tear or damage caused by
stones, pieces of metal or other foreign objects.
Other demands for compensation, e.g. due to consequential loss or interruption
of production, shall not be accepted.
Other conditions in accordance with NL 92.

4
DESCRIPTION
Purpose of use:
Storing of crimped harvest-moist feed grains, crimping and grinding of dry and acified grain,
peas, beans etc. for feed.
Manufactured in Finland (EU)
Serial number plate
Serial number
Model
Manufacturing date
Serial number plate for
roller cassette
Serial number plate for
crimper frame

5
Reference Numbers:
1.......Handle for feeding door
2.......Flange nut
3.......Roller adjustment bolt
4.......Elevator guard bolt
5.......Hand pump and jack
6.......Jack spring
7.......Roller clearance adjustment crank
8.......Handle for adjustment shaft
9.......Scraper knife bar
10.....Scraper knife spring
11.....Cut-off plate
12.... Elevator maintenance door
13.... Flow meter
14.... Elevator top hat
15.... Elevator chain adjuster
16.... Feeder shaft V-belt
17.... Elevator V-belt

6
TECHNICAL INFORMATION
Machine Murska 700HD Murska 1000HD
Crimping capacity 7000-10 000 kg/h 10000-15000 kg/h
Power demand (750rpm) 20-50 KW 30-65 KW
Hopper capacity 380 liters 330 liters
Elevator lifting height 3300 mm 3300 mm
Length (elevator model) 1450 mm 1800 mm
Length (bagger model) 5350 mm 5350 mm
Width (elevator model) 1150 mm 11150 mm
Width (bagger model) 2190 mm 2190 mm
Height (to the edge of hopper) 1300 mm 1300 mm
Height (bagger model) 1970 mm 1970 mm
Weight (elevator model) 990 kg 1260 kg
Weight (bagger model) 1990 kg 2260 kg
Roller rotation rate 300-540 rpm 300-540 rpm
Rolleres
Spot-fluted, hardened + +
Spring-loaded + +
Both rollers drive + +
Roller length 700 mm 1000 mm
Diameter 300 mm 300 mm
Extra accessories
Additional container, galvanized 2500 liters 3500 liters
Acid applicator, flow meter + +
Universal-rollers (peas, beans, maize) + +
Elevator extention 0,5 m, 0,8m ja 1 m 0,5 m, 0,8 m ja 1m
Electric motor usage, adapter kit + +

7
Safety instructions
2. Do not move the mill during use,
when the hopper is full or when the
hopper is being filled. Make sure
that the hopper is empty before
driving.
3. It is recommended to wear type-
approved safety glasses during
crimping.
4. Keep your hands, clothes, tools
etc. out of the hopper.
5. Do not stand on the PTO shaft
or between the tractor and the
machine.
6. It is dangerous to have children
in the tractor cab or near the mill
when it is being used.
7. The mill must be on the ground,
PTO shaft must be disconnected
and the tractor motor must be
switched off during cleaning and
adjusting.
8. If using preservatives, follow all
safety instructions by the
manufacturer of the preservative.
9. In dusty conditions, use a type-
approved respiratory protection.
1. Always keep the grinder on the
ground or on a steady surface
during use. All guards must be
installed correctly.
Read the instruction manual
carefully before operating the
device. Follow all safety and
other instructions during
operation.
Check the instruction manual for
the proper maintenance procedure.
Do not operate the machine with
roller clearance less than 0.3 mm.
A smaller clearance makes the
rollers wear sooner and may cause
damage to the rollers.
Noise levels during crimping
may be 98-116dB. Use type-
approved ear protectors that
protect from noise above 100dB!
Anyone spending an extended
period of time near the mill must
also protect their hearing.

8
V-belts and pulleys –hand
or arm may become
entangled.
Never open or remove the
guards when the motor is
running.
Never reach or climb into the
hopper when the motor is
running.
Location of manual.
Keep your body far off the
universal shaft.
Turning cogwheels –arm may
become entangled.
Lubrication point.

9
…Safety instructions
Grain container: moving parts, danger of entanglement
Never climb into the grain container when the crimper is running!
Check the tightness of fastener bolts regularly.
Never put tools, clothes or your hand into the grain container.
Connecting to the tractor
The maximum allowed towing speed is 40km/h
Preservatives
When using preservatives, use appropriate safety equipment and follow all
safety and other instructions by the manufacturer.
Make sure that all guards are correctly placed and installed before start-
up!

10
START-UP
Read the instruction manual carefully before using the device.
Start-up after delivery
1) Attach the pole to the frame (Bagger model)
2) Attach the brake cables and connect the power plug (Bagger model)
3) Bleed the brakes if necessary
4) Assemble the additional hopper and mount it
5) Install the bagger and light bar if necessary (bagger model)
6) Install the elevator if necessary (elevator model)
7) Make sure that the elevator does not touch the additional container. Move the
additional container if necessary.
8) Make sure that the hopper, feeder, roller cassette, auger or any other part of the device
does not contain any foreign objects.
Connecting to the tractor
Murska 700-1000HD bagger models are designed to be connected to the tractor trailer
connector. Murska 700-1000HD elevator models are connected to the three-point hitch of the
tractor.
The recommended tractor output rotation speed for Murska 700-1000HD crimper is ca. 300-
540rpm.
The acidifier pump requires a 12V voltage.

11
PTO shaft
*The recommended PTO shaft for 700-1000HD –crimper is:
*PTO shaft with slip clutch
*Torque:
*700HD: 2000 Nm
*1000HD: 2000 Nm
*(e.g. Bondioli size 8, slip clutch)
*The PTO shaft safety clutch must be installed on the side of the machine.
*The PTO shaft must be as level as possible when the mill is in its working
position
*Check the length of the PTO shaft. At least 1/3 of the PTO shaft pipe length
must be overlapping. A PTO shaft that is too long can put unnecessary strain on
the driver roller bearings.
*The PTO shaft guards must be fixed in their correct places.
*PTO shaft maintenance: see the PTO shaft maintenance instructions

12
Installing the elevator
1. Fix the chain tensioner adjustment bolts to the top of the elevator chute.
2. Push the chain tensioner/sheave into the sliding sleeve and tighten the adjustment bolts.
3.Pull the chain into the elevator.
4. Ensure the correct position of the chain

13
5. Attach the elevator to the flange on the
transporter and lock and tighten the chain
appropriately.
6. Attach the head of the elevator. Make sure
that the output direction is right
Example of elevator head adjustment

14
INSTRUCTIONS FOR USE
Recommendations
1. Routine checks before use
Perform these checks every time the device is used after it has been unused for a
while and before any other maintenance is performed.
2. Adjusting rollers
Roller adjustments are always checked before starting the machine and after any
maintenance work. Check roller adjustment at least once daily when the machine
is being used.
3. Start-up, starting crimping and use
Always performed after the routine checks have been carried out.
4. Ending crimping
Carry out every time the device is stopped and crimping has ended.

15
Routine checks before use
1. Check that all screws and bolts are tight enough. Replace any worn or rusty parts.
2. Place the elevator in an upright position and check elevator chain tightness at the
tensioner. Movement in line with the tensioner’s axis is allowed. Adjust the gear at the
top of the elevator if necessary.
3. In the bagger model, check the condition and tension of the auger chain as well as the
amount of lubricant in the lubricator.
4. Check the tension of the v-belts. When pressing with a finger, the belt must yield 1cm.
5. Make sure there are no foreign objects in the hopper.
6. Check the feeder (feeder shaft). Remove any straws or strings from the shaft. Clean the
platforms and level if necessary. Clean the guard magnets.
7. Check the condition of the acidifier system.
8. Monitor the condition of the hydraulics components. Repair any possible leaks.
9. Lubricate indicated points (grease nipples) with petroleum jelly.
NOTE! Make sure that all guards are correctly placed and installed before start-up!
Lubricant tank
Chain cover

16
Basic roller adjustments
The rollers must always be adjusted at the beginning and during the harvest season. If the
machine is in constant use, check the adjustments daily.
Checking the rollers
1. Adjust the roller clearance to the minimum using the adjustment crank (to open, turn
counter-clockwise).
Picture. Quick adjustment using the crank.
2. Adjust the roller tension spring to maximum. Use the hand pump to apply maximum
pressure to the cylinder (max.140 bar).
Picture. Hydraulic pump, ball valves and pressure gauge

17
3. Measure the roller clearance at both ends using a feeler gauge.
The minimum clearance is 0.3mm
The roller clearance must be same at both ends, i.e. the rollers must be perfectly
aligned.
Picture. Measuring the roller clearance
4. If the clearance is suitable and rollers are aligned, there is no need for further adjustments.

18
Roller adjustment
Roller adjustment is always carried out for both roller pairs, one side at a time. The mill is
delivered with default adjustments.
NOTE! If the rollers touch each other when turning, they may wear out very fast. The
warranty will not cover wear that results from incorrect use of rollers.
Picture. Roller adjustment
List of components:
1) Roller clearance adjustment crank
2) Hydraulics cylinder
3) Roller clearance coarse adjustment
4) Feeder hatch handle
5) Coarse adjustment locking nut
1. Release the coarse adjustment locking nuts (5) and release the roller clearance adjustment
screws (3).
2. Use the hydraulic pump to apply approximately half the maximum tension to the springs.
When the tension is fully released, the transmission gears are not necessarily fully
in line. First, pump the pressure up carefully and ensure that the gearwheels
connect correctly
2
1
5
3
4

19
3. Wind the roller clearance adjustment crank (1) so that the adjustment shaft arm is at the
furthest position.
4. Finger tighten the adjustment screws (3)
5. Tighten the adjustment screws (3) half a turn using a wrench
6. Adjust the roller clearance to 0.3mm at both ends using a feeler gauge
7. Tighten the locking nuts (5)
The mill is now appropriately adjusted and you can start crimping.
NOTE! Make sure that all guards are correctly placed and installed before start-up!
Adjusting rollers during crimping
The rollers can be adjusted during crimping using the adjustment crank. You can adjust the
coarseness of the grain by turning the crank. If the grain is too coarse or is not being ground
properly, the rollers can be moved closer to each other by turning the crank counter-clockwise. If
the grain is too fine, the roller clearance can be increased by turning the crank clockwise.
Monitor the quality of the grain regularly during crimping because the result may differ between
batches. Factors influencing the crimping result include the variety of grain, grain size,
temperature etc. In addition, monitor the moisture of grain because this will affect the correct
roller adjustments and the amount of preservatives needed.
1

20
Start-up, starting crimping and use
1. Make sure you have carried out the routine checks before starting.
2. Make sure that the crimper is adjusted appropriately.
3. Make sure that the crimper is placed evenly on the ground. If the mill is askew during
crimping, the grain may roll to one side of the machine.
4. (Ensure that the flow gauge is calibrated for the used preservative.)
5. Make sure that all guards are correctly placed and installed.
6. Close the feeder hatches.
7. Fill up the hopper with grain.
8. Apply maximum tension to the roller springs: (700HD ca. 120bar. and 1000HD ca.
140bar.)
9. Engage tractor PTO at 540rpm.
10. Open the feeder hatch so that the grain starts pouring down onto the rollers in a steady
stream.
11. Make sure that the rollers have enough time to pull all grain through. As flow increases,
tractor revs may require adjustment.
12. Make sure that the grain is flowing steadily onto the rollers and that all grain passes
through the rollers instead of accumulating on them.
13. Check the crimping result to make sure that every grain is ground. If you spot any
unground grain, move the rollers closer to each other. If dough balls are produced,
increase roller clearance. If there are both unground and doughy grains among the
crimped grain, the rollers are touching at one end and the clearance is too big at the other
end. Adjust the mill according to the above instructions.
a. The sampling point is located between the machine and the bagger. In the
elevator model the sampling is done from the pile of ground grain.
14. Start the acid pump and adjust the flow gauge according to how much grain passes
through the rollers.
15. Crimping coarseness can also be adjusted by changing the rotation rate of the rollers.
16. Monitor the cleanliness of the rollers and the functioning of the scraper knives during
operation.
17. Add water during crimping if necessary.
18. Ensure maintenance as instructed in this manual.
NOTE! Make sure that all guards are correctly placed and installed before start-up!
This manual suits for next models
1
Table of contents
Other Murska Farm Equipment manuals
Popular Farm Equipment manuals by other brands

Titan Attachments
Titan Attachments JDTS005V2 Operator's manual

Rosensteiner
Rosensteiner Red 5 Operation and maintenance manual

Gaspardo
Gaspardo PINTA Use and maintenance

Rotomec
Rotomec CYCLONE C30-CE5 Operator's manual

Landoll
Landoll Weatherproofer III 2310 Series Operator's manual

Baroness
Baroness LH52 Owner's operating manual