Bestway Field Pro II 1000 User manual

Field Pro II
1000
A DIVISION OF RHS, INC.
2005 West Oregon Street • P.O. Box 394
Hiawatha, Kansas 66434 USA
Phone (785) 742-2949 • FAX (785) 742-7174
Call Toll Free 1-800-247-3808
www.rhs-inc.com
DOM-BW010 Revision D
OPERATOR’S MANUAL
Effective May 2002
Last Edit May 2002

GENERAL INFORMATION
Congratulations on your purchase of a BESTWAY sprayer. We at RHS wish to thank you for
your patronage and appreciate your confidence in BESTWAY equipment. Your BESTWAY Field-
Pro II 1000 sprayer has been carefully designed and ruggedly built to provide many years of
dependable service in return for your investment.
This manual has been prepared to assist you in the operation and maintenance of your Field-
Pro II 1000 sprayer and to provide the necessary part numbers to keep it in near original condition.
Sprayer Serial Number___________________________
Boom Serial Number____________________________
Foam Marker Serial Number______________________
A1

Introduction . . . . . . . . . . . . . . . . . . . . . . . . A3
Serial Number . . . . . . . . . . . . . . . . . . . . . A3
Definitions of Safety and
Service Statements . . . . . . . . . . . . . . . . A4
Warranty . . . . . . . . . . . . . . . . . . . . . . . . . A6
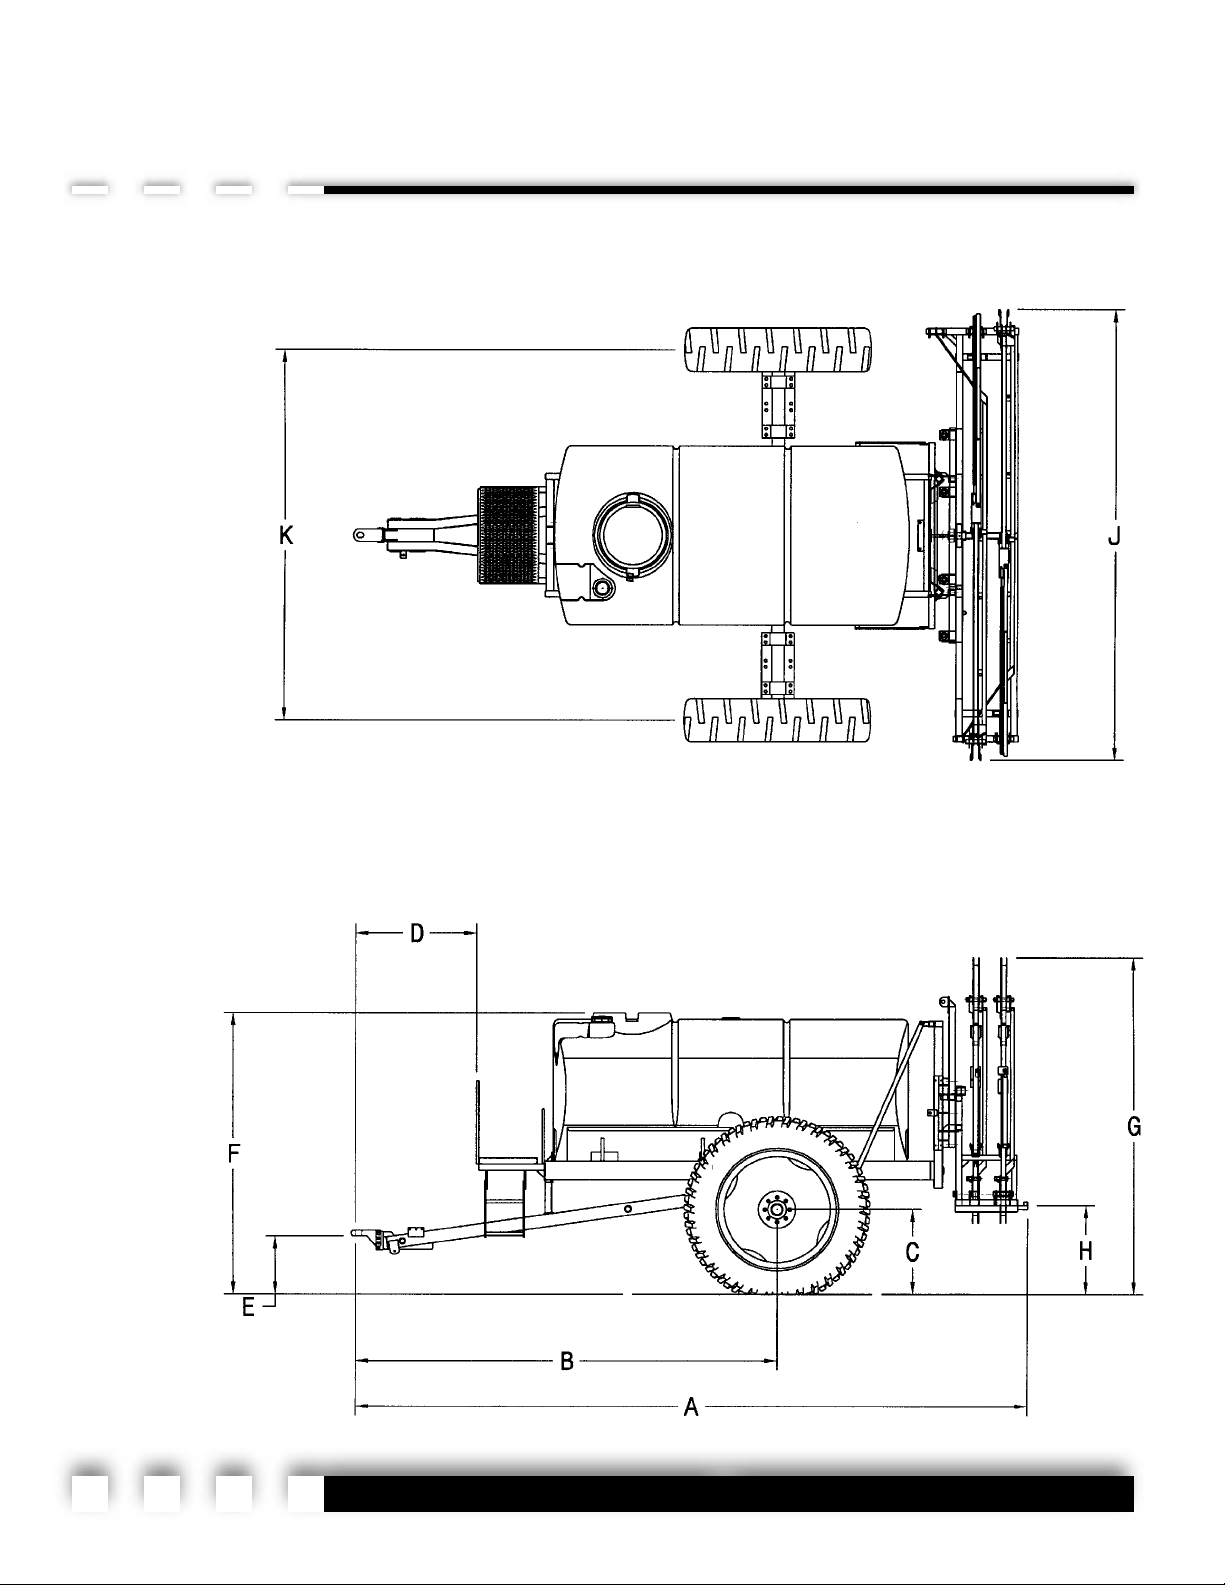
Specifications . . . . . . . . . . . . . . . . . . . . . . A8
Safety Sign Locations. . . . . . . . . . . . . . . A10
Safety Sign Care . . . . . . . . . . . . . . . . . . A12
Safety Information . . . . . . . . . . . . . . . . . . . B1
Chemical Safety . . . . . . . . . . . . . . . . . . . . B1
Equipment Safety. . . . . . . . . . . . . . . . . . . B3
Lighting and Marking . . . . . . . . . . . . . . . . B4
During Operation . . . . . . . . . . . . . . . . . . . B4
Following Operation . . . . . . . . . . . . . . . . . B4
Highway and Transport Operations. . . . . . B5
Remember . . . . . . . . . . . . . . . . . . . . . . . . B5
Initial Preparation And Setup . . . . . . . . . . C1
Tractor Preparation and Hookup. . . . . . . . C1
Initial Preparation of the Sprayer . . . . . . . C6
Controller Installation . . . . . . . . . . . . . . . . C8
Raven 440 Controller . . . . . . . . . . . . . . . . C9
Spraying Systems 744 Controller . . . . . . C12
Raven Radar Mount . . . . . . . . . . . . . . . . C16
Operation . . . . . . . . . . . . . . . . . . . . . . . . . . D1
Filling the Tank. . . . . . . . . . . . . . . . . . . . . D1
Using the Optional Flow Max 110
Fill Meter . . . . . . . . . . . . . . . . . . . . . . . D2
Adding and Mixing Chemicals . . . . . . . . . D4
Boom Operation. . . . . . . . . . . . . . . . . . . . D5
Boom Control with John Deere 8000
Series & Case IH MX Magnum Series
Tractors . . . . . . . . . . . . . . . . . . . . . . . . D6
Extending the Boom Wings. . . . . . . . . . D7
Retracting the Boom Wings . . . . . . . . . D7
Sprayer Operation . . . . . . . . . . . . . . . . . . D7
Foam Marker Operation . . . . . . . . . . . . D9
Controlling Drift. . . . . . . . . . . . . . . . . . . D9
Types of Drift . . . . . . . . . . . . . . . . . . . D10
Factors Affecting Drift . . . . . . . . . . . . . D10
Managing Drift . . . . . . . . . . . . . . . . . . D11
Spray Nozzle Selection . . . . . . . . . . . . . D12
Rinsing the Sprayer . . . . . . . . . . . . . . . . D13
Maintenance. . . . . . . . . . . . . . . . . . . . . . . . E1
Cleaning . . . . . . . . . . . . . . . . . . . . . . . . . E1
Lubrication . . . . . . . . . . . . . . . . . . . . . . . . E2
Grease Fittings . . . . . . . . . . . . . . . . . . . E2
Wheel Bearings . . . . . . . . . . . . . . . . . . E2
Line Strainer Maintenance . . . . . . . . . . . . E5
Sprayer Nozzle Maintenance . . . . . . . . . . E5
Spray Tip Care . . . . . . . . . . . . . . . . . . . E5
Tip Replacement. . . . . . . . . . . . . . . . . . E6
Tire Pressure . . . . . . . . . . . . . . . . . . . . . . E7
Wheel Bearing Replacement . . . . . . . . . . E7
Tread Width Adjustment . . . . . . . . . . . . . . E8
Preparation for Storage . . . . . . . . . . . . . . E9
Troubleshooting. . . . . . . . . . . . . . . . . . . . . F1
Field-Pro II Operation . . . . . . . . . . . . . . . . F1
Parts Listing . . . . . . . . . . . . . . . . . . . . . . . G1
1,000 Gallon Frame and Tank Assembly . G1
Base Plumbing details . . . . . . . . . . . . . . . G5
X-Fold Boom Center Section . . . . . . . . . . G7
X-Fold Boom Inner Wing Detail . . . . . . . . G9
X-Fold Boom Outer Wing Detail . . . . . . . G11
X-Fold Boom Hydraulic Detail. . . . . . . . . G13
X-Fold Boom Plumbing Schematic . . . . . G15
Flex-Pro Boom Center Section Assembly G17
Flex-Pro Boom Wing Assembly . . . . . . . G19
Flex-Pro Boom Transport Stand . . . . . . . G21
Flex-Pro Boom Shocked Wheel . . . . . . . G21
Flex-Pro Boom Hyddraulic Schematic . . G23
Flex-Pro Boom Hydraulic Hose Routing . G25
Quick Fill Meter Kit. . . . . . . . . . . . . . . . . G27
Wheel / Hub Assembly . . . . . . . . . . . . . . G28
Outback Foam Guidance System,
Model 6 or 10 . . . . . . . . . . . . . . . . . . . G29
9303C-HM1C Pump Kit . . . . . . . . . . . . . G31
Inductor Kit . . . . . . . . . . . . . . . . . . . . . . G33
Rinse System Assembly. . . . . . . . . . . . . G35
Deluxe Plumbing Plate w/ 3-Valve
Stack Assembly . . . . . . . . . . . . . . . . . G37
Electrical Wiring Details . . . . . . . . . . . . . . H1
Field Pro II Wiring Diagram . . . . . . . . . . . H1
Field Pro II Wiring Diagram for 3
Section Ball Valve Plumbing . . . . . . . . . H3
A2
TABLE OF CONTENTS

INTRODUCTION
Serial Number
The serial number provides important information about your BESTWAY sprayer and may be
required to obtain the correct replacement part(s).
The serial number plate for the sprayer is located on the right side of the mainframe near the
front. The boom has its own serial number, which is located on the rear side of the center section.
It is suggested that the serial numbers also be recorded in the space provided in the front of this
manual. Always provide the serial numbers and model numbers when ordering parts from your
BESTWAY dealer or anytime correspondence is made with RHS Manufacturing.
Definitions of Safety and Service Statements
A3
Frame Serial Number Boom Serial Number

TAKE NOTE! THIS SAFETY ALERT SYMBOL FOUND THROUGHOUT
THIS MANUAL IS USED TO CALL YOUR ATTENTION TO INSTRUC-
TIONS INVOLVING YOUR PERSONAL SAFETY AND THE SAFETY OF
OTHERS. FAILURE TO FOLLOW THESE INSTRUCTIONS CAN
RESULT IN INJURY OR DEATH.
THIS SYMBOL MEANS
- ATTENTION!
- BECOME ALERT!
- YOUR SAFETY IS INVOLVED!
If you have questions not answered in this manual, require additional copies or the manual is
damaged, please contact your dealer or RHS, Inc., 2005 West Oregon Street, Hiawatha, KS 66434.
TELEPHONE: (785) 742-2949, FAX: (785) 742-7174.
All safety statements in this manual, as well as those found on safety decals, are preceded by
A4
!

A5
the following warning symbols. Carefully read and follow the instructions provided.
Indicates and imminently hazardous situation that, if not
avoided, will result in death or serious injury. This signal
word is to be limited to the most extreme situations typically for machine components
which, for functional purposes, cannot be guarded.
Indicates a potentially hazardous situation that, if not avoided,
could result in death or serious injury, and includes hazards that
are exposed when guards are removed. It may also be used to alert against unsafe practices.
Indicates a potentially hazardous situation that, if not avoided,
may result in minor or moderate injury. It may also be used to
alert against unsafe practices.
The IMPORTANT notice gives important instructions to prevent
damage to the machine or systems.
A Note will give general information about the correct operation
and maintenance of the machine and systems.
DANGER:
WARNING:
CAUTION:
NOTE:
!
!
!
IMPORTANT:

Warranty
RHS, Inc. ("RHS") warrants each new Bestway product to be free from defects in RHS manu-
factured components and workmanship. This warranty is applicable only for the normal service
life expectancy of the product or components, not to exceed twenty-four (24) consecutive months
from the date of delivery of the new Bestway product to the original purchaser.
Purchased components installed by RHS (pumps, controls, tanks, wheels, valves, cylinders, fit-
tings, etc.) shall be warranted by their respective manufacturer for a period of twelve (12)
consecutive months from the date of delivery of the new Bestway product to the original purchaser.
A completed Owner Registration Form from the original purchaser must have been received by
RHS to activate warranty coverage.
Genuine Bestway replacement parts and components will be warranted for ninety (90) days
from date of purchase, or the remainder of the original equipment warranty period, whichever is
longer.
Under no circumstances will it cover any merchandise or components thereof, which, in the
opinion of RHS, has been subjected to misuse, unauthorized modifications, alteration, an accident
or if repairs have been made with parts other than those obtainable through RHS.
Our obligation under this warranty shall be limited to repairing or replacing, free of charge to
the original purchaser, any part that, in our judgement, shall show evidence of such defect, provid-
ed further that such part shall be returned within thirty (30) days from the date of failure to RHS
through the dealer or distributor from whom the product was purchased, transportation charges pre-
paid.
This warranty shall not be interpreted to render RHS liable for injury or damages of any kind
or nature to person or property. This warranty does not extend to the loss of crops, loss because of
delay in harvesting, or any expense or loss incurred for labor, substitute machinery, rental or for
any other reason.
A6

Except as set forth above, RHS shall have no obligation or liability of any kind on account
of its equipment and shall not be liable for special or consequential damages. RHS makes no
other warranty, expressed or implied, and, specifically, RHS disclaims any implied warranty
or merchantability or fitness for a particular purpose. Some states or provinces do not per-
mit limitations or exclusions of implied warranties or incidental or consequential damages, so
the limitations or exclusion in this warranty may not apply.
This warranty is subject to any existing conditions of supply, which may directly affect our
ability to obtain materials or manufacture replacement parts.
RHS reserves the right to make improvements in design or changes in specifications at any
time, without incurring any obligation to owners of units previously sold.
No one is authorized to alter, modify or enlarge neither this warranty nor the exclusions, limi-
tations and reservations.
A7

A8
SPECIFICATIONS

Overall Dimensions
(A)Total length 220 in. (5488 mm)
(B)Hitch to axle length 136 in. (3455 mm)
(C)Crop clearance
12.4-38 Tire 27.5 in. (699 mm)
(D)Hitch clearance 39.5 in. (1003 mm)
(E)Hitch height
12.4-38 Tire 17.5-19 in. (445-483 mm)
(F)Height to top of tank
12.4-38 Tire 92 in. (2337 mm)
(G)Transport height (booms folded)
60’ X-Fold Boom & 12.4-38 Tires 97-127 in.
(2464-3226mm)
(H)Boom working height
12.4-38 Tire 18 in. (457mm) to
48 in. (1219 mm)
(J)Boom width (folded) 146 in. (3709 mm)
(K)Treadwidth
Narrow axle 96-120 in. (2438-3048 mm)
Wide axle 120-144 in. (3048 to 3658 mm)
Weights (1,000 Gal. Tank w/60’ Boom)
Empty weight 4580 lbs. (2078 kg)
Tongue weight 120 lbs. (55 kg)) empty
Payload 12000 lbs. (5443 kg) max.
Boom weight 1350 lbs. (613 kg)
Capacities
Sprayer tank 1,000 gal. (3785.5L)
Rinse system tank 50 gal. (189.3 L)
Chemical induction tank 4 gal. (15.2 L)
Fresh water tank 5 gal. (18.9 L)
Foam marker
OBK-6 6 gpm (22.7 L/min.)
w/50 gal. (189.3 L)
OBK-10 10 gpm (37.8 L/min.)
w/50 gal. (189.3 L)
Suspension
Axle 4 x 6 x 3/8 in. (102 x 152 x 10 mm)
Spindle 2.75 in. ( 70 mm)
Hub 8 bolt @ 6,000 lbs.(2722 kg)
Tire size 12.4-38 bias 8-ply
Tractor Requirements (Minimum)
Horsepower Rating 110 hp with cab
Hydraulic Capacity 10 to 19 gpm(38-72.2L/min.)
A9

A10
ACD
E
P/N 67657 A P/N DEC-HAZ01 A
Safety Sign Locations
BF
!

A11
P/N SW001 C P/N/ 67671 C
P/N DEC-HAZ02 D
P/N 67672 C
P/N 60962 FP/N SW900 E
P/N 67673 B

A12
Safety Sign Care
•Keep safety signs clean and legible at all times.
•Replace safety signs that are missing or have become illegible.
•Replaced parts that displayed a safety sign should also display the current sign.
•Safety signs are available from your Distributor or Dealer Parts Department or RHS, Inc.
How to Install Safety Signs:
•Be sure that the installation area is clean and dry.
•Decide on the exact position before you remove the backing paper.
•Remove the smallest portion of the split backing paper.
•Align the decal over the specified area and carefully press the small portion with the
exposed sticky backing in place.
•Slowly peel back the remaining paper and carefully smooth the remaining portion of the
decal in place.
•Small air pockets can be pierced with a pin and smoothed out using the piece of decal
backing paper.
!

SAFETY INFORMATION
As the manufacturer of your BESTWAY Field-Pro II sprayer, we care about your safety. In
fact, this machine and its systems have been designed to provide maximum safety. Unfortunately,
no machine design can prevent operator error or carelessness.
This operator’s manual provides instructions for the safe operation and maintenance of the
Field-Pro II. Please read and understand this and all other manuals included in your owner’s packet
before operating the machine.
Chemical Safety
•Handle all agricultural chemicals with care as required by the chemical manufacturer’s
recommendations. This includes, but is not limited to, the following safety precautions.
•Do not spray chemicals when the wind is in
excess of the label recommendations.
•Never allow chemical to contact the skin or eyes.
•Wear approved protective equipment and cloth-
ing. This equipment includes, but is not
limited to, a protective hat, goggles or face shield,
chemical resistant gloves, long sleeved shirt, long
pants, and a chemical resistant apron.
•Keep in mind that the cab filter may not filter out
dangerous chemicals. Follow instructions provid-
ed by the chemical manufacturer.
•Before leaving the tractor cab, wear personal protective equipment as required by the
B1
Keep personal wash tank
full of clean water for
emergencies and rinse
purposes.
!
!

It is possible for certain agricultural chemicals to
penetrate into the polyethylene tank wall and/or the
walls of connecting hoses. There is a possibility that certain chemicals subsequently
introduced into the tank may cause some leaching of a previously used chemical from
the tank wall. As a result, personal injury, as well as crop, soil or other damage could
occur, depending on the properties of the chemicals involved. Before making any
decision regarding the later use of different chemical solutions, the operator should
consider this leaching trait and consult the chemical suppliers regarding any potential
effects. Prior use of certain chemicals may prevent the appropriate and safe use of
some chemicals at a later date. Repeated flushing between appropriate chemical
changes is required.
WARNING:
!
pesticide use instructions. When re-entering the cab, remove protective equipment and
store either outside the cab in a closed box or some other type of sealable container, or
inside the cab in a pesticide resistant container, such as a plastic bag.
•Clean your shoes or boots to remove soil or other contaminated pesticides prior to entering
the tractor cab.
•Select an area to fill, flush, calibrate and decontaminate the sprayer where chemicals will
not drift or run off to contaminate people, animals, vegetation, water sources, etc.
•Never place nozzle tips or other parts to the lips to blow out trash or residue. Have spare
tips available for replacement.
•Know the phone number and location of your nearest poison control center. Maintain a list
of all chemicals being used and the MSDS for each one.
•Keep personal wash tank full of clean water for rinsing face and hands, as well as for
cleaning safety equipment and spray nozzles. This water is not intended for human or ani-
B2

B3
mal consumption.
Equipment Safety
•Make sure no person or object is in the path of the sprayer booms, especially when retract-
ing or extending the wings.
•Always retract and lock booms in the storage position, except during application.
•Stay clear of overhead power lines when folding or extending the boom wings. Serious
injury or death from electrocution could
occur if the wings come in contact with
power lines.
•Always maintain correct tire pressure. Do
not inflate above the recommended pressure.
•Check wheels and tires regularly for low
pressure, cuts, bubbles, damaged rims, loose
or missing lug bolts and nuts.
•Restrict towing speed to 25 MPH empty, 10
MPH loaded.
•Do not remove safety devices or shields.
Never service, clean or repair any part of the
sprayer while the machine or the tractor is
operating.
•Replace any CAUTION, WARNING, DAN-
GER or instruction safety decal that is not readable or is missing. Location of such decals is
indicated in this booklet.
•Do not attempt to operate this equipment under the influence of drugs or alcohol.
Be particularly careful
when folding and unfolding
the spray booms.
!

Lighting and Marking
•It is the responsibility of the customer to know the lighting and marking requirements of
the local highway authorities.
•REMEMBER: If Safety Signs have been damaged, removed, become illegible or parts
are replaced without decals, new decals must be applied. New decals are available from RHS,
Inc at 1-800-247-3808.
During Operation
•NO PASSENGERS ALLOWED - Do not carry passengers anywhere on, or in, the tractor
or equipment, except as required for operation.
•Be especially observant of the operating area and terrain - watch for holes, rocks or other
hidden hazzards. Always inspect the area prior to operation. DO NOT operate near the edge
of drop-offs or banks. DO NOT operate on steep slopes as overturn may result. Operate up
and down (not across) intermediate slopes. Avoid sudden starts and stops.
•Maneuver the tractor or towing vehicle at safe speeds.
•Do not walk or work under raised components or attachments unless securely positioned
and blocked.
Following Operation
•Store the unit in an area away from human activity.
•Do not permit children to play on or around the stored unit.
B4
!
!
!

Highway and Transport Operations
•Comply with state and local laws governing highway safety and movement of farm
machinery on public roads.
•Always operate equipment in a position to provide maximum visibility at all times. Make
allowances for increased length and weight of the equipment when making turns, stopping
the unit, etc...
Remember
•Your best assurance against accidents is a careful and responsible operator. If there is
any portion of this manual or function you do not understand, contact your local authorized
dealer or RHS, Inc at 1-800-247-3808.
B5
!
!

B6

INITIAL PREPARATION
AND SETUP
Tractor Preparation and Hookup
1. Check and adjust tractor drawbar as shown so that it is located 13 to 17 inches above the
ground. Then adjust the drawbar to a stationary position so that the hitch pin is directly below the
center line of the PTO shaft.
2. Adjust sprayer hitch position, if necessary, to a setting that allows the trailer to tow in a level
position when hitched to the tractor. A total of three holes in the hitch mounting bracket permit the
choice of two different mounting positions.
3. Securely attach to towing unit. Connect sprayer to the tractor using a high strength, 1-1/4” -
1-1/2” hitch pin with a locking hairpin or hammer strap latch and attach safety chains. Install the
safety chain by crossing the chains under the tongue and secure to the draw bar cage or hitch or
C1
Table of contents
Other Bestway Farm Equipment manuals
Popular Farm Equipment manuals by other brands

Bertolini
Bertolini NTR 270V Use and maintenance

Landoll
Landoll 2510 Series Operator's manual

MASSEY FERGUSON
MASSEY FERGUSON 9183 Service manual

Koppert
Koppert Wireless Beehome user manual

IDROFOGLIA
IDROFOGLIA TURBOCAR IG1.1 Operating instructions manual

Farmers Friend
Farmers Friend Terrateck AP.FF.0001 Notice Instructions

SlurryKat
SlurryKat BAK-PAK 600m Operation and maintenance manual

Pottinger
Pottinger MERGENTO VT 9220 Operator's manual

Summers
Summers VRT Renegade Operator's manual

Toro
Toro Reelmaster 33455 Operator's manual

Harvest Pro
Harvest Pro RoHand II owner's manual

MASSEY FERGUSON
MASSEY FERGUSON 8702 Service manual