MW TOOLS UCC006 User manual

TOOLS
M1.1.UCC.NLFREN - 12032018
HANDLEIDING - MODE D’EMPLOI - MANUAL
UCC006 (754750140) - UCC010 (754750142)
UCC020 (754750144) - UCC030 (754750146)
Ultrasoonreiniger
Nettoyeur à ultrasons
Ultrasonic cleaner
P.02 Gelieve te lezen en voor later gebruik bewaren
P.05 Veuillez lire et conserver pour consultation ultérieure
P.08 Please read and keep for future reference
FR
EN
NL
copyrighted document - all rights reserved by FBC

2
NL
TOOLS
M1.1.UCC.NLFREN - 12032018
Neem de tijd om deze instructies te lezen voor gebruik, en bewaar deze voor toekomstige
raadpleging. Het niet naleven van deze instructies kan tot zware materiële en/of lichamelijke
schade leiden.
1 Veiligheidsvoorschriften
AANDACHT!
Houd de reiniger ver van kinderen!
Dit toestel is niet geschikt om bediend te worden door mensen met fysieke, sensorische of
mentale beperkingen, of met onvoldoende ervaring of kennis, waaronder kinderen, tenzij onder
toezicht van een persoon die verantwoordelijk is voor hun veiligheid, en die getraind werd voor
het gebruik van het toestel.
Lees de volgende voorschriften aandachtig, omdat deze niet navolgen kan de productgarantie
annuleren.
• Gebruik de reiniger niet meer dan een uur zonder onderbreking, omdat dit de interne componenten kan beschadigen.
• Gebruik het toestel niet zonder vloeistof in de tank. Maak altijd zeker dat de vloeistof het maximum niveau niet overschrijdt.
Zorg er altijd voor, dat er een diepte van mintens 7 cm is.
• Gooi geen voorwerp in de tank, omdat dit de transductor kan beschadigen. Gebruik altijd een mand en plaats deze
voorzichtig in de tank.
• Hoe meer voorwerpen u in het reinigingsbad plaatst, hoe minder effectief de reiniging zal zijn. Het wordt afgeraden om
voorwerpen elkaar te laten overlappen. Laat steeds voldoende ruimte tussen de voorwerpen.
• Laat het deksel gesloten tijdens het gebruik. Dit voorkomt spatten en vermindert de verdamping van de vloeistof.
• Dompel het toestel of de voedingskabel nooit in water of een andere vloeistof.
• Raak de stekker niet met natte handen aan, vooral wanneer u het toestel aansluit of loskoppelt.
• Raak het toestel niet aan als het in het water gevallen is tijdens het gebruik. Koppel het eerst los van de stroomtoevoer.
• Demonteer het toestel niet.
• Schakel de stroomvoeding uit bij het invullen of legen van de tank.
• Spuit geen water of vloeistof op het toestel of het bedieningspaneel.
• Gebruik het toestel niet als het niet geaard is.
• Plaats het toestel niet op een zacht oppervlak, waar de ventilatieopeningen verstopt kunnen zijn.
• Schakel de verwarming altijd uit na gebruik, want als u deze aan laat kan de vloeistof verdampen en interne componenten
kunnen beschadigd zijn.
• Aan het einde van de reinigingscyclus, schakel de verwarming en de stroomtoevoer uit.
• Wees voorzichtig wanneer u voorwerpen in de tank toevoegt of verwijdert, omdat de vloeistof warm is en gemorste
vloeistof kan interne componenten beschadigen. Gemorste vloeistof moet onmiddellijk afgeveegd worden.
• In geval van een storing/noodgeval, ontkoppel het toestel van de stroomtoevoer.
2 Omschrijving
• Behuizing, tank en deksel uit roestvrij staal.
• Tank zonder lasopening voor een betere dichtheid.
• Drainage en koelventilator.
• Vochtbestendige PCB
• Industriële kwaliteit geïntegreerde schakeling en ultrasoon transductor.
copyrighted document - all rights reserved by FBC

3
NL TOOLS
M1.1.UCC.NLFREN - 12032018
14. Always turn the heater o after using as leaving it on can cause the
uid to evaporate and damage the internal components.
15. Upon completion of the cleaning cycle, turn the heater button o
and isolate the machine from the electrical supply.
16. Take care when adding or removing items from the cleaning tank as
the uid is likely to be hot and displaced uid can damage the inter-
nal components. Any displaced uid must be dried up immediately.
17. In the event of failure/emergency, disconnect the mains supply by
removing the plug from the mains socket.
Operation
1. Fill stainless steel tank with liquid; Plug the cleaner into grounded
outlet; After powering on, the temperature displays the actual solu-
tion temperature.
2. Timer setting: Press the timer control ”UP“ button for setting 1-99
min working time, Press the timer control “DOWN” button for reduc-
ing the time per minute. The cleaning stops when the timer counts
down to 00:00. If the unit needs to be stopped before the timer runs
up, press “ON/OFF” button.
LED display
timer
LED display
heating temp
Temperature
control
Timer control
Heating ON/
OFF Ultrasonic
ON/OFF
LED display
verwarmingstemperatuur
Temperatuur
controle
Verwarming ON/OFF Ultrasoon ON/OFF Timer controle
LED display timer
2.1 Technische gegevens
Model UCC006 UCC010 UCC020 UCC030
Tankinhoud [l] 6 10 20 30
Ultrasoon vermogen [W] 180 240 480 600
Verwarming vermogen [W] 300 300 800 800
Totaal vermogen [W] 480 540 1280 1400
Afmetingen binnenruimte
(l x b x h) (mm) 270 x 146 x 110 280 x 230 x 120 470 x 226 x 100 470 x 270 x 120
Frequentie [kHz] 40
Temperatuur instelbaar [°C] 20 ~ 80
Timer instelbaar [min.] 1 ~ 99
Totale afmetingen
(l x b x h) [mm] 325 x 180 x 315 330 x 270 x 310 550 x 330 x 310 530 x 525 x 380
Netto gewicht 6,98 10 16 18,2 kg
3 Principe van ultrasoon reinigen
Ultrasoon reiniging is gebaseerd op het cavitatie effect veroorzaakt door het
hoogfrequentie ultrasone golfvibratiesignaal in de vloeistof.
Microscopische bubbels worden gevormd en imploderen heftig, waardoor
cavitatie ontstaat die een intense wrijfactie op het oppervlak van de
voorwerpen veroorzaakt. De bubbels zijn klein genoeg om door kleine ruimtes
te dringen voor een volledige en uniforme reiniging.
Ultrasoon reiniging is uiterst effectief voor het verwijderen van vuil en roet
dat normaal gesproken een langdurige handmatige reiniging zou vereisen.
Deze wordt gebruikt voor de reiniging van allerlei soorten instrumenten en
mechanische onderdelen zoals carburatoren, die bijna nieuw worden zonder
kwetsbare onderdelen te beschadigen.
ULTRASONIC CLEANING PRINCIPLE
Ultrasonic cleaning is based on the cavitation eect caused by high
frequency ultrasonic wave vibration signal in the uid.
Microscopic bubbles are formed, and they implode violently causing
the cavitation which create an intense scrubbing action on the surface
of the item being cleaned. The bubbles
are small enough to penetrate microscopic
crevices, cleaning hem thoroughly and
consistently.
Ultrasonic cleaning is extremely eective
at removing dirt and grime which would
normally require tedious manual cleaning
by hand. It has been used to clean a wide
variety of instruments and mechanical
parts such as carburetors, returning them
to almost “like new” condition without
damaging delicate parts.
PREPARATION
1. Carefully unpack the cleaner and remove all traces of packing mate-
rials. Visually inspect the cleaner for any parts that may have become
loose or damaged during transit.
Content :
a: Main unit
b: Stainless steel lid
c. Mesh basket
d: Power cord
e: Outlet lter (6L and above models)
f: Instruction manual
Principe van ultrasoon reinigen
Transductor
Generator
Tank Oplossing
Reinigingsmiddel
Kleine trillingen Cavitatie Vuil komt los
copyrighted document - all rights reserved by FBC

4
NL
TOOLS
M1.1.UCC.NLFREN - 12032018
4 Voorbereiding
1. Pak de reiniger voorzichtig uit en verwijder alle verpakkingsdelen. Controleer de reiniger visueel, om u ervan te verzekeren,
dat geen onderdelen dosgedraaid of beschadigd werden tijdens het transport.
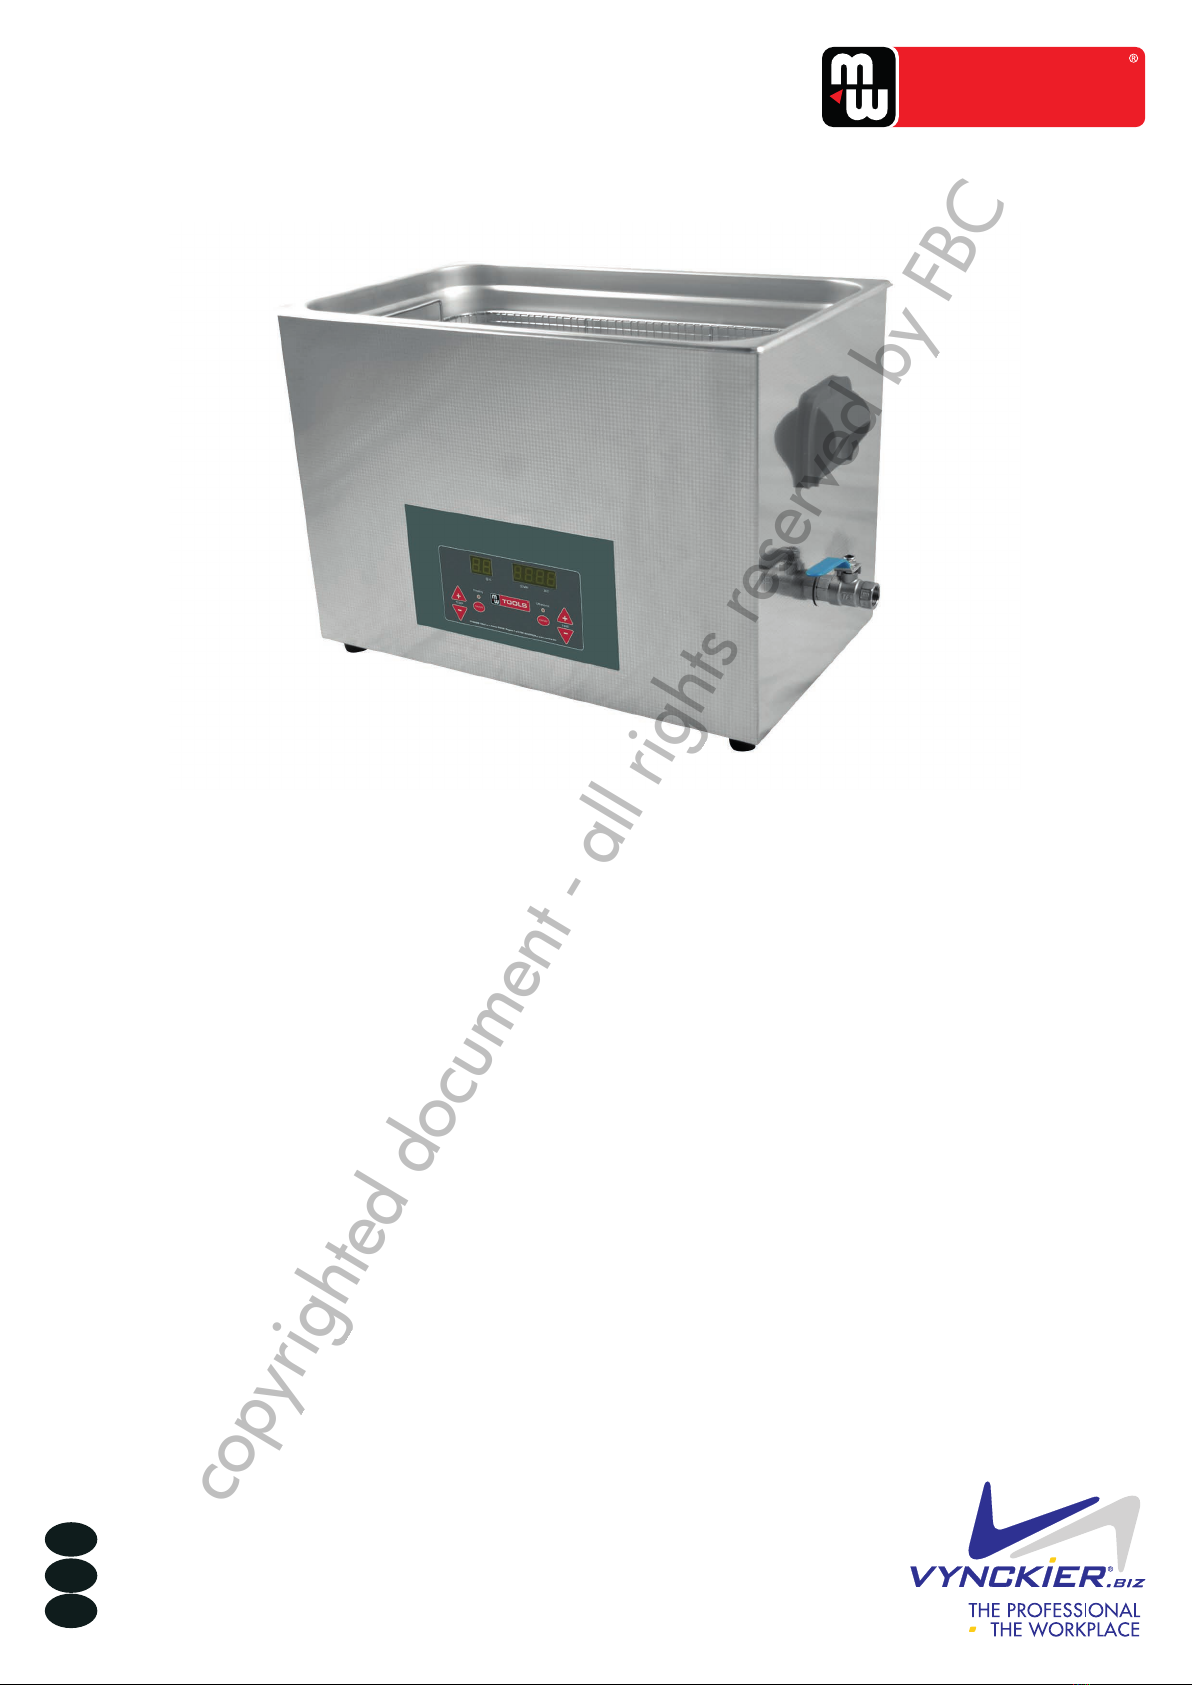
Inhoud:
a. Hoofdapparaat
b. Roestvrijstalen deksel
c. Netmand
d. Voedingskabel
e. Uitlaatlter
f. Handleiding
2. Plaats de reiniger op een vlak, schoon oppervlak, waar de ventilatieopeningen voldoende ventilatie krijgen, en zorg ervoor
dat alle bedieningselementen uitgeschakeld zijn. Zorg er ook voor dat de aftapkraan gesloten is.
3. Zorg ervoor dat de voedingskabel goed in de reiniger aangesloten is, en dat geen deel van de kabel in contact met vocht
komt.
4. Vul voorzichtig ten minste de helft van de watertank in. Voor specieke reinigingswerkzaamheden, is het raadzaam een
geschikt reinigingsmiddel te gebruiken, dat de reinigingsprestaties zal verbeteren. De reiniger is nu klaar voor gebruik.
INFORMATIE
Wanneer het toestel normaal werkt, geeft de syntonie van ultrasoon en tank een typisch geluid, zonder trillingen op
het wateroppervlak. Toch is er een verdamping door de kleine belletjes. Als er discontinue golven zijn, voeg dan wat
oplossing toe of laat er wat uit de tank. Door golven te voorkomen, wordt het resultaat verbetert.
Om goede resultaten te bereiken, is het raadzaam het toestel gedurende enkele minuten voor het werk te laten
functioneren, om de oplossing te ontgassen. De energie, die vrijkomt als gevolg van de cavitatie, verhoogt de
temperatuur van de oplossing.
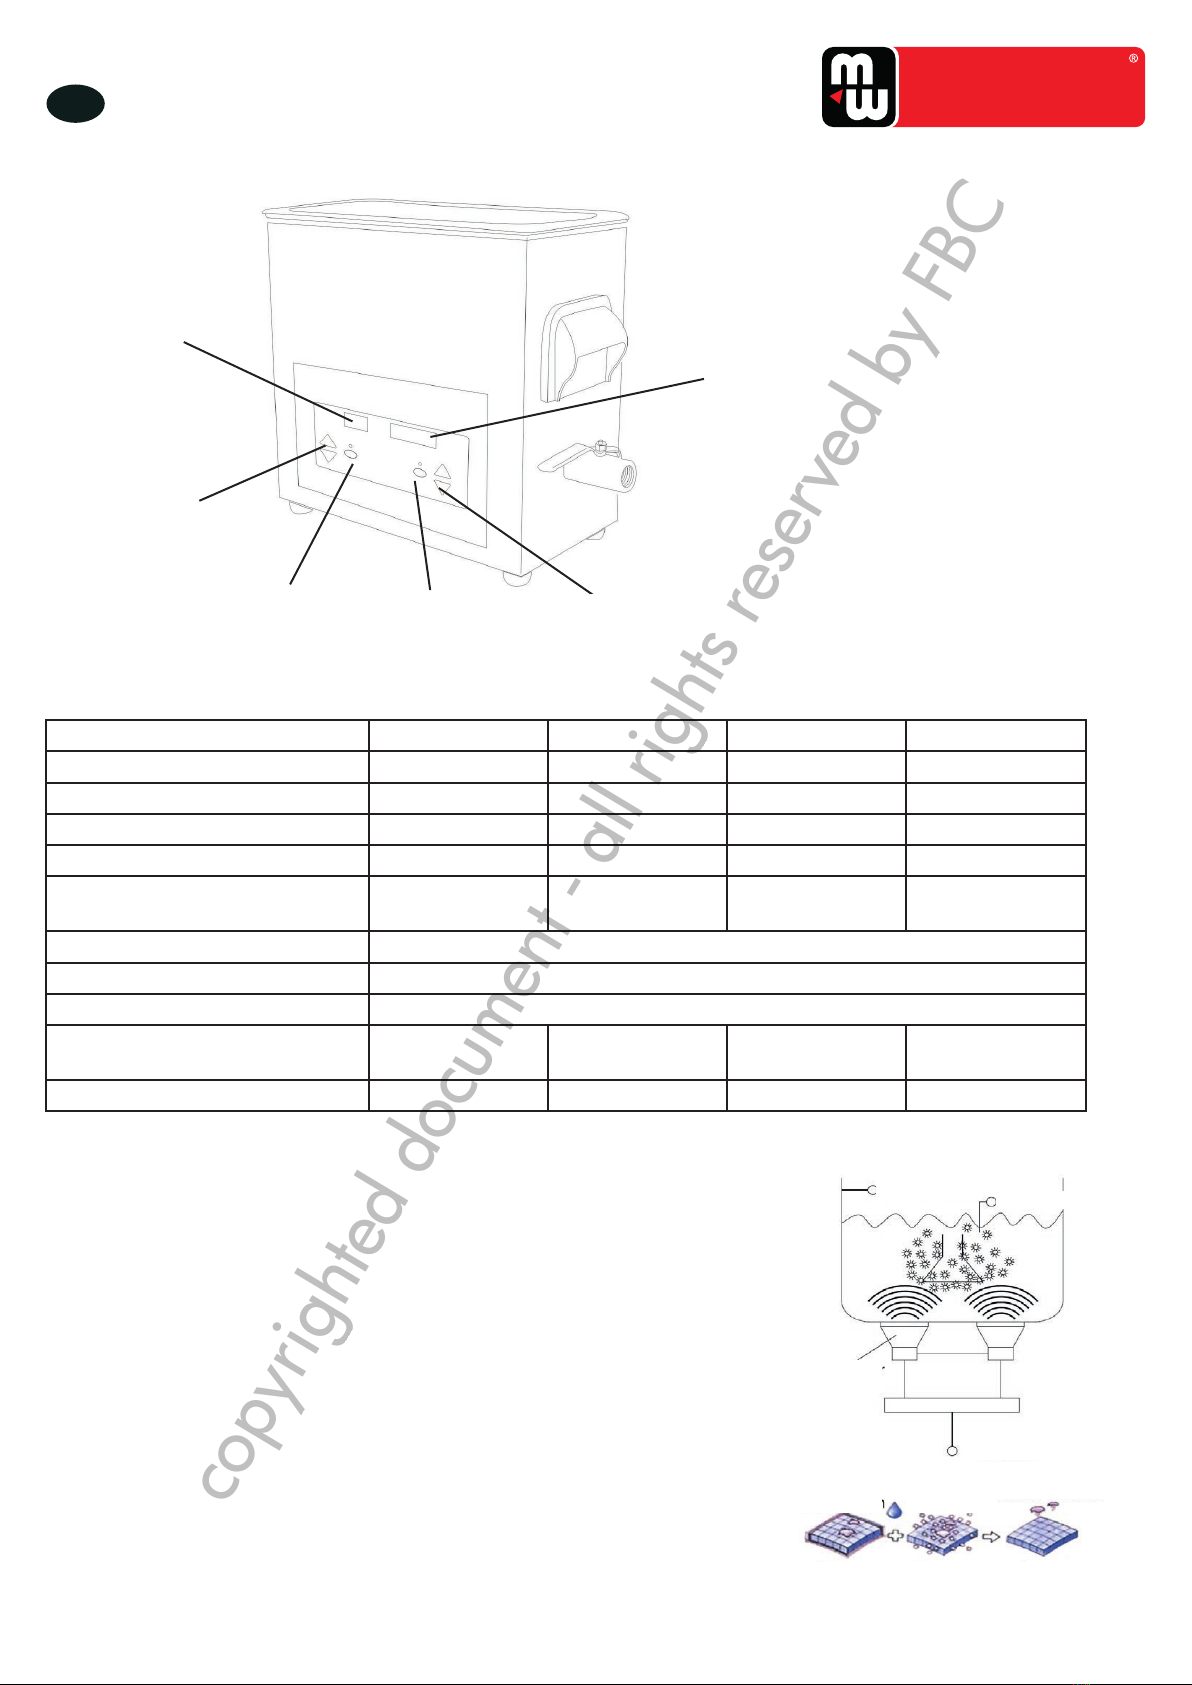
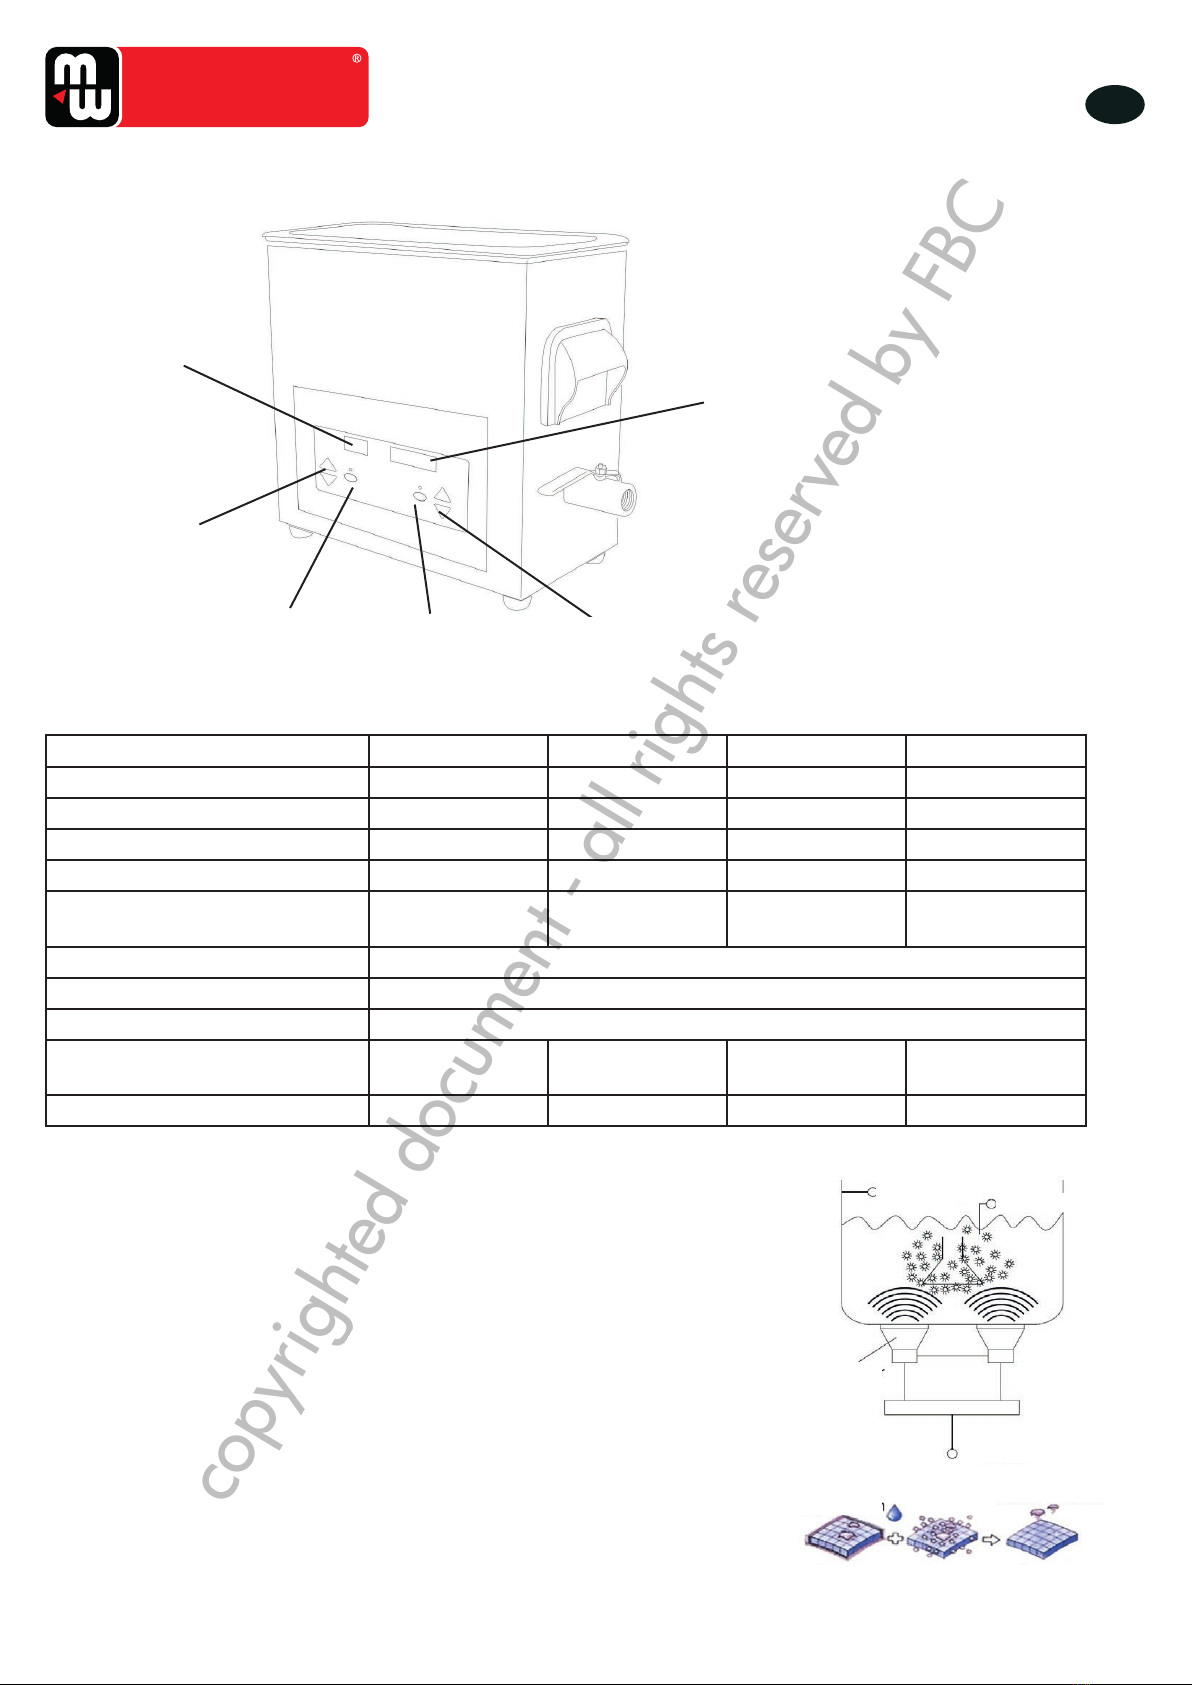
5 Bediening
1. Vul de roestvrijstalen tank met vloeistof. Sluit de reiniger aan op een geaard stopcontact. Na het inschakelen wordt de
huidige temperatuur van de oplossing op het scherm weergegeven.
2. De timer instellen: Druk op de toets “UP” van de timer bediening, om de werktijd tussen 1 en 99 minuten te regelen. Druk
op de toets “DOWN” om de duur te verkorten. De reiniging stopt wanneer de timer tot 00:00 afgeteld heeft. Als u de
reiniger voor het einde van de vooraf ingestelde tijdsduur wil stoppen, druk dan op de toets “ON/OFF”.
Nota: Laat de reiniger nooit meer dan een uur ononderbroken werken.
3. De temperatuur instellen: Druk op de verwarmingsknop, om de temperatuur tussen 0 en 80 °C te regelen. De beste
resultaten worden meestal bereikt bij een temperatuur tussen 40 en 60 °C.
4. Nadat de tijdsduur en de temperatuur ingesteld zijn, druk op de toets ON/OFF, om beide functie op te starten. Druk om
de verwarmingsknop OFF om de verwarmingsfunctie te stoppen. Hetzelfde voor de ultrasone functie.
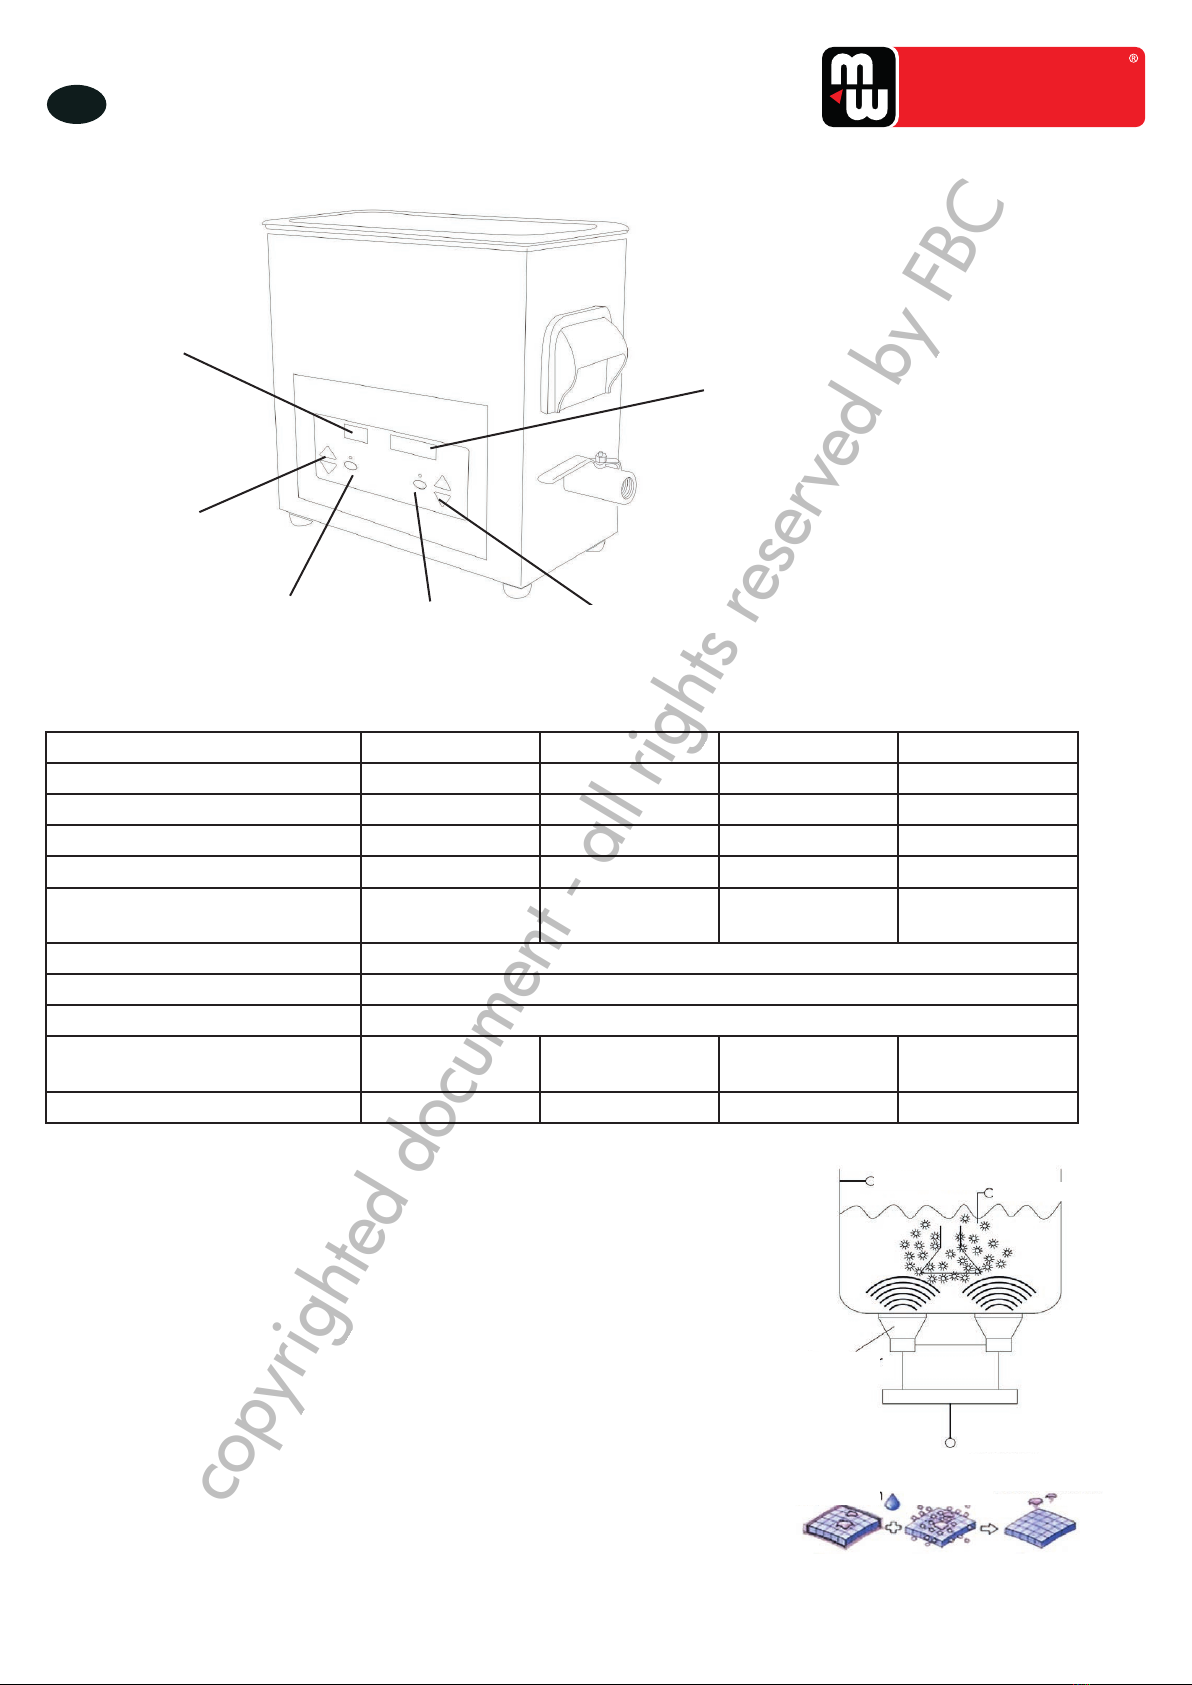
5.1 Voor een beter resultaat
• Het voorwerp moet volledig in de oplossing ondergedompeld worden.
Nota: Het merkteken “MAX” nooit overschrijden.
• De oplossing opwarmen (niet koken) en een geschikt reinigingsmiddel toevoegen verbetert de reinigingsefciëntie.
• Zorg ervoor, dat er voldoende ruimte is tussen de verschillende stukken in de tank. Hoe meer voorwerpen in de tank zitten,
hoe minder effectief de reiniging zal zijn. Laat meerdere voorwerpen niet elkaar overlappen. Als stukken door andere
bedekt worden, zal de reiniging niet werken zoals het moet.
• Plaats geen voorwerp direct in de bodem van de tank. Het resultaat zal beter zijn met een geschikte mand. Een netmand
absorbeert slechts 8 % van de ultrasone energie.
• Temperatuur: Hoe hoger de temperatuur, hoe beter het reinigingsresultaat. Als de temperatuur echter hoger is dan 70-80
°C, wordt het resultaat beïnvloed. De aabevolen reinigingstemperatuur ligt tussen 40 en 60 °C.
copyrighted document - all rights reserved by FBC

5
FR TOOLS
M1.1.UCC.NLFREN - 12032018
Prenez le temps de lire ces instructions avant utilisation, et gardez-les pour pouvoir les consulter à
tout moment. Le non-respect de ces instructions peut provoquer de graves dommages matériel et/
ou corporels.
1 Consignes de sécurité
ATTENTION !
Gardez le nettoyeur loin des enfants !
Cet appareil n’est pas conçu pour être utilisé par des personnes avec des déciences physiques,
sensorielles ou mentales, ou n’ayant pas l’expérience ou les connaissances sufsantes, y compris
les enfants, sauf s’il sont supervisés par une personne responsable de leur sécurité et qui a reçu
la formation nécessaire pour l’utilisation de l’appareil.
Lisez attentivement les consignes qui suivent, car ne pas les respecter peut annuler la garantie du
produit.
• N’utilisez pas le nettoyeur de manière ininterrompue pendant plus d’une heure, car cela pourrait endommager des
composants internes.
• N’utilisez pas l’appareil sans liquide dans le réservoir. Assurez-vous toujours que le liquide ne dépasse pas la marque du
niveau maximum. Assurez-vous toujours qu’il y ait une profondeur d’au moins 7 cm.
• Ne jetez jamais un objet dans le réservoir, car il pourrait endommager le transducteur. Utilisez toujours un panier et
placez-le doucement dans le réservoir.
• Plus vous mettez d’objets dans le bain de nettoyage, moins le nettoyage sera efcace. Il est déconseillé de laisser les objets
se chevaucher. Laissez toujours assez d’espace libre entre les objets.
• Laissez le couvercle fermé pendant l’utilisation. Il empêche les éclaboussures et réduit l’évaporation du liquide.
• N’immergez jamais l’appareil ou le câble d’alimentation dans l’eau ou un autre liquide.
• Ne touchez pas la che électrique avec des mains mouillées, en particulier quand vous branchez ou débranchez
l’appareil.
• Ne touchez pas l’appareil s’il est tombé dans l’eau pendant son fonctionnement. Débranchez-le d’abord.
• Ne démontez pas l’appareil.
• Coupez l’alimentation électrique quand vous remplissez ou videz le réservoir.
• Ne vaporisez pas d’eau ou de liquide sur l’appareil ou le panneau de commande.
• N’utilisez pas l’appareil s’il n’est pas relié à la terre.
• Ne placez pas l’appareil sur une surface molle, où les évents pourraient être bouchés.
• Éteignez toujours le chauffage après utilisation, car le laisser allumé pourrait provoquer une évaporation du liquide et
endommager les composants internes.
• À la n du cycle de nettoyage, éteignez le chauffage et coupez l’alimentation électrique.
• Faites attention quand vous ajoutez ou retirez des objets du réservoir de nettoyage, car le liquide est chaud et du liquide
renversé pourrait endommager les composants internes. Si du liquide se renverse, il doit immédiatement essuyé.
• En cas de dysfonctionnement/d’urgence, débranchez l’appareil de l’alimentation électrique.
2 Description
• Boîtier, réservoir et couvercle en acier inoxydable.
• Réservoir sans espace de soudure, pour une meilleure étanchéité.
• Drainage et ventilateur de refroidissement.
• PCB étanche à l’humidité.
• Circuit intégré de qualité industrielle et transducteur à ultrasons.
copyrighted document - all rights reserved by FBC

6
FR
TOOLS
M1.1.UCC.NLFREN - 12032018
14. Always turn the heater o after using as leaving it on can cause the
uid to evaporate and damage the internal components.
15. Upon completion of the cleaning cycle, turn the heater button o
and isolate the machine from the electrical supply.
16. Take care when adding or removing items from the cleaning tank as
the uid is likely to be hot and displaced uid can damage the inter-
nal components. Any displaced uid must be dried up immediately.
17. In the event of failure/emergency, disconnect the mains supply by
removing the plug from the mains socket.
Operation
1. Fill stainless steel tank with liquid; Plug the cleaner into grounded
outlet; After powering on, the temperature displays the actual solu-
tion temperature.
2. Timer setting: Press the timer control ”UP“ button for setting 1-99
min working time, Press the timer control “DOWN” button for reduc-
ing the time per minute. The cleaning stops when the timer counts
down to 00:00. If the unit needs to be stopped before the timer runs
up, press “ON/OFF” button.
LED display
timer
LED display
heating temp
Temperature
control
Timer control
Heating ON/
OFF Ultrasonic
ON/OFF
Afchage LED
température de
chauffage
Contrôle de
température
Chauffage ON/OFF Ultrasons ON/OFF Contrôle minuterie
Afchage LED
minuterie
2.1 Données techniques
Modèle UCC006 UCC010 UCC020 UCC030
Capacité de la cuve [l] 6 10 20 30
Puissance ultrasonique [W] 180 240 480 600
Puissance de chauffage [W] 300 300 800 800
Puissance totale [W] 480 540 1280 1400
Dimensions chambre intérieure
(L x l x h) (mm) 270 x 146 x 110 280 x 230 x 120 470 x 226 x 100 470 x 270 x 120
Fréquence [kHz] 40
Réglage de température [°C] 20 ~ 80
Minuterie [min.] 1 ~ 99
Dimensions totales
(L x l x h) [mm] 325 x 180 x 315 330 x 270 x 310 550 x 330 x 310 530 x 525 x 380
Poids net 6,98 10 16 18,2 kg
3 Principe du nettoyage par ultrasons
Le nettoyage par ultrasons est basé sur l’effet de cavitation causé par le signal
de vibration d’ondes ultrasonores à haute fréquence dans le liquide.
Des bulles microscopiques se forment et implosent violemment, provoquant la
cavitation qui crée une action intense de frottement sur la surface des objets
à nettoyer. Les bulles sont sufsamment petites pour pénétrer dans les petits
interstices, pour un nettoyage complet et uniforme.
Le nettoyage par ultrasons est extrêmement efcace pour enlever la saleté et
la crasse qui nécessiterait normalement un nettoyage manuel fastidieux. Il est
utilisé pour nettoyer une grande variété d’instruments et de pièces mécaniques
comme les carburateurs, les rendant presque comme neufs sans endommager
les parties délicates.
ULTRASONIC CLEANING PRINCIPLE
Ultrasonic cleaning is based on the cavitation eect caused by high
frequency ultrasonic wave vibration signal in the uid.
Microscopic bubbles are formed, and they implode violently causing
the cavitation which create an intense scrubbing action on the surface
of the item being cleaned. The bubbles
are small enough to penetrate microscopic
crevices, cleaning hem thoroughly and
consistently.
Ultrasonic cleaning is extremely eective
at removing dirt and grime which would
normally require tedious manual cleaning
by hand. It has been used to clean a wide
variety of instruments and mechanical
parts such as carburetors, returning them
to almost “like new” condition without
damaging delicate parts.
PREPARATION
1. Carefully unpack the cleaner and remove all traces of packing mate-
rials. Visually inspect the cleaner for any parts that may have become
loose or damaged during transit.
Content :
a: Main unit
b: Stainless steel lid
c. Mesh basket
d: Power cord
e: Outlet lter (6L and above models)
f: Instruction manual
Principe du nettoyage par ultrasons
Transducteur
Générateur
Réservoir Solution
Détergent
Vibrations minuscules Cavitation La saleté s’enlève
copyrighted document - all rights reserved by FBC

7
FR TOOLS
M1.1.UCC.NLFREN - 12032018
4 Préparation
1. Déballez soigneusement le nettoyeur et enlevez toute trace d’emballage. Effectuez un contrôle visuel du nettoyeur, pour
vous assurer qu’aucune pièce n’est desserrée ou endommagée suite au transport.
Contenu de l’emballage :
a. Appareil principal
b. Couvercle en inox
c. Panier en mailles
d. Câble d’alimentation
e. Filtre de sortie
f. Manuel d’utilisation
2. Placez le nettoyeur sur une surface plane et propre, où les évents de refroidissement recevront une ventilation sufsante, et
assurez-vous que toutes les commandes sont éteintes. Assurez-vous aussi que le robinet de vidange est fermé.
3. Assurez-vous que le câble d’alimentation est bien branché dans le nettoyeur, et qu’aucune partie du câble n’est susceptible
d’entrer en contact avec de l’humidité.
4. Remplissez le réservoir d’eau avec précaution, au moins jusqu’à la moitié. Pour certains travaux de nettoyage spéciques,
il est recommandé d’utiliser un détergent adapté qui améliorera l’efcacité du nettoyage. Le nettoyeur est maintenant prêt à
l’usage.
INFORMATION
Quand l’appareil fonctionne normalement, la syntonie des ultrasons et du réservoir produit un son typique sans
frémissement à la surface de l’eau. Il y a pourtant une vaporisation faite par les bulles minuscules. Si des remous
discontinus se produisent, ajoutez ou videz un peu de la solution dans le réservoir. Empêcher les remous permet
d’obtenir un meilleur résultat.
Pour obtenir de bons résultats, il est recommandé de faire fonctionner l’appareil pendant quelques minutes avant le
nettoyage, pour dégazer la solution. L’énergie libérée par la cavitation va augmenter la température de la solution.
5 Utilisation
1. Remplissez le réservoir en inox avec du liquide. Branchez le nettoyeur sur une alimentation avec mise à la terre. Quand
vous allumez l’appareil, l’écran afche la température actuelle de la solution.
2. Réglage de la minuterie : Appuyez sur la touche «UP» de la commande de la minuterie, pour régler la durée de nettoyage
de 1 à 99 minutes. Appuyez sur la touche «DOWN» pour diminuer la durée par minute. Le nettoyage se termine quand
la minuterie a décompté le temps jusque 00:00. Si vous voulez arrêter le nettoyeur avant la n du temps programmé,
appuyez sur la touche ON/OFF.
Remarque : ne laissez pas le nettoyeur fonctionner sans interruption pendant plus d’une heure.
3. Réglage de la température : Appuyez sur la touche de contrôle du chauffage pour régler la température entre 0 et 80 °C.
Habituellement, les meilleurs résultats sont obtenus à une température située entre 40 et 60 °C.
4. Après le réglage de la minuterie et de la température, appuyez sur la touche ON/OFF pour faire démarrer les deux
fonctions. Appuyez sur la touche OFF du chauffage pour arrêter la fonction chauffage. Faites de même pour la fonction
ultrasons.
5.1 Pour un meilleur résultat
• L’objet doit être complètement immergé dans la solution.
Remarque : Ne dépassez pas la marque «MAX».
• Chauffer la solution (ne pas faire bouillir) et ajouter un détergent adapté augmente l’efcacité du nettoyage.
• Assurez-vous qu’il y a assez d’espace entre les différentes pièces dans le réservoir. Plus il y a de pièces dans le réservoir,
moins le nettoyage sera efcace. Ne laissez pas plusieurs pièces se chevaucher. Si des objets en recouvrent d’autres, le
nettoyage ne fonctionnera pas comme il devrait.
• Ne placez pas d’objet directement dans le fond du réservoir. Le résultat sera meilleur avec un panier adapté. Un panier
métallique absorbe seulement environ 8% de l’énergie des ultrasons.
• Température : Plus la température est élevée, meilleur est le résultat du nettoyage. Cependant, si la température est
supérieure à 70-80 °C, le résultat en sera affecté. La température de nettoyage recommandée se situe entre 40 et 60 °C.
copyrighted document - all rights reserved by FBC

8
EN
TOOLS
M1.1.UCC.NLFREN - 12032018
Please take the time to read these operating instructions before use and retain them for future
reference. Failure to follow these instructions may lead to serious personal injury and damage to
property.
1 Safety instructions
WARNING!
Keep the cleaner away from children!
This device is not intended to use by individuals with restricted physical, sensory or mental
capacities or those with lack of experience or knowledge, including children, unless they are
supervised by an individual who is responsible for their safety or have received training in
operating the device.
Please read the following very carefully as failure to comply may invalidate your guarantee.
• Do not run the cleaner continuously for more than one hour at a time, as doing so can damage the internal components.
• Do not operate the unit without uid in the tank. Always ensure the uid is no higher than the maximum mark. Always
ensure there is a minimum depth of 7 cm.
• Do not drop any item into the tank as this may cause damage to the transducer. Always use a basket and place the items
gently into the tank.
• The more items that you place in your cleaning bath the less ef cient it will clean. It is not advised to overlap items. Always
allow plenty of clear space between the items.
• Do keep the lid on during use. This will prevent splashes and re duce evaporation of the uid.
• Never immerse the machine or power cord in water or other liquid.
• Do not touch the power plug with wet hands, especially when inserting or removing the plug.
• Do not touch the unit if the machine has fallen into water during operation. Remove the power plug from the socket rst.
• Do not disassemble the machine.
• Unplug the power source while lling or emptying the tank.
• Do not spray water or liquid over the device or control panel.
• Do not operate the cleaner without proper grounding.
• Do not place the device on a soft surface, where the vents could be blocked.
• Always turn the heater off after using as leaving it on can cause the uid to evaporate and damage the internal
components.
• Upon completion of the cleaning cycle, turn the heater button off and isolate the machine from the electrical supply.
• Take care when adding or removing items from the cleaning tank as the uid is likely to be hot and displaced uid can
damage the inter nal components. Any displaced uid must be dried up immediately.
• In the event of failure/emergency, disconnect the mains supply by removing the plug from the mains socket.
2 Description
• Stainless steel housing, tank and lid.
• Stamp tank without welding gap for better waterproof.
• Drainage and cool fan.
• Moisture-proof PCB.
• Industrial grade IC and ultrasonic transducer.
copyrighted document - all rights reserved by FBC

9
EN TOOLS
M1.1.UCC.NLFREN - 12032018
14. Always turn the heater o after using as leaving it on can cause the
uid to evaporate and damage the internal components.
15. Upon completion of the cleaning cycle, turn the heater button o
and isolate the machine from the electrical supply.
16. Take care when adding or removing items from the cleaning tank as
the uid is likely to be hot and displaced uid can damage the inter-
nal components. Any displaced uid must be dried up immediately.
17. In the event of failure/emergency, disconnect the mains supply by
removing the plug from the mains socket.
Operation
1. Fill stainless steel tank with liquid; Plug the cleaner into grounded
outlet; After powering on, the temperature displays the actual solu-
tion temperature.
2. Timer setting: Press the timer control ”UP“ button for setting 1-99
min working time, Press the timer control “DOWN” button for reduc-
ing the time per minute. The cleaning stops when the timer counts
down to 00:00. If the unit needs to be stopped before the timer runs
up, press “ON/OFF” button.
LED display
timer
LED display
heating temp
Temperature
control
Timer control
Heating ON/
OFF Ultrasonic
ON/OFF
LED display
heating temperature
Temperature control
Heating ON/OFF Ultrasonic ON/OFF Timer control
LED display timer
2.1 Technical specications
Model UCC006 UCC010 UCC020 UCC030
Tank capacity [l] 6 10 20 30
Ultrasonic power [W] 180 240 480 600
Heating power [W] 300 300 800 800
Total power [W] 480 540 1280 1400
Inner chamber dimensions
(l x w x h) (mm) 270 x 146 x 110 280 x 230 x 120 470 x 226 x 100 470 x 270 x 120
Frequency [kHz] 40
Temperature setting [°C] 20 ~ 80
Timer [min.] 1 ~ 99
Overall dimensions
(l x w x h) [mm] 325 x 180 x 315 330 x 270 x 310 550 x 330 x 310 530 x 525 x 380
Net weight 6,98 10 16 18,2 kg
3 Ultrasonic cleaning principle
Ultrasonic cleaning is based on the cavitation effect caused by high frequency
ultrasonic wave vibration signal in the uid.
Microscopic bubbles are formed, and they implode violently causing the
cavitation which create an intense scrubbing action on the surface of the
item being cleaned. The bubbles are small enough to penetrate microscopic
crevices, cleaning hem thoroughly and consistently.
Ultrasonic cleaning is extremely effective at removing dirt and grime which
would normally require tedious manual cleaning by hand. It has been used to
clean a wide variety of instruments and mechanical parts such as carburettors,
returning them to almost “like new” condition without damaging delicate parts.
ULTRASONIC CLEANING PRINCIPLE
Ultrasonic cleaning is based on the cavitation eect caused by high
frequency ultrasonic wave vibration signal in the uid.
Microscopic bubbles are formed, and they implode violently causing
the cavitation which create an intense scrubbing action on the surface
of the item being cleaned. The bubbles
are small enough to penetrate microscopic
crevices, cleaning hem thoroughly and
consistently.
Ultrasonic cleaning is extremely eective
at removing dirt and grime which would
normally require tedious manual cleaning
by hand. It has been used to clean a wide
variety of instruments and mechanical
parts such as carburetors, returning them
to almost “like new” condition without
damaging delicate parts.
PREPARATION
1. Carefully unpack the cleaner and remove all traces of packing mate-
rials. Visually inspect the cleaner for any parts that may have become
loose or damaged during transit.
Content :
a: Main unit
b: Stainless steel lid
c. Mesh basket
d: Power cord
e: Outlet lter (6L and above models)
f: Instruction manual
Ultrasonic cleaning principle
Transducer
Generator
Tank Solution
Detergent
Tiny vibrations Cavitation Debris come off
copyrighted document - all rights reserved by FBC

10
EN
TOOLS
M1.1.UCC.NLFREN - 12032018
4 Preparation
1. Carefully unpack the cleaner and remove all traces of packing materials. Visually inspect the cleaner for any parts that may
have become loose or damaged during transit.
Content :
a: Main unit
b: Stainless steel lid
c. Mesh basket
d: Power cord
e: Outlet lter
f: Instruction manual
2. Place the cleaner on a at, clean surface where the cooling vents will receive adequate ventilation, and ensure all controls
are turned off. Ensure the drain tap is in closed position.
3. Ensure the power lead is securely plugged into the cleaner and that no part of the lead is likely to come into contact with
moisture.
4. Carefully ll at least ½ of the tank with water. For specic cleaning purposes it is recommended to add the appropriate
detergent which will improve the cleaning performance. The cleaner is now ready for usage.
INFORMATION
While the machine is working normally, ultrasonic and tank syntony gives a typical sound wile no shudder on the
surface of the water. Yet there is spray made by the tiny bubbles. If there are discontinuous surges, please add or
release a little of solution in the tank. Avoiding surges result in better cleaning effect.
To achieve good results it is recommended to run the unit before cleaning for several minutes to degas the solution. The
energy released due to cavitation will increase the temperature of the solution.
5 Operation
1. Fill stainless steel tank with liquid. Plug the cleaner into grounded outlet. After powering on, the temperature displays the
actual solution temperature.
2. Timer setting: Press the timer control ”UP“ button for setting 1-99 min working time, Press the timer control “DOWN” button
for reducing the time per minute. The cleaning stops when the timer counts down to 00:00. If the unit needs to be stopped
before the timer runs up, press “ON/OFF” button.
Note: Do not run the cleaner continuously for more than one hour.
3. Set temperature: Press the heating control button for temperature setting with the range 0 °C - 80 °C. Usually, the best
results are within 40 °C to 60 °C.
4. After time and heating have been set, press ultrasonic ON/OFF key to start both functions. Press “Heating” button “OFF”,
the heating function will stop. The same for ultrasonic function.
5.1 For better cleaning effect
• The item should be immersed completely in the solution.
Note: Do not exceed the “MAX” mark.
• Heating up the solution (no boiling) and adding appropriate detergents will help increase the cleaning performance.
• Make sure there is enough space around each part you put in the tank. The more items that you place in the tank the less
efcient the cleaning result will be. It is not advised to overlap items. If items are covering other items the cleaning result will
be doesn’t work the way it’s supposed to.
• Do not put items directly on the bottom of the tank, a better cleaning effect will be achieved with a suitable basket. A metal
basket absorbs only around 8% ultrasonic energy.
• Temperature: The higher temperature the better the cleaning effect. However, when temperature exceeds 70°C - 80°C the
cleaning effect will be affected. The suggested cleaning temperature is 40°C - 60°C.
copyrighted document - all rights reserved by FBC

11
TOOLS
M1.1.UCC.NLFREN - 12032018
Fabrikant/Invoerder :
Fabricant/Importateur :
Manufacturer/Retailer :
Verklaart hierbij dat het volgende product :
Déclare par la présente que le produit suivant :
Hereby declares that the following product :
Product :
Produit :
Product :
Ultrasoonreiniger
Nettoyeur à ultrasons
Ultrasonic cleaner
Order nr. :
Geldende CE-richtlijnen :
Normes CE en vigueur :
Relevant EU directives :
2014/35/EU
EN 60335-1:2012
EN 62233:2008
2014/30/EU
EN 55014-1:2006 + A1:2009 + A2:2011
EN 55014-2:1997 + A1:2001 + A2:2008
EN 61000-3-2:2006 + A1:2009 + A2:2009
EN 61000-3-3:2013
Overeenstemt met de bestemming van de bovengenoemde richtlijnen - met inbegrip van deze betreffende het
tijdstip van de verklaring der geldende veranderingen.
Correspond aux directives citées ci-dessus, y compris aux modications en vigueur au moment de cette
déclaration.
Meets the provisions of the aforementioned directive, including, any amendments valid at the time of this
statement.
Bart Vynckier, Director
Vynckier Tools sa
Vynckier Tools sa
Avenue Patrick Wagnon, 7
ZAEM de Haureu
B-7700 Mouscron
6 EG conformiteitsverklaring
6 Déclaration de conformité CE
6 EC declaration of conformity
FR
EN
NL
Mouscron, 12/03/2018
UCC006 (754750140) - UCC010 (754750142)
UCC020 (754750144) - UCC030 (754750146)
copyrighted document - all rights reserved by FBC
This manual suits for next models
7
Table of contents
Other MW TOOLS Ultrasonic Jewelry Cleaner manuals
Popular Ultrasonic Jewelry Cleaner manuals by other brands

Hedson
Hedson DRESTER BOXER D22A Original Operator's Manual

Innovative Cleaning Equipment
Innovative Cleaning Equipment FI-10N-SM user manual

HIKOKI
HIKOKI R 36DB Handling instructions

Steren
Steren LIM-RAY instruction manual

Brookstone
Brookstone Ultrasonic Jewelry/DVD Cleaner user manual

Makita
Makita CL108FD instruction manual