My Pet Command DF113R User manual

- 1 -
My Pet Command Dual Function
Pet Containment Fence and
Remote Trainer
Operation Guide
www.mypetcommand.com
Email:- [email protected]
Tel:- USA 888 686 6495
Tel:- Australia:- 1300 416 703
For Model Number DF113R
PLEASE READ FULLY BEFORE USE

- 2 -
Introduction
Congratulations on your purchase of the MY PET
COMMAND Dog Fence System Dual function with
remote trainer! We understand that along with the
proper setup of your new electronic fence system,
it’s also important to properly train and teach your
pet to understand it’s new boundaries. This
training will ensure your pet(s) will be happy and
safe for years to come, and we look forward to
helping you successfully achieve this goal.
Please read the operation guide fully and carefully
before beginning system setup and training your
pet. As always, if you have any questions when
reading through this manual, don’t hesitate to
contact us via the contact details in this Manual.

- 3 -
Table of Contents
Components……………………………..…………........4
How the system works…………………….…..…….5
Main Features ……………………………………..........7
Fence Transmitter ……………………………..….…..9
Transmitter…….……………..…………………………12
Receiver Collar……………………………….…...……16
Switch Single Mode and Dual Mode……...…...16
Setting Up In Ground Fence System ……...…..21
Examples of Cable layouts………………………...30
Fence System Training Guide………..…………..33
Dog Pass Through Fence System Mode ……..35
Setting Up Multi-Dog System…………………….37
Charging …………………………………………………45
Troubleshooting Guide……..………………….…..48

- 4 -
Components
Bonus Ultrasonic whistle Plastic Prongs

- 5 -
How the System Works
Proven to be safe, comfortable, and effective
for dogs over 10 lbs./5kg., the MY PET
COMMAND Dog Fence System is a 2 in 1 dual
system of both the in ground wire fence
system and the remote dog training system.
To begin with, you define the Pet Area or
boundaries you wish to have for your pet.
Once that is determined, Boundary Wire is
buried or attached above ground to a fixed
object to enclose the Pet Area. Your fence
system works by producing a radio signal
from the Fence Transmitter through the
Boundary Wire, helping your pet to learn and
understand their boundaries. When first
implementing this system, you should
temporarily define the Pet Area with
Boundary Flags for a visual aid in training
your pet.

- 6 -
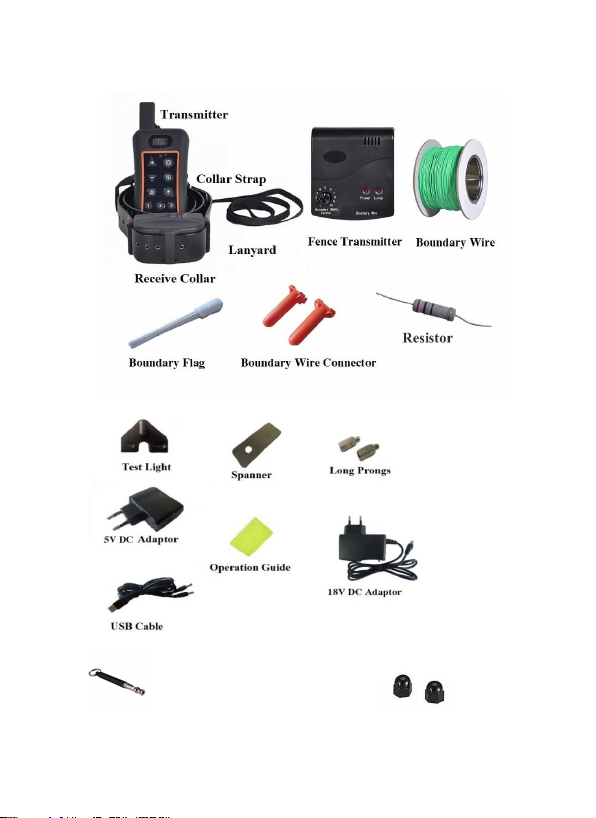
In addition to the Boundary Wire, your pet
wears a Receiver Collar with Contact Prongs
that touch your dog’s neck. When your pet
reaches the Warning Zone, the Receiver Collar
gives a warning beep to indicate you pet has
reached the boundary. If your pet continues
into the Correction Zone, a safe Vibration and
Static Correction will be delivered through the
Contact Prongs to get your dog’s attention
until your dog returns to the ‘Safe Pet Area.’
Once trained, your pet is allowed to roam
freely in the designated ‘Safe Pet Area.’
Also included is the remote control (For
selected kits only), designed to assist you in
controlling your pet without a leash and from
long distances. At the push of a button, the
Remote Transmitter sends a signal, activating
the Receiver Collar. Using the Remote Trainer
consistently and correctly, will aide in the
training of your pet and correct many
nuisance behaviors your pet currently

- 7 -
displays i.e. excessive barking, pulling
washing off your line, digging under your
fence, etc.
Important: The Remote Trainer’s effectiveness
and range is highly dependent on the way you
hold the Remote Transmitter. Hold the Remote
Transmitter in a horizontal position away from
your body to achieve maximum range. Terrain,
weather, vegetation, vehicle, buildings,
transmission from other radio devices, and
other factors may affect the range of your
Remote Trainer.
Main Features
1. Dual 2 in 1 in ground fence system and remote
training system.
2. Train up to three dogs from the same Remote
Trainer, with extended range up to 1,200
meters (¾ Mile) in open areas.
3. 10 levels of shock stimulation.
4. 10 levels of vibration.

- 8 -
5. “Buzz” sound activated with a separate button.
6. Buttons “+” and “-” allow you to set your shock
and vibration intensity.
7. Dog selection buttons allow you to select
specific dog.
8. LCD digital display provides easy visibility for
selecting 10 shock and vibration levels, and
seeing dog ID.
9. 8 seconds safety termination. Your pet’s
Receiver Collar will automatically cease
vibration or static correction when your pet
gets stuck in the correction zone for more than
8 seconds.
10. Audible wire-break alarm to ensure you
system is never down.
11. Beep warning with vibration and three levels
of static correction for pet boundary
awareness training.
12. Ability to set pet pass through areas for your
pet to pass through without any static
corrections.

- 9 -
13. 492 FT(150M)of Durable Polyolefin solid
copper wire, 50 flags, and 2 Adaptors included.
Expand you area by adding extra wire.
14. IPX7 Waterproof receiver and remote trainer.
15. Rechargeable 3.7V Li-ion battery for Receiver
Collar and Remote Trainer.
16. LED low power indicator that flashes red
when battery is low.
17. Fully functional multi-dog training system.
Fence Transmitter
Power
Light
Loop
Indicator
Light
Power Jack
Boundary Width
Control Switch
Boundary Wire
Terminals

- 10 -
Boundary Width Control Switch:
This knob allows you to adjust the Boundary
Width, which is the combination of Warning
Zone and Vibration & Static Correction Zone.
Boundary Wire Terminals:
These terminals are where the Boundary Wire
connect to the Fence Transmitter in order to
form a continuous loop, designating the pet
area.
Power Light:
This light indicates if the system is on or off. If
the light is glowing, the system is on and
functioning.
Loop Indicator Light:
This light indicates whether or not the
Boundary Wire is forming a complete loop

- 11 -
enabling the signal to be transmitted. If the
light is glowing, a continuous loop has been
formed.
Power Jack:
This is the connection point for your Power
Adaptor. The Transmitter is powered by 18V
DC Power.

- 12 -
Transmitter
Antenna
Stimulation
Level
Adjustment
Button
On/Off
Button
Dog
Selection
Button
LED Light
LCD display
Buzz Button
Vibration
Button
Static
Shock
Button
DC Jack Cover

- 13 -
Transmitter Key
“ ” and “ “ These buttons are the
stimulation adjustment settings. Press up or
down to adjust the shock intensity and
vibration from level 1 to 10.
“ ” This is the On/Off button. Hold this
button for 2 seconds to switch the power on.
The power light will glow, and the LCD will
then display the default “A01”, indicating the
device is on. You can change Dog ID by
pressing buttons 1, 2, or 3 at the bottom of the
transmitter. To switch the power off, hold this
button for 2 seconds and the power light
indicator will switch off.

- 14 -
“ ” This button initiates the no-
stimulation warning buzz.
“ ” This button initiates the vibration
warning. Simply press it one time for a single
vibration warning, or press and hold for a
continuous vibration that will stop
automatically after 8 seconds.
“ ” This button initiates the shock
stimulation, Simply press it one time for a
single static shock, or press and hold for a
continuous shock that will stop automatically
after 8 seconds.
“1, 2, 3 ” These are your dog selection
buttons. The default setting is “1”. Your
transmitter is able to connect with up to three
Receiver Collars, and you can see which collar

- 15 -
the transmitter is paired with based on what
is displayed in the LCD display screen. If collar
1 is selected, the LCD screen will display dog
ID “A XX”. If you would like to switch to
collar 2, press the “2” button. The LCD will
then display “BXX”. And last, if you would
like to transmit to collar 3press the “3” button.
Again, the LCD will display “C XX”.
A = Dog 1
B = Dog 2
C = Dog 3
“XX” = The shock & vibration level.
The transmitter has the capability to maintain
the suitable shock & vibration levels for each
individual dog.
Important: The red LED light will flash when the
battery power is low. Recharge battery at once,
when this is noticed. (The transmitter should
also be charged before your first use and all

- 16 -
units should be left on charge for min 4 hours for
full charge.)
Receiver Collar
Please note your collar/receiver is dual
function unit and has 2 functions being:-
Fence/containment auto operations
Remote Trainer Manual operations
For Fence Containment operations the
collar will work automatically when the
dog nears the fence boundary wire
For Remote manual Training, you will use
the remote control to manually activate the
collar and train your dog as required.

- 17 -
The collar is designed to run in Dual mode
(both Fence and remote trainer mode) or
single mode (Fence only)
Please make certain the collars are fully charged by
leaving them on charge for Minimum 8-10 hours
before first use.
Turn on the collar by pressing and holding the
on/off button for 3-4 seconds and release once you
hear the double beep sound.
The green LED will flash ONCE every 5 seconds
indicating that the collar is paired to the remote and
in Dual Mode (Factory Default). In Dual Mode
the collar can be used as both a fence containment
system and simultaneously as a remote training
collar.
It is strongly recommended only to use Dual Mode
when you are using the collar for both pet

- 18 -
containment and remote training purposes
simultaneously. When the system is being used
for containment purposes only, it is strongly
recommended to switch the collar to Single Mode
only to substantially increase the battery
life of the collar for fence operations.
To switch/toggle the collar to Single Mode do the
following:-
While the Collar is in the on position (Green LED
flashing once every 5 seconds), hold down the
on/off button till the LED turns RED and then
release as soon as you see the red light. The Collar
will then flash green twice every 5 seconds
Indicating it is now in Single Mode (Fence
Containment System only).
To switch/toggle back to Dual Mode follow the
same procedure as stated above.
To switch off the collar keep on holding the on/off

- 19 -
switch until a long BEEP sound is heard indicating
the collar has switched off.
Battery operating times can vary and are dependent
on usage and estimated as follows:-
Dual Mode: 24-48 Hours
Single Mode 7-9 Days
Please note the remote control will only
control the collar when it is in Dual mode !
In single mode, the collar will not react to
the remote control.
It is not recommended to keep the collars on your
dogs for more than 12 hours/day. It is advised
that collars should be switched off and always be
left on charge whenever not in use to get the
maximum battery life usage out of the collar.

- 20 -
Receiver Collar
LED Light
This indicates the working
status, Low battery, and
Charging status
Contact Prong
Choose the short or long prong
to match your dog’s coat type
On/Off Button
Press and hold on 4 seconds to turn the collar on. Two confirming tones will sound and
the collar green LED light will flash 1 time per 5 seconds if connected/paired. The LED
will flash fast if disconnected/unpaired. Press and hold on 4 seconds to turn the collar off.
One long tone will sound and the green LED light will stop flashing and turn off.
Turn the collar off when not in use to conserve battery
Switch on/off Single mode and Dual mode.
Single mode: Fence function only , Green led flash 2 times per 5 seconds
Dual mode: Fence function and remote function both, Green led flash 1 time per 5
seconds
Press and hold on 2 seconds when receive collar is on , the Red LED light on then release
at once . The green LED will flash 2 times of 5 seconds. The fence function is on, the
remote function is off. It is Single mode now . Press and hold on 2 seconds again, the
Red LED light on then release at once . The green LED will flash 1 time of 5 seconds.
The fence function and remote function are both on .Now it is Dual mode .
DC Jack Cover
To charge, open the
rubber cover and
insert the adaptor
plug into DC Jack.
Table of contents
Popular Pet Care Product manuals by other brands

Prevue Hendryx
Prevue Hendryx Play Tower 7362 quick start guide

DogWatch
DogWatch R9 operating instructions

Petsafe
Petsafe ULTRALIGHT SONIC BARK CONTROL quick guide

Petsafe
Petsafe Deluxe In-Ground Radio Fence Operating and training guide

Coziwow
Coziwow CW12T0499 user manual

Leuchtie
Leuchtie Plus quick start guide