N'oveen HC3299 WiFi User manual

1
KURTYNA POWIETRZNA –INSTRUKCJA OBSŁUGI
AIR CURTAIN –USER MANUAL
HC3299 WiFi
POLSKI........................................................................................................................................................................................................s. 2
ENGLISH.....................................................................................................................................................................................................p. 8

2
POLSKI PL
WAŻNE ŚRODKI BEZPIECZEŃSTWA
Dziękujemy za zakup naszego produktu. Przeczytaj uważnie niniejszą instrukcję przed
uruchomieniem urządzenia. Zachowaj tę instrukcję obsługi na potrzeby ponownego użycia.
1. Urządzenie należy zawiesić na ścianie i skierować wylot powietrza w dół. Nie należy
montować urządzenia pospiesznie i w sposób niestabilny.
2. Nie używaj urządzenia w miejscu, w którym znajduje się gaz palny lub wybuchowy. Nie
zakrywaj wylotu powietrza.
3. Jeśli przewód zasilający jest uszkodzony, musi zostać wymieniony przez producenta lub
jego przedstawiciela serwisowego lub osobę o podobnych kwalifikacjach w celu uniknięcia
zagrożenia.
4. Nagrzewnicy nie wolno umieszczać bezpośrednio pod gniazdkiem elektrycznym.
Gniazdko elektryczne musi być uziemione, jego napięcie powinno wynosić 220-240 V i
zabezpieczone bezpiecznikiem 10A. Gniazdko i wtyczka zasilania powinny być w dobrym
stanie.
5. Jeśli urządzenie nie jest używane lub naprawiane, należy odłączyć wtyczkę.
6. Nie dotykaj urządzenia wilgotną ręką.
7. Jeśli silnik nie działa prawidłowo, należy go natychmiast zatrzymać.
8. Podczas korzystania z urządzenia nie należy otwierać drzwi ani okna, ponieważ może to
wpłynąć na efekt ogrzewania.
9. Jeśli chcesz wyłączyć urządzenie wciśnij przycisk włączania / wyłączania. Nagrzewnica
będzie pracowała przez 30 sekund, aż będzie wydmuchiwane zimne powietrze, wtedy
urządzenie przestanie działać i możesz wyciągnąć wtyczkę.
10. Nie używaj tego urządzenia w łazience.
11. Timer ustawia czas pracy grzałki.
12. Pilot zdalnego sterowania działa z 1 baterią.
13. Nagrzewnica musi być zainstalowana co najmniej 2 metry nad podłogą.
14. Jeśli urządzenie wymaga naprawy, przekaż je wykwalifikowanej osobie lub dostarcz do
autoryzowanego serwisu.
15. To urządzenie może być używane przez dzieci w wieku od 8 lat i powyżej oraz osoby o
ograniczonych zdolnościach fizycznych, sensorycznych lub umysłowych lub z brakiem
doświadczenia i wiedzy, jeśli zostały one objęte nadzorem lub instrukcjami dotyczącymi
użytkowania urządzenia w sposób bezpieczny i zrozumiały związane z tym zagrożenia.
Dzieci nie powinny bawić się urządzeniem. Czyszczenie i konserwacja nie powinny być
wykonywane przez dzieci bez nadzoru.
16. Dzieci w wieku poniżej 3 lat powinny być trzymane z dala, chyba że są nadzorowane.
17. Dzieci w wieku od 3 do 8 lat mogą włączać i wyłączać urządzenie jedynie pod
3
warunkiem, że zostało ono umieszczone lub zainstalowane w normalnej pozycji roboczej i
osoby te zostały objęte nadzorem lub instrukcjami dotyczącymi użytkowania urządzenia w
sposób bezpieczny i zrozumiały związane z tym zagrożenia. Dzieci w wieku od 3 do 8 lat
nie mogą podłączać, regulować i czyścić urządzenia ani wykonywać konserwacji.
18. UWAGA - niektóre części tego produktu mogą mocno się nagrzewać i spowodować
oparzenia. Szczególną uwagę należy zwrócić na dzieci i osoby wymagające szczególnej
troski. Aby uniknąć wszystkich niebezpieczeństw, postępuj zgodnie z instrukcjami
bezpieczeństwa.
MONTAŻ URZĄDZENIA
Grzejnik powinien być zainstalowany i używany zgodnie ze standardami
bezpieczeństwa.
- Instalację musi wykonać serwisant lub osoba o podobnych kwalifikacjach, aby uniknąć
zagrożenia.
- Ważne! Upewnij się, że w pobliżu otworów wiertniczych nie ma kabli elektrycznych ani
innych instalacji (np. rur wodnych). Upewnij się, że urządzenie jest bezpiecznie i pionowo
przymocowane do ściany.
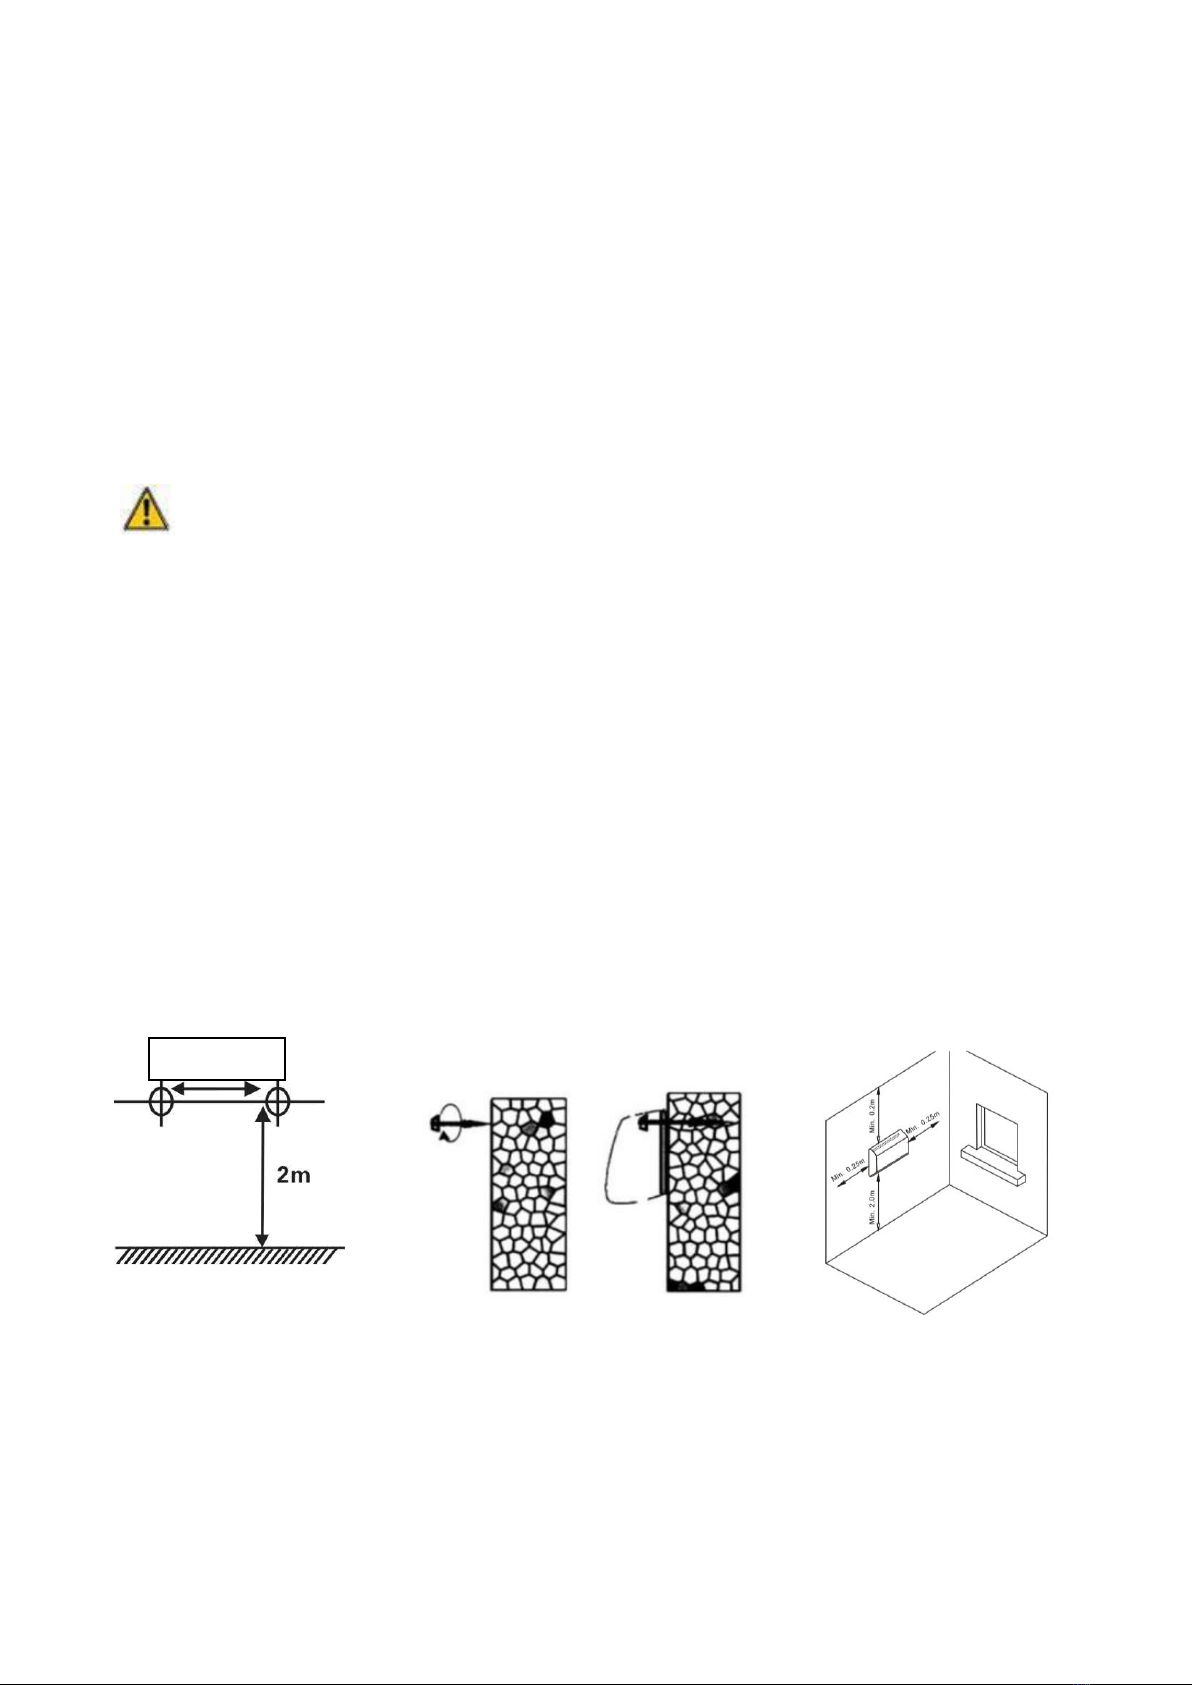
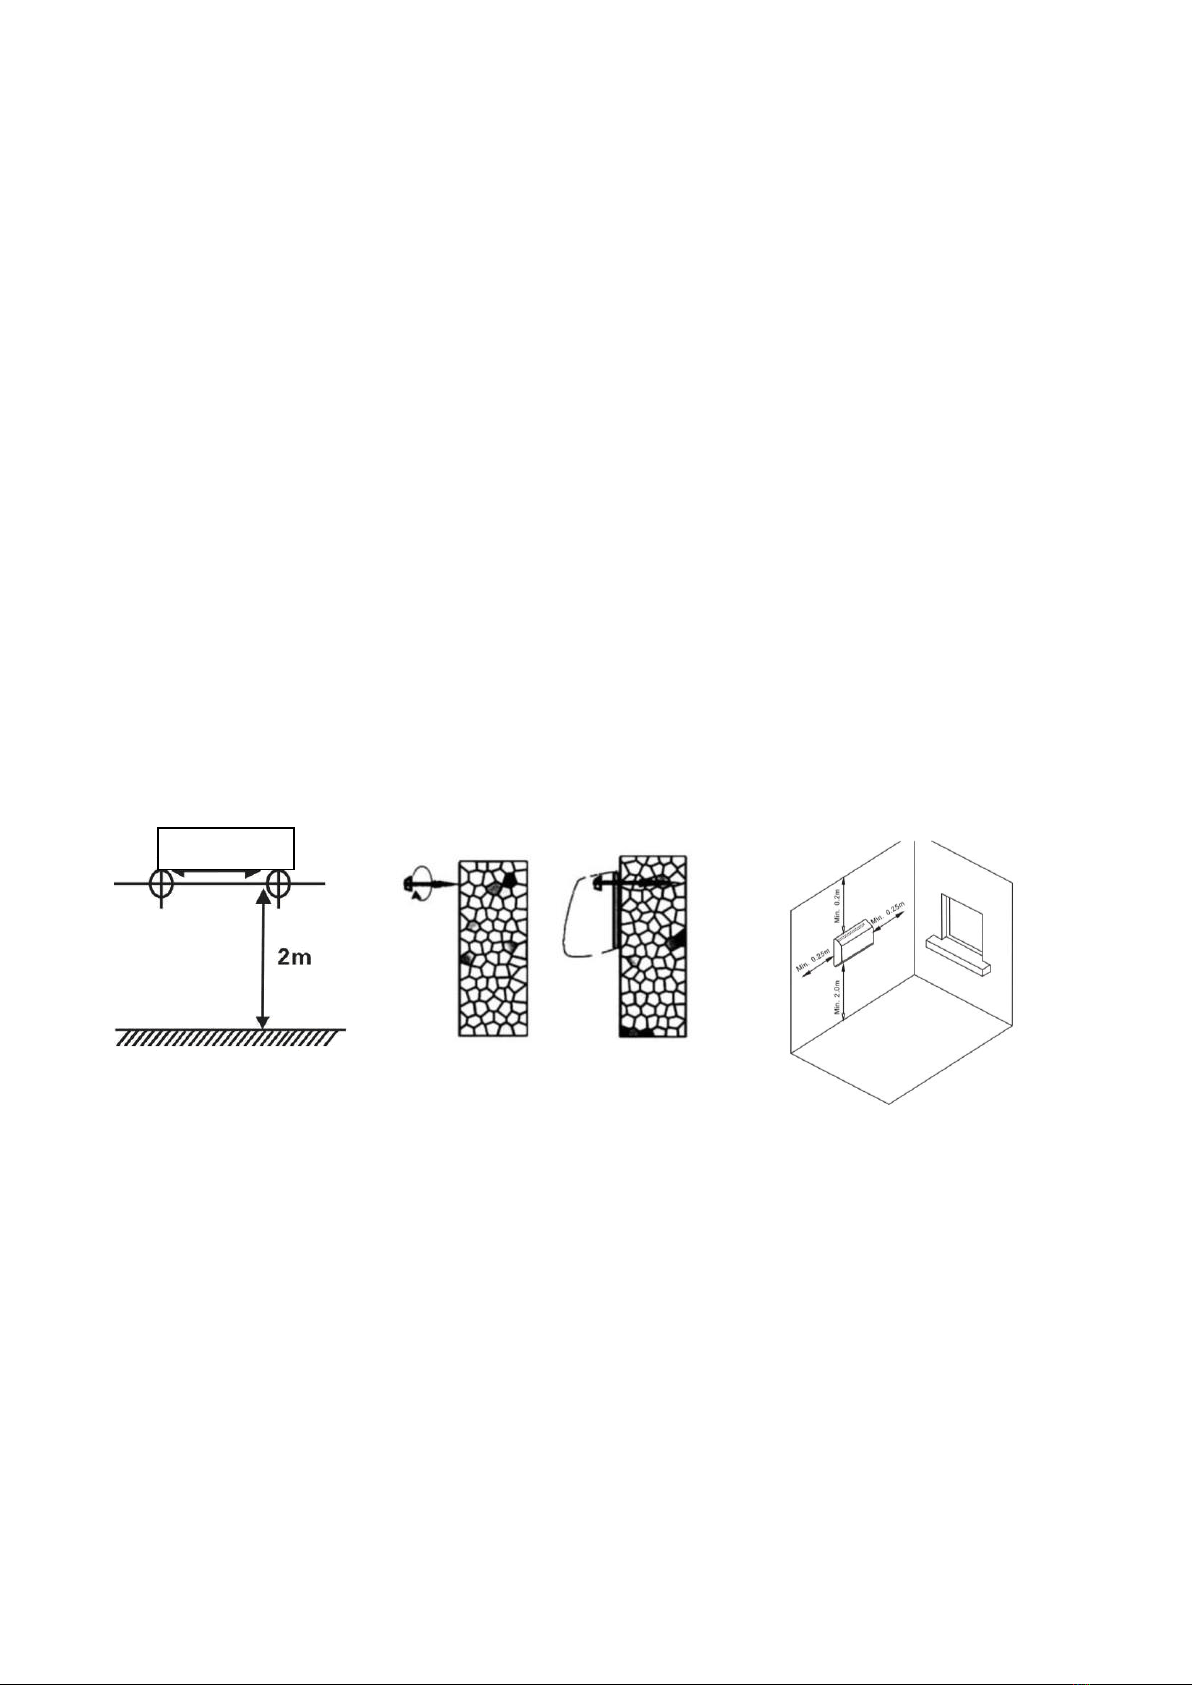
Wykonaj dwa otwory na ścianie 2 metry nad podłogą i minimum 0,25 m od rogów, upewnij
się, że średnica otworów jest taka sama jak średnica kołków. Zamocuj dwie śruby w
kołkach, końcówki śrub powinny wystawać na 10 mm. Zawieś urządzenie po odpowiednim
ustawieniu śrub.
330 mm
4
OBSŁUGA URZĄDZENIA
1. Przed włożeniem wtyczki do gniazdka elektrycznego upewnij się, że zasilanie elektryczne
jest zgodne z oznaczeniem na tabliczce znamionowej urządzenia.
2. Ostrożnie wyjmij grzejnik z plastikowej torby i kartonu.
3. Zamontuj grzejnik na ścianie, ustaw przycisk główny na pozycję "-". Podłącz wtyczkę do
gniazdka elektrycznego AC220-240V ~ Wskaźnik "Power" zaświeci się, a grzejnik pokaże
domyślną temperaturę i będzie migać przez 3 sekundy.
USTAWIENIE CZASU
TYDZIEŃ Naciśnij ponownie przycisk "Set", "Mo" zacznie migać, użyj przycisków " ”
do ustawienia dni tygodnia od poniedziałku do niedzieli (mo = poniedziałek... niedziela =
niedziela ect.)
GODZINA Naciśnij przycisk „Set” jeden raz, na wyświetlaczu LED wartość „00” zacznie
migać, użyj przycisków” ” do ustawienia godziny od 01--00 (01=1 godzina, 02=2
godzina...00=24-ta godzina)
MINUTA Naciśnij ponownie przycisk "Set", na wyświetlaczu LED wartość "00" zacznie
migać, użyj przycisków” " do ustawienia minut od 00-59 (01 = 1 minuta, 02 = 2 minuty
itd)
OBSŁUGA
1. Włącz grzejnik naciskając na pilocie przycisk ON/OFF, urządzenie wydmuchuje zimne
powietrze.
2. Naciskając przycisk „MODE” na pilocie, urządzenie wydmuchuje ciepłe powietrze i zapali
się
3. Ponowne naciśnięcie przycisku „MODE” na pilocie spowoduje wydmuchanie gorącego
powietrza i zapalenie się
4. Trzykrotne naciśnięcie przycisku „MODE” na pilocie spowoduje wydmuchanie zimnego
powietrza
5. Naciskając przycisk „Swing”, grzejnik będzie kołysał łopatkami w górę iw dół
PS: Aby uzyskać inteligentną obsługę, należy naciskaćtylko przycisk „one start” obok
przycisku głównego, grzejnik będzie działał z funkcją gorącego powietrza i swing
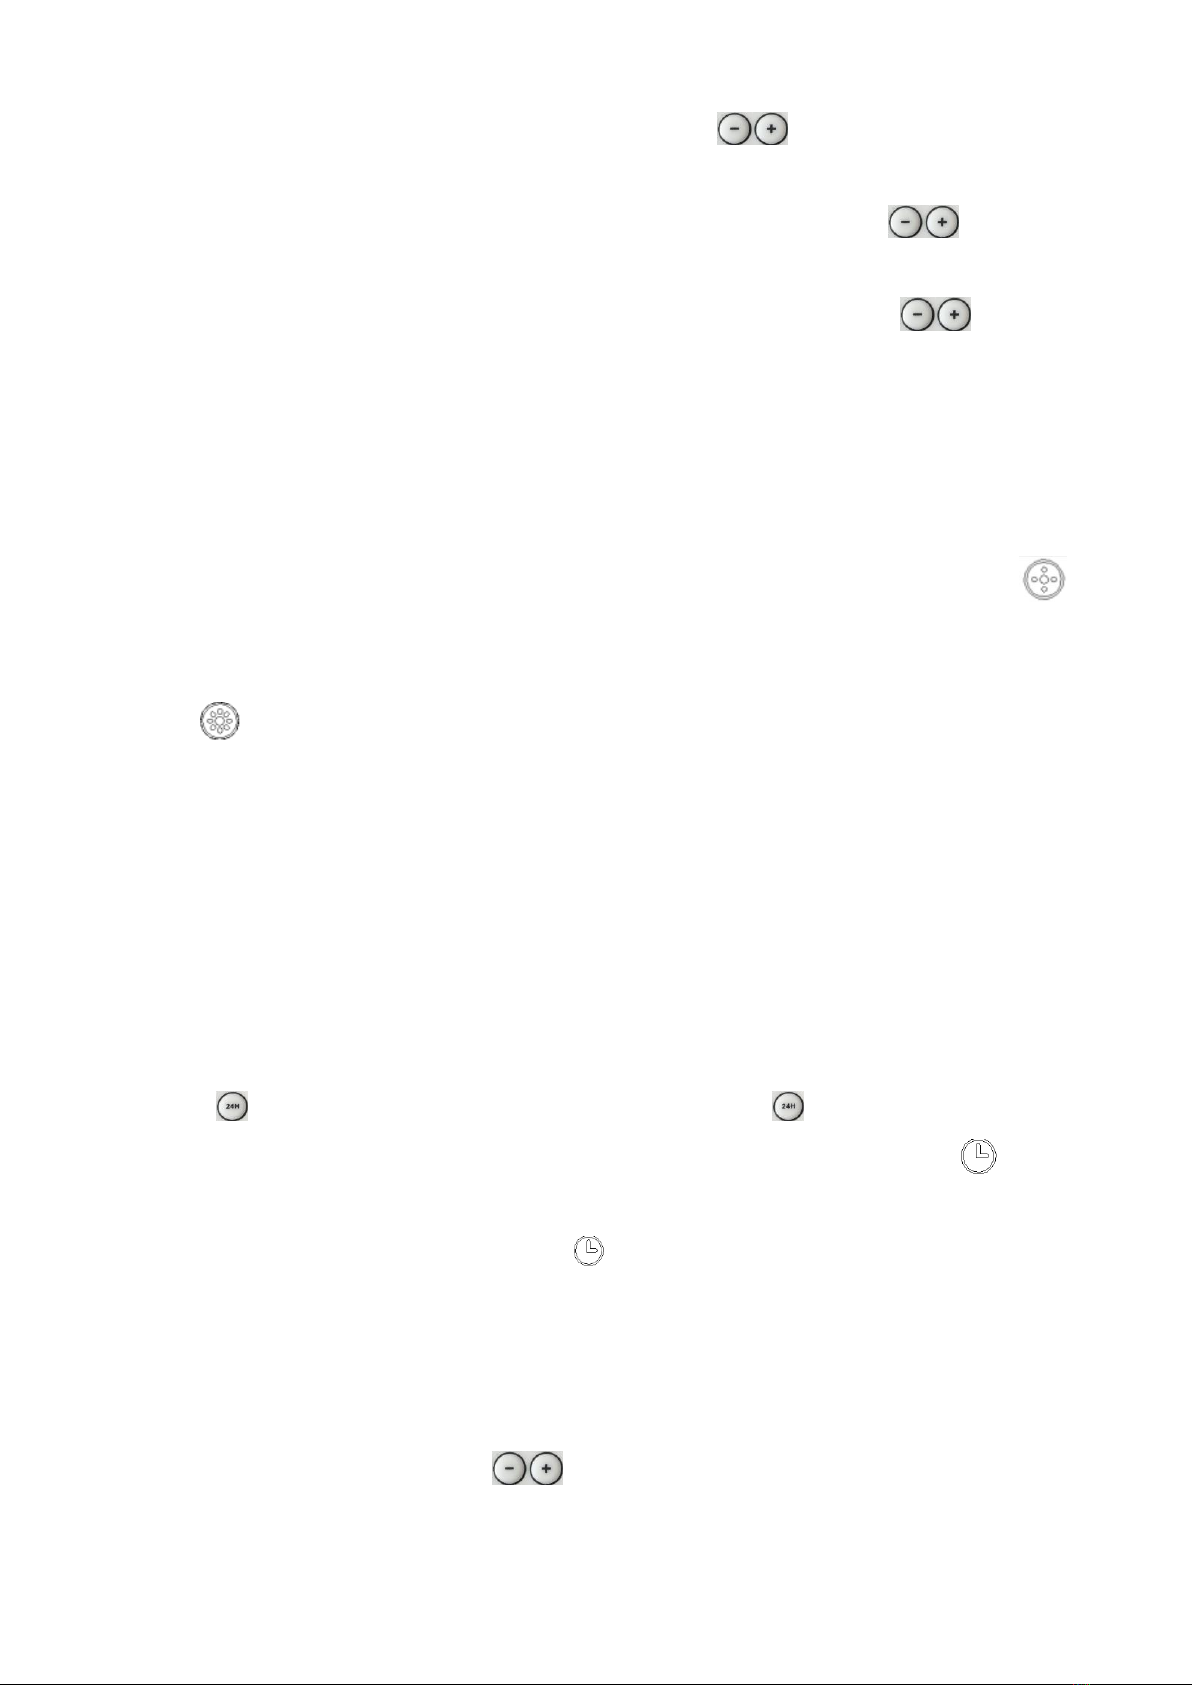
FUNKCJA TIMER 24H
Naciśnij przycisk „ ”, ustaw timer na 24 godziny, przytrzymaj przycisk „ ”, aby
zwiększyć godziny od 00-24 (00=zamknij,01=1godzina,02=2 godziny...24=24 godziny itp. .) i
świeci się kontrolka „ ”.
PS: ustawiony jako „00” oznacza brak ustawionego timera, kontrolka „ ” jest wyłączona.

5
REGULACJA TEMPERATURY GRZANIA (TERMOSTAT)
1. Aby wyregulować temperaturę, naciśnij „ ”, aby ustawić żądaną temperaturę i
temperaturę od 10℃do 49℃
2. Gdy temperatura powietrza spadnie o 2 stopnie poniżej ustawionej temperatury,
nagrzewnica rozpocznie ogrzewanie z „I/W” (1000 W).
3. Gdy temperatura powietrza spadnie o 4 stopnie poniżej ustawionej temperatury,
nagrzewnica rozpocznie ogrzewanie z „II/H” (2000W).
4. Gdy temperatura powietrza jest wysoka o 1 stopień lub ≤ ustawiona temperatura,
nagrzewnica wydmuchuje zimne powietrze.
FUNKCJA OTWARTE OKNO
1. Naciśnij przycisk „ ”, dioda „ ” zaświeci się. Urządzenie działa jako inteligentne
modele oszczędzania energii. (W tej funkcji urządzenie natychmiast sprawdza i rejestruje
temperaturę otoczenia. Przestanie działać, gdy urządzenie sprawdzi środowisko spada o
≧3 ℃w ciągu 1 minuty. Użytkownik powinien ponownie uruchomić urządzenie za pomocą
przycisku „ON/OFF”)
2. Naciśnij ponownie przycisk „ ”, kontrolka „ ” zgaśnie. Funkcja otwierania okna jest
nieaktywna.
ZABEZPIECZENIE PRZED DZIEĆMI
1. Naciśnij przycisk „ ”, kontrolka grzejnika jest wyłączona (z wyjątkiem kontrolki
zasilania), aktywowana jest funkcja blokady przed dziećmi.
Naciśnij ponownie przycisk „ ”, kontrolka grzejnika zaświeci się, funkcja blokady przed
dziećmi zostanie anulowana.
FUNKCJA WIFI
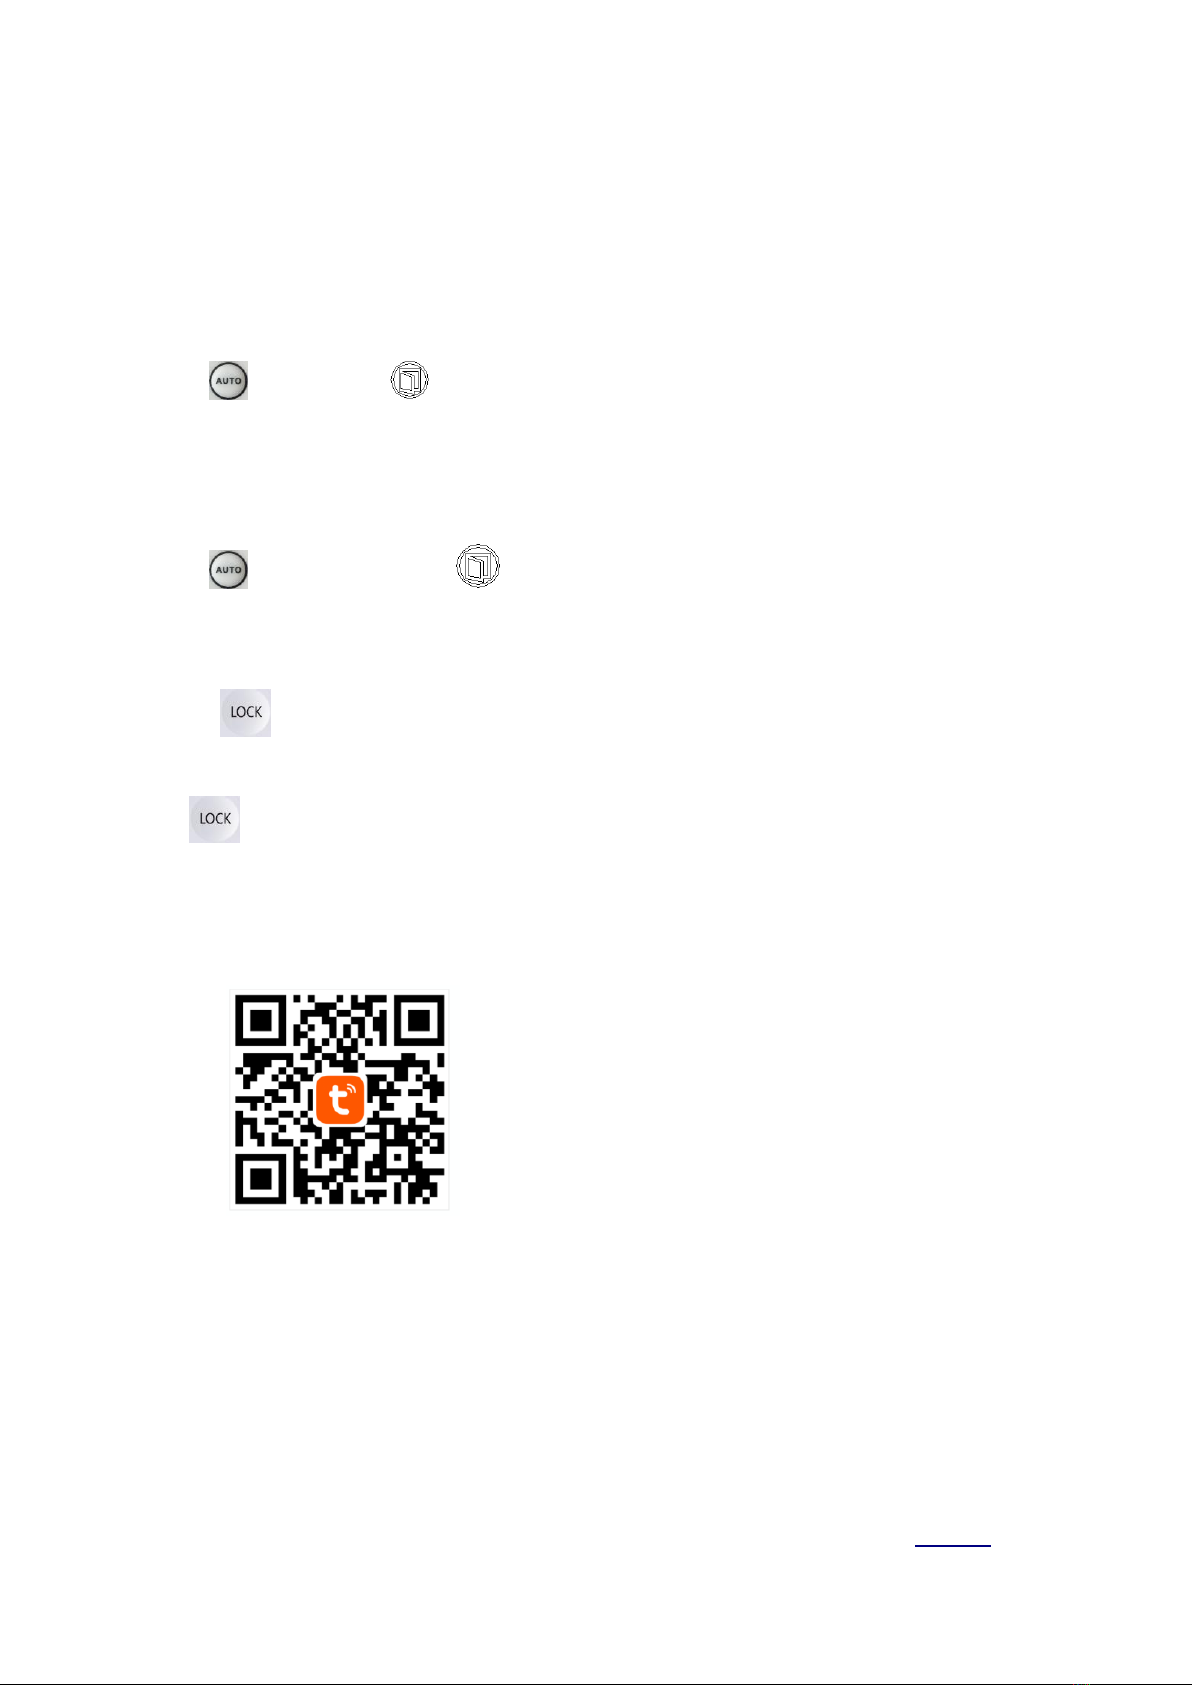
Połączenie przez WIFI
Użyj telefonu, aby zeskanować poniższy kod QR
lub wyszukaj „Tuya Smart”
Połączenie przez WIFI
1. Użyj telefonu, aby zeskanować kod QR lub wyszukaj „Tuya Smart” w Sklepie, aby pobrać
i zainstalować aplikację.
6
2. Wybierz kod swojego kraju, wprowadź numer telefonu komórkowego i naciśnij 'Get', aby
otrzymać wiadomość, zawierającą weryfikację kodu.
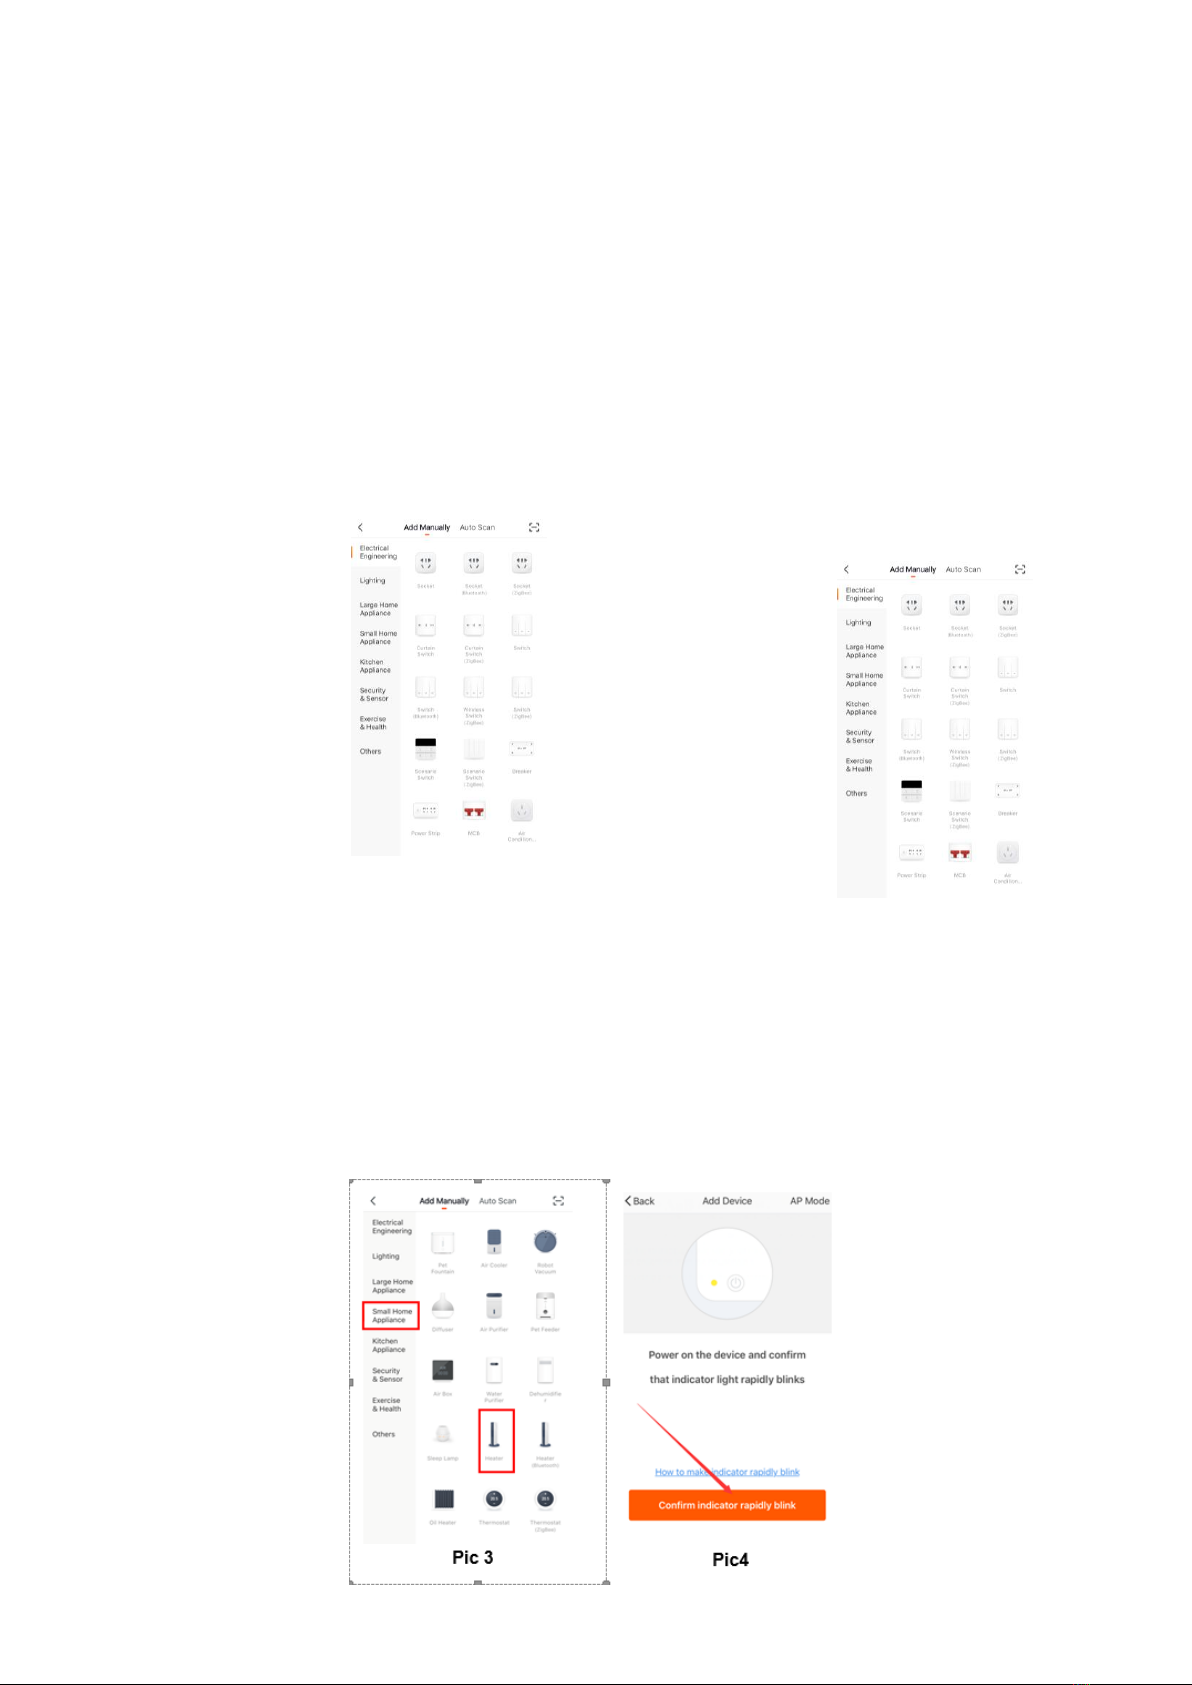
3. Wybierz kategorię produktów „Small Home Appliance”, a następnie wybierz symbol
„Heater”.
3. Wprowadź kod weryfikacyjny z wiadomości i naciśnij „Login”, aby zalogować się do
aplikacji.
4. Włącz urządzenie i upewnij się, że znajduje się ono w zasięgu sieci WIFI. Kontrolka
zacznie szybko migać. Jeśli kontrolna nie miga szybko, naciśnij przycisk „One start button”
przez 5 sekund, a produkt wyda dźwięk „bi”. Następnie przejdź do aplikacji, naciśnij „add
device”, jak pokazano na rysunku 1,
Rys. 1 Rys. 2
A) Naciśnij „Add device”, jak pokazano na rys. 2
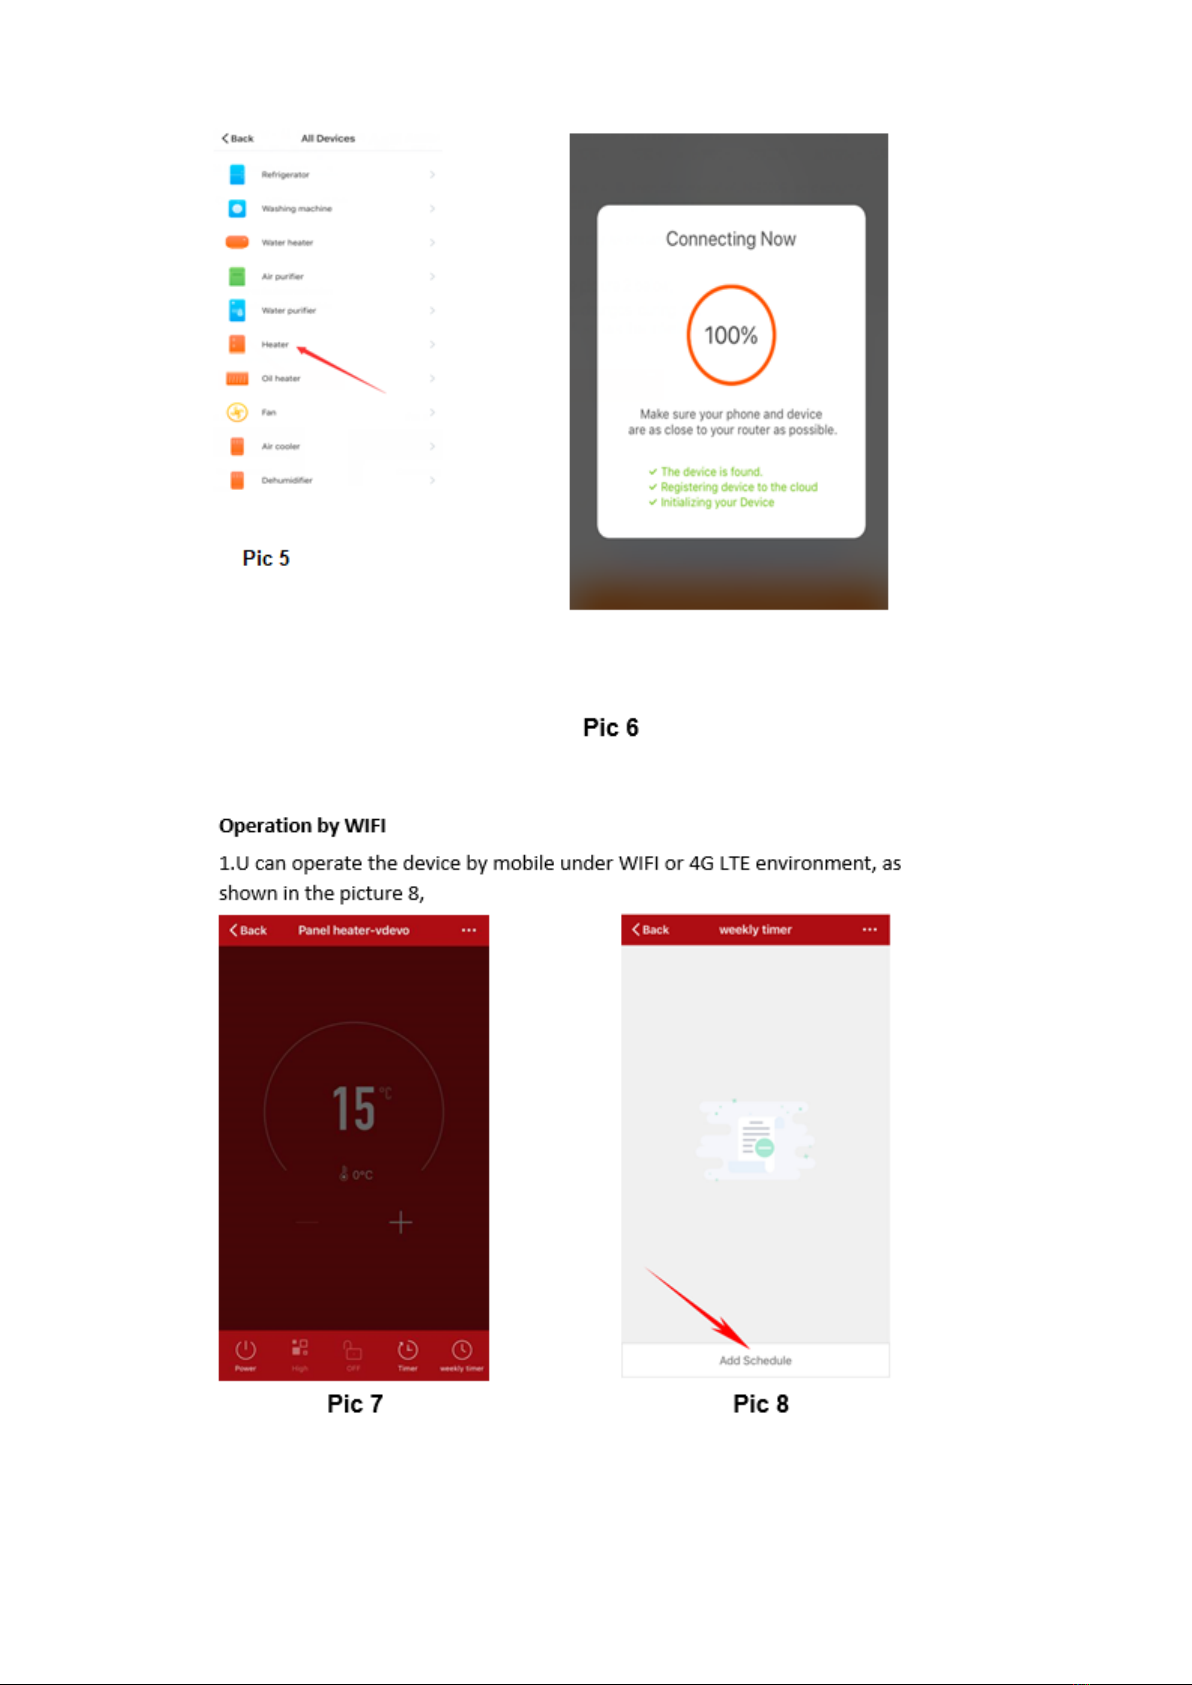
B) Wybierz „All Devices”, jak pokazano na rys. 3
C) Naciśnij przycisk "confirm indicator rapidly blinks", gdy wskaźnik na urządzeniu szybko
miga, jak pokazano na rys. 4
D) Wprowadź hasło WIFI, a następnie potwierdź, jak pokazano na rys. 5
E) Poczekaj, aż aplikacja połączy się z urządzeniem, jak pokazano na rys. 6

7
Rys. 5 Rys.6
Obsługa przez WIFI
1. Możesz obsługiwać urządzenie za pomocą telefonu komórkowego w sieci WIFI lub 4G
LTE, jak pokazano na rysunku 8,
PANEL STEROWANIA HC3299
8
2. Wybierz przycisk „Weekly timer”:
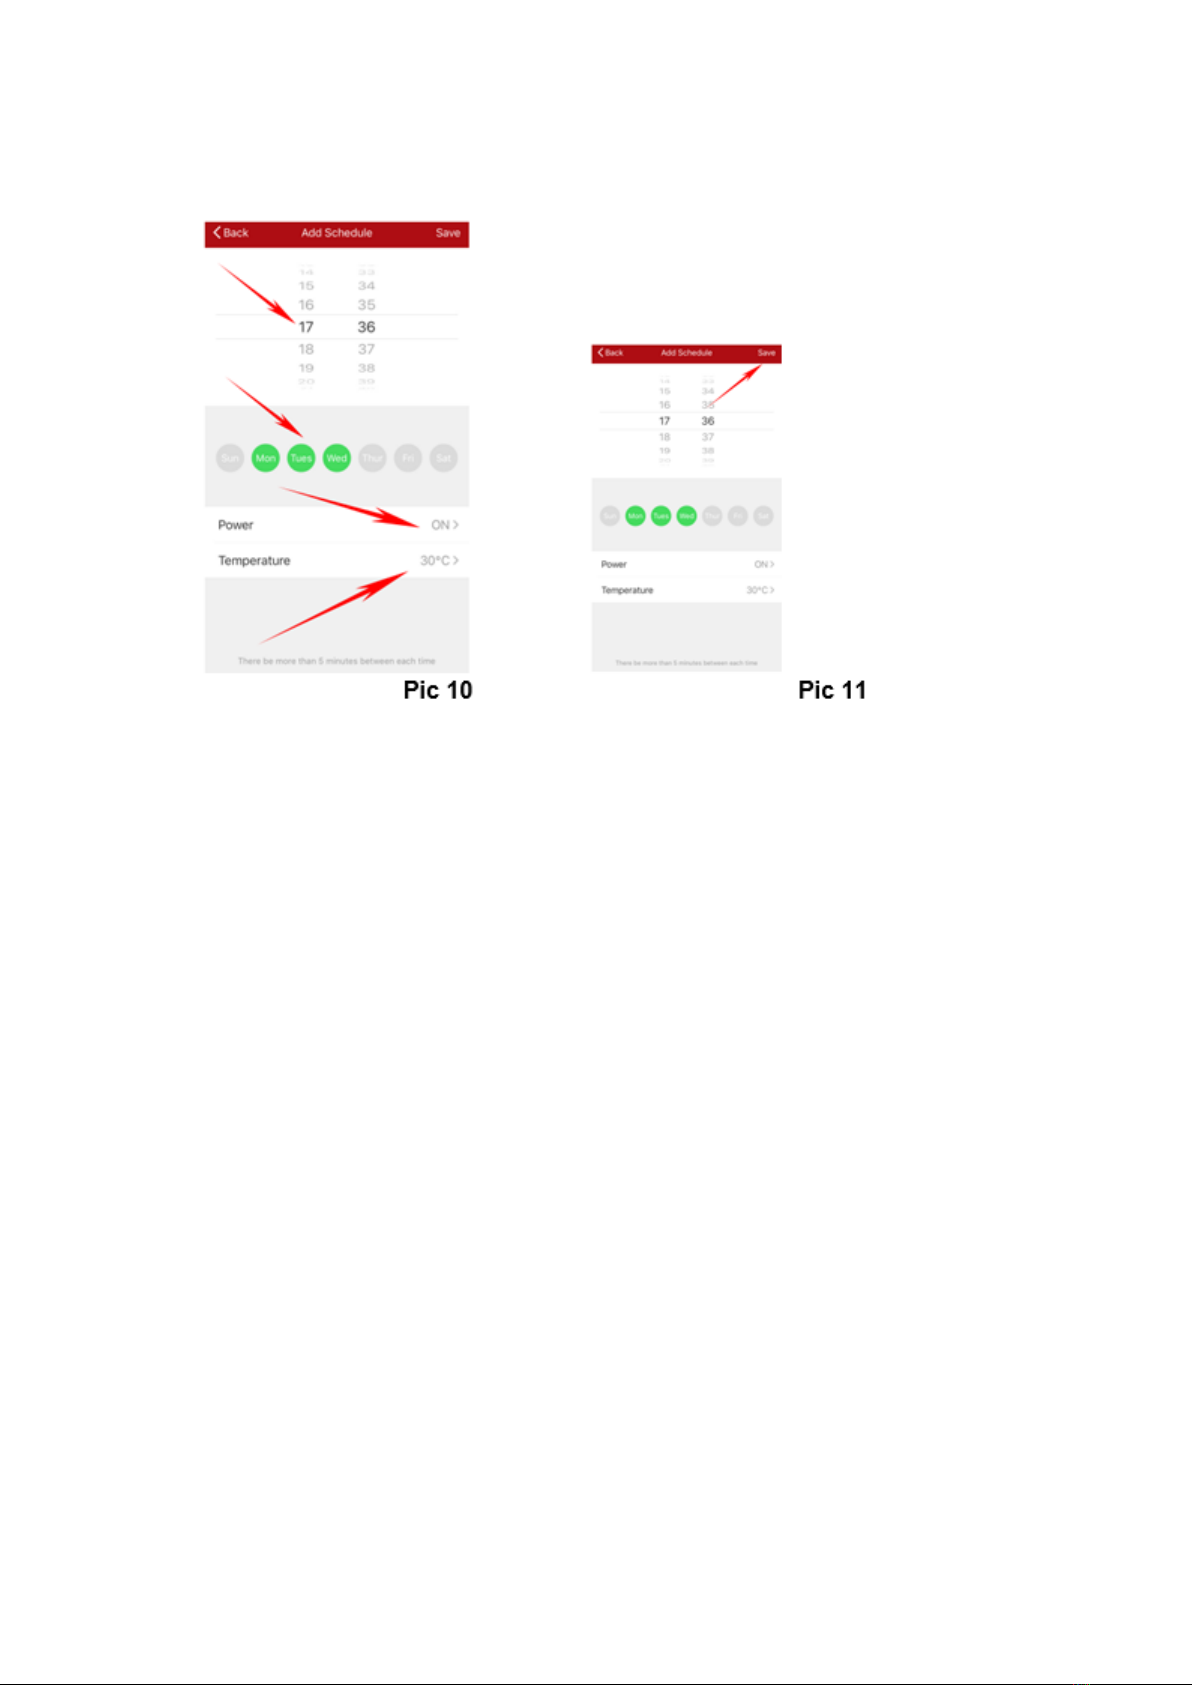
A) Naciśnij „Add schedule”, jak pokazano na rys. 9
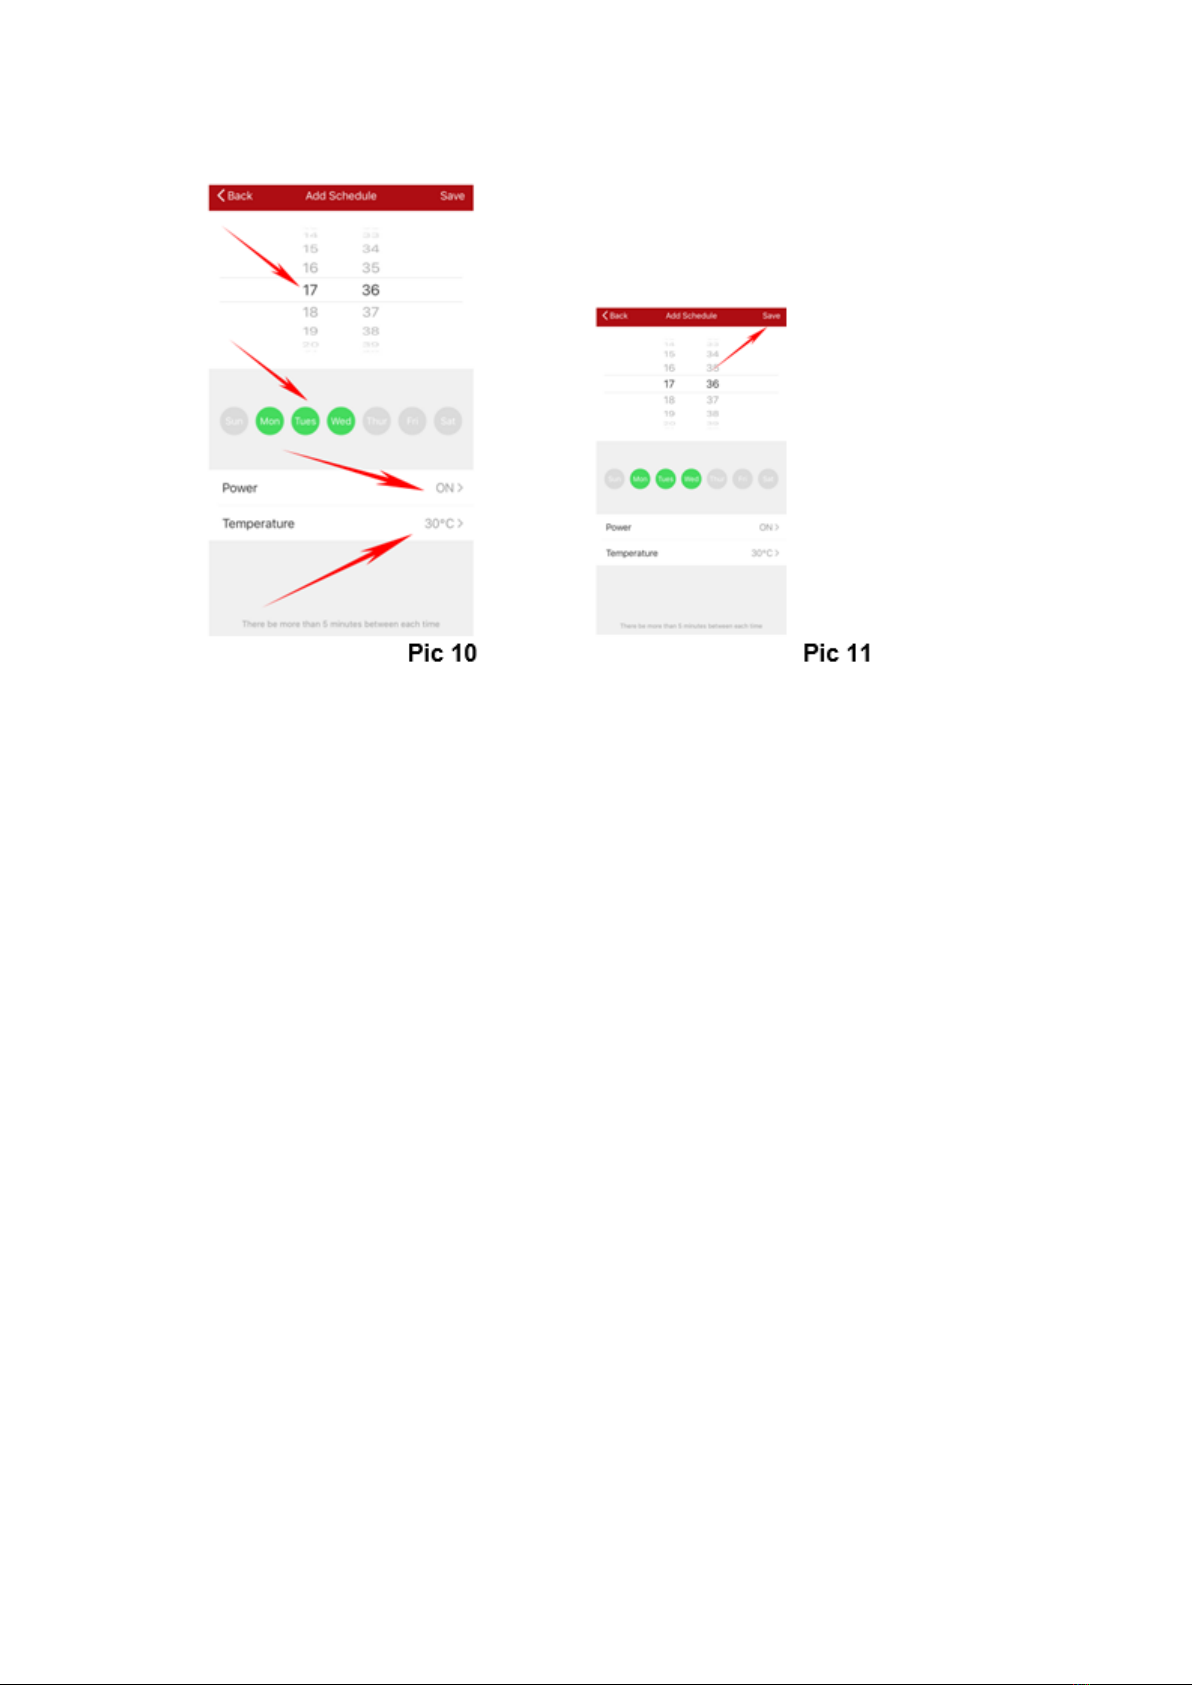
B) Możesz wybrać tygodniowy timer,pamiętaj, że musisz utrzymywać ustawioną
temperaturę wyższą niż obecna, gdy zasilanie (Power) jest ustawione na ON, jak pokazano
na rys. 10
C) Naciśnij przycisk „Save” w prawym górnym rogu, aby zapisać w trybie "stop/start", jak
pokazano na rys. 11.
D) Ponownie ustaw następny tygodnowy timer „stop/start”.
E) Naciśnij przycisk „back” w lewym górnym rogu, aby sprawdzić co zostało ustawione.
F) Naciśnij i przytrzymaj 'record', możesz anulować.
Dźwięk ustawienia
Urządzenie emituje sygnał dźwiękowy przy każdym ustawieniu pracy.

9
WIDOK PANELU STEROWANIA
10
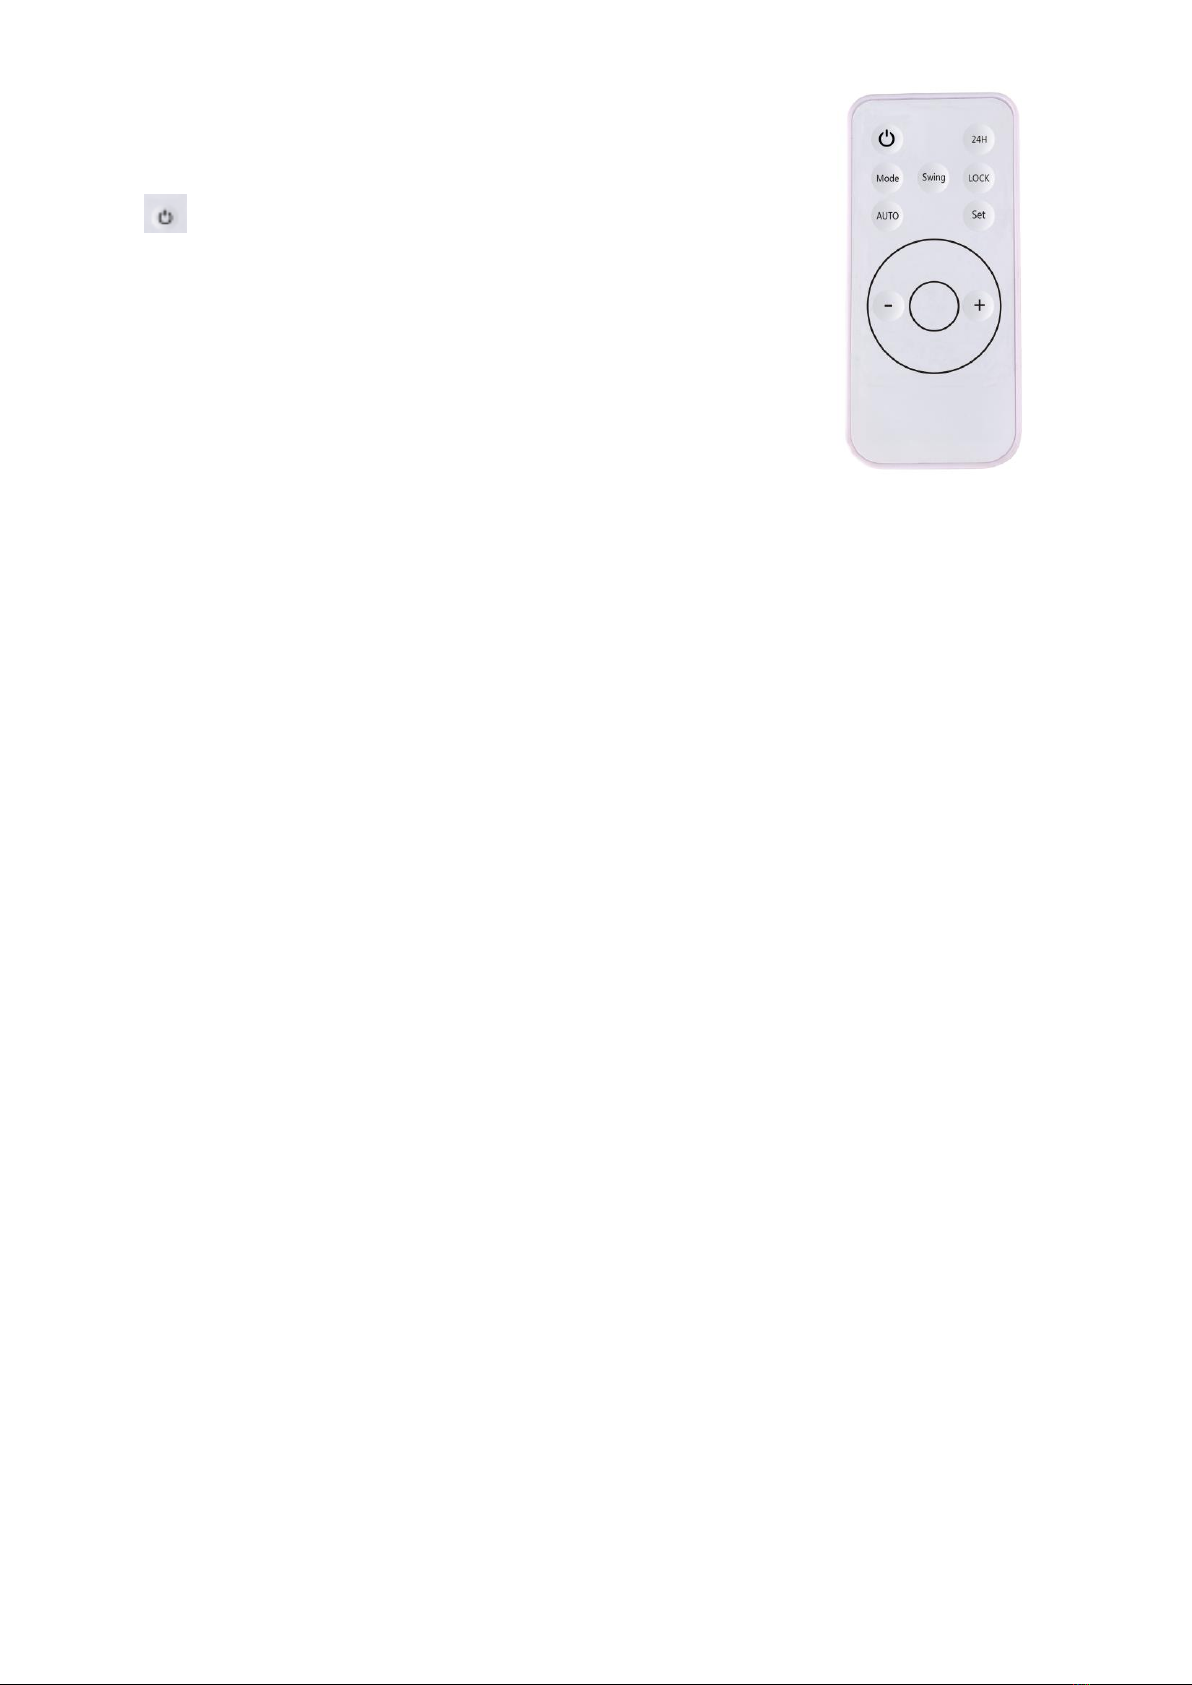
PILOT ZDALNEGO STEROWANIA HC3299
Pilot działa z baterią CR2025 3V.
1.” ” Główny przycisk zasilania
2. „24H” Ustawianie timera od 1-24 godzin
3. „MODE” 3 funkcje wyboru: ZIMNY NAWIEW, CIEPŁY, GORĄCY
4. "Swing" ruch łopatek góra-dół
5. „LOCK” Funkcja blokady przed dziećmi
6. „AUTO” Funkcja „Otwarte okno”
7. „Set” Ustawienia zegara
8. „+” Zwiększanie temperatury
9. „-” Zmniejszanie temperatury
PS: Po uruchomieniu urządzenia, gdy funkcja ogrzewania nie jest włączona, zostanie ona
wyłączona bezpośrednio. Produkt nie przejdzie w proces wyłączania, czekając przez 30 sekund, ale
przejdzie bezpośrednio w stan gotowości
ZABEZPIECZENIE PRZED PRZEGRZANIEM
Kurtyna jest chroniona przez zabezpieczenie przed przegrzaniem, które automatycznie
wyłącza urządzenie w przypadku przegrzania. Na przykład z powodu całkowitej lub
częściowej niedrożności wlotu/wylotu powietrza. W takim przypadku odłącz urządzenie,
odczekaj około 30 minut, aż ostygnie i usuń obiekt, który zasłania kratki. Następnie włącz
urządzenie ponownie.
UWAGA: Po wyłączeniu kurtyny wentylator działa jeszcze przez ok 30 sekund by schłodzić
urządzenie.
CZYSZCZENIE I KONSERWACJA
1. Jeśli nie będziesz korzystać z urządzenia przez dłuższy czas, wytrzyj je i umieść w
pudełku. Umieść karton w wentylowanym i suchym miejscu.
2. Zaczekaj, aż urządzenie będzie schłodzone, wyciągnij wtyczkę, a następnie wyczyść je.
Użyj czystej, wilgotnej ściereczki lub łagodnego środka czyszczącego. Nigdy nie należy myć
urządzenia bezpośrednio wodą; nie dopuszczaj, aby woda dostała się do urządzenia. Nigdy
nie czyść urządzenia kwasami, rozcieńczalnikami chemicznymi, benzyną, benzenem itp.
3. Przed ponownym użyciem sprawdź urządzenie i upewnij się, że kratka wylotu powietrza
nie jest zapchana przez jakieś obiekty.
DANE TECHNICZNE
Moc: 2000 W
Zasilanie: 220-240 V ~ 50/60 Hz

11
ENGLISH EN
IMPORTANT SAFEGUARDS
Thank you for buying our product. Please read this instruction carefully before operating the
heater. Keep this operating instruction for future reference.
1. The heater should be hung on the wall and make the wind outlet down. You must not
place it precipitantly or tipsily.
2. Please do not use the heater in the place where full of combustible or explosive gas.
Don’t cover the wind outlet.
3. If the supply cord is damaged, it must be replaced by the manufacturer or its service
agent or a similarly qualified person in order to avoid a hazard.
4. The heater must not be located immediately below an electrical socket. The electrical
socket must be equipped with earth wire, its capacity should be 220-240 V ~10A. The
socket and the power plug should be in good connecting condition.
5. If nobody is in using or you are repairing the heater, please pull off the plug.
6. Please don’t touch the heater by the wet hand or other conductor.
7. If motor is not working properly, please stop it immediately.
8. During using the heater, please do not open the door or window continually otherwise it
will influence the heating effect.
9. If want to shut off the heater, press the on/off switch to off, then the heater will keep the
fan working 30 seconds until it blowing out cool wind, then the heater will stop working, and
you may pull off the plug.
10. Do not use this heater in bathroom.
11. Timer sets the heater working time.
12. Remote control, please use 1 battery.
13. The heater must be installed at least 2 m above the floor.
14. If the heater needs repair, please ask for special person or our company authorized
maintenance department.
15. This appliance can be used by children aged from 8 years and above and persons with
reduced physical, sensory or mental capabilities or lack of experience and knowledge if they
have been given supervision or instruction concerning use of the appliance in a safe way
and understand the hazards involved. Children shall not play with the appliance. Cleaning
and user maintenance shall not be made by children without supervision.
16. Children of less than 3 years should be kept away unless continuously supervised.
17. Children aged from 3 years and less than 8 years shall only switch on/off the appliance
provided that it has been placed or installed in its intended normal operating position and
they have been given supervision or instruction concerning use of the appliance in a safe
way and understand the hazards involved. Children aged from 3 years and less than 8
12
years shall not plug in, regulate and clean the appliance or perform user maintenance.
18. CAUTION —some parts of this product can become very hot and cause burns.
Particular attention has to be given where children and vulnerable people are present.
INSTALLING THE DEVICE
The heater shall be installed and used according to the safe standard.
To avoid all dangers, follow the safety instructions.
- The installation must be done by the service agent or similarly qualified persons in order to
avoid a hazard.
- Important! Make sure that there are no electric cables or other installations (for example
water pipes) near the drill holes. Make sure that the appliance is securely and vertically
fitted to the wall.
Get two holes on the wall 2 m above the floor and near the corner more 25 mm, be sure to
make the diameter just as same as the expanding pipe.
Fix two screws on the expanding pipe, keep the tips of the screws out for 10mm, and hang
up the machine after the screws are fixed enough
OPERATION INSTRUCTION
1. Before inserting the plug into an electrical outlet, make sure that the electrical supply in
your area matches that on the rating label on the unit.
2. Carefully remove the heater from the plastic bag and the carton.
3. Place the heater on a firm level surface ,setting the master button to “-”position.plug the
cord set into a AC220-240V electrical outlet,with “BEE” sounds the “Power”light is on
and the heater will shows the room temperature.
330 mm
13
1.Set time
WEEK Press “Set”button again,“Mo”light twinkle ,press “two buttons set the week
from Mo--Su (Mo=Monday...Su=Sunday ect.)
HOUR Press “Set”button one time,LED display front “00”twinkle, press“two buttons
set the Hours from 01--00(01=1 o’clock,02=2 o’clock...00=24 o’clock ect.)
MINUTE Press “Set”button again,LED display behind “00”twinkle, press “two
buttons set the minutes from 00--59(01=1 Minute,02=2 Minute ect.)
2)General Using OPERATION
1. Turn the heater ON by pressing remote control the ON/OFF button ,the unit will blow the
cold air .
2. Pressing the “MODE”button on remote control ,the unit will blow the warm air and
will light on.
3. Pressing the “MODE”button second times on remote control,the unit will blow the hot air
and the will light on
4.Pressing the “MODE”button Three times on remote control,the unit will blow the cold air
5. Pressing the “Swing”button,the heater will be swing the blade up and down
PS:For smart operate,customer only press the one start button near about master
button,the heater will working with hot air and Swing function.
3) 24H Timer FUNCTION
1. Press “ ” button ,set the timer up to 24 hours,keep press “ ” button to increase the
hours from 00--24(00=close,01=1hour,02=2 hours...24=24 hours ect.) and the “ ” light is
on.
PS:set as “00”means no set timer ,the “ ” light is off.
4) THERMOSTAT INSTRUCTIONS
1. To adjust temperature,press the “ ” to set the desired temperature and the
temperature set from 10℃to 49℃
2. When the air temperature drops 2 degree below the set temperature,the heater will start
14
heating with ”I/W”(1000W).
3. When the air temperature drops 4 degree below the set temperature ,the heater will start
heating with”II/H”(2000W).
4. When the air temperature high 1 degree or ≤ the set temperature,the heater will blow the
cold air .
5) WINDOW OPEN FUNCTION
1.Press “ ” button, the “ ” light is on.The appliance is working as smart saving energy
models.(In this function,the appliance is check and record environment temperature in
immediately.It will stop working,when the appliance check the environment are drop ≧3 ℃
within 1 minute.The user should restart the appliance with “ON/OFF”button)
2.Press “ ” button again, the “ ” light is off.Window Open Function is closed.
6) CHILD-LOCK FUNCTION
1. Press “ ” button, the heater light is off (except power light),he child lock function is
activated.
Press “ ” button again, the heater light is on,the child lock function is cancelled.
7) WIFI FUNCTION
Connection by WIFI
1.Use your phone to scan the QR code below or search “Tuya Smart”in
Application on market to download and install the App.
2.Select your country code, enter the cellphone number and tap “Get”to get a message
containing verification on code.
3.Select The product category “Small Home Appliance”then select “Heater”symbol.
3.Enter the verification on code in the message and tap“Login”to login the App.

15
4.Switch on the product and make sure the product is in WIFI covered environment. The
indicator light will rapidly blinks. If the indicator light do not rapidly blinks, please press “One
start Button ”for 5 seconds and the product will have “bi”sound,then go to the App, tap “add
device”, as shown in the picture 1,
Pic 1 Pic 2
A) Press “Add Device”,as shown in pic 2
B) Choose “All Devices”as shown in pic 3
C) Press the “confirm indicator rapidly blinks” when the indicating light on device
rapidly blinks,as shown in pic 4
D) Input password of WIFI and then confirm,as shown in pic 5
E) Wait for the APP to connect with the device until it is connected succesfully .as
shown in pic 6
16
17
2.Select “Weekly timer”button to operation:
A) Press the “Add schedule”,as shown in pic 9
B) U can choose the weekly and timer what u want,pls note that u must keep the set
temperature higher the currently temperate when ON the power ,as shown in pic 10
C) Press the “Save”button in top right corner,to save this during “stop or start”weekly
timer operation,,as shown in pic 11.
D) Once again operation to set the next during “stop or start”weekly timer.
E) Press the”back”button in top left corner,to check the record what u set.
F) Long time touch the record,u can make choice to cancel.
Operating sound
The appliance emits a beep upon each operation setting.

18
CONTROL PANEL VIEW

19
REMOTE CONTROL VIEW:
1.Remote control, please use Lithium battery CR2025 3V.
2.The remote control power button is labeled as such
1.” ” Main power button
2.“24H” Setting timer from 1-24 hours
3.“MODE” COLD,WARM,HOT 3 setting for selection
4.“Swing”Louver swing up and down
5.“LOCK” Child-Lock function for heater
6.“AUTO” Window Open Function
7.“Set” Set real time
8.“+” Increase
9.“-” Decrease
PS: After the machine is started up, when the heating function is not turned on, it will be
shut down directly. The product will not go into the process of shutdown waiting for 30
seconds, but will go into the standby state directly
OVERHEAT PROTECTION
This heater is protected with an overheat protection that switches off the appliance
automatically in case of overheating. For example: due to the total or partial obstruction of
the vents. In this case, unplug the appliance, wait about 30 seconds for it to cool and
remove the object which is obstructing the vents. Then switch it back on as described
above. The appliance should now operate normally. If the problem persist, please contact
Customer Service for assistance.
CLEANING & MAINTENANCE
Before undertaking any cleaning or maintenance on the appliance, disconnect it from
the power supply.
For cleaning it is recommended to use a soft moist rag and neutral detergent. Do not
use an abrasive cloth or devices which could affect the appearance of the appliance.
Check that the hot air outlet and the ventilation inlet are free of dust and dirt.
During cleaning, be careful not to touch the heating elements.

20
To open the filter on the back for cleaning, press the top of plastic net at back.
In case of breakdown and/or poor functioning of the appliance, disconnect the appliance
from the power supply and contact an authorised repairer.
NOTE: As a result of continual improvements, the design and specifications of the product
within may differ slightly to the unit illustrated on the packaging.
Environment
Meaning of the crossed-out wheeled dustbin:
Do not dispose of electrical appliances as unsorted municipal waste, use separate
collection facilities. Contact your local council for information regarding the collection
systems available.
If electrical appliances are disposed of in landfills or dumps, hazardous substances can leak
into the groundwater and get into the food chain, damaging your health and well-being.
Table of contents
Languages:
Other N'oveen Heater manuals

N'oveen
N'oveen FH11 User manual

N'oveen
N'oveen CH7100 User manual

N'oveen
N'oveen SMART PTC2000 User manual

N'oveen
N'oveen CH9099 User manual

N'oveen
N'oveen CH3300 User manual

N'oveen
N'oveen FH03 User manual

N'oveen
N'oveen PTC09 User manual

N'oveen
N'oveen CH-5000 User manual

N'oveen
N'oveen OH9 Quick guide

N'oveen
N'oveen HC1500 User manual


