Nakamichi Shockwafe Pro 7.1 User manual

USER MANUAL
SPEAK
to our shockwafe
ninjas in usa today
STOP
please do not
return this unit
ONE-STOP SUPPORT SOLUTION
www.nakamichi-usa.com/faq
CUSTOMER CARE
support@nakamichi-usa.com
(415) 805 6913
(Weekdays 10am - 6:45pm PST; Saturday, Holidays 10am - 4:45pm PST)


Package Contents .............................................................................................................4
Controls and Connections................................................................................................5
Setting up Your Home Theater
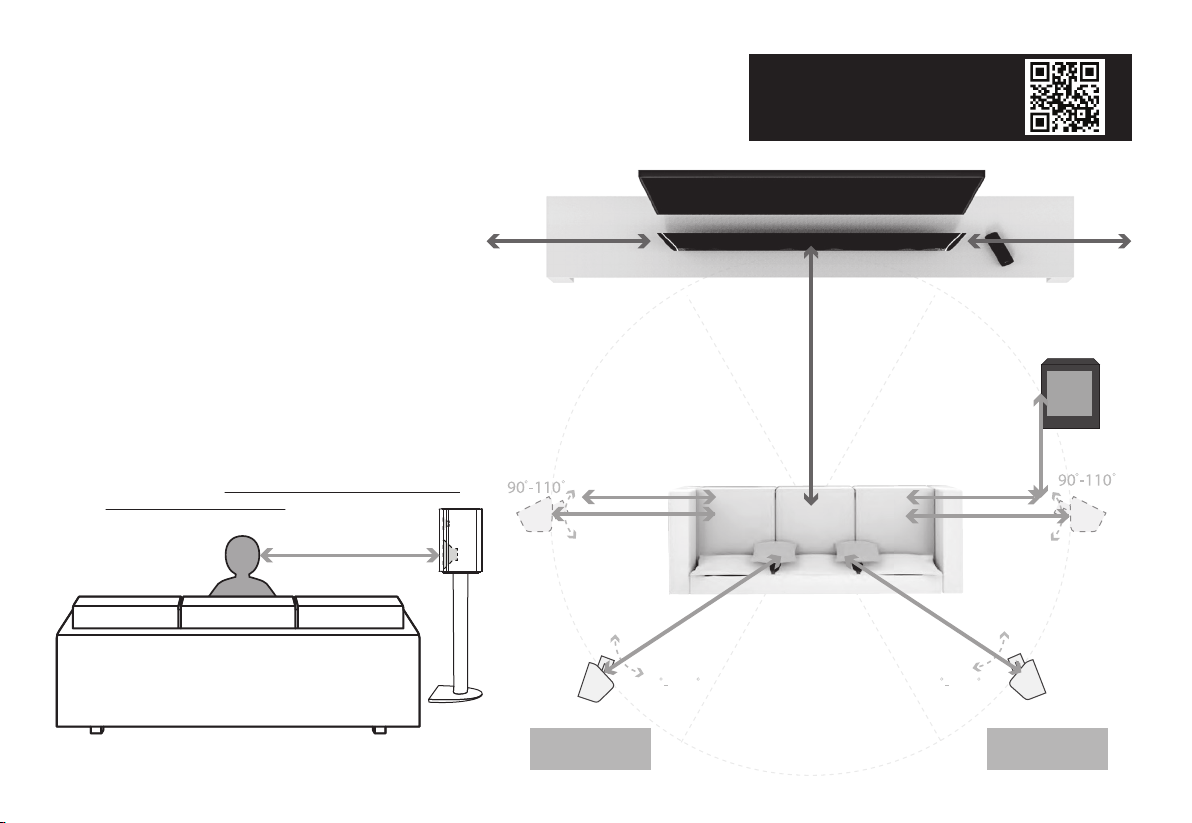
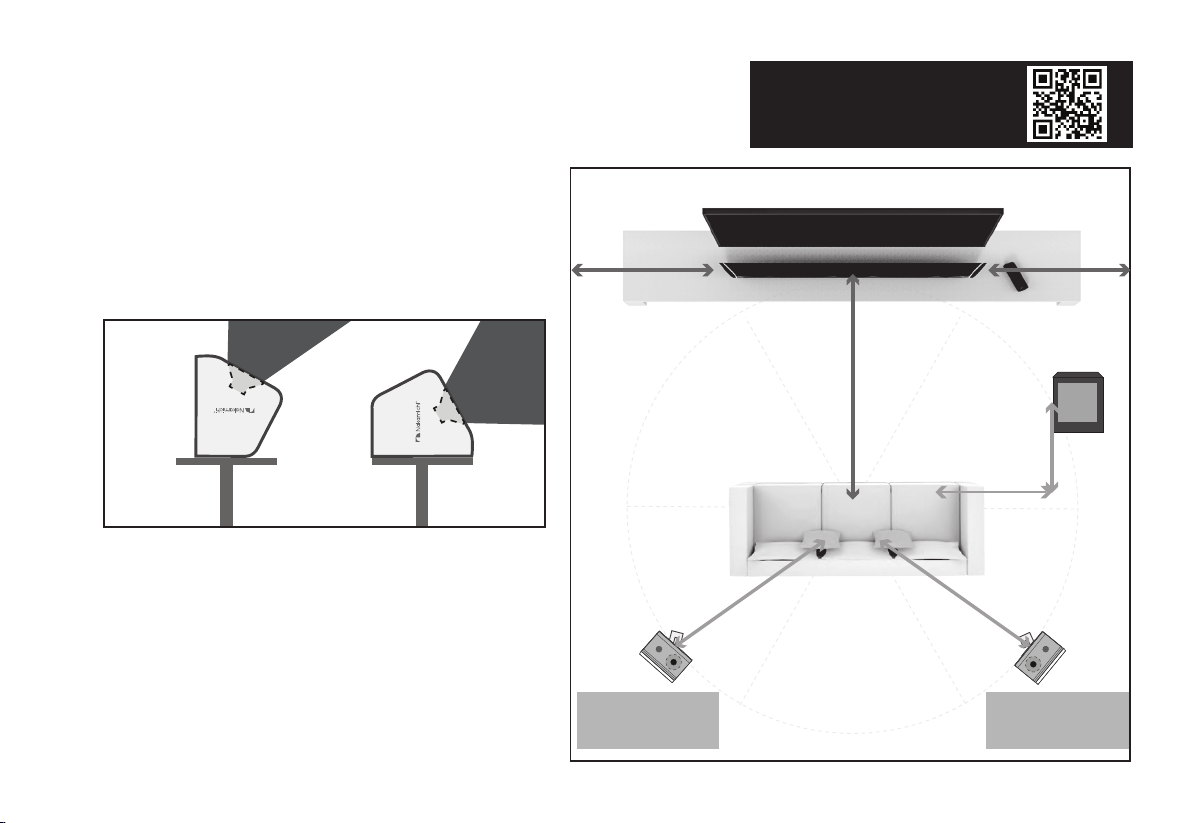
1. Speaker Placements ....................................................................................................8
2. Connecting Surround Speakers to Subwoofers ....................................................... 10
3. Turning On Your Soundbar System ...........................................................................11
4. Connecting Your TV................................................................................................... 12
5. Listening to Your Soundbar ....................................................................................... 14
6. Setting up Your TV..................................................................................................... 15
7. Connecting Your Content Devices............................................................................. 16
8. Setting up Your Content Devices .............................................................................. 21
Controlling the Soundbar
Remote Control Overview ............................................................................................. 22
Selecting Different Input Sources on Your Remote ....................................................... 23
Accessing Audio Presets on Your Remote .................................................................... 24
Accessing Advanced System Settings on Your Remote................................................ 25
Accessing Channel Mapping/Upmixing on Your Remote .............................................. 26
Accessing Menu Functions on Your Remote ................................................................. 27
Accessing SSE Mode on Your Remote ......................................................................... 28
Accessing Info on Your Remote .................................................................................... 29
Accessing Room Size on Your Remote ......................................................................... 30
Saving Audio Settings to System Memory .................................................................... 31
Wireless Bluetooth Audio Streaming ........................................................................... 32
Re-linking the Subwoofers with the Soundbar............................................................ 33
Wall-Mounting Your Soundbar System ........................................................................ 34
Firmware Upgrade.......................................................................................................... 36
Help & Troubleshooting................................................................................................. 37
Specifications ................................................................................................................. 38
Warranty Information & Customer Support ................................................................. 39
Glossary .......................................................................................................................... 40
Legal & Compliance ....................................................................................................... 42
TABLE OF CONTENTS
3

4
2 x Mounting Screws
(Soundbar)
4 x Mounting Screws
(Satellite Speakers)
6 x Soundbar and
Satellite Wall Mount Brackets
Mounting Guide
2 x Surround Speaker Audio Cables
(Length: 32.8 ft.)
(Length: 5 ft.)
1 x Subwoofer Power Cables
1 x Soundbar Power Cable (Length: 5 ft.)
1 x Digital Optical Cable
(Length: 5 ft.)
1 x
1 x Soundbar 1 x Wireless
Subwoofer
2 x Surround
Speakers
1 x
Soundbar Power Adapter
(Length: 5 feet)
(Length: 4 ft.)
3.5mm Audio Cable 12 x Wall Screws and
Brackets
PACKAGE CONTENTS

5
PRO 7.1
HDMI OUT [1]
(ARC TO TV)
(HDCP 2.2,
Dolby Vision,
4K HDR Pass-thru)
HDMI IN [4]
(HDCP 2.2,
Dolby Vision,
4K HDR Pass-thru)
HDMI IN [2]
(HDCP 2.2,
Dolby Vision,
4K HDR Pass-thru)
HDMI IN [3]
(HDCP 2.2,
Dolby Vision,
4K HDR Pass-thru)
USB
Music Playback
(WAV & MP3)
and Firmware Upgrade
OPTICAL
Digital Optical
Audio Input
AUX
3.5mm Stereo
Analog Audio
Input
COAXIAL
Digital Coaxial
Audio Input
DC IN
Power Supply
CONTROLS & CONNECTIONS
VOLUME - / +
Decrease or Increase volume
DEMO
Play NAKAMICHI audio
test tone on each channel
POWER
Power ON soundbar or
go to STANDBY mode
INPUT
Switch the audio source
LED PANEL
Display soundbar information
HELLO
SOUNDBAR FRONT
SOUNDBAR BACK

6
REMOTE ANGLE
Tilt the remote downwards by 15-25 degrees for
best response (as if you are aiming the remote
slightly towards the ground)
Once HDMI-CEC is set up, use your TV/content
device’s remote control to power ON your
soundbar.
Always use your TV’s remote control to power
OFF the system.
DID YOU KNOW?
Once HDMI-CEC is set up, TV’s HDMI-CEC has taken control
over soundbar's remote ON/OFF and other functions. Those
functions will not longer work on the soundbar remote.
!
Infrared
Transmitter
Infrared
Sensor
TV
Remove the battery cover by
pulling it down from the remote
Insert the included batteries
and gently push the battery cover back
into place
REMOTE CONTROL
A
A
BB

7
Back of Satellite Speakers
Satellite Speaker Port
(Connects to Subwoofer)
Satellite Speaker Port
(Connects to Subwoofer)
LEFT RIGHT
Back of Subwoofer
Pairing
LED indicator
Pairing Button
Power Switch
USB IN
(For Firmware upgrade only)
RED LED Indicator
(Firmware upgrade indicator)
Connect to
LEFT BACK
Satellite
Speaker
Connect to
RIGHT BACK
Satellite Speaker
Power Port

8
SETTING UP YOUR HOME THEATER
SPEAKER PLACEMENTS
Recommended speaker placement with optimal distance.
Actual distance can vary based on actual room layout.
1OPTION A (Best):
7.1CH SURROUND
135 150
135 150
SURROUND
BACK LEFT
SURROUND
BACK RIGHT
Sub
5 ft 5 ft
3.2 ft
5 ft
3.2 ft min
clearance
5 ft 5 ft
3.2 ft min
clearance
9 ft min
clearance
5 ft
Option B Option B
Option A (Recommended) Option A (Recommended)
The bottom speaker driver of the surround speakers should
be at ear level and pointing directly at the listener's sitting
area for optimal performance.
Note: Illustration is not to scale. Speaker stands are not included.
For recommended speaker stands,
scan QR code or visit:
bit.ly/71-speaker-stands

9
Note: Recommended speaker placement with optimal distance.
Actual distance can vary based on actual room layout.
OPTION B: ALL ELEVATION
Lay the surround speakers down (drivers tilted upward
in 2 modes, see illustration on the right) to enhance the
vertical effects to bounce off the ceiling of your room.
Elevation 2:
Hybrid 360O Surround
with Vertical Effects
Elevation 1:
Vertical Effects-Centric
Mode
SURROUND
BACK LEFT
(VERTICAL EFFECTS)
SURROUND
BACK RIGHT
(VERTICAL EFFECTS)
Sub
5 ft
3.2 ft
5 ft 5 ft
3.2 ft min
clearance
3.2 ft min
clearance
9 ft min
clearance
For recommended speaker stands,
scan QR code or visit:
bit.ly/71-speaker-stands

10
Connect the Surround LEFT and RIGHT BACK satellite speakers to the subwoofer using the included satellite
speaker audio cables.
CONNECTING SURROUND SPEAKERS TO SUBWOOFERS
2
LEFT RIGHT

11
TURNING ON YOUR SOUNDBAR SYSTEM
3
SOUNDBAR
a
b
g
Blinking Blue Light:
Subwoofer is in pairing mode.
Blue Light Stays On:
Subwoofer successfully
paired.
Note: Once soundbar is powered off, the blue LED lights on the subwoofer will continue blinking for 10 minutes before going into standby mode.
SUBWOOFER
c
d
e
f
AC IN
POWER
PAIRING
TOP OF SOUNDBAR

12
CONNECTING YOUR TV
4
Connect one end of the HDMI cable to the HDMI (ARC) port at
the back of your TV.
Connect the other end to the HDMI OUT [1] (ARC TO TV) port
to your Nakamichi soundbar.
DID YOU KNOW?
HDMI Audio Return Channel (ARC)
sends audio from the TV to our soundbar
Options for connecting your TV: HDMI , OPTICAL , COAXIAL (See next page)
* HDMI ARC port location may
differ based on TV brand. See
your TV’s user manual for more
information
BACK OF TV*
1.
2.
BACK OF SOUNDBAR

13
!Note: Be sure to connect to a TV’s audio output port, not an audio input port.
Not all TVs have the audio outputs shown above. To connect the soundbar directly to your other
devices (Blu-ray player, game system, etc.). See page 20 CONNECTING YOUR CONTENT DEVICES
Cable appearance may dier from the ones supplied.
If there is no audio during the setup, see page 37 for Help & Troubleshooting
Cable not included
b

14
DID YOU KNOW?
Dolby Atmos is the latest Dolby’s object-based 3D surround sound format. It is
encoded into Dolby TrueHD or Dolby Digital Plus stream with metadata to extract and
place the objects in relevant positions.
LISTENING TO YOUR SOUNDBAR
5
+
+
SIZE
V S D
CLEAR VOICE
SETUP
SETUP
RETURN INFO
DISPLAY
VOL
MENU
MENU
ENTER
STEREO DIRECT DSP OFF
BLUETOOTH / USB MODE ONLY
SYSTEM MEMORY
BASS
DSP
ROOM
MOVIE
MUSIC
2
AUX USB
1NIGHT
Set DIRECT to recommended settings below for best
surround.
For Dolby/PCM audio:
DOLBY SURR = Dolby All-Channel Surround + Height
DOLBY UPMIX = Dolby All-Channel Surround Upmix
NATIVE = Playback based on original surround format
encoded for source material
For DTS encoded content only. Cannot enable when
Dolby or PCM content is playing
NEURAL X = DTS All Channel Surround Sound Upmix
(See page 26 ACCESSING CHANNEL MAPPING/UPMIXING /
DOWN-MIXING ON YOUR REMOTE)
INFO
Access to rmware upgrade and wireless subwoofers
pairing. (Button only works when soundbar is in USB
mode only, see page 27 ACCESSING MENU FUNCTIONS
ON YOUR REMOTE)
Access to advanced system settings. (Button only
works when soundbar is in any HDMI (ARC/2/3/4)
mode, see Page 25 for more information)
D
DIRECT
Press HDMI ARC button to listen to TV audio
Press HDMI 2/3/4/Optical/Coaxial button to listen to content
from other devices
All Channel Stereo / Stereo Only
ALL CHANNEL STEREO = Enables Stereo playback on
surround speakers. Best for music, YouTubeTM and
boosting immersiveness for surround speakers.
STEREO ONLY = Enables playback with soundbar +
Subwoofers only (no surround)
S
STEREO
Press to power on/o the soundbar.
Important: Once HDMI-ARC/CEC is set up, always power on the
soundbar by using your TV or content device's remote control power
ON button.
Always use your TV’s / content device’s remote control to power OFF
the system.
For more about HDMI-ARC/CEC, visit: nakamichi-usa.com/what-is-hdmi-cec/
For expanded remote control guide,
scan QR code or visit:
bit.ly/71-shockwafe-remote
Press INFO button to see the source audio format on the
soundbar’s LED display:
DOLBY ATMOS TRUEHD
(Dolby Atmos encoded Dolby TrueHD)
DOLBY ATMOS D PLUS
(Dolby Atmos encoded Dolby Digital Plus)
DOLBY ATMOS MAT**
(Dolby Atmos metadata into lossless pulse-code modulation)
DOLBY TRUEHD
DOLBY D PLUS (Dolby Digital Plus)
DOLBY DIGITAL
DTS X
DTS-HD MA (DTS HD Master Audio)
DTS HD (DTS High Denition Audio)
DTS DIGITAL (DTS Digital Surround)
LPCM 7.1 (Linear Pulse Code Modulation 7.1)
LPCM 5.1 (Linear Pulse Code Modulation 5.1)
PCM 2.0 (Pulse Code Modulation)
** Xbox One X/S and Apple TV 4K come with a Dolby Atmos
MAT encoder, which is designed to encode, decode and
incorporate Dolby Atmos metadata into lossless pulse-code
modulation (PCM) audio, allowing listeners to experience
Dolby Atmos even in PCM audio.

15
SETTING UP YOUR TV
6All units sold since Aug 2019 can receive Dolby Atmos
surround via TV’s eARC when streaming with TV’s smart
apps like Netix (Note: not all TVs can output Atmos.)
What is HDMI Audio Return Channel (ARC)?
Using HDMI ARC, your TV can send audio to the soundbar
using a HDMI cable. You will need to connect your soundbar
to your TV’s HDMI ARC port using a high speed HDMI 2.0
cable.
Audio settings for TV*
Setting the audio output:
A) Go to Settings > Sound
B) Select Speaker Settings
C) Set as HDMI Audio Out
Setting the audio format:
A) Go to Settings > Sound > Additional Settings
B) Select Audio Format
C) Set as Dolby Digital / DTS / Bitstream
(whichever is available)
*
Visit nakamichi-usa.com/best-sound for expanded list of TVs’ audio
settings instructions. Visit bit.ly/hdmi-cec-settings or scan QR Code
for HDMI-CEC setup instructions by device
If your devices are not listed on our website, please check with the
device manufacturer’s manual
What is CEC?
CEC is a HDMI protocol that is only available when:
1. Your TV is CEC enabled. (Check with your TV manufacturer for more
information)
2. The soundbar and TV is connected via a HDMI cable through the
ARC ports.
By doing so, you are able to control the soundbar’s volume and power
functions with the TV remote.
Enabling CEC
From the SYSTEM menu, enable CEC and ARC (SAC) functions.
From the CEC menu, select Device Discovery to register the soundbar
with the TV.
Enable CEC for TV only. Do not enable CEC for other source devices or
inputs may switch randomly.
To disable CEC for the soundbar, see page 25.
Steps may dier based on TV brand. See your TV’s user manual for more information.
HDMI-CEC TV Trade names: Samsung (Anynet+), Sharp (Aquos Link), Sony (Bravia Sync), LG
(SIMPLINK), Panasonic (HDAVI Control / EZ Sync / Viera Link), Philips (EasyLink), Vizio (CEC),
Hitachi (HDMI-CEC). Naming may dier based on TV brand. See your TV’s user manual for
more information.

16
CONNECTING YOUR CONTENT DEVICES
7
Back of Soundbar
HDMI IN [2]
(Compatible with
HDCP 2.2,
Dolby Vision &
4K HDR Pass-thru)
HDMI IN [3]
(Compatible with
HDCP 2.2,
Dolby Vision &
4K HDR Pass-thru)
(Compatible with
HDCP 2.2,
Dolby Vision &
4K HDR Pass-thru)
HDMI OUT [1]
(ARC TO TV)
(Compatible with
HDCP 2.2,
Dolby Vision &
4K HDR Pass-thru)
HDMI IN [4]
Game Console
Cable Set-Top Box /
Streaming Box
Blu-ray Player
TV
Connect devices with the same HDCP standards for seamless switching between sources. If
there are devices with different HDCP standards, connect all HPCP 2.2 devices to soundbar
while connecting HDCP 1.4/2.0/2.1 devices to TV to avoid audio and video instability.
HDMI CONNECTION SETUP
HDMI cables transmit both audio and video content. To view video
from these devices, turn the soundbar on, then set the soundbar
input to HDMI IN [2], HDMI IN [3] or HDMI IN [4]. Set your TV input
to the HDMI ARC port which the soundbar is connected.
!
!* Cables may appear differently from the ones supplied.
Use our “Perfect Device Matching Tool”
to create a custom setup guide based on your TV and
devices. Scan QR code or visit bit.ly/device-matching-tool

17
Use our “Perfect Device Matching Tool”
to create a custom setup guide based on your TV and
devices. Scan QR code or visit bit.ly/device-matching-tool
CONNECTING YOUR CONTENT DEVICES (cont.)
7
Tablet/MP3 Player/Computer
Network Media Player
Game Console
b
NON-HDMI CONNECTION SETUP
Dolby Atmos and DTS:X audio are not supported
on Optical, Coaxial and Aux connections
!

18
CONNECTING YOUR CONTENT DEVICES
7ADVANCED SETUP - FOUR-DEVICE SETUP FOR HDTV
HDMI OUT [1]
(ARC TO TV)
4
HDMI IN (ARC)
VIDEO & AUDIO HDMI IN*
If the device is not equipped with a HDMI
port, use an Optical or Coaxial output.
!
Switch the soundbar’s source to ARC for
playing Device 4’s audio. (via TV’s ARC /
eARC connection. DTS:X audio are not
supported on ARC connection)
!
Dolby Atmos/DTS:X
device supported)
Dolby Atmos/DTS:X
device supported)
Dolby Atmos/DTS:X
device supported)
Use our “Perfect Device Matching Tool”
to create a custom setup guide based on your TV and
devices. Scan QR code or visit bit.ly/device-matching-tool

19
VIDEO
*HDMI IN
CONNECTING YOUR CONTENT DEVICES (cont.)
7ADVANCED SETUP - FOUR-DEVICE SETUP FOR TV
WITHOUT HDMI ARC
HDMI OUT [1]
(ARC TO TV)
4
AUDIO
AUDIO
HDMI IN
(OR)
If the device is not equipped with a HDMI
port, use an Optical or Coaxial output.
!
Dolby Atmos/DTS:X
device supported)
Dolby Atmos/DTS:X
device not supported)
Dolby Atmos/DTS:X
device supported)
Dolby Atmos/DTS:X
device supported)
!Switch the soundbar’s source to OPTICAL or COAXIAL
for playing Device 4’s audio. Dolby Atmos and DTS:X
formats are not supported on these connections.
Use our “Perfect Device Matching Tool”
to create a custom setup guide based on your TV and
devices. Scan QR code or visit bit.ly/device-matching-tool

20
TV
Satellites
Set-Top Boxes
Streaming Devices
Gaming Consoles
Connect these devices directly
to Soundbar Via HDMI
Connect TV HDMI ARC to
Soundbar HDMI 1 ARC
Connect these devices
directly to your TV via HDMI
If you are using Optical connection
option, connect all your content
devices to TV.
Blu-ray Players
!
CONNECTING YOUR CONTENT DEVICES
7CONNECTIONS CENTRAL - RECOMMENDED CONNECTION BASED ON DEVICES
Use our “Perfect Device Matching Tool”
to create a custom setup guide based on your TV and
devices. Scan QR code or visit bit.ly/device-matching-tool
Other manuals for Shockwafe Pro 7.1
1
Table of contents
Other Nakamichi Speakers System manuals

Nakamichi
Nakamichi SHOCKWAFE ELITE User manual

Nakamichi
Nakamichi NK SHOCKWAVE User manual

Nakamichi
Nakamichi DRAGON 11.4.6 User manual

Nakamichi
Nakamichi Shockwafe Pro 7.1 User manual

Nakamichi
Nakamichi DRAGON 11.4.6 User manual

Nakamichi
Nakamichi SHOCWAFE ULTRA 9.2 eARC User manual

Nakamichi
Nakamichi NK12 User manual

Nakamichi
Nakamichi DRAGON LILY User manual