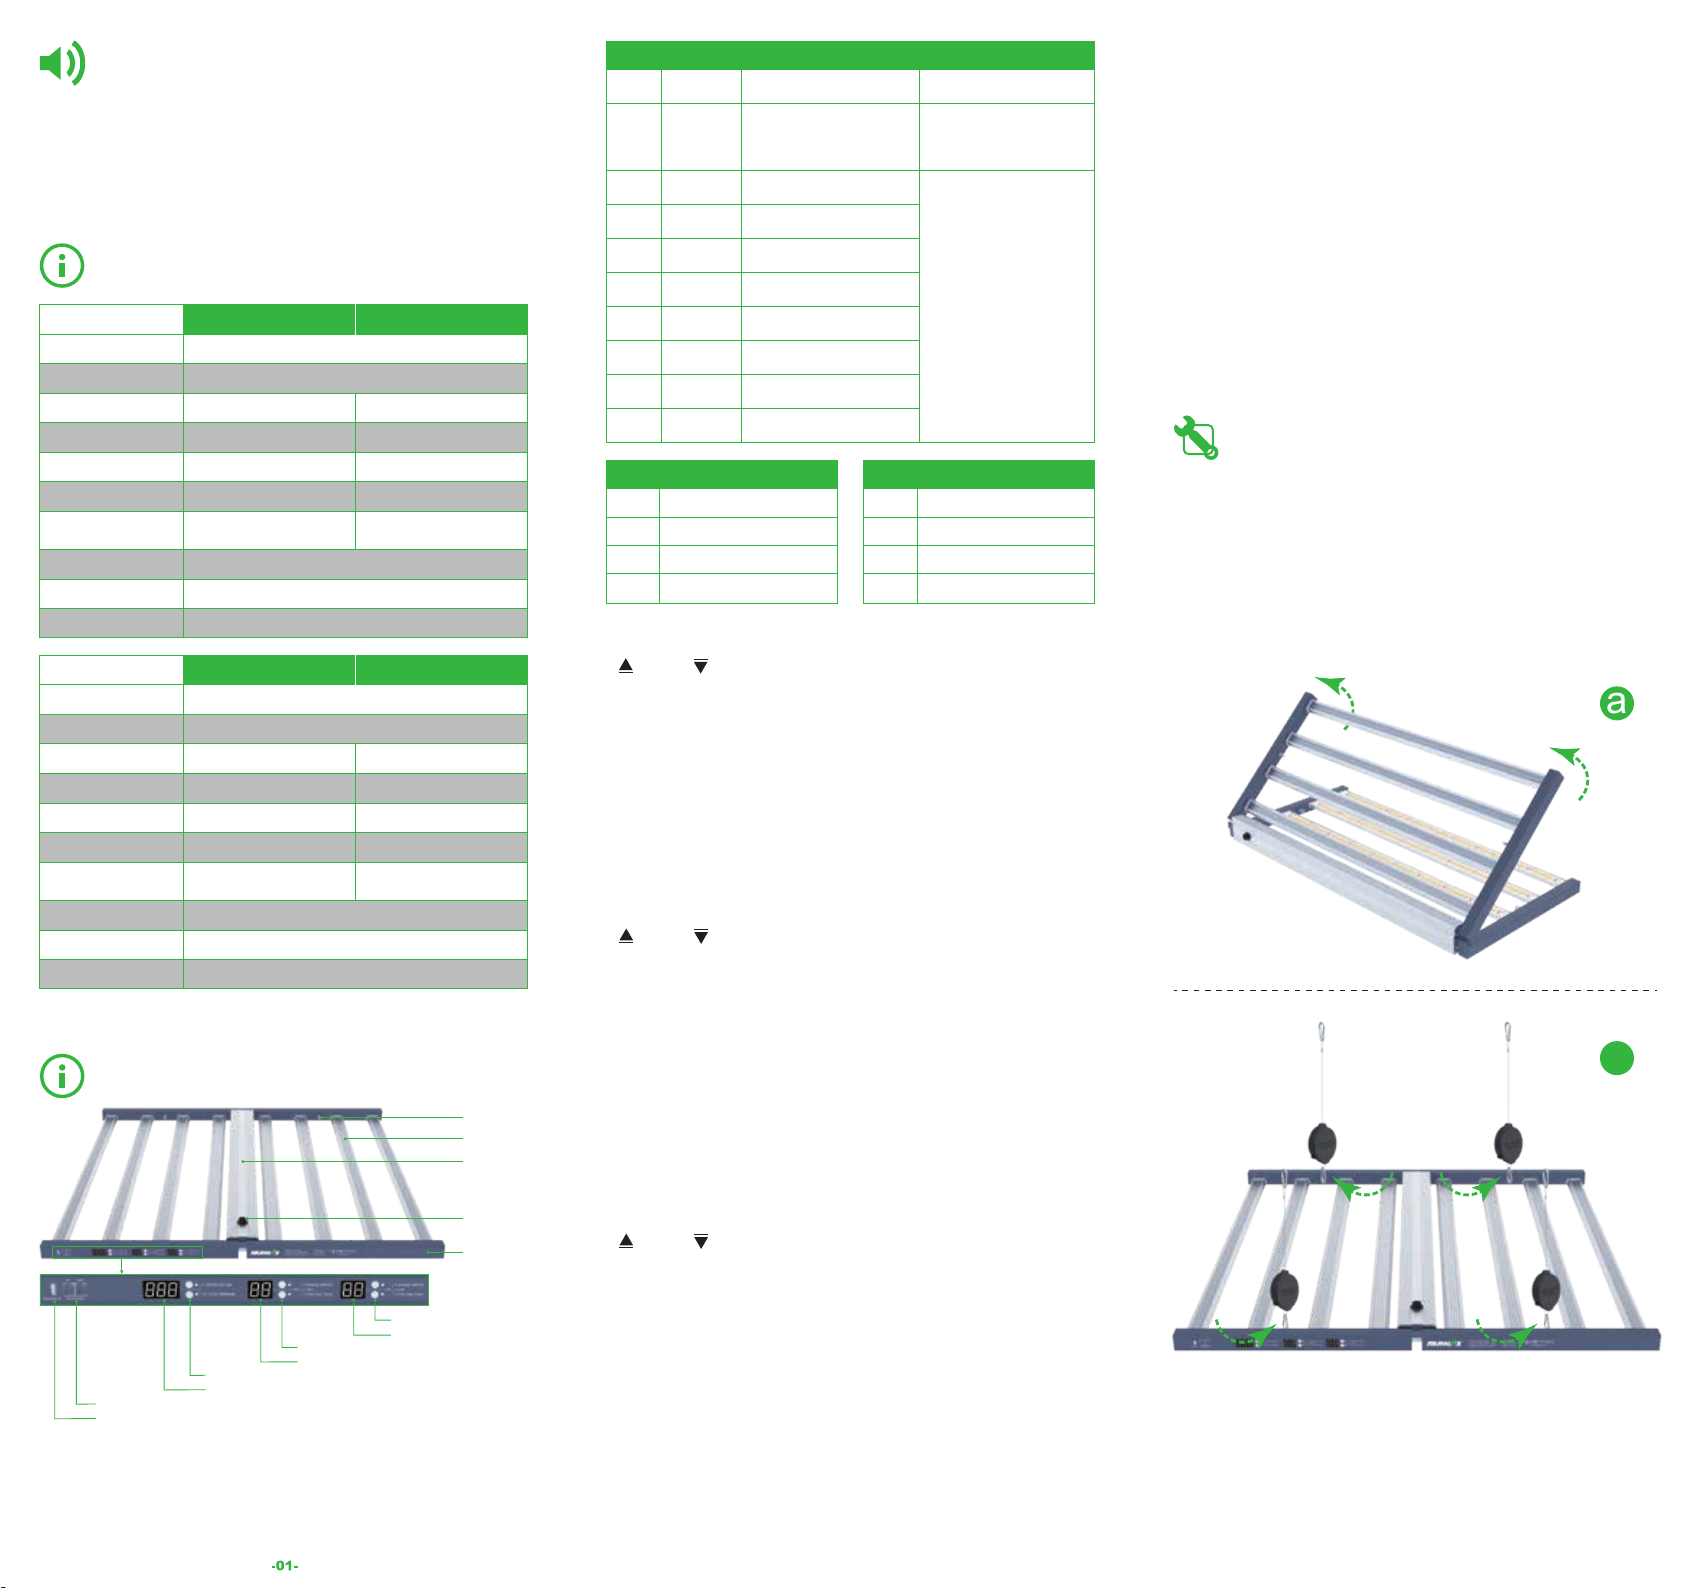
a
b
Fixture Hanging
1. First take the fixture out of the packing.
2. Unfold the fixture track (Fig.a) and place it on a sturdy and flat surface with the diode
array facing downward (Fig.b).
3. Attach the carabiners from the YO-Ratchets to the ring bolts (Fig.b).
4. Hang the fixture in the required location. Make sure the fixture hanging is level.
ASSEMBLY INSTRUCTIONS
ABOUT PRODUCT
44.7x43.7x2.4inch / 19.2lbs
1135x1110x60mm / 8.7kgs
Display
Display Local mode or Remote mode
UV off
UV follows white output IR follows white output
UV off in 1-12 hours
Function
Description
Power off/
RTU/0-10V
0
30
40
50
60
70
80
90
100
0
FL
1-12
0
FL
1-12
30%
brightness Create 30% brightness
Create 40% brightness
Create 50% brightness
Create 60% brightness
Create 70% brightness
Create 80% brightness
Create 90% brightness
Create 100% brightness
40%
brightness
50%
brightness
60%
brightness
70%
brightness
80%
brightness
90%
brightness
100%
brightness
Product Output Function
The fixture is off when no RTU/
0-10V dimming signal connects
Remote Output Function
When RTU/0-10V dimming
signal is connected, the output
is according to the dimming
signal setting value
/
It is recommended that you keep a mounting height of 8”-20”(20cm-50cm) above
canopy for optimal light efficiency and uniformity. Growers should regularly monitor
the temperature at the canopy level to ensure the height of the fixture is appropriate,
as canopy temperature and ambient room temperature can differ.
Input Plug
Light Bar
PLEASE READ THESE INSTRUCTIONS
FIRST BEFORE INSTALLATION
Welcome to purchase and use this new Nanolux LED luminaire. We have done
everything to ensure a product of long lifespan and safe operation, but the installation
and use of the product is at the responsibility of the user. Incorrect use or installation
can lead to failure and damage to the luminaire. Damage to the luminaire or electronic
circuitry as a result of incorrect installation or use will revoke your warranty. Read this
manual carefully before installing your luminaire.
-02- -03-
Track
Ring Bolt
LED Driver
Box
IR timing selection button
IR timing display
UV timing selection button
UV timing display
NCCS-0-10V in/out interface
NCCS-RTU input interface
DIM mode selection button
DIM control status display
UV Timing Switch Function
Display Local mode or Remote mode
IR off
IR off in 1-12 hours
IR Timing Switch Function
DIM Function
TECHNICAL SPECIFICATIONS
AC120-277V
630W
2.9μmol/J
≧50,000hrs
120°
Lifetime
Model
Light Distribution
Dimming
Input Voltage
Input Power
Efficacy
Spectrum
Dimension
/ Weight
*Subject to change without notice, Tolerance ±10%.
Input Frequency 50/60Hz
1830µmol/s
Light Output PPF
LED SN630 Pro LED SN720 Pro
WHITE+UV+IR Spectrum
44.7x43.7x2.4inch / 22.5lbs
1135x1110x60mm / 10.2kgs
720W
2.9μmol/J
2090µmol/s
WHITE+UV+IR Spectrum
Manual DIM 30%-100%, NCCS-RTU/0-10V compatible
1. DIM mode selection button function
is to add, is to subtract, includes 0, 30, 40, 50, 60, 70, 80, 90, 100.
Press button to add or subtract, cycle switching. When pressing button over 2
seconds, the mode will add or subtract each 0.3 seconds accordingly.
(1) 0 stands for NCCS-RTU/0-10V/OFF function
When there is an external control signal (NCCS-RTU/0-10V), DIM dimming ratio
will be dimmed according to the external control signal. DIM mode is displayed as
0 whether the external control signal is set to off or output.
When no external control signal (NCCS-RTU/0-10V) is connected, the fixture will
shutdown itself. If no operation is performed, the DIM mode display changes to
OFF after 3 seconds.
(2) The numbers 30 to 100 indicate the fixture DIM dimming ratio. The dimming is
carried out according to the fixture DIM dimming ratio, with no responding to
external control.
(1) When UV timing display shows FL, it indicates local/remote control mode. UV
diode follow white diode, UV diode is on when white diode is on, UV diode is off
when white diode is off.
(2) When UV timing display shows 0, it means local/remote mode: UV off.
(3) When UV timing display shows 1-12, it means local/remote mode: UV diode will be
turned off after turning on 1~12 hours.
UV timing time in hours, in the 24H cycle the longest timing is 12 hours. When the
DIM dimming ratio is not 0, the UV diode will start timing according to the setting.
After the time is up, the UV diode will be turned off. Every 24H, the UV diode will
re-light according to the set UV timing hours. If you want to change the UV timing
reference, please first set the UV to 0, and then reset the UV timing time. When
the DIM dimming ratio is 0, the timing will stop.
Button Function Instructions:
1. Turn off the digital tube display
When DIM mode selects 0.
(1) When there is an external control signal (NCCS-RTU/0-10V) connected, and the
setting is closed. When there is no change in the external control signal and no
button operation, all digital tubes will go out after 5 seconds.
(2) When there is no external control signal (NCCS-RTU/0-10V) connected and there
is no button operation, all the digital tubes will go out after 5 seconds.
2. Wake up the digital tube display
When there is a button operation, or the external control signal is changed from off
to other option, the digital tube will wake up.
Digital Tube Screensaver Function:
2. UV timing selection button function
is to add, is to subtract, timing options include 0, 1, 2, 3, 4, 5…12, FL (Follow
White). Press button to add or subtract time, cycle switching. When pressing button
over 2 seconds, the mode will add or subtract each 0.3 seconds accordingly.
(1) When IR timing display shows FL, it indicates local/remote control mode. IR diode
follow white diode, IR diode is on when white diode is on, IR diode is off when
white diode is off.
(2) When IR timing display shows 0, it means local/remote mode: IR off.
(3) When IR timing display shows 1-12, it means local/remote mode: IR diode will be
turned off after turning on 1~12 hours.
IR timing time in hours, in the 24H cycle the longest timing is 12 hours. When the
DIM dimming ratio is not 0, the IR diode will start timing according to the setting.
After the time is up, the IR diode will be turned off. Every 24h, the IR diode will
re-light according to the set IR timing hours. If you want to change the IR timing
reference, please first set the IR to 0, and then reset the IR timing time. When the
DIM dimming ratio is 0, the timing will stop.
(For example, applicable to UV and IR: after power-on, DIM mode is set to 30, UV is
set to 3H, and power-on time is caculated as the starting point for timing. Normally, the
UV will be off after 3H. If the user sets the UV timing to 1H after lighting on 2H, then
UV diode will be off immediately, if setting UV to 4H, then it will be off after another 2H
lighting. If the user wants to start timing 5H from the current lighting time, just set the
UV timing to 0 and then to 5.)
3. IR timing selection button function
is to add, is to subtract, timing options include 0, 1, 2, 3, 4, 5…12, FL (Follow
White). Press button to add or subtract time, cycle switching. When pressing button
over 2 seconds, the mode will add or subtract each 0.3 seconds accordingly.
44.7x43.7x2.4inch / 22.5lbs
1135x1110x60mm / 10.2kgs
AC120-277V
830W
2.9μmol/J
≧50,000hrs
120°
Lifetime
Model
Light Distribution
Dimming
Input Voltage
Input Power
Efficacy
Spectrum
Dimension
/ Weight
Input Frequency 50/60Hz
2410µmol/s
Light Output PPF
LED SN830 Pro LED SN1000 Pro
WHITE+UV+IR Spectrum
44.7x43.7x2.4inch / 27.8lbs
1135x1110x60mm / 12.6kgs
1000W
2.9μmol/J
2900µmol/s
WHITE+UV+IR Spectrum
Manual DIM 30%-100%, NCCS-RTU/0-10V compatible


