These luminaires are suitable for humid, indoor environments. Do not install your
luminaires in wet or outdoor environments. Do not operate these luminaires close to
combustible materials. The light bar and track will get hot during operation. Do not touch
the bar or track during or right after operation. Make sure the power cord does not touch
any hot part of the luminaire. Make sure the light bar is clean and inserted correctly. A
normal operating environment temperature should be below 104°F. Exceeding the
maximum environmental temperature will stress electronic components, which will lead
to shorter lifetime and decreased reliability.
Our fixture comes with a heat sink rather than other cooling components, dissipating
heat effectively and allowing maximum heat conductivity during the operation.
This model is compatible with SLC controller & DTU NCCS-APP-2.0 (the “DTU”).
Insert telephone wire into the jack of the track and SLC controller / DTU, and then
Dimming function on the luminaire will be enabled.
● Maximum of 120 units can be controlled.
● Simulate sunrise and sunset for dimming.
● Turn off the device automatically with time and temperature setting.
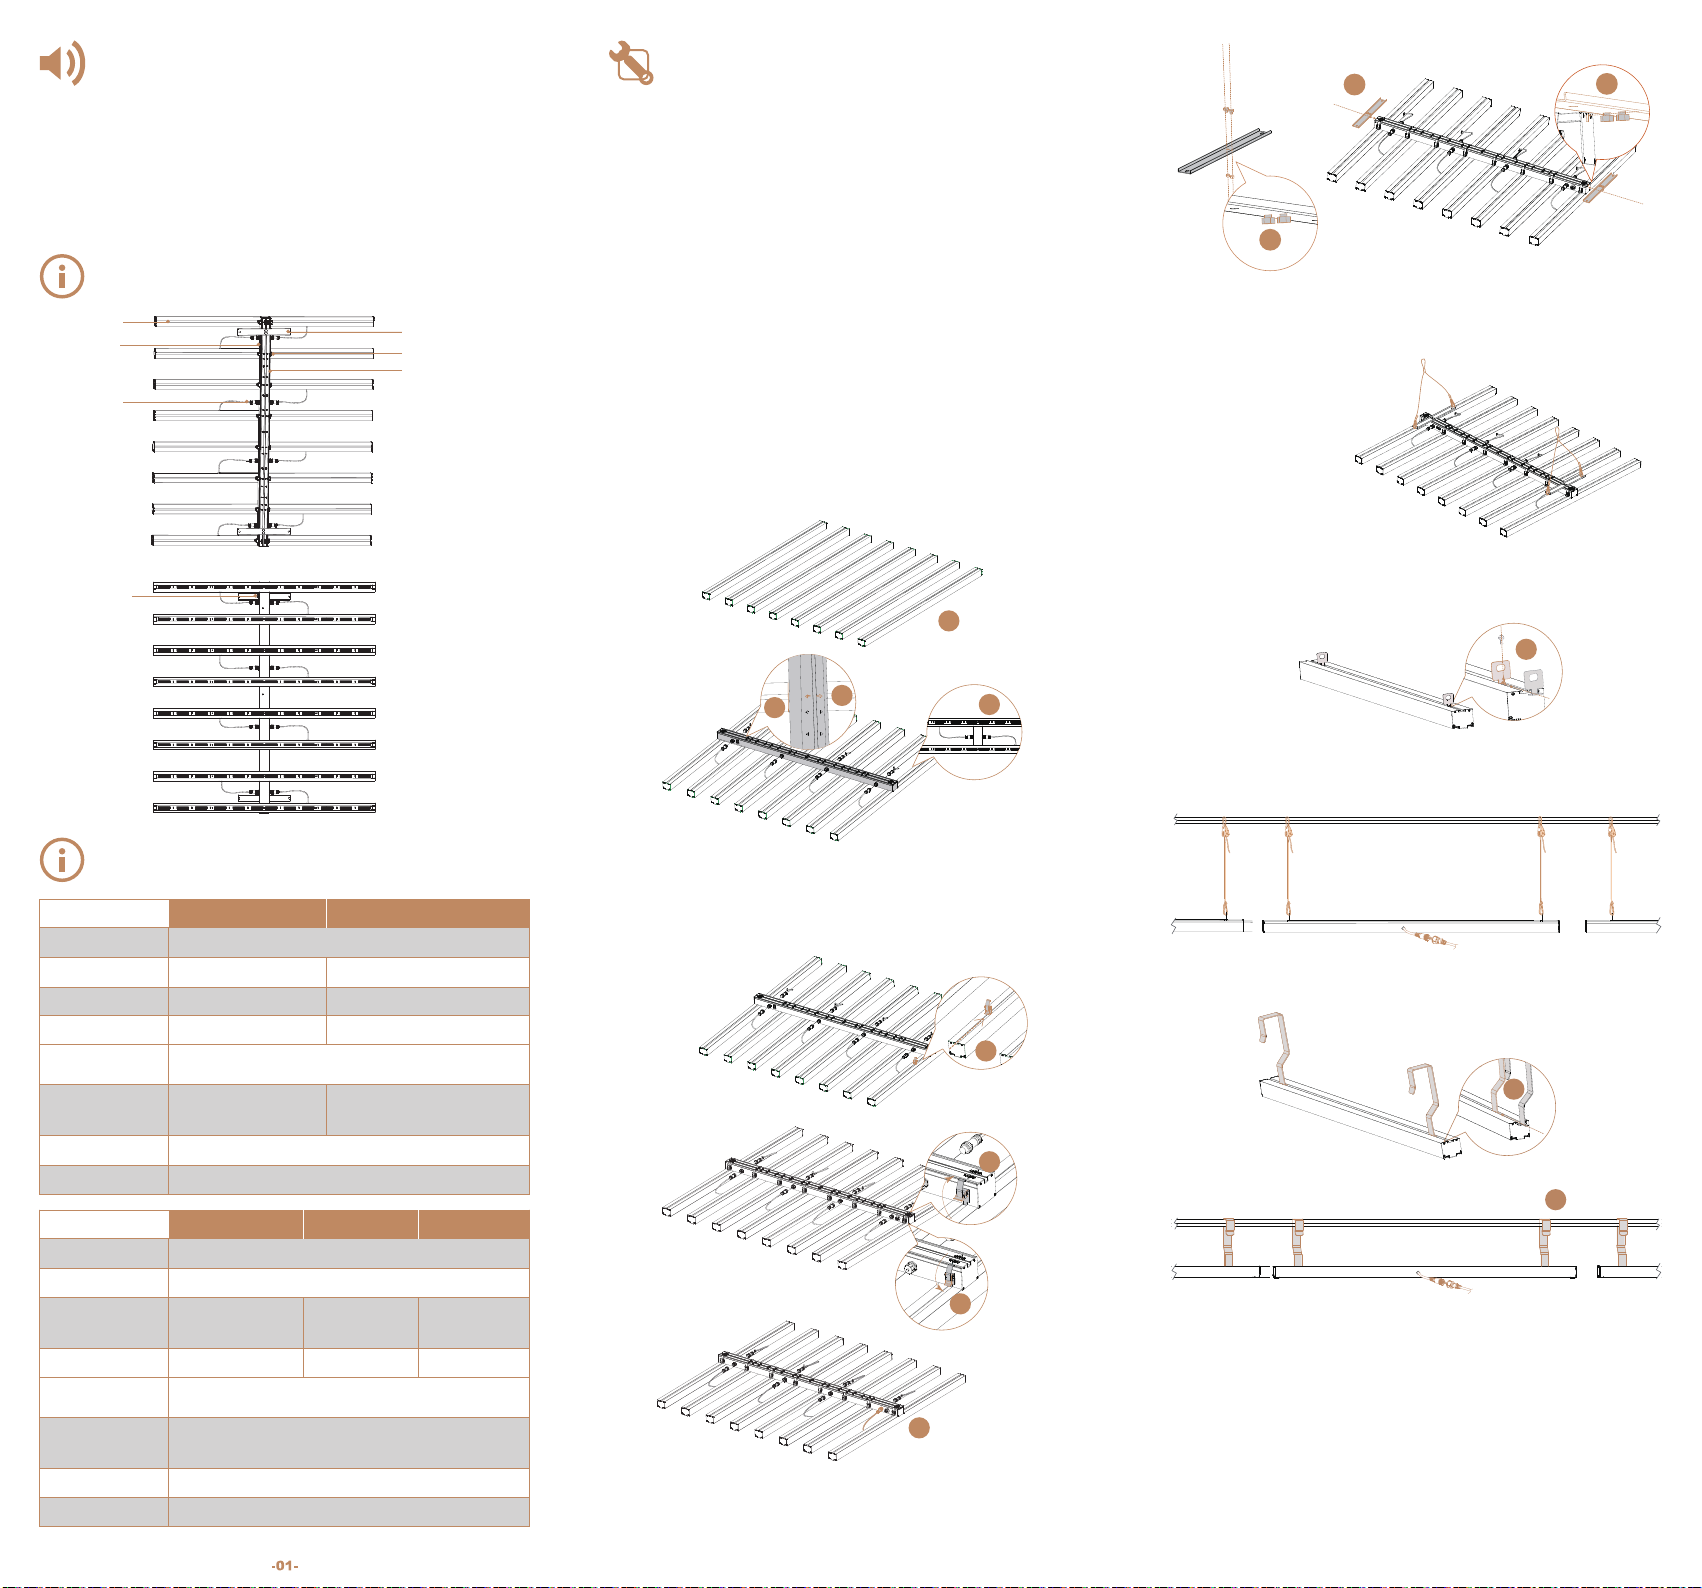
In & Out jacks included on the Light Track allows for multi-fixtures connected in parallel.
● Comply with local installation regulations.
● Store the fixture in a dry and clean environment, with an ambient temperature of -10°C
~ 50°C and ambient humidity of less than 90% RH. It is recommended that the fixture
doesn't sit unused for longer than six months. If it has sat unused for longer than six
months, please test to ensure fixture is functioning at 100%.
● Please keep products safe. Avoid mechanical pressure, excessive vibration and
dropping the unit during the process of assembly to protect the light bar and track.
● Keep away from water, oil and organic solvent, or it will decrease the efficacy and have
the potential risk of electric leakage.
● All equipment, devices and machines shall be effectively grounded.
● Regularly check and clean the dust from the heatsink and LED array.
1. Disconnect from power supply before general care.
2. Remove the dust from the light bar using low-pressure compressed air.
3. Clean the diode array with a soft cloth preventing it from being scratched.
4. Be sure not to touch the diode with your bare hands, even after the luminaire is
disconnected from power supply.
● It is recommended that you contact a licensed electrician or an expert if any of the
following take place:
1. The cable or the plug has been damaged.
2. The unit has been exposed to rain.
3. Significant changes in the unit performance.
4. Dropped fixture or light bar and bent corner of its enclosure.
● There are no serviceable parts inside the luminaire. Opening the luminaire will void
warranty.
Nanolux warrants manufacturing defects of this product if used under normal operating
conditions for a period of three (3) years from the original date of purchase. If the product
shows manufacturing defects within this period and that defect is not due to user error or
improper use, Nanolux shall, at its discretion, either replace or repair the product using
suitably new or refurbished parts. For service return the product to your shop with the
original sales receipt.
SCOPE OF USE AND MAINTENANCE
TROUBLESHOOTING
ALWAYS COMPLY WITH LOCAL
INSTALLATION REGULATIONS AND CODES
0-10V DIMMING
Problem
One or more
fixtures are
completely off.
Disconnect from power source.
Broken cable or wire connecting
controller to fixture or wire
connecting fixture to fixture.
The power supply settings do
not match with local AC
voltage and frequency.
Make sure power is on and
cables are plugged in.
Dimming
failure
LED will not
come on.
Probable cause(s) Possible fixes or
corrective maintenance
CAUTION:
After installation, verify installation was a success by cycling the lights on/off a few times,
by setting 'over temperature shut down' to a low value like 85°F, and rubbing the
temperature probe with your fingers, tricking the controller /DTU into an over temperature
condition and shutting the lights off. Then leave the probe alone, and after recommended
10-15 minutes the controller /DTU should turn all the lights back on.
For detailed instructions, please refer to SLC & DTU NCCS-APP-2.0 operating manual.
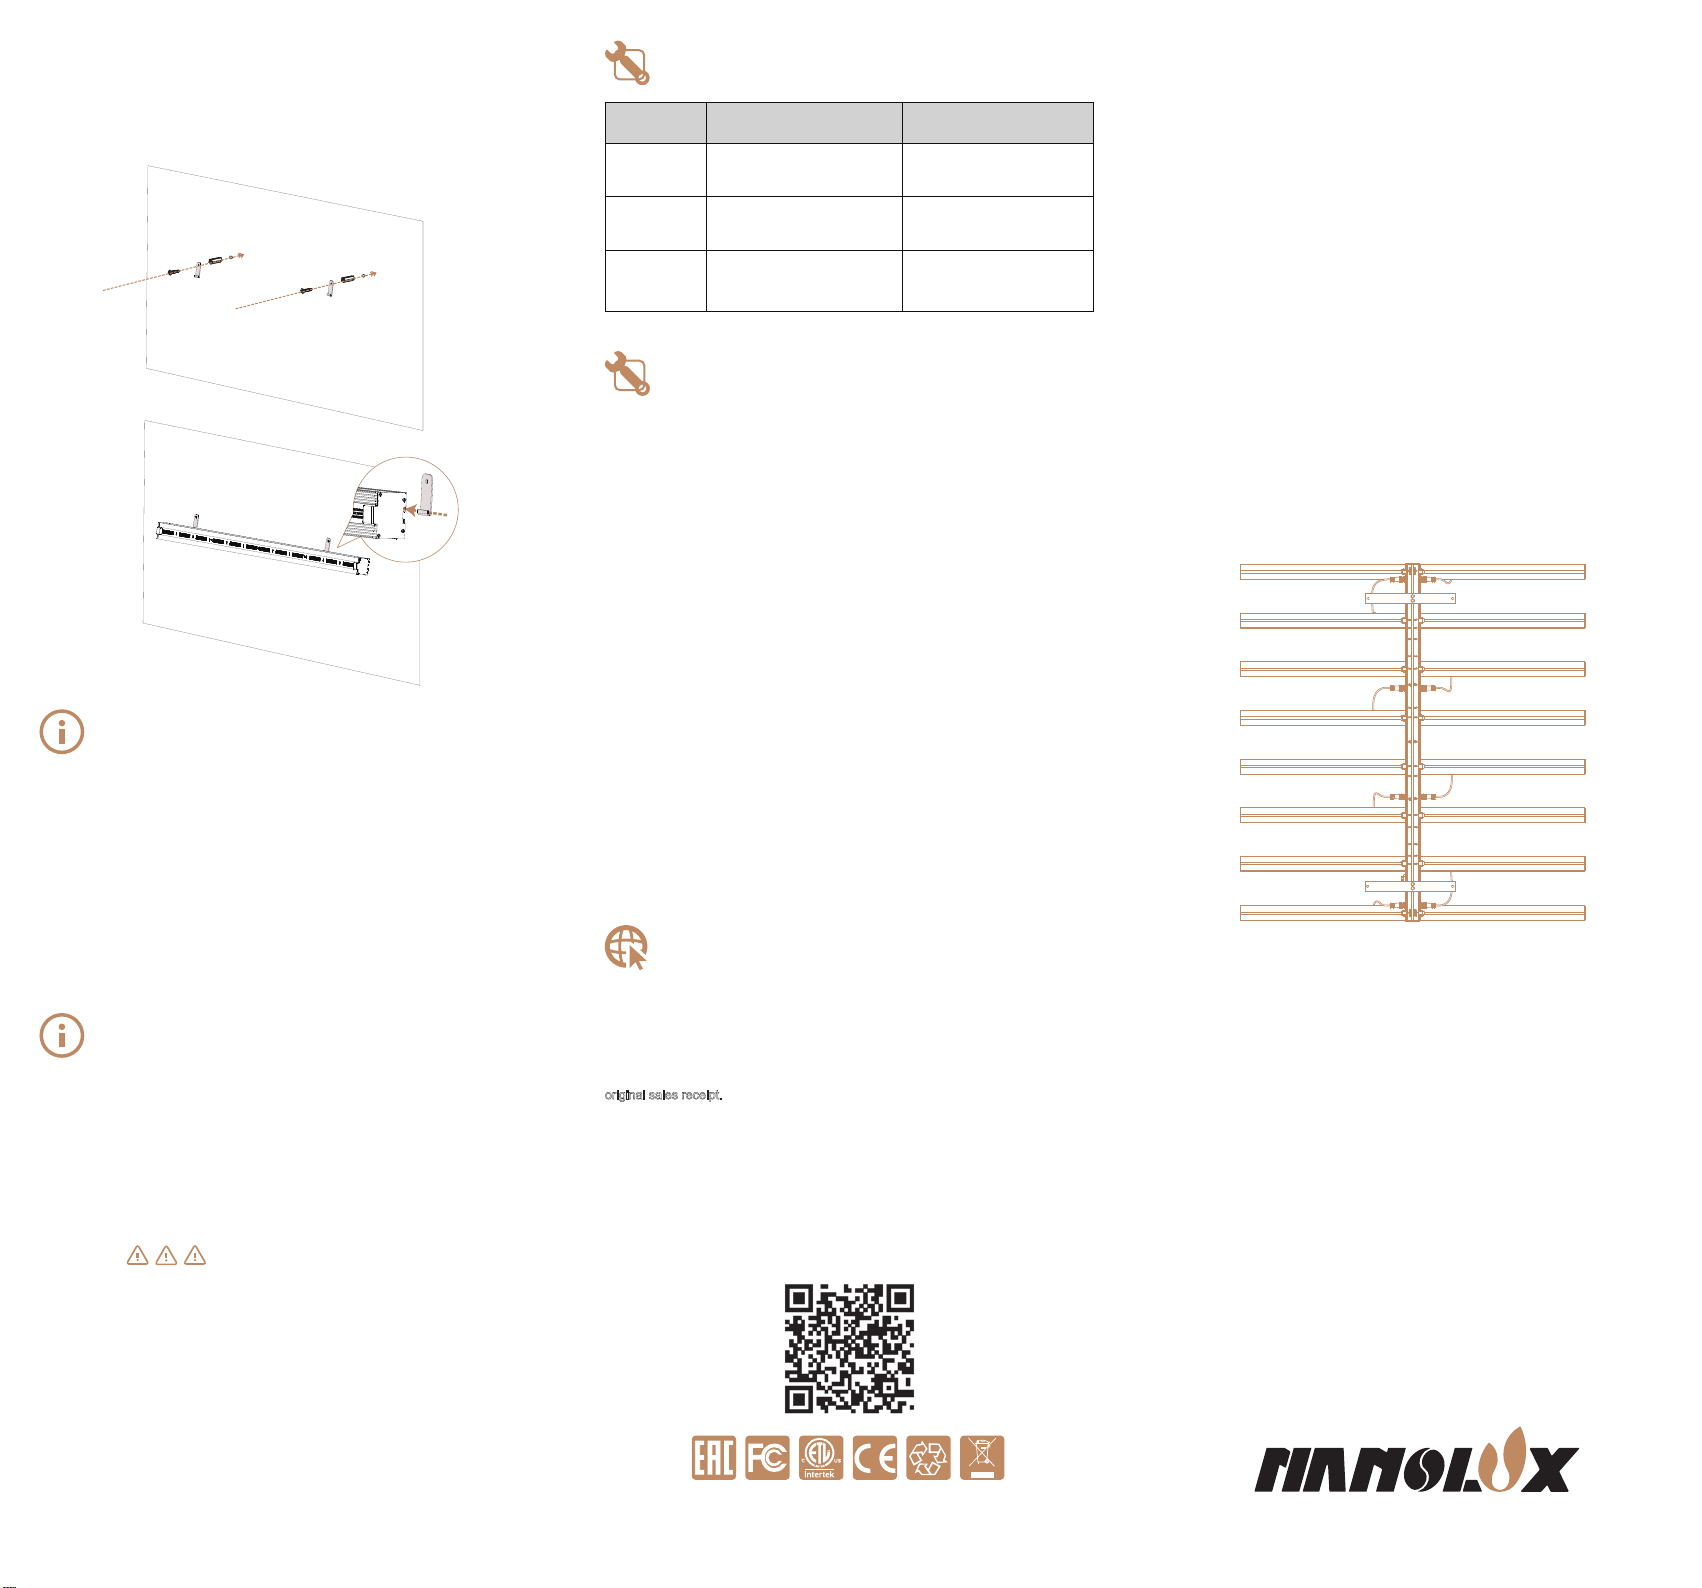
Method#3: wall-mounted installation
1. Only mount the product on a solid surface.
2. Pre-measure the holes for mounting first.
3. Drill two holes on the wall, then put the mounting hook into installation holes.
4. Insert and tighten the screw to secure the mounting hook.
5. Slide the light bar into the mounting hooks.
Repair or replace any
damaged cables if necessary.
Disconnect fixture from the
power supply. Check settings
and correct if necessary.
OPERATING
MANUAL
LEDex
Modular design
0-10V SLC & DTU NCCS-APP-2.0
COMPATIBLE WITH LIGHT TRACK
110W LIGHT BAR (Full Spectrum,Red,Blue,Red/Blue)
55W LIGHT BAR (UV)
WARRANTY
-04-
Designed by NANOLUX in California
Made in China
PATENTED PRODUCTS, COUNTERFEITING NOT ALLOWED.