manuals.online logo
Brands
  1. Home
  2. •
  3. Brands
  4. •
  5. NARVI
  6. •
  7. Stove
  8. •
  9. NARVI 30 Series Operating instructions

NARVI 30 Series Operating instructions

INSTALLATION, USE AND SERVICE
INSTRUCTIONS
SAUNA WOODBURNING STOVES
– MIRVA, STEAMMASTER, NARVI 30 AND NARVI 50.
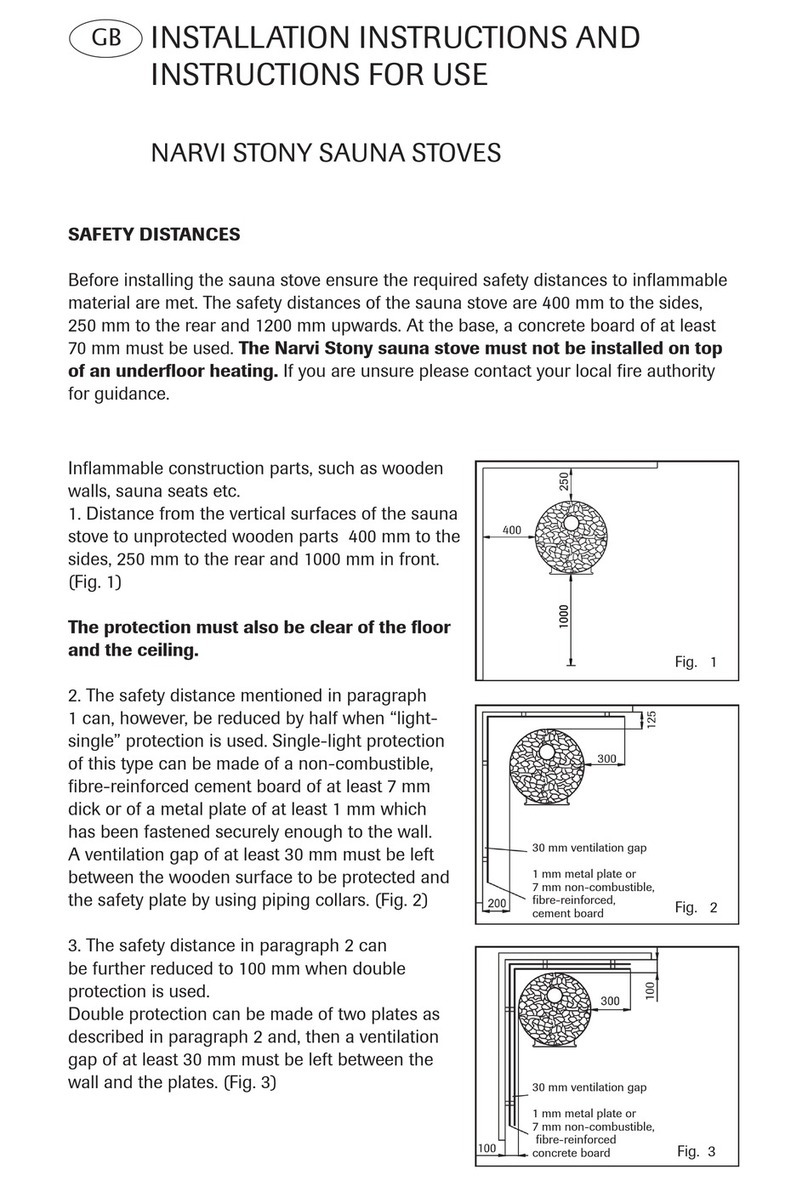
SAFETY DISTANCES
Prior to installation of the sauna woodburning stove, ensure the required safety
distances to combustible structures are observed. For woodburning stoves the safety
distances are 500 mm to the sides and rear and 1,200 mm overhead. A min. 70 mm
thick concrete slab or a NARVI installation base should be installed beneath the
woodburning stove. For any further queries regarding fire safety, please contact your
local fire authority for assistance.
Note! If the sauna woodburning stove is installed above under-floor heating,
a NARVI installation base must always be used.
GB
Combustible components
(wooden walls, benches etc.)
1. Distance to wooden components from vertical
sides of sauna woodburning stove without heat
shield min. 500 mm. (Figure 1)
2. The safety distance stated in section 1
(500 mm) can be reduced by half to 250 mm if
so-called light, single-layer thermal protection
is installed. A single-layer, light thermal shield
can be made from min. 7 mm thick fire-resistant
fibre-reinforced cement board or from min. 1 mm
thick metal sheet which has been fixed
sufficiently tightly to the wall. A ventilation gap of
30 mm must be left between the thermal shield
and the wooden surface, e.g. using pipe sleeves.
(Figure 2)
The heat shield must also be in non-contact
with the floor or ceiling.
3. The safety distance mentioned in section 2
can be further reduced by half (125 mm) if a
double shield is installed. A double thermal
shield can consist e.g. of two boards of the type
recommended in section 2 if a ventilation gap of
30 mm is left between the wall and the boards.
(Figure 3)
30 mm ventilation gap
1 mm metal plate or 7 mm
incombustible fibre-reinforced
cement board
Figure 1
Figure 2
Figure 3
30 mm ventilation gap
1 mm metal plate or 7 mm
incombustible fibre-reinforced
cement board
Figure 4
Figure 5
Figure 7
X mm
Unprotected ceiling 1200
Single-layer,
light protection 900
Figure 6
4. If the wall is a masonry wall, a 50 mm
ventilation gap between the vertical sides of
the sauna woodburning stove and the wall is
sufficient. (Figure 4)
Measurement A is applied to wooden surfaces
in accordance with the thermal protection
method applied:
- no thermal protection: 500 mm
- single-layer, light thermal protection: 250 mm
- double, light thermal protection: 125 mm
5. 55 mm thick masonry which is open at
the edges and detached from the protected
surface by at least 30 mm also constitutes
single-layer, light thermal protection. Double
light thermal protection constitutes 110 mm
thick masonry detached from the protected
surface as above. (Figure 5)
Thermal protection of the ceiling:
When the distance from the upper surface
of the sauna woodburning stove is at least
1,200 mm no ceiling protection is needed. If
the safety distance is less than 1,200 mm, the
thermal protection method for the ceiling is
chosen from sections 1-3. (Figure 6)
Thermal protection of the floor in front of the
sauna woodburning stove:
A floor consisting of combustible material must
be protected with a metal sheet extending 100
mm to each side of the woodburning stove fire
door and 400 mm to its front. (Figure 7)
Figure 8
Measurement A is applied to wooden
surfaces in accordance with the thermal
protection method applied:
- no thermal protection 500 mm
- single-layer, light thermal protection 250 mm
- double, light thermal protection 125mm
Figure 9
SAUNA WOODBURNING STOVE INSTALLATION
All of our sauna woodburning stove models are
fitted with a flue pipe connection both behind and
on top of the sauna woodburning stove. Block
the unused opening with the cover plate included
in the delivery. Also included in the delivery is
a 160 mm flue pipe connector for connection
of the sauna woodburning stove to a rear flue
pipe. When connecting the sauna woodburning
stove to the flue from the top of the woodburning
stove, always use NARVI chimney pipes or NARVI
chimney flues.
Do not install the flue adapter pipe too deeply into the chimney flue, as this will
reduce the flue draw. The gap between the flue adapter pipe and the chimney flue
must be insulated e.g. with mineral wool.
In connection with the sauna woodburning stove installation, ensure that the
woodburning stove stands firmly on its base and that all of the safety distances
mentioned in these instructions have been observed correctly.
Installation of tunnel model sauna woodburning
stoves:
The wall separating the fire tending room and
the sauna woodburning stove must be built of
fire-resistant material such as brick. The required
hole size for a brick wall is ...
Measurements from floor:
Product Height mm Width mm
ST MIRVA 430 270
WT STEAMMASTER 455 360
ST NARVI 30 570 390
ST NARVI 50 590 390
We recommend the use of mineral wool quilt for insulation of the brick wall and
tunnel section, as this material allows for thermal expansion. The tunnel model
is connected to the flue from the top of the sauna woodburning stove. Always
use NARVI chimney pipes or NARVI chimney flues. In connection with the sauna
woodburning stove installation, ensure that the woodburning stove stands firmly on
its base and that all of the safety distances mentioned in these instructions have been
observed correctly.
Thermal protection of the floor in front of the sauna woodburning stove:
A floor consisting of combustible material must be protected with a metal sheet
extending 100 mm to each side of the woodburning stove fire door and 400 mm to the
front.
INITIAL HEATING
Before use and installation of stones, the sauna woodburning stove must be pre-
heated to remove any protective agents. 1-2 firebox loads of wood is sufficient for
initial heating. Ensure that the sauna room has sufficient ventilation during initial
heating to aid removal of combustion gases generated by the burning off of protective
agents. Initial heating can also be performed outdoors.
SAUNA WOODBURNING STOVE STONES
We recommend use of NARVI olivine diabase stones. Stack the stones in the stone
compartment so that the biggest stones are at the bottom. In order to ensure good
air circulation between the stones, do not stack the stones too tightly. NARVI sauna
woodburning stove stones come ready washed and can be loaded directly into the
sauna stove. We do not recommend use of light stone types. Sauna water used on
the stove should always be clean. Use of seawater will reduce the service life of your
sauna stove considerably.
FIREWOOD
Both hardwood and softwood species will provide ideal fuel for your Narvi sauna
woodburning stove. Trees for firewood should be felled and cross-cut outside of their
growing season. Firewood should be dried outdoors during summer months and
transferred to dry storage before damp autumn/winter weather sets in. The amount of
firewood stored should ideally cover one to two years worth of consumption, during
which time the moisture content of the wood will reach < 20 %.
HEATING
Always clean and empty the fire grate and ashpan first before lighting your sauna
woodburning stove or stove. Begin lighting the woodburning stove using a small
quantity of kindling. Once the wood is burning well, add more wood until the firebox
is stacked about 2/3 full. To aid combustion, additional air intake can be regulated by
adjusting the ashpan. Avoid overheating the sauna woodburning stove to the extent
that the channels within the stone compartment remain red-hot for long periods, as
this overloads the firebox and shortens the service life of the woodburning stove. At
the end of your sauna bath, a low fire can be left burning in the woodburning stove to
help dry out the sauna.
SAUNA WOODBURNING STOVE MAINTENANCE
The sauna woodburning stove should be swept via the chimney sweeping hatches
once a year to maintain the best possible flue draw. It is also recommended to check
the condition of sauna woodburning stove stones on an annual basis and replace any
that may have deteriorated in service.

Other manuals for 30 Series

1

This manual suits for next models

7

Other NARVI Stove manuals

NARVI GREENLINE WT NM 12-25 Operating instructions

NARVI

NARVI GREENLINE WT NM 12-25 Operating instructions

NARVI Softy 4,5kW User manual

NARVI

NARVI Softy 4,5kW User manual

NARVI ULTRA BIG N18 Quick guide

NARVI

NARVI ULTRA BIG N18 Quick guide

NARVI NM 450 Quick guide

NARVI

NARVI NM 450 Quick guide

NARVI NARVI-ULTRA Quick guide

NARVI

NARVI NARVI-ULTRA Quick guide

NARVI NOVA ELECTRON Series Quick guide

NARVI

NARVI NOVA ELECTRON Series Quick guide

NARVI STONY 18 Setup guide

NARVI

NARVI STONY 18 Setup guide

NARVI ELECTRON 450 Quick guide

NARVI

NARVI ELECTRON 450 Quick guide

NARVI AITO Aitokiuas AK-68 Operating instructions

NARVI

NARVI AITO Aitokiuas AK-68 Operating instructions

NARVI STONY 18 Setup guide

NARVI

NARVI STONY 18 Setup guide

NARVI SMOOTH 9kW Quick guide

NARVI

NARVI SMOOTH 9kW Quick guide

NARVI NME 450 User manual

NARVI

NARVI NME 450 User manual

Popular Stove manuals by other brands

COZY 12 Guide to installing

COZY

COZY 12 Guide to installing

Harman P42i-TC Owners manual care and operation

Harman

Harman P42i-TC Owners manual care and operation

Coleman 9946 Series Instructions for use

Coleman

Coleman 9946 Series Instructions for use

Dean Hembury 5 SE operating instructions

Dean

Dean Hembury 5 SE operating instructions

Olsberg PALE Instruction

Olsberg

Olsberg PALE Instruction

Italiana Camini POLIS Installation, use and maintenance

Italiana Camini

Italiana Camini POLIS Installation, use and maintenance

GAS ONE GS-800P instruction manual

GAS ONE

GAS ONE GS-800P instruction manual

Ravelli HRV 100 Touch quick start guide

Ravelli

Ravelli HRV 100 Touch quick start guide

wallas Safe Flame 800 installation instructions

wallas

wallas Safe Flame 800 installation instructions

Cadel VEGA AIRTIGHT user manual

Cadel

Cadel VEGA AIRTIGHT user manual

Tim Sistem Magic owner's manual

Tim Sistem

Tim Sistem Magic owner's manual

EdilKamin Italiana Camini IDROPOINT Installation, use and maintenance

EdilKamin

EdilKamin Italiana Camini IDROPOINT Installation, use and maintenance

Valor ardeche 8121 Installation and operating guide

Valor

Valor ardeche 8121 Installation and operating guide

Olsberg Alegre Compact Instruction

Olsberg

Olsberg Alegre Compact Instruction

Charnwood Country 6 MkII Operating & installation instructions

Charnwood

Charnwood Country 6 MkII Operating & installation instructions

Morso 3600 Series Installation and operating instructions

Morso

Morso 3600 Series Installation and operating instructions

KYOWA KW-3500 instruction manual

KYOWA

KYOWA KW-3500 instruction manual

Palazzetti BETTY Instructions for use and maintenance

Palazzetti

Palazzetti BETTY Instructions for use and maintenance

manuals.online logo
manuals.online logoBrands
  • About & Mission
  • Contact us
  • Privacy Policy
  • Terms and Conditions

Copyright 2025 Manuals.Online. All Rights Reserved.