Narvon SLUSHY 378SM2 User manual

1
NARVON
NARVON SLUSHY
SERVICE MANUAL
READ THOROUGHLY BEFORE OPERATION • UPDATED 01/2022
#378SM2
DOUBLE BOWL
#378SM1
SINGLE BOWL #378SM3
TRIPLE BOWL

NARVON
TABLE OF CONTENTS
1. GENERAL INFORMATION .............................................4
1.1 Manufacturer ................................................................4
1.2 Authorized persons...........................................................4
1.3 Layout of the manual .........................................................4
1.3.1 Purpose and contents ...................................................4
1.3.2 Who must read the manual...............................................4
1.3.3 How to keep the manual .................................................4
1.3.4 Symbols used...........................................................4
2. MACHINE DESCRIPTION ..............................................6
2.1 Main components ............................................................6
2.2 Technical data ...............................................................6
2.3Controlpaneldescriponandfuncons .........................................7
3. SAFETY ...............................................................8
3.1 General safety rules ..........................................................8
3.2Stopfuncons ...............................................................8
3.3 Plates.......................................................................8
4. HANDLING AND STORAGE ............................................8
4.1 Packaging . . . . . . . . . . . . . . . . . . . . . . . . . . . . . . . . . . . . . . . . . . . . . . . . . . . . . . . . . . . . . . . . . . .9
4.2 Conveyance and handling .....................................................9
4.3 Storage .....................................................................9
5. INSTALLATION.......................................................10
5.1 List of accessories provided.................................................. 10
5.2Installaon-Posioning...................................................... 10
5.3 Disposal of packing materials ................................................ 10
5.4Electricalconnecon ....................................................... 11
6. OPERATION .........................................................11
6.1 Preparing the product ...................................................... 11
6.2Starngaslushymachine ................................................... 12
6.3Starngaslushymachine
(temperature display) ....................................................... 10
6.4Starngaslushymachine2/3
(temperature display) ....................................................... 13
6.5Adjusngslushyconsistency................................................. 13
6.6 Dispensing slushy .......................................................... 14

NARVON
6.7Emergencysituaons ....................................................... 15
6.8Oponalaccessories........................................................ 15
6.8.1 Locking System........................................................... 15
6.8.2 Timer ................................................................... 16
6.8.2.1Sengthecurrentme .............................................. 16
6.8.2.2Operangthemachinewiththemer.................................. 16
6.8.3 Mechanical thermostat .................................................... 16
6.8.4Highpressurealarm(pressureswitch)/dirtyltersignal ....................... 16
6.8.4.1 Air machines........................................................ 16
6.8.4.2 Water machines ..................................................... 16
7. CLEANING AND MAINTENANCE......................................17
7.1 Emptying the bowls ........................................................ 18
7.2 Disassembling the dispensing tap ............................................ 19
7.3 Removing the bowl and the lid ............................................... 19
7.4Washingandsanizingthecomponents....................................... 20
7.5 Reassembling the washed components........................................ 20
7.6 Rinsing cycle .............................................................. 22
7.7 Cleaning the drip tray....................................................... 22
7.8 Lighted lid................................................................. 22
7.8.1 Bulb replacement......................................................... 23
7.9 Cleaning the condenser . . . . . . . . . . . . . . . . . . . . . . . . . . . . . . . . . . . . . . . . . . . . . . . . . . . . . 23
7.9.1Cleaningtheslushymachine1/1FFcondenser............................ 23
7.9.2Cleaningtheslushymachine2/2FF-3/3FFcondenser ................... 23
7.10 Periodic maintenance...................................................... 24
8. DISPOSAL............................................................24
9. TROUBLESHOOTING.................................................25
10. BASIC WIRING DIAGRAMS ..........................................26
11. EQUIPMENT LIMITED WARRANTY . . . . . . . . . . . . . . . . . . . . . . . . . . . . . . . . . .29

4NARVON
1. GENERAL INFORMATION
1.1. Manufacturer
Themanufacturer’sdetailsareshownontheidencaonplate,illustratedonrstand/orlastpageofthemanual.
1.2. Authorized persons
Twotypesofpeoplemayaccessthemachinefordierentpurposes:
User
Apersonwhohasadequatetechnicaltrainingtopreparetheproductsthemachineusestodispenseslushy,inobservance
of current standards of hygiene.
Aerreadingthismanual,theywillbecapableof:
• carryingoutnormalproductloadingand/orreplacementoperaons;
• properlydispensingtheproduct;
• cleaningandsanizingthemachine.
Specialized technician
Apersonwhohasexaminedthismanualandhasspecictrainingintheinstallaon,useandservicingoftheslushy
machine:
• must be able to carry out repairs in the event of serious faults and be well acquainted with this manual and all the
informaonregardingsafety;
• mustbeabletounderstandthecontentsofthemanualandcorrectlyinterpretdrawingsanddiagrams;
• mustbefamiliarwithsanitaonmethods,accidentprevenon,technologicalandsafetystandards;
• musthavespecicexperienceinservicingslushymachines;
• mustknowhowtobehaveincaseofemergency,wheretondindividualsafetyequipmentandhowtouseitproperly.
Persons who do not meet the above requirements must
not be allowed to use the machine.
1.3. Layout of the manual
ThePurchasermustverycarefullyreadtheinformaoncontainedinthismanual.
1.3.1. Purpose and contents
ThepurposeofthismanualistoprovidethePurchaserwithallthenecessaryinformaonregardingtheinstallaon,
maintenance and use of the granita machine.
Before carrying out any operation on the machine, users and specialized technicians must carefully
read the instructions herein.
Shouldyouhaveanydoubtsastothecorrectinterpretaonoftheseinstrucons,contactthemanufacturertorequestthe
necessaryexplanaons.
You should not carry out any type of operation until you have read and thoroughly understood the
contents of this manual.
1.3.2. Who must read the manual
This manual is aimed at users and specialized technicians.
Users must not attempt to carry out any operations restricted to qualified technicians.
The manufacturer will not be liable for any damage or injury caused as a result of failure to comply with this rule.
Theinstruconmanualisanintegralpartoftheproductpurchasedandmustthereforebehandedovertoanysubsequent
owners.

5
NARVON
1.3.3. How to keep the manual
Thisinstruconmanualmustbekeptintheimmediatevicinityofthemachine.
Dueprecauonsshouldbetakentoensurethatthemanualismaintainedintact
andlegibleoverme:
• Use the manual in such a way as to avoid damaging any of its contents.
• Donotforanyreasonremove,tearorrewritepartsofthemanual.
• Keep the manual in a place that is protected against humidity and heat in order to preserve the quality of the print and
the legibility of all its parts.
If the present instruction manual is damaged or lost, another copy should be immediately requested
from the manufacturer or authorized distributor in the user’s country.
1.3.4. Symbols used
GENERAL DANGER WARNING
This symbol indicates a danger which may also place the User at mortal risk. In such cases utmost
care is required and every precaution must be taken in order to operate safely.
DANGER OF ELECTROCUTION
This symbol warns the personnel concerned that the operation described may result in an electric
shock unless all the necessary safety precautions are taken.
IMPORTANT
This symbol indicates a cautionary note, a note about key functions or useful information. Very close
attention should be paid to the portions of text marked with this symbol.
PROHIBITED
This symbol is used to indicate operations that must absolutely be avoided since they create hazards
for the User and any other individuals present in the vicinity.
DO NOT EXTINGUISH FIRES WITH WATER
The presence of this symbol warns against attempting to extinguish fires with water or any substance
containing water.
PERSONAL PROTECTION
When this symbol appears alongside a description it means that personal safety equipment must be
used, as there is an implicit risk of accidents.
SPECIALIZED TECHNICIAN
This symbol identifies operations that may be performed only by qualified technical personnel.
MOVING MACHINE PARTS
This symbol identifies the danger due to moving parts existing in the machine.

6NARVON
2. MACHINE
DESCRIPTION
Use of the machine
The professional machine you are using is suitable for making
granitas,slushiesandcoldbeverages.Ifusedwithdairy-
basedproductsand/orwhenenvisagedbylawinaccording
tothetypeofproductused,itmustbeequippedwiththe
oponalextraofa“temperaturegauge”fortheproductin
the bowl. It is also obligatory to comply with the current
regulaonsandstandardsconcerningtheproductsused.
2.1. Main components
Themaincomponentsmakingupthemachineare:
To make the instructions easier to read, the
following abbreviations are used herein:
Slushy 1, idenes a Slushy machine with one (1) bowl;
Slushy 2, idenes a Slushy machine with two (2) bowls;
Slushy 3, idenes a Slushy machine with three (3bowls;
Slushy 1 FF, idenes a Slushy machine with one
(1) bowl and Fast Freeze refrigeraon system;
Slushy 2 FF, idenes a Slushy machine with two
(2) bowls and Fast Freeze refrigeraon system;
Slushy 3 FF, idenes a Slushy machine with three
(3) bowls and Fast Freeze refrigeraon system.
2.2. Technical Data
The technical data and features are listed below
Note: The manufacturer reserves the right to
make changes to the machine without notice.
Important! Any changes and/or additions of
accessories must be explicitly approved and
implemented by the Manufacturer.
Fig. 02
1
3
9
2
10
4
6
7
8
5
1Bowl lid
2Thickness regulator
3Bowl
4Control panel
5Drip tray
6Grid
7Float(overowindicator)
8Product dispenser
9Product dispensing lever
10Feet
Model Slushy 1 Slushy 2 Slushy 3
Dimensions
W x D x L (cm) 20 x 53 x 84 40 x 50 x 84 60 x 50 x 84
Maximum
Electrical Input (W) 2.9 4.7 6.8
5.2 7.0
Operang
voltage (V) 115
Operang
temperature
(Air temp)
Min.68°F-Max.89°F
Number of bowls. 1 2 3
Capacity of
each bowl 3 gallons
Sound pressure level << 70 dBA
Class N
RefrigeraonType R290
WW
W
D
D
D
L
L
L

7
NARVON
2.4. Control panel description and functions
The machine controls are located on the side control panel.
Control Machines with this control Funcons
All
Mainswitch:itsfunconistocontrol:
• thestarngofthemachine;
• theswitchingoofallthe
funconspresentonthemachine.
All Lidlightswitch:toturnon/olight
(if present) on the bowl lids.
All
Bowl mixing switch (one for each
bowl):itisusedtoswitchonando
the gearmotor that drives the auger for
mixingtheproductintherespecve
bowl.
All
Refrigeraonsystemchangeover
switch(oneforeachbowl):
• inposion“0”,therefrigeraon
systemisdeacvated;
• inposion“I”,therefrigeraon
systemisacvatedforthe
produconofgranitas;
• inposion“II”,therefrigeraon
systemisacvatedforthe
produconofcolddrinks.
All versions
with temperature
display
Temperaturedisplay:
• This shows the temperature of the
product inside the tank

8NARVON
3. SAFETY
3.1 General safety rules
• Carefullyreadthewholeinstruconmanual.
• Theconnecontotheelectricitymainsmustcomplywith
the current safety standards in the user’s country.
• The machine must be connected to an electric outlet
thatis:
- compablewiththeplugprovidedwiththemachine;
- ofdimensions conforming to the data shown on the
rangplateonthesideofthemachine.
- properlygrounded;
- connectedtoasystemprovidedwithadierenal
switch and circuit breaker.
• Thepowercordmustnotbe:
- allowedtocomeintocontactwithanykindofliquid:
thiscancauseelectricshocksand/orre;
- crushedand/orbroughtintocontactwithsharp
surfaces;
- usedtomovethemachine;
- usedifitshowsanydamage;
- handledwithdamporwethands;
- woundintoacoilwhenthemachineison.
- tamperedwith.
• DONOT:
- installthemachineinamannerotherthanthat
describedinSecon5.
- installthemachineinaplacewhereitmaybeexposed
to any kind of water or liquid.
- usethemachinenearinammableand/orexplosive
substances.
- leaveplascbags,polystyrene,nails,oranyparts
withinchildren’sreach,sincetheyarepotenal
sources for danger.
- allowchildrentoplayorstaynearthemachine.
- usesparepartsotherthanthoserecommendedbythe
manufacturer.
- makeanytechnicalchangestothemachine.
- immersethemachineinanykindofliquid.
- spraywateronthemachinetowashit.
- usethemachineotherthanasdirectedinthismanual.
- usethemachinewhennotinfullpossessionofyour
mentalandphysicalfacules:undertheinuenceof
drugs,alcohol,etc.
- installthemachineontopofotherequipment.
- usethemachineinanexplosiveatmosphereorin
thepresenceofahighconcentraonofdustoroily
substancessuspendedintheair;
- usethemachineinaplacewherethereisariskofre;
- usethemachinetodispensesubstancesthatarenot
compablewiththemachine’sspecicaons;
• Beforecleaningthemachine,makesurethatitis
unplugged;donotcleanthemachinewithgasolineand/
or solvents of any kind.
• Repair work may be performed only by a service center
memberauthorizedbytheManufacturerand/orbya
specialized,trainedpersonnel.
• Do not obstruct the grill vents on the side of the
machine.
• Donotplacethemachinenearheangequipment
(stoves or radiators).
• Incaseofre,usecarbondioxide(CO2)exnguishers.
Donotusewaterorpowderexnguishers.
In the event of improper use, all warranty
rights will be forfeited and the manufacturer
will accept no liability for injury or damage to
persons and/or property.
The following are to be considered improper use:
- any use other than the intended use and/or with methods
other than those described herein;
- any operaon on the machine that is in contrast with the
direcons provided herein;
- use of the machine aer any components have been
tampered with and/or safety devices have been changed;
- use of the machine aer it has undergone repair with
components not authorized by the manufacturer;
- outdoor installaon of the machine.
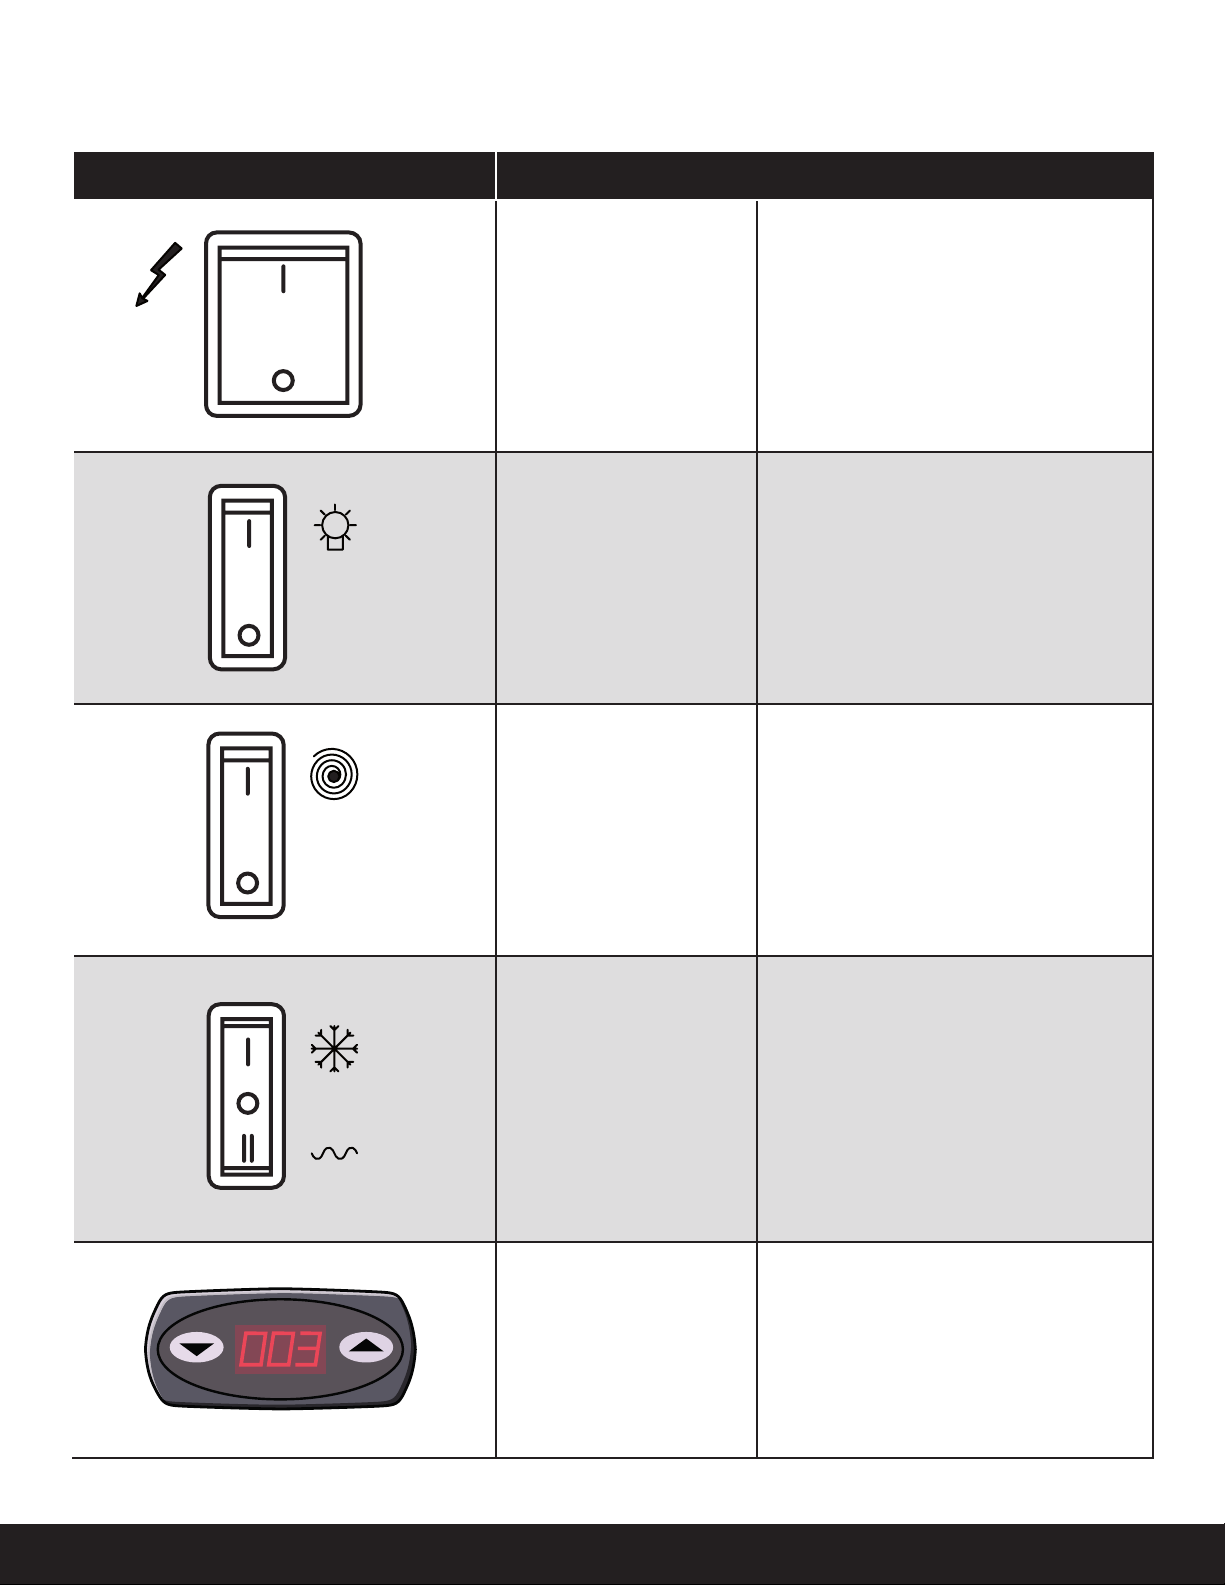
3.2 Stop functions
The machine is shut down by turning o the main switch.
3.3 Plates
NONE OF THE PLATES OR LABELS APPLIED ON
THE MACHINE MUST BE REMOVED, COVERED OR
DAMAGED, ESPECIALLY THOSE RELATING TO SAFETY.
4. HANDLING
AND STORAGE
All the operations described in Section 4 may
be carried out exclusively by technicians who
are also specialized in the lifting and handling
of packed or unpacked machines. They must
organize all the operational sequences and
use suitable equipment, according to the
characteristics and weight of the object to
be handled and in strict compliance with the
applicable regulations currently in force.

9
NARVON
4.1. Packaging
The machine is shipped ready for use in a cardboard box.
Thecardboardboxcomprisesabaseandacover,whichare
secured together with two nylon straps.
DIMENSIONS AND WEIGHT OF PACKING CONTAINER
Note: The dimensions and weight of the packing
container are approximate.
4.2. Conveyance and handling
Make sure that no one is stationed within
range of lifting and handling operations.
In difficult conditions, specialized personnel
should be appointed to oversee the
movements of the machine.
Manual handling of the machine requires at least
two people.
Themachinemustbemovedintoanuprightposion,only
aereverybowlhasbeenempedofproduct.
Litheboxandcarefullyconveyit,avoidingrouteswith
obstacles.Payaenontotheoveralldimensionsandany
partssckingout.
Warning: Do not make any additional cuts on
the packing container.
The WARRANTY does not cover damage caused to the
machine during its conveyance and handling.
The Purchaser will bear the cost of repairing or replacing
damaged parts
4.3. Storage
Before the machine is placed in storage
and whenever the machine is started up
again after a period of storage, it must be
thoroughly cleaned and sanitized.
Warning: Do not store more than two machines
stacked on top of one another.
Ifthemachineistoremainunusedforalongperiodofme,
dueprecauonsmustbetakenwithrespecttotheplace
andduraonofstorage:
• storethemachineinaclosedplace;
• protectthemachinefromshocksandstresses;
• protect the machine from humidity and large
temperatureuctuaons;preventthemachinefrom
coming into contact with corrosive substances.
Fig.04
Model Width (L) Depth (P) Height (H) Weight
Slushy 1 30.5 cm 53 cm 93 cm 31 kg
Slushy1FF 30.5 cm 53 cm 93 cm 31 kg
Slushy 2 58 cm 54 cm 97 cm 51 kg
Slushy2FF 58 cm 54 cm 97 cm 60 kg
Slushy 3 77 cm 54 cm 97 cm 67 kg
Slushy3FF 77 cm 54 cm 97 cm 75 kg
MAX

10 NARVON
5. INSTALLATION
All of the operations described in Section 5
may be carried out exclusively by specialized
technicians, who must organize all the
operational sequences and use suitable
equipment, in strict compliance with the
applicable regulations currently in force.
Themachinemustbeinstalledindoorsinawell-litandwell-
venlatedroomwitharm,solid,leveloor(slopelessthan
2°).
The machine is of the attended type, and
must be installed in places where it can be
monitored by trained personnel.
Current legislation may dictate that the
connection between the power cable and
the mains must be permanent. Contact a
specialist technician to connect/disconnect
the cable to/from the mains in accordance
with the current regulations.
Warning: It is forbidden to install the machine
in a place where it may be reached, touched
and/or operated by persons other than those
specified in section 1.2.
The machine may only operate in places with an
ambient temperature ranging between 20°C and 32°C
(68°F-89.6°F).
5.1. List of accessories provided
• Foodgradelubricant:tolubricatealloftheparts
indicatedinthismanualaerwashingandsanizaon
operaons.
5.2. Installation-Positioning
Theinstallermustcheckthat:
• thesitehasbeendulypreparedformachineinstallaon;
• thesurfacethatthemachinewillbeinstalledonisrm,
atandsolid;
• theroomisadequatelylit,venlatedandhygienicandan
electric outlet is within easy reach.
Adequate clearance must be left around the
machine to enable personnel to work without
any constraints and also able to leave the
work area immediately in case
of need.
Figure 5 shows the minimum clearances for installaon
Note: Leave a 25 cm (10 inches) space in the
upper part.
Fig.5showstheclearancesrequiredtoaccess:
• thecontrolpanelontherightside;
• machine parts so that they may be serviced in the event
of a fault.
Aerposioningthepackingcontainerinthevicinityofthe
installaonsite,proceedasfollows:
1.Cutthestrapssecuringthebox;
2.Lithecardboardbox;
3.Thenlithemachineandposionitonthepreparedsite.
Before the machine is used for the first time,
its components must undergo thorough
cleaning and the parts that will come into
contact with the granita must be sanitized;
for further details see the relevant section
herein.
5.3. Disposal of packing materials
Aeropeningthebox,makesuretoseparatethepacking
materials according to type and dispose of them in
accordancewiththecurrentregulaonsintheuser’s
country.
We recommend keeping the box for future conveyance or
transport.
150 cm
60 inches
25 cm
10 inches
25 cm
10 inches
25 cm
10 inches
Fig.5

11
NARVON
5.4. Electrical connection
This job may be performed only by specialized
technical personnel.
Beforeplugginginthemachine,makesurethatthemain
switchison“0”.
The Purchaser is responsible for making the electrical
connecon.
The machine must be connected to the electricity mains
bymeansoftheplugedonthepowercord.Besureto
complywith:
• thetechnicalregulaonsandstandardsinforceatthe
meofinstallaon;
• thedatashownontherangplateonthesideofthe
machine.
Warning: The electric outlet must be situated
in a place easily within reach of the user,
so that no effort is required in order to
disconnect the machine from the power
supply when necessary.
Ifthepowercordisdamaged,youmusthaveitreplaced
either by the manufacturer or a specialized technician
It is forbidden:
• to use extension cords of any type;
• to replace the original plug;
• to use adapters.
6. OPERATION
Beforethemachinemaybestartedupfortherstme,
specializedtechnicalpersonnelmustcheckthatitfuncons
properly.
6.1 Preparing the product
Warning: Product may be poured into the
bowl only when the machine is off and
unplugged.
Fig.6 Never only use water
Dilute and mix the CONCENTRATE with WATER in a
suitablecontainer,followingthemanufacturer’sdirecons.
THE MIXTURE OBTAINED MUST HAVE A MINIMUM
SUGARCONTENTOF13°BRIX-Alowerconcentraon
maydamagetheaugersand/orgearmotors.
Toremovethelidfromthebowl,followtheseinstrucons:
1lithelid;
Warning: Do not force the lid opening
in case of difficulty.

12 NARVON
NEVER INTRODUCE HOT LIQUIDS with temperatures
exceeding25°C(77°F)
Fig.8
Pour the product into the bowl making sure
that it never goes above the max level.
Fig.9
Aerpouringtheproductintothebowl,closethelidontop
of the bowl.
Warning: Never switch on the machine if the
lid is missing. Before removing the lid, switch
off the machine and unplug it.
Warning: There are some moving parts inside
the bowl, which may cause injuries; turn off
and unplug the machine before carrying out
any operation inside the bowl.
6.2. Starting a Slushy Machine
Forthesakeofsimplicityonlytheoperaonoftheright
bowlwillbeillustrated;tooperatetheotherbowlssimply
carry out the same sequence of steps on the switches of the
bowlinqueson.
Switch inposion“I”:machinepowered.
Each bowl is controlled by a switch and a changeover
switch,whichmustbeoperatedasfollows:
Switch inposion“I”:mixeron.
If the machine is equipped with a timer, refer
to section 6.7 for directions on how to set the
machine correctly.
TodispenseSlushy:
Changeover switch :inposion“I”refrigeraonsystem
on (freeze mode).
Max
level
Product
Fig.10
Fig.11
Fig.12

13
NARVON
Changeover switch :inposion“II”refrigeraonsystem
on (cooling mode).
Press the switch
to turn on the machine lid light.
6.3. Starting the Slushy Machine 1
(Temperature display)
The temperature display serves to view the temperature of
theproductinsidethetankwhenthemachineisoperang
in“colddrinksfridge”mode.
Switch (A)inposion“I“:powerisbeingsuppliedtothe
machine.
Switch (C)inposion“I“:themixerisoperang.
To make SLUSH DRINKS (GRANITA): Switch (D) in
posion“I“:Refrigeratorsystemoperang(slushdrinks-
granita).
To make COLD DRINKS: Switch (D)inposion“II“:
Refrigeratorsystemoperang(colddrinks).
To disable the FRIDGE (mixing only): Switch (D) in
posion“0“:Refrigeratorsystemo(mixingonly).
3secondsaerthelastkeyispressed,thesengisstored
to memory and the display will show the temperature of the
product in the tank.
ALARMS
Incaseofprobefailure,thedisplaywillreadA1.
Programming and adjustment outputs will be disabled.
6.4. Starting the Slushy Machine 2/3
(Temperature display)
Forthesakeofsimplicity,wewillshowhowtoenablethe
right-handtank;fortheothertanks,itissucienttocarry
outthesamesequenceofoperaonsontheswitchesfor
thetankinqueson.
Switch (A)inposion“I“:Machinepowered.
Switch (C)inposion“I“:Mixersoperang.
To make SLUSH DRINKS (GRANITA): Deviators (D) in
posion“I“:Refrigeratorsystemoperang(slushdrinks-
granita).
To make COLD DRINKS: Deviators (D)inposion“II“:
Refrigeratorsystemoperang(colddrinks).
To disable the FRIDGE (mixing only): Deviators (D) in
posion“0“:Refrigeratorsystemo(mixingonly).
Fig.13
Fig.14
Fig.15
A
E
C
D
Fig.15
A
C
D
E
A
E
D
C
E
A
D
2 TANKS
3 TANKS
Fig.16
C

14 NARVON
ALARMS
Incaseofprobefailure,thedisplaywillshowthefollowing
alarmmessages:
“A1”:Tank1probedisconnected
“A2”:Tank1probeshortcircuit
“A3”:Tank2probedisconnected
“A4”:Tank2probeshortcircuit
“A5”:Tank3probedisconnected
“A6”:Tank3probeshortcircuit
Duringoperaon,thetemperaturedisplayshowsthe
temperatureoftheproductinthetanks,cyclicallyshowing
thetemperatureoftheproductrstinonetankandthenin
theother,every3seconds.Toseewhichtankisreferredto
withthetemperaturereading,itisnecessarytocheckwhich
decimal point is being shown.
Ifthedecimalpointviewedisonthele,thetemperature
readingreferstothetank1(seeFig.2Page4).
Ifthedecimalpointviewedisinthecentre,thetemperature
readingreferstothetank2(seeFig.2,Page4).
Ifthedecimalpointviewedisontheright,thetemperature
readingreferstothetank3(seeFig.2,Page4).
Note: If while using machine, the temperature
display should switch off suddenly, to start
it again press the . key. If the temperature
display should not switch on again, switch
off the machine and contact your nearest
assistance center.
Important: While using the machine, the
temperature display must always be on so
as to show the temperature of the product in
the tanks.
6.5. Adjusting slushy consistency
Theconsistencyoftheslushymaybeadjusted(+/-)
bymeansofthescrewshowninthegure+: thicker
consistency, -: thinner consistency.
The adjustment may be made by hand or
with the aid of a suitable flat-tip screwdriver.
The machine comes straight from the factory with the valve
(2)setinanintermediateposionbetweenthemaximum(E)
and minimum (D) consistency points.
If you wish to raise the consistency of the product all that is
neededistoturnthevalvecounterclockwise(le).Wecan
seethatthetablowersinposiontowardspointE(pointof
maximum consistency).
If you wish to lower the consistency of the product all that is
needed is to turn the valve counterclockwise (right). We can
seethatthetabmoveshigherinposiontowardspointD
(point of minimum consistency).
Fig.17
1 TANK
Decimal point
2 TANKS
Fig.18 Decimal point
Fig.19
3 TANKS
Decimal point
Fig.20
D
E
(2)

15
NARVON
PULL
PUSH
Fig.21
6.6. Dispensing Slushy
Todispensethebeverage,pullthetaplever.
Check the temperature of the product
in the hopper on a regular basis, using a
sample thermometer to make sure that the
product remains always under the storage
temperature. For machine models equipped
with temperature display, also check that the
temperature of the product, as measured by
a sample thermometer, corresponds to the
temperature shown on the machine. If there
is still product to be used up in the hopper,
never disconnect the machine from the mains
power or switch off the machine; leave the
machine on in granita or refrigerated drinks
mode.
If the machine is not used continuously,
when used with milk-based products, it is
necessary to:
- Spray sanitizer solution around the spigot
area and on the spigot itself (alternatively,
wash with a clean cloth and sanitizer);
or:
- Dispense a small amount of the
product from the spigot before dispensing
the serving for the customer.
6.7. Emergency situations
WARNING: To shut down the machine in an
emergency situation, firmly press the main
switch into position -0-.
In case of freezing, switch off the machine and
contact a service center or specialized technician.
If a fire breaks out, the area must be
immediately cleared to make way for
trained personnel provided with suitable
safety equipment. Always use approved
extinguishers, never use water or substances
of dubious nature.
6.8. Optional accessories
6.8.1 Locking System
Usethenewtaplockingsystemasfollows:
Fig. A: Whenusingthemachine,placetherod“R”as
showed in the picture.
Fig. B:Tolockthehandle,inserttherod“R”initsholeand
place the padlock as showed in the picture.
Fig.22
R
P
FIG.
A
FIG.
B

16 NARVON
6.8.2 Optionals (Timer)
The timer shown is given as an indication
only.
The timer must be set while the main switch
is positioned on -0- and the machine is
unplugged.
6.8.2.1 Setting the current time
Beforeyoustartusingthemeryoumustsetthecurrent
dateandme.
Toset,turnthemerdialinthedireconindicatedbythe
arrowunltheindicator
(A)showsthecorrectdate;thenturnthepointer(C)unl
reachingthecurrentme
Do not:
- turn the pointer using a tool;
- turn the pointer in the direction opposite
that is shown in the timer.
6.8.2.2 Operating the machine
with the timer
In all machines equipped with a timer, the
user must check that the selector (B) is in the
central position .
ThemachinemustbestartedasshowninSecon6.2.
Switch in posion “I”:
- toobtainslushy,posionthemerleverinposion on
thedesireddateandme;
- toobtaincolddrinks,posionthemerleverinposion
onthedesireddateandme.
Switch in posion “II”:
themerisoandthemachineworksasabeveragecooler
only.
6.8.3 Mechanical thermostat
It is possible to regulate the temperature of machines
providedwithamechanicalthermostat,whenthey
operatein“colddrink”mode.Todoso,simplyadjustthe
refrigeraonpowerusingthepotenometer.Toobtaina
higherrefrigeraonpower(lowerproducttemperature)turn
it clockwise towards higher power values.
6.8.4 Dirty filter signal
6.8.4.1 Air machines
Whenthemachineisworkingincricalcondions,dueto
dirtaccumulatedinthecondenser,theinsucientairsupply
at the condenser causes an increase of temperature at the
coldcircuit.Oponallyitispossibletoinstallasensorthat
warnsyouaboutthissituaon.Whenithappens,aredpilot
willash(PR).
Toresetthemachineitmustbedisconnected,thelepanel
removedandthecondensercleaned(seeSecon7.9).
Reconnectthemachineandpresstherestartbuon(R)
situated on the right panel. The red pilot light (PR) on the
frontpanelwillturno.
6.8.4.2. Water machines
The machines provided with a condenser refrigerated with
waterincludeapressuresensor,sothat,whenthepressure
risesandreachesasafetyvalue(factoryseng)duetoan
insucientwatersupplyforproperrefrigeraonitsendsa
signal to the compressor and stops it. A red pilot light (PR)
willlightupautomacallyonthefrontpanel.
Whenthishappens,theoperatorshouldstopthemachine,
checkthewaterconneconsandthewatersupply,turnthe
machinebackonandpressthepressureswitch(R)tore-
establishnormaloperaon.Thepilotlightwillturnowhen
the machine begins to operate normally once again.
A
B
C
Fig.23
13
4
5
6
7
0
2
13
4
5
6
7
0
2
Fig.24

17
NARVON
Before starting up a machine refrigerated by
water, it is necessary to follow the following
instructions.
1. Take the water input tube,
2. Put the rubber joint inside the fitting,
3. Connect the water input to the water network,
4. Connect the output pipe to the drain,
5. Open the water tap and
6. Turn on the machine.
7. CLEANING AND
MAINTENANCE
Before undertaking any cleaning and
maintenance of external machine
components, make sure that the main switch
is positioned on -0- and that the machine is
unplugged.
Before performing any cleaning and
maintenance or operation on the machine,
wear personal protection (gloves, glasses,
etc.) which are recommended by the safety
standards in force in the country where the
machine is used.
When performing the Cleaning and Maintenance
operaons,followtheseinstrucons:
•wearproteconaccident-proofgloves;
•donotusesolventsorinammablematerials;
•donotuseabrasiveand/ormetalspongestocleanthe
machineanditscomponents;
• take care to avoid dispersing liquids in the surrounding
area;
•donotwashmachinecomponentsinadishwasher;
•donotdrypartsofthemachineinaconvenonaland/or
microwaveoven;
•donotimmersethemachineinwater;
•donotexposethemachinetodirectspraysofwater;
• for cleaning use only lukewarm water and a suitable
sanizingagent(conformingtocurrentregulaonsin
the user’s country) that will not risk damaging machine
components;
•oncomplengwork,makesurethatallprotecvecovers
and guards that have been removed or opened are set
back in place and properly secured.
Cleaningandsanizaonareoperaonsthatmustbe
performed with utmost care and on a regular basis to
guarantee the quality of the beverages dispensed and
compliance with mandatory hygiene standards.
PR R
Fig.25
Fig.26
1
3
2
4

18 NARVON
The bowl must be cleaned and sanitized
at least once a day and in any case, in
compliance with the current hygiene
regulations in the country of use. These
operations need to be performed more
frequently if demanded by the characteristics
of the product used; for more details, contact
the product supplier. If the machine is not
used continuously throughout the day, wipe
the dispensing tap area and the product
outlet pipe with a clean cloth and sanitizing
fluid, as illustrated in the figure below.
The stainless materials, plastic and rubber
used to manufacture said parts, as well as
their particular shape, make them easy to
clean but do not prevent the build-up of
germs and mold in the event of inadequate
cleaning.
It is forbidden to clean or service the machine
when it is plugged in and the main switch is
positioned on 1- .
7.1. Emptying the bowls
Beforeabowlmaybecleaned,itmustbeempedofthe
previously prepared product.
If the bowl is to be cleaned prior to the rst use of the
machine, it need not be emped. In such a case refer
directly to Secon 7.2.
Forthesakeofsimplicityonlytheoperaonoftheright
bowlwillbeillustrated;tooperatetheotherbowlssimply
carry out the same sequence of steps on the switches of the
bowlinqueson.
The procedure shown below applies to models with and
without temperature display.
Withthemachineswitchedon,putthefreeze/cool
changeover switch on“O”,andemptythebowlofallits
contents.
Fig.28
PULL
PUSH
Product
Fig.27

19
NARVON
Aerthat,turnoboththemainswitchandmixerswitch
and unplug the machine.
7.2. Disassembling the
dispensing tap
Before removing the bowl it is recommended to disassemble
thetap;aercleaning,thetapmustnotbereappliedunl
thebowlhasbeencorrectlyposioned,initsseat.
Disassemble the tap by removing the pin from its seat to
release all the other parts. Push the push lever dispenser
unlitmakescontactwiththetankandpullupwardsas
shown.
These components may be placed in a basin containing hot
water(approx.50°C/122°F);theymustlaterbetreatedas
describedinSecon7.4.
Never disassemble the tap if the product or
any other liquid is present inside the bowl.
7.3. Removing the bowl and the lid
Removal of every machine bowl is fundamental to ensure
correctcleaningandsanizaon.
Toremoveabowlcorrectlyproceedasfollows:
1.RemovethelidasshowninSecon6.1.;
2.Raisethefrontpartofthebowltoreleaseit;
3. Remove the bowl from its seat by pushing and tapping
lightlyontherearpart;
4.Removetheseal(B);
Fig.29
Fig.30
Fig.31
Fig.32
Fig.33
Fig.34
B
Fig.34

20 NARVON
5. Take out the auger and remove the seal (A).
7.4. Washing and sanitizing the
components
All of the previously disassembled and removed components
mustbethoroughlywashedandsanized.
Important: the sanitizing solution must
comply with the regulations enforced at the
time the machine is used.
Tocarryouttheprocedurecorrectly,pleaseusethe
followinginstrucons:
1.Fillacontainerwithasanizersoluonmixedinwater
(2% of sodium hypoclorite mixed in water).
2.Thoroughlywashthetank,lidandevaporatorwitha
spongesoakedinthesanizersoluon.
3. Thoroughly wash again with clean water.
4.Fillanothercontainerwithasanizersoluon.
5.Dipthedismantledcomponentsintothesanizersoluon.
6.Leavethedismantledcomponentstosoakinthesoluon
for 30 minutes.
7. Thoroughly wash again with clean water.
8. Place the components on a clean surface and dry them.
9.AssemblethemachineasdescribedinSecon7.5.
10.Beforeusingthemachineagain,runtherinsing
cyclewithcleanwater(Secon7.6).
Warning: Do not submerge lids equipped
with lighting in any type of liquid. Before
starting the cleaning and sanitizing
operations of the lid, remove it from the
machine as described in the previous
chapter.
Tocleanthelightedlidcorrectly,proceedasfollows;
1.Usingaclean,dampcloth,rstwipecleantheboom
partofthelid(incontactwiththeproduct);
2.Usingaclean,dampcloth,wipecleanthewholeouter
part;
3.Usingaspongedippedinsanisingsoluon,sanisethe
boompartofthelid,takingcarenottowetzthe
contacts(X);
4.Allowtoprocessfor30minutes;
5.Rinseonlytheboompartatleasttwicewithaclean
sponge soaked in fresh water.
6.Placethelidonacleansurfaceanddryit;rstdrythe
boomandthentheouterpartwithacleancloth.
7.Setthelidbackinplaceonlyaerhavingcleanedand
sanisedthebowl.
It is forbidden to wash and/or sanitise the lid
while it is installed in the machine.
7.5. Reassembling the washed
components.
Allofthewashedandsanizedcomponentsmustbe
carefully reassembled. Some components must be
adequately lubricated in order to ensure that they work
eciently.
Applytheseal(A)ontheaugerasshownintheFig.37.
A
Fig.35
Fig.36
X
Fig.37
Boom Part
Other manuals for SLUSHY 378SM2
2
This manual suits for next models
2
Table of contents
Other Narvon Dispenser manuals