Natarom Zephyr User manual

ZEPHYR
manuel d’utilisation

DESCRIPTION DE L’APPAREIL
DEVICE DESCRIPTION

Cet appareil peut être utilisé par des enfant âgés d’au moins 8 ans et par des personnes ayant des capacités physiques, senso-
rielles ou mentales réduites ou dénuées d’expérience ou de connaissances, s’ils (si elles) sont correctement surveillé(e)s ou si des
instructions relatives à l’utilisation de l’appareil en toute sécurité leur ont été données et si les risques encourus ont été appré-
hendés. Les enfants ne doivent pas jouer avec l’appareil. Le nettoyage te l’entretien par l’usager ne doivent pas être fait par un
enfant sans surveillance.
This device can be used by at least 8-years-old children and by people having reduced physical, sensory or mental abilities or divested
of experience or knowledge, if they are correctly watched or if instructions concerning the use of the device in complete safety were
given to them and if the incurred risks were arrested. The children should not play with the device. The cleaning and the maintenance
by the user should not be made by unattended children.
Zephyr, le diffuseur compact
entièrement et facilement programmable grâce à sa carte électronique. Il suit de
manière autonome et très précise les cycles quotidiens pré-enregistrés.
fully and easily programmable with its electronic card. It autonomously and preciselly
follows the pre-recorded daily cycles.
capot de fermeture
logement recharge
alimentation d’air/
connexion recharge
bouton de démarrage
afcheur
boutons de programmation
porte fusible
branchement secteur

MISE EN ROUTE
GETTING STARTED

Branchez la prise électrique, puis...
Conseils d’utilisation et d’entretien
TOUJOURS débrancher l’appareil avant nettoyage & toujours
enlever la cartouche avant de déplacer l’appareil !
Installer impérativement sur support horizontal et stable.
Ne pas exposer à la chaleur, la amme, l’humidité, la poussière.
Ne pas coucher, retourner ou déplacer le diffuseur sans retirer la
recharge.
Ne pas re-remplir la recharge, elle est à usage unique.
Ne pas obstruer la diffusion (sur le dessus de l’appareil)
Le nettoyage se fait à l’aide d’un chiffon doux ou d’une éponge
imprégnée de savon non corrosif. Éviter tout solvant. Ne jamais
plonger dans l’eau.
Ne pas démonter (danger électrique). Pour tout
dysfonctionnement, contacter votre revendeur.
Garantie 1 an (dans des conditions normales d’utilisation et à
l’exclusion des dommages causés)
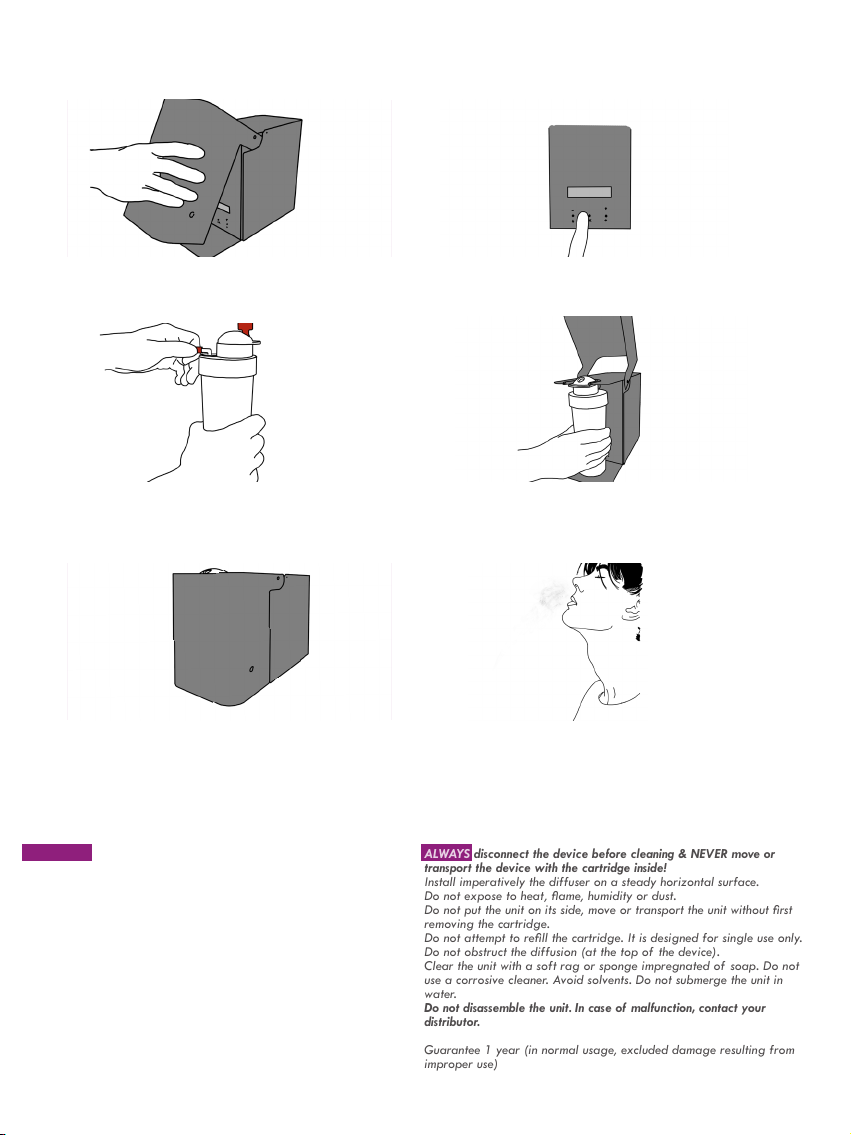
Ouvrir le capot en le faisant pivoter vers le haut.
Open the device hood by pivoting it upwards.
Retirer les 2 bouchons de la recharge.
Remove the 2 corks from the cartridge.
Rerfermer le capot.
Close the hood.
Programmer (voir prochaine section).
Programming (see next section).
Poser la recharge sur le fond du diffuseur et la
pousser jusqu’à complète insertion.
Place the cartridge at the base of the diffuser and
push it until it is completely inserted in the unit.
Maintenant, sentez et appréciez !
Now, smell & enjoy!
ALWAYS disconnect the device before cleaning & NEVER move or
transport the device with the cartridge inside!
Install imperatively the diffuser on a steady horizontal surface.
Do not expose to heat, ame, humidity or dust.
Do not put the unit on its side, move or transport the unit without rst
removing the cartridge.
Do not attempt to rell the cartridge. It is designed for single use only.
Do not obstruct the diffusion (at the top of the device).
Clear the unit with a soft rag or sponge impregnated of soap. Do not
use a corrosive cleaner. Avoid solvents. Do not submerge the unit in
water.
Do not disassemble the unit. In case of malfunction, contact your
distributor.
Guarantee 1 year (in normal usage, excluded damage resulting from
improper use)

PROGRAMMATION
SETTING UP

Menu
1
A B
C
D
Régler l’heure et la date
Set the time and date
LE JOUR day LA DATE date
L’HEURE time
Menu
OK
OK
OK
OK
OK
Sélectionner le bon jour avec
Répéter l’opération pour le mois et l’année
Répéter l’opération pour les minutes et les
secondes (secondes facultatives)
Mettre la date du jour avec
Régler l’heure avec
Select the right day with
Repet the process for month and year
Repet the process for minutes and seconds
(seconds facultatives)
Set the right date with
Set the hour with
touche
déler - touche
déler +
touche
menu et OK
+
+
+
VÉRIFICATION check
Vériez que l’appareil est réglé au bon jour,
date et heure
Vous pouvez maintenant régler la diffusion.
Check if the device is set up to the right day, day
time
If so, you can now set the diffusion mode.

2
A B
Régler la diffusion
Set the diffusion
DIFFUSION ON en fonctionnement DIFFUSION OFF fréquences d’arrêt
APPUYER SUR press
Menu
OK OK
OK OK
Sélectionner l’unité de temps (en
s, min ou h) avec Sélectionner l’unité de temps (en
s, min ou h) avec
Régler la durée des temps de
diffusion avec
Le diffuseur est maintenant réglé pour diffuser sur les fréquences (ON/OFF) programmées.
Régler la durée des temps de
d’arrêt avec
Chaque jour de la semaine où l’appareil doit
diffuser (en min, s ou h) Plages de temps où l’on souhaite stopper la
diffusion (en min, s ou h)
Select the unit of time (in s, min or
h) with Select the unit of time (in s, min or
h) with
Set the lengh of diffusion time with
The diffuser is now set to diffuse on the programmed frequencies (ON/OFF).
Set the lengh of diffusion downtime
with
Each day of the week on which the device is diffu-
sing (in min, s or h) Time ranges where you want to stop the diffusion (in
min, s or h)
+ +
+ +

3
A
B
Régler sur une semaine
Set the whole week
CHOISIR LE MODE choose mode SI C’EST ON if its ON
CHAQUE JOUR each day
OK
OK
OK
Choisir ON ou OFF
Régler l’heure de démarrage de la
diffusion avec
Régler l’heure d’arrêt de la diffu-
sion avec
Vous devez valider chaque étape et chaque jour, jusqu’au dimanche pour que vos instructions soient
enregistrées. Sinon, vos données ne seront pas prisent en compte.
Pour chaque jour, choisir si l’on diffuse ou non
(ON/OFF)
Recommencer l’opération pour chaque jour de
la semaine
Choose ON or OFF
Set the start hour of the diffusion
with
Set the stop hour of the diffusion
with
You must validate each step and each day until Sunday for your instructions to be recorded. Otherwise, your
data will not be taken into account.
For each day, choose if you want to diffuse or not
(ON/OFF)
Repeat the process for each day of the week.
+
+
+
!

ACCESSOIRES
ACCESSORIES

2 bouchons de protection à retirer avant utilisation.
Support mural
Les cartouches sont rechargeables
Accessoires additionnels
Le ZEPHYR fonctionne avec sa recharge de 400mL de produit
(parfum, huile essentielle...), conçu spécialement à cet effet.
Conservation avec bouchons, dans un endroit sec, frais et à
l’éabri de la lumière.
Le ZEPHYR peut être xé au mur. Le diffuseur est vissé sur
son support par 2 vis au dessous de l’appareil.
FIXER LE SUPPORT AU MUR AVANT
D’Y INSTALLER L’APPAREIL !
ZEPHYR has been developed to work with a disposable cartridge
of perfume, essential oils... (of 400mL). Storage with corks in a
cool dry place away from bright light.
ZEPHYR can be hung on the wall, with its support. The diffuser
is xed to its support, by 2 screws, under the device.
FIX THE SUPPORT TO THE WALL BEFORE
SCREWING IT TO THE SUPPORT!
2 protective corks. Removed before use.
Wall support accroche mur
accroche
appareil
Attention !
RISQUE DE DOMMAGES IRRÉVERSIBLES
Ne jamais transporter ou déplacer l’appareil avec la recharge à l’intérieur.
Risques d’inltration de parfum dans le moteur.
RISK OF IRREVERSIBLE DAMAGE
Never carry or move the device with the cartridge inside.
Risk of perfume inltration into the motor.

Pour plus d’informations, n’hésitez pas à nous contacter :
For more information, do not hesitate to contact us:
PIOT ET TIROUFLET
6 rue Bernard Palissy | 91070 Bondoue
www.natarom.com
Table of contents
Other Natarom Accessories manuals
Popular Accessories manuals by other brands

PCB Piezotronics
PCB Piezotronics 106M131 Installation and operating manual

Brink
Brink 616860-B user manual

IFM Electronic
IFM Electronic VSA003 installation instructions

Outdoor Revolution
Outdoor Revolution MoveAirLite Classic Annexe Instructions & care manual

Roland
Roland FC-7 quick guide

Rado
Rado MASTER OF MATERIALS A 'How To' Guide