NATURE LOO Mini Instruction Manual

®
Mini
Installation & Maintenance Manual
▪Thank you for purchasing the Mini. Please read this manual carefully before installation.
▪“Nature Loo” is a brand of Ecoflo Wastewater Management Pty Ltd.
▪ Visit our website at ecoflo.com.au
IMNL-002.190704 © Ecoflo Wastewater Management Pty Ltd

IMNL-002.190704 © Ecoflo Wastewater Management Pty Ltd Page 2
Copyright © 2019 Ecoflo Wastewater Management Pty Ltd
Please call your local distributor or Ecoflo Wastewater Management for support if required.
Ecoflo Wastewater Management Pty Ltd
www.ecoflo.com.au
www.natureloo.com.au
Phone: 1300 138 182
Phone: 07 3889 6144
Email: [email protected]
Proudly Designed and Assembled in Australia
by Ecoflo Wastewater Management

IMNL-002.190704 © Ecoflo Wastewater Management Pty Ltd Page 3
WHAT’S IN THE BOX? ..................................................................................................... 4
\INSTALLATION................................................................................................................ 5
Step 1: Choose a suitable site to install the toilet ..................................................................................5
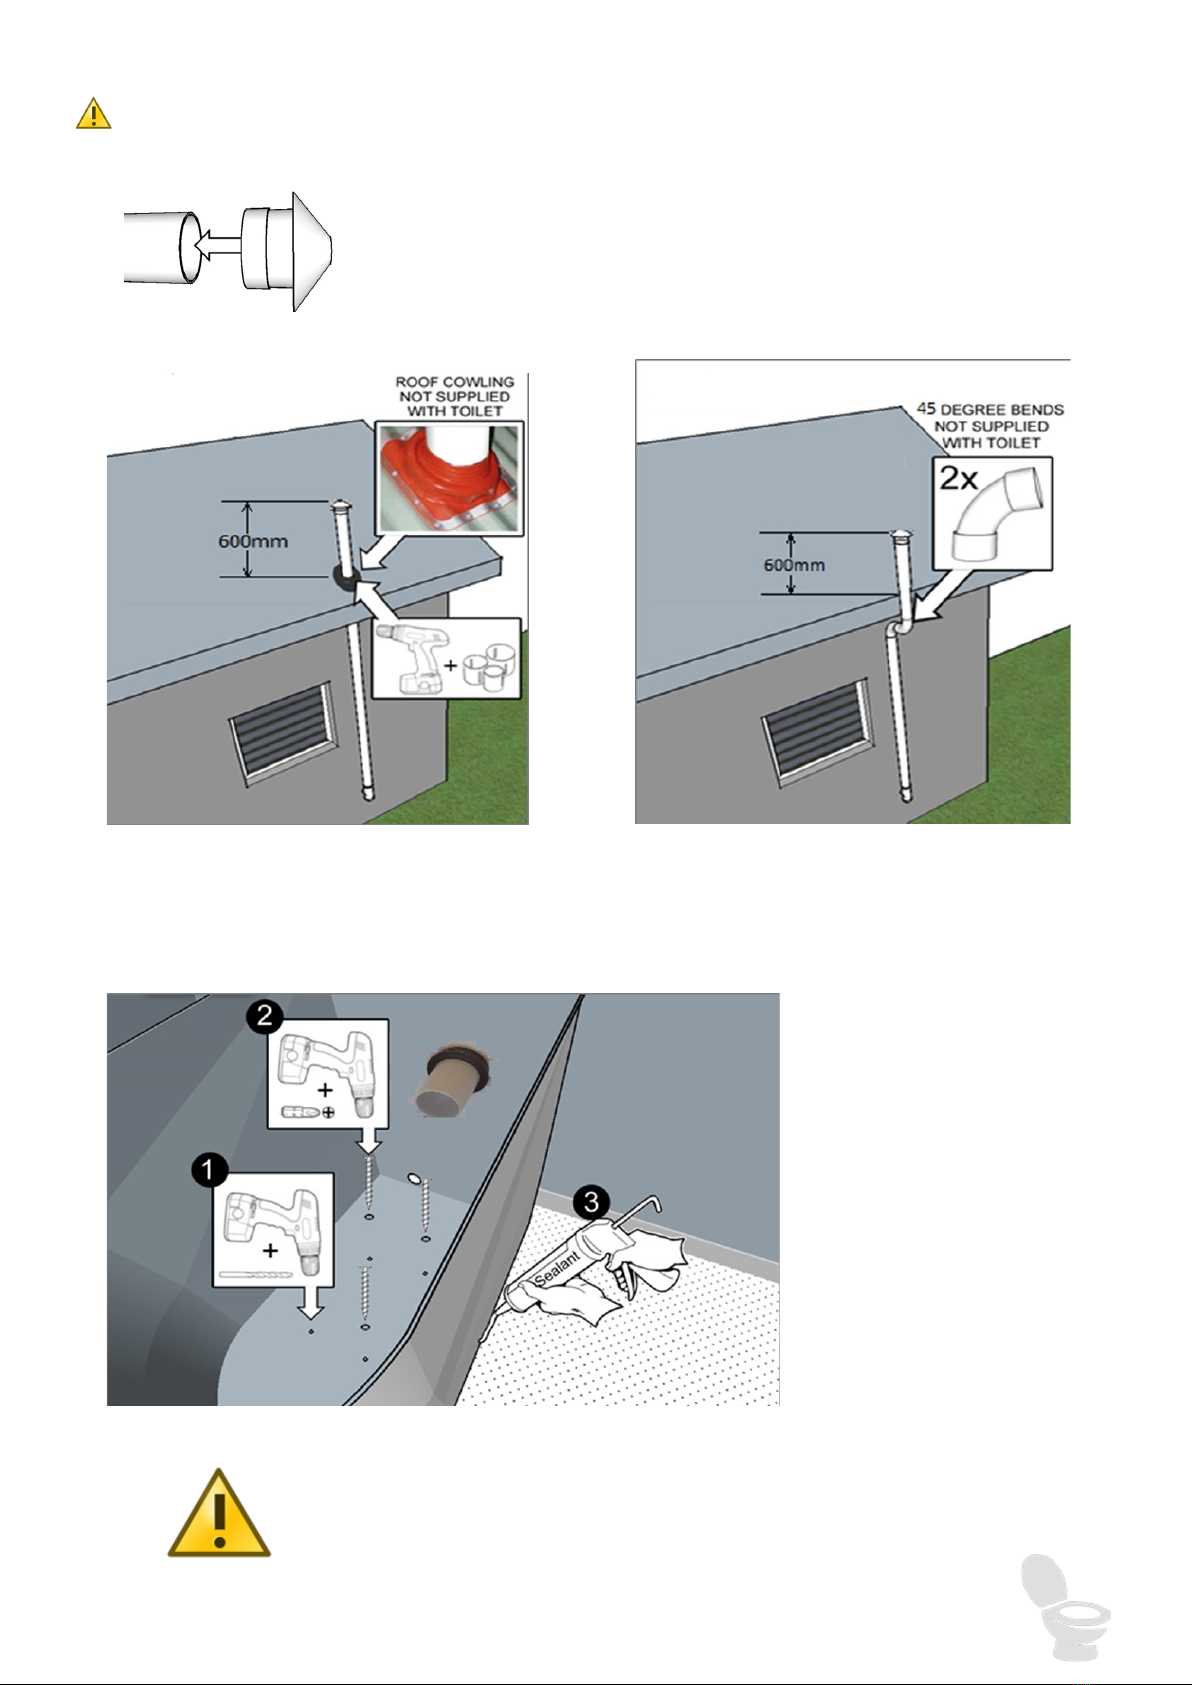
Step 2: Installing the vent pipe & liquid drain.........................................................................................6
Step 3: Constructing the liquid drain trench...........................................................................................9
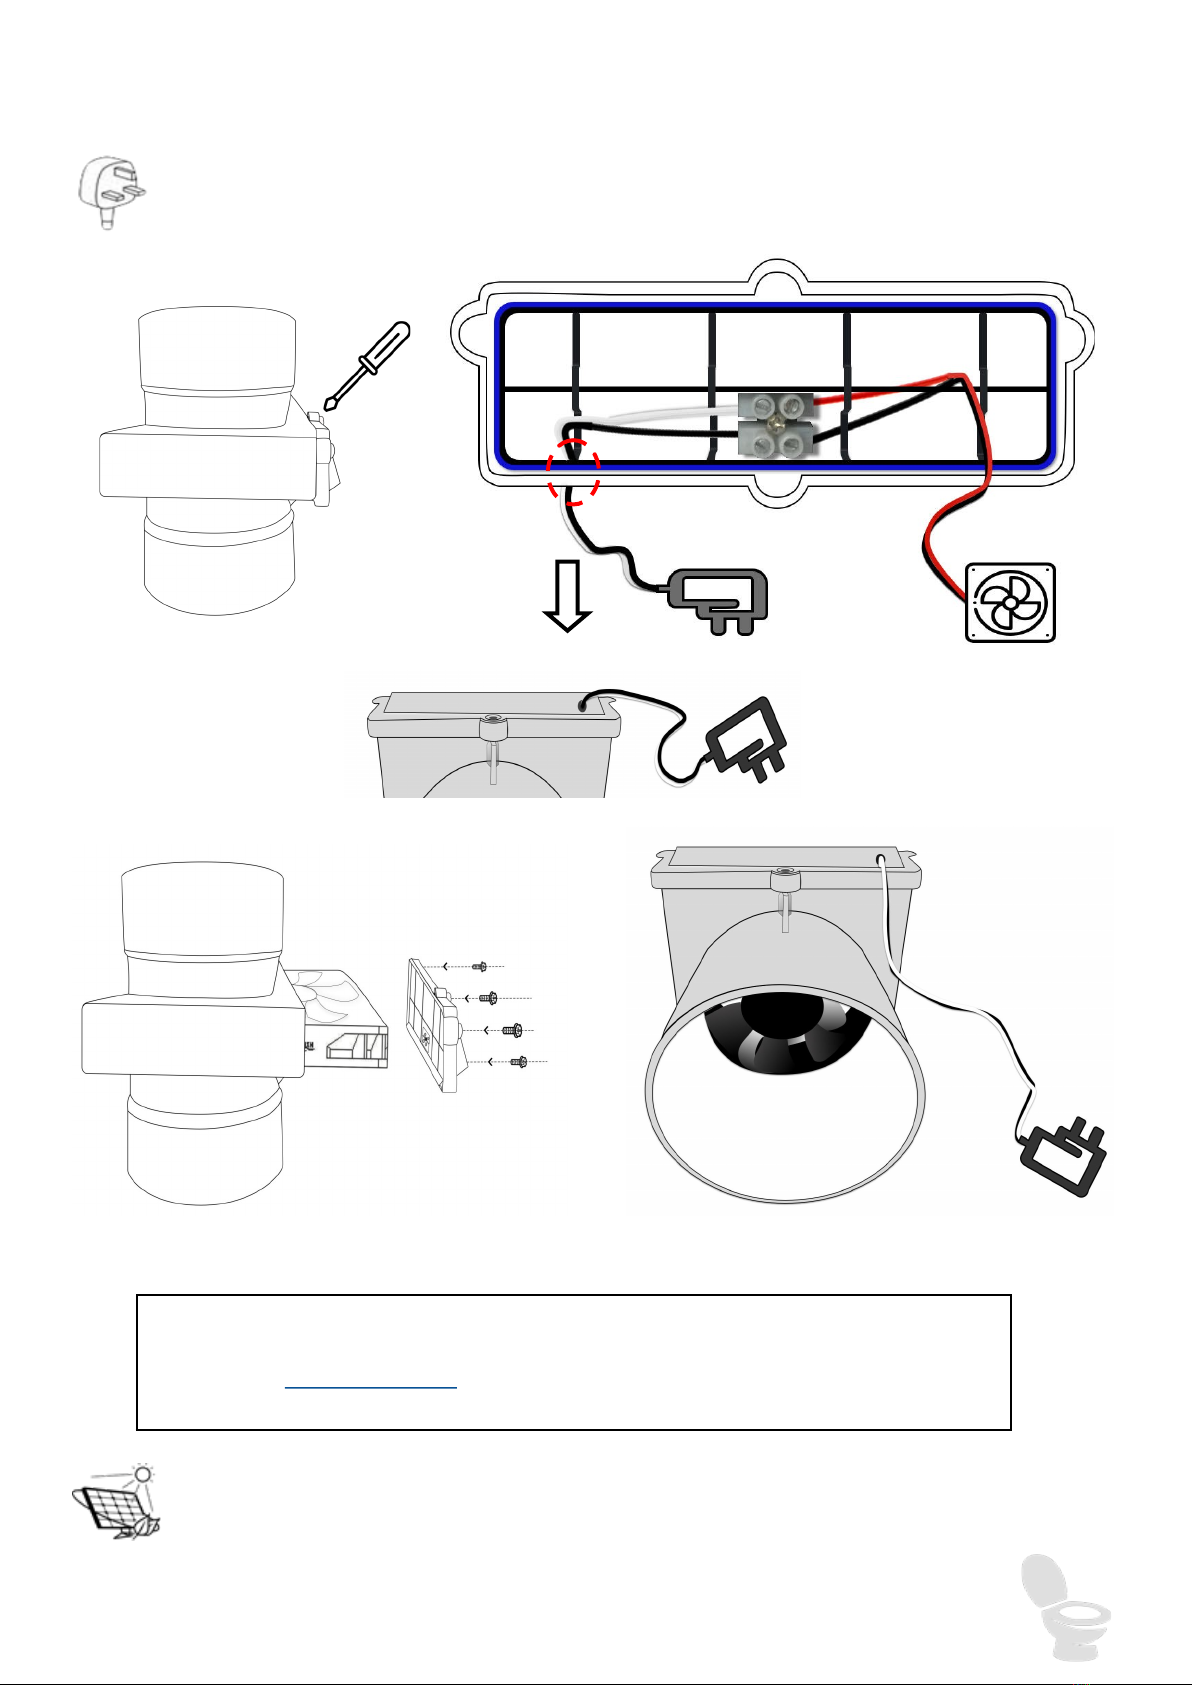
Step 4: Powering the fan .........................................................................................................................10
Mains Power ...............................................................................................................................10
Solar Power – refer to Solar Panel Installation Manual .........................................................10
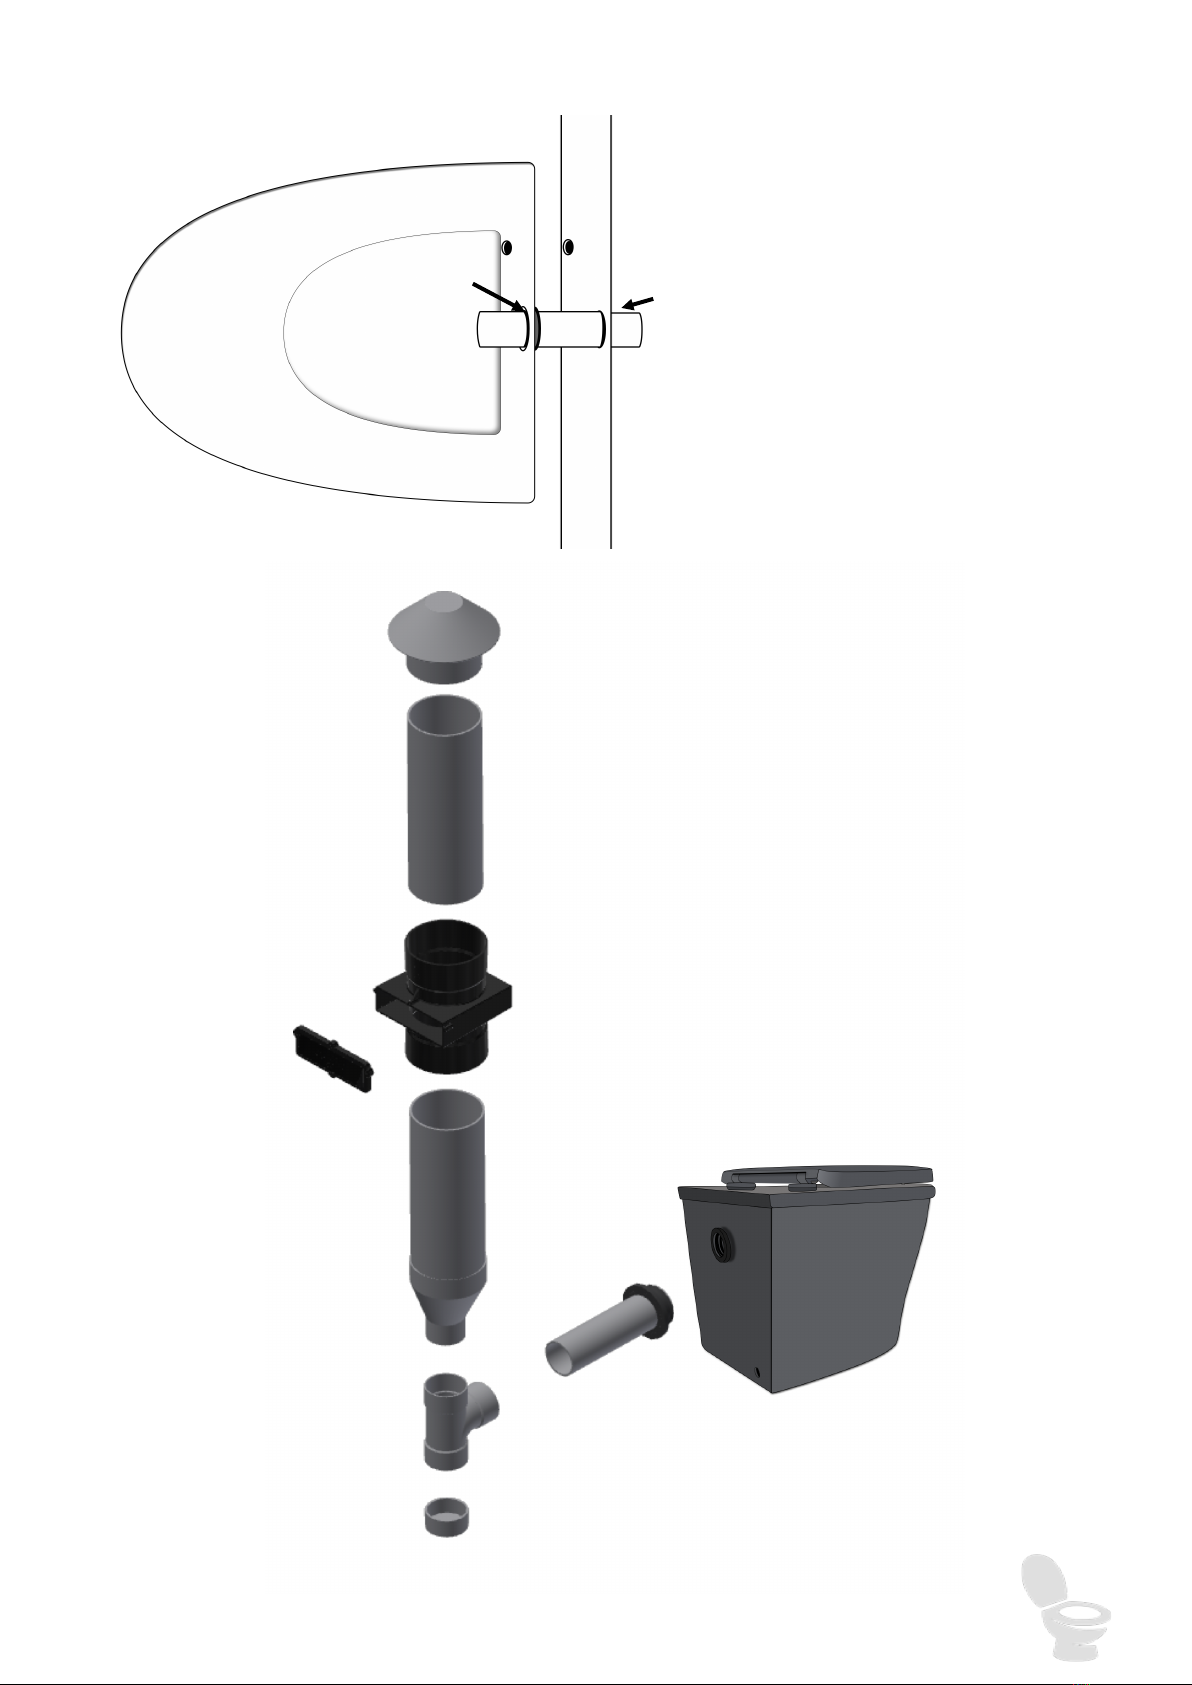
Step 5: Assembling the collection chamber .........................................................................................11
CARE & MAINTENANCE................................................................................................ 11
EXCHANGING THE BIO BAG ........................................................................................ 12
COMPOSTING ACCELERATORS.................................................................................. 13
TROUBLE SHOOTING.................................................................................................... 14
PRODUCT & COMPONENT WARRANTY...................................................................... 15
APPENDIX 1.................................................................................................................... 16
Table of Content

IMNL-002.190704 © Ecoflo Wastewater Management Pty Ltd Page 4
WHAT’S IN THE BOX?
Please check the packing slip to ensure everything has been delivered.
If anything is missing, please notify your supplier immediately.
Items you will need to complete your installation:
100mm (DWV) PVC Pipe (ventilation):
Enough length/meters to rise 600mm above the roof line.
N.B. This height is very important for venting.
2 x 100mm (DWV) PVC 45 degree bends
The bends divert the vent pipe around the roof gutter/awning.
Or 1x 100mm roof dektite
Allows a water proof seal if the vent goes through the roof.
Brackets/pipe clips to hold the vent pipe to the outside wall:
2 or 3 depending on the height to the length of pipe
100mm slotted agricultural or drilled PVC pipe: 2m
Additional 19mm polypipe (liquid drain hose): Enough meters to reach the absorption trench
Aggregate/Gravel (~25mm grade): 0.3m3
Hessian or plastic geotextile material: 2m x 0.4m

IMNL-002.190704 © Ecoflo Wastewater Management Pty Ltd Page 5
INSTALLATION
Step 1: Choose a suitable site to install the toilet
The toilet must also be locat-
ed close to a power source.
E.g.
/
The location of the toilet must have both:
1. Easy access to connect the fan system to a permanent vent pipe up the outside of the structure.
The vent pipe from the toilet exits horizontally through the wall behind the toilet.
2. An elevated starting point for liquid to flow by gravity from the toilet down into a liquid absorption
trench which is to be dug outside the toilet room.

IMNL-002.190704 © Ecoflo Wastewater Management Pty Ltd Page 6
Step 2: Installing the vent pipe & liquid drain
After selecting the toilet’s location, fit the Wallace
Grommet to the back of the fibreglass shell. Push
the shell flush against the wall (in the correct position
& alignment). Mark a circle on the wall through the
Wallace Grommet & Liquid Drain Hole as a guide.
Move the Shell away from the wall.
Prepare to drill suitable holes to ac-
commodate the 19mm liquid drain
hose and the 50mm PVC Pipe. Use
these pipes to accurately mark the
diameters on the wall.
Wallace
Grommet
Liquid Drain Hole
Hose removed
Using the circles drawn on the wall as a guide, cut a hole of sufficient size to allow the 50mm pipe
to push through the wall and a second hole (approximately 25mm) for the liquid drain hose.
Push the 50mm PVC pipe length
provided into the ‘T’ piece and then
insert the 50mm PVC pipe through
the wall until the ‘T’ piece is flat
against the wall.
50mm PVC
Pipe

IMNL-002.190704 © Ecoflo Wastewater Management Pty Ltd Page 7
Wall
Wallace
Grommet 50mm PVC
Pipe
Insert the 50mm PVC pipe from
the wall into the Shell through
the Wallace Grommet and push
Shell to its chosen position. If
the PVC pipe protrudes too far
into the shell [fouling the 20L
bin], mark & trim the pipe to
allow free air movement.
Shell
Not supplied

IMNL-002.190704 © Ecoflo Wastewater Management Pty Ltd Page 8
Option 2
Option 1
PVC pipe components, except the push on cap at the base of the ‘T’ piece (i.e. the Moisture
Trap), should be glued together using Plumbers PVC glue.
Connect the supplied Sewer Vent Cap to the top of the vent pipe,
and then the bottom of the vent pipe into the moisture trap.
Install the 100mm PVC pipe as per Option 1 or Option 2 (pictured above). If possible, Option 1
is far better for ventilation as the two 45 degree elbows in Option 2 can slow the air flow. Use
pipe clips (not provided) to secure the 100mm pipe to the outside wall.
Once the toilet is permanently
connected to the ‘T’ piece you
may attach the fibreglass toilet
shell to the floor with the self-
tapping screws and nylon
washers (supplied) and / or a
sealant (not supplied).
Pre-Drill Clearance Holes in the Shell floor; so the screws do not
stress the fibreglass shell.

IMNL-002.190704 © Ecoflo Wastewater Management Pty Ltd Page 9
Step 3: Constructing the liquid drain trench
Place the plain end of the 19mm
Liquid Drain Hose through the
small hole in the rear of the fibre-
glass toilet shell. Feed the hose
through until the liquid drain valve
connection side is resting just on
the inside of the shell near the
front edge.
The hose exiting through the hole
in the shell should lead through
the hole previously cut into the
bathroom wall and out towards
the absorption trench.
Wall
Shell
Liquid Drain Hose
50mm PVC
Pipe
Wallace
Grommet
Construct the excess liquid drain absorption trench as per the following diagrams.
Also note that the liquid drain hose when installed must always allow the liquid to
continuously run downhill.

IMNL-002.190704 © Ecoflo Wastewater Management Pty Ltd Page 10
Step 4: Powering the fan
Mains Power
A 240/12 volt regulated transformer is included to run the fan from mains power. Connect the
fans to the transformer as follows:
We recommend a spare fan is kept on hand at all times, particularly after a year of use.
Go to Ecoflo Online Store or call 1300 138 182 for replacement or spare fans.
Solar Power – refer to Solar Panel Installation Manual

IMNL-002.190704 © Ecoflo Wastewater Management Pty Ltd Page 11
Step 5: Assembling the collection chamber
1. Place the ‘Bio Bag’ into the 20Ltr bin supplied (no lid) & place in the space provided
within the Shell under the Lid’s waste chute.
2. Gently lift the Fibreglass Lid from the front & connect the liquid drain hose using the
quick click connection supplied, directly to the base of the urine diverter at the front
of the lid. You should hear a faint click when they are properly connected .
If you have completed Steps 1-5 you
are now ready to use your toilet!
Follow these instructions each time you change the Bio Bag.
CARE & MAINTENANCE
Urine Diversion Bowl: After using the toilet you should spray Nature Flush Enzymes five
times into the bowl to keep the liquid drain clear of crystallisation and odour.
Foreign Objects: The system should not be used for the disposal of sanitary napkins or
disposable diapers.
Cleaning the Shell and Seat: Just like any other toilet system, you will need to clean it
occasionally. To do so, use the Nature Flush enzymes as per the instructions on the bottle
with toilet paper. Soiled toilet paper can simply be dropped into the toilet.
Fan: Every month or every time you restart the system, check that the fan is turning freely
and clean the hole at the bottom of the moisture trap.

IMNL-002.190704 © Ecoflo Wastewater Management Pty Ltd Page 12
EXCHANGING THE BIO BAG
The Bio Bag will need to be changed on a regular basis. The rate of filling will depend on the
number of users. When the bag becomes approximately 70% full, you will need to replace it
with a new Bio Bag by following these instructions.
Please ensure you wear protective glasses, face mask & gloves.
1. Identify an area that is suitable to empty the compost into a hole (not within 100m of a
potable water supply) on your property. Cover the top of the compost pile with at least
100mm of soil or mulch. Alternatively, check with your local government if would allow you
to mix the toilet compost with your general garden compost.
2. Carefully lift the lid slightly, and then carefully disconnect the urine diversion by unclicking
the connection (same as a garden hose) Cover the surface with 3-5cm of Wood Shavings.
Now twist the Bio Bag closed, remove the bin and Bio Bag as one. This will help if the Bio
Bag has already begun to break down. Bury the Bio Bag into the previously selected area
and cover.
3. Rinse bin if required, place a new Bio Bag in to the bin. To reduce the chance of soiling
the bin, (in case the Bio Bag breaks down prematurely), cover the floor of the bin with
some pine wood shavings or even use a conventional bin liner.
Now redo Step 5, Assembling the compost bin. And then you’re ready to go
again.

IMNL-002.190704 © Ecoflo Wastewater Management Pty Ltd Page 13
COMPOSTING ACCELERATORS
Whilst Nature Loo users report successful composting without the use of any additives, we
strongly recommend the use of the following in order to optimise composting, particularly when
the toilet is in permanent use by more than two people.
Bulking Agent
Should be added on a regular basis, preferably a handful after each solid
use. Alternatively, if this is not possible add the equivalent of this on a daily
or weekly basis. The bulking agent can be added through the pedestal.
Refer to our website for suitable bulking agents.
We Do Not recommend the use of :
• sawdust as it creates an anaerobic condition within the chamber.
• Cypress, cedar or eucalypt wood shavings due to their antimicrobial properties.
Nature Flush Enzymes
A 125ml bottle of enzyme concentrate is supplied with the toilet. Please
refer to the label for instructions and spray into the waste chute. A trigger
bottle is provided. Any staining of the pedestal can also be removed with
the spray.
Nature Quick Microbes
Should be used each time a chamber is changed to kick start the
Shop Online

IMNL-002.190704 © Ecoflo Wastewater Management Pty Ltd Page 14
This is normally the result of a failed fan.
Check your fan is working correctly.
Check the bin is empty and clean.
Also check the drain hose is working correctly (poor a cup of warm water into the urine
diversion bowl). If necessary replace the drain hose or clean out the pipe leading to the
absorption trench by flushing with your water hose.
Vinegar Flies are present:
Sometimes vinegar flies are attracted into the chamber and can breed. Should this
problem occur in your system refer to our information on ‘How to deal with vinegar
flies’ on our website.
It is best however to not let them in……
But if you have flies, simply empty the Bio Bag and give the bin a quick wash and
start again.
Please note that broken fans should be replaced immediately in order to avoid flies
entering the system. It is recommended that you keep a spare fan on hand at all
times.
There is an unpleasant odour in the toilet room:
The power has failed resulting in toilet room odours:
Carefully follow the directions on how to empty your unit. Check your fan is working correctly,
you still have power to the premises. . A replacement fan or Bio Bags can be purchased online.
Nature Loo toilets have proven themselves to be one of the easiest systems to manage. However, being a
natural process, reliant on a number of factors beyond our control, it can occasionally need some help to
maintain an appropriate balance.
TROUBLE SHOOTING
Please read this section before using your toilet.
Find more Trouble Shooting and FAQ information online at ecoflo.com.au/FAQ, or call
us on 1300 138 182.

IMNL-002.190704 © Ecoflo Wastewater Management Pty Ltd Page 15
PRODUCT & COMPONENT WARRANTY
Ecoflo will furnish new parts to a customer whose toilet fails within the allotted warranty pe-
riod for the particular component, provided that our inspection shows such failure is due to
defective material or workmanship. Any part supplied is warranted for the balance of the
original warranty period. The warranty period for a part begins from the date the original
product was dispatched (plus 10 working days for transportation).
Warranty Period:
This warranty does not cover:
• Damage resulting from neglect, abuse, accident or alteration; or damage caused by
fire, flood, acts of god or other causality.
• Damage resulting from failure of the purchaser to follow normal installation and oper-
ating procedures outlined in the manual or in any other printed instructions supplied
with the system.
• Labour and service charges incurred in the removal and replacement of any parts
found defective under this warranty.
Items subject to a dispute, where photographic evidence is inconclusive, must be sent
prepaid to Ecoflo. The cost will be reimbursed by Ecoflo should the claim be found valid.
In addition to the above, Ecoflo will only replace a fan that fails during the warranty period
under the following conditions:
• The fan has only ever been connected and powered by either a 12 volt transformer
plugged into mains power or a solar system supplied by Ecoflo. Connecting your fan
directly to a power source other than one supplied or specified by Ecoflo may result in
damage to the fan and void the warranty.
• The fan and transformer must not be modified/altered in any way.
Any electrical component including solar 1 year
Any plastic bin 1 year
Any fibreglass/polymarble component 3 years
Toilet seats 1 year
Any other component 1 year

IMNL-002.190704 © Ecoflo Wastewater Management Pty Ltd Page 16
APPENDIX 1
Table of contents
Other NATURE LOO Toilet manuals
Popular Toilet manuals by other brands

LIXIL
LIXIL American Standard Cadet 2794.709 INSTALLATION INSTRUCTIONS CARE AND MAINTENANCE

Thetford
Thetford C220 Series installation manual

Pressalit
Pressalit TL3 Operation and maintenance manual

miseno
miseno Yosemite MT-YOSE32-15WST-WHTOU installation manual

Grohe
Grohe Sensia ARENA installation manual

Kohler
Kohler K-11968 Installation and care guide