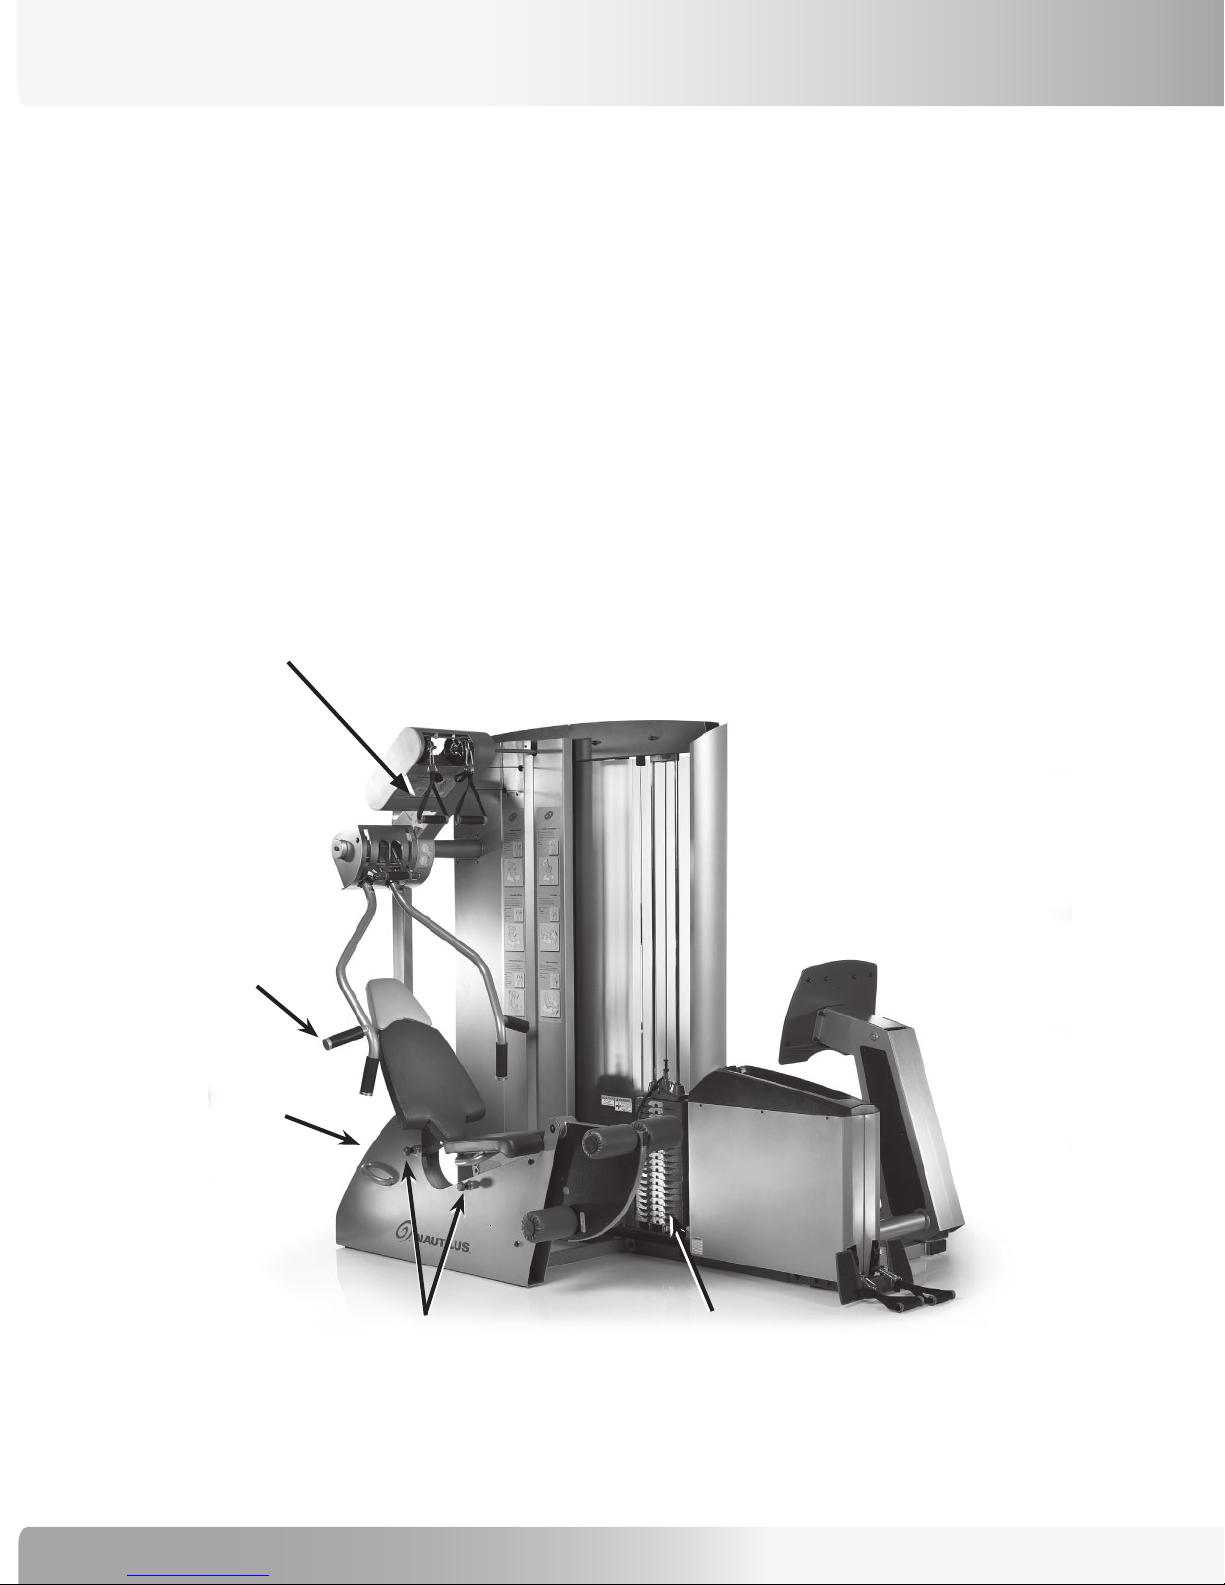
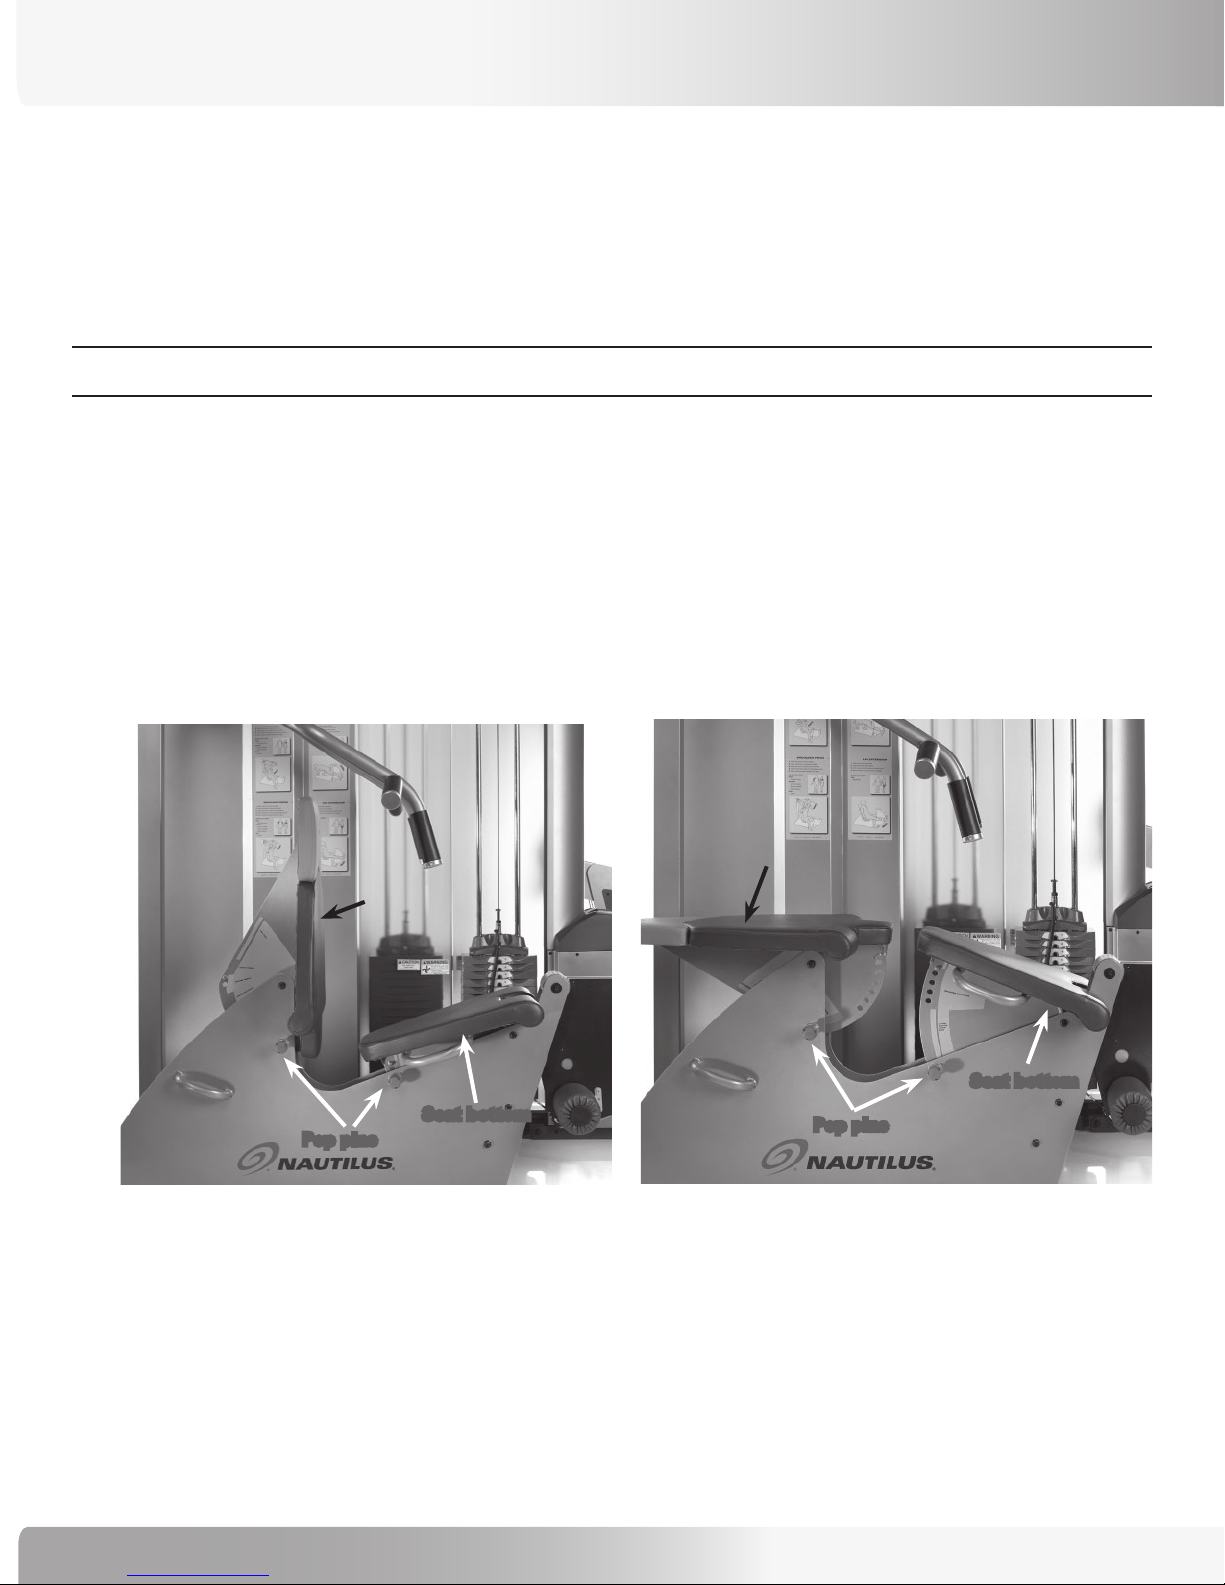
Nautilus S912 User manual

Model: S912
P/N: 001-6936 Rev A (06/2006)
Owner’s Manual
Commercial Series
Be Strong.™

2
Thank you for purchasing the Nautilus® Commercial Series S912 gym. For more than 30 years Nautilus has
been producing the world’s finest fitness equipment used in health clubs and homes around the globe. We
hope this product exceeds your expectations and is a valuable tool for your facility.
Please carefully read through this manual to familiarize yourself with the operation of your new Nautilus
strength system. Doing so will help to insure that your users get the most out of your gym, enjoying safe and
effective workouts ahead.
Nautilus
World Headquarters
16400 SE Nautilus Drive
Vancouver, WA 98683
1-800-NAUTILUS
nautilus.com
PREFACE

3
Nautilus® Commercial Vertical Series S912 Owner’s Manual
TABLE OF CONTENTS
Safety Requirements ............................................................. 4
General Guidelines For Safe Operation ................................. 5
Stations ................................................................................. 6
Adjustment Points .................................................................. 7
Weight Selection and Adjustment ......................................... 8
Seat Pivot Adjustment (Leg Ext./Leg Curl/
Pressing exercises) .......................................................... 8
Seat Back Adjustment (Leg Ext./Leg Curl/
Pressing exercises) .......................................................... 8
Converging Press Arm Adjustment ........................................ 9
Foot Pad Adjustment .............................................................. 9
Pec Fly Adjustment ............................................................... 9
Seat Adjustment (Pec Fly/Abdominal Crunch exercises) ......10
Hand Grips .............................................................................10
Dual Handle Grips ..................................................................11
General Strength Guidelines ................................................12
Determine your goal ........................................................12
Control .....................................................................12
Range of Motion ......................................................12
Effort ........................................................................12
Repetitions ...............................................................13
Sets ..........................................................................13
Load .........................................................................13
EXERCISES
Core Exercise Chart ................................................................14
Chest Press ............................................................................15
Incline Press ...........................................................................16
Shoulder Press .......................................................................17
Triceps Extension ...................................................................18
Lat Pulldown .........................................................................19
Leg Curl .................................................................................20
Leg Extension .........................................................................21
Leg Press ................................................................................22
Seated Calf Raise ..................................................................23
Pec Fly .................................................................................24
Abdominal Crunch ..................................................................25
Mid Row .................................................................................26
Arm Curl .................................................................................27
Seated Row ............................................................................28
Machine Maintenance Recommendations ............................30
Warranty Information .............................................................32
Important Contact Information ..............................................33

4
SAFETY REQUIREMENTS: SAVE THESE INSTRUCTIONS!
The following definitions apply to the words “Danger” and “Warning” found throughout this manual:
DANGER! Used to call attention to IMMEDIATE hazards which, if not avoided, will result in immediate,
serious personal injury or loss of life.
WARNING! Used to call attention to POTENTIAL hazards that could result in personal injury or loss of life.
READ ALL INSTRUCTIONS BEFORE USING THE MACHINE.
Read this manual in full before operating the S912 gym. Failure to follow these guidelines can produce a serious or possibly fatal injury.
Close supervision is necessary whenever the machine is used by or near children, invalids, or disabled persons.
Keep your hands and feet away from all moving parts while exercising.
Use this machine only for its intended use as described in this Manual. Do not use parts, attachments, or accessories
other than those provided by Nautilus Inc.
To avoid potential safety problems, replace with manufacturer’s specified parts only.
Never drop or insert any object into any opening on the machine. Keep the area underneath and around the machine
clear.
Keep your body weight centered on the machine or bench while exercising.
Be certain that weight pins are completely inserted prior to exercising.
Make sure the weight stack or top plate is never pinned in an elevated position. Do not use the machine if it is found in
this position. Call your repair facility or consult your assembly guides if this occurs.
Inspect all cables, fasteners, belts or chains and their connections prior to every exercising. Do not use the machine if
any component is found worn or damaged.
Never use dumbbells or any other means to incrementally increase the machine’s weight resistance, other than those
means provided by Nautilus.
Never move or adjust the bench while sitting or lying on the Bench. Never stand on the bench.
IMPORTANT! This Nautilus product has a maximum user weight limit of 300 lbs. (136 kgs.) and is not designed to
be used with any load greater than the supplied weight of 205 lbs. (93 kgs.) Do not use any means to increase the
resistance of the machine that is not specified in the owner’ manual.
Use this equipment only on a level surface. Cover the floor or carpet beneath this equipment for protection.
Read all warnings posted on the unit.
•
•
•
•
•
•
•
•
•
•
•
•
•
•

5
Nautilus® Commercial Vertical Series S912 Owner’s Manual
SAFETY REQUIREMENTS: SAVE THESE INSTRUCTIONS!
The safety level provided by the design of this equipment can only be maintained when the equipment is regularly examined for
damage and wear. Inoperable components should be replaced immediately or the equipment be put out of use until it is repaired.
Failure to follow the guidelines may compromise the effectiveness of the exercise experience, expose you (and possibly others) to
injury, and reduce the longevity of the machine. Follow all training instructions listed in the manual and/or on the machine. Physical
injury may result from incorrect or excessive training.
Failure to follow the conditions set forth below shall limit, to the extent allowed by law, Nautilus Inc. responsibility for the safety,
reliability, and performance of this equipment.
The operator manual must be read in full by each owner and trainer before the product is first used. Each user must be
instructed in the proper use of the gym and its accessories.
The equipment must be used in accordance with the instructions for use.
Only Nautilus-trained or Nautilus-authorized personnel should carry out assembly operations, extensions, readjustments,
modifications, or repairs.
For further information or instruction on use, maintenance or specifications, please contact your Authorized Nautilus
Fitness Dealer or Service Technician.
General Guidelines For Safe Operation
WARNING! THESE GUIDELINES ARE DIRECTED TO YOU, AS THE OWNER OF THE MACHINE. YOU SHOULD INSIST
THAT ALL USERS FOLLOW THE SAME GUIDELINES.
WARNING! Do not begin an exercise program without first consulting a physician.
WARNING! If at any time during your workout you feel chest pain, experience severe muscular discomfort, feel faint,
or are short of breath, stop exercising immediately. If the condition persists, you should consult your
medical doctor immediately.
WARNING! Secure long hair and loose clothing before use.
Obtain a complete physical examination from your medical doctor and enlist a health/fitness professional’s aid in
developing an exercise program suitable for your current health status.
The intensity and duration of your exercise program should always be subject to how you feel. Never permit peer
pressure to override your personal judgment while exercising.
Never attempt to exercise with more resistance than you are physically able to handle.
Overweight or severely deconditioned individuals should be particularly cautious when using the machine for the first
time. Even though such individuals may not have histories of serious physical problems, they may perceive the exercise
to be far less intense than it really is, resulting in the possibility of overexertion or injury.
Although all equipment manufactured by Nautilus, Inc. has been thoroughly inspected by the manufacturing facility
prior to shipment, proper installation and regular maintenance are required to ensure safety. Maintenance is the sole
responsibility of the owner.
•
•
•
•
1.
2.
3.
4.
5.

6
PRODUCT FEATURES
Stations
Prone Leg Curl/Seated Leg Extension
Dual Handle Lat Pull
CX Plus™ Press Arm
Nitro® Press Handles
Nautilus® Commercial Ab Crunch
Nautilus® Commercia Dual Pivot Chest Fly
Leg Press with 4-bar linkage
Dual Handle Low Row
•
•
•
•
•
•
•
•
Dual Handle Lat Pull
Nitro® Press Handle
Prone Leg Curl/Seated
Extension
Seat Adjustments Weight stack

7
Nautilus® Commercial Vertical Series S912 Owner’s Manual
PRODUCT FEATURES
Adjustment points
Leg Curl/Ext seat adjustment
Foot pad adjustment
Converging Press arm adjustment handle
Ab crunch/Chest fly seat adjustment
•
•
•
•
Dual Pivot
Pec Fly
Pec Fly Adjustment
Dual Handle Low Row
Abdominal Crunch
Weight stack
Foot Pad
Leg Press

8
S912 FEATURES
Weight Selection and Adjustment
To adjust weight, make certain weight stack is not in use or lifted. Simply pull the weight pin from the weight stack and select the
desired weight. Insert pin completely and make certain it is fully inserted in place before lifting (the magnetized pin will stick onto
the selected weight). In general, always start with lower weights and work up to find the weight most appropriate for your goals and
capacity.
WARNING! Make sure all adjustments are secure before performing any exercises.
Seat Pivot Adjustment (Leg Extension/Leg Curl/Pressing exercises)
Facing the side of the machine, the adjustment is located in front of you, under the seat. To adjust the seat, grasp the seat in one
hand and pull the seat pin from the side of the machine. Rotate the seat up or down to the desired angle. (See photos below.) This
adjustment cannot be done while you are sitting on the seat, so you’ll want to position yourself back on the seat after the adjustment
to ensure proper seat alignment. Proper seat alignment ensures exercise efficiency and comfort, while reducing the risk of injury.
Seat Back Adjustment (Leg Extension/Leg Curl/Pressing exercises)
The tilt angle is adjustable on this machine to allow you to perform various exercises including chest press, shoulder press, incline
press, leg extension and leg curl. To adjust, grasp the back of the seat with one hand and simply pull out the pop pin and reposition
seat back into the desired incline position. (See photos above.)
Pop pins
Seat bottom
Seat back
Seat Back Upright and Seat Bottom Lowered Seat Back Flat and Seat Bottom Raised
Seat back
Seat bottom
Pop pins

9
Nautilus® Commercial Vertical Series S912 Owner’s Manual
S912 FEATURES
Converging Press Arm Adjustment
The converging press arm is adjustable on this machine to allow you to perform various exercises including chest press, shoulder
press, and incline press. To adjust, hold one of the press arm support handles with one hand and pull down the adjustment handle to
release the spring adjustment with your other hand. Rotate the press arms up or down to the desired position. Release the handle to
lock into position. Make sure the adjustment is secure before performing any exercises by pushing up on the adjustment handle. As a
general rule, never start chest exercises behind your shoulders.
Foot Pad Adjustment
There are two footpad adjustments, one adjustment each for the Leg Extension and Leg Curl. The adjustment pop pins are on the side
facing the weight stacks. Simply pull out the pop pin and adjust each footpad to the desired position on your lower leg.
Pec Fly Adjustment
From a seated position, the adjustment pop pin is located at the bottom of the right Pec Fly arm. Simply pull up on the pop pin and
rotate the Pec Fly arms to the desired position.

10
S912 FEATURES
Seat Adjustment (Pec Fly/Abdominal Crunch exercises)
Pull up on the adjustment handle located directly under the front of the seat. Slide seat forward or backward to desired position.
Make sure the seat is completely locked into position before performing any exercises.
Hand Grips
Grasp the handle to form a grip as shown in the photo.

11
Nautilus® Commercial Vertical Series S912 Owner’s Manual
S912 FEATURES
Dual Handle Grips
These handgrips offer two length adjustments. For the longer length adjustment simply attach the longer of the two D-rings to the
cable attachment clip. For the shorter adjustment, attach the shorter D-ring as shown.

12
General Strength Guidelines
Determine your goal:
Power/Speed: Ability to do something in short bursts and be stronger and more powerful performing that task, like
jumping or pushing.
Hypertrophy: Larger muscle size
Endurance: Ability to work with a moderate load over a longer period of time without getting fatigued.
Once you have determined the goal for training you can make informed decisions about your training regimen.
Progression of exercise is determined by the following variables: control, reps, range of motion, sets, effort, and load (resistance/
weight moved). Detailed descriptions and instructions follow.
Control
Determine what muscles are acting (agonist) within the scope of each exercise. Learn how to best fit your body on the machine
for optimal range of motion (movement within each repetition), and how or where to apply force. On each machine there will be a
general description of the area worked on the body. Once you have determined the proper alignment or body position, try a couple of
repetitions to make sure the muscles that are intended to be worked are in fact being contracted during each individual repetition. If
you feel pain or discomfort beyond what is considered reasonable muscle discomfort, discontinue the exercise.
The number of adjustments on each machine are intended to provide every user with the best possible fit; therefore, achieving the
goal you are setting safely.
Range of Motion
Each machine has a predetermined range of motion (ROM) or movement pattern it travels through each repetition. When performing
the exercise make sure to take a look at the diagram provided to achieve the ideal ROM. It’s easy to relax the body so much on a
machine that body posture suffers and as a result the movement is compromised. It’s not only important to look at the movement
pattern, but also look at the body diagram provided on each machine as a guide.
Effort
The amount of effort involved in each repetition or set will evolve over time. Based on your goal of training, the effort will be
determined based on the level of fatigue that is experienced in the final 1 or 2 repetitions for each set. Ideally an individual should
feel moderate to intense fatigue at the end of a set in order to provide enough stimuli to the muscles for adaptation. In basic terms, if
one does not work hard enough the results will not happen as quickly (this does not mean working to injury or intense pain).
Take the following points into consideration when discussing exercise effort:
A movement must be learned before it is intensified.
You can only progress as fast as the weakest muscle (meaning that skipping exercises in the circuit could be detrimental
to your overall muscular balance) An example of this is being very “strong” on the leg press and skipping the leg
extension or leg curl. The front (quadriceps) and the back (hamstrings) of the leg are muscle groups that provide stability
to the body and are two of the primary muscle groups that contract in a squat or leg press. Therefore, eliminating them
would or could be detrimental to overall progress.
•
•
•
1.
2.
STRENGTH GUIDELINES

13
Nautilus® Commercial Vertical Series S912 Owner’s Manual
If control is still a challenge, adding another form of challenge is inappropriate (this means that adding more weight or
more sets to an exercise that is already difficult or more complex is a bad idea).
To progress in one area you may have to temporarily regress or stay the same in others. For example if you are very tight
in the hamstrings and have a difficult time extending the leg using the leg extension machine within the full ROM, you
may have to decrease the resistance on the leg extension and focus on active hamstring flexibility.
Repetitions
The following chart lists the appropriate number of repetitions for your goal.
Training Goal Power/Speed Hypertrophy Endurance
Repetitions 3-9 10-12 13-15
The number of repetitions is less important than the quality of each rep performed. Repetitions are less about how many times the
movement was performed than they are about the time under which muscular work occurred.
The speed of each rep should be approximately 6 seconds in length (unless you are working for more power and speed –these reps
will be quicke, while still maintaining control).
Sets
A set is a series of continuous movements or repetitions the end of which is determined by fatigue/training goal. Fatigue is a
sensation that one is unable to complete another repetition without compromising form or ROM. Levels of fatigue will range from the
initiation of shaky or burning sensation in the muscles worked to a progressive reduction in the ability to complete a repetition.
Start out with one (1) set of your goal repetitions. The maximum number of sets necessary to provide stimulus to the muscle per
exercise session is three (3). Anything above and beyond that is excessive movement and is also evidence that the load or resistance
you have selected is incorrect (most of the time it’s too low).
The rest between sets should be longer for power or speed and less for hypertrophy and endurance. The rest for power speed can be
up to 3 minutes between sets and for hypertrophy and endurance from 30-60 seconds.
Load
The resistance or weight you choose should be gradual and progressive over time. Start by chosing a weight that you can perform at
least 5-7 repetitions of without the onset of burning or shaking. This will assure you that you have not overdone it. Once you have had
a couple of sessions you can adjust the weight more appropriately based on your goals of training. Try not to adjust the resistance
too often. Muscle adaptation does take time; it will not happen overnight or even in a week. If you are new to this type of exercise,
make sure you are able to finish 2-3 sets with the weight selected and are able to complete all reps in each set, and then you can
increase the weight or resistance by 5-7%. This process is called progressive overload. Progressive overload is necessary to notice
changes safely in your body and in achievement of your goals.
If too much load is applied too quickly or improperly (meaning body positioning will be incorrect), this will not lead to progress…in
fact it will lead to injury and poor functional posture. You need to make sure to set yourself up in the machine properly, learn the
movement pattern correctly and then lastly apply resistance or load.
3.
4.
STRENGTH GUIDELINES

14
Core Exercises
The following pages contain information on how to correctly perform core S912 exercises. Be sure to follow the instruction labels on
the machine for each exercise station’s equipment settings.
Core Exercise Muscles Worked
Chest Press: Shoulder horizontal adduction with
elbow extension
Pectoralis major, anterior deltoid, triceps
Incline Press: Horizontal shoulder adduction with
elbow extension
Pectoralis major, anterior deltoid, triceps
Shoulder Press: Shoulder abduction with elbow
extension
Pectoralis major, anterior deltoid, posterior deltoid, triceps
Triceps Extension: Elbow extension Triceps
Leg Curl: Knee flexion Hamstring group (biceps femoris, semimebranosus, semitneonosus),
gluteals)
Leg Extension Quadriceps
Leg Press: Hip extension with knee extension Quadriceps, gluteous maximus, hamstrings
Seated Calf Raise: Ankle plantar flexion Gastrocnemius, Soleus (lower leg muscles)
Pec Fly: Horizontal shoulder adduction Pectoralis major, anterior deltoid
Abdominal Crunch: Trunk flexion Upper/lower front abdominals (rectus abdominus)
Mid Row: Shoulder extension with elbow flexion Trapezius, deltoids, rhomboids, and biceps.
Arm Curl: Elbow flexion Biceps, brachialis, brachioradialis.
Seated Row: Shoulder extension with elbow
flexion
Latissimus dorsi, teres major, rear deltoid, trapezius, rhomboids, and
biceps.
Lat Pulldown: Shoulder adduction with elbow
flexion
Latissimus dorsi, teres major, rear deltoid, biceps.
EXERCISES

15
Nautilus® Commercial Vertical Series S912 Owner’s Manual
Chest Press
Muscles Worked
This exercise emphasizes the chest muscles (pectoralis major), also involving the front shoulder muscles (anterior deltoid) and the
triceps, muscles on the back of the upper arm.
Starting Position
Adjust the seat back to the Chest Press position, as noted on the seat back label.
Adjust the seat bottom to the appropriate height as shown in the Start position below.
Adjust the press arm to the Chest Press setting. Check that the press arm’s plane of motion is pressing 90 degrees
off the chest.
Grasp the press arm with the hands in a position such that when it is lowered toward the chest, the wrist and
forearm are lined up straight over the elbow.
Stabilize your core and lower body by keeping the feet flat on the floor directly under the knees.
Raise the chest and slightly pinch the shoulder blades together. Maintain a slight, comfortable arch in the low back.
Motion
Slowly move the press arm away from the body allowing the elbows to straighten as the hands move closer together.
Stop the movement when the upper arms are approximately straight out to the side (elbows will be level with the
shoulders) and the press arm handles are over the nipple line of the chest.
Slowly lower the press arm, allowing your arms to bend as they move outward. Your forearms should remain parallel
to each other and the hands remain over the elbows throughout the movement.
Keep the chest muscles tight throughout the movement.
Key Points
Limit and control the range of motion so that the elbows only travel slightly below the shoulders, if at all.
Squeeze the chest at the top of the press by attempting to bring the hands together on the press arm.
•
•
•
•
•
•
•
•
•
•
•
•
EXERCISES
START FINISH

16
Incline Press
Muscles Worked:
This exercise emphasizes the chest muscles (pectoralis major), also involving the front shoulder muscles (anterior and middle deltoids)
and the triceps, muscles on the back of the upper arm.
Starting Position:
Adjust the seat back to the Incline Press position, as noted on the seat back label.
Adjust the seat bottom to the appropriate height as shown in the Start position below.
Adjust the press arm to the Incline Press setting.
Reach up and grasp the handles with the hands in a position that when the bar is lowered toward the chest, the wrist
and forearm are lined up straight over the elbow.
Stabilize the core and lower body by keeping the feet flat on the floor directly in a vertical line with the knee.
Raise the chest and slightly pinch the shoulder blades together. Maintain a slight comfortable arch in the low back.
Motion:
Slowly press against the handles, moving the press arm upward and forward.
As the hands come closer together, the elbows will straighten.
Stop the movement when the upper arms are approximately straight, above and forward of the starting position.
Slowly lower the press arm toward the chest allowing the elbows to bend outward, simultaneously bending your arms so
that your forearms remain parallel to each other and the hands remain over the elbows throughout the movement.
Keep the chest muscle tight throughout the movement.
Key Points:
Limit and control the range of motion so that the elbows only travel slightly above the shoulders.
Squeeze the chest at the top of the press by attempting to bring the hands closer together on the bar.
•
•
•
•
•
•
•
•
•
•
•
•
•
EXERCISES
START FINISH

17
Nautilus® Commercial Vertical Series S912 Owner’s Manual
Shoulder Press
Muscles Worked
This exercise emphasizes the chest muscles (pectoralis major), the front shoulder muscles (anterior deltoid), the back shoulder muscles
(posterior deltoid and upper trapezius) and the triceps muscles on the back of the upper arm.
Starting Position
Adjust the seat back to the Shoulder Press position, as noted on the seat back label.
Adjust the seat bottom to the appropriate height as shown in the Start position below.
Adjust the press arm to the Shoulder Press setting. Check that when you are seated on the bench, you can place your
hands on the grips with the arms slightly lower than the shoulders and elbows bent.
Your feet should be flat on the floor and directly in line under your knees. Stabilize your lower body from your ankles,
through your knees and up into your hips.
Slightly arch your lower back and lift your chest to stabilize your core.
Grasp the handles so that your hands are in line with the forearm and elbow. Your elbows should be bent to
approximately 90 degrees.
Motion
Slowly move the press arm upward in a plane slightly in front of your face so that your elbows straighten to a point
where they are parallel to each other. The hands should remain over the elbows throughout the entire movement.
Stop when your upper arms are approximately straight over your shoulders controlling the movement of the press arm.
Slowly lower the press arm by letting the elbows bend and the upper arm moves straight out from your sides. (elbows
will be level with the shoulders or slightly below).
Key Points:
Limit and control the range of motion so that your elbows travel in line with your shoulders or slightly more in front of
the shoulder.
Lower the press arm under control without letting your elbows go below the height of the shoulder.
•
•
•
•
•
•
•
•
•
•
•
EXERCISES
START FINISH

18
Triceps extension
Muscles Worked
This exercise emphasizes the triceps muscles located on the back of the upper arms. These muscles are responsible for straightening
your arms and assist in any upper body pushing or pressing motion.
Starting Position
Adjust the seat back to the vertical position, as shown in the Start photo below.
Adjust the seat bottom to the declined as shown in the Start photo below.
Adjust the press arm to the Chest Press setting.
Straddle the seat pad, facing away from the seat back.
Grasp the handles with a hammer type grip.
Keeping your arms bent, bring your upper arms to your sides and maintain that position.
Lift your chest and tighten your abs to stabilize your spine while maintaining a very slight arch in the lower back.
Motion
Keeping your upper arms stationary and your elbows next to the sides of your torso, slowly straighten your arms by
arcing downward and then inward toward your legs.
Straighten your arms fully.
Controlling the motion, allow your elbows to bend, returning to the starting position without moving your upper arm.
Key Points
Keep your upper arms motionless.
Keep wrists straight.
Tighten the triceps throughout the exercise and control the motion on the way up.
Maintain good posture by keeping your chest lifted, abs tight and maintain a very slight arch in your lower back.
•
•
•
•
•
•
•
•
•
•
•
•
•
•
EXERCISES
START FINISH

19
Nautilus® Commercial Vertical Series S912 Owner’s Manual
Lat Pulldown
Muscles Worked
This exercise emphasizes the latissimus dorsi, teres major and rear deltoid which make up the large pulling muscles of the upper back.
It also involves the biceps, muscles of the front of the upper arm which are responsible for bending the elbow.
Starting Position
Adjust the seat back to the vertical position, as shown in the Start photo below.
Adjust the seat bottom to the declined as shown in the Start photo below.
Adjust the press arm to the Chest Press setting.
Sit on the seat facing the tower and rest your thighs comfortably beneath the seat back.
Facing the machine, grasp the handles so that your palms are facing forward.
Position your feet directly under your knees which are bent to 90 degrees, sit upright with your arms extended up. NOTE:
You may position your hips directly under the pulley, but make sure to lean back slightly from the hips (not the spine).
Maintain good spinal alignment, chest lifted, abs tight and maintain a very slight arch in your lower back.
Motion
Initiate the movement by pulling your shoulder blades down and together while simultaneously drawing your elbows
downward to the sides, and then inward, toward your trunk.
Slowly return to the starting position allowing your arms and shoulder blades to move fully upward, without relaxing the
muscles.
Key Points
From the side view the forearms should appear to remain in line with the cable.
Do not lose spinal alignment.
Do not lean backward as you pull.
Keep chest up, especially at the bottom of the movement.
Keep the lats tightened throughout the entire motion.
•
•
•
•
•
•
•
•
•
•
•
•
•
•
EXERCISES
START FINISH

20
Leg Curl
Muscles Worked:
This exercise emphasizes the hamstring muscle group (biceps femoris, semimembranosus, semitneonosus) on the back of the thigh as
well as the gluteals.
Starting Position:
Adjust the seat bottom and seat back to the Leg Curl position as noted on the seat position labels.
Adjust press arm to rearmost position as shown in the photos below.
Lie face down with your upper thigh on the seat pad, knees near the pivot point and ankles under the upper roller pads.
If necessary, adjust position of upper roller pads to rest comfortably on ankles.
Point your knees and feet straight down and tighten your inner thigh muscles (as if squeezing your knees together) to
stabilize.
Place your hands down on the handles or in front of you.
Place your forehead on the bench, or turn your head to the side, but do not look up, hyper-extending your neck.
Tighten your abs to prevent spinal motion and very slightly lift your knees off the bench pad, taking the pressure off your
thighs and tightening the hamstrings.
Motion:
Slowly bend your knees, upward then inward toward your hips without moving your spine and without your hips lifting
from the bench.
Keeping the hamstrings tight, slowly allow your legs to straighten and return near the starting position. Do not fully
extend your legs.
Key Points:
Make sure you straighten your legs under control, do not allow your knees to hyper-extend.
Keep your chest lifted, abs tight and maintain a very slight arch in your lower back.
Try to relax your calf and foot muscles.
•
•
•
•
•
•
•
•
•
•
•
•
EXERCISES
START FINISH
Table of contents
Other Nautilus Home Gym manuals

Nautilus
Nautilus NT#1020 User manual

Nautilus
Nautilus P3DLS Technical specifications

Nautilus
Nautilus Be strong NS 200X User manual

Nautilus
Nautilus ONE CP02 User manual

Nautilus
Nautilus NS 600X User manual

Nautilus
Nautilus BE STRONG. NS 600X User manual

Nautilus
Nautilus Be strong NS 700X User manual

Nautilus
Nautilus 2ST PULLOVER User manual

Nautilus
Nautilus Bowflex Classic User manual

Nautilus
Nautilus 2ST ABDOMINAL User manual