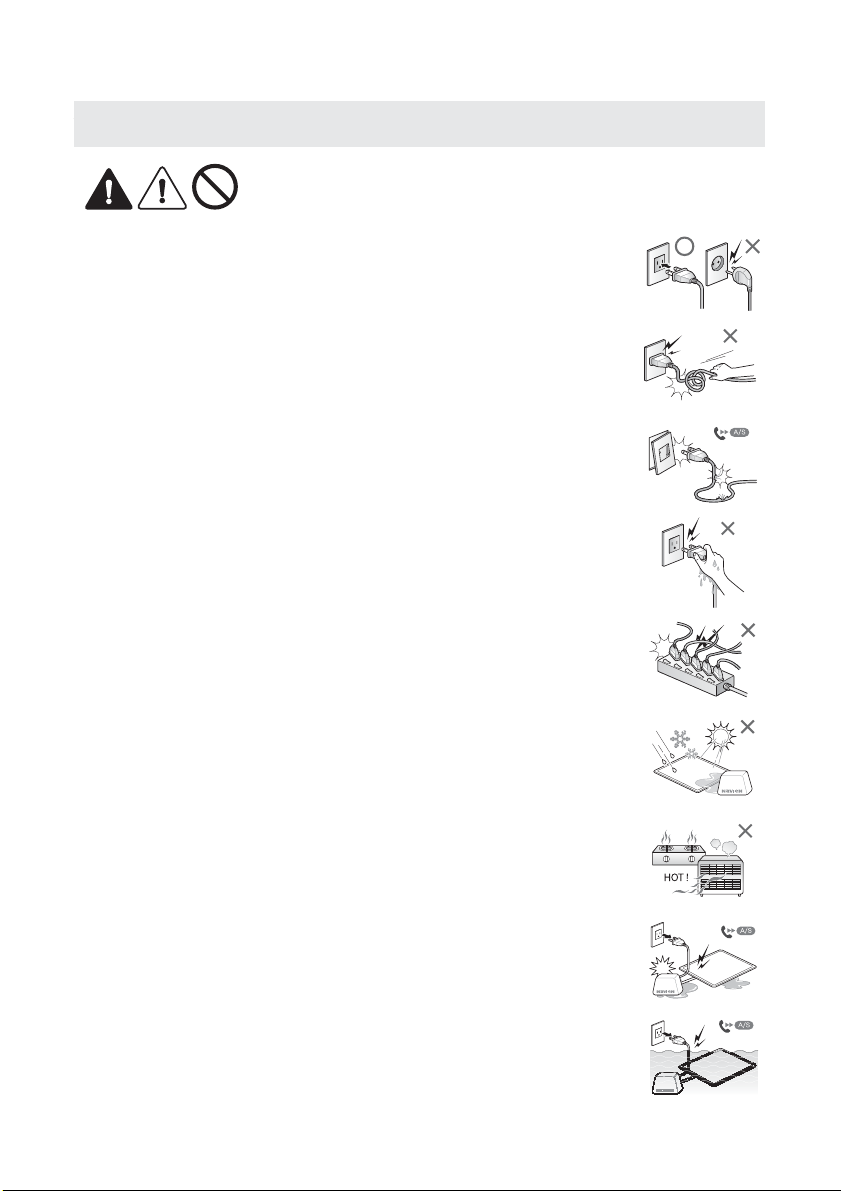
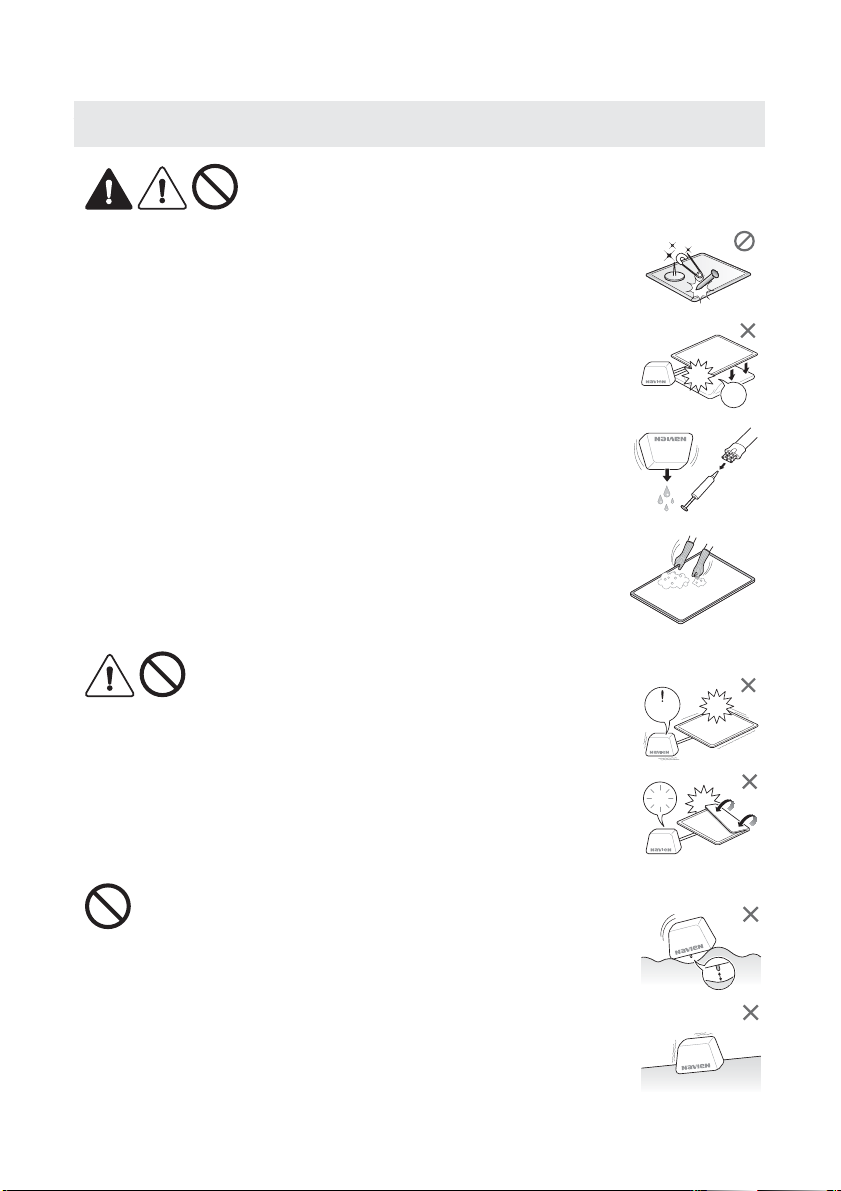
Navien Mate EQM 580 User manual

EQM
580
ýKeep this manual in an easy-to-nd location.
Pleasereadthemanualcarefullytousetheproductasintended.
7KHDSSHDUDQFHDQGVSHFLȴFDWLRQVRIWKHSURGXFWDUHVXEMHFW
to change without prior notice for quality improvement.
7KHLOOXVWUDWLRQVLQWKLVPDQXDOPD\EHGLIIHUHQWIURPWKRVH
of the product you purchased.
User Manual


Contents
For safety and correct use of the product, be sure to read the manual before use.
Experience the warmth of Navien for good and healthy sleep.
Safety Precautions
Product Components
Name of Each Part
Display & Control Panel Guide
Remote Control Operation Guide
Product Installation Guide
Control Panel Features
- Power On and O
- Setting the Temperature
- Setting the Timer Mode
- Setting the Lock Mode(Child Lock)
- Setting Mute and Volume
- Setting the Sterilization Mode
- Setting the Fast Heating
- Setting the Auto Drain Mode
- Connecting Smart Device Application
- Using Smart Device Application
Product storage
Navien Mate Care
Error Code Guide
Trouble Shootings
Specications
FCC Certication
Product Warranty
4
9
10
11
12
13
14
25
27
28
29
30
31

4
Safety Precautions
Please read the safety precautions carefully to ensure that the product is used
safely and correctly to prevent accidents and risks in advance.
Disassembly
prohibited Indication that prohibits disassembly.
Ensure Proper
Grounding Grounding for prevention of electric shock.
Warning Failure to follow the instructions may result in death or serious
personal injury of the user.
Caution Failure to follow the instructions may result in minor injury
or property damage.
Actions
Prohibited Prohibited actions are shown with emphasis.
When using the product for a long period of time, such as while
sleeping, set the temperature to less than 95°F(35°C.).
There is a risk of low temperature burns.
35
Warning/ Caution/ Actions Prohibited
There is a risk of burns.
People who are physically disabled or unable to detect high
temperatures should be careful not to use the product.
Patients with diabetes or skin disease is in risk of skin burns,
so please refrain from using this product.
Please read and follow the safety precautions.
Please use the provided pad cover or blanket on the pad.
There is a risk of low temperature burns.
Please take caution for skin contact with the connector hose.
There is a risk of low temperature burns.
California law requires the following Prop 65 warning to be provided:
This product can expose you to chemicals including lead, lead compounds, and carbon
bisulde which are known to the State of California to cause cancer and birth defects or
other reproductive harm. For more information, go to www.P65Warnings.ca.gov.
WARNING

5
Please read and follow the safety precautions.
Warning/ Caution/ Actions Prohibited
If the power cord or plug is damaged,
contact the manufacturer or its authorized
technician for replacement.
120V 220V
This product is for domestic use only for 120V/60Hz.
Always use a country-specic outlet with a grounding terminal.
A dierent voltage may cause electric shock or re. Failure to use a grounding
outlet may result in malfunction or electric shock.
Do not bend, twist, or tie the power cord by force.
There is a risk of electric shock and re.
Do not plug or touch the power plug with wet hands.
There is a risk of electric shock and injury.
Do not use multiple devices at the same time when using a multi-outlet.
There is a risk of re and electric shock.
Do not use the product in a place exposed to direct sunlight,
snow, rain, or in a wet environment.
There is a risk of electric shock or re due to heating or short circuit.
Do not use the product near a heating device such as a gas
stove
or a stove.
It may cause deformation of the product and re.
If there is a leak in the heating unit or pad, be sure to disconnect
the power plug and contact the service center.
If the product is submerged, immediately disconnect the
power plug and contact the service center.
There is a risk of malfunction, electric shock or re if operated after water damage.

6
Error!
Do not operate the product with wet hands.
There is a risk of electric shock.
Do not allow infants or children from operating the product
and set the child-lock when not in use.
There is a risk of electric shock, burns and product malfunction.
If an error code or operating issue occurs while using the product,
disconnect the power cord from the outlet and contact the service
center.
There is a risk of re or electric shock due to heating or short circuit.
Do not clean the heating unit with chemicals such as benzene,
paint thinner, alcohol, or general detergents.
It may cause discoloration, deformation, breakage, electric shock or re.
Never disassemble, repair or modify the product at your own
discretion.
There is a risk of malfunction, electric shock or re. If yproduct repair is required,
please contact the service center.
Do not kick or exert excessive force on the heating unit and do
not put foreign objects inside.
There is a risk of product malfunction and accident.
Be aware that a some steam may be released from the micro
pores of the water inlet cap during operation.
There is a risk of electric shock and burns.
Alcohol
Thinner
Benzene
Use of clean water(distilled water, puried water,
mineral water) is recommended.
Do not use underground water or other liquids.
It may cause the product to malfunction.
DetergentDetergent
Air freshnerAir freshner
Purified
water
Purified
water
ChemicalsChemicals
Mineral
water
Mineral
water Oil
Underground
water
Underground
water
Be sure to securely fasten the connection between the Heating unit
and the pad and do not break the connecting hose or step on it.
There is a risk of product malfunction or blockage in hot water circulation.
Please read and follow the safety precautions.
Warning/ Caution/ Actions Prohibited

7
No
Wate r
Do not place heavy or sharp objects (tacks, nails,
knives, needles, etc.) on the pad or pierce the pad.
It may cause deformation of the product or leakage.
Do not use the pad with latex products to avoid a risk of
product deformation.
There is a risk of product failure.
Do not operate the product without water.
It may cause the product to malfunction.
Never crumple or fold the mattress pad when the heating
unit is operating.
It may cause the product to malfunction.
Do not place the heating unit on an uneven surface or on
the carpet.
The balance sensor at the bottom of the Heating unit may trigger and the heating
unit may not operate.
Do not place the heating unit on a slated surface.
It may cause product failure or malfunction.
Latex
on
Please read and follow the safety precautions.
Warning/ Caution/ Actions Prohibited
Caution/ Actions Prohibited
Actions Prohibited
The pad is not machine washable. Please take the pad cover
o before cleaning with a mild detergent and wipe gently.
It may cause the product to malfunction.
If not used for a long time, turn the heating unit upside
down and drain the water. Remove the water from the
pad using a residual water removal kit.

8
Safety Precautions
Be careful for low temperature burns.
What is a low temperature burn ?
Main symptoms of low temperature burns
Low-temperature burns are skin damage caused by slow penetration of heat over a relatively
long period of time from temperatures of 104°F(40°C) to 111.2°F(44°C) that is not relatively hot.
According to the American Burn Association (ABA), skin deformation (protein breakdown)
occurs when exposed to 113°F(45°C) for 1 hour, 122°F(50°C) for 3 minutes, and 140°F(60°C) and
greater for 8 seconds.
It occurs in the dermis or adipocytes that do not feel pain well, and the burned area is narrower
and deeper than burns caused by high temperature. It is important to use the product safely
with special care as burns are mostly caused by misuse of heat mats, heaters, and hot packs
used at home.
1. Your skin may turn red and you may feel a tingling sensation.
2. Burned area appears discolored and may be itchy.
3. Over time, the degree of pain may increase.
4. If symptoms process further, blisters may occur due to burns
5. The burned area has a tendency to be narrower than a normal burn injury.
ýCool down the burned area using cold water or saline on the aected area with the low temperature
burn. (Please refrain from direct stimulation by applying an ice pack or with a shower.)
ýPlease see the doctor as soon as possible for care.
1. Use provided cover or any thin cover over mattress pad.
2. Be careful not to touch the skin with the hose connector for a long period.
3. Anyone who are physically disabled and unable to sense the high temperature should not use it.
4. Diabetes or skin disease patients should not use it.
5. Be careful not to operate it by infants or children, and set a child lock mode when not in use.
6. Make sure not to lie down in one position for a long time. If you feel tingling during use, adjust
the temperature or change your posture.
7. When sleeping, set the temperature below the recommended temperature of 95
°
F(35
°
C),
please refrain from using high temperature for a long time.
Safety tips using Navien Mate.

9
Product Components
EQM580
Heating unit (Boiler) Mattress Pad(Mat)
Pad Cover User Manual / Quick Manual
Air pump / Water Removal Kit Auto Drain Kit
Remote Control Storage Bags
ýShape and color may vary depends on product model.
ý
Shape and color may vary depends on product model.
1EA 1EA
1EA
1EA 1EA1EA
1EA 1EA 1EA
1EA1EA

Name of Each Part
10
Screen display
Window &
Boiler control
panel
Connection area of the
Water inlet/outlet connector
* Single size has
2 connectors.
Water inlet
Remote control
receiver
Connector area
Mattress pad area
ý
Shape and color may vary depends on product model.
Heating unit (Boiler)
Mattress pad (Mat)

Display & Control Panel Guide
11
EQM
580
Label Name Description
Power button To turn on/o the product.
Volume button To increase or decrease the volume.
Lock button To lock/unlock the heating unit control panel.
Sterilization button To set the sterilization mode.
Timer button To set or stop the timer.
Drain button To set the automatic drain mode.
Wi-Fi button Pairing to Wi-Fi(Connect to Wi-Fi).
Water Level
Indicator Lamp Amount of water inside the heating unit.
High temperature
Warning Lamp
When temperature is above 100°F(38° C)
.
Wi-Fi Lamp Wi-Fi connection status.
Timer Lamp Status of timer set.
Mute Lamp When mute mode is on.
Fast Heating Lamp Status of fast heating mode set.
Sterilization Lamp When sterilization mode is set.
Operation indicator When power saving mode is on.
Control Panel Display

Sign Name Description
Power button To turn on/o the product.
Lock button To lock/unlock the heating unit control panel.
Left / Right button To select the heating area(Left or Right).
* Applies to Queen and King Size only.
+/- button To increase or decrease the the temperature and voice
guidance.
OK button To complete the setting or mode.
Timer button To set or stop the timer.
Mute button To set or stop the mute.
Return button To return to normal mode exiting from timer or fast
heating mode.
Fast Heating button To set fast heating mode.
Remote Control Operation Guide
12
Remote Control
* Dual temperature control is not available for single size.
* Battery type for remote control is CR2032.
ý:KHQXVLQJWKHUHPRWHFRQWUROSRLQWLWWRZDUGVWKH
VLJQDOUHFHLYHURQWKHIURQWSDQHOGLVSOD\ZLQGRZ
If the remote control does not work
How to install the Remote Control Battery
1. Replace the battery.
2. Check if any objects are covering the remote control signal
receiver on the display window.
3. Please use the remote control above the boiler unit as shown in the illustration.
1. Access the battery terminals from the back of the remote control.
2. Insert the battery with the (+) side facing up, then enclose the
battery by closing the battery cover.
3. Repeat Step 1 and 2 when replacing the remote control battery.

Product Installation Guide
13
1ft
Click!
To prevent heat loss when using on the oor, please use any kinds of
mattress pads or topper beneath Navien Mate Pad.
1. Insert the mattress pad inside the provided zipper cover.
- If you don't have provided cover, use any other types of pad or thin layer of blanket as a cover.
- Tie up corner ring of the pad and the inner lining of the cover.
ýThere is a risk of low temperature burns when used for a long time without covering the pad.
2. Select the location to install.
- Make sure the distance between heating unit and pad is more than 1ft.
- Placing the heating unit at the same height or slightly higher than the
pad is recommended.
- Do not place the heating unit on uneven oor or soft carpeted area.
(May not operate due to the malfunction of the balance sensor)
3. Connect the hose to the heating unit.
- Untangle the hose and lay it at.
- Be sure to connect the hose facing Navien logo.
6. Set desired temperature to begin use. Refer to the "Control Panel Features" page for
instructions on setting the temperature.
ý The water shortage error code may occur 2~3 times during initial use. Repeat the water replenishment
procedure according to the above instructions until enough water is replenished.
ý We recommend using distilled water, bottled water, puried water or tap water.
Using tap water may cause partial product discoloration.
ý If the water touches the safety net inside the water inlet, it can overow. Be careful to keep the water level
low enough to prevent it from touching the safety net.
ý For continuous and stable heating, it is recommended to ll water above the second stage (the mid level)
before or while using.
5. Fill the heating unit with water.
ةPrepare the water.
(The amount of water to be lled is approximately 1,500ml for King size,
1,350ml for Queen size, 1,050ml for Single size.
تOpen the water inlet cap by turning it counterclockwise.
ثSlowly add the water while checking the water level indicator lamp.
جKeep adding the water until the water level indicator lamp goes up to
the highest level and then wait for a brief moment.
ح
As the water is transferred to the pad from the heating unit, the low water level
and water shortage error will be displayed again. Fill with water as done before.
خAfter water lling is complete, close the water cap by turning it clockwise.
- (water storage error code) will be displayed when you set up for the rst time.
- The water level indicator will also blink.
4. Plug the power cord and touch the power button.

Control Panel Features
14
- Touch the power button on the heating unit to power on and o.
- Default temperature is set for 95
°
F(35
°
C) for both sides and the current temperature will be displayed.
- It is automatically set to the previous use temperature when power is turned o and restarted.
The current temperature will displayed on the left and set temperature will be on the right side.
For single size
If the heating unit has not been operated for 30 seconds, it goes into step 1 power saving mode.
(Screen brightness decreases)
If the power saving mode is maintained for more than 1 minute, the power saving mode is
entered in step 2 and the "Operation indicator" icon is displayed to indicate normal operation.
This indicator icon will display for sides that are being heated. If only one side is being heated,
the indicator icon will only be displayed on that one side.
To resume control of the heating unit, touch any button to exit power saving mode.
Power saving mode
Power On and O
- The heating temperature can be set between 82°F(28°C) through 113°F(45°C).
- The queen and king sizes are equipped with dual heating function which can set the left and
right temperatures independently.
- When setting the temperature above 100°F(38°C), the high temperature entry mode is applied
for safety and the high temperature warning lamp will be lit.
- The left and right temperature of the pad can be set in
1
°F
increments with the "+/-" buttons on the
left/right display screen.
- When the desired temperature is displayed on the screen, setting will be completed after 3 seconds.
ýSingle size is not equipped with dual heating mode.
ýAbove 95°F(35°C) is recommended for Dual heating mode.
Setting the left and right temperature.
Setting the Temperature
Turing o one side.
Set the temperature below 82°F (28°C) until you see " " on the screen.
ة
" " will be on when you press "+" after 99 °F(37°C).
ت
Release the button and wait for a brief moment, the " " indicator and the high temperature caution
lamp will blink. (For about 1.5 seconds)
ثPress "+" button one more time when you see " " blinking.
Setting temperatures over 100°F(38°C)

15
Lock Mode (Child Lock) can be set to prevent accidents caused by unit tampering
by infants or young children.
ةWith the heating unit on, touch the Lock button for 2 seconds to activate lock mode.
تWhen lock mode is activated, none of the buttons of the heating unit will work.
ثTouch the lock button for 2 seconds to deactivate lock mode.
Setting the Lock Mode (Child Lock)
You can adjust the volume of the voice guidance.
ة
By touching the volume button on the boiler control panel, you can select mute and volume
in 1 ~ 3 steps.
تWhen set to 0, the mute lamp is lit.
ث
The setting is completed automatically after 3 seconds after the desired volume level is
displayed as a number.
Setting Mute and Volume
You can sterilize the water inside the pad and the heating unit.
ýCaution ýPlease DO NOT use the bed warming mattress pad when the sterilization
mode is active.
Please DO NOT consecutively activate sterilization mode.
Consecutive activation can lead to overheating errors.
Please close the water cap tightly while the sterilization mode is active,
because the water is heated at high temperature.
ةTouch the Sterilization button for 2 seconds to initiate sterilization mode.
The sterilization lamp will light up.
تThe time to completion of sterilization will be displayed on the screen, showing minutes and
seconds remaining.
ثSterilization mode lasts for 30 minutes. Once the sterilization is complete, the heating unit will
automatically turn o.
Setting the Sterilization Mode
The timer can be set for 3 to 12 hours, and the heating unit will automatically power o after
the set time has passed.
ةTouch the timer button and the right side number will blink.
تSet the desired time by touching the "+/-"
ثWhen the desired schedule time is displayed, the setting is completed after 3 seconds and the screen
display changes to the temperature display.
جWhen the timer mode is activated, touch the Timer button again to cancel the timer mode.
Setting the Timer Mode

16
This function helps you reach the set temperature more quickly.
ةIt is possible to set fast heating mode through quick heating button or application of remote
controller.
تWhen fast heating is selected, the icon will light up and fast heating mode will be activated.
ثFast heating function lasts for 30 minutes.
جIt is possible to resume after 30 minutes.
ýDuring fast heating operation, the function is automatically shut down when the set temperature is reached.
ýHeating Assist mode
If the set temperature cannot be reached, the heater output is changed to 340W maximum, and it is
controlled automatically until the set temperature is reached.
The heating unit activates this mode itself without any button operation.
Setting the Fast Heating
ýExclusive use for APP & Remote Control

ةAfter turn o the heating unit, wait until cool down the water inside.
تPlace the heating unit and the pad on the oor and prepare the bucket(about 1.8 L Water) and an
Auto Drain Kit.
ýIf the pad is above the Auto drain kit, water may overow.
ثRemove the boiler and pad by pressing the easy connector on the back of the boiler connector.
ýBe careful of any leaking water drops from the connectors.
جOpen the water inlet lid of the boiler and check if the water is full.
If the water is full, close the cap tightly; otherwise ll the water.
ýAutomatic drain function is to automatically discharge the water inside the boiler and mattress pad.
Normal operation is possible when the water in the boiler is full and the water inlet lid is properly closed.
ح7XUQRQWKHERLOHUDQGWRXFKWKHGUDLQEXWWRQIRUVHFRQGV
ýA voice guidance will conrm whether the boiler is fully lled and if a bucket is prepared for the water.
خ$IWHUWDSSLQJWKHGUDLQEXWWRQIROORZWKHYRLFHJXLGDQFHWRFRQQHFWWKH
$XWRGUDLQNLWEHWZHHQWKHERLOHUDQGWKHPDWFRQQHFWRUDQGWKHQSUHVV
WKHGUDLQEXWWRQRQFHDJDLQ
ýPlease connect the Auto drain kit following the voice guidance.
17
Setting the Auto Drain Mode
Be sure to cool down the water in the heating unit and the pad before using Auto
Drain due to the risk of burn.
ýIf you use the water for a long time without replacing the water, minerals and other components in
the water may solidify and cause foreign substances like incrustation.
ýEven after the automatic water drainage, there may be remaining water in the mattress pad depending
on the usage environment. Use the enclosed air pump and residual water removal kit to remove the
remaining water.
د:DLWXQWLOWKHFRXQWHUILQLVKHV2QFHDXWRGUDLQPRGHLVILQLVKHG
WKHKHDWLQJXQLWZLOOWXUQRIIDXWRPDWLFDOO\
ذAfter the automatic drain mode, please tilt the boiler as shown in the gure
to remove the remaining water.
رPress the valve of the water-inlet/outlet connector at the rear of boiler as
shown above to remove the residue.
Make sure to connect the Kit to the heating unit rst other wise it may
cause leakage.

18
If you install "Navien Mate" App and connect to your device via Wi-Fi, you can control
your Navien Mate.
How to connect Wi-Fi after installing the application
How to download "Navien Mate" App.
Search and down load for"Navien Mate" in Google play store or Apple App Store.
[Android] Run Google Play Store ċSearch for 'Navien Mate' ċInstall ċSelect ċRun
[iOS] Launch App Store ċSelect Search ċEnter 'Navien Mate' ċSelect [Download] ċDownload
ةMake sure you have downloaded "Navien Mate" App.
تConnecting Wi-Fi
When the boiler is on, press and hold the button for two seconds at the
same time, the smart device is ready to connect the lamp on the screen
display blinks.
ثConnecting to APP
Launch the Navien Mate app on your phone. Select [Connect Wi-Fi] to go to each connection screen.
(Please refer to the following page for more information on How to Connect Application and Bed
Warming Mattress Pad using Wi-Fi
جTerminating Smart Device Connection
If you want to exist from this app, press the button and button on the boiler control panel
for 2 seconds, the lamp disappears and disconnects with the smart device.
ýPlease check before connecting to Wi-Fi!
Be sure to release below Wi-Fi Setting. (May dierent according to device brands)
Prevent bad networks
Disconnect weak signaling Wi-Fi
Disconnect when Internet is not
available
Disconnect abnormal AP
Automatically switch networks
Check Internet service
Switch to smart network
Supported OS
iOS 9.0+, Android 4.4+
(Some features may work dierently when operating on other smart phones.)
Connect the smart device after installing the application
Connecting Smart Device Application

19
Wi-Fi module specications
Using Wi-Fi Notice
ةThe SSID is 32 digits or less, and the password is 64 digits or less (depending on the security method).
The alphabet + number + space can be used in combination. Supports IEEE 802.11 b / g / n mode.
ت
Wireless usable channels: 1 ~ 13 channels (2.4GHz band) ý5GHz band cannot be used
ث
Authentication method: Supports OPEN, WEP, WPAPSK, WPA2PSK, WPAPSK / WPA2PSK.
WPAPSK (TKIP) and WPA2PSK (AES) are recommended.
When using encryption, WEP authentication is vulnerable to security and is not recommended.
We do not recommend connections that are compatible with the new Wi-Fi authentication
specications and Wi-Fi nonstandard authentication
ج
Depending on the connected AP, wireless network connection may not be smooth.
ح
If a device using the same frequency band is nearby, it may interfere with connection to AP device.
خ
When connecting to a wireless network, it may not be connected to the network depending on
the surrounding environment.
د
Please contact your service provider for internet service that requires authentication of a separate
provider, as it may not be connected.
ذ
Network setting method may be dierent depending on network environment.
ر
If the setting of the router is changed during operation (SSID, password, authentication method,
channel), connection to the router may not be smooth. In this case, please reset the router.
ý
The software or manual may be changed without any notice due to performance improvement
and other reasons.
Wireless Specications
Specications
IEEE 802.11 b/g/n
Wireless Channel
Channels 1~13
Authentication Methods
OPEN, WEP, WPA-PSK, WPA2-PSK

20
Connecting Wi-Fi with Navien Mate
1. Run the application and select [Connect Wi-Fi] and press the [Next] button.
2. Click the [Subscribe] button at the bottom of the login screen to register.
ý
ID is required to use remote controlling function through the app.
3. Follow the instructions on the screen and select [Settings] Ċ[Wi-Fi] on the smart phone.
Please select Navien Mate's AP. (Example: NWMKDxxxx)ĊPlease check if Wi-Fi connection is possible.
(You can connect the AP by touching the button and the button simultaneously
for 2 seconds in the boiler section.)
4. When the connection is completed, press the [Next] button on the Navien Mate application screen.
Table of contents
Other Navien Heater manuals
Popular Heater manuals by other brands

BELLAGIO
BELLAGIO H2NLTGMG2ASF owner's manual

Frico
Frico Corinte W AD Series Mounting and operating instructions

Rinnai
Rinnai Graduate MkII Operating information and installation instructions

VOLTOMAT HEATING
VOLTOMAT HEATING QH-104263.1 manual

Holmes
Holmes AccuTemp HCH4124 owner's guide

veito
veito CH1200 LT user manual