NeoChord DS1000 User manual

700010-002 Rev 5
DCN 0670, 26-Dec-2018
Page 1 of 12
INSTRUCTIONS FOR USE
NeoChord™Artificial Chordae Delivery System
Model DS1000™
For Export Only
NeoChord, Inc.
5402 Parkdale Drive, Suite 160
St. Louis Park, Minnesota 55416, U.S.A.
Phone: (952) 698 7800
NEOCHORD and the stylized NeoChord logo are registered trademarks of the NeoChord Corporation.

700010-002 Rev 5
DCN 0670, 26-Dec-2018
Page 2 of 12
1. CONTENTS
(1) Delivery System
(2) Cartridges
(2) Needles
Device IEC 60601-1 Classification:
The DS1000 is DC internally powered, 3.0 VDC 420 mAmps Max.
Type CF applied part IPX0
2. DEVICE DESCRIPTION
The NeoChord DS1000 is a single-use, hand-held device designed to deploy artificial chordae
through a minimally invasive incision that accesses the mitral valve through the left ventricle while
the heart is beating. The DS1000 deploys artificial chordae using commercially available ePTFE
suture material, labeled for use as artificial chordae tendinae. The NeoChord DS1000 is an
integrated modular system consisting of a hand-held delivery instrument, a cartridge in which
ePTFE suture is loaded, a needle, and a tethered Leaflet Capture Verification monitor (LCV) that
enables confirmation of capture of the free edge of the mitral leaflet in the distal clamp of the
delivery instrument prior to deploying the ePTFE suture and knot at the leaflet.
The system is supplied sterile in disposable packaging.
3. ENVIRONMENTAL SPECIFICATIONS
Operating Conditions:
4. INTENDED USE
Repair of chordal elongation and rupture resulting in mitral valve prolapse.
INDICATIONS
Indicated for use in patients with Grade 3+ or 4+ mitral valve regurgitation who are candidates
for surgical mitral valve repair or replacement.
CONTRAINDICATIONS
•Heavily calcified valves
•Valvular retraction with severely reduced mobility
•Active bacterial endocarditis
•Complex mechanism of MR (leaflet perforation, etc.)
•Significant tethering of leaflets
•Inflammatory valve disease
CAUTION: The NeoChord DS1000 has not been studied in patients with functional mitral
regurgitation.

700010-002 Rev 5
DCN 0670, 26-Dec-2018
Page 3 of 12
CAUTION: The NeoChord DS1000 has not been studied in patients with anterior leaflet
prolapse.
WARNING: Patients who exhibit evidence of fragile tissue (e.g., severely dilated left ventricle,
cachexia) may not be appropriate candidates for this surgery.
5. WARNINGS
•Use of the NeoChord DS1000 should be limited to physicians that have received training on
the use of the device.
•Use of the device requires a minimum of one trained physician / operator and one trained
member of the operating room staff.
•The NeoChord DS1000 is sterilized using EtO and is for single use only. Do not reuse or
resterilize. Attempts to reuse or resterilize the device may result in patient harm, device
malfunction, or inadequate sterilization.
•To avoid serious eye injury do not look directly into LED lumens at distal tip of the device.
•The NeoChord DS1000 is not suitable for use in the presence of flammable anesthetic
mixture with air, oxygen nor nitrous oxide.
•The NeoChord DS1000 is not defibrillation proof and must be removed from the patient if
defibrillation of the heart is required.
•The NeoChord DS1000 is not designed, nor should an attempt be made, to connect the
system with any endoscopic devices.
•To minimize risks associated with the use of electrically powered devices during surgical
procedures, ensure all devices are conformant with the relevant IEC and ISO standards and
that their use is in accordance with Clause 16 of IEC 60601-1:2012.
•Do not attempt to tether the Leaflet Capture Verification monitor onto any high voltage
devices within the operating room.
•After use of the NeoChord DS1000, dispose of all elements of the device, including
cartridges, needles and Leaflet Capture Verification monitor in accordance with accepted
institutional practice and in compliance with applicable laws and regulations including those
pertaining to biohazardous material, needles and device batteries.
6. PRECAUTIONS
•The NeoChord DS1000 should be used in accordance with the necessary safety precautions
appropriate to a thoracic device implantation procedure.
•Inspect package prior to use. Do not use any component of the system if damage to the
sterile package is noted. Inspect all components prior to use. Do not use damaged, expired
or non-sterile components.
•Do not use a device that has been dropped from a height of greater than eighteen (18)
inches.
•The NeoChord DS1000 is to be used with ePTFE suture material that have an indication for
use to repair or replace native chordae tendinae and which have a mean diameter of
0.307mm (e.g. GORE™ CV-4) or 0.246mm (e.g. GORE™ CV-5) only. Do not use the
DS1000 with other suture materials or sizes as the compatibility of the DS1000 with other
suture material and sizes is not known.

700010-002 Rev 5
DCN 0670, 26-Dec-2018
Page 4 of 12
7. POTENTIAL ADVERSE EVENTS
The potential risks associated with the use of the NeoChord DS1000 System include the
following:
•Air embolism
•Allergic reaction
•Arrhythmias
•Bleeding (with or without requiring
transfusion)
•Broken ribs
•Conversion to standard valve repair surgery
•Damage to cardiovascular or nervous tissue
•Infection
•Failure to deliver ePTFE artificial
chord to intended leaflet site
•Mitral regurgitation (>3)
•Mitral valve injury
•Pericardial damage
•Peripheral embolism
•Pulmonary embolism
•Stroke (CVA) or TIA
The potential risks associated with the general cardiac surgery include the following:
•Angina
•Hemolysis
•Allergic reaction (anesthetic)
•Hematoma
•Cardiac arrest
•Hypertension / hypotension
•Cardiac perforation
•Mitral stenosis
•Cardiac tamponade
•Myocardial infarction
•Death
•Outflow tract obstruction
•Dilation of heart
•Drug reactions to antiplatelet /
anticoagulation agents / contrast media
•Prolonged ventilation time
•Renal compromise
•Re-operation
•Emergency cardiac surgery
•Endocarditis
•Septicemia
•Thrombosis
•Heart Failure
•Wound dehiscence
8. ANCILLARY EQUIPMENT REQUIRED FOR THE PROCEDURE
In addition to the standard equipment used for lateral thoracotomy, anesthesia and procedural
patient monitoring, the NeoChord DS1000 procedure requires the use of the following equipment:
•Trans-Esophageal Echocardiography (TEE)
•Commercially available ePTFE suture indicated for chordae tendinae repair or replacement
with a mean diameter of 0.307mm (e.g. GORE™ CV-4) or 0.246mm (e.g. GORE™ CV-5)
•Standard prolene suture
•Pledget
•Rubber-shod clamps
Additional Recommended Ancillary Equipment:
•Saline rinse tray
9. DIRECTIONS FOR USE
9.1. PRE-OP PATIENT MANAGEMENT / PLANNING:
9.1.1. Prophylactic antibiotic therapy is recommended, with dosage as dictated by
institutional protocols for implantable surgical devices.
NOTE: Antiarrhythmics can be continued in cases of existing arrhythmias and can be
used operatively per institutional protocol.
NOTE: Discontinuation of antiplatelet therapy is not required.

700010-002 Rev 5
DCN 0670, 26-Dec-2018
Page 5 of 12
9.2. PREPARATION:
9.2.1. Ensure standards of room cleanliness and aseptic procedures are sufficient to
assure device and procedural sterility.
9.2.2. Conduct aseptic skin preparation at access site using suitable technique.
NOTE: Patient draping is recommended.
9.2.3. Minimize patient discomfort utilizing standard sedation and local analgesia.
9.2.4. Perform a TEE examination of the mitral valve to:
9.2.4.1. Confirm that the patient does not have functional or ischemic mitral
regurgitation.
9.2.4.2. Assess the width and location of the prolapsing leaflet segment to pre-
operatively determine the appropriate number and placement location
of artificial chordae. If patient anatomy allows, multiple chords should
be placed in the prolapsing segment for maximum durability of the
repair.
WARNING:Artificial chordae placed more laterally towards the pericommissural region
may cause damage to or interfere with the native chordae.
9.2.5. Insert monitoring lines via standard procedures.
NOTE: Basic physiologic monitoring (EKG and aortic pressure) is recommended.
9.2.6. Open the NeoChord DS1000 Device pouches using standard sterile handling
procedures.
9.3. IMPLANTATION PROCEDURE:
The NeoChord DS1000 procedure occurs in five steps: (i) Device Preparation; (ii) Left
Ventricular Access; (iii) Leaflet Capture and Verification; (vi) Suture Deployment and (v)
Suture Closure.
The sutures are placed via a ventriculotomy 2-4 cm postero-lateral from the apex of the
left ventricle via thoracotomy.
WARNING: To avoid potential damage to or interference with the subvalvular apparatus
including native chordae, the LV entry site should be in the postero-lateral
LV wall rather than anterior.
9.4. Device Preparation
NOTE: A commercially available expanded polytetrafluoroethylene (ePTFE) suture
indicated for chordae tendinae repair or replacement with a mean diameter of
0.307mm (e.g. GORE™ CV-4) or 0.246mm (e.g. GORE™ CV-5) is necessary
to prepare the device. If the suture is provided from the manufacturer with an
attached needle, remove the needle using a standard operating room sterile
scissors cutting as close to the needle attachment point as possible. Dispose
of needle(s) in Sharps Disposal or Destruction container.
CAUTION: Do not damage the suture while removing the needle.
9.4.1. Test the device to ensure that the fiber optics are functioning properly by pushing
the power button located on the Leaflet Capture Verification monitor.
NOTE: For proper battery management, the device should be turned off when not
attempting leaflet capture.
CAUTION: Do not attempt to replace the batteries contained within the device. If the
device does not function as expected obtain a new system.
700010-002 Rev 5
DCN 0670, 26-Dec-2018
Page 6 of 12
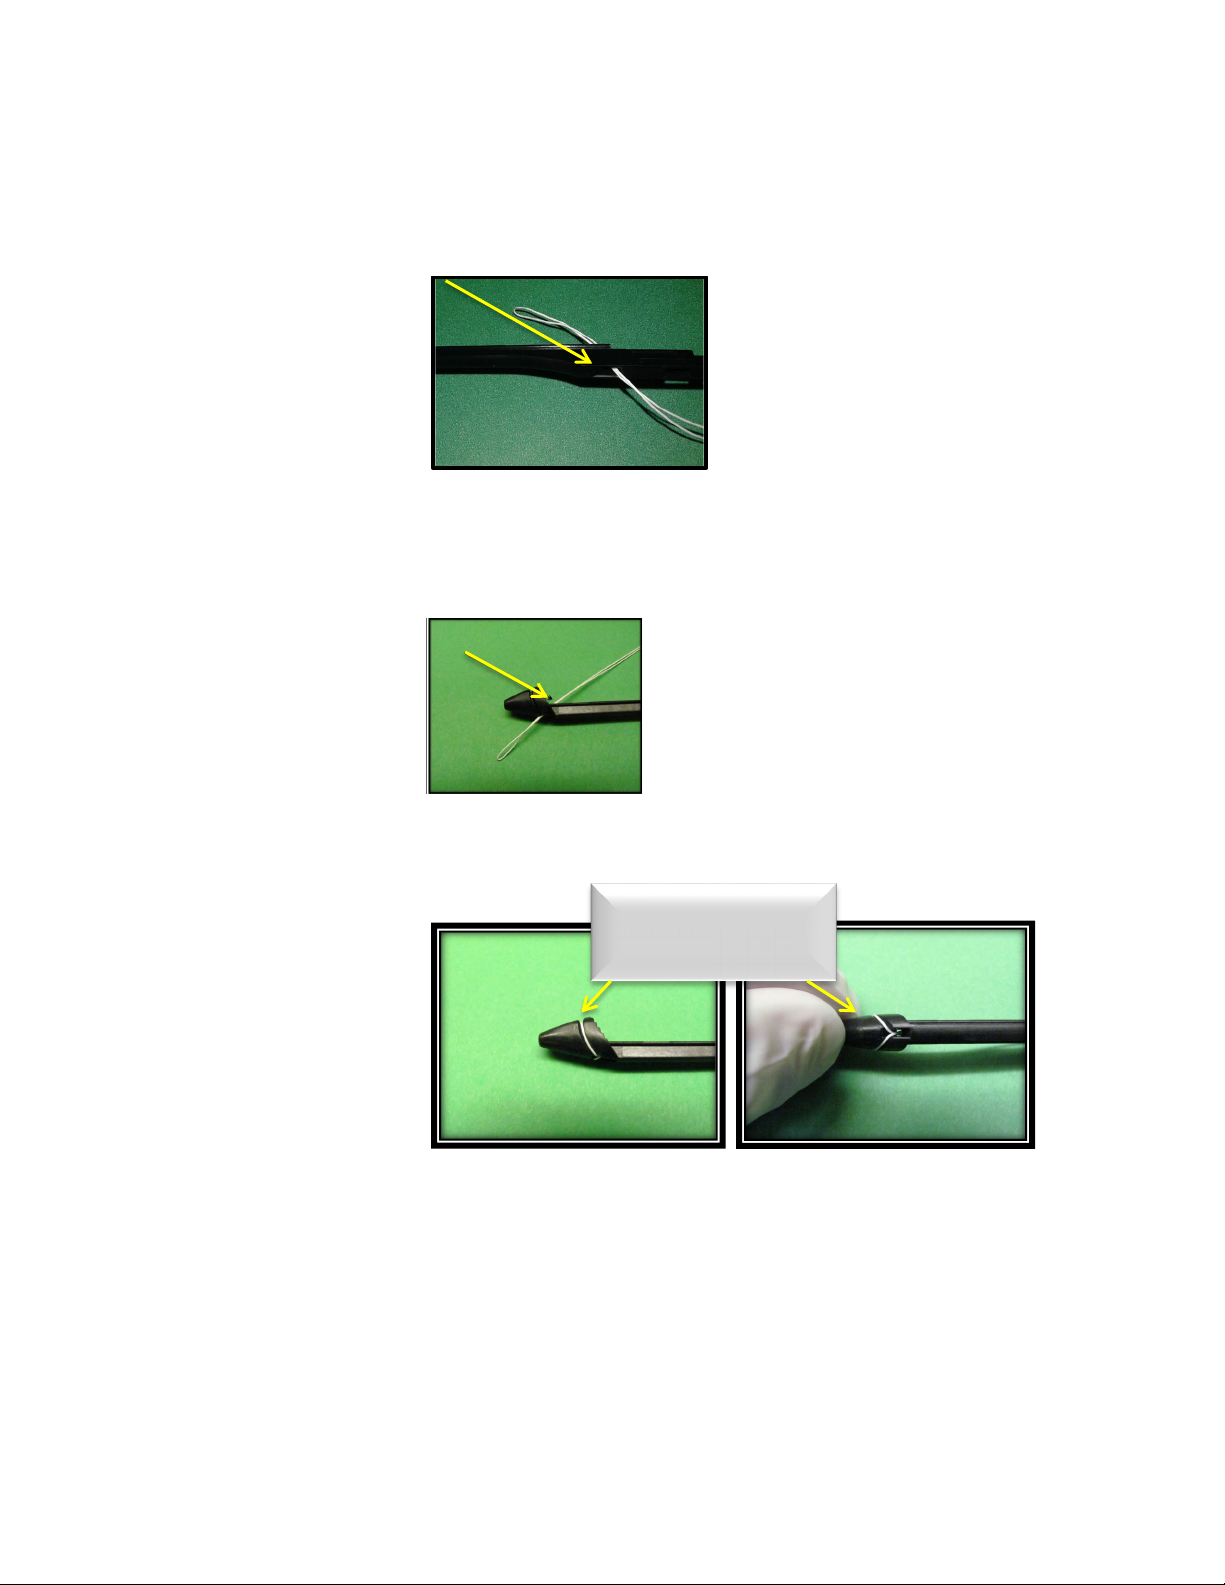
9.4.2. Locate the center of the ePTFE suture and create a gentle fold using care to not
damage the suture. Holding the NeoChord DS1000 cartridge assembly in one
hand with the distal clamp pointed toward the ceiling; thread the folded end of the
ePTFE suture through the proximal opening on the underside of the cartridge
assembly.
9.4.3. Draw the folded end of the suture along the groove in the cartridge assembly to
the distal end, just proximal to the clamp used to secure the mitral valve during the
procedure.
9.4.4. Thread the folded end through the opening at the end of the groove in the
cartridge assembly.
9.4.5. Separate the two halves of the suture at the fold and draw the loop over the head
of the clamp, securing it in the groove proximal to the distal end of the device.
Ensure that the loop over the head of the clamp is not twisted.
9.4.6. Pull the ends of the suture so the suture is loaded securely onto the cartridge
assembly.
9.4.7. Place a rubber shod clamp on the free ends of the suture to assist in retaining the
suture in the channel.
Tension to position in
channel
Assure suture chords
are aligned

700010-002 Rev 5
DCN 0670, 26-Dec-2018
Page 7 of 12
9.4.8. Select the handle from the sterile packaging and align the proximal end of the
cartridge assembly with the distal end of the handle. The cartridge assembly and
handle are grooved to create a channel for attachment. Slide the cartridge
assembly into the handle. Advance the cartridge assembly until an audible snap
is heard.
9.4.9. Once the audible snap is heard, gently depress on the thumb ring with one hand
while you continue to advance the cartridge assembly until a second audible snap
is heard. The cartridge is properly loaded and locked in position.
9.4.10. At this time, load a needle into the cartridge by selecting one of the needles
from the sterile packaging.Grasping the needle at the proximal end, gently
guide the needle into the groove at the top of the handle until the needle is in
the start position.
CAUTION: Do not squeeze the handles of the needle together during device
preparation.
WARNING: Do not advance the needle tip through the opening on the distal end of
the device during loading. The needle must remain completely within the
device until after leaflet capture.
Hold device as shown
While advancing the
cartridge into device
Assure the device locking
tabs have engaged
cartridge
ØCAUTION: Do not
depress the thumb ring
fully during cartridge
loading (Fully = until it
contacts the unit body)

700010-002 Rev 5
DCN 0670, 26-Dec-2018
Page 8 of 12
9.4.11. Thoroughly rinse the needle and delivery system in sterile heparinized saline
making sure to keep the LCV monitor dry and out of the saline.
9.4.12. The device is now ready for use.
9.5. Left Ventricular Access:
9.5.1. Define the thoracic anatomy using x-ray and echo.
9.5.2. Identify relevant landmarks such as cardiac silhouette, intercostal spacing and
diaphragm.
9.5.3. Determine appropriate site for and complete lateral thoracotomy.
9.5.4. Expose apex of heart.
9.5.5. Determine the LV entry site. The LV entry site should be slightly displaced 2-4 cm
from the apex of the left ventricle towards the postero-lateral LV free wall.
WARNING: To avoid potential damage to or interference with the subvalvular
apparatus including native chordae, the LV entry site should be in the
postero-lateral LV wall rather than anterior.
NOTE: Artificial chordae secured to this area will assume a more natural orientation
inside the LV and will exit close to the base of the posterior papillary muscle.
More importantly, this will ensure the artificial chordae will not cross the A-P
midline of the mitral valve intercommissural plane.
9.5.6. A purse-string suture should be used at the site of the left ventricular apical access
to control blood loss.
9.5.7. Make a small incision in the LV free wall 2-4 cm postero-lateral from the apex of
the heart to allow access of the device.
9.5.8. Insert the device through the ventriculotomy into the left ventricle.
NOTE: Insertion of the device should be done using transesophageal
echocardiography (TEE) to guide the surgeon.
WARNING: Do not advance the device into the left ventricle without TEE
visualization.
9.5.9. While the heart is beating and under TEE visualization, advance the tip of the
device to the mitral valve, passing the tip of the device approximately 4mm
beyond the leaflets and into the left atrium.
9.6. Leaflet Capture and Verification
9.6.1. Once the device is across the mitral valve orifice, turn the power on by pressing
the power button .
NOTE: Device will operate continuously for one hour once button is pressed.
9.6.2. The clamp should be opened by advancing the thumb ring towards the distal end
of the device.
9.6.3. The tip of the device should be used to guide the flailing leaflet into the open
clamp.
WARNING: Beware of possible interference with the subvalvular apparatus.
WARNING: Artificial chordae placed more laterally towards the pericommissural
region may cause damage to or interfere with the native chordae.
9.6.4. Gently close the clamp by retracting the thumb ring toward the user.
700010-002 Rev 5
DCN 0670, 26-Dec-2018
Page 9 of 12
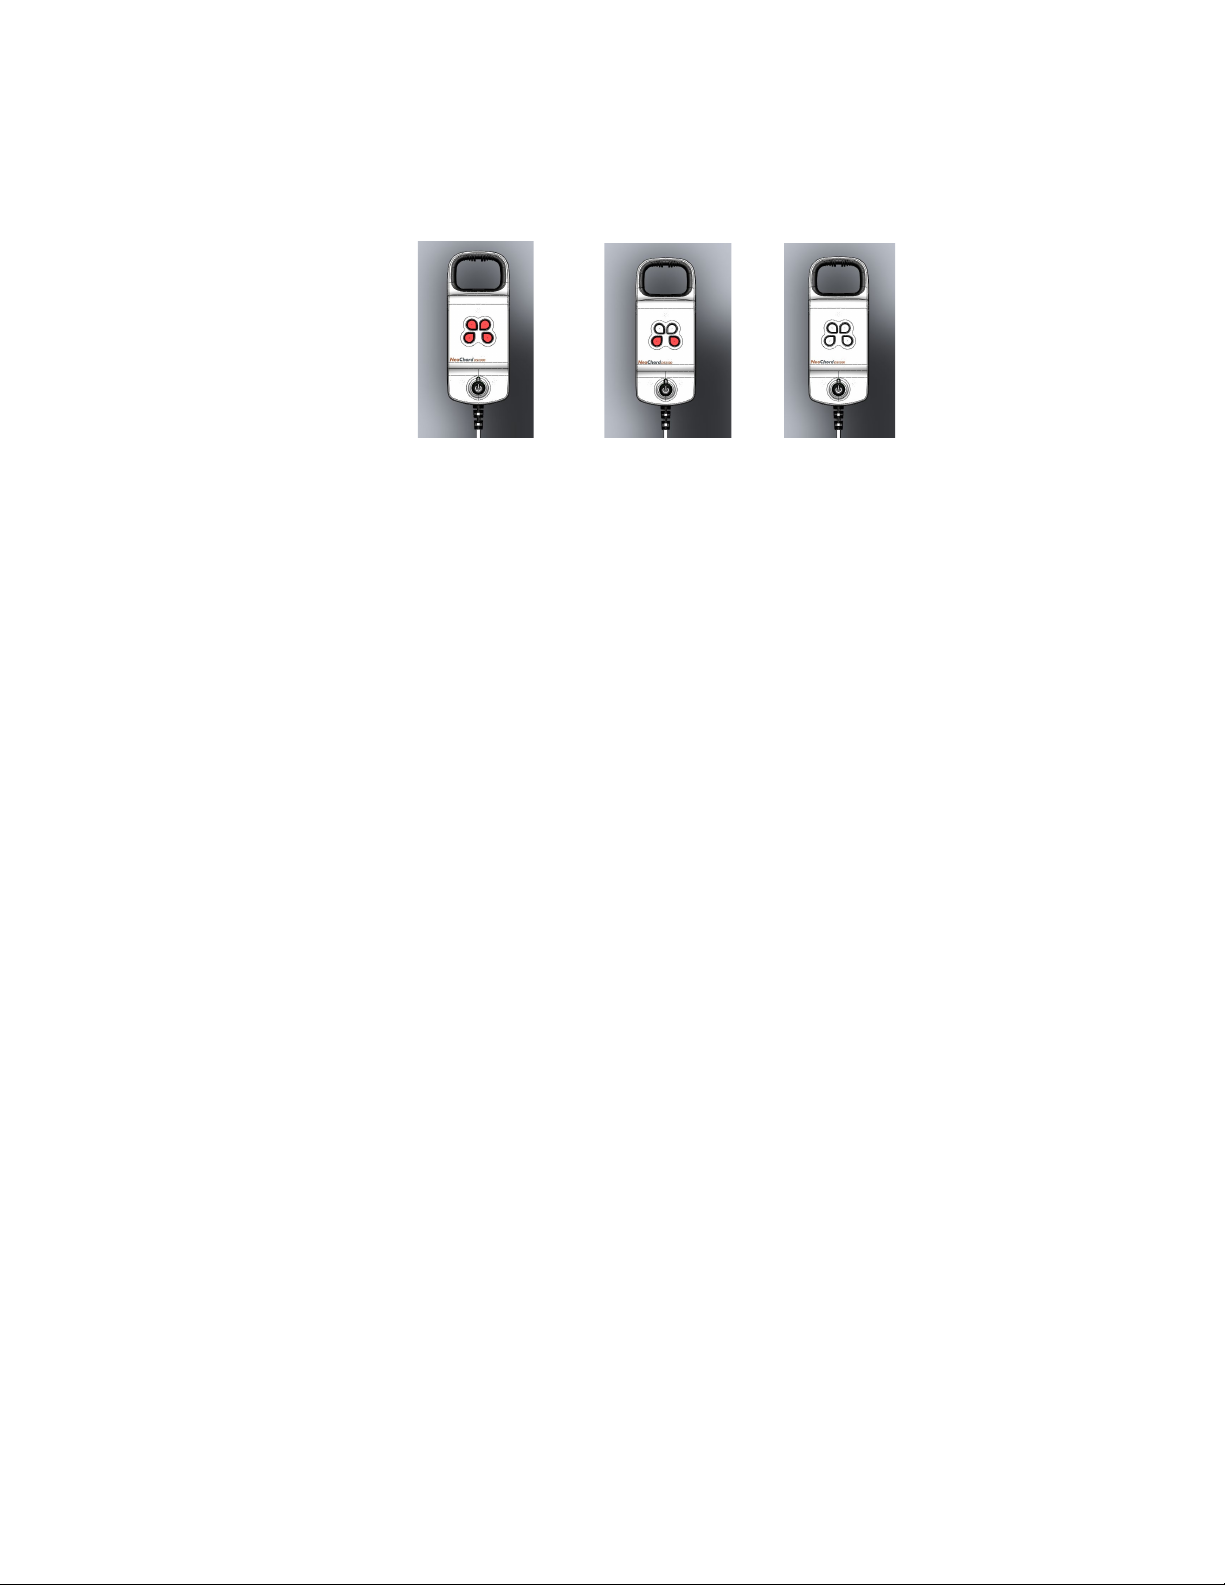
9.6.5. Confirmation of leaflet capture is accomplished by examining the fiber optic display.
Four white lights on the monitor display confirm that leaflet tissue is captured within
the distal clamp.
CAUTION: If any light is illuminated red, release the leaflet and repeat this step.
No Partial Complete
Capture Capture Capture
9.7. Suture Deployment
9.7.1. Visualize the mitral valve using TEE and confirm that all fiber optic indicators are
still white.
NOTE: Maintain back pressure on thumb ring during needle advancement.
9.7.2. Advance the needle by grasping the needle handle and compressing the needle
handle tabs.
9.7.3. Advance the needle to the fully advanced position marked on the body of the
instrument.
9.7.4. Simultaneously, with the rubber shod clamp holding tension on the suture, maintain
back pressure on thumb ring and retract the needle until engagement of the suture
is detected. At this point, release the rubber shod clamp and continue to retract the
needle in a smooth continuous motion until the distal tip of the needle and suture
loop exit the instrument.
NOTE: Make sure the needle is pulled straight back, parallel to the instrument without
bending.
NOTE:Instrument clamp must remain closed during needle retraction.
9.7.5. Carefully, disengage the needle from the suture and return the needle to the sterile
area.
9.7.6. Open the instrument clamp and release the captured leaflet. Close the clamp and
exit the left ventricle while guiding the two ends of the suture material from the
instrument. The Leaflet Capture Verification monitor should be turned off.
9.7.7. Thread a prolene suture through the loop end of the ePTFE suture.
NOTE: The prolene suture is only for use in ePTFE suture retrieval procedure after
tensioning if necessary.
9.7.8. Take the two free ends of the ePTFE suture and pass them through the loop end
of the ePTFE to create a girth hitch on the leaflet. Pull the ePTFE girth hitch tight.
9.7.9. Test the ePTFE suture placement to assure optimal MR reduction. This is
completed by tensioning the suture and monitoring MR reduction on the TEE
monitor.
9.7.10. If the suture deployment is unsatisfactory, pull gently on the prolene suture to
retrieve the ePTFE suture. Discard both the prolene and ePTFE suture.
WARNING: Prior to loading the device to deploy a second suture, thoroughly rinse the
needle, cartridge and delivery system in sterile heparinized saline.

700010-002 Rev 5
DCN 0670, 26-Dec-2018
Page 10 of 12
•Ensure components are completely rinsed to remove blood from all
areas, particularly suture channels, distal tip fiber optics, cartridge, and
slider bar.
•Visually inspect the needle tip to ensure it is straight and has not been
bent or damaged. Do not reuse the needle if the tip has been bent or
damaged.
•Keep the LCV monitor dry and out of the saline.
9.7.11. If placement of additional suture(s) is desired, repeat steps 9.4.2 - 9.7.10.
NOTE: If patient’s anatomy allows, multiple chords should be placed in the prolapsing
segment for maximum durability of the repair.
9.8. SUTURE CLOSURE
9.8.1. Under TEE or TTE visualization, determine the appropriate length for the ePTFE
chord(s) to minimize residual MR.
WARNING:Prior to final anchoring of the artificial chordae, assess for any involvement
of the anterior leaflet with the artificial chordae.If any artificial chordae
appears to have potential interference with the native anterior chordae,
the artificial chordae should be removed to prevent potential damage or
rupture of the native chordae.
NOTE: Ideally, three (3) double chordae should be implanted, and each double
chordae, when tensioned, should be able to significantly reduce MR to at least
mild-to-moderate.
NOTE: Any chordae that fails to be able to independently reduce MR should be
removed and replaced.
9.8.2. If the suture deployment is satisfactory, remove and discard each prolene suture.
9.8.3. If suture deployment is unsatisfactory pull gently on the prolene suture to retrieve
the ePTFE suture. Discard both the prolene and ePTFE suture. If placement of
additional suture(s) is desired, repeat steps 9.4.2 - 9.7.10.
9.8.4. When the appropriate length has been determined, secure the suture(s) on the
epicardium adjacent to the ventriculotomy using a standard knot and pledget. It is
recommended to secure each suture individually to the large purse string pledget
at the ventriculotomy site which provides a wide base of support.
CAUTION: Each suture should be anchored independently to a large pledget to
prevent potential gradual shifting of the anchored artificial chordae which
may result in loosening of the artificial chordae post-operatively.
WARNING: Once the suture has been secured to the epicardium the artificial
chordae can no longer be removed without surgical (open heart)
intervention.
9.8.5. Close the incision area as appropriate.
10. POSTOPERATIVE CONSIDERATIONS
Patients who receive at least one artificial chordae using the NeoChord DS1000 should be
managed per the normal standard of care for cardiac implants. As such, a standard
anticoagulation regimen for similar cardiac implants such as an annuloplasty ring is
recommended. Antibiotic administration is recommended per institutional protocol for
cardiovascular implant procedure. Patient monitoring via telemetry should be continued as
necessary.

700010-002 Rev 5
DCN 0670, 26-Dec-2018
Page 11 of 12
11. ELECTROMAGNETIC COMPLIANCE
The DS1000 is suitable for use in professional healthcare facilities.
The DS1000 does not have any replaceable components or accessories.
The DS1000 fiber optic display provides visual indication of leaflet capture. If excessive
electromagnetic disturbance is encountered, the visual indicator may no longer function.
Guidance and manufacturer’s declaration – electromagnetic emissions
The DS1000 is intended for use in the electromagnetic environment specified below. The customer or the user of the
DS1000 should assure that it is used in such an environment.
Emissions test
Compliance
Electromagnetic environment - guidance
RF emissions
CISPR 11 Group 1
The DS1000 uses RF energy only for its internal function. Therefore, its
RF emissions are very low and are not likely to cause any interference
in nearby electronic equipment.
RF emissions
CISPR 11
Class B
Guidance and manufacturer’s declaration – electromagnetic immunity
The DS1000 is intended for use in the electromagnetic environment specified below. The customer or the user of the
DS1000 should assure that it is used in such an environment.
Phenomenon
Basic EMC standard
or test method
Immunity Test Levels
Electrostatic Discharge IEC 61000-4-2
± 8 kV contact
± 2 kV, ± 4 kV, ± 8 kV, ± 15 kV air
Radiated RF EM fields IEC 61000-4-3
3 V/m
80 MHz – 2.7 GHz
80 % AM at 1 kHz
Proximity fields from RF wireless
communications equipment
IEC 61000-4-3 Levels according to 60601-1-2 Edition 4. Table 9
Rated Power frequency magnetic
fields IEC 61000-4-8 30 A/m
50 Hz or 60 Hz
WARNINGS:
•Use of this equipment adjacent to or stacked with other equipment should be avoided because it
could result in improper operation. If such use is necessary, this equipment and the other
equipment should be observed to verify that they are operating normally.
•Use of accessories, transducers and cables other than those specified or provided by the
manufacturer of this equipment could result in increased electromagnetic emissions or decreased
electromagnetic immunity of this equipment and result in improper operation.
•Portable RF communications equipment (including peripherals such as antenna cables and
external antennas) should be used no closer than 30 cm (12 inches) to any part of the DS1000,
including cables specified by the manufacturer. Otherwise, degradation of the performance of this
equipment could result.
12. STORAGE
Store devices in a cool, dark, dry place.
700010-002 Rev 5
DCN 0670, 26-Dec-2018
Page 12 of 12
13. WARRANTY AND LIMITATIONS
NeoChord, Inc. warrants that each component of this system has been manufactured packaged
and tested with reasonable care and will be free from defects in workmanship and material.
NeoChord, Inc. will not be liable for any incidental, special or consequential loss, damage or
expense, direct or indirect, from the use of its product. NeoChord’s sole obligation shall be to
repair or replace at its option, any device that we feel was defective at time of shipment if notice
thereof is received within six (6) months. User assumes all liability, whether arising on warranty,
contract, and negligence or otherwise for damages resulting from the handling, possession, use
or misuse of the product. Because NeoChord has no control over the operation, inspection,
maintenance or use of its products after distribution and has no control over the selection of
patients, THIS WARRANTY IS EXPRESSLY IN LIEU OF ANY OTHER EXPRESS OR IMPLIED
WARRANTY OR MERCHANTABILITY OR FITNESS FOR ANY PARTICULAR PURPOSE, AND
OF ANY OTHER OBLIGATION ON THE PART OF THE SELLER. The remedies set forth in the
Warranty and Limitation shall be the exclusive remedy available to any person. No agent,
employee or representative of NeoChord has any authority to change any of the foregoing or
assume or bind NeoChord to any additional liability or responsibility in connection with this
device.
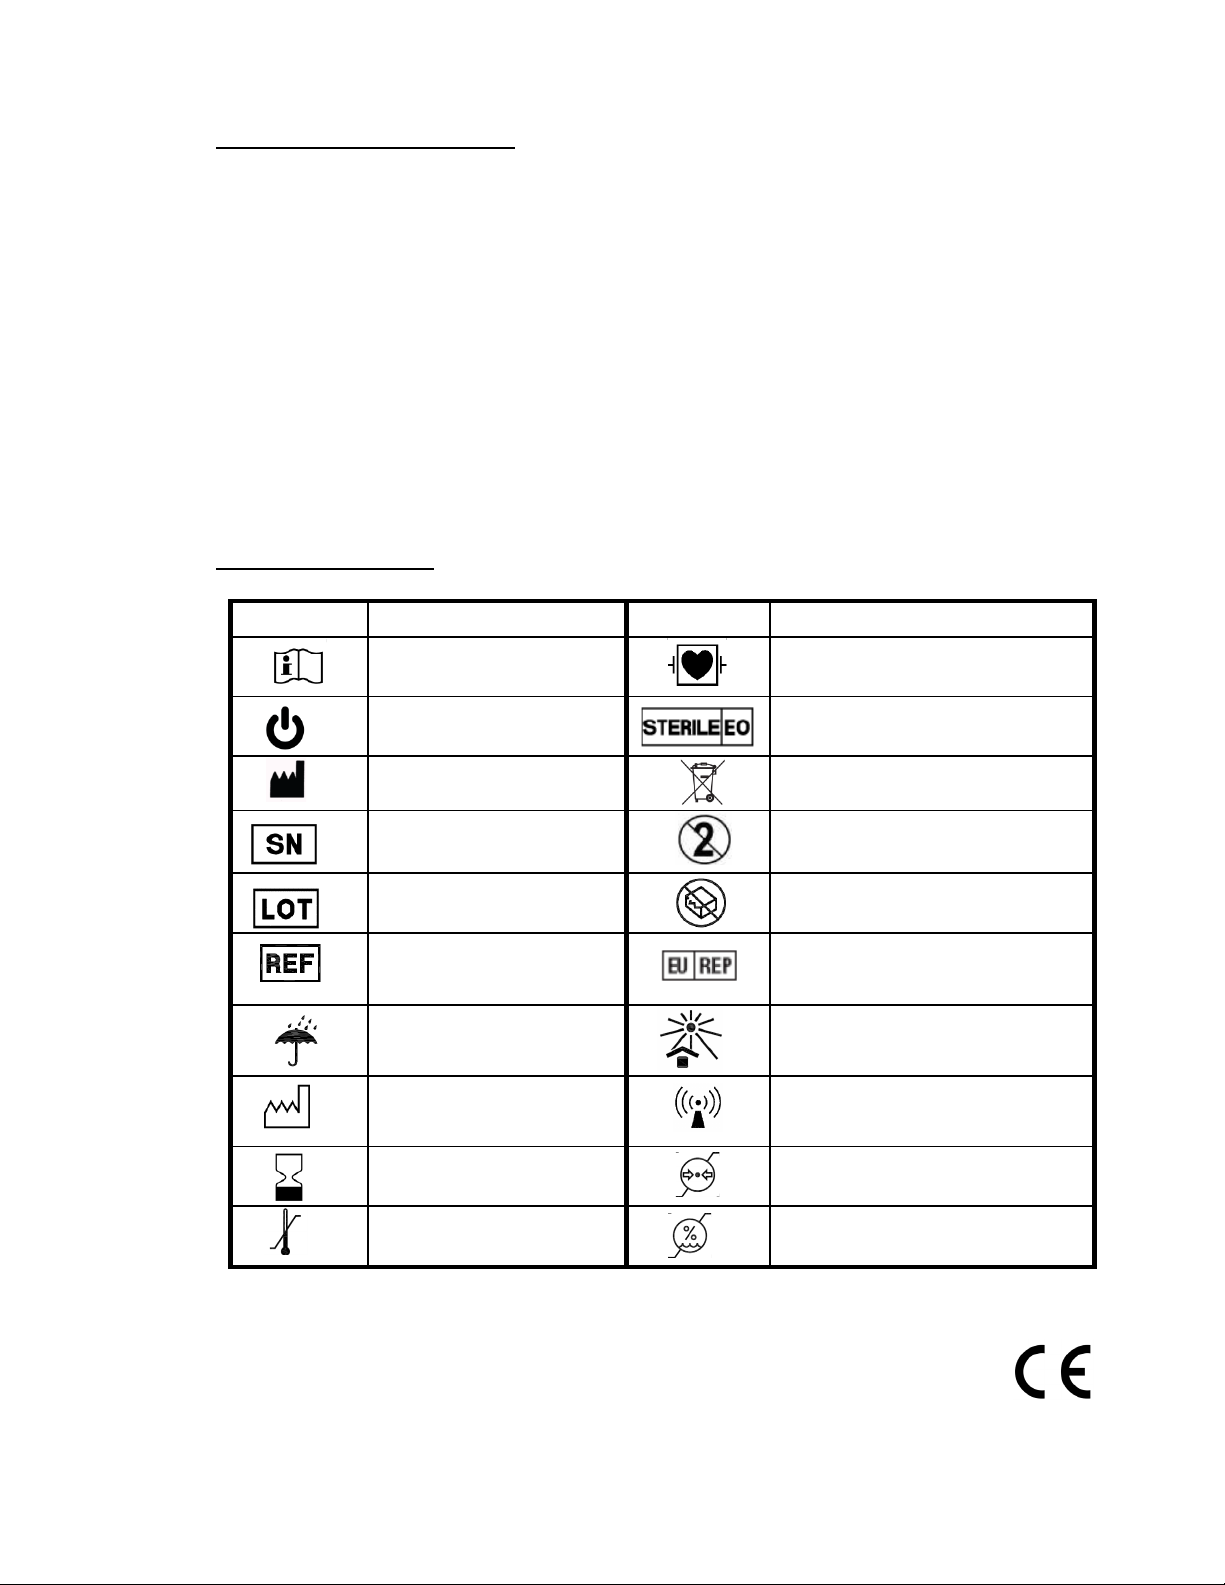
14. SYMBOL DEFINITIONS
The following symbols appear on the device packaging and labeling:
Symbol Description Symbol Description
Consult Operating
Instructions
Type CF Equipment
Power Button Sterilized using ethylene oxide
Manufacturer
Not for General Waste
Serial Number Single use only
Batch Code
Do not use if package is
damaged
Catalogue Number EU authorized representative
Keep dry
Store in cool place
Date of Manufacture Non-ionized radiation
Use by Date Atmospheric pressure limitation
Temperature limitation Humidity limitation
Authorized Representative: DS1000 Part Number:
PSF Medical BV 500000-002
Marten Meesweg 8-10
3068 AV Rotterdam
The Netherlands
0086
Table of contents
Popular Medical Equipment manuals by other brands

Leica
Leica SM2000 R instruction manual

OYMotion Technologies
OYMotion Technologies OHand2CH OYM-OH-A001LS-B001 user guide

Ziehm Imaging, Inc.
Ziehm Imaging, Inc. VISION installation manual

Accu-Chek
Accu-Chek Tender Instructions for use

mychway
mychway MS-2183 user manual

Fluke Biomedical
Fluke Biomedical ProSim 2 user manual


