Neolab neoPipetta D-6019 User manual
neoPipetta
D-6019
User Manual

CONTENTS
1.YOUR NEOPIPETTA......................................................................................................................................... 1
2.Charging the neoPipetta....................................................................................................................................... 1
2.1. Electrical specifications.............................................................................................................................. 1
3. NEOPIPETTA OVERIVIEW (Fig. 1) ................................................................................................................ 1
4. NEOPIPETTA DESCRIPTION.......................................................................................................................... 2
4.1. Operating buttons........................................................................................................................................ 2
4.2. Speed adjustment button............................................................................................................................. 2
4.3. Nose cone and silicone adaptor .................................................................................................................. 2
4.4. Filters.......................................................................................................................................................... 2
5. OPERATING THE NEOPIPETTA..................................................................................................................... 2
5.1. Setting the operating speed......................................................................................................................... 2
5.2. Inserting a serological pipet........................................................................................................................ 2
5.3. Aspiration.................................................................................................................................................... 3
5.4. Dispensing.................................................................................................................................................. 3
5.5 Other pipetting recommendations................................................................................................................ 3
6. MAINTENANCE.................................................................................................................................................. 3
6.1. Decontamination......................................................................................................................................... 3
6.2. Changing the nose cone, silicone adapter and filter (Fig. 2)....................................................................... 3
6.3. Changing the battery (Fig. 3 and Fig. 4)..................................................................................................... 4
7. STORAGE............................................................................................................................................................. 4
8. TROUBLE SHOOTING ....................................................................................................................................... 5
9. WARRANTY INFORMATION ............................................................................................................................ 5


1
1.YOUR NEW NEOPIPETTA
The neoPipetta has been carefully designed and manufactured as a lightweight, cordless Pipette Filler. neoPipetta
offers simple, efficient pipetting performance and maximum pipetting comfort.
It can be used with all plastic or glass pipettes between 0.1-100ml.
2.Charging the neoPipetta
Before the first use the battery must be charged for 10 hours. Allow the unit to charge anywhere from 2 to 3 hours
for all subsequent recharging. More than 8 hours of intermittent use is typical when fully charged.
Before connecting the AC-adapter to the electrical outlet, check that its voltage setting corresponding to
the voltage of your electrical outlet.
Connect the AC-adapter to the electrical outlet and to the electrical fitting at the base of the handle of
the neoPipetta
Note: The neoPipetta should only be charged with the AC-adapter provided.
Arrows on the top indicate the power situation. When need to be charged, it shows red.
Special circuitry prevents overcharging of the battery and allows the neoPipetta to be charged or partially charged
at any convenient time.
2.1. Electrical specifications
Battery: 3.6 V, 1100mA, rechargeable lithium-ion battery
Charging time 10 hours for completely drained batteries
AC-adapter: Input AC 100-240V
Output 4.2v 500mA
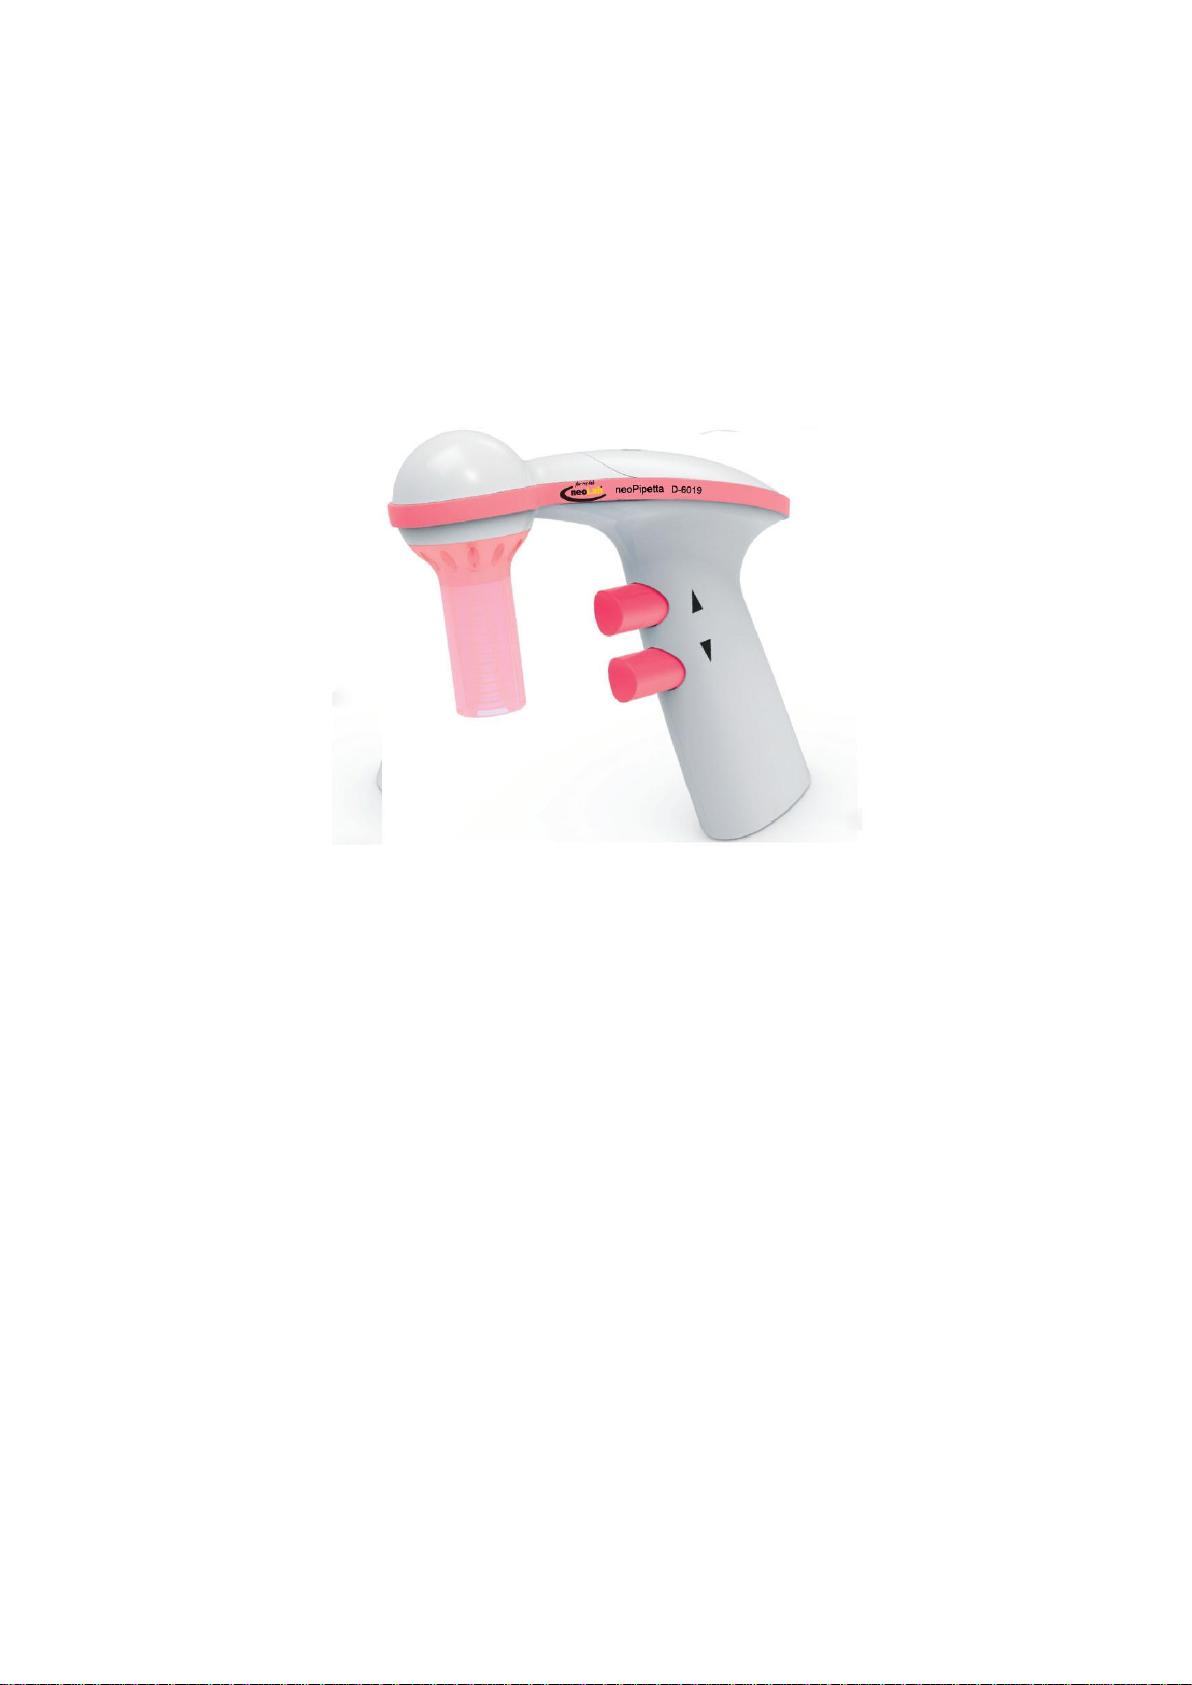
3. NEOPIPETTA OVERIVIEW (Fig. 1)
Fig.1
Nose coneNose cone
Case
Aspirating button
Dispensing button
The battery compartment lid
Speed adjustment button
Recharge socket
Silicone adaptor
Power display

2
4. NEOPIPETTA DESCRIPTION
4.1. Operating buttons
The neoPipetta has two operating buttons located at the front of the handle. The upper button enables aspiration
for as long as the button is held down. The lower button allows for dispensing. The aspiration and dispensing
speeds can be fine-tuned during operation by applying varying finger pressure on the operating buttons.
4.2. Speed adjustment button
The speed adjustment button is located at the upper part of the handle. The desired speed is set by sliding the
pulley.
4.3. Nose cone and silicone adaptor
The pipet adapter provided with the neoPipetta allows the use of all standard plastic and glass pipets (graduated
and non-graduated) including Pasteur pipets. The pipet adapter of the neoPipetta consists of the nose cone and
silicone adapter. The silicon adapter enables a pipet to fit securely in place, thus creating a proper vacuum level
and prevents leakage.
4.4. Filters
Removing the nose cone and silicone adaptor exposes a hydrophobic filter (0.45 micron), located at the top of the
nose piece. The filter protects the neoPipetta from accidental over-aspiration. It is strongly recommended to use
only the original filters supplied by the manufacturer with the neoPipetta.
Note: The neoPipetta cannot be operated without a filter. Wetting of filter due to overfilling will slow or prevent
fluid movement. If overfilling occurs, change the filter immediately.
5. OPERATING THE NEOPIPETTA
5.1. Setting the operating speed
The pulley located at the back of the handle allows you to adjust your aspiration and dispensing speeds. Simply
turn right for faster and left for slower speeds. The neoPipetta can self-regulate the aspiration and dispensing
speeds by circuit feedback.
Note: The aspiration and dispensing speeds can be fine-tuned during operation by applying a varying amount of
finger pressure to the operating buttons.
5.2. Inserting a serological pipet
Gently push a serological pipet into the silicone adapter and ensure that it fits securely. To insert the serological
pipet safely, hold the neoPipetta firmly by the nose cone and the serological pipet from the top end of the tube.

3
5.3. Aspiration
Select a speed and fill the pipet by pressing the aspirating button. Fill the pipet just above the desired
level, check level by the meniscus.
Remove the serological pipet from the sample.
Adjust the volume of the sample by pressing the dispensing button until the meniscus is at the required
level.
5.4. Dispensing
The neoPipetta offers two different dispensing modes:
If the dispensing button is pressed only partially to a point where a check can be felt, the dispensing
function will be based on the force of gravity and the liquid will simply flow out.
Pressing the dispensing button further in will engage the motor and activates the blow-out function.
Note: Finger pressure can be varied to fine-tune the speed within each mode.
5.5 Other pipetting recommendations
Use the instrument within the limits of its chemical resistance.
Never use with highly flammable liquids.
Observe the reagent manufacturer’s safety information.
Never use the instrument in an atmosphere with a danger of explosion.
Never use force with the neoPipetta.
Should the instrument fail to function properly, stop pipetting and check the Trouble Shooting section.
6. MAINTENANCE
The neoPipetta has been designed for easy in-house maintenance.
6.1. Decontamination
To decontaminate, lightly spray the outside of the neoPipetta with the decontamination spray and wipe dry with a
clean cloth.
6.2. Changing the nose cone, silicone adapter and filter (Fig. 2)
To change the nose cone, silicone adapter and filter firmly hold the nose cone by the ribbed collar, rotate the nose
cone counter-clockwise until completely loosen and pull out the nose cone and the silicone adapter. The filter can
be removed by simply pulling it out once the nose cone and the silicone adapter have been disengaged. Position
the new filter with the colored side upwards. To reassemble, insert the adapter and nose cone and twist the nose
cone gently clockwise.
Note: It is recommended to check and clean the silicone adapter every six months, or when necessary, to prevent a
loss of vacuum. If there is a loss of vacuum, please contact the manufacturer or your local distributor.

4
Product
D-6026
Silicone adapter
D-6040
Nose cone for neoPipetta
D-6028
Filter 0.45µm
D-6029
Battery
The neoPipetta cannot be operated without a filter. Wetting of filter due to overfilling will slow or prevent fluid
movement. If overfilling occurs, change the filter immediately. Only use filters supplied by the manufacturer.
6.3. Changing the battery
If the battery needs be replaced follow these steps to replace the battery:
Take the lid off the battery compartment to expose the battery compartment
Disconnect the plug of the Lithium-ion battery from the Printed Circuit Board (PCB) connector inside
the battery compartment exposing a 2pin connector on the PCB
Connect the 2 pin plug of the new Lithium-ion battery to the exposed 2 pin connector on the PCB. The
side of the plug with the exposed metal tabs, should face away from the PCB. If the battery is connected
with the plug in the wrong orientation, the indication arrow light will be not on.
Replace the battery compartment lid.
Dispose of the battery appropriately.
Note: Only use the original battery supplied by the manufacturer.
7. STORAGE
The neoPipetta should not be stored for a long period of time without removing the serological pipet. It is
recommended to disconnect the neoPipetta from the AC-adapter if the unit is not used for a lengthy period of time.
Fig.2
Power
display
Fig.4
Fig.3
Side with expose
metal tabs
2 Pin connector
on PCB

5
8. TROUBLE SHOOTING
Problem
Cause
Solution
Reduced aspiration capacity
or the neoPipetta is blocked
- Filter blocked, dirty or damaged
-Battery low
-Replace the filter
-Recharge
Serological pipet drips
-Serological pipet not securely attached
-Silicone adapter or nose cone loose
-Silicone adapter or nose cone damaged
-Reattach serological pipet
-Reassemble silicone adapter or nose
cone
-Replace silicone adapter or nose cone
Reduced operating time
-Battery worn
-Replace battery
Power indication light
abnormally off
-Dead battery
-Battery plugged in the wrong
orientation
-Failure of the Printed Circuit Board
-Replace battery
-Refer to section 6.3 of manual to plug
battery in correctly.
-Call the manufacturer Tech Support
9. WARRANTY INFORMATION
The neoPipetta is warranted for one year against defects in materials and workmanship (Battery is warranted for
three months only). Should your neoPipetta fail to function according to specifications at any time, please contact
the local representative immediately. The warranty will not cover defects caused by normal wear or by a breach of
the manufacturer’s recommendations.
Each neoPipetta is tested before shipping by the manufacturer. The Quality Assurance Procedure guarantees that
the Pipette Filler you have purchased is ready for use.

neoLab Migge GmbH.
Rischerstr. 7-9, 69123, Heidelberg, Germany
Tel: +49-06221-8442-0
Fax: +49-06221-8442-9933
Email: info@neolab.de
www.neolab.de
Table of contents
Other Neolab Laboratory Equipment manuals


