Ness 104-462 NIP700PTZ User manual
Full HD Speed Dome IP Camera Quick Guide
This Quick Guide is for quick installing and connecting the network Speed Dome IP Camera. For details, please refer
to the camera’s User Manual and Installation Guide.
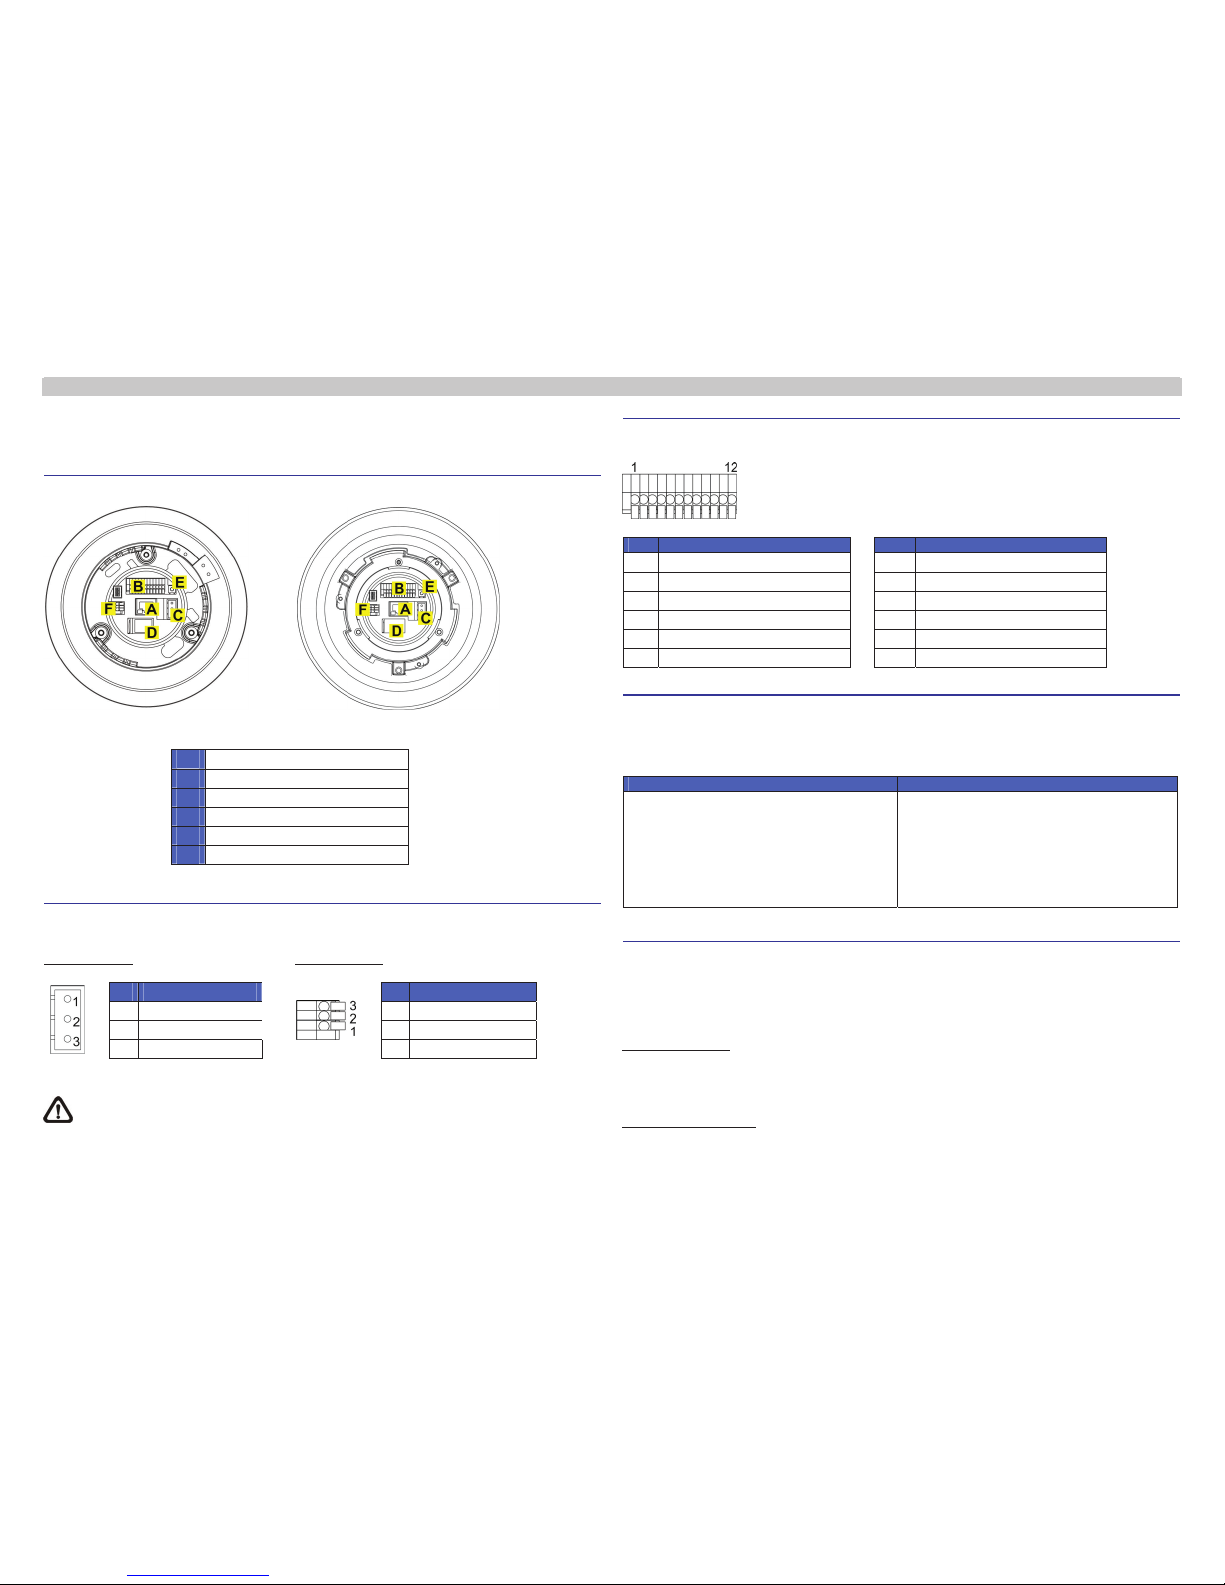
Switch Definition
Indoor Outdoor
ARJ-45 Connector
BALARM I/O
CPower
DMicro SD Card Slot
EFactory Reset Button
FAudio I/O
Power & Audio Connector Definition
Please refer to the illustrations below to connect power core through the supplied power adaptor, and set up the audio
according to the Audio pin definition.
Power Connector Audio Connector
To power up the Camera, please connect the Ethernet cable to the Camera’s Ethernet Port and plug the
other end of the cable into an IEEE 802.3at High Power over Ethernet (PoE Plus) Switch. If there is a need
to operate the Heater for Outdoor Models, please plug the AC 24V cable into the Camera’s Power Connector
to power up the Camera instead.
Alarm I/O Connector Definition
When cabling, please refer to the table below for pin definition of the Alarm I/O setting
Pin Definition Pin Definition
1ALARM_OUT_NO_1 7 ALARM_OUT_COM_2
2ALARM_OUT_NC_1 8 GND
3ALARM_OUT_COM_1 9 ALARM_IN_4
4GND 10
ALARM_IN_3
5ALARM_OUT_NO_2 11
ALARM_IN_2
6ALARM_OUT_NC_2 12
ALARM_IN_1
Before Login to the Camera
A client program will be automatically installed on your PC when connecting to the network Speed Dome Camera.
Before logging in to the Dome Camera, please ensure downloading the ActiveX control is allowed by either changing
the ActiveX controls and plug-ins or setting Internet’s security level to default. For further details, please refer to the
network Speed Dome Camera’s Software Guide.
ActiveX Controls and Plug-ins Settings Internet Security Level
Step 1: Start the Internet Explorer (IE).
Step 2: Select <Tools> from the main menu of the
browser. Then Click <Internet Options>.
Step 3: Click the <Security> tab and select “Internet”,
and click <Custom level> to change ActiveX
settings.
Step 4: Set “ActiveX controls and plug-ins” items to
<Prompt> or <Enable>.
Step 1: Start the IE.
Step 2: Select <Tools> from the main menu of the
browser. Then Click <Internet Options>.
Step 3: Click the <Security> tab and select “Internet.”
Step 4: Down the page, press “Default Level” and click
“OK” to confirm the setting. Close the browser
window, and open a new one later for
accessing the IP Camera
Camera Login
The network Speed Dome Camera’s default IP address is: 192.168.0.250. Therefore, to access the camera for the
first time, set the PC’s IP address as: 192.168.0.XXX; for example:
IP Address: 192.168.0.100
Subnet Mask: 255.255.255.0
Login ID & Password
•Key in the camera’s IP address in the URL bar of the Web browser window and press “Enter.”
•Enter the default user name (Admin) and password (1234) in the prompt request dialogue. Note that user name is
case sensitive.
Install the ActiveX Control
•After connecting to the network Speed Dome Camera, the request for installing the ActiveX control will appear just
below the URL bar.
•Right Click on the information bar, and click “Install ActiveX Control…” to permit ActiveX control installation.
Pin Definition Pin Definition
1AC 24_1 1LINE_OUT
2FG 2GND
3AC 24_2 3LINE_IN
00P5NH720ZXSEA4
•In the pop-up security warning window, click “Install” to start downloading DC Viewer software on the PC.
•Click “Finish” after DC Viewer installation is complete.
Browser-based Viewer
The main page of the network Speed Dome Camera user interface is as shown below.
Full HD Speed Dome IP Camera
Quick Guide
Ver. 1.4
REV1.4
Full HD Speed Dome IP Camera
104-462 NIP700PTZ
QUICK GUIDE
www.ness.com.au
Other manuals for 104-462 NIP700PTZ
1
Other Ness Security Camera manuals


