Netatmo NDB01 User manual

Smart Video Doorbell
EN ES
FR IT
DE NL
User guide
Guide de l’utilisateur
Benutzerhandbuch
Guía del usuario
Manuale di istruzioni
Gebruikershandleiding

2 3
Lees de instructies aandachtig voor u begint met de installatie.
Bewaar de met het product meegeleverde documentatie
tijdens de gehele levensduur van het product.
Read these instructions carefully before starting the
installation.
The documentation provided with this product must be kept
throughout the product’s life time.
EN
Lire attentivement cette notice avant l’installation.
Conserver impérativement la documentation fournie avec ce
produit pendant toute sa durée de vie.
FR
Lesen Sie diese Anleitung aufmerksam durch, bevor Sie mit
der Installation beginnen.
Bewahren Sie die mit diesem Produkt mitgelieferte
Dokumentation auf jeden Fall über seine gesamte Lebens-
dauer auf.
DE
Lee atentamente estas instrucciones antes de empezar la
instalación.
Conservar toda la documentación entregada con el producto
durante toda su vida útil.
ES
Leggi attentamente le seguenti istruzioni prima di iniziare
l’installazione.
Conservate obbligatoriamente la documentazione fornita con
il prodotto per tutta la sua durata di vita.
IT
NL

4 5
https://doorbell.netatmo.com
User guide available in more languages at the following
address:
Bruksanvisningen finns på fler språk på:
Le guide de l’utilisateur est disponible dans plusieurs autres
langues à l’adresse ci-dessous :
Brukerguide tilgjengelig på flere andre språk på:
Unter der folgenden Adresse finden Sie das Benutzerhand-
buch in mehreren Sprachen:
Brugervejledningen fås på flere sprog på:
Guía del usuario disponible en otros idiomas en la siguiente
dirección:
Uživatelská příručka v dalších jazykových verzích je k
dispozici na adrese:
Il manuale di istruzioni è disponibile in numerose altre lingue
al seguente indirizzo:
Instrukcję obsługi dostępną w innych językach można
znaleźć pod adresem:
Gebruikershandleiding in meer talen beschikbaar op de
volgende website:
より多くの言語で利用可能なユーザーガイドは、次のアド
レスで入手できます。
EN
SE
FR
NO
DE
DA
ES
CZ
IT
PL
NL
JA
Руководство пользователя доступно на нескольких
языках по следующему адресу:
RU
Guia do utilizador disponível em mais línguas em:
PT
https://doorbell.netatmo.com
You can watch an installation video tutorial online at the
following address:
Du kan titta på en installationsvideohandledning online på
följande adress:
Une vidéo d’aide à l’installation est disponible à l’adresse
ci-dessous :
Du kan se en opplæringsvideoopplæring online på følgende
adresse:
Unter der folgenden Adresse können Sie ein Tutorial-Video
zur Installation online anschauen:
Du kan se en installationsvideovejledning online på følgende
adresse:
Puedes ver un tutorial de instalación en línea en la siguiente
dirección:
Instalační video tutoriál můžete sledovat online na následující
adrese:
Guarda online il video tutorial sull’installazione del prodotto al
seguente indirizzo:
Samouczek wideo dotyczący instalacji można obejrzeć online
pod następującym adresem:
U kunt een online installatievideo bekijken op de volgende
website
次のアドレスでインストールビデオチュートリアルをオン
ラインで見ることができます。
EN
SE
FR
NO
DE
DA
ES
CZ
IT
PL
NL
JA
Вы можете посмотреть онлайн-учебник по установке по
следующему адресу:
RU
Você pode assistir a um tutorial em vídeo de instalação on-
line no seguinte endereço:
PT

6 7
SUMMARY
Pack Content
Product Overview
Product Installation
Troubleshooting
Safety Warnings
Legal Mentions
SOMMAIRE
Contenu du pack
Aperçu du produit
Installation du produit
Résolution des problèmes
Consignes de sécurité
Mentions légales
ZUSAMMENFASSUNG
Packungsinhalt
Produktübersicht
Produktinstallation
Fehlersuche
Sicherheitshinweise
Rechtliche hinweise
8
14
18
78
88
90
8
14
18
78
88
90
8
14
18
78
88
90
EN
FR
DE
SUMARIO
Contenido del pack
Descripción del producto
Instalación del producto
Solución de problemas
Advertencias de seguridad
Menciones legales
SOMMARIO
Contenuto della confezione
Descrizione prodotto
Installazione del prodotto
Risoluzione di problemi
Avvisi di sicurezza
Menzioni legali
SAMENVATTING
Inhoud van het pakket
Productoverzicht
Product installatie
Problemen oplossen
Veiligheidswaarschuwingen
Juridische vermeldingen
8
14
18
78
88
90
8
14
18
78
88
90
8
14
18
78
88
90
ES
IT
NL

8 9
Pack content 1/3
A. 1 Smart Video Doorbell
B. 1 wall mounting plate
C. 1 25° bracket
D. 1 finish plate
A. 1 Sonnette Vidéo Intelligente
B. 1 support mural
C. 1 support incliné à 25°
D. 1 plaque de finition
Pack content
Contenu du pack
A. 1 Smarte Videotürklingel
B. 1 Wandhalterung
C. 1 25°-Halterung
D. 1 Abschlussplatte
Verpackungsinhalt
A. 1 Slimme Video Deurbel
B. 1 muurmontageplaat
C. 1 steun met een hoek van 25°
D. 1 afdekplaat
Inhoud van het pakket
A. 1 Campanello Intelligente
con Videocamera
B. 1 supporto da parete
C. 1 supporto inclinato a 25°
D. 1 piastra di finitura
Contenuto della confezione
A. 1 Timbre con Vídeo
Inteligente
B. 1 soporte mural
C. 1 soporte inclinado a 25°
D. 1 placa de acabado
Contenido de la caja
EN
FR
DE
ES
IT
NL
Pack content 1/3
A B
C D

10 11
Pack content 2/3
E.
F.
G.
H.
I.
E.
F.
G.
H.
I.
E.
F.
G.
H.
I.
E.
F.
G.
H.
I.
E.
F.
G.
H.
I.
E.
F.
G.
H.
I.
Pack content
Contenu du pack
Contenido de la caja
1 module de carillon
1 connecteur de fils
1 gabarit de perçage
1 fusible supplémentaire
1 carte Homekit
Contenuto della confezione
Verpackungsinhalt Inhoud van het pakket
EN
FR
DE
ES
IT
NL
1 chime module
1 wire connector
1 drilling template
1 additional fuse
1 Homekit card
1 módulo de campanilla
1 conector de cables
1 plantilla de perforación
1 fusible adicional
1 tarjeta HomeKit
1 modulo di suoneria
1 connettore per cavi
1 dima di foratura
1 fusibile aggiuntivo
1 scheda HomeKit
1 Gong-Modul
1 Leitungsverbinder
1 Bohrschablone
1 Zusatzsicherung
1 HomeKit-Karte
1 gongmodule
1 draadconnector
1 boorsjabloon
1 extra zekering
1 HomeKit kaart
Pack content 2/3
EF
H
I
G
HomeKit setup code
During the setup of Apple HomeKit, scan
the code above with your iPhone or iPad.
12 13
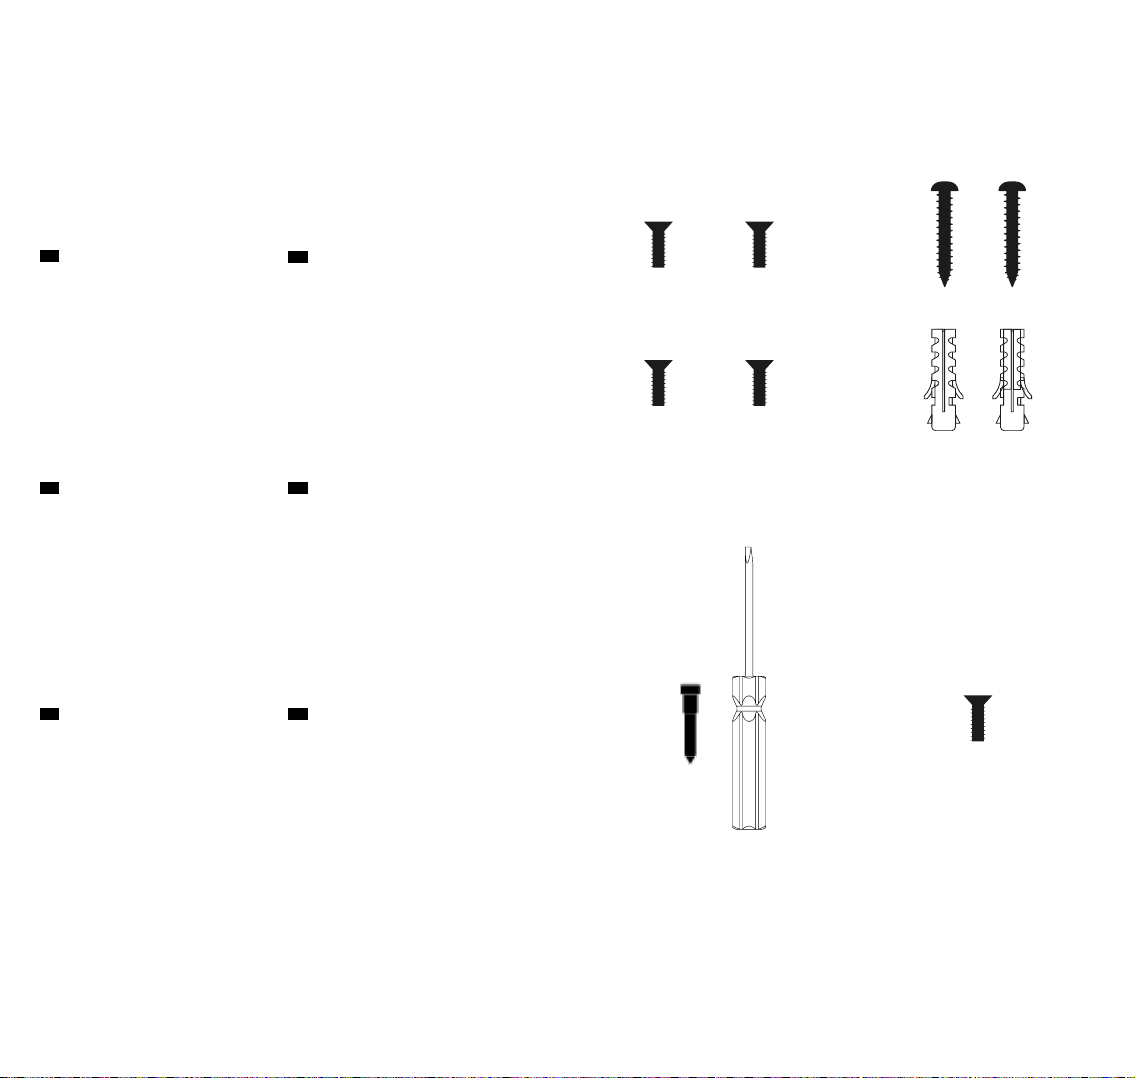
Pack content 3/3
J.
K.
L.
M.
J.
K.
L.
M.
J.
K.
L.
M.
J.
K.
L.
M.
J.
K.
L.
M.
J.
K.
L.
M.
Pack content
Contenu du pack
4 vis pour support incliné
2 vis de montage et
2 chevilles
1 vis de sécurité et son
outil personnalisé
1 vis de connecteur
Verpackungsinhalt Inhoud van het pakket
Contenuto della confezione
Contenido de la caja
EN
FR
DE
ES
IT
NL
4 bracket screws
2 mounting screws and
2 anchors
1 security screw and its
custom tool
1 connector screw
4 viti per supporto
inclinato
2 viti di montaggio e
2 tasselli
1 vite di sicurezza con
apposito utensile
1 vite per connettore
4 Halterungsschrauben
2 Befestigungsschrauben
und 2 Dübel
1 Sicherheitsschraube
mit Si-
cherheitsschraubenschlüs-
sel
1 Verbindungsschraube
4 beugel
montageschroeven
2 bevestigingsschroeven
en 2 pluggen
1 veiligheidsschroef (met
aangepast gereedschap)
1 verbindingsschroef
4 tornillos para soporte
inclinado
2 tornillos de montaje y
2 clavijas
1 tornillo de seguridad y su
herramienta personalizada
1 tornillo de conector
Pack content 3/3
K
M
J
L

14 15
Product overview
Night Vision LED
LED
Camera
Speaker
Microphone
Doorbell Button
Visión nocturna LED
LED
Cámara
Altavoz
Micrófono
Botón de timbre
Visione notturna a LED
LED
Videocamera
Altoparlante
Microfono
Pulsante del campanello
LED Nachtzicht
LED
Camera
Speaker
Microfoon
Deurbelknop
LED Nachtsicht
LED
Kamera
Lautsprecher
Mikrofon
Türklingelknopf
Product overview
Aperçu du produit
Descripción del producto
LED de vision nocturne
LED
Camera
Microphone
Haut-parleur
Bouton de sonnette
Descrizione prodotto
Produktübersicht Productoverzicht
EN
FR
DE
ES
IT
NL
A.
B.
C.
D.
E.
F.
A.
B.
C.
D.
E.
F.
A.
B.
C.
D.
E.
F.
A.
B.
C.
D.
E.
F.
A.
B.
C.
D.
E.
F.
A.
B.
C.
D.
E.
F.
Product overview
A
B
C
E
F
D

16 17
Required tools
Required tools Herramientas necesarias
Outils nécessaires Strumenti necessari
Erforderliches Werkzeug Benodigd gereedschap
EN
FR
DE
ES
IT
NL
Philips screwdriver
Drill - Ø6mm
Pair of wagos
(optional tool)
Level (recommended tool)
Destornillador de estrella
Taladro - Ø6mm
Par de wagos
(herramienta opcional)
Nivel de burbuja
(herramienta recomendada)
Philips schroevendraaier
Boor - Ø6mm
Een paar wago verbin-
dingsklemmen (optioneel)
Waterpas (aanbevolen)
Philips-Schraubendreher
Bohrmaschine - Ø6mm
Ein Paar Wago-Reihenklem-
men (optional)
Wasserwaage
(empfehlenswert)
Cacciavite a croce
Trapano - Ø6mm
Coppia di morsetti
(uso facoltativo)
Livella (uso raccomandato)
Tournevis cruciforme
Perceuse - Ø6mm
Paire de wagos
(outil optionnel)
Niveau à bulle
(outil recommandé)
A.
B.
C.
D.
A.
B.
C.
D.
A.
B.
C.
D.
A.
B.
C.
D.
A.
B.
C.
D.
A.
B.
C.
D.
Required tools
A B
C D
18 19
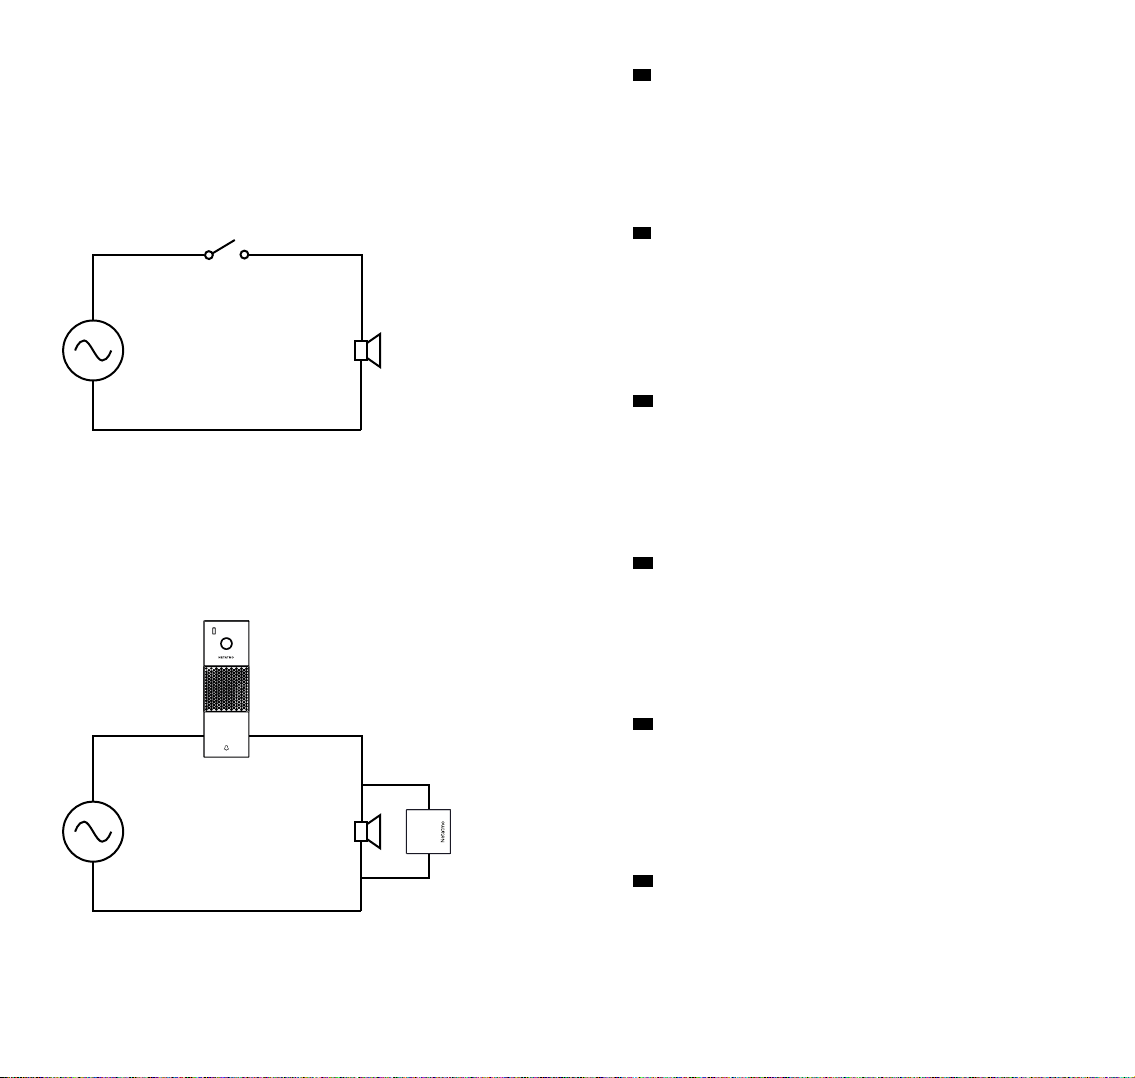
Electrical Diagrams
3. Chime
2. Doorbell Button
1. Power
4. Chime
Module
1. Power
2. Doorbell Button
3. Chime
AClassical Doorbell Wiring
BDoorbell Wiring with the Smart Video Doorbell
A. Klassische Türgong-Verkabelung
B. Türgong-Verkabelung mit der Smarten Videotürklingel
Hinweis: Die Smarte Videotürklingel ersetzt Ihren alten Türklingelknopf, und
das Gong-Modul wird parallel zu Ihrem bestehenden Gong eingesteckt.
1. Strom
2. Türklingelknopf
Schaltpläne
A. Cableado de timbre clásico
B. Cableado de timbre con Timbre con Vídeo Inteligente
Nota: El Timbre con Vídeo Inteligente reemplaza tu antiguo botón de timbre
y el módulo de campanilla se instala en paralelo a tu campanilla existente.
1. Alimentación eléctrica
2. Botón de timbre
Esquemas eléctricos
A. Cablaggio campanello tradizionale
B. Cablaggio Campanello Intelligente con Videocamera
Nota: Il Campanello Intelligente con Videocamera sostituisce il pulsante
del vecchio campanello e il modulo di suoneria è collegato in parallelo alla
suoneria esistente.
1. Corrente
2. Pulsante del campanello
Schemi elettrici
A. Classical Doorbell Wiring
B. Doorbell Wiring with your Smart Video Doorbell
Note : The Smart Video Doorbell replaces your old doorbell button, and the
chime module is plugged in parallel to your existing chime.
1. Power
2. Doorbell Button
Electrical Diagrams
EN
A. Circuit de sonnette classique
B. Circuit de sonnette avec votre Sonnette Vidéo Intelligente
Note : La Sonnette Video Intelligente remplace votre ancien bouton de son-
nette, et le module de carillon s'installe en parallèle de votre carillon existant.
1. Alimentation
2. Bouton de sonnette
Schémas Électriques
FR
DE
ES
IT
NL
A. Bedrading Klassieke Deurbel
B. Deurbel Bedrading met de Slimme Video Deurbel
Opmerking: De Slimme Video Deurbel vervangt uw oude deurbelknop en de
gongmodule is parallel aangesloten op uw bestaande gong.
1. Stroom
2. Deurbelknop
Elektrische Diagrammen
3. Chime
4. Chime Module
3. Carillon
4. Module de carillon
3. Gong
4. Gong-Modul
3. Campanilla
4. Módulo de campanilla
3. Suoneria
4. Modulo di suoneria
3. Gong
4. Gongmodule
20 21
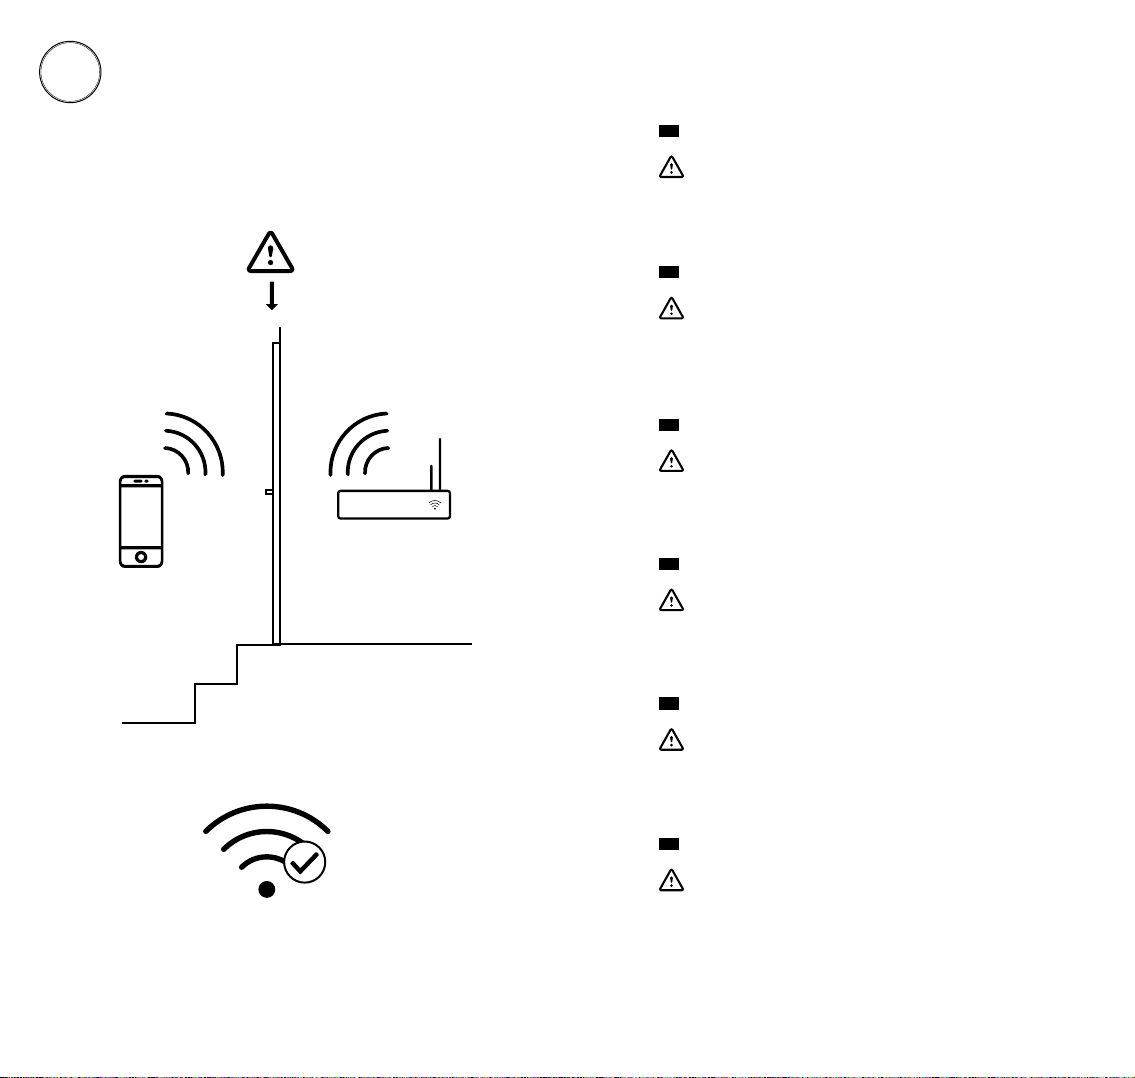
1Check Wi-Fi Reception
Verificare con la porta chiusa e tramite smartphone di avere
suciente segnale WiFi fino al pulsante del campanello.
Se il WiFi non riceve, provare ad avvicinare il router o installare
un ripetitore WiFi.
Verifica con el smartphone que tienes recepción Wi-Fi donde
se encuentra tu botón de timbre con la puerta cerrada.
Si no tienes, intenta mover el router Wi-Fi más cerca o instala
un repetidor de Wi-Fi.
Check with your smartphone that you have Wi-Fi reception at
your doorbell button with your door closed.
If you do not, try to move your Wi-Fi router closer or install a
Wi-Fi extender.
Check Wi-Fi Reception
Überprüfen Sie den WLAN-Empfang
Verifica la recepción Wi-Fi
Controllare ricezione WiFi
Controleer wifi-ontvangst
Vérifiez avec votre smartphone que vous recevez une connexion
Wi-Fi au niveau de votre bouton de sonnette avec votre porte
d’entrée fermée.
Dans le cas contraire, essayez de rapprocher votre routeur Wi-Fi
ou ajoutez un répéteur.
Vérifiez la réception Wi-Fi
EN
FR
Überprüfen Sie, ob Ihr Smartphone bei geschlossener Tür
WLAN-Empfang an Ihrem Klingelknopf hat.
Ist dies nicht der Fall, nähern Sie den WLAN-Router oder instal-
lieren Sie einen WLAN-Repeater.
DE
Controleer met uw smartphone of u wifi-ontvangst hebt bij uw
deurbelknop met uw deur dicht.
Als u dat niet heeft, probeer dan uw wifi-router dichterbij te
plaatsen of installeer een wifi-extender.
ES
IT
NL
22 23
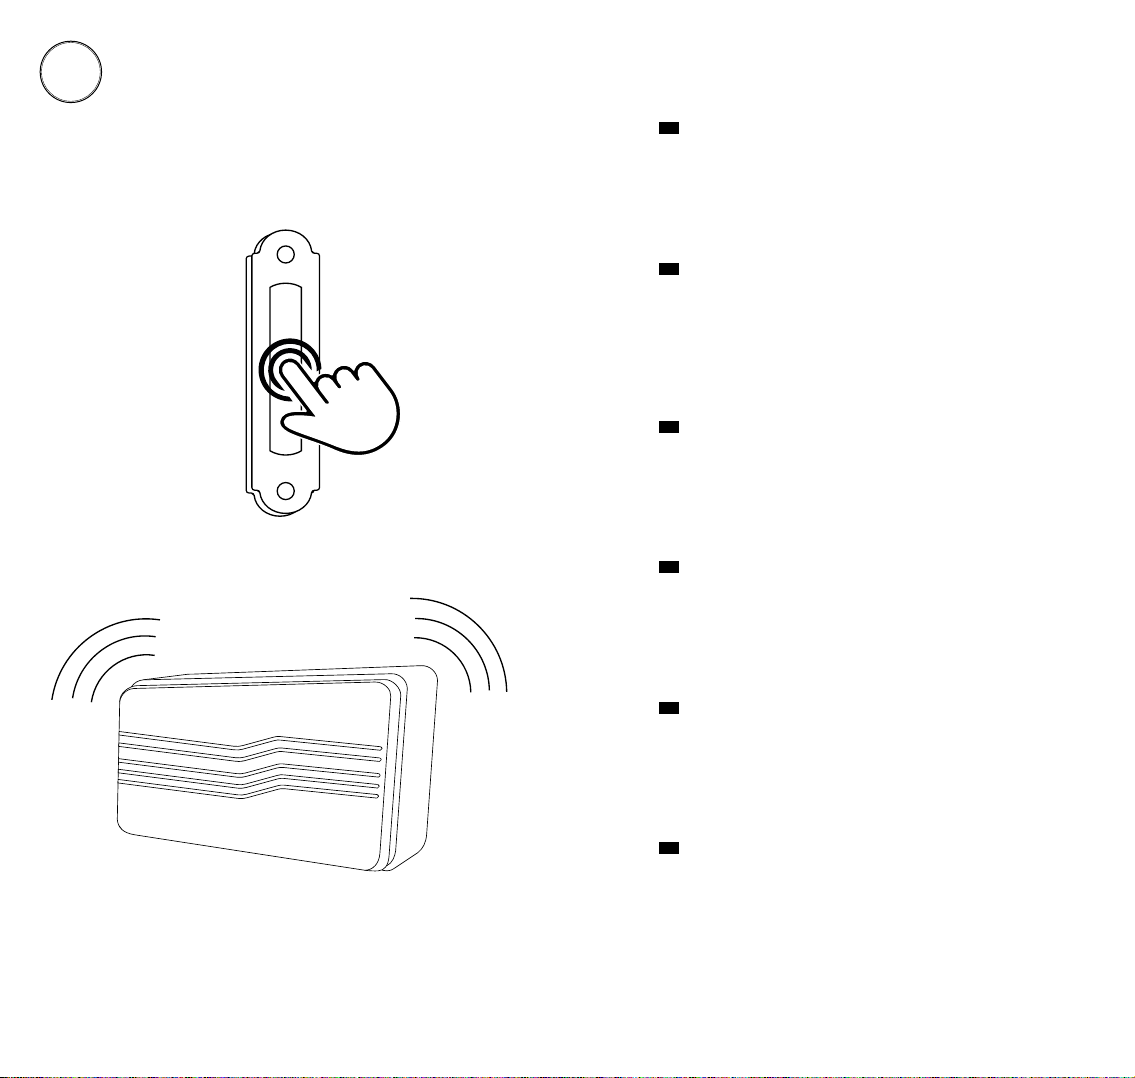
Locate your chime
2
Press your doorbell button to locate your chime.
Note: The chime is the little box that rings.
If you don’t have a chime please visit the Help Center at
helpcenter.netatmo.com.
Locate your chime
Appuyez sur votre bouton de sonnette pour repérer votre
carillon.
Note : Le carillon est le petit boitier qui sonne.
Si vous n’avez pas de carillon, rendez-vous sur l'Assistance
Netatmo à l'adresse helpcenter.netatmo.com.
Localisez votre carillon
Betätigen Sie Ihren Türklingelknopf, um denn Gong zu lokalisie-
ren.
Hinweis: Der Gong ist das kleine Kästchen, das ertönt.
Wenn Sie über keinen Gong verfügen, konsultieren Sie das
Hilfe-Center unter helpcenter.netatmo.com
Lokalisieren Sie Ihren Gong
Pulsa el botón de timbre para localizar tu campanilla.
Nota: La campanilla es la cajita que suena.
Si no tienes campanilla, ingresa al Centro de ayuda de Netatmo
en la dirección helpcenter.netatmo.com
Localiza tu campanilla
Premere il pulsante del campanello per individuare la suoneria.
Nota: La suoneria è la scatolina che emette la melodia.
Se manca la suoneria, visitare l’Assitanza Netatmo su helpcenter.
netatmo.com
Individuare la suoneria
Druk op uw deurbelknop om uw gong te lokaliseren.
Opmerking: De gong is het kleine doosje dat rinkelt.
Als u geen gong hebt, bezoek dan het Netatmo Hulpcentrum op
helpcenter.netatmo.com.
Lokaliseer uw gong
EN
FR
DE
ES
IT
NL
24 25
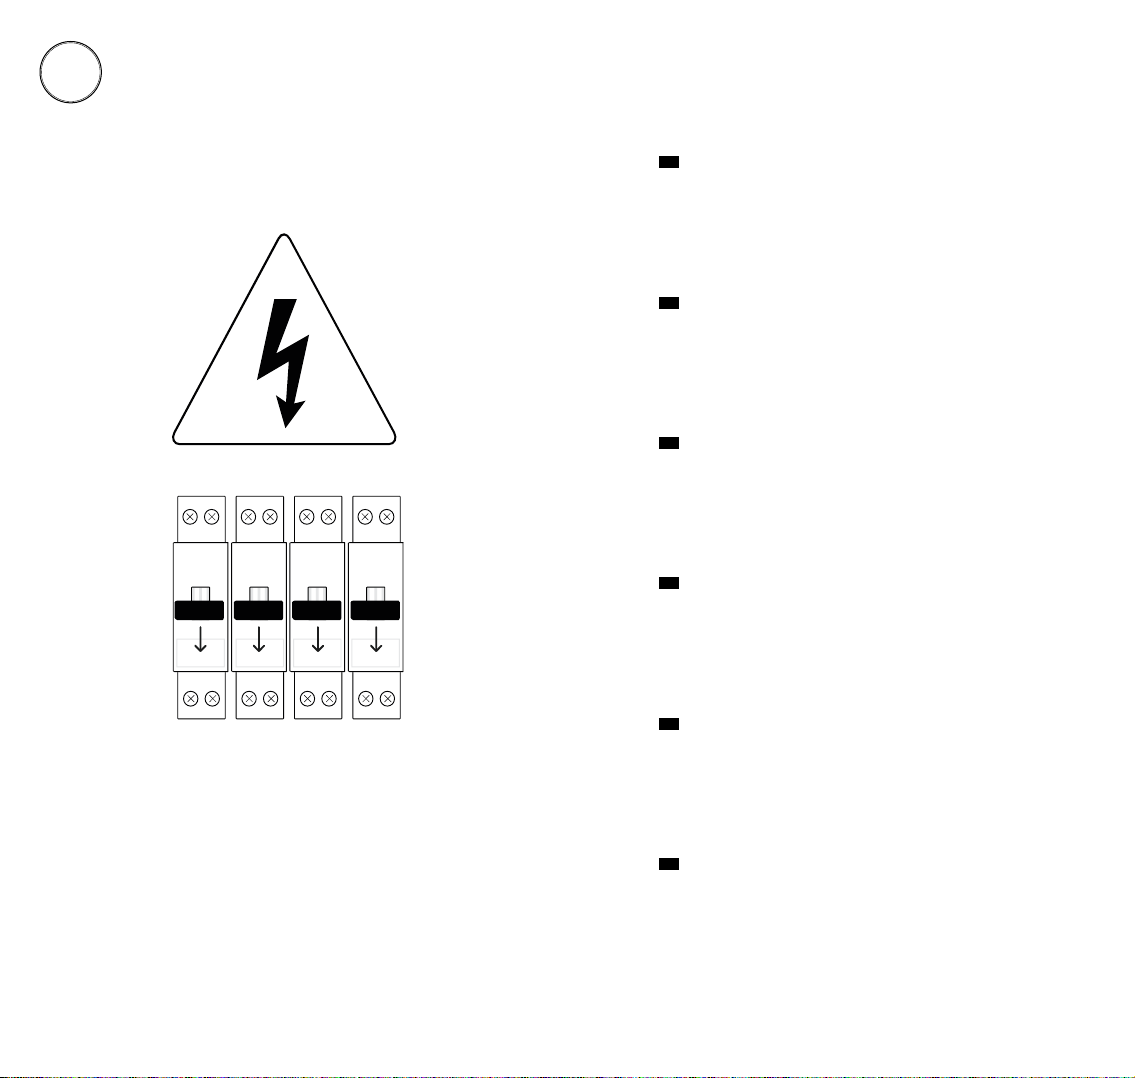
OFF
3Caution: Electrical Danger
Disconnect power at fuse or circuit breaker before proceeding to
the installation.
Caution: Electrical Danger
Coupez le courant au disjoncteur général avant de procéder à
l'installation.
Avertissement : danger électrique
Schalten Sie den Strom der Sicherung oder Schutzschalter ab,
bevor Sie mit der Installation beginnen..
Vorsicht: elektrische Gefahr
Antes de proceder con la instalación desconecta el fusible o el
disyuntor.
Atención: peligro eléctrico
Staccare i fusibili o il contatore della corrente, prima di eettuare
l'installazione.
Attenzione: rischio elettrico
Schakel de stroom uit bij de zekering of stroomonderbreker
voordat u de installatie uitvoert.
Let op: gevaar door elektriciteit
EN
FR
DE
ES
IT
NL

26 27
4Open your chime
A
B
A. If your chime is near your door:
Remove your chime cover.
B. If your chime is in your switch board:
Unscrew and remove your switch board cover.
You should see the two wires connecting your chime. If you see more than
two wires please visit the Help Center at helpcenter.netatmo.com.
Open your chime
A. Befindet sich Ihr Gong-Kästchen in der Nähe der Tür:
Entfernen Sie die Gong-Kästchen-Schale.
B. Befindet sich Ihr Gong-Kästchen in der Schalttafel:
Entfernen Sie Ihre Schalttafelabdeckung, indem Sie sie abschrauben.
Sie sollten die beiden Drähte sehen, die zum Gong-Kästchen führen. Wenn
Sie mehr als zwei Drähte sehen, besuchen Sie bitte das Help Center unter
helpcenter.netatmo.com.
Önen Sie das Gong-Kästchen
A. Si tu campanilla está cerca de tu puerta:
Retira la tapa de la campanilla.
B. Si tu campanilla está en tu tablero eléctrico:
Desatornilla y retira la tapa de tu tablero eléctrico.
Deberías ver dos cables conectados a tu campanilla. Si ves más que dos
cables, ingresa al Centro de ayuda en la dirección helpcenter.netatmo.com.
Abre tu campanilla
A. Se la suoneria si trova vicino alla porta:
Rimuovere il coperchio della suoneria.
B. Se la suoneria si trova nel quadro elettrico:
Svitare e rimuovere il coperchio del quadro elettrico.
Dovrebbero esserci due cavi che collegano la suoneria. Se ci fossero più di
due cavi, visitare l'Assistanza Netatmo su helpcenter.netatmo.com.
Aprire la suoneria
A. Als uw gong zicht dichtbij uw deur bevindt:
Verwijder de afdekking van de gong.
B. Als uw bel in uw schakelpaneel zit:
Schroef de afdekking van uw schakelpaneel los en verwijder deze.
U zou de twee draden moeten zien die uw gong verbinden. Als u meer dan
twee draden ziet, bezoek dan het Hulpcentrum op helpcenter.netatmo.com.
Open uw gong
A. Si votre carillon est proche de votre porte :
Retirez le couvercle de votre carillon.
B. Si votre carillon est dans votre tableau électrique :
Dévissez et retirez le couvercle de votre tableau électrique.
Vous devriez voir les 2 fils connectés à votre carillon.
Si vous voyez plus de 2 fils, rendez-vous sur l'Assistance Netatmo à l'adresse
helpcenter.netatmo.com.
Ouvrez votre carillon
FR
DE
ES
IT
NL
EN
28 29
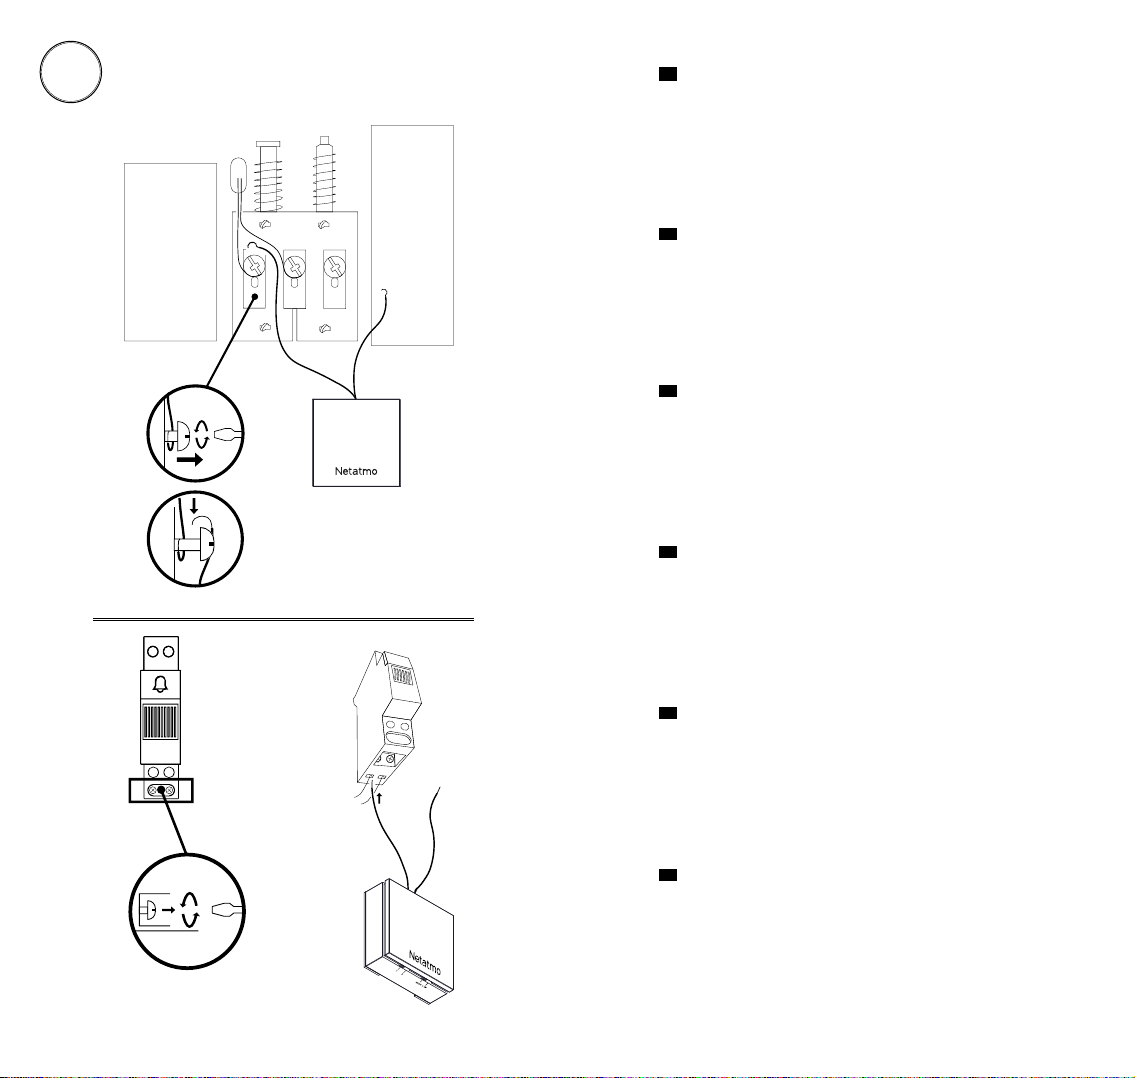
5
1
2
1 2
Connect the first wire of the chime module
1. Loosen one of the screws.
2. Hook one of the chime module's wires.
Note: There is no polarity in the circuit, choose the wire you want.
Connect the first wire of the chime module
1. Desserrez une des vis.
2. Accrochez un des fils du module de carillon.
Note : Il n’y a aucune polarité dans le circuit, choisissez le fil que
vous souhaitez.
Connectez le premier fil du module de carillon
EN
FR
DE
ES
IT
NL
1. Lösen Sie eine der Schrauben.
2. Haken Sie einen der Kabel des Gong-Moduls ein.
Hinweis: Es gibt keine Polarität in der Schaltung, wählen Sie das
gewünschte Kabel.
Verbinden Sie das erste Kabel mit dem Gong-Modul
1. Afloja uno de los tornillos.
2. Engancha uno de los cables del módulo de campanilla.
Nota: No hay polaridad en el circuito, elige el cable que quieras.
1. Allentare una delle viti.
2. Agganciare uno dei cavi del modulo di suoneria.
Nota: Nessuna polarità nel circuito, scegliere uno qualsiasi dei
cavi.
1. Draai een van de schroeven los.
2. Haak een van de draden van de gongmodule vast.
Opmerking: Er is geen polariteit in het circuit, kies de gewenste
draad.
Conecta el primer cable del módulo de campanilla
Collegare il primo cavo del modulo di suoneria
Sluit de eerste draad van de gongmodule aan
30 31
6Secure the first wire
Tighten the screw in order to maintain the wires together.
Note: Use wagos if you have troubles maintening the wires
together.
Secure the first wire
Resserrez la vis pour maintenir les fils ensemble.
Note: Utilisez des wagos si vous avez des dicultés à maintenir
les fils ensemble.
Sécurisez le premier fil
Ziehen Sie die Schraube fest, um die Kabel zusammenzuhalten.
Hinweis: Benutzen Sie Wago-Reihenklemmen, sollten Sie
Schwierigkeiten haben, um die Kabel zusammen zu halten.
Sichern Sie das erste Kabel
Ajusta el tornillo para mantener los cables juntos.
Nota: Utiliza wagos si te cuesta mantener los cables juntos.
Asegura el primer cable
Serrare la vite per mantenere uniti i cavi.
Nota: Utilizzare i morsetti se si fa fatica a collegare i cavi.
Fissare il primo cavo
Draai de schroef vast om de draden bij elkaar te houden.
Opmerking: Gebruik wago verbindingsklemmen als u problemen
heeft om de draden bij elkaar te houden.
Zet de eerste draad vast
EN
FR
DE
ES
IT
NL

32 33
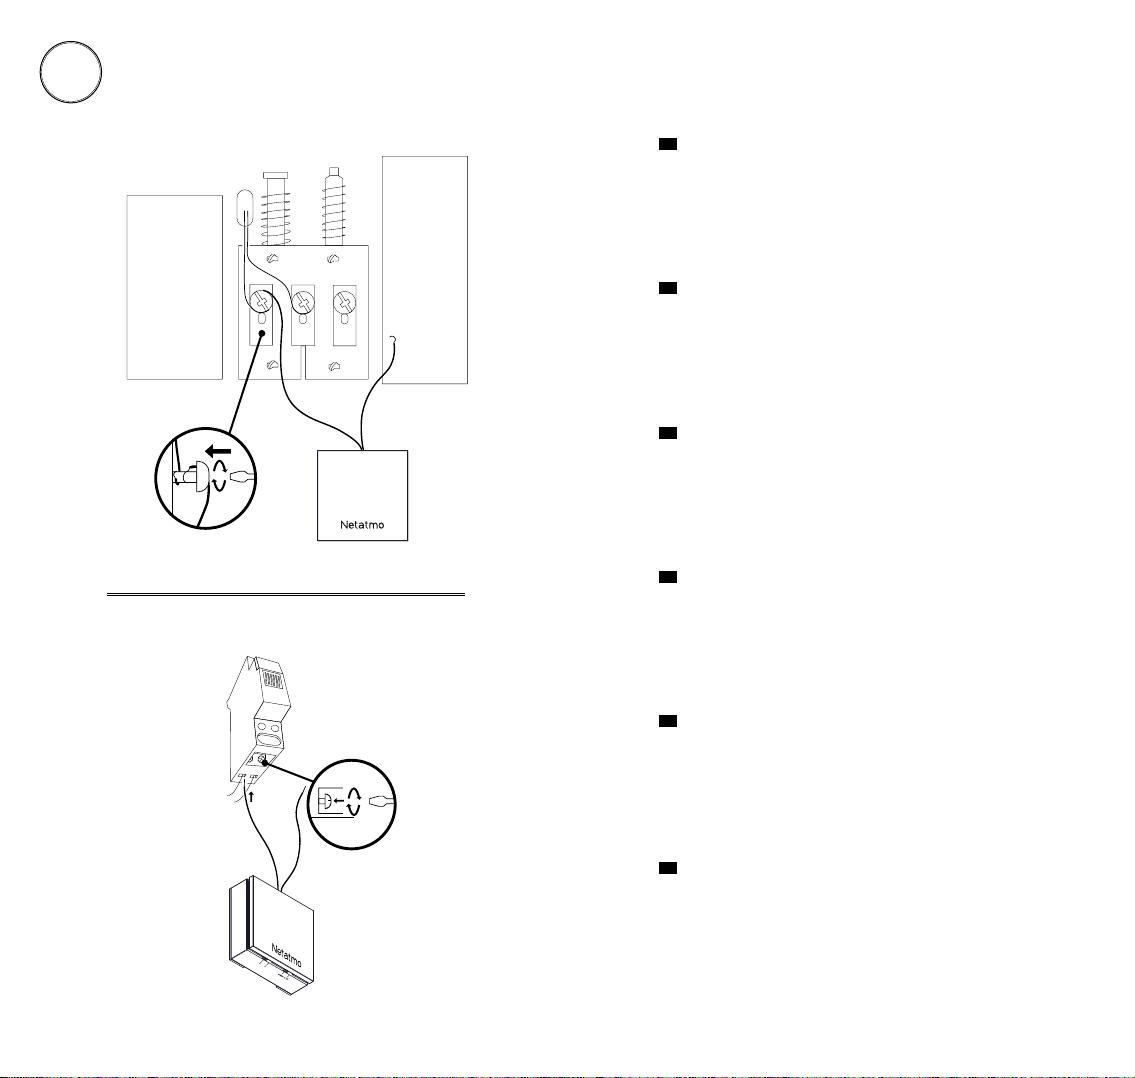
7Connect and secure the second wire
Repeat steps (5) and (6) with the second wire.
Connect and secure the second wire
Répétez les étapes (5) et (6) pour le second fil.
Connectez et sécurisez le second fil
Wiederholen Sie Schritt (5) und (6) mit dem zweiten Kabel.
Verbinden und sichern Sie das zweite Kabel
Repite las etapas (5) y (6) con el segundo cable.
Conecta y asegura el segundo cable
Ripetere i punti (5) e (6) con il secondo cavo.
Collegare e fissare il secondo cavo
Herhaal stap (5) en (6) met het tweede draad.
Sluit de tweede draad aan en zet deze vast
EN
FR
DE
ES
IT
NL

34 35
8Verify the chime module configuration
Make sure the selectors are in 1 - LOW position.
Verify the chime module configuration
Assurez-vous que les sélecteurs soient sur la position 1 - LOW.
Vérifiez la configuration du module de carillon
Vergewissern Sie sich, dass die Schieber in der Position 1 - LOW
stehen.
Überprüfen Sie die Gong-Modul-Konfiguration
Asegúrate de que los selectores estén en la posición 1 - LOW.
Verifica la configuración del módulo de campanilla
Assicurarsi che i selettori siano in posizione 1 - LOW.
Verificare la configurazione del modulo di suoneria
Zorg ervoor dat de schakelaars in de stand 1-LOW staan.
Controleer de configuratie van de gongmodule
EN
FR
DE
ES
IT
NL
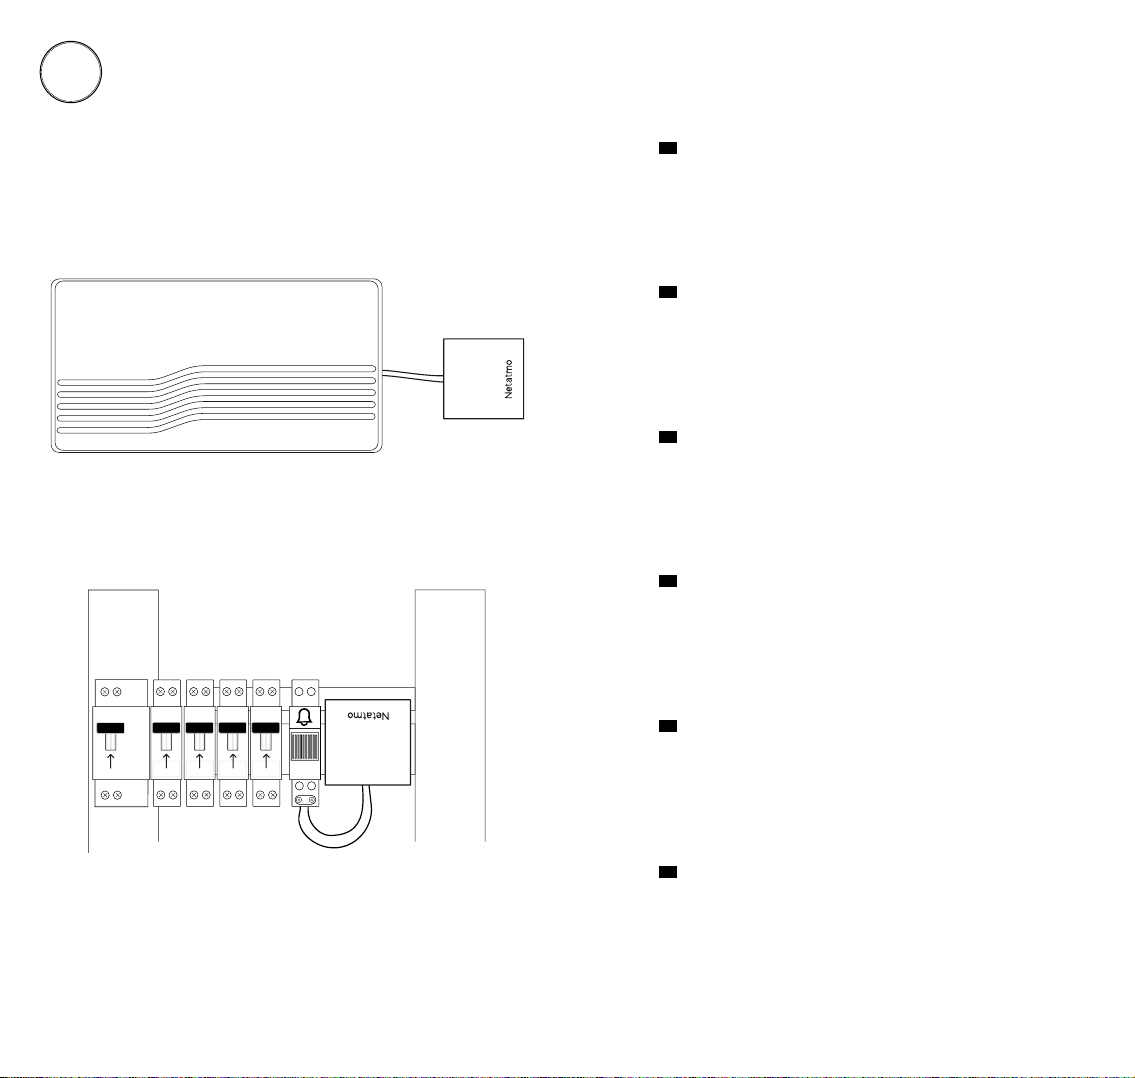
36 37
9Stick the chime module
Put the chime cover or switch board cover back on and stick the
chime module next to your chime or on its cover using the two
stickers on the back.
Stick the chime module
Remettez le couvercle du carillon ou du tableau électrique et fixez
le module de carillon à coté de votre carillon ou directement sur
le couvercle en utilisant les deux stickers au dos du module.
Fixez le module de carillon
EN
FR
DE
ES
IT
NL
Setzen Sie die Abdeckung des Gongs-Kästchens oder der Schalt-
tafel wieder auf. Befestigen Sie dann das Gong-Modul neben
Ihren Gong oder auf dessen Abdeckung. Verwenden Sie hierfür
die beiden Klebestreifen auf der Rückseite.
Coloca la tapa de la campanilla o del tablero eléctrico de nuevo y
fija el módulo de campanilla al lado de tu campanilla o en su tapa
gracias a los dos adhesivos en la parte posterior del módulo.
Rimettere il coperchio della suoneria o del quadro elettrico e
attaccare il modulo di suoneria accanto alla suoneria o sul coper-
chio usando i due adesivi sul retro.
Plaats de afdekking van de gong of het schakelpaneel terug en
plak de gongmodule naast uw bel of op de afdekking met behulp
van de twee stickers op de achterkant.
Stecken Sie das Gong-Modul ein
Fija el módulo de campanilla
Attaccare il modulo di suoneria
Bevestig de gongmodule

38 39
OFF
Caution: Electrical Danger
10
Make sure power is still disconnected before continuing the
installation.
Caution: Electrical Danger
Assurez-vous que le courant est toujours coupé au disjoncteur
général avant de poursuivre l'installation.
Avertissement : danger électrique
Stellen Sie sicher, dass die Stromzufuhr noch unterbrochen ist,
bevor Sie mit der Installation fortfahren.
Vorsicht: elektrische Gefahr
Asegúrate de que la alimentación eléctrica esté aún desconecta-
da para continuar con la instalación.
Atención: peligro eléctrico
Assicurarsi che l'alimentazione sia ancora scollegata prima di
continuare l'installazione.
Attenzione: rischio elettrico
Zorg ervoor dat de stroom nog steeds is losgekoppeld voordat u
doorgaat met de installatie.
Let op: gevaar door elektriciteit
EN
FR
DE
ES
IT
NL
Other manuals for NDB01
2
Other Netatmo Accessories manuals


