Nets Desk/3500 User manual

User Guide
Payment Terminals
Desk/3500
Move/3500
Lane/3000
iCT250E
iPP350
iWL250B
iWL250G
iSMP4
Viking
Software

Payment Terminals | Page 2 of 54
Table of Contents
1. Introduction ................................................................................................................................................................................................................. 5
Countertop ............................................................................................................................................................................................................................................................................5
Mobile .....................................................................................................................................................................................................................................................................................5
Integrated..............................................................................................................................................................................................................................................................................5
Mobile Integrated .............................................................................................................................................................................................................................................................5
2. Features ....................................................................................................................................................................................................................... 6
2.1 Desk/3500 ...........................................................................................................................................................................................................................................................6
2.2 Move/3500 ..........................................................................................................................................................................................................................................................6
2.3 Lane/3000 ............................................................................................................................................................................................................................................................ 7
2.4 iCT250E.................................................................................................................................................................................................................................................................... 7
2.5 iPP350 .....................................................................................................................................................................................................................................................................8
2.6 iWL250B ................................................................................................................................................................................................................................................................8
2.7 iWL250G ................................................................................................................................................................................................................................................................9
2.8 iSMP4 .......................................................................................................................................................................................................................................................................9
2.8.1 Bluetooth Pairing .....................................................................................................................................................................................................................10
2.8.2 Barcode Reader..........................................................................................................................................................................................................................10
3. Display......................................................................................................................................................................................................................... 11
3.1 Menu Structure..................................................................................................................................................................................................................................................11
3.2 Quick Menu ......................................................................................................................................................................................................................................................... 12
3.3 Parameter Menu .............................................................................................................................................................................................................................................13
3.4 Etherne t ................................................................................................................................................................................................................................................................15
3.5 Bluetooth ..............................................................................................................................................................................................................................................................15
3.6 GPRS ........................................................................................................................................................................................................................................................................ 15
3.7 Battery & Cloc ................................................................................................................................................................................................................................................... 15
4. Card Reading ..............................................................................................................................................................................................................16
4.1 Chip ..........................................................................................................................................................................................................................................................................16
4.2 Magnetic Strip....................................................................................................................................................................................................................................................16
4.3 Manual Key..........................................................................................................................................................................................................................................................16
4.4 Contactless (NFC) Payment ..................................................................................................................................................................................................................... 17
4.4.1 Wallet Solution........................................................................................................................................................................................................................... 17
4.4.2 QR Codes ........................................................................................................................................................................................................................................ 17
4.4.3 Contactless Payment with Wallet Solution............................................................................................................................................................. 17
4.4.4 IFR Selection ............................................................................................................................................................................................................................... 17
5. Transactions...............................................................................................................................................................................................................18
5.1 Perform a Purchase.......................................................................................................................................................................................................................................18
5.1.1Purchase (Standard).............................................................................................................................................................................................................................18
5.1.2 Purchase with Cash Withdrawal (Cashback)..........................................................................................................................................................19
5.1.3 Purchase with Manual Entry of Card Data...............................................................................................................................................................19
5.1.4 Cancellation (Reversal) of Last Transaction...........................................................................................................................................................20
5.1.5 Return of Goods .......................................................................................................................................................................................................................20
5.2 Receipt .................................................................................................................................................................................................................................................................. 21
5.2.1 Create a Receipt ....................................................................................................................................................................................................................... 21
5.2.2 Copy of Last Receip ................................................................................................................................................................................................................ 21
5.2.3 Receipt Info................................................................................................................................................................................................................................... 21
5.2.4 Additional Transaction Features ................................................................................................................................................................................... 21
5.3 Prepaid ..................................................................................................................................................................................................................................................................23
5.3.1 Gift Cards ......................................................................................................................................................................................................................................23
6. Hardware Connections .................................................................................................................................................................................................24
6.1 Desk/3500 ........................................................................................................................................................................................................................................................ 24
6.2 Move/3500 ....................................................................................................................................................................................................................................................... 24
6.3 Lane/3000 .........................................................................................................................................................................................................................................................25
6.3.1 Security ..........................................................................................................................................................................................................................................25
6.4 iSMP4 ....................................................................................................................................................................................................................................................................25
6.5 iCT250E ...............................................................................................................................................................................................................................................................26
6.5.1 Ethernet / Broadband ...........................................................................................................................................................................................................26
6.5.2 MagicBox ......................................................................................................................................................................................................................................26
6.6 iWL250B ............................................................................................................................................................................................................................................................. 27
6.6.1 Base Station ................................................................................................................................................................................................................................ 27
6.7 iWL250G .............................................................................................................................................................................................................................................................28
6.7.1 Base Station ................................................................................................................................................................................................................................28
6.7.2 SIM Card ........................................................................................................................................................................................................................................28

Payment Terminals | Page 3 of 54
6.8 iPP350 ..................................................................................................................................................................................................................................................................29
6.8.1 Security...........................................................................................................................................................................................................................................29
6.8.2 Download USB Drivers.........................................................................................................................................................................................................29
6.8.3 MagicBox ......................................................................................................................................................................................................................................29
7. Network Connections .............................................................................................................................................................................................30
7.1 By Terminal Type ...........................................................................................................................................................................................................................................30
7.2 Access Point Name (APN) in GPRS Terminals ............................................................................................................................................................................. 31
7.3 Static IP Addresses in Ethernet Terminals..................................................................................................................................................................................... 31
7.4 ECR IP Address and Ports ......................................................................................................................................................................................................................... 31
7.5 Wi-Fi for Standalone Terminals............................................................................................................................................................................................................32
7.5.1 Move/ 3500 ..................................................................................................................................................................................................................................32
7.5.2 iSMP4...............................................................................................................................................................................................................................................32
8. Merchant Card ..........................................................................................................................................................................................................33
9. Receipt Paper Rolls .................................................................................................................................................................................................33
9.1 Ordering Receipt Rolls ...............................................................................................................................................................................................................................33
9.1.1 Subscription Service for Receipt Rolls .....................................................................................................................................................................33
9.2 Inserting a Receipt Roll into the Payment Terminal ................................................................................................................................................................34
10. Reconciliation ...........................................................................................................................................................................................................35
10.1 Manual Reconciliation .................................................................................................................................................................................................................................35
10.2 Automatic Reconciliation ...........................................................................................................................................................................................................................35
10.3 Copy of Last Reconciliation Report.....................................................................................................................................................................................................35
11. Reports .......................................................................................................................................................................................................................36
11.1 Transaction List................................................................................................................................................................................................................................................36
11.2 X-Total ................................................................................................................................................................................................................................................................... 37
11.3 Z-Tota l....................................................................................................................................................................................................................................................................38
11.4 Copy of Last Z-Total ......................................................................................................................................................................................................................................38
11.5 Operator X-Total ..............................................................................................................................................................................................................................................39
11.6 Operator Z-Total .............................................................................................................................................................................................................................................40
12. Operators ................................................................................................................................................................................................................... 41
12.1 Create a New Operator.................................................................................................................................................................................................................................41
12.2 Delete Operator ...............................................................................................................................................................................................................................................42
12.3 Print Operator List .........................................................................................................................................................................................................................................43
12.4 Use Operator ID ..............................................................................................................................................................................................................................................43
13. Multiterminal ............................................................................................................................................................................................................44
13.1 Multiple Merchants .......................................................................................................................................................................................................................................44
14. Administrative Tasks...............................................................................................................................................................................................45
14.1 Update Terminal Card Agreements.....................................................................................................................................................................................................45
14.2 Download Card Agreements................................................................................................................................................................................................................... 45
14.3 Print Card Agreements ...............................................................................................................................................................................................................................45
14.4 Update Software.............................................................................................................................................................................................................................................46
14.5 Identify Different Terminal Parameters...........................................................................................................................................................................................46
14.6 Update Terminal Parameters / Network Settings ....................................................................................................................................................................46
15. Troubleshooting ....................................................................................................................................................................................................... 47
16. Back-up ......................................................................................................................................................................................................................49
16.1 Electronic Offline Transaction (EOT)..................................................................................................................................................................................................49
16.1.1 Print EOT ........................................................................................................................................................................................................................................50
16.1.2 Submit EOT...................................................................................................................................................................................................................................50
17. Servicing .................................................................................................................................................................................................................... 51
17.1 Swap Service .................................................................................................................................................................................................................................................... 51
17.2 Terminations .......................................................................................................................................................................................................................................................51
18. Security ......................................................................................................................................................................................................................52
18.1 PCI PTS Compliance ....................................................................................................................................................................................................................................52
18.2 Guidance for PIN Entry ..............................................................................................................................................................................................................................52
18.3 Periodical Inspection of Terminals .....................................................................................................................................................................................................52
18.3.1 Prevention of Skimming.......................................................................................................................................................................................................52
19. Cleaning......................................................................................................................................................................................................................53
19.1 Coronavirus Outbreak Advice.................................................................................................................................................................................................................53
20. Customer Service Contacts...................................................................................................................................................................................53

Payment Terminals | Page 4 of 54
Glossary
The following terms are used throughout this document:
Term Description
BAXI Protocol program used on the ECR
BC Barcode
BLE Bluetooth Low Energy
CVC Card Verification Code
DCC Dynamic Currency Conversion
ECR Electronic Cash Register
EOT Electronic Offline Transaction
GPRS General Packet Radio Service
Host Internet server that processes transactions
IFR Interchange Fee Regulation (EU requirement)
Integrated Terminals integrated with an ECR
IP Internet Protocol
MAB Mobile Acceptance Box
mPOS Mobile Point of Sale
NFC Near Field Communication
POS Point of Sale
PSP Payment Service Provider
QR Quick Response (code)
Standalone Terminals not integrated with an ECR
SW Software
USB Universal Serial Bus
Payment Terminals | Page 5 of 54
1. Introduction
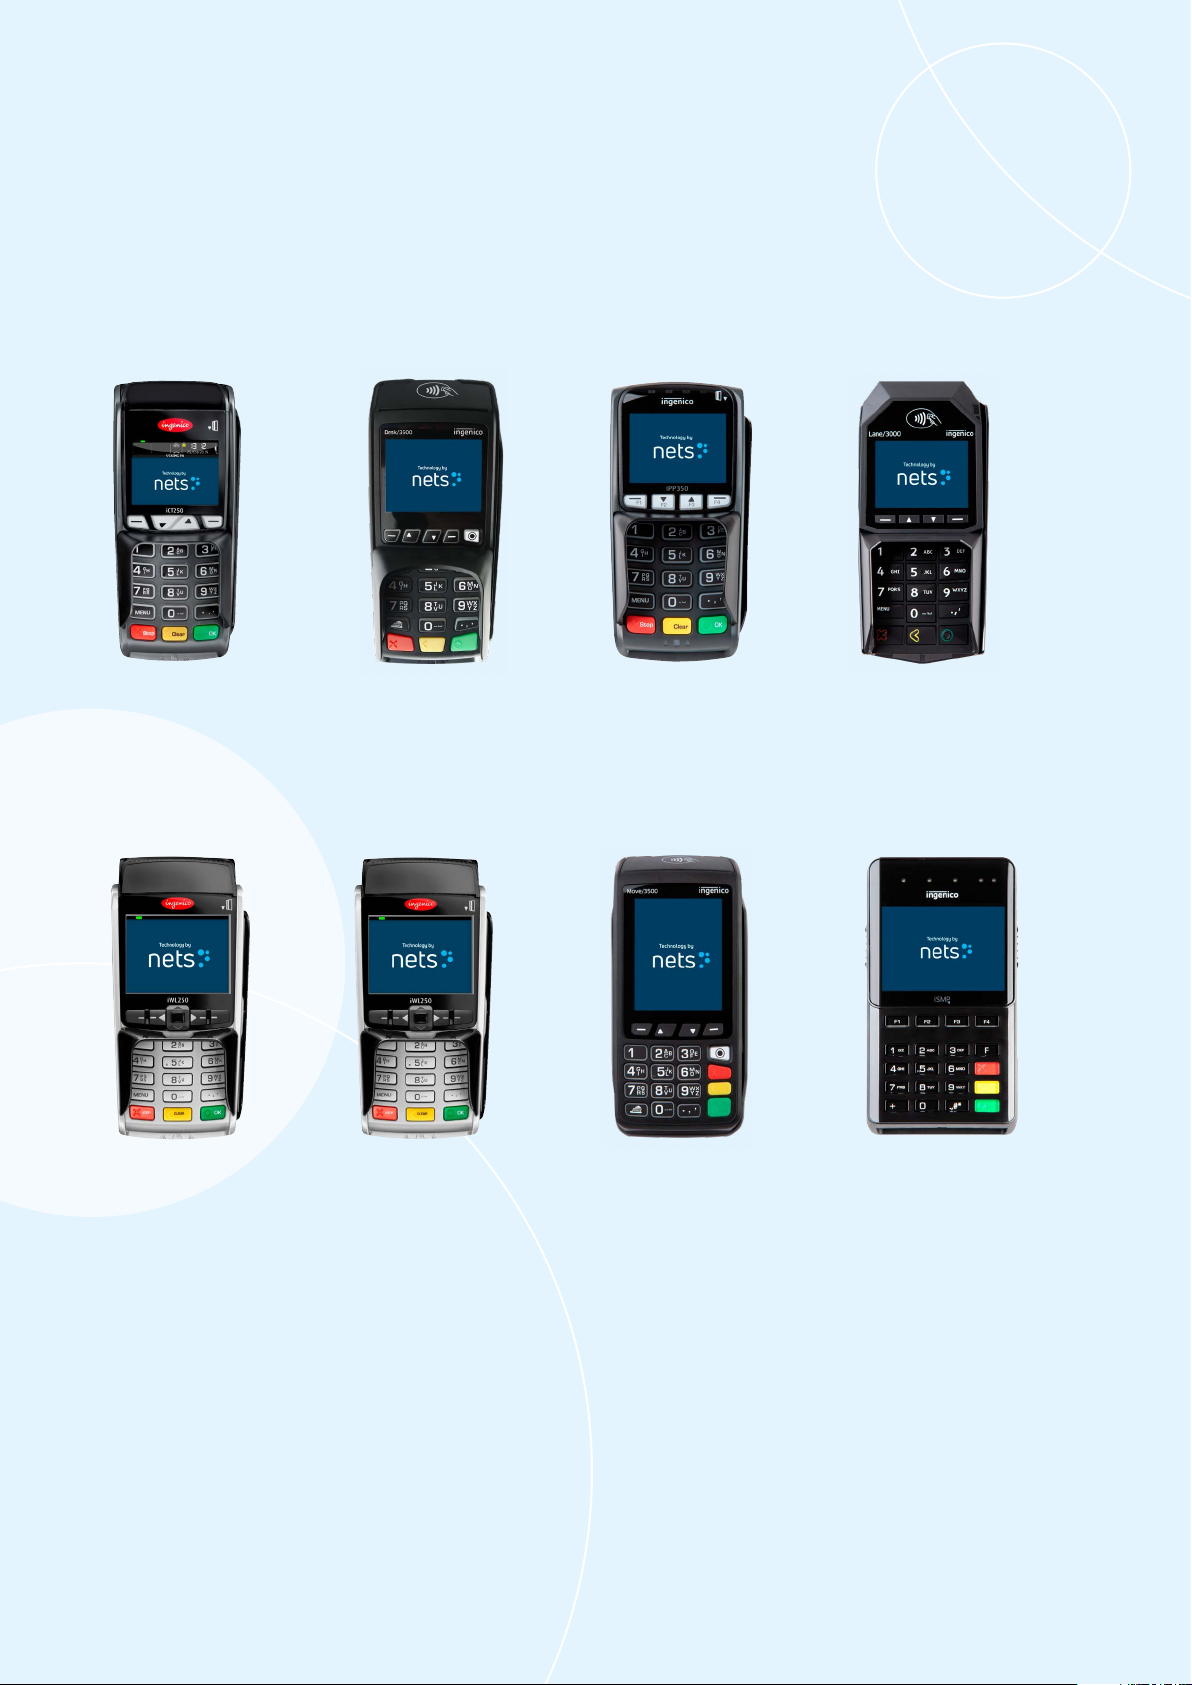
This User Guide is intended for use by merchants and covers the following types of Nets payment terminals:
Mobile IntegratedMobile
The information contained herein shall not be used, copied or redistributed without the prior written consent of
Nets A/S.
IntegratedCountertop
iCT250E Desk/3500 iPP350 Lane/3000
iWL250B iWL250G Move/3500 iSMP4
* This terminal can
also be integrated.

Payment Terminals | Page 6 of 54
2. Features
This section describes the specific features of each payment terminal and lists the accompanying accessories.
For all the terminals, popular additional services include tip functionality for restaurants, multiple users on the
same terminal (for reporting sales per salesperson) and multiple companies set up on the same device, with
differing settlement accounts.
NB: For RS232 integration, a minimum baud rate of 57600 is required.
2.1 Desk/3500
Desk/3500 is the Nets premium countertop terminal and the successor to the iCT250E model. It offers ECR
integration via MagicBox, USB or RS232 cables.
MENU key
CLEAR (yellow) /
feed paper
(long press)
Accessories include:
› Integration cable
› Power cable (if integrated
via an RS232 cable)
› Nets Merchant Card
Dot key (press Dot key plus
F3 or F2 to increase/decrease
screen contrast)
CANCEL (red)
VALIDATION key (green)
Navigation keys (F1, F3, F2, F4)
Contactless reader
Magnetic strip reader
Chip reader
2.2 Move/3500
Move/3500 is the Nets premium mobile terminal and successor to both iWL250G/3G and iWL250B. It provides
all-in-one communication options, including Wi-Fi. It has been configured for popular tourist cards such as Discover,
Diners Club, JCB and Union Pay. It features a receipt printer (refer to Section 9 for information on receipt paper rolls).
For functionality, it will also be possible to control this terminal remotely using the Nets Paypoint application.
MENU key
Feed paper
Navigation keys
(F1, F3, F2, F4)
CLEAR (yellow)
CANCEL (red)
VALIDATION key (green)
Contactless reader
Magnetic strip
reader
Chip reader
Accessories include:
› Integration cable
› Power cable (if integrated
via an RS232 cable)
› Nets Merchant Card
NB: Move/3500 is not fitted with a PIN shield, therefore it must be handheld and used in a portable environment
only. Move/3500 must not be fixed or used as a countertop.
Payment Terminals | Page 7 of 54
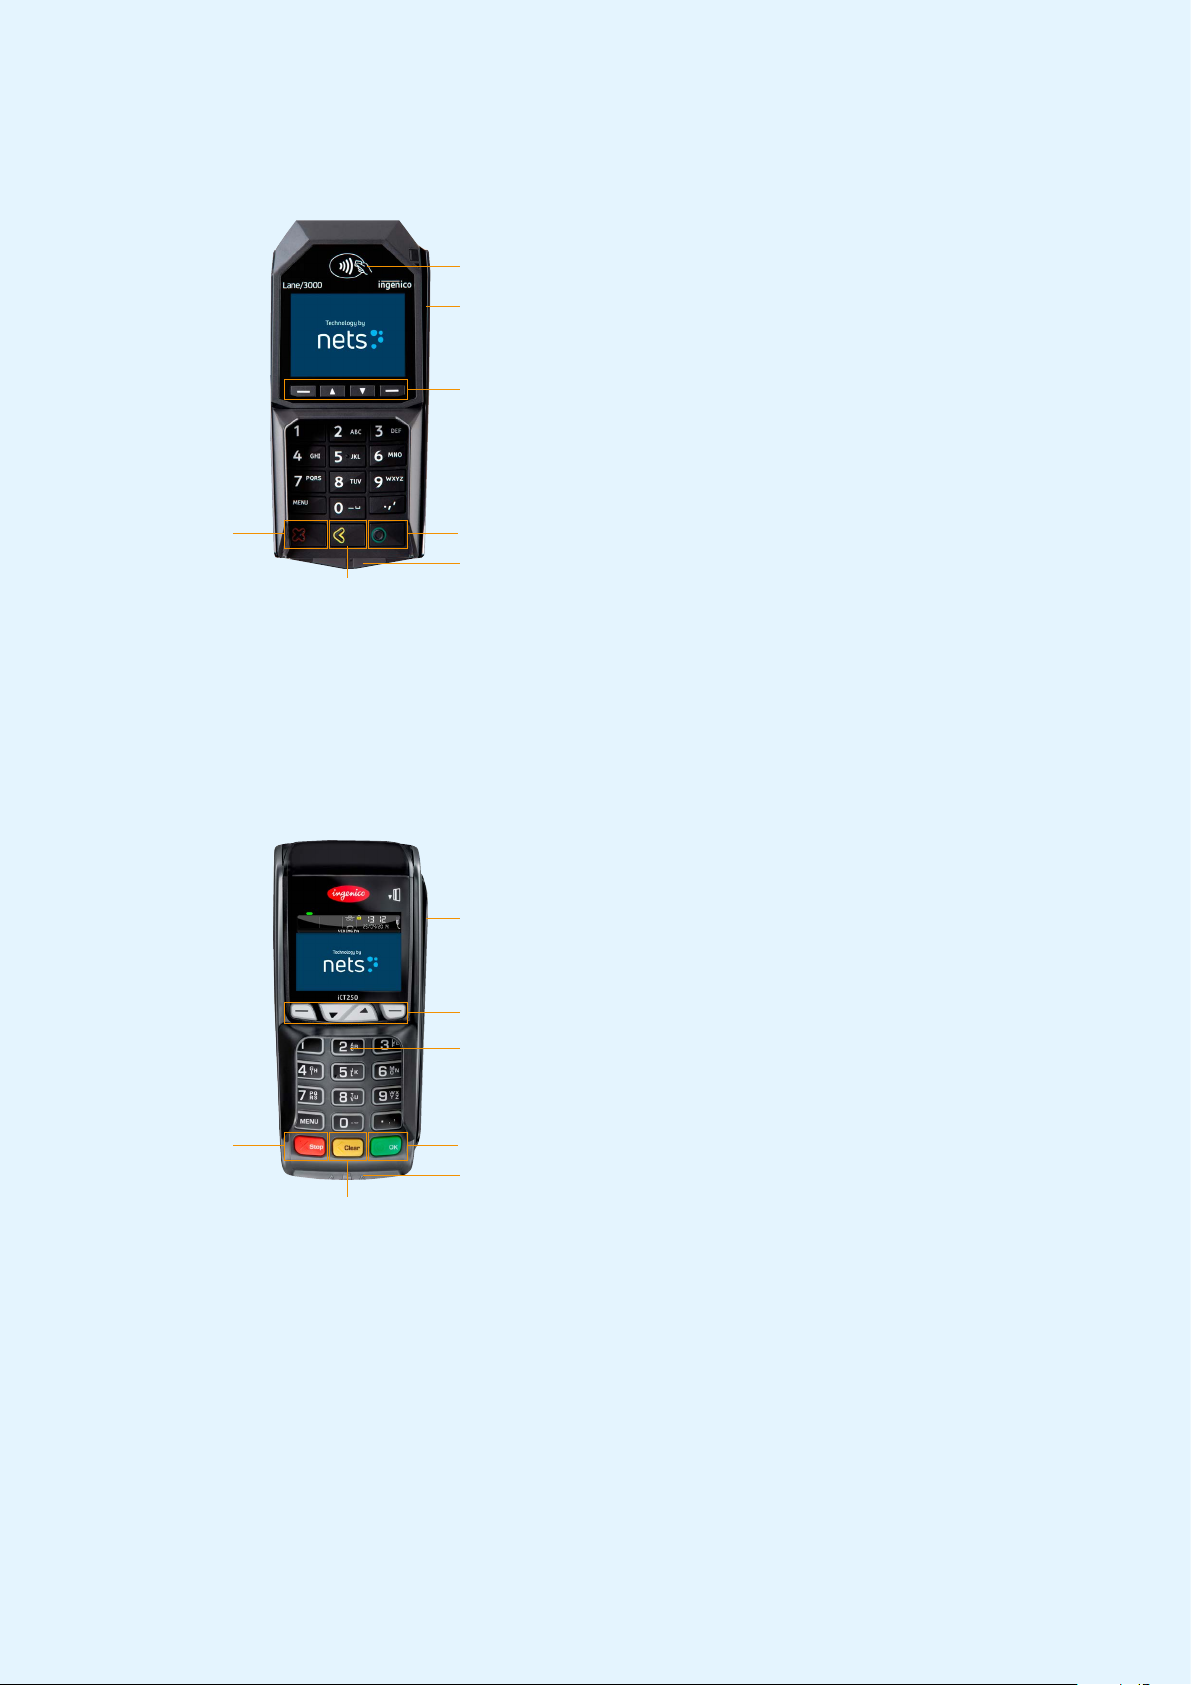
2.3 Lane/3000
Lane/3000 is a countertop terminal that is the direct successor to the iPP350 integrated terminal.
Accessories include:
› Power supply cable
(whether integrated via
vBox or RS232
› Nets Merchant Card
› Integration cable
2.4 iCT250E
iCT250E is, typically, a countertop terminal that is integrated with an ECR and communicates via internet. It has
also been offered as a GPRS variant (iCT2x0EG) where GPRS is used as the sole connection or is activated as a
backup in case internet communication fails. This model can also act as a standalone terminal, with no
integration to an ECR.
Accessories include:
› Power supply cable
› Network cable RJ9 to
RJ45
› Receipt roll
› Nets Merchant Card
Navigation keys (F1, F3, F2, F4)
CLEAR (yellow)
CANCEL (red) VALIDATION key (green)
Contactless reader
Magnetic strip reader
Chip reader
Navigation keys (F1, F3, F2, F4)
CLEAR (yellow) /
feed paper (long press)
CANCEL (red) VALIDATION key (green)
Contactless reader
Magnetic strip reader
Chip reader
Payment Terminals | Page 8 of 54
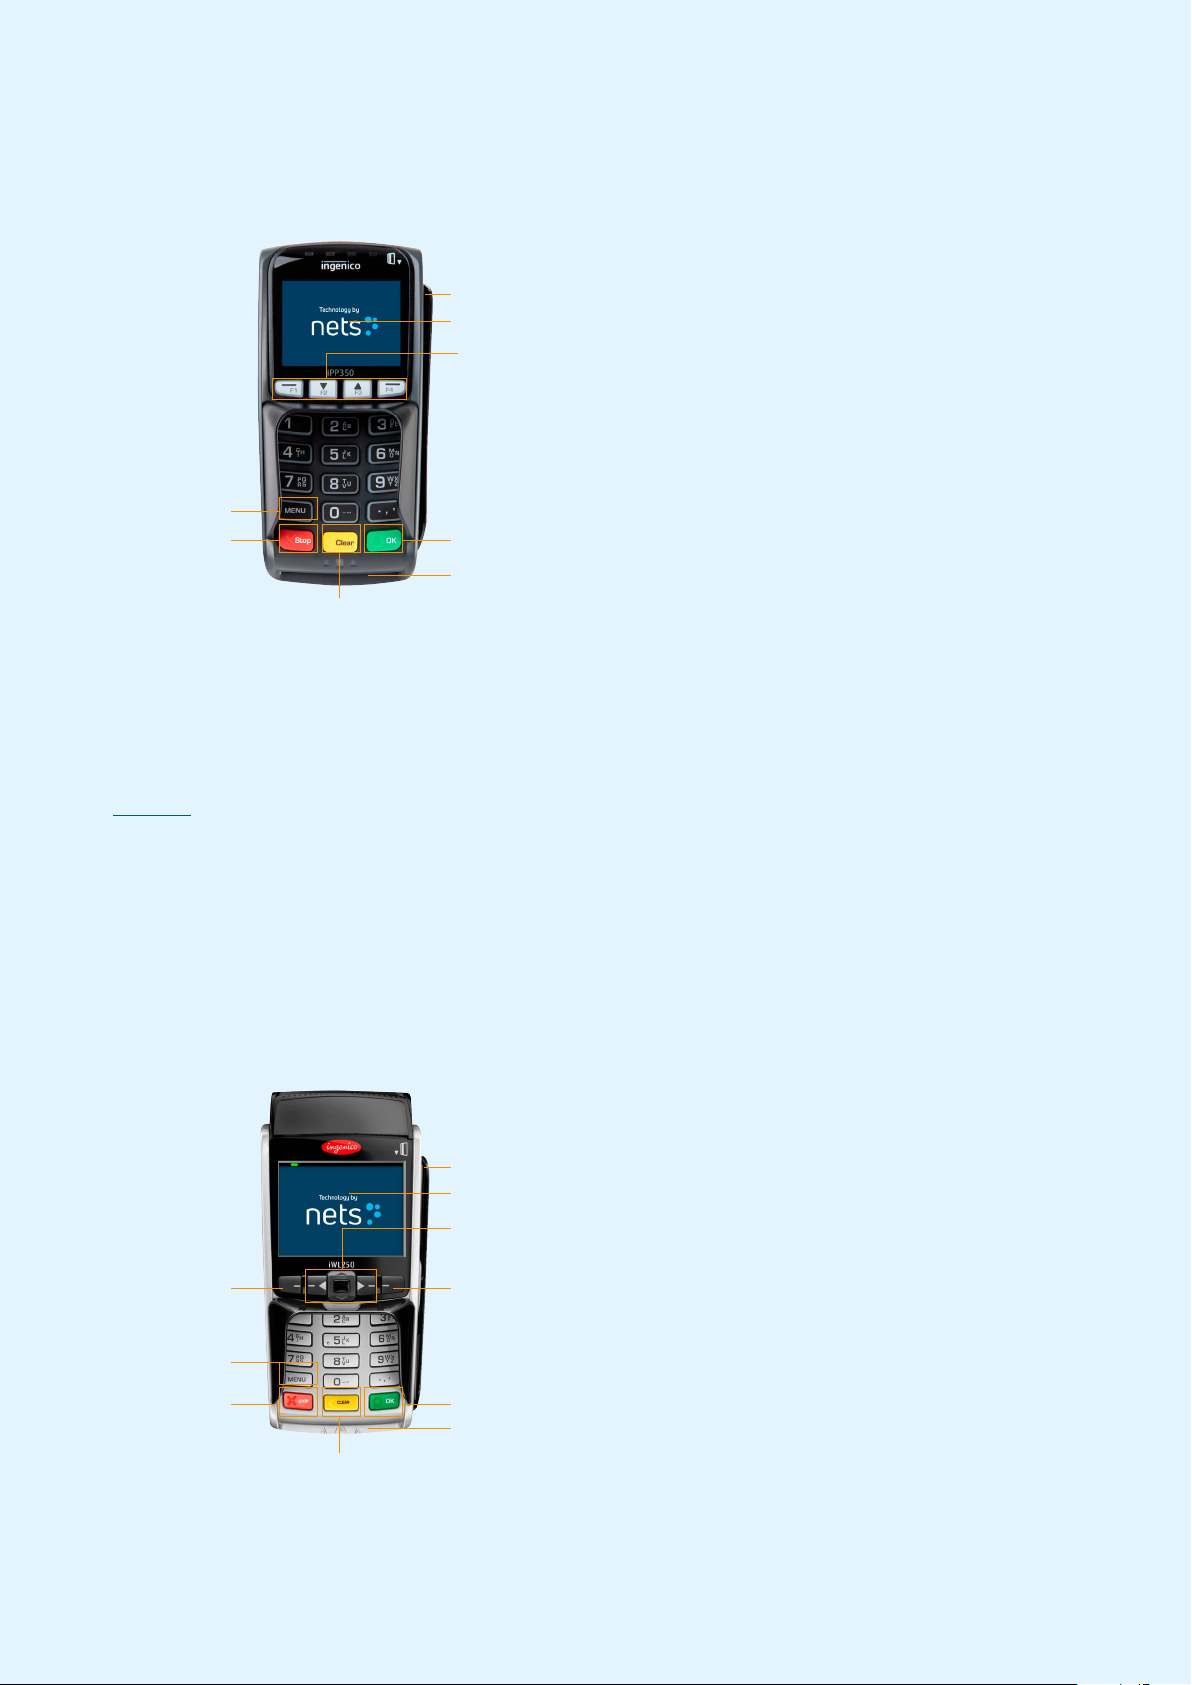
2.5 iPP350
iPP350 is a countertop terminal from the Telium 2 range which is integrated with an ECR.
Accessories include:
› Power supply cable
(whether integrated via
MagicBox, RS232 or
powered USB cables)*
› Integration cable
› Nets Merchant Card
* Accessories may vary from
country to country
2.6 iWL250B
iWL250B is a mobile terminal from the Telium 2 range that allows in-store mobility through a Base Station which
also serves as a charging station). The terminal communicates over Bluetooth with the Base Station, which is
connected via an Ethernet cable to the existing internet connection of the store. It features a receipt printer (refer to
Section 9 for information on receipt paper rolls). The communication distance – whilst dependent on the internal
configuration of the store – may be up to 100 meters.
Unlike iWL250G, the terminal offers ECR-integration capabilities through its communication via the Base
Station. A popular use case for this is Pay@Table and it is typically done via serial cable.
For special purposes, the terminal can also be paired over open Bluetooth with tablet ECRs that then offer
internet communication.
Accessories include:
› Power supply cable
› Base station
› Network cable
› Receipt roll
› Nets Merchant Card
MENU key
CLEAR (yellow)
CANCEL (red) VALIDATION key (green)
Navigation keys (F1, F2, F3, F4)
Contactless reader
Magnetic strip reader
Chip reader
MENU key
CLEAR (yellow)
CANCEL (red) VALIDATION key (green)
Contactless reader
Magnetic strip reader
Chip reader
Navigation keys to scroll up and
down in menus
Connecting to base
station (iWL250B)
Used to manually enter card data.
Used to toggle between upper and
lower case letters or from letters
to numbers, and to check balance
Connecting to base
station (iWL250B)

Payment Terminals | Page 9 of 54
2.7 iWL250G
iWL250G is a mobile, standalone terminal that uses GPRS or 3G for communication. It is not designed to be used
as an ECR-integrated terminal. Typically, Nets SIM cards are bundled with the delivery, but customers are also
free to use their own SIMs. Nets SIM cards enable roaming between national networks that are most prominent
at the merchant site – this is a clear advantage to any competition that offers local SIMs.
Accessories include:
› Power supply cable
› Base station
› SIM card
› Receipt roll
› Nets Merchant Card
2.8 iSMP4
iSMP4 is is a mobile terminal that is integrated with an ECR. It allows a cashier to roam freely within a store
environment and close sales on-the-spot without the need to escort their customers to a checkout counter. ECR
partners may also add payment functionalities to their tablet or smartphone-based system. It uses open Bluetooth
or Wi-Fi integration to a host system that can either be a generic mobile ECR app or a customer-specific set-up.
Both Android and iOS are supported. An optional laser barcode reader enables scanning of items/QR codes to the
ECR app.
Accessories include:
› USB-C cable
› Nets Merchant Card
MENU key
CLEAR (yellow)
CANCEL (red)
VALIDATION key (green)
Contactless reader
Magnetic strip reader
Chip reader
MENU key
CLEAR (yellow)
CANCEL (red) VALIDATION key (green)
Contactless reader
Magnetic strip reader
Chip reader
Navigation keys to scroll up and
down in menus
Connecting to base
station (iWL250B)
Used to manually enter card data.
Used to toggle between upper and
lower case letters or from letters
to numbers, and to check balance
F1: Technical main meny (Functions)
F2: Scroll down
F3: Scroll up
F4: Bar code reader activation button

Payment Terminals | Page 10 of 54
2.8.1 Bluetooth Pairing
For the mobile device + ECR solution to be used with iSMP4, the devices must be connected via Bluetooth. To
connect the payment terminal to a mobile device, activate Bluetooth on the mobile device. Then perform the
following on the iSMP4 payment terminal:
› Press F2.
› Press 2 - Bluetooth or scroll down to 2 Bluetooth, then press OK (green button at the bottom-right of the terminal).
› Press 2 - Pair with phone.
› The terminal will display a code, and start pairing for a mobile device. Compare the code and press OK to
confirm code.
› With iSMP4 and the mobile device (the box solution) connected via Bluetooth, the Bluetooth icon appears in the
iSMP4 screen. If something goes wrong with the pairing, an error will appear.
2.8.2 Barcode Reader
iSMP4 is equipped with a 1D and 2D barcode reader that can read several barcode formats. To configure the
reader for a specific use, consult a POS partner for assistance.
NB: The barcode reader will not work when iSMP4 is charging.
To use the barcode reader, follow the below steps:
› Press F4.
› When the side buttons are activated for 20 seconds, the timer is reset after each read.
› When the reader is active, “Barcode reader active” is displayed.
› To turn on the barcode reader, press one of the side buttons on the terminal.
› A beeping sound will verify that the barcode has been read and is sent to the ECR. The laser then turns off.
› To read the next barcode, press one of the side buttons again.
› To abort a barcode reading session, press the red STOP button or MENU. The barcode reading will also be
aborted if a request from the ECR is sent or a payment card is swiped or inserted.
› Barcode data is sent to the ECR/POS system directly when read. If an error occurs, the barcode must be read again.
By using an API in the terminal, terminal functions can be activated through the ECR-integrated device, whether
tablet or cash-register. This can be, for example, to activate, block or accept barcode scans.
2.8.2.1 Supported Barcode Symbologies
All of these are enabled by default. To learn how they are configured from your POS, please consult your
POS partner.
2.8.2.2 Resetting the Barcode Reader
If the barcode reader is not working properly, attempt a reset by following this procedure:
› Press F to enter the Main Menu.
› Press 7 for Operator Menu.
› Press 6 for Barcode Reset and the barcode reader will return to default settings.
› Press OK to leave the menu or alternatively try again.

Payment Terminals | Page 11 of 54
3. Display
This section describes the information that is presented on the display screens of payment terminals.
NB: The terminal menus shown are not available for all terminal types.
3.1 Menu Structure
1 Purchase 2 Purchase + Cash
(C/B)
3 Card Services 5 Copy Menu
3 Balance
4 Deposit
5 Withdrawal
6 Reversal
7 Rtn of Goods
1 Last Receipt
2 Last Reconc.
3 Last Z-Total
6 Reconciliation
7 Operator Menu 8 Merchant Menu
1 Issuers
1 Get Issuers
2 Print
2 EOT
1 Print
2 Send to Host
3 Delete
3 Operator Admin.
1 Add Op.
2 Delete Op.
3 Print Ops.
6 Parameters
1 Change
2 Print
7 Comms
1 Remove Obstruc
2 Ping Host
8 Software
1 Get Software
9 Battery+Signal
Battery: 100%
Signal: 5
1 Reports
1 Trans. List
2 X-Total
3 Z-Total
4 Op X-Total
5 Op Z-Total
7 Reconciliation
2 Issuers
1 Print
3 Term Status
1 Print
2 Send to Host
4 Send Error Logs
5 Send Trace Logs
9 Switch Off
MAIN MENU
Menu Function Terminal Type
Main Menu > Switch Off This function is only present in iWL and iSMP
Operator Menu > Battery + Signal For all battery-operated GPRS terminals
Operator Menu > Battery For all battery-operated terminals except GPRS
Menu 7-6 “Reset Barcode” This is only available on iSMP terminals
Table 1: Additional Information on Menu Items

Payment Terminals | Page 12 of 54
3.2 Quick Menu
By using Quick Menu, merchants can avoid scrolling through menus or giving validations (using the OK button)
each time they want to e.g. perform a transaction. Quick Menu allows merchants to perform functions on the
terminal more swiftly.
When the terminal display requests ‘Swipe the Merchant Card’, the Merchant Card should be swiped with the
strip facing left. Once the MENU appears, press on the digits in Table 2 to go directly to your selection.
Alternatively, the arrow keys may be used to arrive at selections.
NB: For integrated terminals, all commands must be started with MENU or by swiping the Merchant Card.
Function Keys (does not include Lane/3000 or iPP350)
Purchase Enter the amount
Purchase + cash (C/B) Press MENU and 2
Reconciliation Press MENU and 6
Balance Press MENU and 3+3
Deposit Press MENU and 3+4
Cancel the last transaction Press MENU and 3+6
Return of goods Press MENU and 3+7
Copy of the last receipt Press MENU and 5+1
Transaction list Press MENU and 7+1+1
X-Total Press MENU and 7+1+2
Z-Total Press MENU and 7+1+3
Operator X-Total Press MENU and 7+1+4
Operator Z-Total Press MENU and 7+1+5
Printing out backup solution (EOT) Swipe the Merchant Card, then press 2+1
Table 2: Quick Menu

Payment Terminals | Page 13 of 54
3.3 Parameter Menu
The Parameter Menu options are explained in Table 3.
Level 1 Level 2 Level 3 Explanation
1 Function
Terminal ID Enter Unique ID
Amount Mode Øre/Kroner or Cent/Euro
Backup Solution
(EOT) Yes/No
It is used to enable/disable
BankAxept offline. Applicable in
Norway.
Service First Yes/No To enable/disable card-initiated
transactions.
Information Field No Information/CID/
Information Text/OperID
Additional information is required
to be sent to the PSP.
Sound None/On Error/Always
Always Copy No/Yes
Yes: Always 2 copies of receipt
will be printed
No: Only one copy of receipt will
be printed.
Duplicate Check No/Yes
Yes: Customer will not be able to
make 2 transactions with the
same amount.
No: Customer can make a number
of transactions with the same
amount.
Language NO, SE, DK, EN, FI, DE, HU, ET,
PL, NL, FR, ES
All these languages are supported
by the terminal.
Tips Total amount > Yes/No
Change Operator
Disable/After Reconc/After
Z-Total/Always/After
0-Report
This option comes into use when
there is more than one operator
using that terminal.
VAT Fixed Rate/Change Rate/No
VAT
VAT Rate
Sleep Mode Auto/Always (not visible if
ECR switched on)
Only applicable for battery-
operated terminals.
Power-Off Modes Never/After 1 hour/After 2
hours
Power-Off Menu will not work if
power-charging is ongoing.
Fallback Language NO, SE, DK, EN, FI, DE, HU, ET,
PL, NL, ES, FR
Languages will be downloaded
from the host environment.
Backlight Auto/Always
Chip Direction Chip up/Chip towards you/
Chip down
The direction in which the chip is
to be inserted into the terminal.
Customer Receipt Always/On demand
IFR Priority Domestic/None/International
Visibility: Only shown when
merchant has an agreement with
a national scheme.
Comment: The latest setting
value can be downloaded from
MS-TMS or update to MS-TMS.
Table 3: Parameter Menu Options

Payment Terminals | Page 14 of 54
Level 1 Level 2 Level 3 Explanation
2 Communication
Comm. Type = Wi-Fi/Ethernet/BT Android/via
ECR/GPRS
Host IP Address 91.102.24.142 / 193.214.20.211 *
Host IP Port 9670
GPRS APN Nets
GSM PIN ****
DHCP Use DHCP/Static
3 ECR
ECR Yes/No
Comm. Type IP Wi-Fi/BT Android/IP
Ethernet/USB Slave
Card Info Never/After amount/Always It allows you to send card
information to the ECR.
Header/Footer Yes/No
It allows you to enable/disable
the header and footer on the
terminal display.
4 Security
Protect Menu Yes/No
To set whether access can be
controlled by pressing the Menu
button. Access control is default
OFF for standalone terminals
and default ON for integrated
terminals.
Protect
Reconciliation Yes/No
To set whether you need access
control on performing
Reconciliation. Default: No
Protect Reversal Yes/No
To set whether you need access
control when performing
reversal. Default: Off
6 Change profile NO, FR, SE, DK, FI, DE,
HU, ET, PL, NL
* 91.102.24.142 Internet address.
193.214.20.211 (VPN) Requires service through ISP.

Payment Terminals | Page 15 of 54
3.4 Ethernet
This 3-block symbol indicates whether the terminal has access to Ethernet.
› White symbol = the terminal has an Ethernet port.
› Green symbol = the terminal has an Ethernet port and is connected to a network.
› Red symbol = the terminal has an Ethernet port but has not been assigned an IP over DHCP.
3.5 Bluetooth
This field shows the serial number of the Base Station to which the terminal is
connected. The signal strength is indicated over 5 levels; red is the weakest signal, green
is the strongest.
This indicates whether the terminal has Bluetooth support. If the symbol is not visible,
Bluetooth is not supported. If the Bluetooth symbol is grey or red, the terminal is outside
the Base Station’s coverage range.
3.6 GPRS
This field shows the name of the telecom company that supplies the terminal. The signal
strength is indicated over 5 levels; red is the weakest signal, green is the strongest.
This indicates whether the terminal has GPRS support. If the symbol is not visible, GPRS
is not supported. If the GPRS symbol is white, the terminal is not connected to the
network. If the GPRS symbol is green, the terminal is network connected.
3.7 Battery & Clock
This field shows the battery level and the date/time. The battery
symbol indicates the remaining battery charge and confirms that the
battery is installed. The plug symbol shows that the terminal or the
terminal’s Base Station is connected to power.
13
5.2 Bluetooth
indicates whether the terminal has Bluetooth support. If the symbol is not visible, Bluetooth is not
supported. If the Bluetooth symbol is grey or red, the terminal is outside the base station’s coverage
range.
is the serial number of the base station to which the terminal is connected. The signal
strength is indi cated with 5 levels where red is the weakest and green is the strongest
signal.
5.3 GPRS
indicates whether the terminal has GPRS support. If the symbol is not visible, GPRS is not suppor-
ted. If the GPRS symbol is white, the terminal is not connected to the network. If the GPRS
symbol is green, the terminal is network connected.
shows the name of the telecom provider to which the terminal is connected.
The signal strength is indicated with 5 levels where red is the weakest and green is
the strongest signal.
5 STATUS LINE – DESCRIPTIONS
The status line in the upper part of the terminal’s display provides information on the status of communica-
tion and available hardware.
5.1 Ethernet
This symbol indicates whether the terminal has access to Ethernet:
White symbol: The terminal has an Ethernet port
Green symbol: The terminal has an Ethernet port and is connected to a network
Red symbol: The terminal has an Ethernet port but has not been assigned IP over DHCP
14
Function Keys (does not apply to iPP350)
Purchase Enter the amount
Purchase + cash (C/B) Press MENU and 2
Reconciliation Press MENU and 6
Balance Press MENU and 3+3
Deposit Press MENU and 3+4
Cancel the last transaction Press MENU and 3+6
Return of goods Press MENU and 3+7
Copy of the last receipt Press MENU and 5+1
Transaction list Press MENU and 7+1+1
X-Total Press MENU and 7+1+2
Z-Total Press MENU and 7+1+3
Operator X-Total Press MENU and 7+1+4
Operator Z-Total Press MENU and 7+1+5
Printing out backup solution (EOT) Swipe the Merchant Card and press 2+1
This chapter explains the most common terminal functions. By using this guide, you will not have to scroll
through menus and confirm using OK, but can go directly to your selection. When the terminal display says
‘Swipe the Merchant Card’, swipe the Merchant Card with the strip facing left. A detailed description of each
feature is contained in separate chapters.
On integrated terminals: Start all commands with MENU or swipe the Merchant Card. When you are in the
menu, press numbers to go directly to your selection or use the arrow keys.
6 QUICK MENU
5.4 Battery and clock
This field shows the date and time. The clock is updated every time the terminal connects to Nets to submit
transactions. The battery symbol indicates that the battery is installed and how much charge the battery
has. The socket symbol shows that the terminal or the terminal’s charging base is connected to power.

Payment Terminals | Page 16 of 54
4. Card Reading
This section describes the various methods that may be used to read information on a customer’s bank card.
4.1 Chip
To read the card using the chip, the chip must be facing upwards when inserting the card into the front of the
terminal.
4.2 Magnetic Strip
To read the card using the magnetic strip, the strip must by facing left. Swipe the card as shown.
NB: If the contactless option is activated, press F2 (down arrow) to activate the magnetic strip reader.
4.3 Manual Key
This function can be used to purchase and return goods. Instead of the customer using their card, his/her card
data can be entered on the terminal.
1. Press MENU.
2. Press OK for purchase.
3. Enter the purchase amount, then press OK.
4. Press the F4 key (top-right of the terminal).
5. Enter customer’s card number (shown on card), then press OK.
6. Enter the card expiry date (mm/yy), then press OK.
7. Enter the card’s CVC number, then press OK. CVC is the three digits shown on the back of the card, next to
the customer’s signature.
8. The amount is verified by pressing OK.
9. If the amount is authorised, the terminal display will show APPROVED and a receipt is printed.
NB: This feature is only available for credit cards with signature check. Transactions that are not supported will
be rejected at the PSP side.
Chip Magnetic Strip Contactless (NFC) Payments

Payment Terminals | Page 17 of 54
4.4 Contactless (NFC) Payment
Reading the card (or mobile phone) using contactless depends on what type of payment terminal is used. For
terminals from the Telium 2 range (iCT250E, iPP350, iSMP4 and iWL250B/G), the card/phone must be held
above the display screen of the terminal. For terminals from the TETRA range (Desk/3500, Move/3500 and
Lane/3000), the card/phone must be held above the contactless symbol found at the top of the terminal casing.
Contactless payment is a common term for all payments using NFC technology (Near Field Communication).
NFC can be implemented in a range of payment methods such as chip cards and Micro SD cards connected to
mobile phones, clocks, bracelets etc. or via mobile phone (through a wallet application).
Contactless payments without verification can only be used for purchases under a certain amount; all
purchases above this amount will require verification – either with a PIN code or password. The details of the
verification will depend on the payment card provider. However, the instructions to enter the verification code
will be shown on the terminal and/or on the mobile phone.
NB: The first time a contactless card is used, the card must be opened for NFC transactions. This is done by
inserting the chip into the terminal while performing the transaction.
For security reasons, the terminal will, in some cases, ask for a PIN - even if the amount the amount is under the
contactless limit.
4.4.1 Wallet Solution
“Wallet” is a solution for confirming a contactless payment using the customer’s mobile phone. Viking terminals
also support Mobile Dankort both via BLE (MAB Box) and QR.
4.4.2 QR Codes
When initiating a transaction using a QR code:
1. The QR text will be shown in the lower right-hand corner of terminal screen. Press F1 to activate it.
2. Once the terminal shows the QR code, scan it using the wallet installed on the phone.
3. The transaction will proceed by asking (on the wallet screen) for confirmation of the amount.
4. Enter the passcode to complete the transaction.
4.4.3 Contactless Payment with Wallet Solution
To use the wallet function, customers must install a phone app supplied by their card issuer. They can then confirm
contactless payments by holding their phone over the top of the terminal (where the contactless symbol is shown
on the terminal casing). As with card-based contactless payments, purchases above a certain amount will require
verification.
Contactless payment via wallet can be performed even if the mobile phone is switched off. However, the cus-
tomer will be unable to confirm payments in such instances. If the customer has registered several payment
cards via a wallet solution, the correct payment card must be selected in the application/program before the
phone is switched off.
4.4.4 IFR Selection
The Merchant can choose which card scheme is the default choice on the terminal:
› Swipe the Merchant card
› 6 (parameters)
› 1 (change)
› 1 (Function)
› IFR Priority
NB: You may also choose between “domestic”, “international” and “none”
The customer can override the terminal settings by pressing the yellow button before swiping/tapping the card.
Payment Terminals | Page 18 of 54
5. Transactions
This section describes the transaction methods that may be performed on the payment terminals.
› You must perform manual reconciliation before the terminal is used for the first time.
› Reconciliation of one terminal reconciles all the terminals under the same merchant number. Read more about
reconciliation in Section 10.
NB: If your payment terminal is integrated with an ECR, these functions must be called from the ECR and not
directly from the payment terminal.
Manual reconciliation:
Press MENU.
Main menu
4 Optional Func
5 Copy menu
6 Reconciliation
Press 6
or scroll down using the arrow key to Reconciliation and press OK.
Print Pending
If the reconciliation is initiated from the terminal, the terminal will print/
store the receipt even if integrated.
If the ECR sends the reconciliation command (i.e. the ECR initates the
action), the terminal will send the receipt to the ECR.
The terminal behaves according to where the action was initiated.
5.1 Perform a Purchase
5.1.1 Purchase (Standard)
This function is used to complete standard purchases.
Enter amount.
Amount + OK
100.00 Press OK.
NOK = 100.00
Awaiting card Ask the customer to insert the card.
NOK = 100.00
Code + OK
Hide PIN entry
Ask the customer to enter their PIN code and press OK (for credit card
with signature, press only OK to confirm amount).
APPROVED If authorised, the terminal display will show APPROVED and print a
receipt.

Payment Terminals | Page 19 of 54
5.1.2 Purchase with Cash Withdrawal (Cashback)
This function is used to complete purchases that include cash withdrawals. Purchases + cash are shown as
Option 2 under Card services.
Press MENU.
Main menu
1 Purchase
2 Purchase + C/B
3 Card services
Press 2 - Purchase with C/B.
Amount + OK
100.00 Enter the purchase amount and press OK.
Amount + OK
20.00 Enter the cash amount and press OK.
NOK = 100.00
Awaiting card Ask the customer to present their card.
APPROVED If authorised, the terminal display will show APPROVED and print a
receipt.
5.1.3 Purchase with Manual Entry of Card Data
This function can be used to purchase and return goods. Enter card data on the terminal instead of the customer
using his/her card. This feature is only available for credit cards with signature check.
Press MENU.
Main menu
1 Purchase Press OK for Purchase.
Amount + OK
100.00 Enter amount of purchase and press OK.
NOK = 100.00
Awaiting card
Press the F4 key (the key at the top right of the terminal).
Enter card no.: Enter the customer’s card number (from the front of the customer’s
card) and press OK.
Expiry date:
/
Enter card expiry date mm/yy and press OK.
Enter CVC:
Enter the card’s CVC number and press OK. CVC is the last three digits
of the number that can be found on the back of the card next to the
customer’s signature.
Amount = 100.00
OK or STOP
The amount is verified by pressing OK.
Cancel the transaction by pressing STOP.
APPROVED
If the amount is authorised, the terminal display will show APPROVED
and print a receipt.
NB: The user can skip the entry of CVC by pressing OK.

Payment Terminals | Page 20 of 54
5.1.4 Cancellation (Reversal) of Last Transaction
Cancellation can only be carried out for the most recently authorised purchase transaction.
Press MENU.
Main menu
1 Purchase
2 Purchase + cash
3 Card services
Press 3
or scroll down to Card services and press OK.
Card services
4 Deposit
5 Withdrawal
6 Reversal
Press 6
or scroll down to Reversal and press OK.
Swipe
Merchant card Swipe the Merchant Card, magnetic strip facing left.
NOK 100.00
OK or Cancel
Press OK to confirm cancellation, or press STOP to abort.
REVERSED Wait for receipt.
5.1.5 Return of Goods
Used when goods that have been paid for with a card are returned. Make sure you have an agreement with your
acquirer to process refunds.
Press MENU.
Main menu
1 Purchase
2 Purchase + C/B
3 Card services
Press 3
or scroll down to Card Services and press OK.
Card services
5 Withdrawal
6 Reversal
7 Rtn of goods
Press 7
or scroll down to Return of Goods and press OK.
Swipe
Merchant card Swipe the Merchant Card, with the magnetic strip facing left.
Return amount:
100.00 Enter the amount on the customer’s receipt and press OK.
NOK = 100.00
Awaiting card
Ask the customer to insert/swipe the card or press the F4 key to enter
the card number manually.
APPROVED
If the product refund is authorised, the terminal display will show
APPROVED and print a receipt. Approved receipt corresponds to
purchase receipt.
Other manuals for Desk/3500
1
This manual suits for next models
7
Table of contents
Other Nets Payment Terminal manuals


Popular Payment Terminal manuals by other brands


VeriFone
VeriFone evolution series Quick reference manual

Desjardins
Desjardins globalpayments Desk/5000 quick start guide

PAX
PAX A920 Installation and user guide

VeriFone
VeriFone VX805 CTLS Integration guide

Ingenico
Ingenico iCT220, iCT250 quick start guide

Sharp
Sharp RZ-X700F Series Hardware operation manual