6 7
Dynamic Broadcast Microphone BCM 705
4. Einige Hinweise zur Pflege von
Mikrophon, Schutzkorb und Popschutz
Das Mikrophon nicht ohne Schutzkorb und ohne
Popschutz betreiben! Die empfind iche Kapse
kann beim Betrieb ohne Schutzkorb oder ohne
Popschutz beschädigt werden. Außerdem sind die
akustischen Eigenschaften auf das Zusammenwir-
ken von Kapse , Popschutz und Schutzkorb abge-
stimmt.
Der Mikrophon-Schutzkorb
Zum Reinigen kann der Schutzkorb ohne Werk-
zeug vom Mikrophongehäuse abgeschraubt wer-
den (siehe Abb. 2).
Für die Reinigung am besten auwarmes Wasser
mit etwas Spü mitte verwenden, bei hartnäckiger
Verschmutzung den Korb evt .
vorsichtig mit einer Bürste be-
hande n. Nach dem Waschen mit
k arem Wasser gründ ich spü en
und an der Luft bzw. mit einem
Tuch trocknen. Auf keinen Fa
einen Fön oder Hitze verwen-
den. Nach dem Reinigen den
trockenen Schutzkorb wieder
aufschrauben, bis er am An-
sch ag deut ich hörbar einras-
tet.
Der Schutzkorb ist auch a s Zu-
behör einze n ieferbar, siehe
Kapite Zubehör. Dadurch kann
jeder Mikrophon-Benutzer sei-
nen individue en Schutzkorb
am Mikrophon verwenden.
Der integrierte Popschutz
Der Popschutz hat nicht nur die Aufgabe, bei
Sprachaufnahmen die Entstehung von Pop auten
zu verhindern. Er vermeidet auch effizient, dass
sich von der Feuchtigkeit des Atems, Nikotin- und
Essensreste auf der Membran ab agern.
Auch der Popschutz kann zur Reinigung werkzeug-
os abgenommen werden. Zuvor muss das Mikro-Zuvor muss das Mikro-
Zuvor muss das Mikro-Zuvor muss das Mikro-
Zuvor muss das Mikro-
phon geschwenkt werden, so dass der Korb an-phon geschwenkt werden, so dass der Korb an-
phon geschwenkt werden, so dass der Korb an-phon geschwenkt werden, so dass der Korb an-
phon geschwenkt werden, so dass der Korb an-
4. Hints on Maintenance of the
Microphone, Headgrille and Pop Screen
Do not operate the microphone without the head-
gri e and pop screen! Operation without the
headgri e or without the pop screen cou d dam-
age the sensitive capsu e. Moreover, the acoustic
properties of the microphone are attuned to the
combined effects of the capsu e, pop screen and
headgri e.
The Microphone Headgrille
For c eaning, the headgri e can be unscrewed from
the microphone housing without the use of too s
(see Fig. 2).
C eaning is best done using ukewarm water with
a itt e detergent. In the case of soi ing which is
difficu t to remove, the head-
gri e may be scrubbed gent y
with a brush. After washing,
rinse the headgri e thorough y
with c ean water and a ow to
air dry, or dry with a c oth. Un-
der no circumstances shou d a
b ow drier or heat be used. Af-
ter c eaning, screw the dry
headgri e back onto the micro-
phone housing, unti it can be
c ear y heard meeting the stop.
Headgri es are avai ab e sepa-
rate y as accessories; p ease
see the Accessory section. Each
user can thus operate the micro-
phone using his or her own in-
dividua headgri e.
The Integrated Pop Screen
A pop screen not on y prevents the occurrence of
p osive pop noises in voca recordings, but a so
efficient y prevents unwanted partic es, from res-
piratory moisture, nicotine, to food remnants, from
sett ing on the diaphragm.
The pop screen can a so be removed for c eaning
without the use of too s. First the microphone First the microphone
First the microphone First the microphone
First the microphone
must be rotated so that the headgri e is upper-must be rotated so that the headgri e is upper-
must be rotated so that the headgri e is upper-must be rotated so that the headgri e is upper-
must be rotated so that the headgri e is upper-
nähernd senkrecht nach obennähernd senkrecht nach oben
nähernd senkrecht nach obennähernd senkrecht nach oben
nähernd senkrecht nach oben
gerichtet ist (siehe Abb. 3).gerichtet ist (siehe Abb. 3).
gerichtet ist (siehe Abb. 3).gerichtet ist (siehe Abb. 3).
gerichtet ist (siehe Abb. 3).
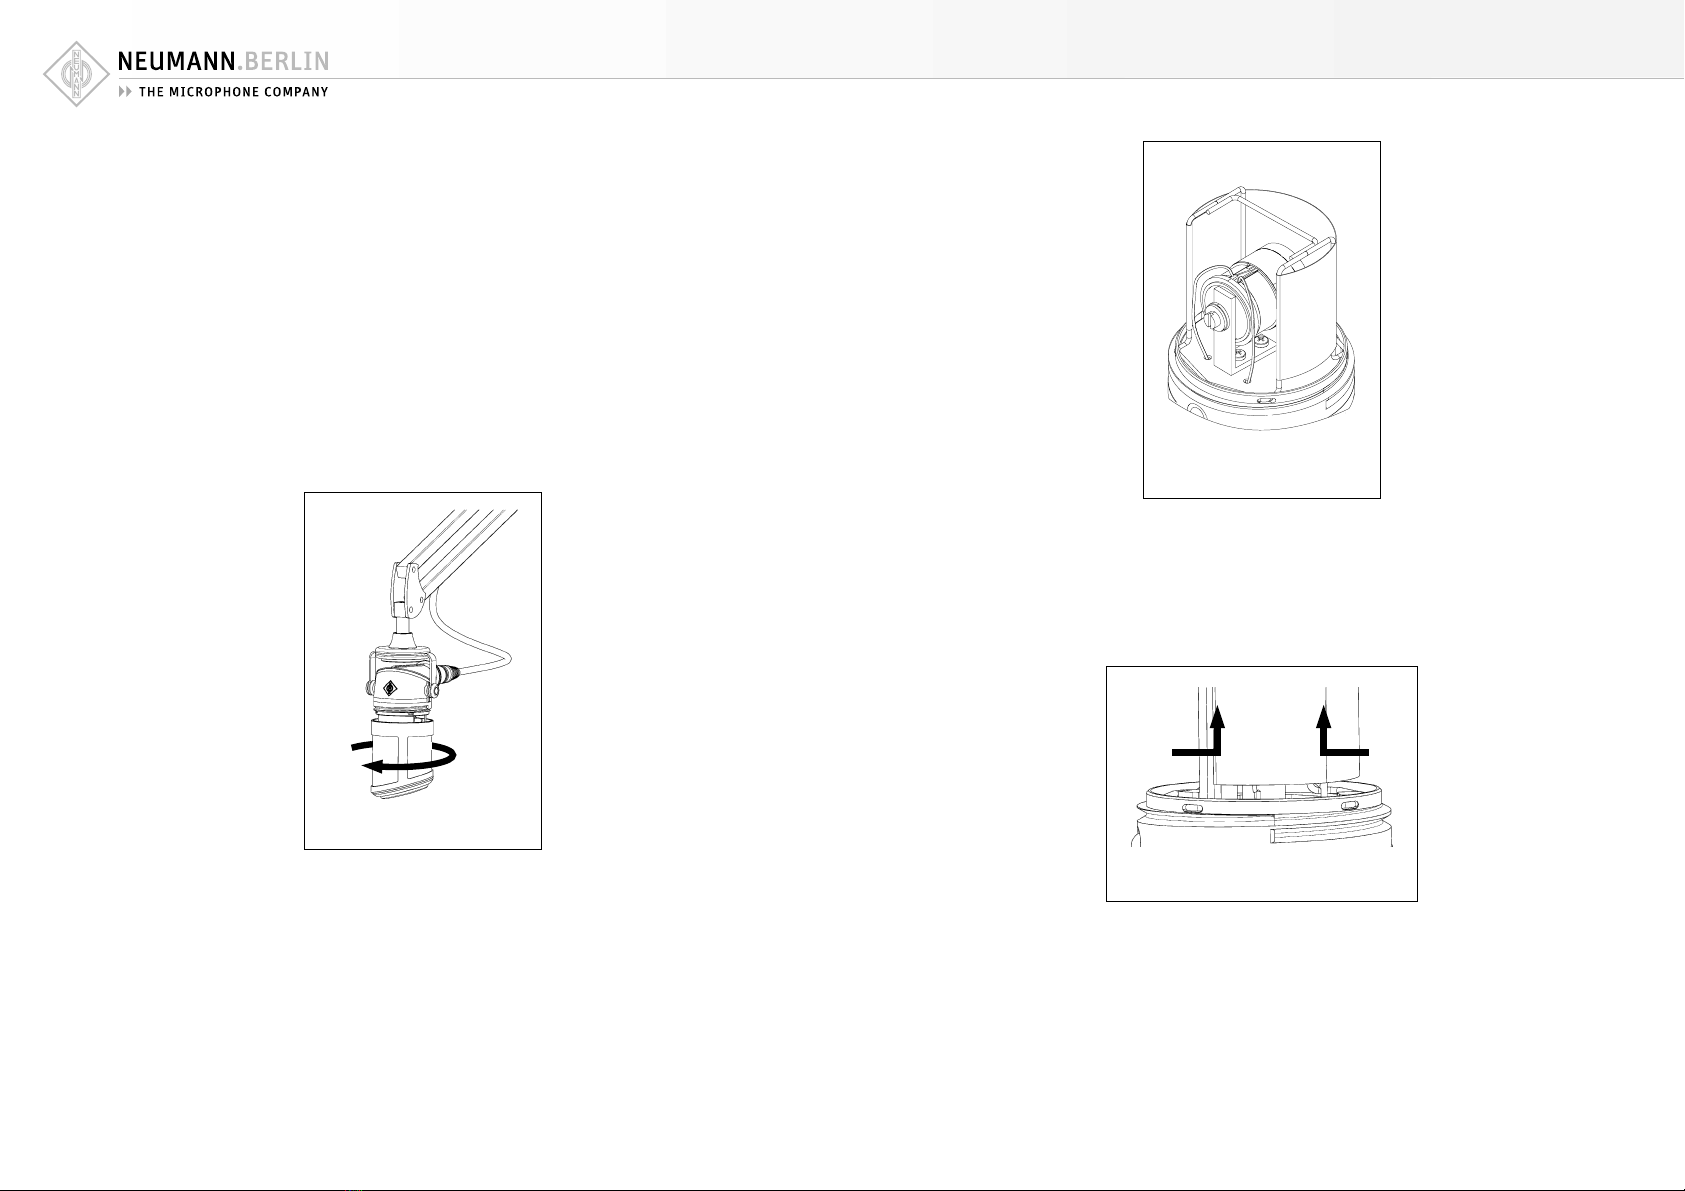
Ansch ießend den Korb ab-
schrauben, siehe oben. Nun
kann der Popschutz vorsichtig
an beiden Seiten g eichzeitig
zusammengedrückt und die
Ecken des Drahtbüge s aus den
Öffnungen im Gehäuse ausge-
rastet werden (siehe Abb. 4).
Dann den Popschutz bitte be-
hutsam, ohne die Kapse zu be-
rühren, entfernen. Zum Schutz
der Kapse so te der Korb vorü-
bergehend wieder aufge-
schraubt werden. Das Mikro-Das Mikro-
Das Mikro-Das Mikro-
Das Mikro-
phon muss aber unbedingt inphon muss aber unbedingt in
phon muss aber unbedingt inphon muss aber unbedingt in
phon muss aber unbedingt in
der hochgeschwenkten Positi-der hochgeschwenkten Positi-
der hochgeschwenkten Positi-der hochgeschwenkten Positi-
der hochgeschwenkten Positi-
on verb eiben, wei der Pop-on verb eiben, wei der Pop-
on verb eiben, wei der Pop-on verb eiben, wei der Pop-
on verb eiben, wei der Pop-
schutz den Innenaufbau me-schutz den Innenaufbau me-
schutz den Innenaufbau me-schutz den Innenaufbau me-
schutz den Innenaufbau me-
chanisch mit dem Gehäusechanisch mit dem Gehäuse
chanisch mit dem Gehäusechanisch mit dem Gehäuse
chanisch mit dem Gehäuse
verbindet. Beim Herumdrehen des Gehäusesverbindet. Beim Herumdrehen des Gehäuses
verbindet. Beim Herumdrehen des Gehäusesverbindet. Beim Herumdrehen des Gehäuses
verbindet. Beim Herumdrehen des Gehäuses
würde beides herausfa en und beschädigt wer-würde beides herausfa en und beschädigt wer-
würde beides herausfa en und beschädigt wer-würde beides herausfa en und beschädigt wer-
würde beides herausfa en und beschädigt wer-
den!den!
den!den!
den!
Der Popschutz kann mit warmem Wasser und etwas
Spü mitte gewaschen werden. Bei hartnäckiger
Verschmutzung den Pop-
schutz einige Zeit einwei-
chen assen. Nötigenfa s
die Verunreinigungen mit
Spiritus an ösen.
Ansch ießend in k arem
Wasser spü en und gut
trocknen assen. Zum Be-
sch eunigen des Trock-
nens kann der Popschutz
mit einem weichen Tuch
vorsichtig abgetupft wer-
den. Auf keinen Fa ei-
nen Fön oder Hitze ver-
wenden.
Achtung:Achtung:
Achtung:Achtung:
Achtung: Nur einen vo ständig trockenen Pop-
schutz und Schutzkorb am Mikrophon montieren.
Feuchtigkeit kann zu Störungen oder Schäden in
der Kapse führen.
Beim erneuten Aufsetzen des Popschutzes darauf
achten, dass die Drahtgaze vor der Membranseite
most, in an approximate ymost, in an approximate y
most, in an approximate ymost, in an approximate y
most, in an approximate y
vertica position (see Fig.vertica position (see Fig.
vertica position (see Fig.vertica position (see Fig.
vertica position (see Fig. 3).3).
3).3).
3).
Then unscrew the headgri e, as
described above. Next carefu y
squeeze the frame of the pop
screen simu taneous y on both
sides, so as to disengage the
corners of the wire frame from
the openings in the microphone
housing (see Fig. 4). Then re-
move the pop screen with ex-
treme care, without touching the
capsu e. In order to protect the
capsu e, the headgri e shou d
be temporari y screwed back in
p ace. However the micro-However the micro-
However the micro-However the micro-
However the micro-
phone must without fai re-phone must without fai re-
phone must without fai re-phone must without fai re-
phone must without fai re-
main upright, with the head-main upright, with the head-
main upright, with the head-main upright, with the head-
main upright, with the head-
gri e uppermost, since it isgri e uppermost, since it is
gri e uppermost, since it isgri e uppermost, since it is
gri e uppermost, since it is
the pop screen which me-the pop screen which me-
the pop screen which me-the pop screen which me-
the pop screen which me-
chanica y ho ds the inner as-chanica y ho ds the inner as-
chanica y ho ds the inner as-chanica y ho ds the inner as-
chanica y ho ds the inner as-
semb y, together with the capsu e, so that theysemb y, together with the capsu e, so that they
semb y, together with the capsu e, so that theysemb y, together with the capsu e, so that they
semb y, together with the capsu e, so that they
are attached to the housing. If the microphoneare attached to the housing. If the microphone
are attached to the housing. If the microphoneare attached to the housing. If the microphone
are attached to the housing. If the microphone
is positioned upside down when the pop screenis positioned upside down when the pop screen
is positioned upside down when the pop screenis positioned upside down when the pop screen
is positioned upside down when the pop screen
is not in p ace, the capsu e wi fa out and beis not in p ace, the capsu e wi fa out and be
is not in p ace, the capsu e wi fa out and beis not in p ace, the capsu e wi fa out and be
is not in p ace, the capsu e wi fa out and be
damaged!damaged!
damaged!damaged!
damaged!
The pop screen can be washed using warm water
and a itt e detergent. In the case of soi ing which
is difficu t to remove, et
the pop screen soak for a
whi e. If necessary, use
a coho as a so vent to re-
move soi ing.
Then rinse in c ean water
and a ow to dry thorough-
y. To speed drying, the
pop screen may be patted
carefu y with a soft c oth.
Under no circumstances
shou d a b ow drier or
heat be used.
Attention:Attention:
Attention:Attention:
Attention: The pop screen and headgri e must be
comp ete y dry before being reassemb ed on the
microphone. Humidity can ead to ma functions
and can cause damage to the capsu e.
When rep acing the pop screen, take care that the
wire gauze is positioned in front of the diaphragm
Abbildung / Figure 2
Abbildung / Figure 3
Abbildung / Figure 4


 Owner's manual")


