NEXhome IS-T102 User manual

NTERCOM
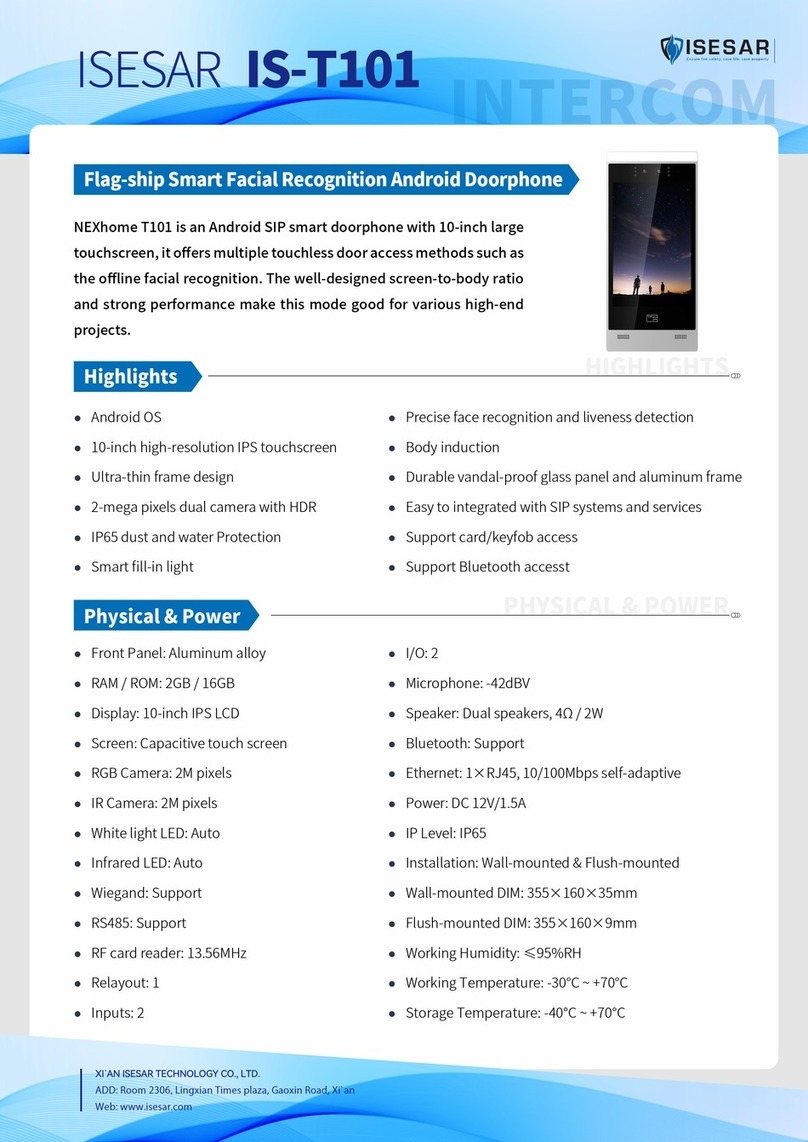
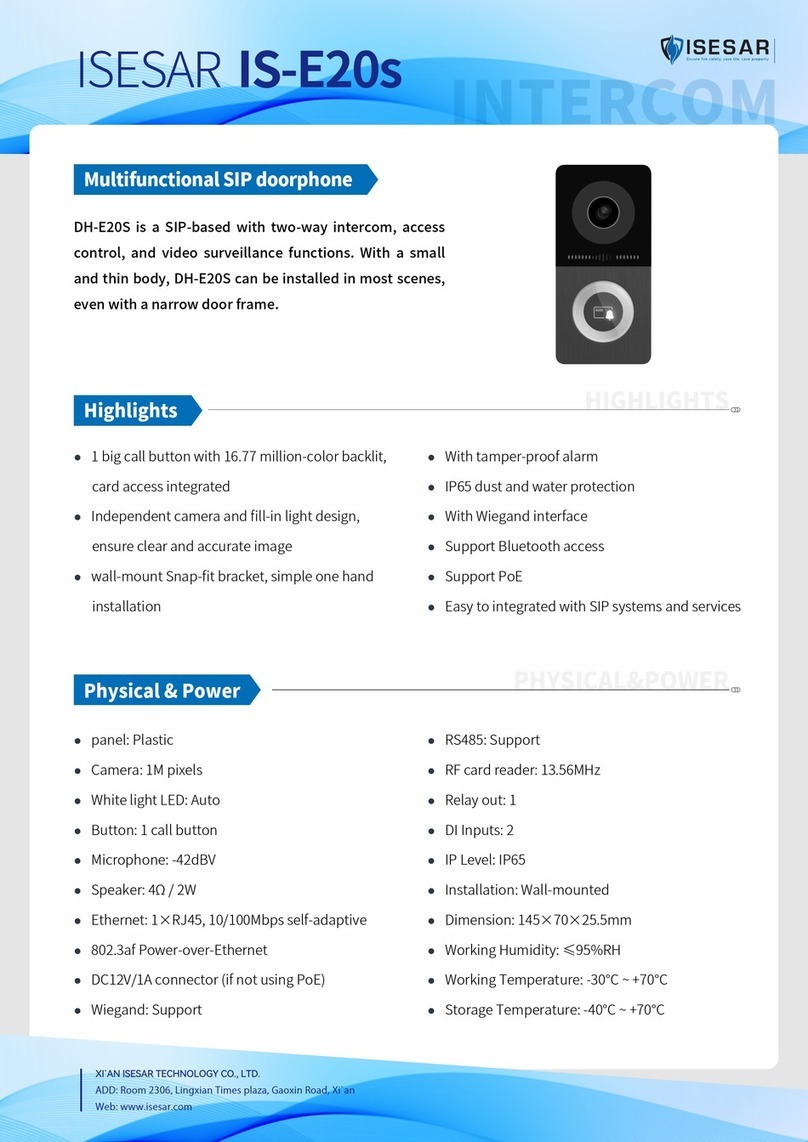
NEXhome T102 is an Android SIP smart doorphone with 10-inch large
touchscreen, it offers multiple touchless door access methods such as
the offline facial recognition. The well-designed screen-to-body ratio
and strong performance make this mode good for various high-end
projects.
Android OS
10-inch high-resolution IPS touchscreen
Ultra-thin frame design
2-mega pixels dual camera with HDR
IP65 dust and water Protection
Smart fill-in light
Precise face recognition and liveness detection
Body induction
Durable vandal-proof glass panel and aluminum frame
Easy to integrated with SIP systems and services
Support card/keyfob access
Support Bluetooth accesst
Front Panel: Aluminum alloy
RAM / ROM: 2GB / 16GB
Display: 10-inch IPS LCD
Screen: Capacitive touch screen
RGB Camera: 2M pixels
IR Camera: 2M pixels
White light LED: Auto
Infrared LED: Auto
Wiegand: Support
RS485: Support
RF card reader: 13.56MHz
Relayout: 1
Inputs: 2
I/O: 2
Microphone: -42dBV
Speaker: Dual speakers, 4Ω / 2W
Bluetooth: Support
Ethernet: 1×RJ45, 10/100Mbps self-adaptive
Power: DC 12V/1.5A
IP Level: IP65
Installation: Wall-mounted & Flush-mounted
Wall-mounted DIM: 355×160×35mm
Flush-mounted DIM: 355×160×9mm
Working Humidity: ≤95%RH
Working Temperature: -30°C ~ +70°C
Storage Temperature: -40°C ~ +70°C
Flag-ship Smart Facial Recognition Android Doorphone
IS-T102ISESAR
Highlights
HIGHLIGHTS
Physical & Power
PHYSICAL & POWER
XI`AN ISESAR TECHNOLOGY CO., LTD.
ADD:Room2306,LingxianTimesplaza,GaoxinRoad,Xian
Web:www.isesar.com

Sensor: 1/2.8", CMOS
Pixels: CIF, QCIF, VGA, 4CIF, 720p, 1080p
Video codec: H.264
Video resolution: up to 1920×1080p
Max. image transfer rate: 1080p - 30fps
Viewing angle: 92°(FOV)
High-intense IR LEDs for fill-in light in dark
Built-in light sensor to detect environment illumination
Protocols support: IPv4, HTTP, HTTPS, FTP, TFTP, SNMP, DNS, SNTP, RTSP, SRTP, RTP, TCP, UDP, TLS,
ICMP, DHCP, ARP
Deployment & Maintenance
Auto-Provisioning
Web management portal
Web-based packet dump
Configuration backup / restore
Entry log export
Credentials export/import
Firmware upgrade
System logs (include door access logs)
Scenarios
Entrance of high-rise buildings
VIP or C-level room
High-end house,community
Self-service kiosk
Door Entry Feature
Unlock methods: Face, Card/keyfob, PIN and BLE
Support live detection to prevent malicious attack such as
HD photo and retaken screen
Support visual human activity detection and real-time
video streams analysis, achieve senseless access
Support HDR, highly improve the facial recognition rate
under extreme conditions such as low, strong and back
light
Up to 20,000 facial image data, 98%+ recognition accuracy
Minimum illumination: 0.1LUX
IS-T102ISESAR
Networking
NETWORKING
SIP v2 (RFC3261)
Audio Codec: G.771a, G.711u, G.729 (Narrowband)
G.722 (Broadband)
DTMF: In-band, RFC2833, SIP Info
Echo Cancellation
Audio
Video
160mm
9mm
26mm
25mm
355mm
MAKE PROPERTIES SAFER
AND SMARTER

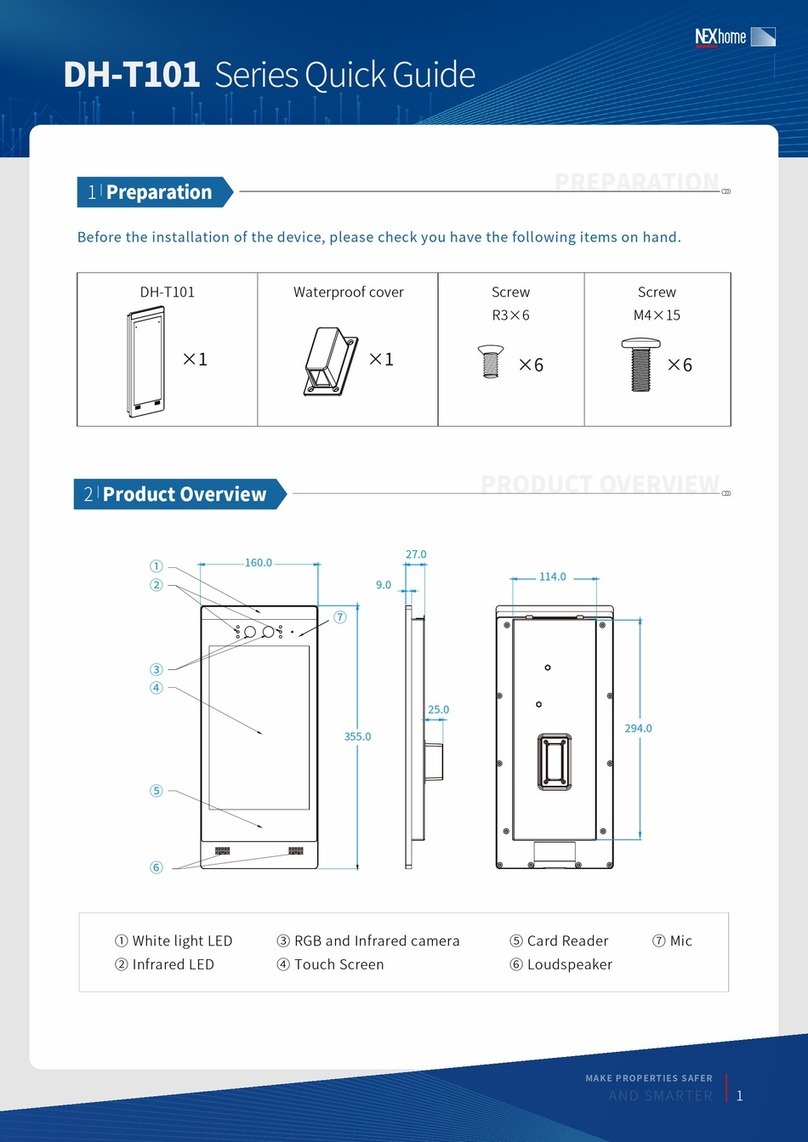
Before the installation of the device, please check you have the following items on hand.
IS-T102 Series Quick Guide
2
|
Product Overview
PRODUCT OVERVIEW
1
|
Preparation
PREPARATION
Waterproof coverDH-T102 Screw
R3×6
×6
Screw
M4×15
×6
×1×1
160.0
①
②
③
④
⑤
⑥
⑦
355.0
27.0
25.0
9.0 114.0
294.0
① White light LED
② Infrared LED
③ RGB and Infrared camera
④ Touch Screen
⑤ Card Reader
⑥ Loudspeaker
⑦ Mic
MAKE PROPERTIES SAFER
AND SMARTER
1

IS-T102 Series Quick Guide
The device can be installed in both indoor and outdoor environment.
Outdoor installation: Avoid to exposing the device to direct sunlight, which will cause damage
to device and components due to high temperature.
Indoor installation: The device should be installed on somewhere 2 meters (6 feet) away from
light or 3 meters (9 feet) away from window/door.
3
|
Installation Environment
INSTALLATION ENVIRONMENT
4
|
Installation
INSTALLATION
Flush Mounting
Backlight Direct sunlight Close to light
A. Dig out a hole on wall. Hole dimension(mm): 307.3(H)×121.9(W)×51(D)
B. Installation Height: Place the camera 1.5m (around 4ft 11in) away from the ground
STEP 1
307.3
TOP
51
121.9 43.5
230.0
90.0 51
37.0
66.0
MAKE PROPERTIES SAFER
AND SMARTER
2

IS-T102 Series Quick Guide
A. Lock the wall-mounting box on a Type86 bottom box with two M4×15 screws.
B. Lock the wall-mounting box on wall with four M4×15 screws.
C. Pull cables through the wall-mounting box and waterproof cover, then connect them to corresponding
interfaces of device. Lock the waterproof cover on device with four R3×6 screws.
D. Embed the device into wall-mounting box and adjust it until device sides run in alignment with the
vertical edges of wall, then lock the device from bottom with two R3×6 screws.
A. Put the embedded box into the dug hole and lock it with six M4×15 screws. Then fill the gap between
wall and embedded box with cement or non-corrosive adhesive.
B. Attach the adjusting bracket into the embedded box and lock it with six M4×15 screws.
C. Pull the cables through the embedded box, bracket and the waterproof cover, then connect them to
corresponding interfaces of device. Lock the waterproof cover on device with four R3×6 screws.
D. Hook the top of device with bracket and adjust it until device sides run in alignment with the vertical
edges of wall, then lock the device from bottom with two R3×6 screws.
Wall Mounting
STEP 2
A
B
C
D
MAKE PROPERTIES SAFER
AND SMARTER
3

IS-T102 Series Quick Guide
+12VGNDGND 485B 485A
NODS GND SW NC COMGND
Exit Button Door LockDoor sensor
Elevator control device
Power
Network
5
|
Device Wiring
DEVICE WIRING
Notes
Pin NO/COM is connected to the cathode lock
Pin NC/COM is connected to anode lock or magnetic lock.
A
B
C
D
MAKE PROPERTIES SAFER
AND SMARTER
4

IS-T102 Series Quick Guide
6
|
Specifications
SPECIFICATIONS
7
|
Configurations
CONFIGURATIONS
The system language and the network
setting can be selected and configured when
the initial booting of device.
Initial Setup
Enter 9999 in Call menu then enter 3888 to get into
the Project Setting. Tap Network to check the IP
address.
Check IP Address
Log into Web configuration portal of device,
set up and register SIP accounts in INTER-
COM-ACCOUNT page. (You can refer to
device user manual for more details)
Set SIP Account
Select DTMF mode and configure the code in
SYSTEM-RELAY page of Web configuration portal.
(You can refer to device user manual for more
details)
Set DTMF Code
8
|
Functions
FUNCTIONS
You can make calls from the device by select
contacts or dial call number
Make Calls
Enter the access PIN set in device to unlock the
door.
PIN Unlock
Incoming calls to T101 will be answered
automatically by default.
Auto Answer
Walk in front of camera, the device can
recognize the face and unlock the door if
facial image is matched.
Face Unlock
Press the configured DTMF code on keypad of
device answering the call, the lock connected on
T101 will be unlocked remotely.
DTMF Unlock
Attach the saved access card or keyfob on the card
reader area of T101 to unlock the door.
Card/Keyfob Unlock
OS: Android
Display: 10-inch IPS LCD
Resolution: 1280×800
Input power: DC12~15V 1.5A
IP level: IP65
Front panel: Aluminum
Working Temperature: -30℃ ~ 70℃
Working Humidity: 10%~95%RH
Dimension:
355×160×35mm (Device Surface)
355×160×9mm (Flush Installation)
MAKE PROPERTIES SAFER
AND SMARTER
5

IS-T102 Series Quick Guide
Visual Angle
9
|
Precautions
PRECAUTIONS
Violent vibration, collision and shock will cause damages to device.
Intense direct sunlight will seriously affect the device performance and life span.
Keep the access card/keyfob away from magnet and water. DO NOT fold or bend the card/keyfob.
The height between camera and ground should be 1.5m (around 4ft 11in) to guarantee the ideal
visual angle.
MAKE PROPERTIES SAFER
AND SMARTER
6
XI`AN ISESAR TECHNOLOGY CO., LTD.
ADD.: Room 2306, Lingxian Times plaza, Gaoxin Road, Xi`an
Web: www.isesar.com
Table of contents
Other NEXhome Intercom System manuals
