NEXhome ISESAR IS-G510s User manual

INTERCOM
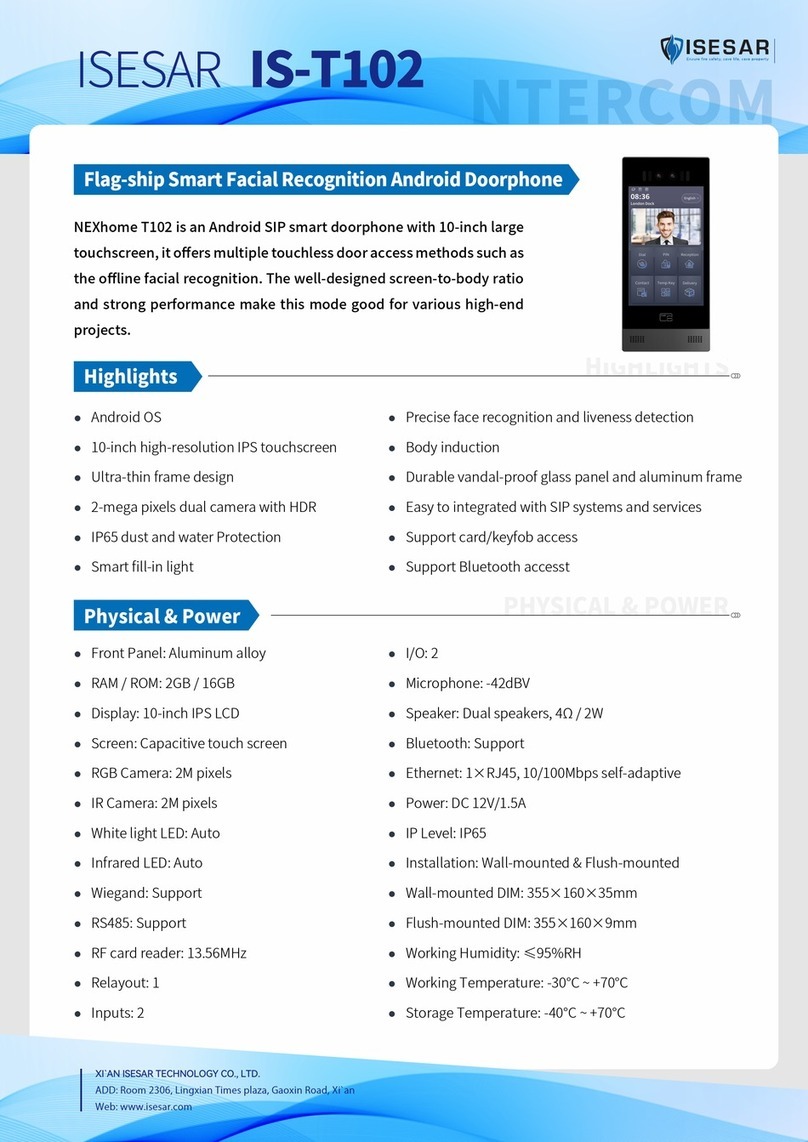
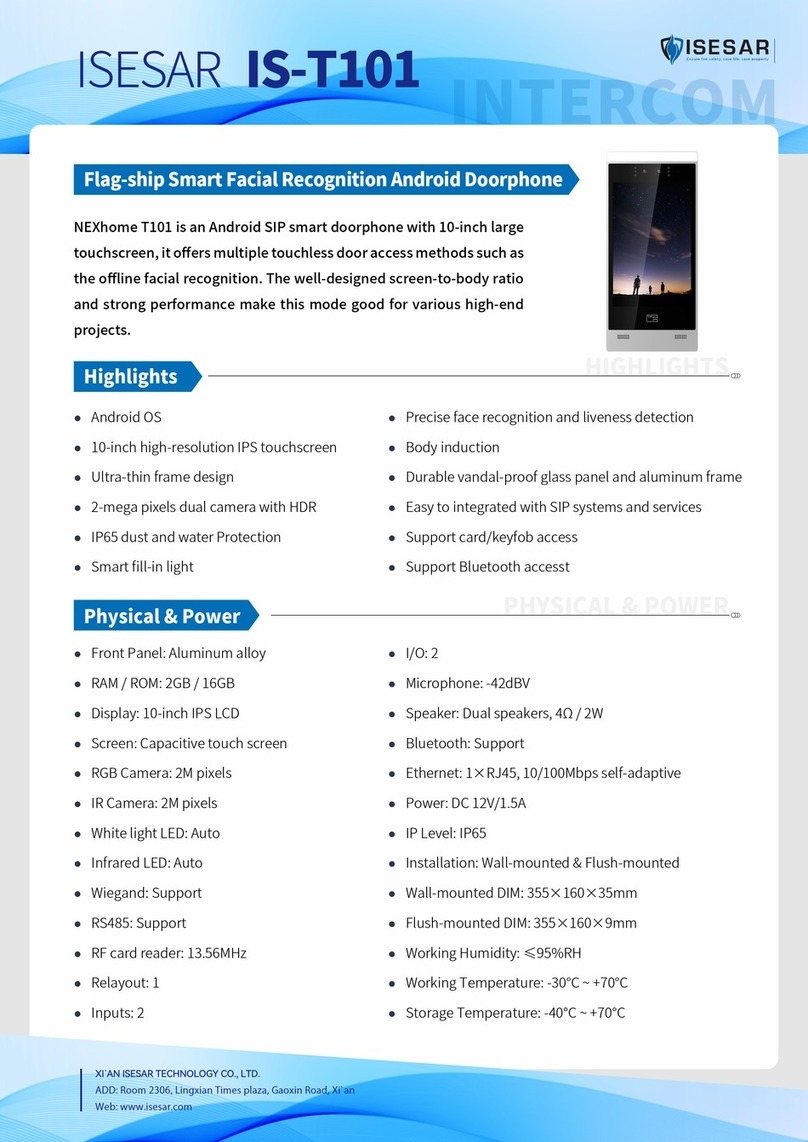
NEXhome G510S is a SIP video doorphone with a 5” touch
screen, which performs AI-powered offline facial recognition
for door access. It is typically used in apartment buildings,
high-rise office buildings and building complexes.
Front panel: Plastics
RAM / ROM: 1GB / 8GB
Display: 5 Inch IPS LCD
Screen: 5 Inch capacitive touch screen
RGB Camera: 2M pixels
IR Camera: 2M pixels
White light LED: automatic lighting
Infrared LED: automatic lighting
Wiegand: Support
RS485: Support
RF card reader: 13.56MHz
Relayout: 1
Inputs: 2
Microphone: -42dBV
Speaker: Speaker, 8Ω/2W
Bluetooth: Support
Ethernet ports: 1xRJ45, 10M/100Mbps adaptive
DC 12V/1A connector (if not using PoE)
802.3af Power-over-Ethernet
IP Level: IP65
Installation: Wall-mounted
Wall-mounted DIM: 184×89×31.3mm
Dimension: 184×89×22.2mm
Working Humidity: <95%RH
Working Temperature: -30°C ~ +70°C
Storage Temperature: -40°C ~ +70°C
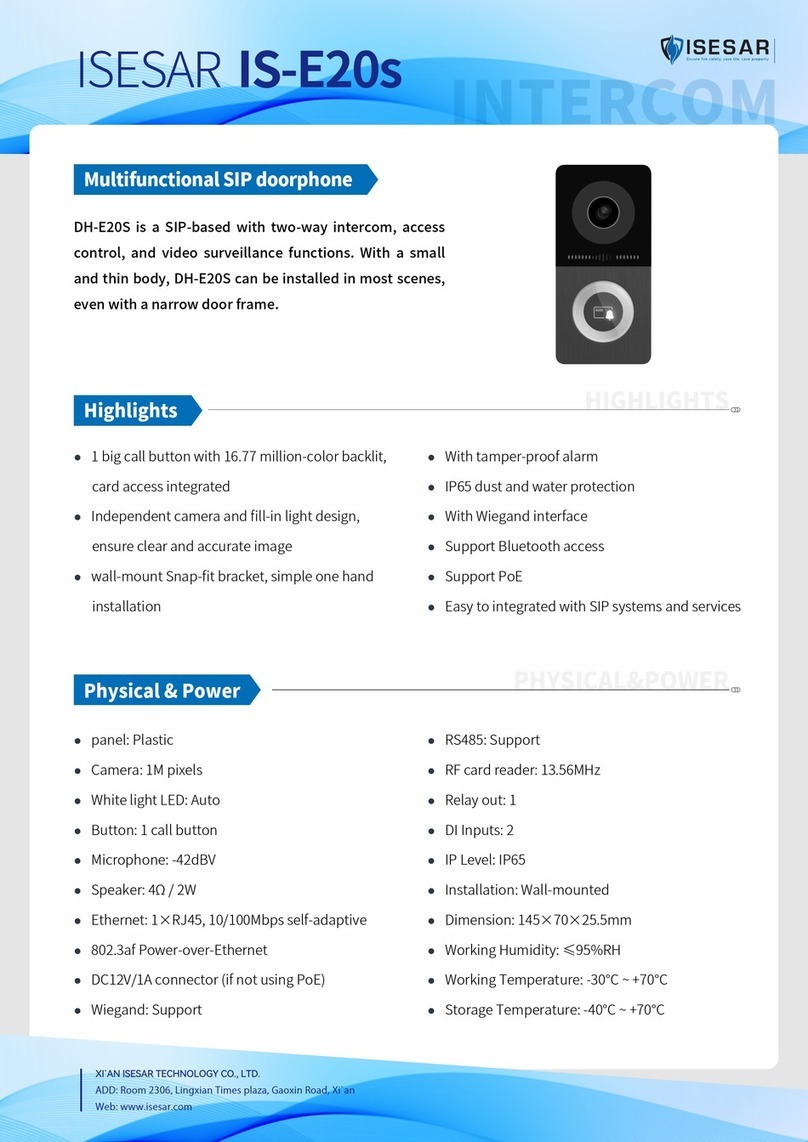
Multifunctional AI powered SIP doorphone
IS-G510sISESAR
5-inch SIP doorphone with Linux system
High-resolution IPS touchscreen
2-mega pixels dual cameras with built-in HDR
Precise face recognition and liveness detection
IP65 dust and water Protection
Smart fill-in light
Body induction
Complies with SIP standard for easy integration
in every SIP capable PBXes
Highlights
HIGHLIGHTS
Physical & Power
PHYSICAL & POWER
XI`AN ISESAR TECHNOLOGY CO., LTD.
ADD:Room2306,LingxianTimesplaza,GaoxinRoad,Xian
Web:www.isesar.com

Video
Sensor: 1/2.8", CMOS
Pixels: CIF, QCIF, VGA, 4CIF, 720p, 1080p
Video codec: H.264
Video resolution: up to 1920×1080p
Max. image transfer rate: 1080p - 30fps
Viewing angle: 92°(FOV)
High-intense IR LEDs for fill-in light in dark
Built-in light sensor to detect environment illumination
Deployment & Maintenance
Auto-Provisioning
Web management portal
Web-based packet dump
Configuration backup / restore
Entry log export
Credentials export/import
Firmware upgrade
System logs (include door access logs)
Scenarios
Entrance of high-rise buildings
VIP or C-level room
High-end house or community
Self-service kiosk
Door Entry Feature
Unlock methods: Face, Card/keyfob, PIN and BLE
Support live detection to prevent malicious attack such as
HD photo and retaken screen
Support visual human activity detection and real-time
video streams analysis, achieve senseless access
Support HDR, highly improve the facial recognition rate
under extreme conditions such as low, strong and back
light
Up to 20,000 facial image data, 98%+ recognition accuracy
Minimum illumination: 0.1LUX
IS-G510sISESAR
Networking
Protocols: IPv4, HTTP, HTTPS, FTP, TFTP, SNMP, DNS, SNTP, RTSP, SRTP, RTP, TCP, UDP, TLS, ICMP, DHCP, ARP
NETWORKING
SIP v2 (RFC3261)
Audio Codec: G.771a, G.711u, G.729 (Narrowband)
G.722 (Broadband)
DTMF: In-band, RFC2833, SIP Info
Echo Cancellation
Audio
89mm
31.3mm
22.2mm
184mm
MAKE PROPERTIES SAFER
AND SMARTER

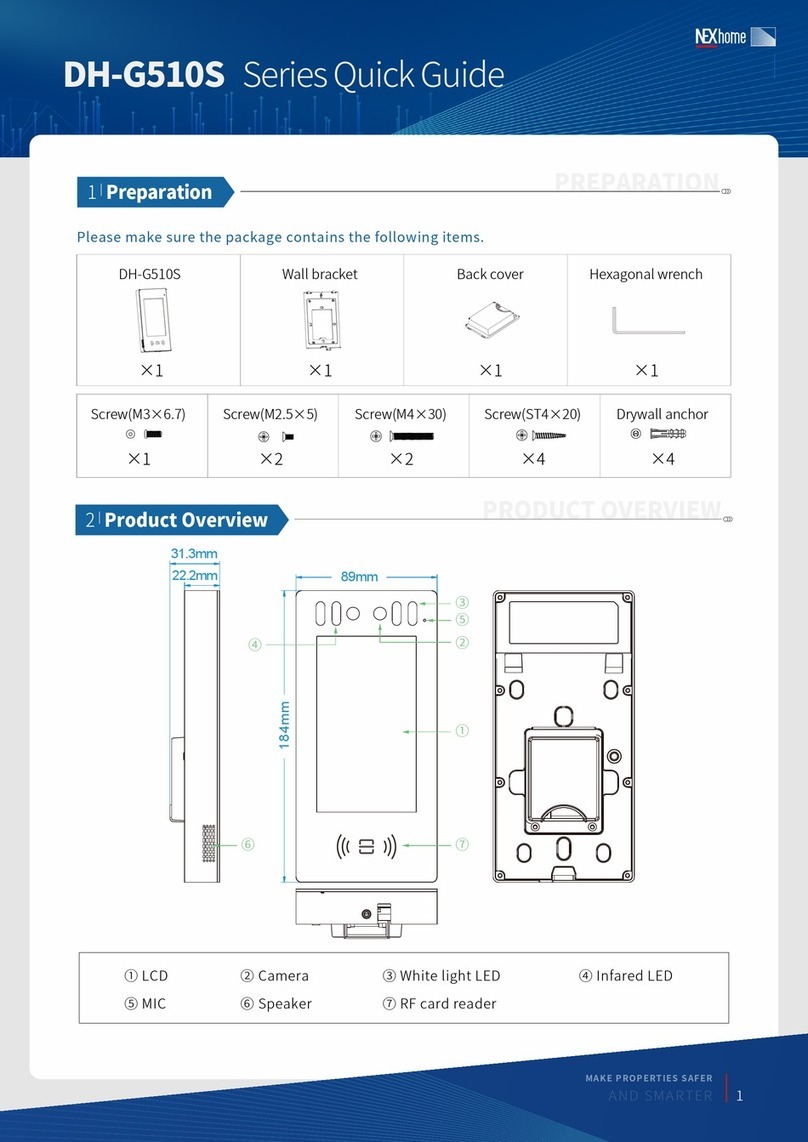
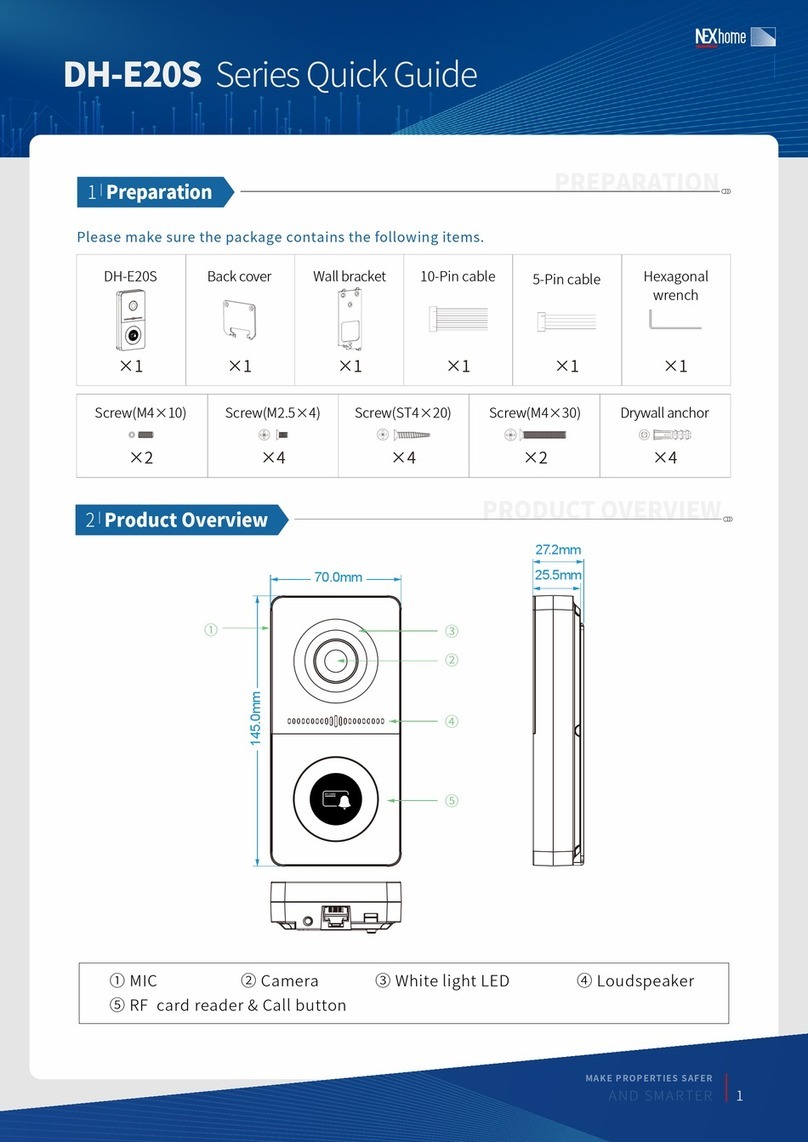
Please make sure the package contains the following items.
IS-G510s Series Quick Guide
2
|
Product Overview
PRODUCT OVERVIEW
1
|
Preparation
PREPARATION
Screw(M2.5×5) Screw(M4×30) Screw(ST4×20)Screw(M3×6.7) Drywall anchor
DH-G510S Wall bracket
×1
Back cover Hexagonal wrench
×1 ×1 ×1
×1 ×2 ×4×2 ×4
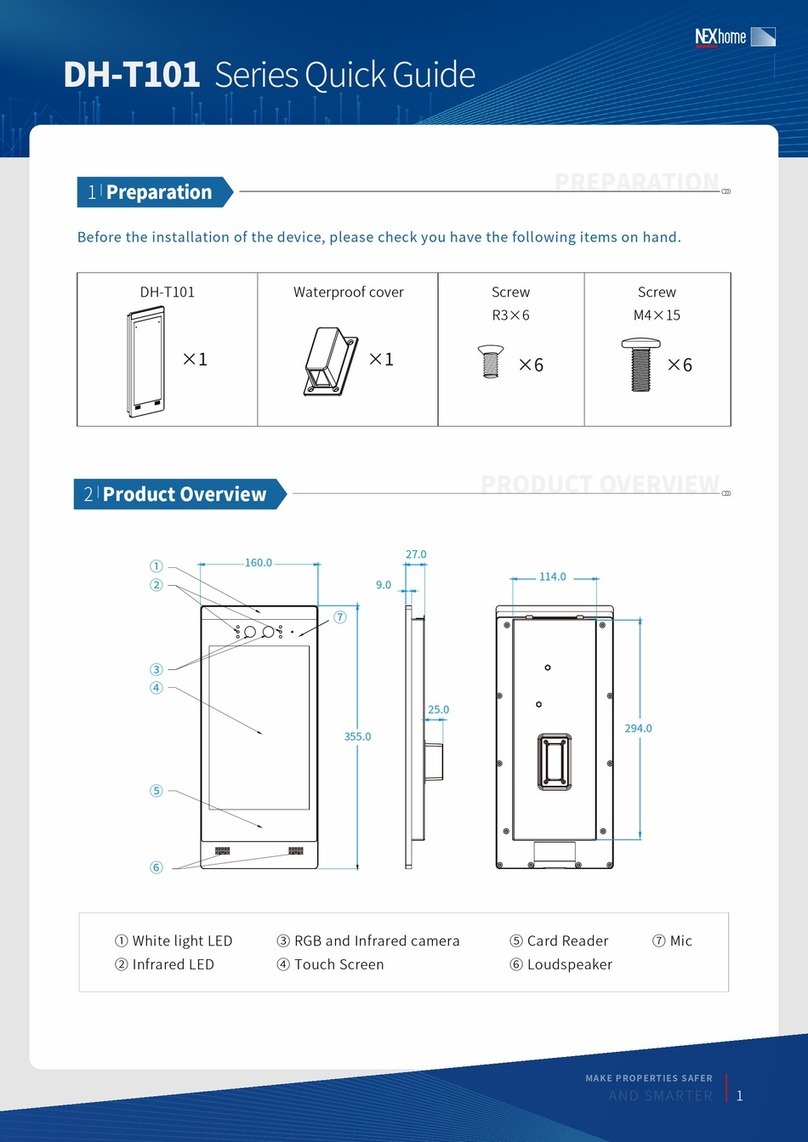
① LCD ② Camera ③ White light LED ④ Infared LED
⑤ MIC ⑥ Speaker ⑦ RF card reader
89mm
31.3mm
22.2mm
184mm
⑥ ⑦
①
⑤
③
②
④
MAKE PROPERTIES SAFER
AND SMARTER
1

The device can be installed in both indoor and outdoor environment.
Outdoor installation: Avoid to exposing the device to direct sunlight, which will cause damage to device
and components due to high temperature.
Indoor installation: The device should be installed on somewhere 2 meters (6 feet) away from light or 3
meters (9 feet) away from window/door.
3
|
Installation Environment
INSTALLATION ENVIRONMENT
4
|
Installation
INSTALLATION
IS-G510s Series Quick Guide
Backlight Direct sunlight Close to light
STEP1
①
②
③
Place the bracket against the wall and around the cable outlet area, then mark the position of drilling
hole according to each hole of the bracket.
Take the wall bracket off, make sure the marked drilling holes are in the right position around the cable
outlet area (shown as diagram). Then drill holes with 6MM churn drill on each marked position.
Drive 4 drywall anchors into drilling positions.
Pull all cables and cords through the bracket, then lock the wall bracket by four ST4×20 screws.
NOTE: For installation on wooden walls, you can skip ② and ③.
A. Without Type 118 Junction Box
④
*
MAKE PROPERTIES SAFER
AND SMARTER
2

IS-G510s Series Quick Guide
Pull all cables through the waterproof cover.
Connect the cables to the corresponding interfaces of the device
Lock the waterproof cover onto device with four R3×6 screws.
Attach the device onto the bracket on the wall, press down to lock by hooks, then use hexagonal
wrench to lock the device from bottom with two M3×6.7 screws.
Installation is completed.
①
②
③
④
⑤
STEP2
Pull all the cables through the junction box and wall bracket,
then lock the wall bracket onto the junction box by two M4x30
screws.
B. With Type 118 Junction Box(recommended)
Pull all the cables through the junction box and wall bracket,
then lock the wall bracket onto the junction box by two M4x30
screws.
C. With Type 86 Junction Box
① ② ③ ④
25mm
55mm
8mm 78mm
① ② ③ ④ ⑤
MAKE PROPERTIES SAFER
AND SMARTER
3

IS-G510s Series Quick Guide
6
|
Configurations
CONFIGURATIONS
5
|
Interfaces
INTERFACES
Log into Web configuration portal of device, set up SIP accounts in INTERCOM-ACCOUNT page.
Set SIP Account
Select DTMF mode and configure the code in SYSTEM-RELAY page of Web configuration portal.
Set DTMF Code
NOTE:You can refer to device user manual for more details.
The system language and the network can be selected and configured when the initial booting of device.
Initial Setup
The initial IP is 192.168.1.101, you can also enter 9999 in CALL menu then 3888 to get into the PROJECT
SETTING,and tap NETWORK to check the IP address.
Check IP Address
*
Elevator
Control Device
Power Adaptor
Door Lock
Ethernet
(POE)
12~15V
GND
DOOR1
DOOR0
WG1
WG0
Power Input RS485
Input/output
Relay
Output
I/O 1 Input
I/O 2 Input
Wiegend
Input/Output
GND
485B
485A
COM
NC
NO
Exit 1
Exit 2
Wiegand
Card Reader
GND
GND
GND
MAKE PROPERTIES SAFER
AND SMARTER
4

IS-G510s Series Quick Guide
7
|
Functions
FUNCTIONS
Walk in front of camera,the device can recognize the face and unlock the door if the facial image is
matched.
Face Unlock
Enter the access PIN set in device to unlock the door.
PIN Unlock
Attach the saved access card or key fob on the card reader area of device to unlock the door.
Card/Key fob Unlock
Press the configured DTMF code on keypad of device answering the call, the lock connected on DH-G510S
will be unlocked remotely.
DTMF Unlock
You can make calls from the device by select contacts or dial call number.
Make Calls
Incoming calls will be answered automatically by default.
Auto Answer
MAKE PROPERTIES SAFER
AND SMARTER
5
XI`AN ISESAR TECHNOLOGY CO., LTD.
ADD.: Room 2306, Lingxian Times plaza, Gaoxin Road, Xi`an
Web: www.isesar.com
Table of contents
Other NEXhome Intercom System manuals
Popular Intercom System manuals by other brands

Mircom
Mircom CA-1010 installation manual
Grandstream Networks
Grandstream Networks GSC3510 Quick installation guide
2N
2N IP Uni installation manual
SkyBell
SkyBell WiFi Video Doorbell Installation & starting guide

Inaxsys
Inaxsys Vupro VUO2111D-WP user manual
Aiphone
Aiphone JK-1MED Installation and operation manual
